
5 Ways To Teach You To Transfer Files from Lava Yuva 2 to Other Android Devices Easily | Dr.fone
5 Ways To Teach You To Transfer Files from Lava Yuva 2 to Other Android Devices Easily
Transferring data from one phone to another when switching devices is a complex and tough task. The data stored in their old phone is one of the major reasons why people are hesitant to switch devices. However, it is only the case when you don’t know the right method. If you plan to switch to a new Android device, this article will help you transfer files from Lava Yuva 2 to Other Android Devices.
There are multiple ways to transfer files from one Android to another, but we have chosen the easiest 5 methods in this article. Stick with the article to find different methods for Android-to-Android file transfer, along with their pro, cons, and best-case scenarios.

Part 1: Transfer Files Between Android via Bluetooth
When trying to transfer files between Android phones, Bluetooth is available as the in-built option. It is part of all Android devices, and you don’t need any internet, computer, or cable to use it. Although newer and faster transfer methods have overshadowed Bluetooth as a data transfer option, it is still among the reliable options.
Steps To Transfer Files via Bluetooth
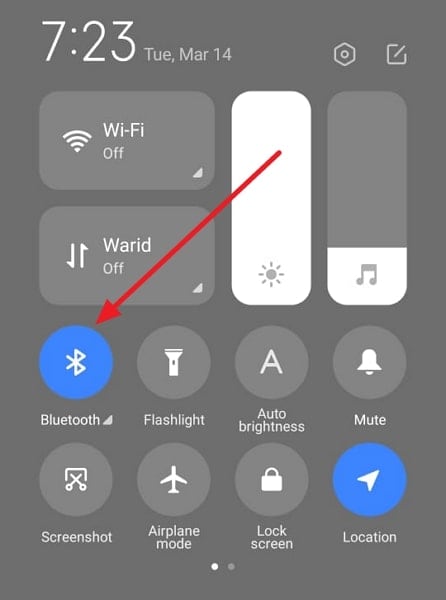
Step 1: Start by enabling Bluetooth on both Android devices and ensuring their visibility is set to all. Afterward, select the targeted files on the old Android phone.
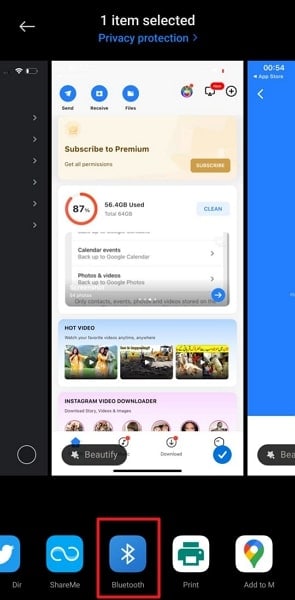
Step 2: Now, press the “Share” icon and select “Bluetooth.” Choose your new Android device from the available devices on the next screen.
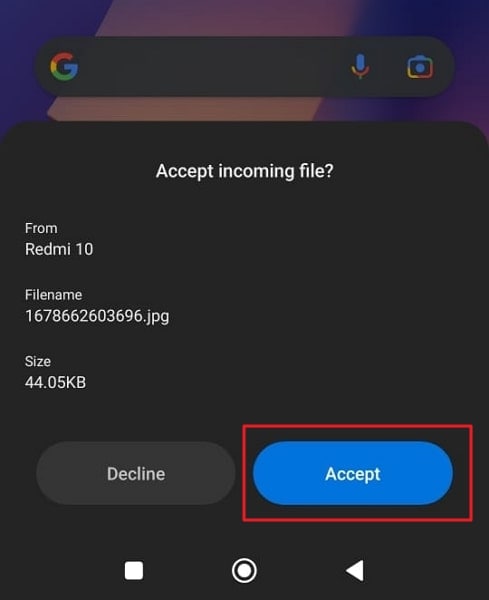
Step 3: Move to your new Android phone and hit “Accept” to start the transfer process. The transfer time will be depended on the size of the files.
Pros and Cons
| Pros | Cons |
|---|---|
| · It is an in-built option for all Android devices. | · It is an extremely slow method for transferring files |
| · You don’t need internet, cable, or Wi-Fi to send files via Bluetooth. | · If you send large files using this method, the process frequently fails, which can corrupt the files. |
| · Using Bluetooth doesn’t require any special knowledge or skills |
Best For
Using Bluetooth is best for transferring small to medium, size files. It is also convenient when you can’t access the internet.

Part 2: Transfer Files from Lava Yuva 2 to Other Android Devices by Nearby Share
Nearby Share is a method developed by Google to share files between Android phones. It can be considered Google’s answer to Apple’s AirDrop, though, unlike AirDrop, it doesn’t require Wi-Fi. This method is available for all Android devices though you should use the latest Android OS for smoother working. Moreover, Bluetooth needs to be enabled to use this method.
Step-by-Step Guide To Transfer Files via Nearby Share
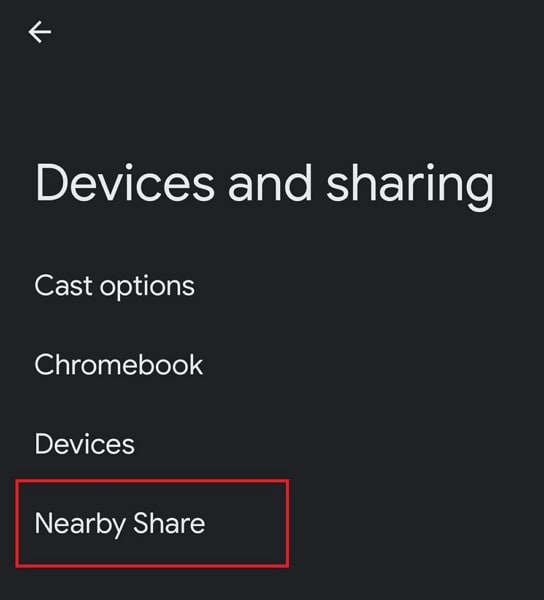
Step 1: You will need to activate “Nearby Share” on both devices first. To do that, go to the phone’s “Settings” and access the “Google” settings. Here, tap “Devices and Sharing,” and from the next appearing screen, choose “Nearby Share.”
Step 2: In the “Nearby Share” screen, toggle it on and set device visibility to “Everyone.” Once you activate it on both Android devices, find and select the files you want to transfer on the old Android phone.
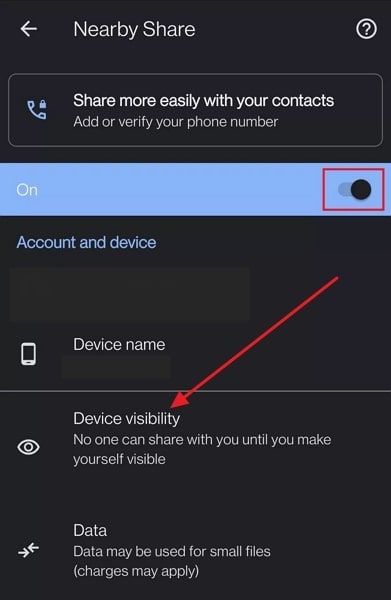
Step 3: After selecting the required files, press the “Share” button and select “Nearby Share” from the options. It will detect nearby devices and select your new Android device once it appears. A prompt will appear on both phones with a matching PIN. Accept the files on the new phone to start the transfer process.

Pros and Cons
| Pros | Cons |
|---|---|
| · It is a fast and secure way of transferring files between Android devices. | · You can only send limited types of files through this method. |
| · You do not need Wi-Fi to use this feature. | · This feature consumes a lot of battery if you use it for a long time or transfer large-size files. |
| · Nearby Share is available on a wide range of Android devices. |
Best For
Using Nearby Share is recommended when you don’t have access to a computer or the internet, and you need to share large files.
## Part 3: Transfer Files Between Android by USB CableIf you have access to a computer, you can use it to transfer files from Lava Yuva 2 to Other Android Devices. All you need is a USB cable, and you are set. In this method, you will first copy data from the old phone to the computer and then copy it to the new phone from the computer. It works by default on Windows, but for Mac, you need Android File Transfer.
Instructions To Transfer Files by USB Cable
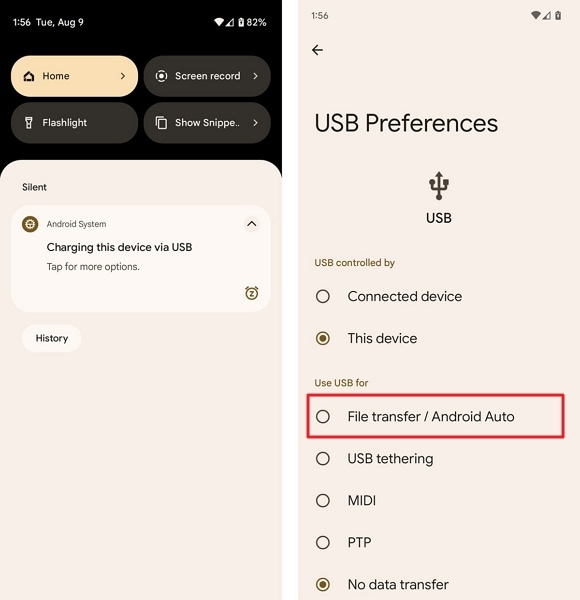
Step 1: First, connect your old Android phone to your computer using a USB cable. A prompt will appear on your asking for the USB purpose. Here, select “File Transfer/Android Auto.” It will give your computer access to the phone data.
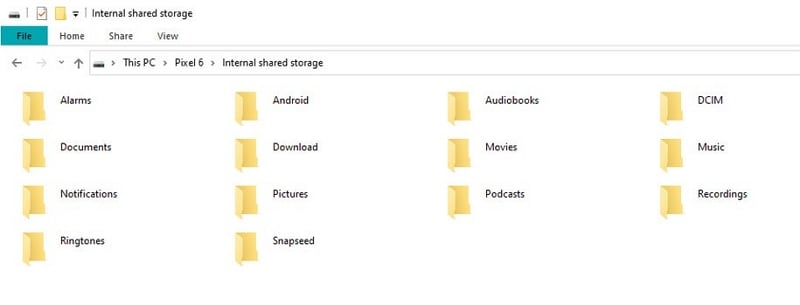
Step 2: Now copy all the data you want to transfer to your computer and disconnect the old device. Afterward, connect the new Android device to the computer, give access permission, and copy the data you took from the old phone to the new phone.
Pros and Cons
| Pros | Cons |
|---|---|
| · You do not need to use any third-party app for this method | · This method can be time-consuming as you need to transfer the same data two times. |
| · It is a reliable and secure method. | · It only works well on Windows; on Mac, it becomes a hassle. |
| · Only a USB cable is needed to transfer the data. |
Best For
Using a USB cable is best for transferring data when you have large files and don’t have any better options.
Part 4: Sync Files from Lava Yuva 2 to Other Android Devices With Google Account
Google Account is another great way for Android-to-Android file transfer if you haven’t set up the new phone yet. It allows you to back up all your data on the old device and restore it to the new Android device. With this method, you can transfer most of the data from the old phone, including settings, contacts, notes, etc.
Step-by-Step Guide To Transfer Files With Google Account
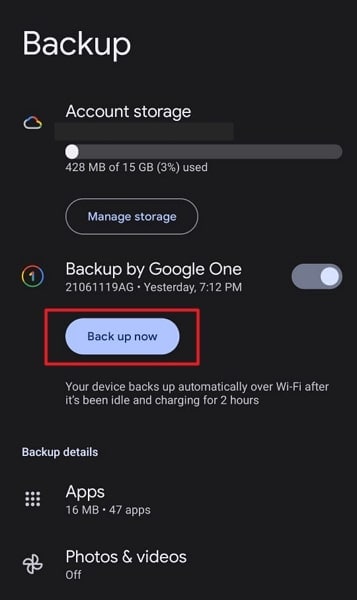
Step 1: On your old Android device, go to “Settings” and tap “Google.” In the Google settings, select “Backup” and tap “Backup Now” to back up your phone. Once the backup is complete, move to the new device.
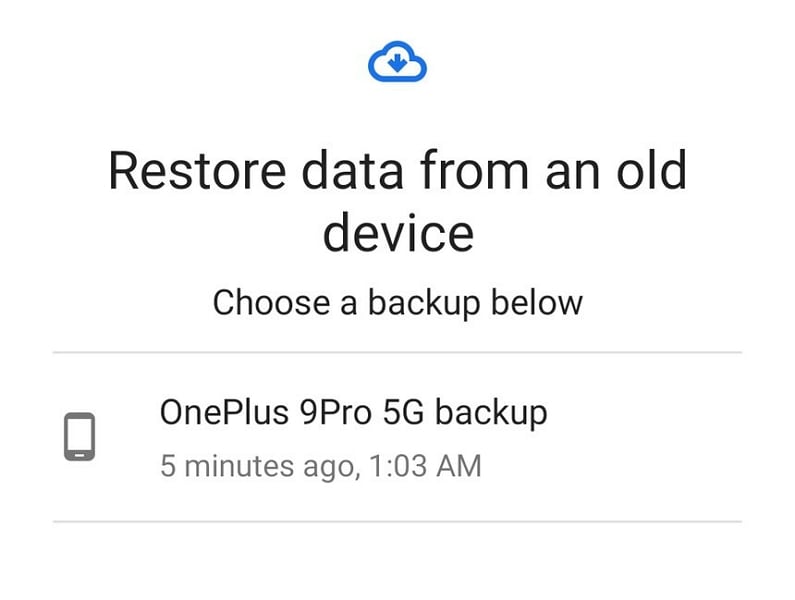
Step 2: When setting up the new Android device, sign in using the same Google Account. Afterward, select “Restore from Google Backup” when the option appears to restore the backup from the old phone.
Pros and Cons
| Pros | Cons |
|---|---|
| · It can transfer most of the phone data to the new Android phone. | · If your old device data is larger than 15GB, then you have to buy the storage because Google only provides 15GB free storage. |
| · Using Google Account is also secure, as your backup is encrypted. | · It requires you to use the same Google Account on both devices. |
| · The devices don’t need to be near each other. |
Best For
Using Google Account to transfer files from Lava Yuva 2 to Other Android Devices is best when you still haven’t set up the new Android device.

Part 5: Best choice: The Fastest Way to Transfer Files from Lava Yuva 2 to Other Android Devices with Dr.Fone
Want to find the best and fast way to transfer files from Lava Yuva 2 to Other Android Devices? If you don’t want to go through any time-consuming or complex transfer process, we recommend you use Wondershare Dr.Fone. It is a complete toolbox for smartphones and includes all the necessary solutions. Regarding Android data transfer, it can quickly transfer data between 8000+ Android devices, including the latest ones.
Key Features of Dr.Fone
- Using the Dr.Fone app, you can transfer data to Android devices with the latest Android 13 OS.
- This tool allows you to transfer, back up, and restore your entire WhatsApp data from chats to emojis to locations.
- If you have lost your phone data, you can recover it back using the Dr.Fone app safely and quickly.
- With this tool, you can also repair system issues in your device in a secure environment.
Steps To Transfer Files from Lava Yuva 2 to Other Android Devices With Dr.Fone
Aside from being the fastest way to transfer files between Android phones, it also has the simplest transfer process. You only need Dr.Fone installed on your system and a couple of USB cables to use this method. Here is how you can transfer files from phone to phone via Dr.Fone:
Step 1: Establish the Connection Between Android Devices
Use USB cables to connect both Android devices to the computer and launch Dr.Fone app. From the “Home” screen, click “Phone Transfer” and wait for the program to assign devices to the correct positions.

Step 2: Assign Android Devices to their Correct Positions
For transferring data from the old Android device to the new one, the old device should be at the “Source” position and the new device at the “Destination” position. If the positions assigned by the program are incorrect, use the “Flip” button to correct them.


Step 3: Select the Desired Data and Complete the Transfer Process
Now select the data you want to transfer and click “Start Transfer” to begin the transfer process. In case you want to delete data on the new device, select “Clear Data before Copy” before pressing “Start Transfer.”

Pros and Cons
| Pros | Cons |
|---|---|
| · It can transfer over 15 types of data from one phone to another. | · You will need a computer to transfer data through Dr.Fone |
| · The transfer process of this method is extremely fast and gets completed within minutes. | · It also needs USB cables to connect your Lava Yuva 2s. |
| · You do not need the internet to use this method. |
Best For
It is best for all sorts of data transfer situations. Whether you are transferring a few files or moving all the data, it is a perfect tool.

Conclusion
To summarize, while it may seem troublesome to transfer files from Lava Yuva 2 to Other Android Devices, in reality, it isn’t. This has been well demonstrated through the article using 5 of the easiest transfer methods. It includes methods suited for a few files, like Bluetooth, to the best method of using Dr.Fone. With Dr.Fone, you can transfer all types of data from Lava Yuva 2 to Other Android Devices in the shortest time possible.
How to Migrate Android Data From Lava Yuva 2 to New Android Phone?
While getting a brand new smartphone is certainly exciting, the process of phone migration is pretty tiresome. Too many times, users spend a lot of time and efforts to migrate Android to a new smartphone. If you wish to Android migrate to new phone without experiencing any data loss then you can take the assistance of a dedicated tool. There are plenty of ways to migrate Android to Android. In this guide, we will teach you how to migrate Android in three different ways.
Part 1: How to migrate Android using Google Drive?
Since Google Drive is already available on all the Lava Yuva 2 devices, it can readily be used to migrate Android to Android without much trouble. Firstly, you need to sync your data from the source device and later log-in to the same account to sync your new phone with the Drive. To perform phone migration using Google Drive, follow these steps:
1. To start with, go to Settings > Backup & Reset on the source device and turn on the option of “Backup my Data”.
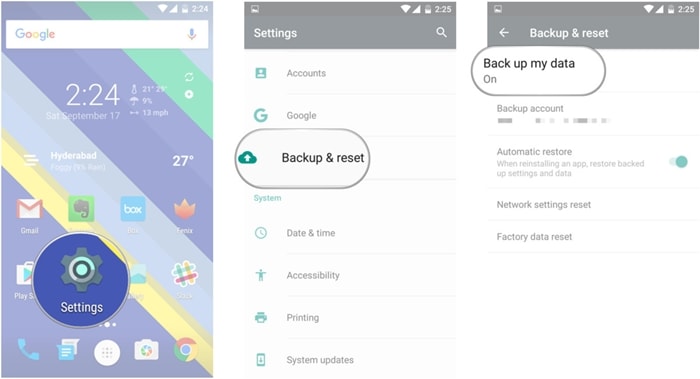
2. Furthermore, you can select the kind of data you wish to sync with your Google Drive. You can simply turn on the feature for Automatic backup to make the most of the space on Google Drive.
3. Wait for a while as your device will backup its content on the Drive. You can even go to your account’s Drive to view the backup.
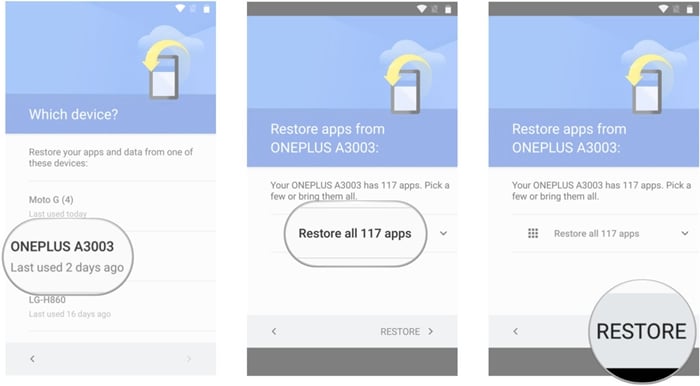
4. Now, in order to Android migrate to new phone, simply turn on the target device and proceed to perform its setup.
5. Agree to the terms and conditions and sign-in to your Google account. Make sure this is the same account that is linked to your source device.

6. As you would sign-in to the account, it will display a list of available backup files. Simply select the recent backup file.
7. Furthermore, you can pick the apps that you wish to restore from here or restore all content at once.
8. To migrate Android to Android, just click on the “Restore” button and move your data from your old to new device.
Part 2: How to migrate Android data using Dr.Fone - Phone Transfer?
One of the most secure and fastest ways to migrate Android device to another phone is by using Dr.Fone Switch . Compatible with all the major Android, iOS, and Windows devices, it can easily be used to perform phone migration between different platforms. The tool performs a direct phone to phone transfer. It can Android migrate to new phone all kinds of data like contacts, call logs, bookmarks, messages, photos, videos, music, and more. To migrate Android to Android with no data loss, perform these steps:
Dr.Fone - Phone Transfer
Migrate Android Data to New Android Phone in 1 Click.
- Easy, fast, and safe.
- Move data between devices with different operating systems, i.e iOS to Android.
- Supports iOS devices that run the latest iOS
- Transfer photos, text messages, contacts, notes, and many other file types.
- Supports over 8000+ Android devices. Works for all models of iPhone, iPad and iPod.

3981454 people have downloaded it
1. Firstly, download Dr.Fone - Phone Transfer on your Windows PC or Mac from its official website. In order to perform Android phone migration, connect your old and new device to the system and wait for them to be detected.
2. Launch Dr.Fone toolkit and select the option of “Switch” from the welcome screen. Make sure that both the Lava Yuva 2 devices are connected to your system in a secure way.
3. This will provide the following interface. As you can see, Dr.Fone will intuitively detect the source and the target device. Though, you can click on the “Flip” button to interchange the position of the Lava Yuva 2 devices as well.

4. Select the kind of data you wish to move from the source to the destination device. You can even erase all the content on the target device by selecting the “Clear data before copy” option.
5. After selecting the type of data you wish to move, click on the “Start Transfer” button. This will initiate the phone migration process by moving your selected content to the target device.
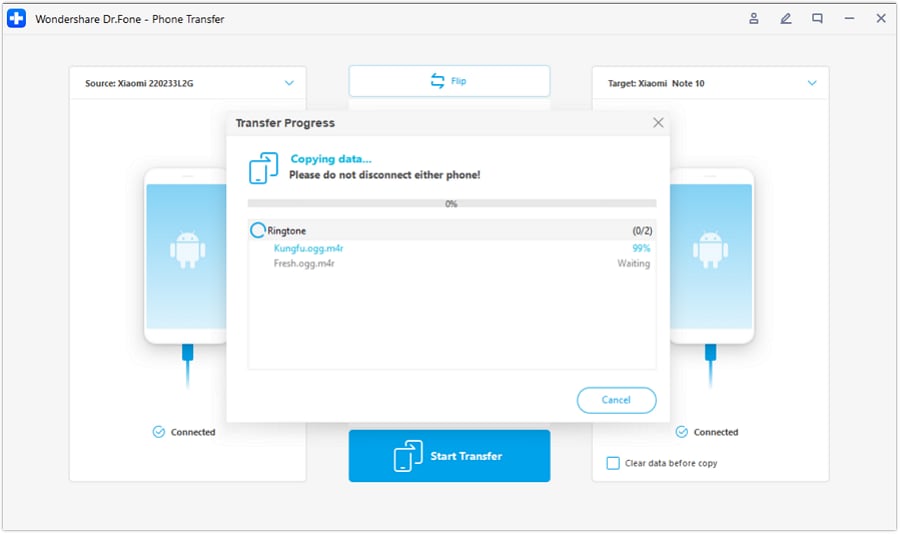
6. Wait for a while as Dr.Fone will migrate Android device to any other phone. Don’t close this window or disconnect the Lava Yuva 2 device during this stage.
7. Once your Android migrate to new phone, you will be notified by displaying the following prompt.
That’s it! After following these steps, you would be able to migrate Android to Android easily. Just disconnect your Lava Yuva 2s safely and use them the way you like.
Part 3: How to migrate Android data manually?
By using Dr.Fone Switch or Google Drive, you would be able to perform phone migration in an effortless manner. Nevertheless, if there is no free space on your Drive and you wish to manually migrate Android, then you can also make it work. Following are certain ways to migrate Android to Android using different tools and techniques.
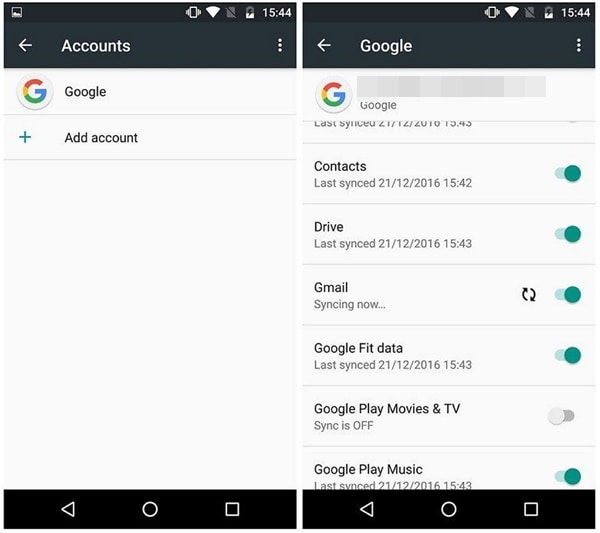
Contacts, Gmail, Fit Data, Play Store, etc.
To migrate Android device’s crucial content like its contacts, Google Fit data, Google Play Store data, Music data, etc. you can go to the respective Account and turn on the sync option. Later, you can use the same account and sync these files to the new device.
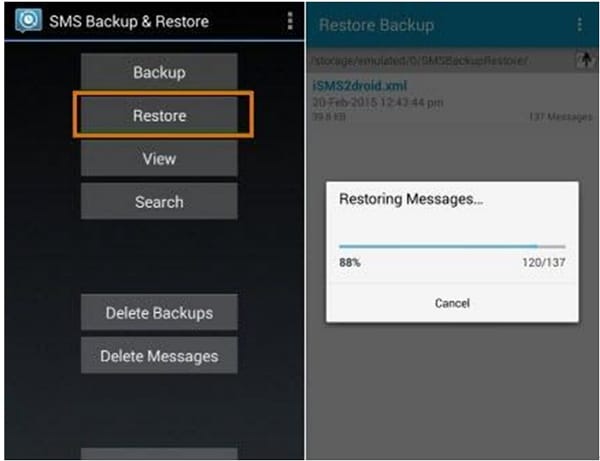
SMS transfer
There are plenty of ways to move your messages from one device to another. Just download a reliable SMS Backup & Restore app from Google Play store and sync your messages. Install the app on the new device to complete phone migration.
SMS Backup & Restore Download URL: https://play.google.com/store/apps/details?id=com.riteshsahu.SMSBackupRestore&hl=en
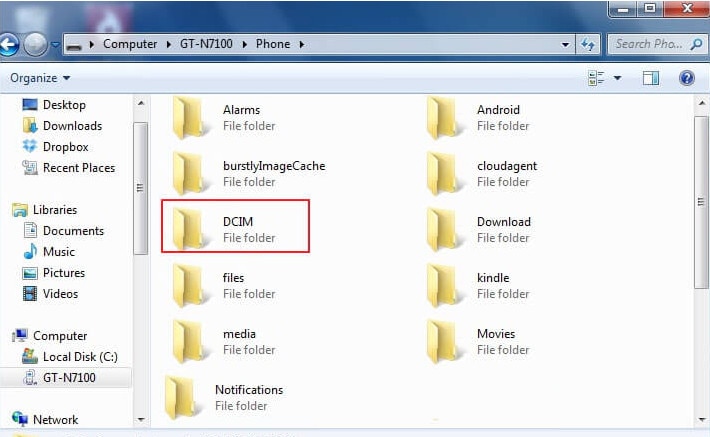
Media content
The smartest way to Android migrate to new phone your media files (like photos, videos, music, etc.) is by syncing them with Google Drive. If your Drive has limited free space, then you need to manually transfer this data. Connect your device to your system and open its storage. From here, you can manually copy the files having your media content and paste them to a safe location (or directly to the new device’s storage).

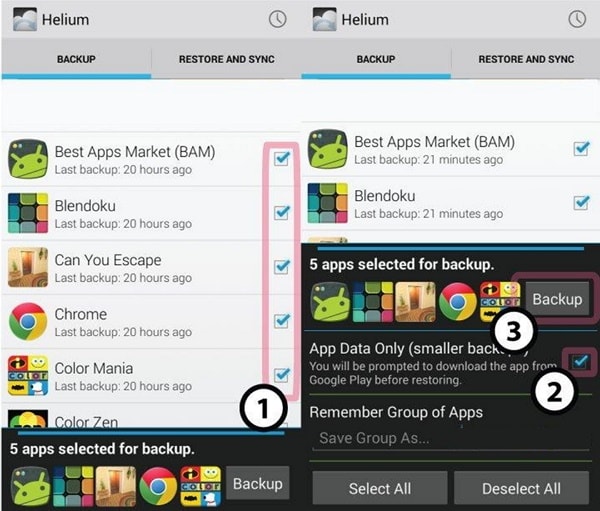
Transfer apps
You can also move your important apps while performing phone migration. There are dedicated third-party solutions that you can use for this. For instance, Helium can help you move your important apps and app data from one device to another.
Helium Download URL: https://play.google.com/store/apps/details?id=com.koushikdutta.backup&hl=en
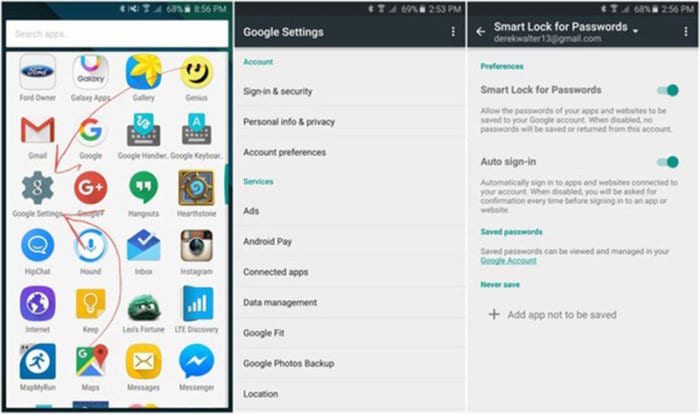
Bookmarks and passwords
If you use Google Chrome to store your passwords and bookmarks, then you can also migrate Android this content. Just go to Google Settings on the Lava Yuva 2 device and turn on the option of “Smart Lock for Passwords”. In this way, you won’t have to enter your passwords over and over again.
As you can see, the manual phone migration method will consume a lot of time and effort of yours. Therefore, we recommend using Dr.Fone Switch to migrate Android to Android without any data loss. It is a highly secure and reliable tool that will let you migrate Android to any other platform without any hassle.
How to Transfer Data from Lava Yuva 2 to Samsung Phone
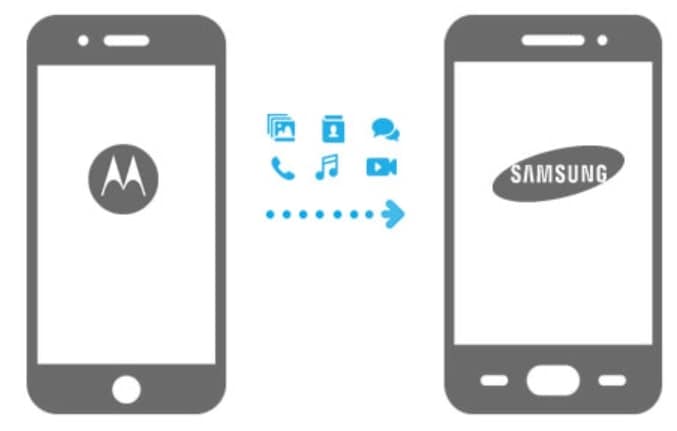
Samsung is undoubtedly the most widely used smartphone manufacturer today. Cutting edge functionalities in prices that are affordable makes Samsung a favorite. Therefore, more and more users will need to transfer data to Samsung’s devices. In this article, we are going to share how to transfer data from Motorola to Samsung, especially for how to transfer contacts from Motorola to Samsung. Check them out.
If you’re going to buy a new Samsung S23, these solutions work as well.
Part 1: Transfer Data from Motorola to Samsung using Dr.Fone
Dr.Fone - Phone Transfer can be used for transferring data from to phone to another phone like messages, contacts, call logs, calendars, photos, music, video, and apps. Also, you can back up your iPhone and save the data on your PC, for example, and restore it later when you wish. Basically, all your necessary data can be transferred fast from a phone to another phone, including transfer from Motorola to Samsung.
Dr.Fone - Phone Transfer
Migrate all data from Motorola to Samsung quickly
- Easily move 11 types of data like photos, videos, calendars, contacts, messages, music, apps, etc. from Motorola to Samsung.
- You can also transfer between iOS and Android, and iOS and iOS.
- Simple clicks to operate.
- The all-in-one process to read from the source device, transfer, and write to the target device.
4,919,791 people have downloaded it
Steps to Transfer Data from Motorola to Samsung
To transfer data from your Motorola to your Samsung phone, you will require:
- USB Cables x2
- A laptop or a computer
To start transferring data from your Motorola to your Samsung phone you will need to
Step 1. Download Dr.Fone and install it on your laptop or computer.
Step 2. Using the USB cables, attach both of your phones to the computer or laptop that you just installed Dr.Fone. When you run Dr.Fone, you’ll see a screen similar to the one shown below:
Step 3. There will be several modes listed on the screen. Select the “Phone Transfer” mode. Dr.Fone - Phone Transfer will display both of your devices after detecting them.
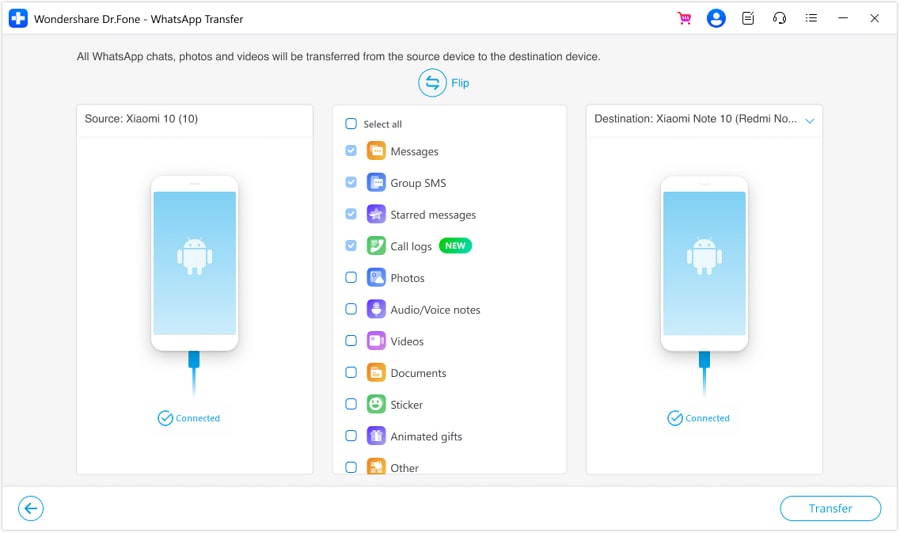
Step 4. Notice that the menu in the center shows the items to be transferred to the destination device. If you want to transfer the contacts, check the contacts item to transfer contacts from Motorola to Samsung. Check or uncheck the boxes as per your requirement. Click “Start Transfer” when you are done. Dr.Fone - Phone Transfer will begin the transferring process. A menu will appear showing the progress of the transfer.

Step 5. You can cancel the transferring process at any time by hitting the “Cancel” button however, make sure that neither of the Lava Yuva 2 devices gets detached while the transferring process is still underway.
Part 2: Transfer WhatsApp from Motorola to Samsung via WhatsApp Transfer Tool
Looking for a hassle-free way to transfer your WhatsApp data from Motorola to Samsung? If yes, your best bet to complete the transfer without a hitch is Dr.Fone - WhatsApp Transfer . This solution facilitates the smooth transfer of WhatsApp chats, ensuring all attachments are included. Not only can you transfer chats, but you can also effortlessly backup and restore your WhatsApp data,
![]()
Dr.Fone - WhatsApp Transfer
One-click to transfer WhatsApp messages from Lava Yuva 2 to iPhone
- Transfer WhatsApp messages from Lava Yuva 2 to iOS, Android to Android, iOS to iOS, and iOS to Android.
- Backup WhatsApp messages from iPhone or Android on your PC.
- Allow restoring any item from the backup to iOS or Android.
- Completely or selectively preview and export WhatsApp messages from iOS backup to your computer.
- Support all iPhone and Android models.
3,480,561 people have downloaded it
This versatile tool enables effortless transfer of WhatsApp and WhatsApp Business chats between smartphones. Dr. Fone stands as your ultimate answer if you seek a smooth merging of WhatsApp chats between two devices. Here is how you can transfer your WhatsApp data with ease using Wondershare Dr.Fone:
Step 1: Access Transfer WhatsApp Messages in Wondershare Dr.Fone
Begin by opening Wondershare Dr.Fone on your computer and proceed to link your Motorola and Samsung devices using a USB cable. Once the Lava Yuva 2 devices are connected, navigate to “Toolbox” and there, tap “WhatsApp Transfer” to proceed. On the following screen, move to the “WhatsApp” tab and click “Transfer WhatsApp Messages.”
Step 2: Assign Correct Positions to Motorola and Samsung Devices
Now, you need to assign the Motorola and Samsung devices to their respective positions. Here, the Motorola phone should be in the “Source” position. In the same way, the Samsung device needs to be in the “Destination” position. Use the “Flip” button in case the assigned positions are incorrect.

Step 3: Complete the WhatsApp Transfer Process
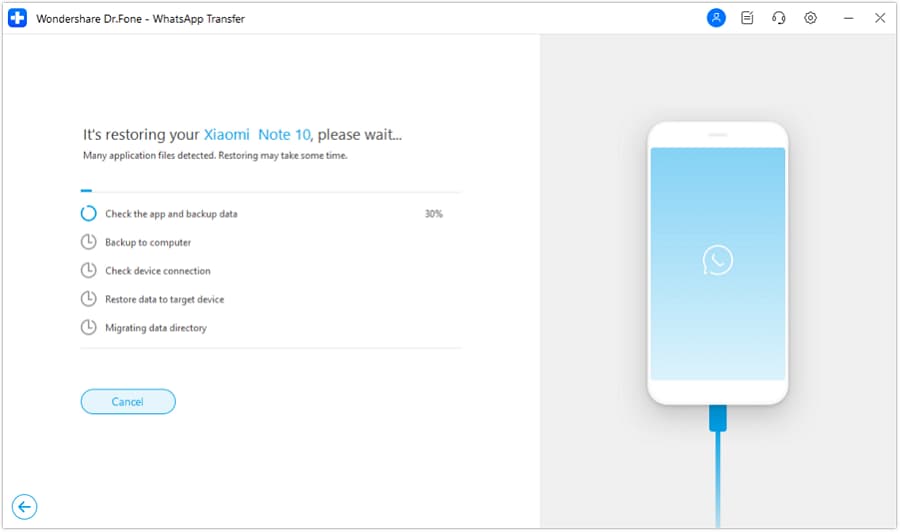
Afterward, click “Transfer” to commence the WhatsApp transfer process. A prompt will appear asking whether you want to back up WhatsApp data on the destination device. After making your choice, wait for the transfer process to finish, which will take only a few moments.
Part 3. Using Official Tools to Transfer Data from Motorola to Samsung
Samsung Smart Switch is an official tool developed by Samsung. This tool is designed to simplify transferring data from an old device, including non-Samsung devices like Motorola, to a new Samsung smartphone or tablet. This tool supports various data types, such as contacts, photos, messages, videos, calendars, and music. You can use the steps given below to transfer your data from Motorola to Samsung using Smart Switch:
Step 1. Begin with ensuring the Smart Switch app is installed on both devices. It comes pre-installed on Samsung devices, and you can download it from the Google Play Store for Motorola. Now, launch the app on both devices and keep both devices near each other.
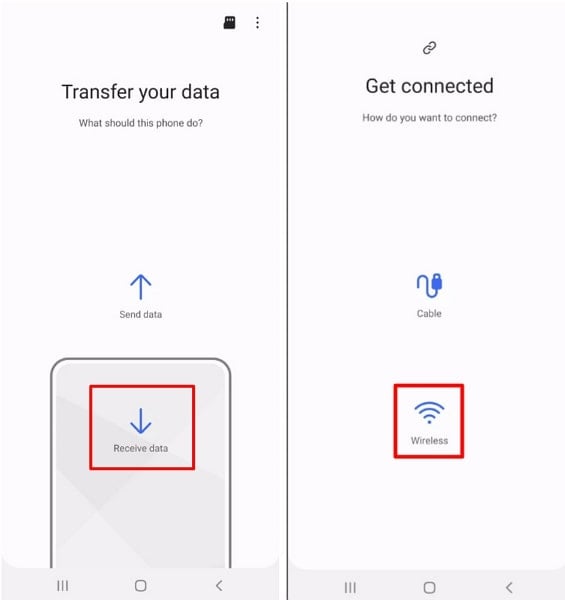
Step 2. On the Motorola device, tap “Send Data” and follow it by pressing “Wireless.” Now move to Samsung and tap “Receive Data,” then press “Galaxy/Android,” and finally tap “Wireless.”
Step 3. Afterward, finalize the connection by selecting “Allow” on the old phone. Then, on your new phone, select the content you wish to transfer and proceed by tapping “Transfer.” Once the transfer finishes, tap “Go to Home Screen” on the new phone, and you’re all set to proceed.

Bonus Tip: Want to Manage Your Lava Yuva 2 Data before Transferring Data?
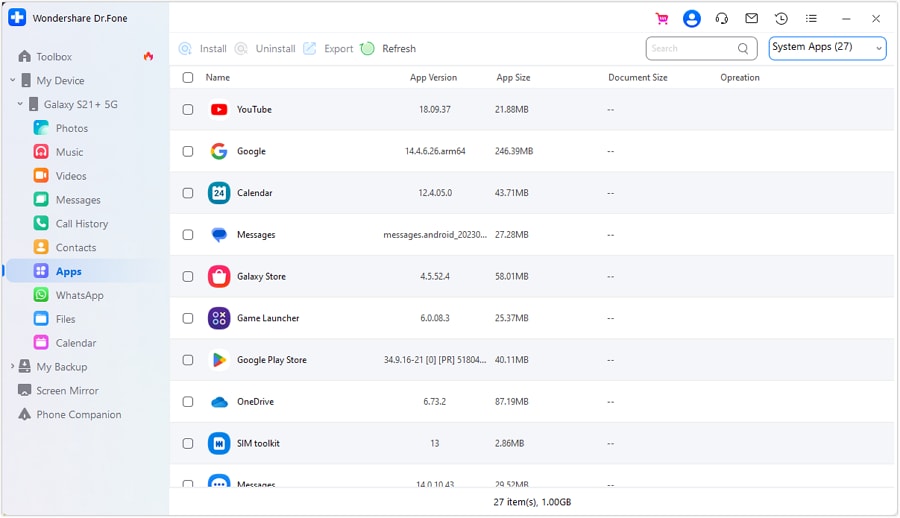
Before initiating data transfer from your Motorola phone to your new Samsung device, it’s a great idea to declutter and organize your data. Wondershare Dr.Fone is your go-to smart solution for managing and transferring Android data. With its intuitive features, you can preview, delete, export, and manage your data. This software facilitates smooth file transfers between your Lava Yuva 2 and computer.
Moreover, it enables easy transfer of media files between iTunes and Android. Dr.Fone also offers the capability to import contacts from iCloud to either your Lava Yuva 2 or computer. Additionally, it allows you to view and manage mobile notifications directly on your PC. It checks how much storage is left and generates a report showing the Lava Yuva 2 device’s history with basic details automatically.
To cater for the above mentioned problems and many other, Dr.Fone - Phone Transfer was developed. Dr.Fone - Phone Transfer is an easy to use tool. It has been designed to assist you to in transferring data from your old phone to your new phone, including transferring contacts from Motorola to Samsung.
- Title: 5 Ways To Teach You To Transfer Files from Lava Yuva 2 to Other Android Devices Easily | Dr.fone
- Author: Nova
- Created at : 2024-08-17 09:01:42
- Updated at : 2024-08-18 09:01:42
- Link: https://blog-min.techidaily.com/5-ways-to-teach-you-to-transfer-files-from-lava-yuva-2-to-other-android-devices-easily-drfone-by-drfone-transfer-from-android-transfer-from-android/
- License: This work is licensed under CC BY-NC-SA 4.0.