
6 Ways To Transfer Contacts From Oppo Reno 10 Pro+ 5G to iPhone | Dr.fone
6 Ways To Transfer Contacts From Oppo Reno 10 Pro+ 5G to iPhone
Transitioning from an Android to an iPhone can be an exciting move. However, the process to transfer contacts from Oppo Reno 10 Pro+ 5G to iPhone might seem daunting. Thankfully, technological advancements have introduced several hassle-free methods. With these, you can smoothly transfer contacts from an Android device to an iPhone.
This article will delve into 6 effective ways to effortlessly migrate your contacts. It ensures a smooth transition without worrying about losing essential contacts. These step-by-step solutions will guide you through the process, simplifying the task.
Author Recommendation. The Best Method to Transfer Contacts from Oppo Reno 10 Pro+ 5G to iPhone
Way 1: Wondershare Dr.Fone
Wondershare Dr.Fone is a powerful and user-friendly tool. It simplifies the process of transferring contacts from an Android device to an iPhone. Dr.Fone offers a robust phone transfer feature that can transfer your contacts and other data in minutes. With its user-friendly interface, the process involves straightforward clicks. This powerful tool efficiently moves data between devices operating on different systems, such as iOS and Android.
Key Features of Wondershare Dr.Fone
- It is compatible with Android 14 and the latest iOS 17.
- The Phone Transfer of Wondershare Dr.Fone is fully compatible with over 8000 devices from all major brands.
- Wondershare Dr.Fone enables the transfer of up to 15 different file types between phones.
Steps To Transfer Contacts From Oppo Reno 10 Pro+ 5G to iPhone via Wondershare Dr.Fone
Follow these simplified steps for how to transfer contacts from Oppo Reno 10 Pro+ 5G to iPhone using Wondershare Dr.Fone:
- Step 1: Choose Phone Transfer After Launching Dr.Fone
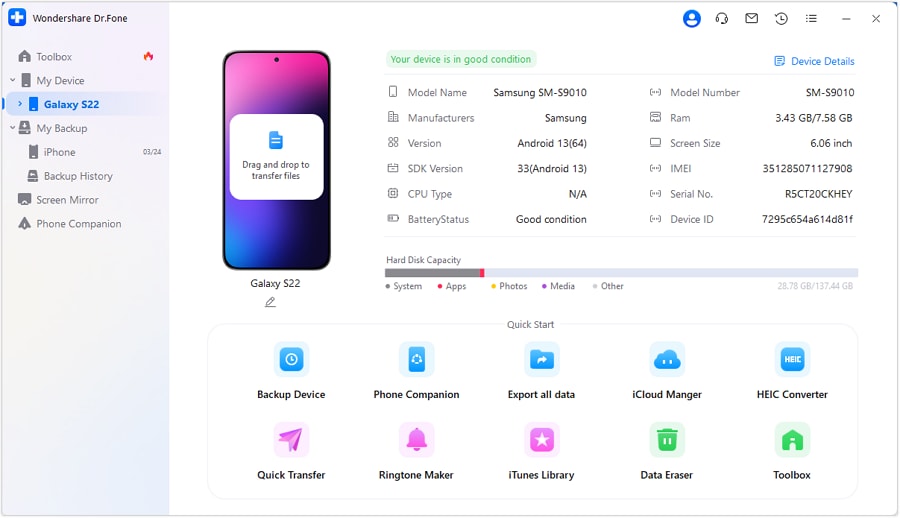
On your computer, download and install the latest version of Wondershare Dr.Fone. Then open it once it is installed and click “Toolbox” from the left sidebar. Proceed to the primary interface and select the option labeled “Phone Transfer.” Then, connect both your Android and iPhone devices to the computer.

- Step 2: Connect Devices and Complete Contacts Transfer
Once devices are detected by Wondershare Dr.Fone, ensure that they are correctly assigned. The Android device will be at the “Source” location. In the same way, assign the “Destination” position to the iPhone. Choose the “Contacts” category among the data options and click “Start Transfer.” Allow the process a few moments to complete.

Way 2: Utilize Move to iOS App
The Move to iOS app is a dedicated solution provided by Apple. It is specifically designed to help the migration of data, including contacts, from an Android device to an iPhone. This official app aims to simplify the transition process. Nevertheless, its utilization is limited to setting up an iPhone for the initial time or following a factory reset. Here is how to transfer contacts from Oppo Reno 10 Pro+ 5G to iPhone using Move to iOS app:
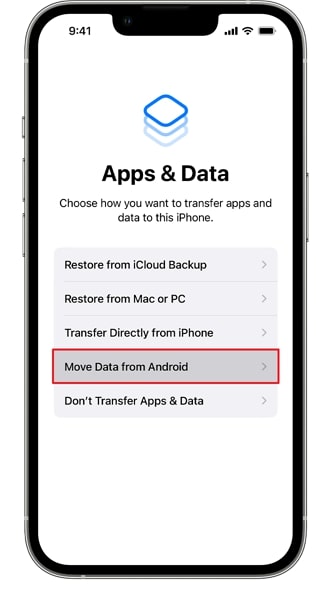
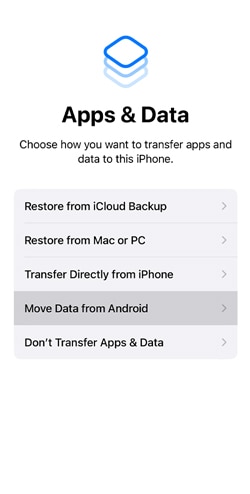
- Step 1. Download and set up the Move to iOS application on your Oppo Reno 10 Pro+ 5G. Then, start setting up your iPhone until you reach the “Apps & Data” screen. Here, choose “Move Data from Android” and go on to open the Move to iOS app on the Android device.
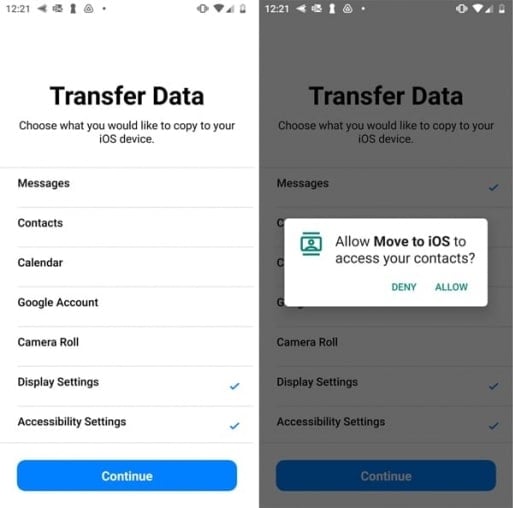
- Step 2. Proceed by tapping “Continue” on both your devices and consenting to the terms and conditions. Follow it by tapping “Next” and insert the code from the iPhone to the Move to iOS app to establish a connection. From the available data transfer options, ensure to choose “Contacts.” Now, follow the on-screen prompts to complete the transfer process.
Way 3: Sync Contacts to Google Account
Syncing contacts to a Google account serves as a convenient method. It can automatically transfer contacts from an Android device to an iPhone. Moreover, it is an excellent choice if your Android contacts are stored in a Google account. This method operates for both new and already set-up iPhones. Follow these instructions to sync your contacts to your Google account and subsequently access them on your iPhone:
- Step 1. Access the Google Contacts app on your Oppo Reno 10 Pro+ 5G and tap on the “Profile” icon at the top right corner. Following this, access the “Contacts Settings” option followed by “Google Contacts sync settings.”

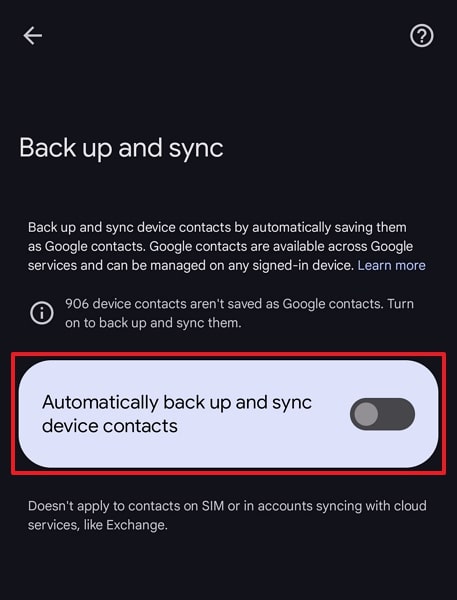
- Step 2. Next, you need to select “Also sync device contacts.” On the following screen, ensure “Automatically back up & sync device contacts” is toggled on. Now, move to your iPhone and access the Settings app.
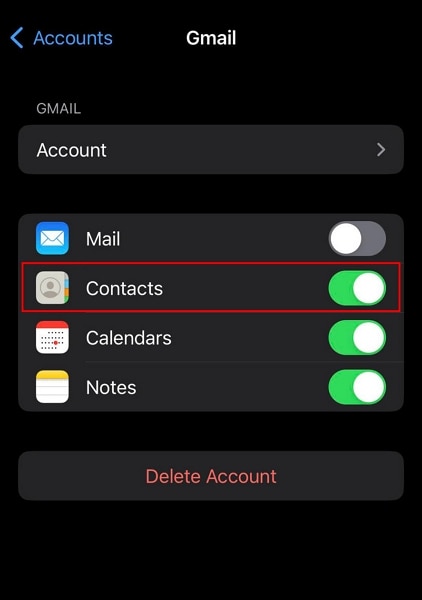
- Step 3. Go to the “Settings” app and locate the “Contacts” settings. Proceed by scrolling to locate “Accounts” and then tap on it. Afterwards, choose “Add Account” and sign in with your Google Account. Once logged in, make sure to enable the “Contacts” option.
Way 4: Using the SIM Card
Transferring contacts using a SIM card provides a basic yet effective method. This method might be the least convenient option. The reason is it involves physically exchanging SIM cards between the phones. Moreover, you can’t use this method if you use the Google Contacts app. However, some Android brands like Samsung still allow it. Follow these steps for how to move contacts from Oppo Reno 10 Pro+ 5G to iPhone via SIM card:
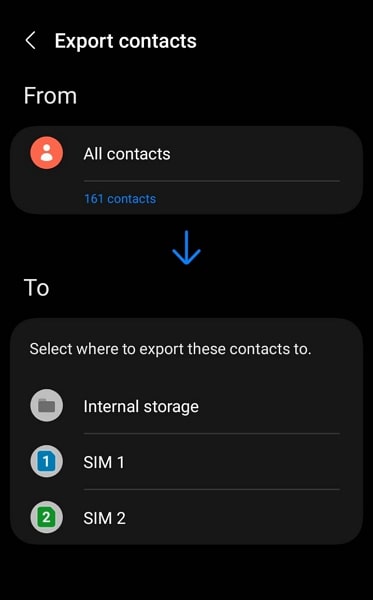
- Step 1. Open the Samsung Contacts app on your Android and tap the “Three Lines” icon to select “Manage Contacts.” Here, tap “Export Contacts,” choose the “SIM Card” as the export location, and select “All” contacts to be exported.
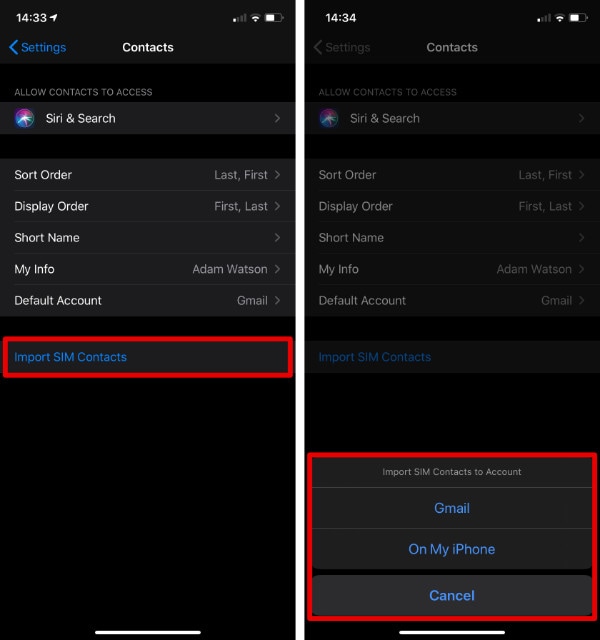
- Step 2. After it is done, insert the SIM card into the iPhone and open Settings. Move to “Contacts” and press “Import SIM Contacts” on the next screen to complete the process of moving contacts from a SIM card on an iPhone or email.
Way 5: Sync Using iTunes/Finder
Syncing contacts from an Android device to an iPhone using iTunes or Finder is another method. It is an indirect transfer by syncing Google contacts from your account to your iPhone. This method enables you to consolidate your contacts from your Google account onto your iPhone. Here is how to send contacts from Oppo Reno 10 Pro+ 5G to iPhone via iTunes/Finder:
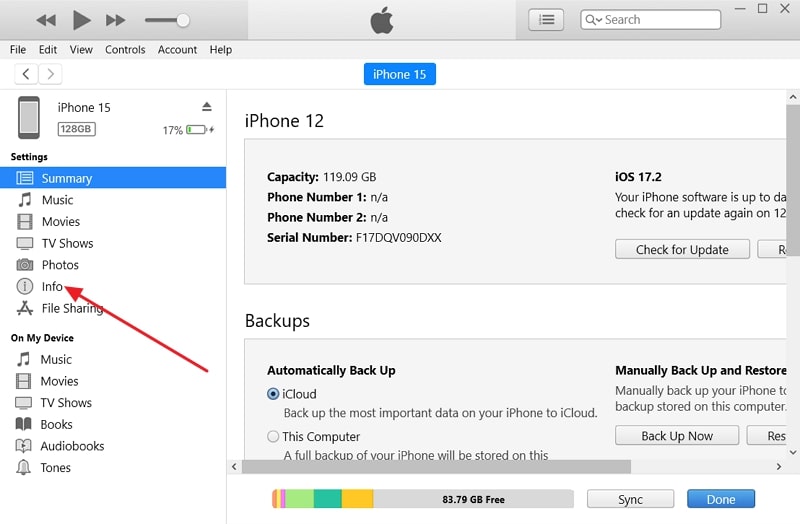
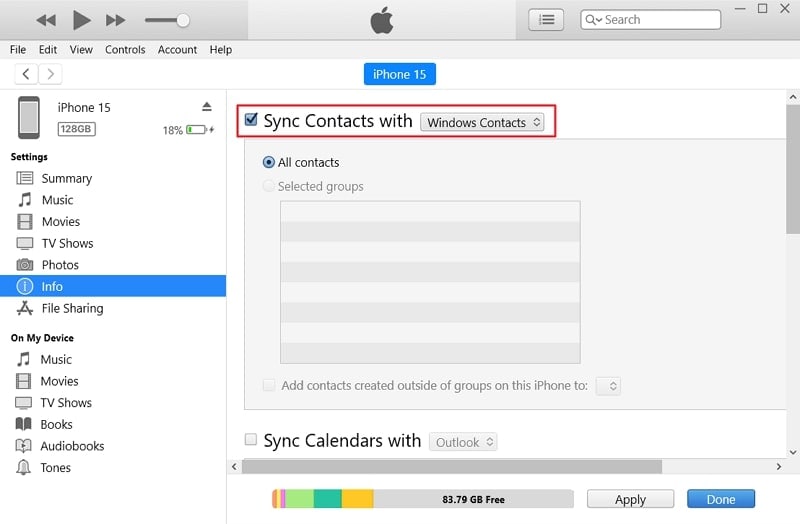
- Step 1. Make sure your Oppo Reno 10 Pro+ 5G has its contacts synced with a Google account. Next, download and install the most recent version of iTunes on your computer. Link your iPhone to your computer using a USB cable and launch iTunes. Once your iPhone icon appears in iTunes, click on it and navigate to the “Info” tab in the left sidebar.
- Step 2. Ensure the box beside “Sync Contacts with” is checked, then pick “Google Contacts” from the drop-down menu. Log in to your Google account and designate the contacts for synchronization. Tap “Apply” in the bottom right to initiate syncing your iPhone with your Google contacts.
Way 6: Import the VCF File
Importing a VCF file directly to your iPhone allows for a simple and direct transfer of contacts. It happens without the need for additional software or complex procedures. This method retains contact details and ensures a smooth transition. Follow these steps to import a VCF file containing your contacts while answering how to move contacts from Oppo Reno 10 Pro+ 5G to iPhone:
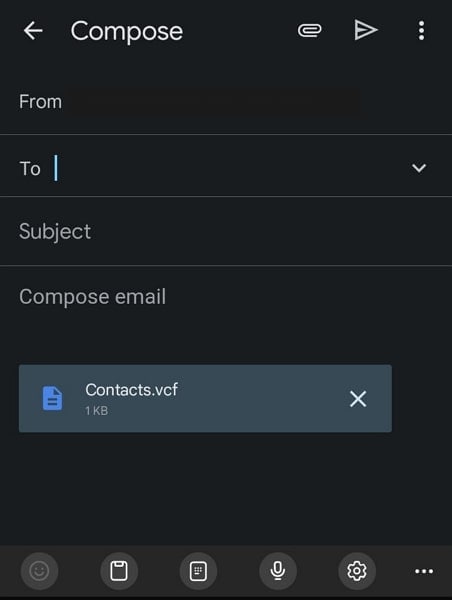
- Step 1. Access the Contacts app on your Oppo Reno 10 Pro+ 5G and hold on to a contact to select. Among the options displayed, opt for “Select All” and proceed by tapping the “Share” option. Now, you need to select a way to share these contacts. Here, we are choosing Gmail as it is the simplest, but you can select any feasible method.
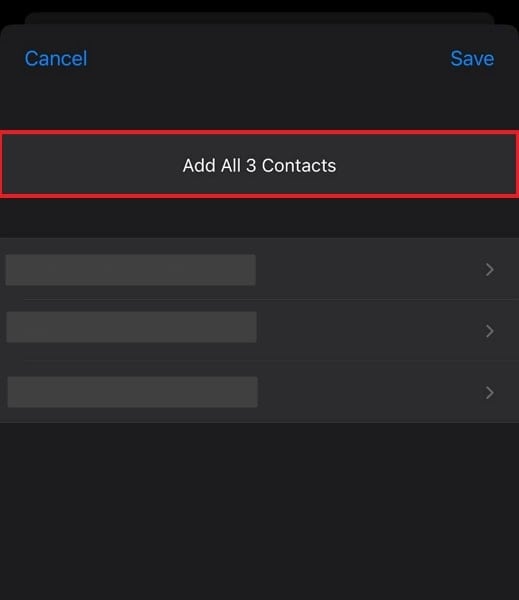
- Step 2. Now move to your iPhone and open the mail with Contacts from the Android device. Press the attached file, choose “Share,” select the “Contacts” app and tap “Add All Contacts.”
Author Recommendation: The Best Method To Transfer Contacts From Oppo Reno 10 Pro+ 5G to iPhone
When considering the most efficient and reliable method to transfer contacts from Oppo Reno 10 Pro+ 5G to iPhone, our recommendation leans toward using Wondershare Dr.Fone. Among various available methods, Wondershare Dr.Fone offers a comprehensive, user-friendly experience.
It simplifies the transfer process with its intuitive interface and dependable performance. Here’s why we recommend Wondershare Dr.Fone for transferring contacts:
- Ease of Use: Wondershare Dr.Fone’s straightforward interface makes it accessible to users with varying levels of technical expertise. The step-by-step guidance ensures a hassle-free transfer process.
- Comprehensive Transfer Options: Beyond contacts, Wondershare Dr.Fone enables the transfer of various data types. This caters to broader migration needs, including photos, messages, music, videos, etc.
- Reliability and Security: With a solid reputation in data management software, Wondershare Dr.Fone ensures the security and integrity of your data. It prioritizes privacy and reliability during the transfer process.
- Cross-Platform Compatibility: Fone supports transfers between different operating systems. That makes it an ideal choice when migrating from Oppo Reno 10 Pro+ 5G to iOS devices like iPhones.
- Efficiency and Speed: The software streamlines the transfer process to an excellent measure. It saves valuable time by swiftly migrating contacts and other data without data loss or errors.
Conclusion
In conclusion, transitioning from an Android device to an iPhone doesn’t have to be a daunting task. It is especially not the case when it comes to how to transfer contacts from Oppo Reno 10 Pro+ 5G to iPhone. Throughout this guide, we’ve explored various effective methods. Each one offered its unique approach to simplify the transfer process.
You can opt for the user-friendly interface of Wondershare Dr.Fone, the official Move to iOS app, or sync via Google accounts. Other options include utilizing the SIM card, syncing through iTunes/Finder, or the direct import of a VCF file. Selecting the ideal method often depends on personal preferences. Wondershare Dr.Fone emerges as a standout recommendation due to its versatility, reliability, and ease of use.
5 Ways to Transfer Music from Oppo Reno 10 Pro+ 5G to Other Android Devices Easily
There can be many reasons to transfer music from Oppo Reno 10 Pro+ 5G to Other Android Devices, such as the change of the Oppo Reno 10 Pro+ 5G device since you bought a new one or want to keep music readily available on multiple devices. Therefore, if you face a dilemma over how to transfer music from one Android device to another, this is the right article for you.
So, keep reading to know about five different ways that will help you transfer your music files easily.
Part 1: How to transfer music from Oppo Reno 10 Pro+ 5G to Other Android Devices in 1 click?
The transfer of all music files from one Android phone to another with a single click of the mouse has never been easier. The switch feature on Dr.Fone - Phone Transfer program has made this action a lot simpler and even faster to transfer music from Oppo Reno 10 Pro+ 5G to Other Android Devices. It can also transfer other file formats such as other multimedia files, contacts, text messages, call logs, including apps and app data files.
Dr.Fone - Phone Transfer
Transfer Music from Oppo Reno 10 Pro+ 5G to Other Android Devices in 1 Click Directly!
- Easily transfer every type of data from Oppo Reno 10 Pro+ 5G to Other Android Devices, including apps, music, videos, photos, contacts, messages, apps data, call logs, etc.
- Works directly and transfer data between two cross-operating system devices in real-time.
- Works perfectly with Apple, Samsung, HTC, LG, Sony, Google, HUAWEI, Motorola, ZTE, Nokia, and more smartphones and tablets.
- Fully compatible with major providers like AT&T, Verizon, Sprint, and T-Mobile.
- Fully compatible with iOS 16 and Android 13
- Fully compatible with the latest Windows or Mac version.
3981454 people have downloaded it
Here are the few simple steps required to be carefully followed to transfer music from Oppo Reno 10 Pro+ 5G to Other Android Devices.
Step 1. The first step is to download the Dr.Fone software from its official website and then run the installer wizard. Once the installation is complete, launch the program.
Step 2. Now, connect both the Android phones via a good USB cable to the PC. Thereafter, go to the Dr.Fone program’s main interface and click on the “Switch” button. You will see the two devices connected with the Source device on the left and the Destination device on the right on the next screen.
If you want the Source device to be the Destination device, click on the “Flip” button at the center of the screen.

Step 3. You can now select the files to be transferred by checking the corresponding boxes. In this case, check the Music box and then click on “Start Transfer” to transfer music from Oppo Reno 10 Pro+ 5G to Other Android Devices.

You should now see your music files being transferred with the overall progress displayed on a dialogue box.
There you go; within a few seconds, your music files will be transferred successfully.
Part 2. How to Transfer Music from Oppo Reno 10 Pro+ 5G to Other Android Devices Selectively?
Another way to transfer music from Oppo Reno 10 Pro+ 5G to Other Android Devices is by using the transfer feature on Dr.Fone - Phone Manager (Android) . As the name implies, this feature can be used to transfer files from one Android device to another by selecting the particular music file one by one instead of choosing an entire music file.
Dr.Fone - Phone Manager (Android)
Transfer Android Media to Android Devices Selectively
- Transfer files between Android and iOS, including contacts, photos, music, SMS, and more.
- Manage, export/import your music, photos, videos, contacts, SMS, Apps, etc.
- Transfer iTunes to Android (vice versa).
- Manage your iOS/Android device on the computer.
- Fully compatible with the latest iOS and Android version.
3981454 people have downloaded it
Here are a few easy steps to follow on how to transfer music from Oppo Reno 10 Pro+ 5G to Other Android Devices.
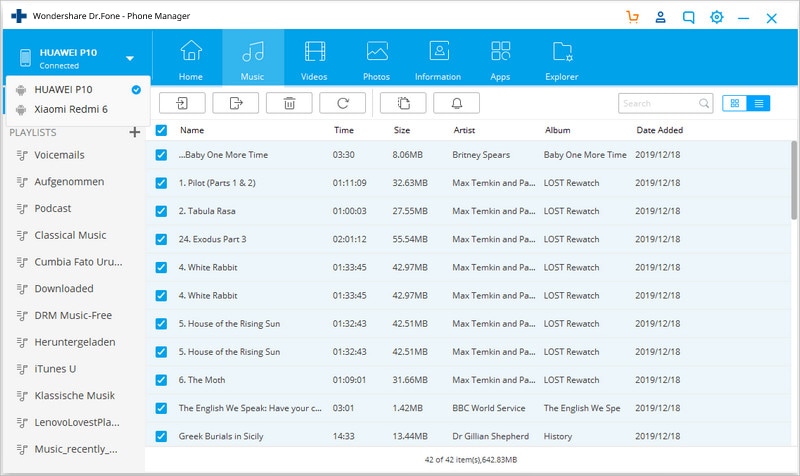
Step 1: After installing Dr.Fone software on your computer and launching it, connect the Android device via USB cable. Now click on the “Music” tab at the top of the screen amongst the other listed options. The program would immediately recognize your device.
Step 2. The moment all the audio files or music files on the connected device are displayed on the Dr.Fone software screen. You can scroll down and select each file you wish to copy or select an entire folder from the left side pane.
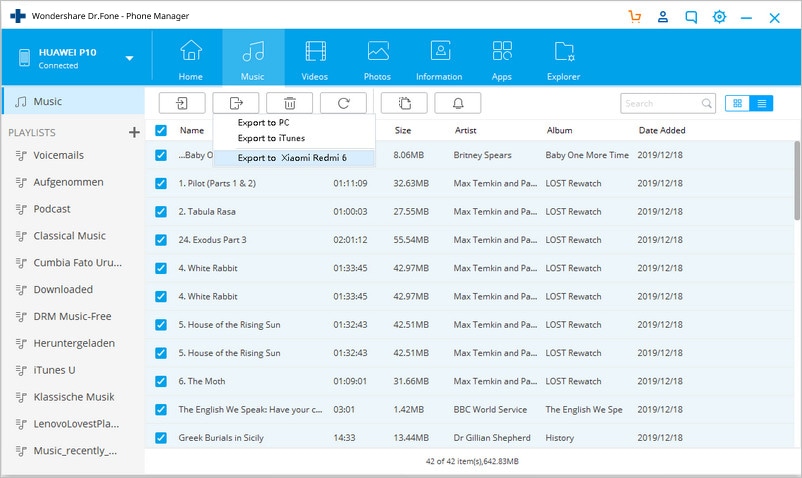
Step 3. After selecting the music files, you wish to copy, click on the “Export” button on the app and then select “Export to Device”. You will see the other device connected; there, click on the Oppo Reno 10 Pro+ 5G device’s name to begin the transfer process.
Part 3. How to transfer music from Oppo Reno 10 Pro+ 5G to Other Android Devices using Bluetooth?
Bluetooth transfer is one of the oldest methods that can be used to transfer music from Oppo Reno 10 Pro+ 5G to Other Android Devices, and it is a simple way to make use of it.
Here are the steps to follow to know how to transfer music from Oppo Reno 10 Pro+ 5G to Other Android Devices.
Step 1. There are two ways you can turn on Bluetooth on your Oppo Reno 10 Pro+ 5G
Method 1: The first method is to swipe from top to down on your Oppo Reno 10 Pro+ 5G to view the swipe menu on some Android OS. You would be able to view and immediately turn on Bluetooth with a single click.
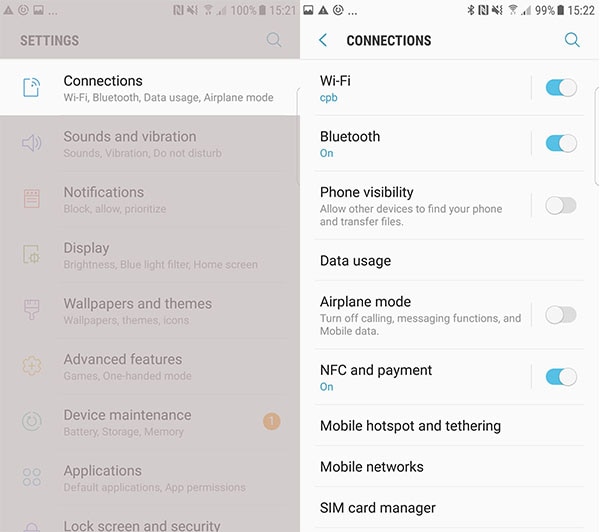
Method 2: Go to “Connection” from the Settings Menu on your Oppo Reno 10 Pro+ 5G, and then in the Connections options, you will see “Bluetooth”. Make sure it is switched on. Also, ensure that the phone’s Bluetooth visibility is enabled so that your device can be seen and easily paired with the other device.
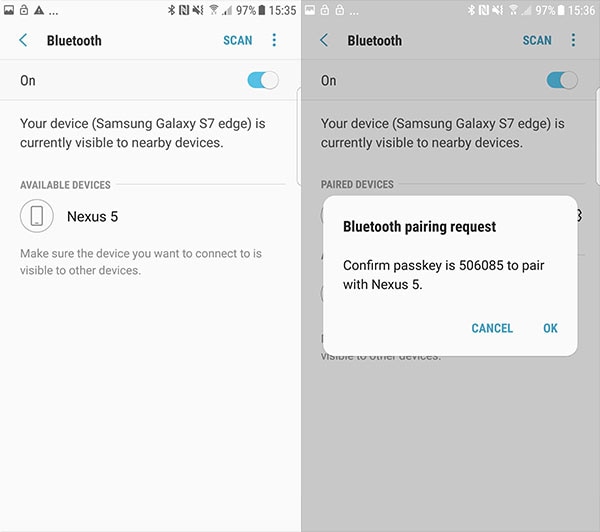
Step 2. Now, switch on the Bluetooth for the destination device as well. Once done, search for your device’s Bluetooth name on the phone and click to pair both Bluetooth devices together.
Mostly, you will be provided with a pair confirmation code that will be displayed on both devices. Click OK to pair both devices successfully.
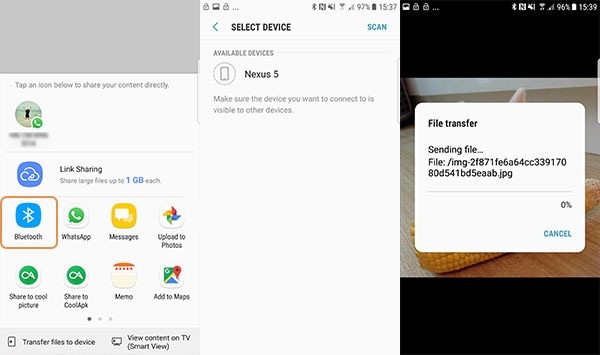
Step 3. The final step is to head to the File Manager app on your phone or go to your Music Player, select the music file you wish to transfer, and then click on your device’s Share button or logo.
Here, scroll until you see the “Bluetooth” option. You will be immediately prompted to select the Oppo Reno 10 Pro+ 5G device to share with, click the earlier paired device name, and then click on “Accept” on the other device.
This is how you can transfer music files from Oppo Reno 10 Pro+ 5G to Other Android Devices using Bluetooth.
Part 4. How to transfer music from Oppo Reno 10 Pro+ 5G to Other Android Devices using NFC?
NFC or Near Field Communication is another wireless means to transfer music from Oppo Reno 10 Pro+ 5G to Other Android Devices. Although, unlike Bluetooth, this method requires contact between the two devices making the transfer.
Below are the steps on how to transfer music from Oppo Reno 10 Pro+ 5G to Other Android Devices using NFC.
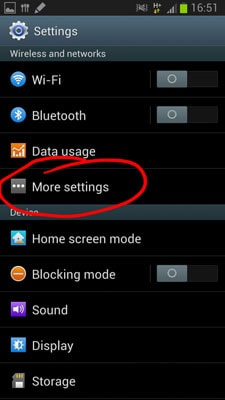
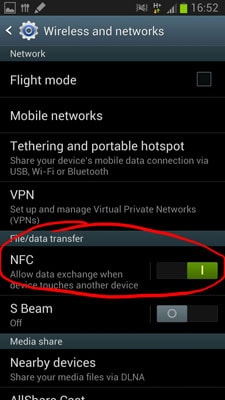
Step 1. First, enable NFC connection on both the Oppo Reno 10 Pro+ 5G devices between which you want to transfer the music files. To switch on NFC on Android, go to Phone’s “Settings” and click on “More Settings” under “Wireless and Network” options. Now click on the NFC button to ensure that it is switched On. Do the same on the other Android device as well.
Step 2. Before you begin to transfer, you need to touch the back of both devices (whose NFC has already been turned on), you will notice that both devices vibrate upon a successful connection. This means you can now start transferring your music files.
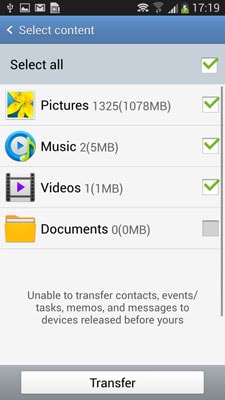
Step 3. After connecting both the Oppo Reno 10 Pro+ 5G devices, you will be provided with media options of files that can be transferred. In this case, select the Music files and then click on “Transfer” to send the music files via NFC.
Part 5. How to transfer music from Oppo Reno 10 Pro+ 5G to Other Android Devices using Google Play Music?
Google Play Music is a free Music streaming service provided by Google and available for all users with a Google account. Follow these steps to transfer music files to an Android phone using Google play.
Note: You need a Google account to be able to make use of this service
Step 1. Open Google Play Music on your computer and sign in with your already existing Google account details (Same as on 1st Android Device).
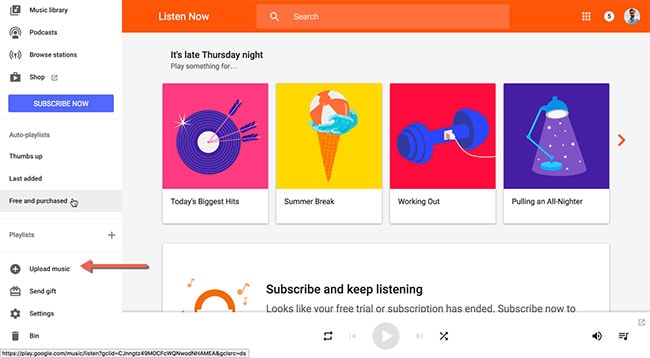
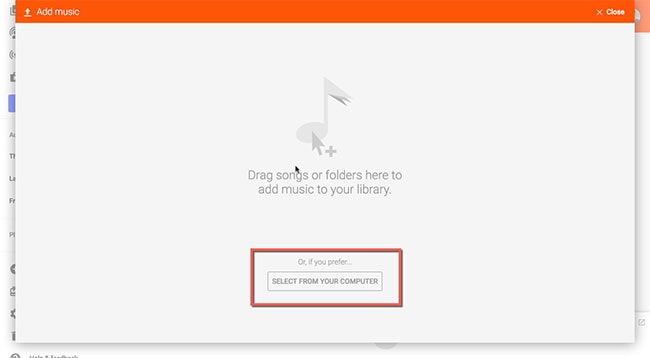
Step 2. You can now upload music files by clicking on the Upload button at the left corner of the screen to view the main Panel of the page. At the bottom of the page, click on “Select From Your Computer” to upload music files from your computer to Google Play.
Step 3. After the upload has been completed, download the “Google Play Music” app on your other Android phone and then log in to the app with the same Google credentials. You will see all the recently uploaded tracks on your Google Play account. You can now stream or download them easily.
At last, we hope that you now know how to transfer music from Oppo Reno 10 Pro+ 5G to Other Android Devices devices safely and securely through the above article. In fact, you have got two very good options to perform the transfer in the form of Dr.Fone - Phone Transfer and Dr.Fone - Phone Manager (Android) . Well, choose the most convenient one for you and make sure that you proceed with the guided steps mentioned for each way.
How to Transfer Content from android to iPhone Directly
Since Oppo Reno 10 Pro+ 5G is embracing Android as its operating system, transitioning from an iPhone to a Oppo Reno 10 Pro+ 5G, or vice versa, can pose challenges due to the differing operating systems. But it doesn’t mean impossible!
If you’re switching to an iPhone and need to transfer all your data, this article has you covered. We will look at ways to facilitate smooth Oppo Reno 10 Pro+ 5G to iPhone transfer while ensuring your valuable information transfers across these devices with no problem.
Part 1. How to Transfer Content from Oppo Reno 10 Pro+ 5G to iPhone Directly
You must be familiar with Oppo Reno 10 Pro+ 5G Migrate if you are a Oppo Reno 10 Pro+ 5G user. It is a solution for seamless data transfer used in Oppo Reno 10 Pro+ 5G devices. With this app, you can transfer data from your Oppo Reno 10 Pro+ 5G device to others, such as iPhones.
However, most of the latest Oppo Reno 10 Pro+ 5G models are now unable to run Oppo Reno 10 Pro+ 5G Migrate since it’s a pretty outdated app. It has been retired by the company since 2015. Users are seeking alternative methods for data transfer as a result. In this section, we explore more effective solutions to transfer content directly from Oppo Reno 10 Pro+ 5G to iPhone besides Oppo Reno 10 Pro+ 5G Migrate.
Solution 1. Using ShareIt App
When Oppo Reno 10 Pro+ 5G Migrate is not an option, ShareIt can be a versatile alternative for Oppo Reno 10 Pro+ 5G to iPhone transfer. ShareIt is a popular cross-platform file-sharing application known for its simplicity and efficiency. To use it, you’ll need to download the ShareIt app on both your Oppo Reno 10 Pro+ 5G and iPhone.
If you have downloaded and installed it, you can continue with the steps below:
- Step 1: Connect your Oppo Reno 10 Pro+ 5G and iPhone devices
Since ShareIt operates by creating a hotspot network among devices, it’s necessary to have both devices connected to the same Wi-Fi network. Make sure to keep both devices close to each other, too.
- Step 2: Select the files to transfer
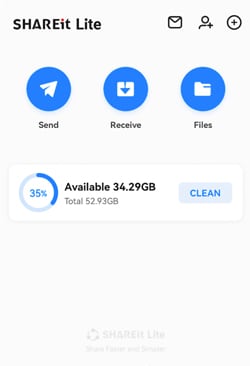
On your Oppo Reno 10 Pro+ 5G device, click the “Send” button. After a new window appears displaying all the categorized files on your device, choose the specific files you want to transfer.
- Step 3: Look for the Oppo Reno 10 Pro+ 5G device to transfer
After selecting the files, press “Send” and provide the necessary permissions for GPS and Bluetooth. Once permissions are granted, the Oppo Reno 10 Pro+ 5G device will initiate a search for nearby devices.
- Step 4: Transfer the files to the iPhone.
On your iPhone, open the ShareIt app and click “Receive.” This action opens all the necessary ports to receive shared files. When your Oppo Reno 10 Pro+ 5G phone detects your iPhone, tap on the iPhone’s avatar to proceed with the transfer.
Solution 2. Move Contents from Oppo Reno 10 Pro+ 5G to iPhone via Apps & Data
Another good alternative of Oppo Reno 10 Pro+ 5G to iPhone transfer app is Move to iOS. This Move to iOS app is designed by Apple specifically for users moving from Android devices to iPhones. You can download it from the Google Play Store. Then, you can transfer the data by accessing Apps & Data on the iPhone.
However, if you have been using your iPhone for a while, you must reset your iPhone first to proceed with this method. It can be done by going to Settings > General > Reset > Erase all content and settings. After resetting, your iPhone will be going back to the initial setup.
For more details, follow the instructions below:
Step 1: Setup your iPhone
Power up your new iPhone and progress through the initial setup until you get into the “Apps & Data” screen. Select the option that reads “Move Data from Android.”
Step 2: Agree to Terms and Conditions
Open Move to iOS on your Oppo Reno 10 Pro+ 5G phone. Review the terms and conditions and press “Agree” to proceed.
Step 3: Enter the Code
On your Oppo Reno 10 Pro+ 5G, a screen will appear to request a 6-10-digit code. This code will be generated on your iPhone. Enter the displayed code on your Oppo Reno 10 Pro+ 5G device to make a secure connection between the two devices.
Step 4: Select Content to Transfer
Next, choose the types of content you wish to transfer. Tap “Continue” to initiate the transfer process. Remember to keep your devices close to each other and connected to power until the transfer process is completed for quicker transfer.
Step 5: Transfer complete.
Once the transfer is complete, you will be prompted to finish setting up your iPhone. Follow the instructions to complete the setup process.

Part 2. How To Make iPhone to Oppo Reno 10 Pro+ 5G Data Transfer Using Easy Software
One significant reason why data transfer from iPhone to Oppo Reno 10 Pro+ 5G is tricky is due to privacy concerns. Apple really prioritizes their user privacy. It implements strict security measures to prevent any breaches. While this is beneficial for users, it can also complicate data transfer.
Another contributing factor is the structure of the files. Android boasts a file system that is more straightforward, unlike iOS. As a solution, third-party software like Wondershare Dr.Fone offers tools like Phone Transfer to simplify the process. With Dr. Fone’s Phone Transfer, you can transfer any data from Oppo Reno 10 Pro+ 5G to iPhone or iPhone to Oppo Reno 10 Pro+ 5G.
How to make iPhone to Oppo Reno 10 Pro+ 5G data transfer with Dr.Fone:
- Step 1: Open Dr.Fone’s Phone Transfer tool
Make a connection between your iPhone and your Oppo Reno 10 Pro+ 5G phone through USB cable on your computer. Launch Wondershare Dr.Fone on your computer and navigate to Toolbox > Phone Transfer.
- Step 2: Specify the source and destination devices
After connecting them, the platform will identify the connected devices and load their data onto the platform. Choose the Source and Destination devices to set the transfer path. Use the Flip button if necessary to alter the transfer direction.
- Step 3: Choose the data type for the transfer
Proceed to select the types of data you wish to transfer. Checkmark the category and click the Start Transfer button. If you want to remove existing data from the destination device, you can select “Clear data before copy.”

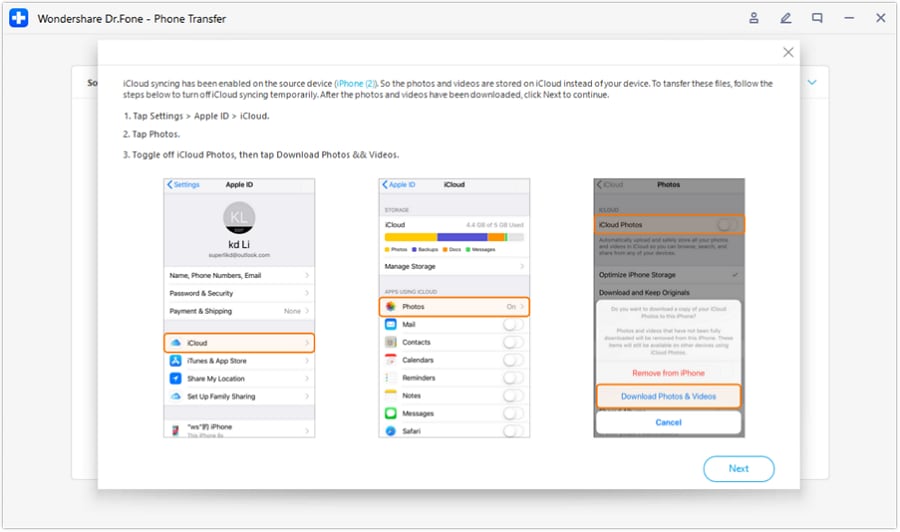
- Step 4: Disable iCloud syncing
Now, Dr. Fone’s Phone Transfer tool should prompt a specific operation on the window. Follow the instructions to turn off iCloud syncing. Open your iPhone Settings and tap on your device’s name. Go to iCloud > Photos to disable the toggle for iCloud Photos.
- Step 5: Monitor data transfer progress
The progress of the data transfer will be displayed in a pop-up window. Once completed, click OK to conclude the process.
Part 3. How to Do Oppo Reno 10 Pro+ 5G to iPhone Data Transfer Using Dropbox/Google Drive
Another method for Oppo Reno 10 Pro+ 5G to iPhone transfer is using Cloud services like Dropbox or Google Drive. Both Dropbox and Google Drive serve as virtual storage spaces accessible from any device with an internet connection. Users can upload and store their files to the cloud, making them available for download on other devices.
Either Google Drive or Dropbox follows similar steps for data transfer. The difference between them is in the amount of free storage each service provides. Notably, Google Drive provides 15GB of free storage, while Dropbox offers 2GB.
Follow these steps on how to do a Oppo Reno 10 Pro+ 5G to iPhone transfer via cloud storage services.
- Step 1: Install and set up Dropbox/Google Drive:
Begin by installing the Dropbox or Google Drive app on both your Oppo Reno 10 Pro+ 5G and iPhone. Create accounts if you don’t have them already.
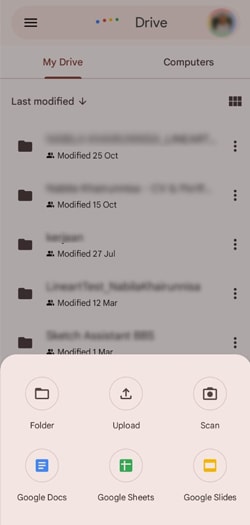
- Step 2: Upload the files from Oppo Reno 10 Pro+ 5G
Open the cloud storage app on your Oppo Reno 10 Pro+ 5G device and upload the data you want to transfer. This can include photos, videos, documents, and more. Then, wait for the upload to complete. Make sure that all files are successfully uploaded before proceeding.
- Step 3: Sign in to the cloud storage on your iPhone
On your iPhone, open Dropbox or Google Drive and sign in with the same account. Find the transferred files in the cloud storage.
- Step 4: Download to iPhone:
Select the files you want to transfer and download them to your iPhone. Once the download is complete, organize the transferred files on your iPhone as needed.
Conclusion
Transitioning from a Oppo Reno 10 Pro+ 5G device to an iPhone, or vice versa, may present challenges due to the difference in operating systems. However, with the right tools and methods, the iPhone to Oppo Reno 10 Pro+ 5G data transfer can be done seamlessly and efficiently.
Even though Oppo Reno 10 Pro+ 5G Migrate is no longer in the game, apps like ShareIt and Move to iOS can be alternatives for a direct transfer. If things get a bit trickier when transferring from iPhone to Oppo Reno 10 Pro+ 5G due to Apple’s privacy measures, third-party software like Wondershare Dr.Fone’s Phone Transfer is there to simplify it all.
And for those who prefer the cloud, Dropbox and Google Drive also offer a solution. So, no matter your preference, there’s a solution to ensure your data transfer moves smoothly.
Also read:
- [Updated] ASMR Expertise Soundscapes That Ease Sleeplessness for 2024
- [Updated] In 2024, Premium Selection – Top 5 Budget-Friendly Vecto Portals
- 8 on ZDNet
- How Can I Accelerate My GPU Performance? - Tips & Tricks From YL Computing
- How to Downgrade iPhone X without Losing Any Data? | Dr.fone
- How to Fix corrupt video files of Samsung Galaxy A05 using Video Repair Utility on Mac?
- How to identify malfunctioning your hardware drivers with Windows Device Manager on Windows 11/10
- How To Install the Latest iOS/iPadOS Beta Version on iPhone 13 Pro Max? | Dr.fone
- How To Recover iPhone X Data From iCloud? | Dr.fone
- How to remove Google FRP Lock on Realme C67 4G
- How to retrieve erased videos from Xperia 10 V
- How to Sign .uot file document with Electronic Digital Signature - (Tutorial)
- How To Transfer Data From iPhone 11 Pro Max To Other iPhone 13 Pro Max devices? | Dr.fone
- In 2024, 1 Choice Easy Online Video Text Conversion
- In 2024, What is the best Pokemon for pokemon pvp ranking On Samsung Galaxy S24+? | Dr.fone
- Life360 Learn How Everything Works On Poco C55 | Dr.fone
- Mastering JSON Editing: A Comprehensive Guide in EmEditor - The Advanced Text Editor
- The way to get back lost videos from Honor Magic V2
- Ultimate Tips for Securely Adding Senders to Your Gmail Whitelist
- Title: 6 Ways To Transfer Contacts From Oppo Reno 10 Pro+ 5G to iPhone | Dr.fone
- Author: Nova
- Created at : 2024-12-31 06:36:48
- Updated at : 2025-01-04 21:43:56
- Link: https://blog-min.techidaily.com/6-ways-to-transfer-contacts-from-oppo-reno-10-proplus-5g-to-iphone-drfone-by-drfone-transfer-from-android-transfer-from-android/
- License: This work is licensed under CC BY-NC-SA 4.0.