Experiencing the Future with a Linux Terminal Powered by AI - My First Encounter
Experiencing the Future with a Linux Terminal Powered by AI - My First Encounter
Quick Links
- What Is the Warp Terminal?
- Setting Up Warp for the First Time
- It’s a Powerful Editor
- Warp AI Can Save You Tons of Googling
- Warp Drive Is Your Personal Workflow Bank
- You Can Collaborate in the Terminal
- There Are Some Catches
- Rocking Linux With a Powerful Terminal
As a Linux enthusiast, I’m always looking for new and cool terminal apps. Out of the many apps I’ve tried in the past, the Warp terminal impressed me to quite an extent. But not all is rosy, you know. So here’s my overall experience with Warp as my daily driver.
What Is the Warp Terminal?
Warp is a modern AI-powered terminal emulator built with Rust. It’s available for both macOS and Linux and is coming soon to Windows. It’s currently a closed-source tool and requires an account to use it.
Warp offers tons of customization, AI, productivity, and collaboration features that will fully transform how you use the command line. If you’re a developer, system administrator, or an advanced Linux user, Warp is worth giving a shot.
Setting Up Warp for the First Time
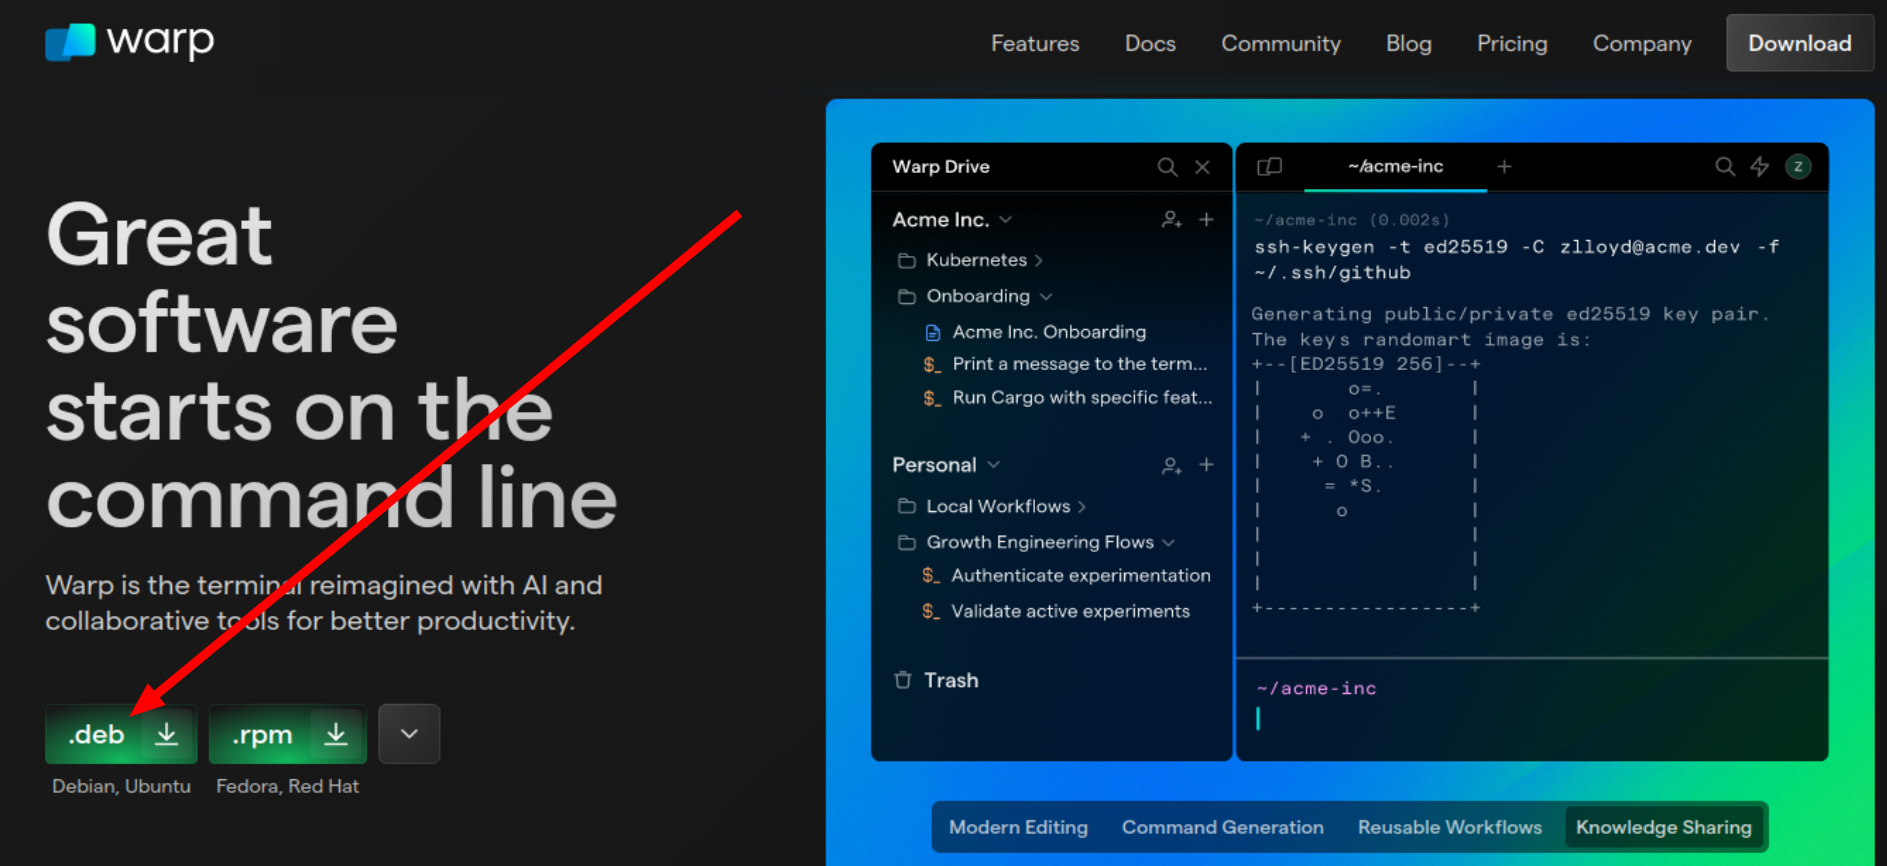
First, visit Warp’s official website. You should see a download option based on your system (Linux, in this case). Since I’m on Linux Mint, I will download the DEB package . You can check the download page for other options, including AppImages .
Once the download is complete, go to the directory where it was downloaded. For me, it’s the “~/Downloads” directory. Open the directory in your terminal using the cd command or by right-clicking on the screen and hitting “Open in Terminal” from the context menu.
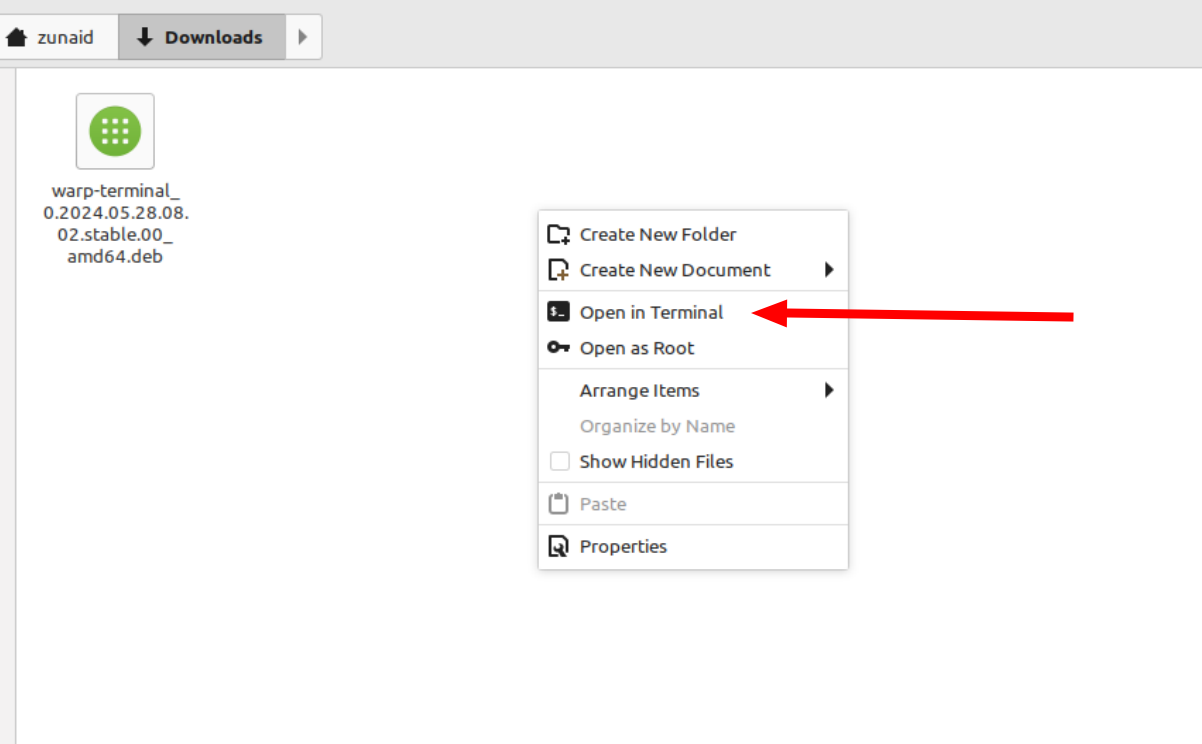
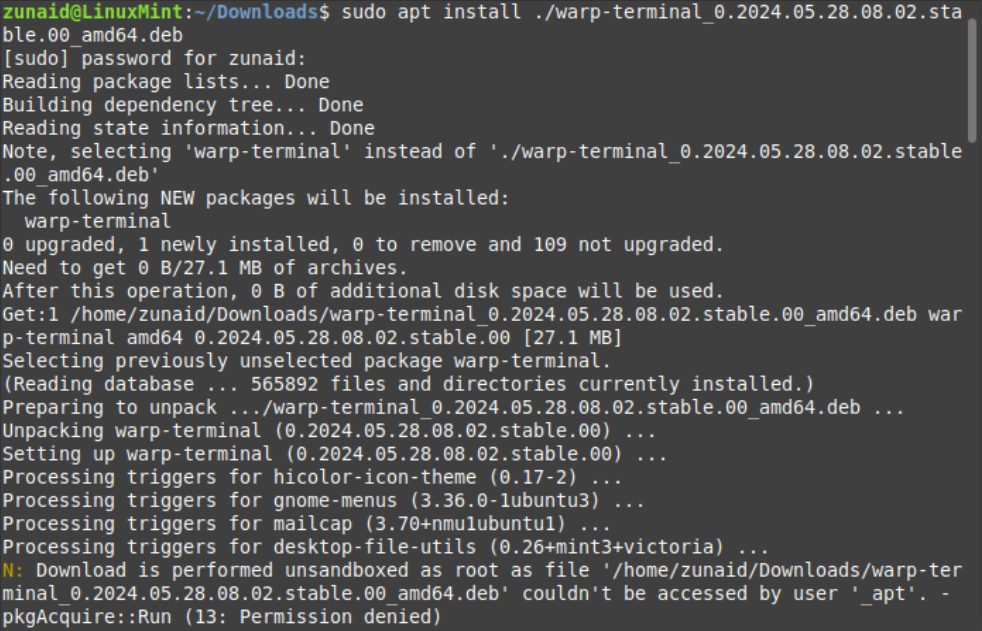
To install Warp on Linux Mint (and other Debian-based distros) using the DEB package, run this command:
sudo apt install warp-terminal_*.deb
After installing, open the application from the app drawer or run this command:
warp-terminal
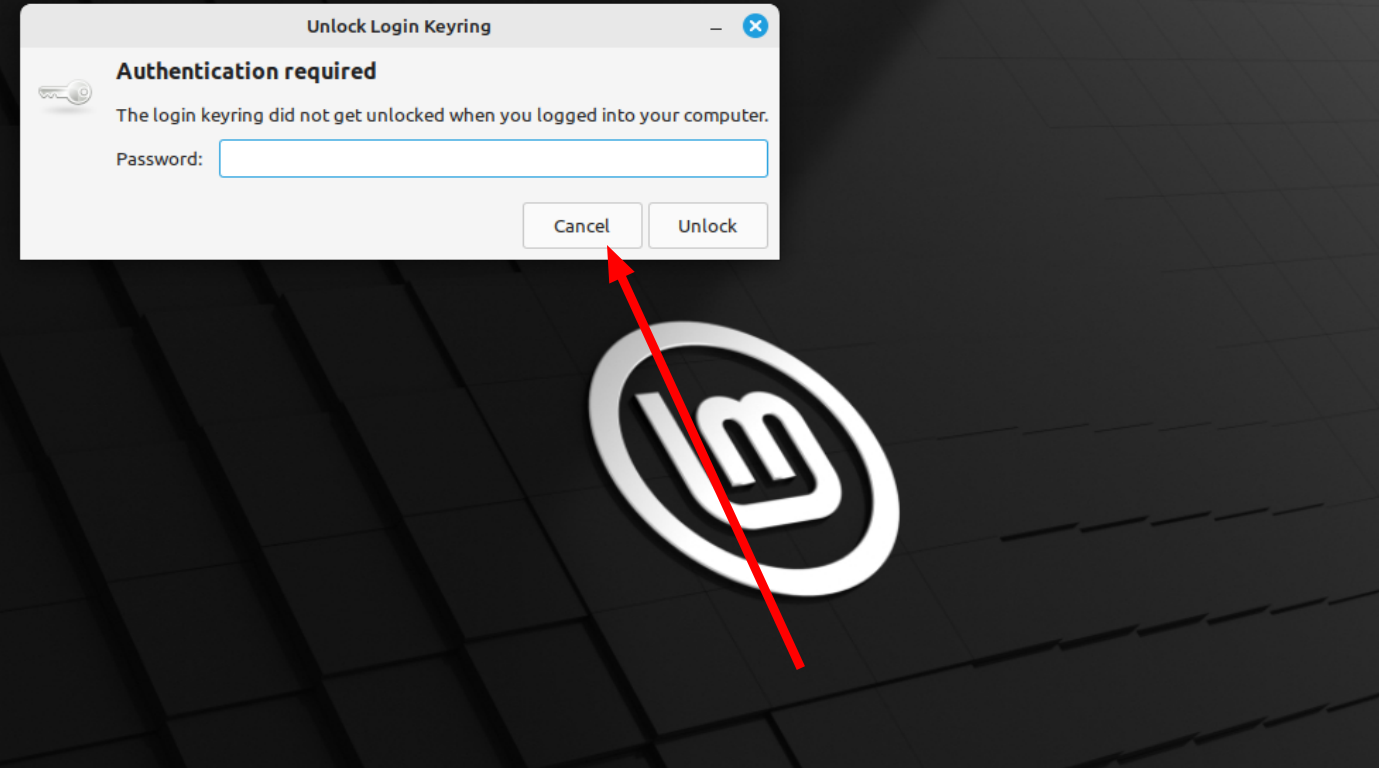
You should see an authentication window appear. Since we haven’t signed up for the service yet, we’ll do that now. Press the “Cancel” button.
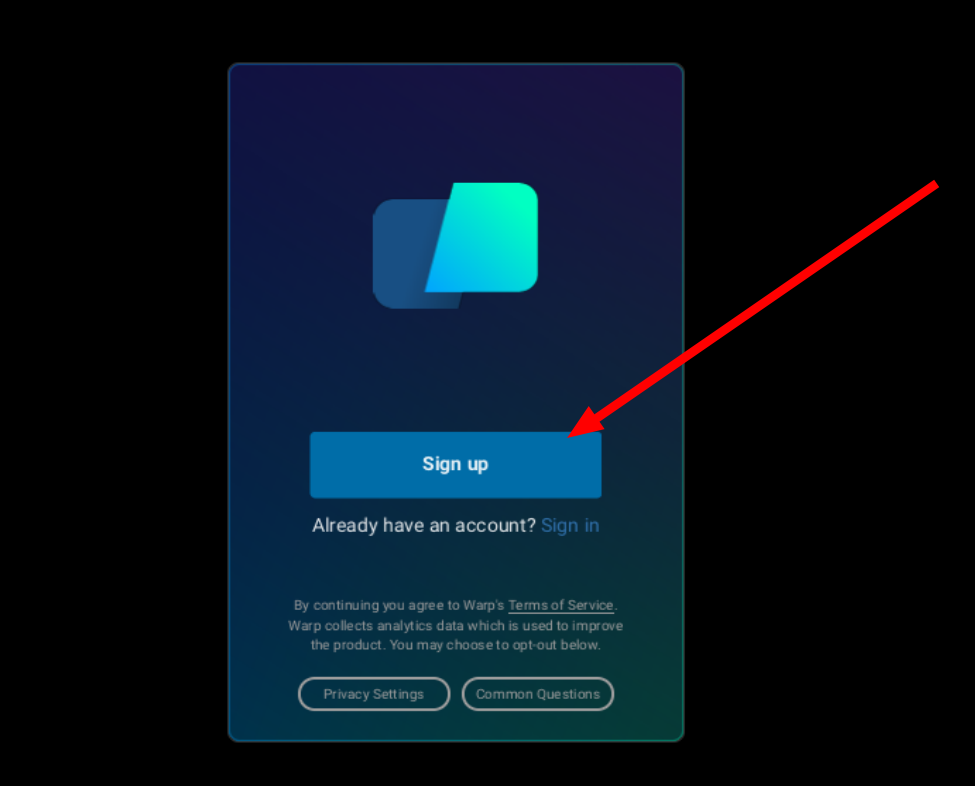
Now you should see a sign-up option. Click the “Sign Up” button.
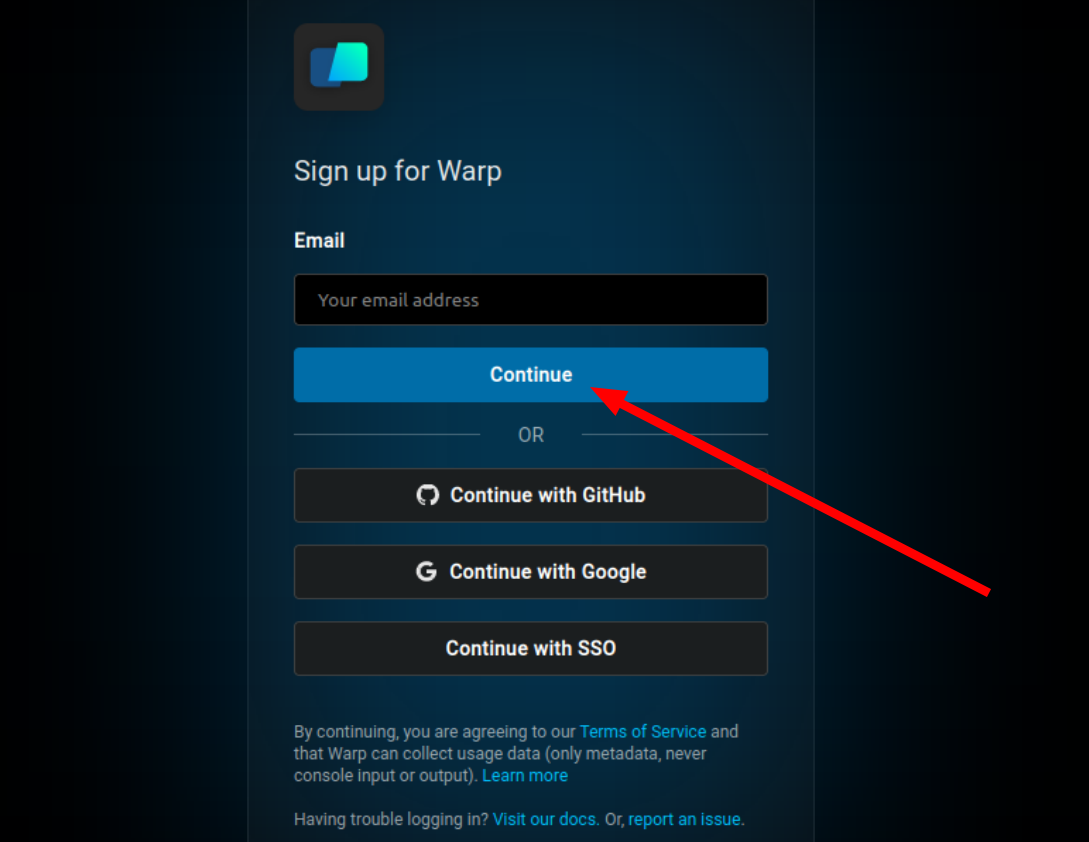
This will open the sign-up page on your browser. You have multiple sign-up options here. I’m going with the regular email version. Enter your email and hit “Continue.” You can also use a temporary email if you don’t want to use your real email .
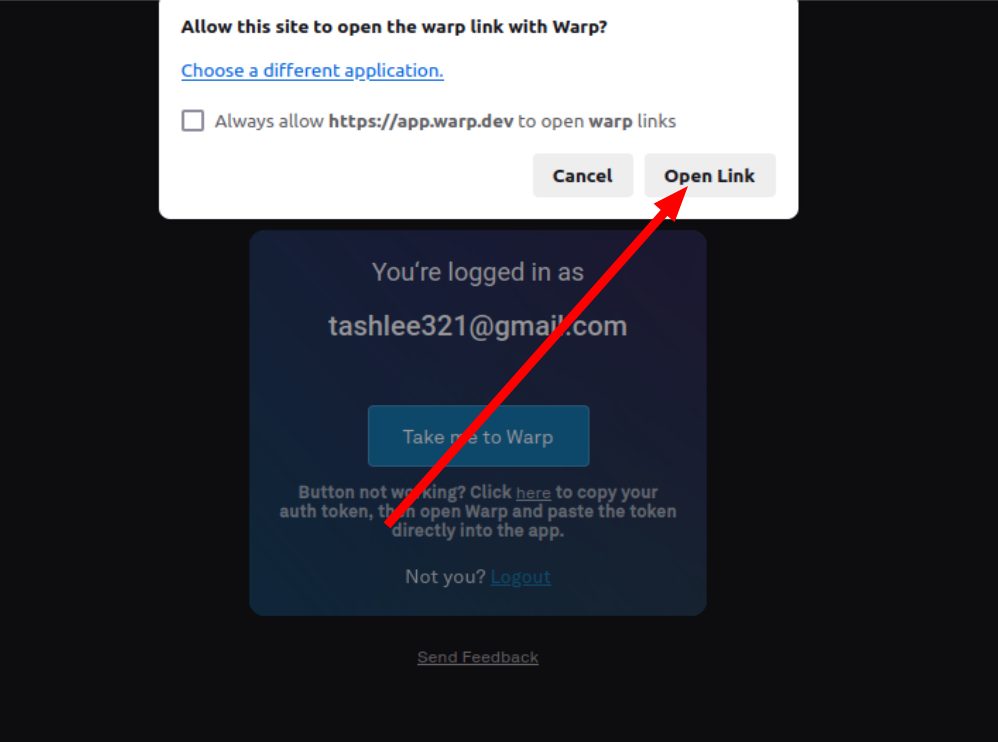
You’ll be sent an email. Open that email and click the link to sign in successfully. You should also get a prompt to open a link in the Warp terminal. Click the “Open Link” button.
You’ll be returned to the Warp terminal window with a thanks message. Now, Warp will ask a few questions about your terminal usage. You can feel free to skip them by pressing the “Remind me later” option. For your convenience, I’ll go through the survey and answer the questions.
Close
After that, you should see the Warp terminal interface.
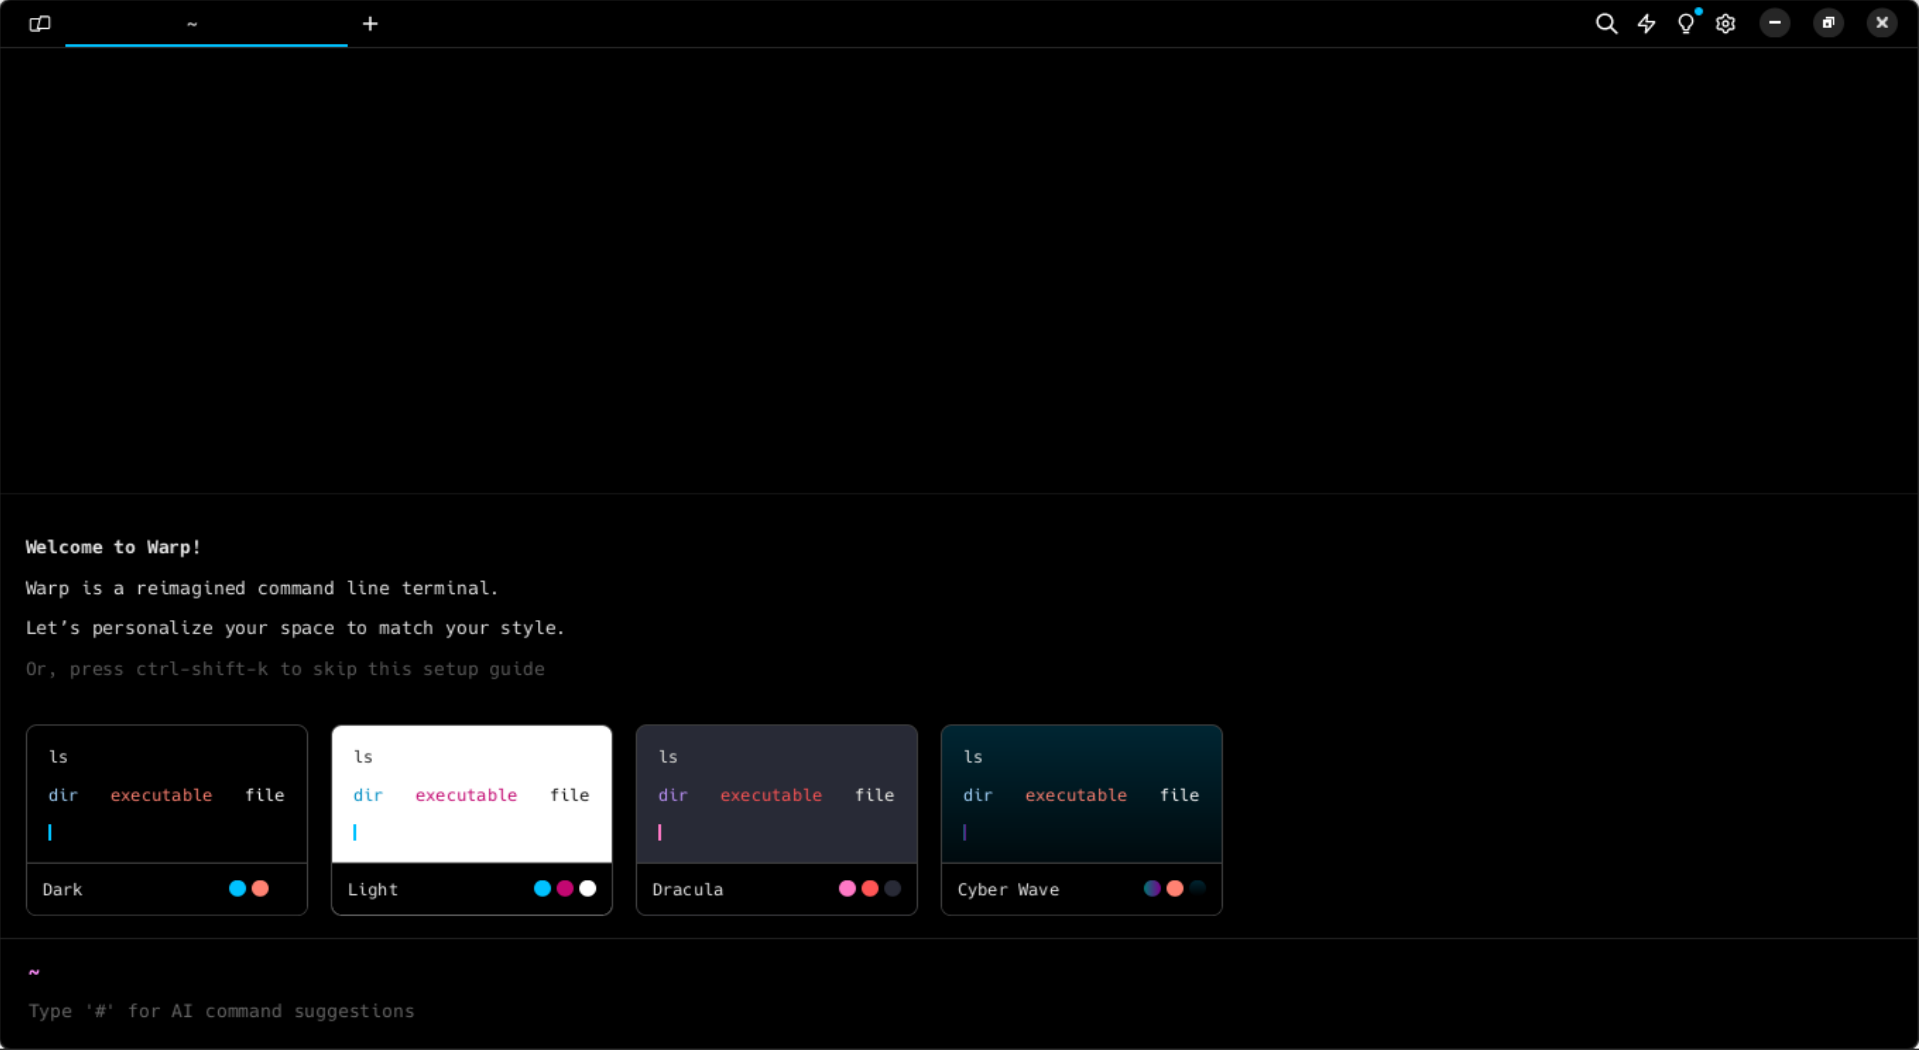
Looks cool to me. But how will it stand as a Linux terminal? Let’s find out.
It’s a Powerful Editor
Warp is not just a terminal emulator, dare I say. There’s much more to it. It falls somewhere between an IDE and an advanced text editor, with access to the shell. You can do everything you’d do on the default terminal using Warp. However, it offers many advanced features that make it a brilliant productivity tool.
Warp uses blocks, a unit combined of your input and the received output encapsulated together. Blocks allow you to easily copy the commands, re-input them, and bookmark them for later reference. You can also copy the output only. Then you can share the block fully or partially with others by creating a link or through embeds. If you have way too many blocks, you can filter them to find the relevant ones.
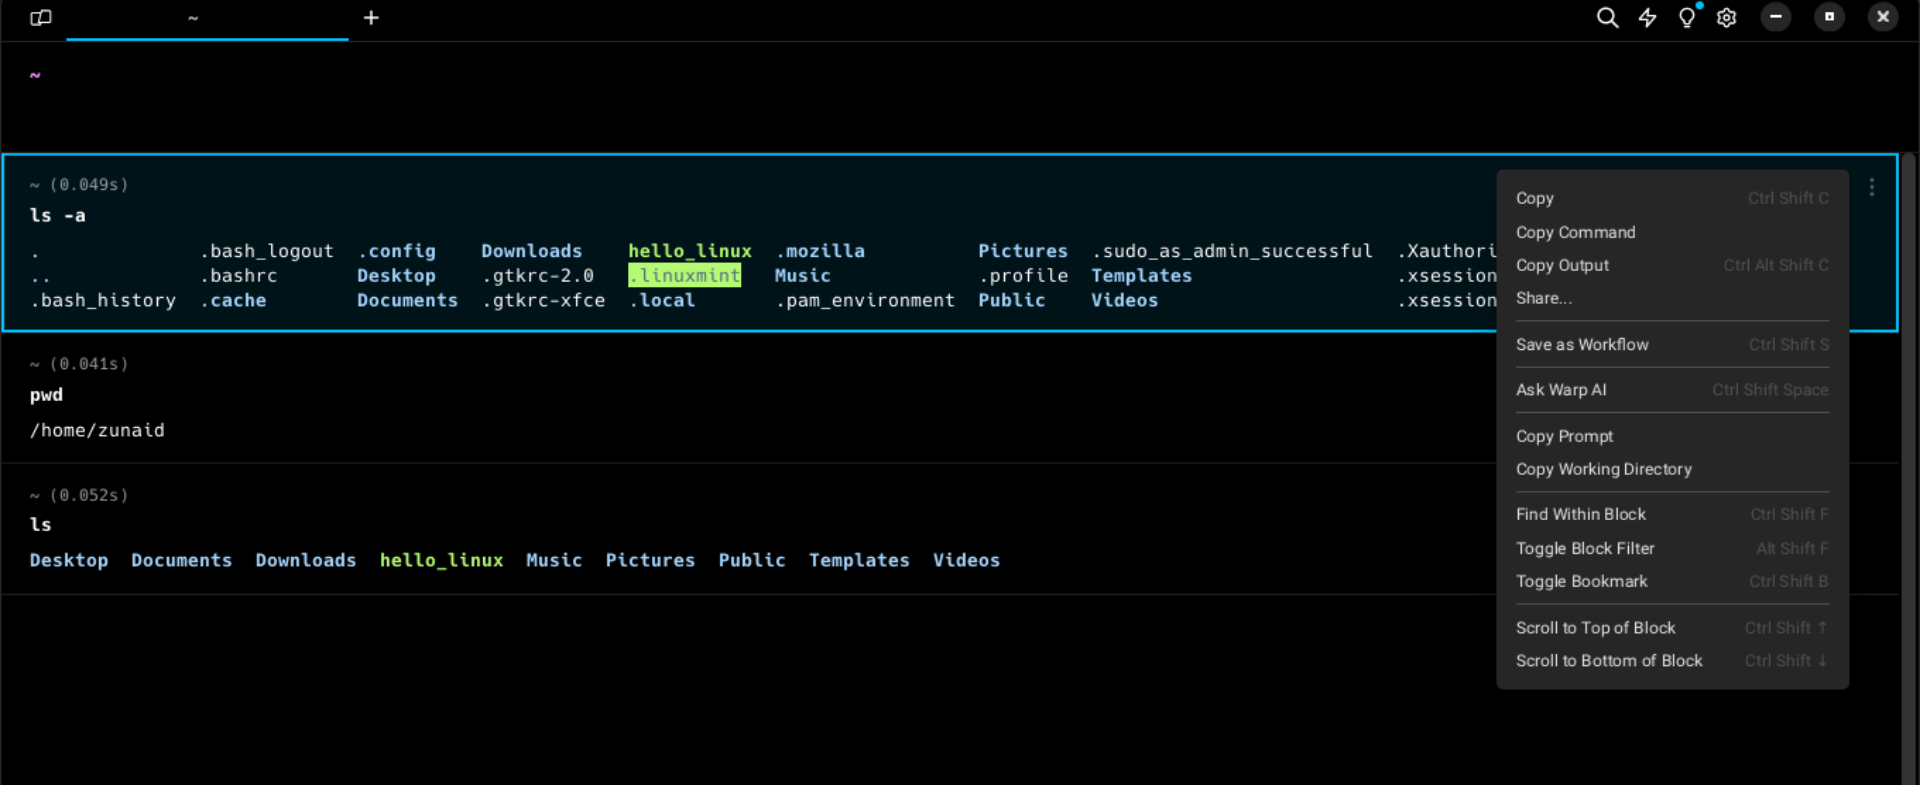
If you unintentionally make a mistake in a command and run it, the block becomes red for easy recognition while scrolling through the terminal feed. While typing a command, you can hover over each part of the command to inspect it in case you don’t understand that part. There is also syntax highlighting for commands, arguments, flags, variables, and sub-commands. Errors are also underlined in red, so you can notice them easily.
The typing experience felt like being at home. It’s more like you’re typing on a regular text editor rather than a terminal. You have all the common keyboard shortcuts for selecting, copy-pasting, and moving the cursor (a big one for me). If you want to use Vim keybindings, you can do that as well.
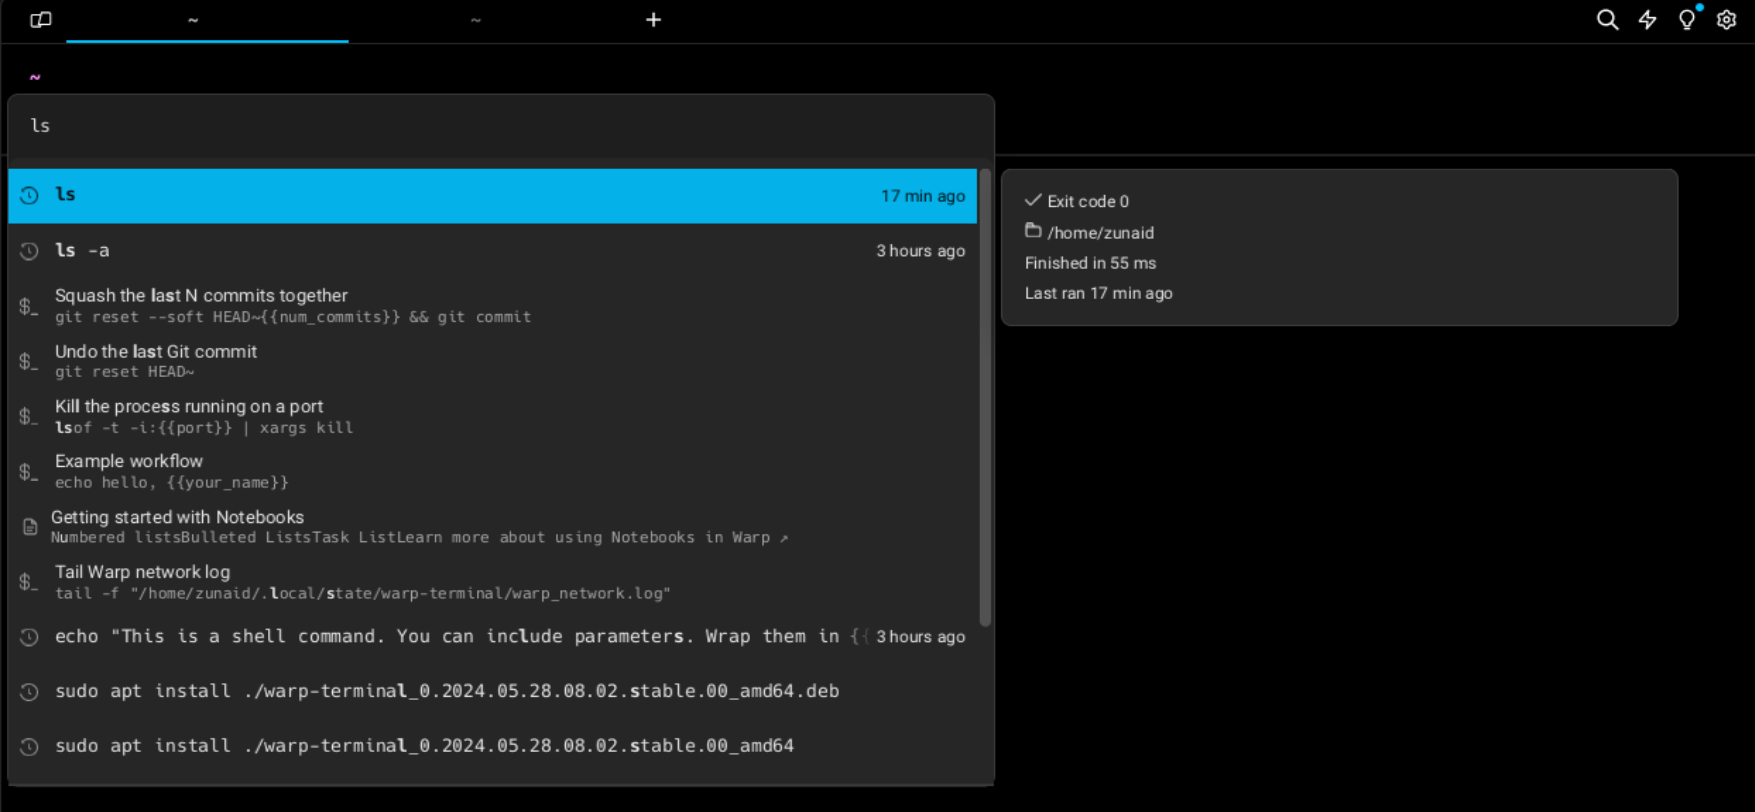
There are many command entry features in Warp that you’ll find in some of the best terminal tools out there. The command correction feature suggests commands when you make spelling or syntax errors. There are also auto-complete and auto-suggestions based on your past command history.
Speaking of command history, you can press the up arrow key to navigate through the command history. But there’s an even better option. Pressing Ctrl+R opens the command history panel. Then you can search for commands and workflows and filter the history.
Warp AI Can Save You Tons of Googling
Even as an experienced Linux user, I often rely on Google to solve problems and AI tools to enhance my Linux experience further. So having an AI assistant built into the terminal is extremely useful.
Warp AI runs ChatGPT under the hood. If I want to perform a specific activity, I can ask Warp AI directly for the command to do that. The output commands suggested are in the Warp workflow format and ready to be used.
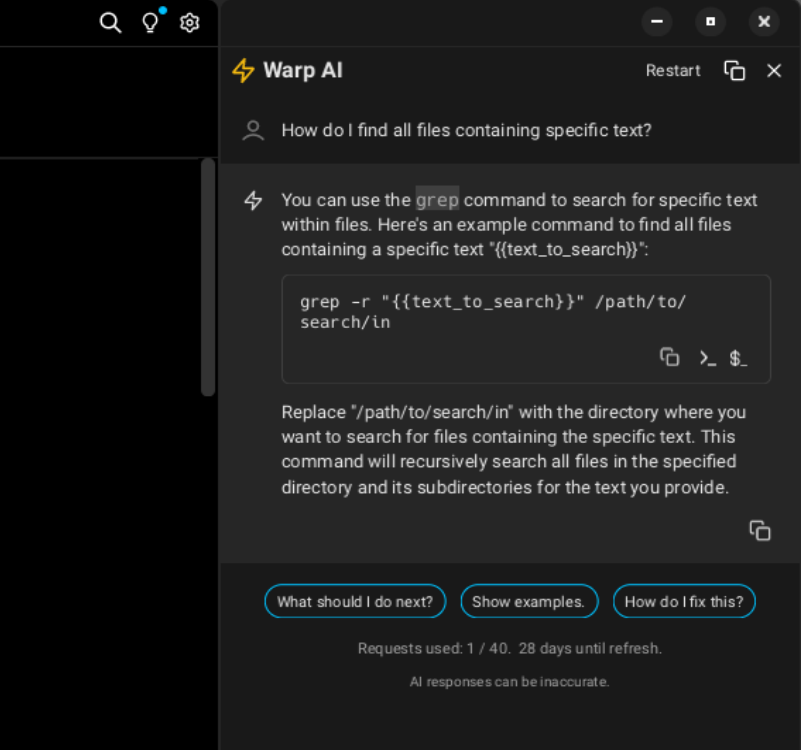
If I don’t understand a command, I can ask Warp AI to explain it. If there’s an output I don’t understand, I can ask for clarification.
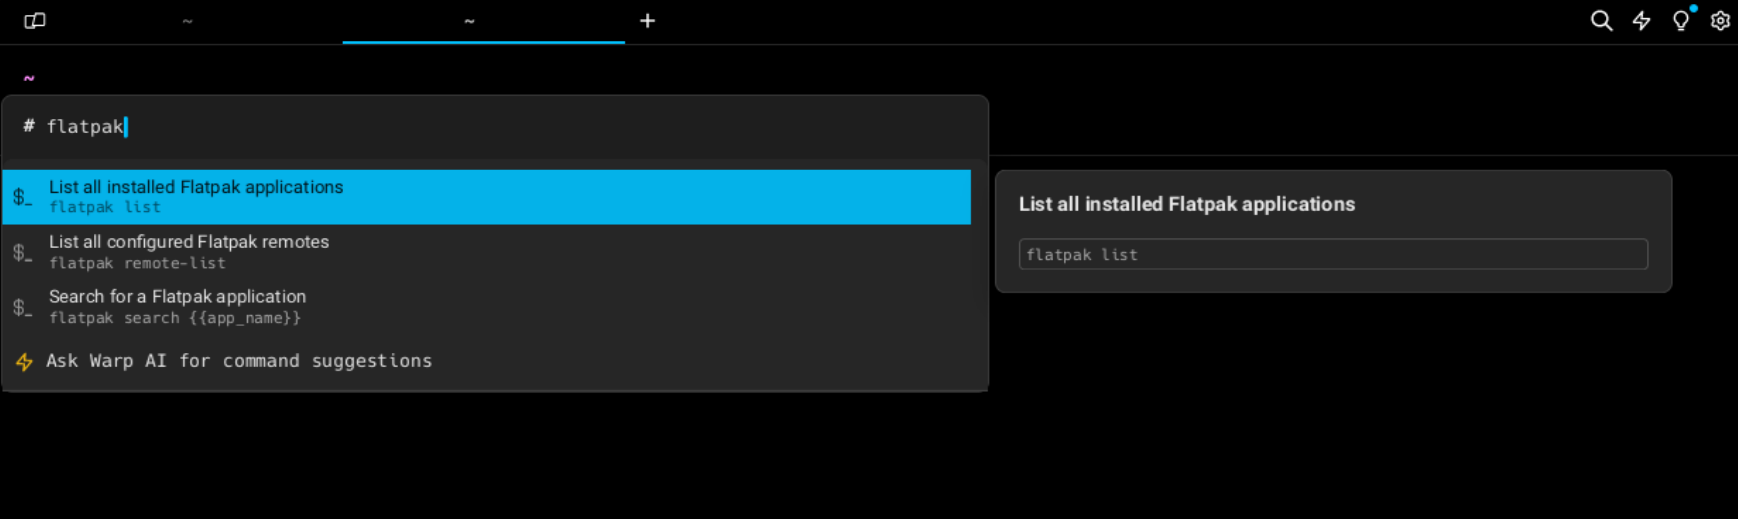
Debugging errors and writing Bash scripts are also useful. You could do any of these using any other AI tools on the web. However, that means you have to open a browser, go to that website, type in your problem, copy-paste the solution to your terminal, then go back to the AI tool for more questions, and so on. Having an integrated AI saves you from that. Other than that, you can also type “#” into the terminal prompt to get AI command suggestions.
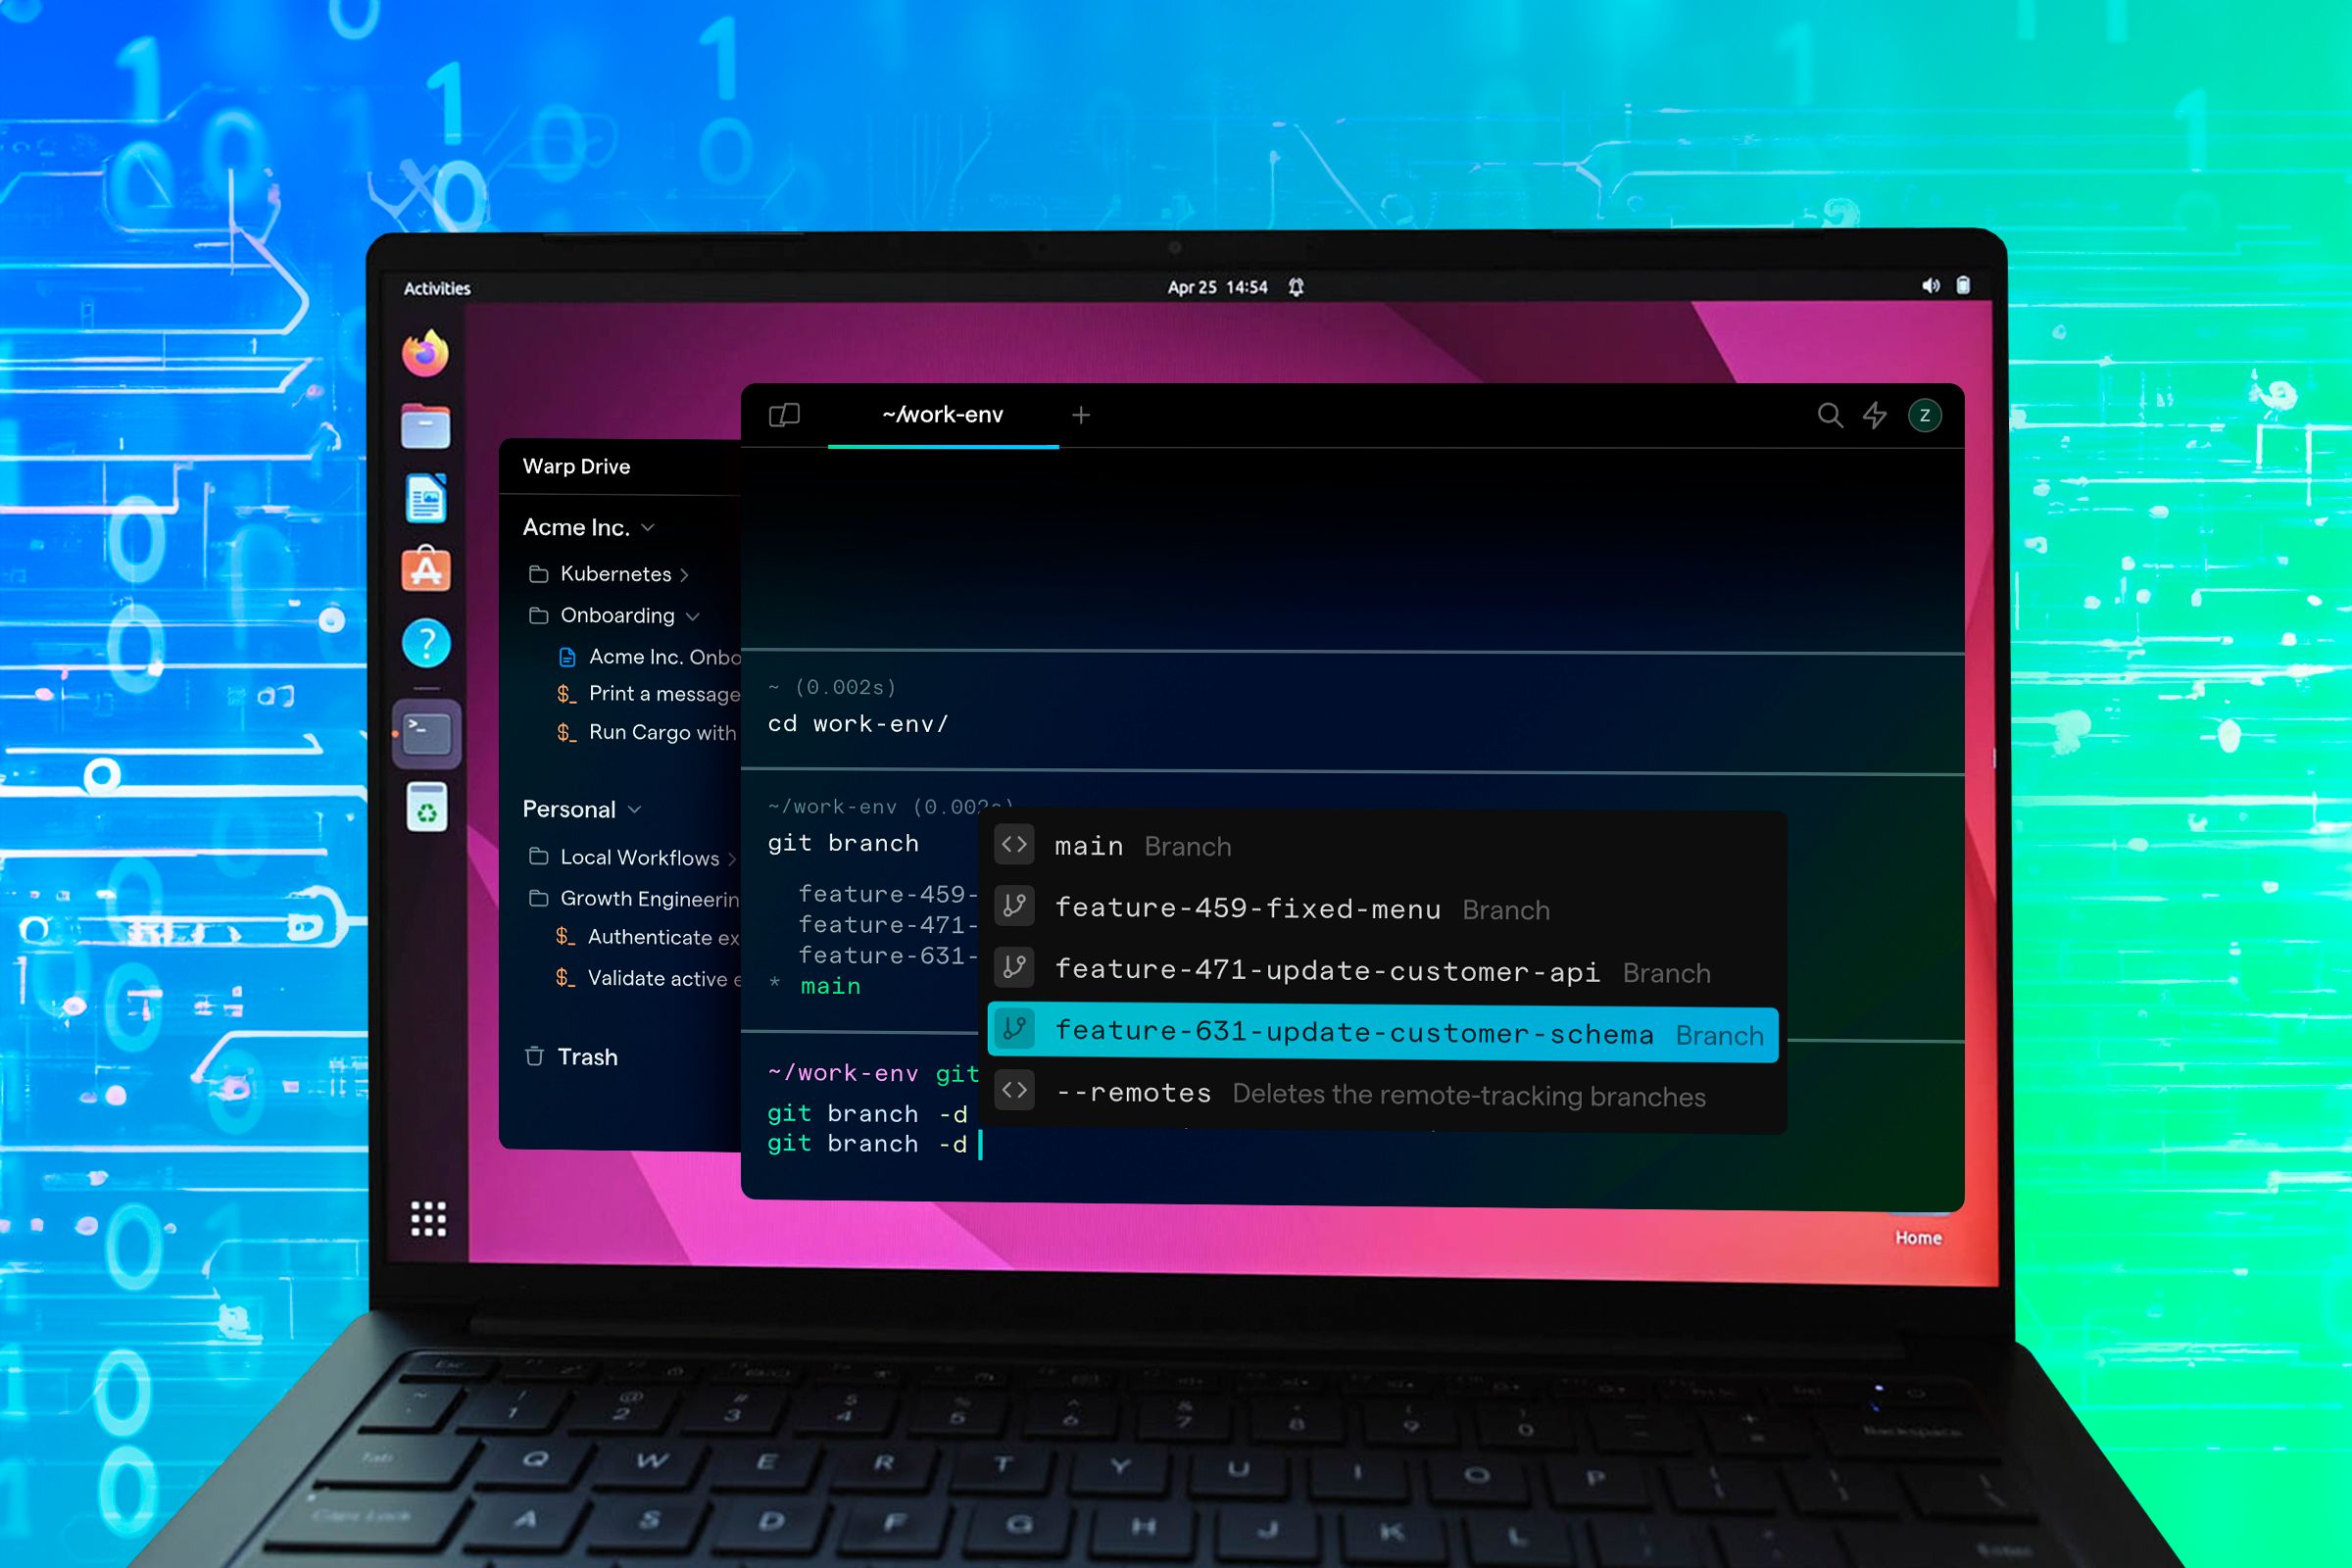
Warp Drive Is Your Personal Workflow Bank
Warp comes with Warp Drive, a vault for saving your most used commands, workflows, and notebooks. You can access it by clicking the icon in the top left corner of the terminal or hitting Ctrl+Shift+\.

You can save your frequently used commands with a description of what they do so that you don’t have to remember and type them every time. You can simply click on the workflow and the command will be copied to the prompt. Not only that, you can save parameterized commands. So if a command takes arguments, you can write that parameter inside double curly braces to indicate it’s an argument.
You can also save a description of what that argument is and a default value for that if you want. Here’s an example of a command for killing a process on a port:
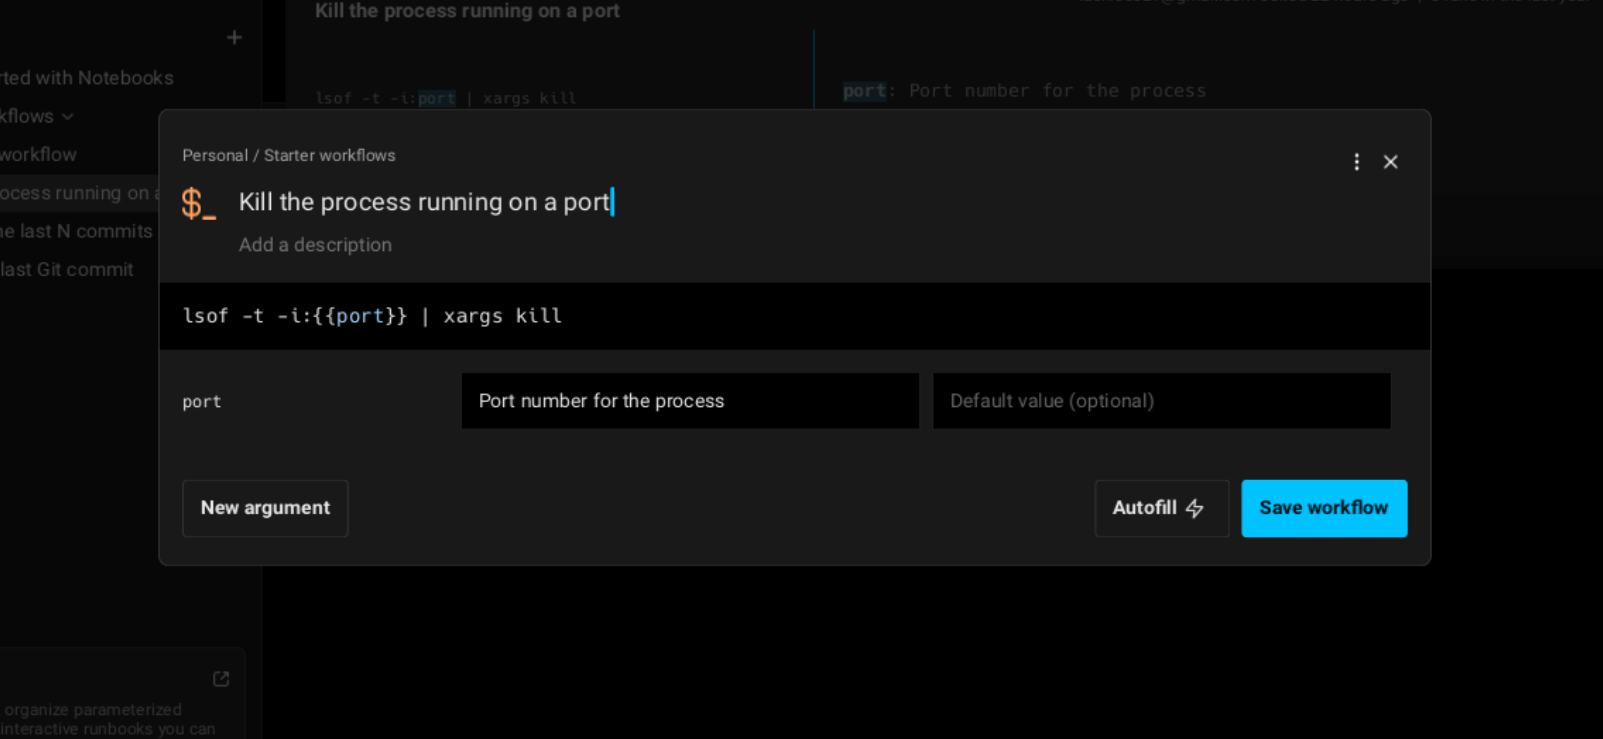
You can add as many arguments as needed. Another great thing I found is that you can search for your workflows by name. Again, no need to remember the syntax or even the command names.
Notebooks are interactive blocks of text created in the Markdown format. Notebooks can contain text, code blocks, lists, shell snippets, and more. Think of it as a mix of Notion and Jupyter Notebook. You can export your notebooks in Markdown format and also import existing ones into Warp from your system.
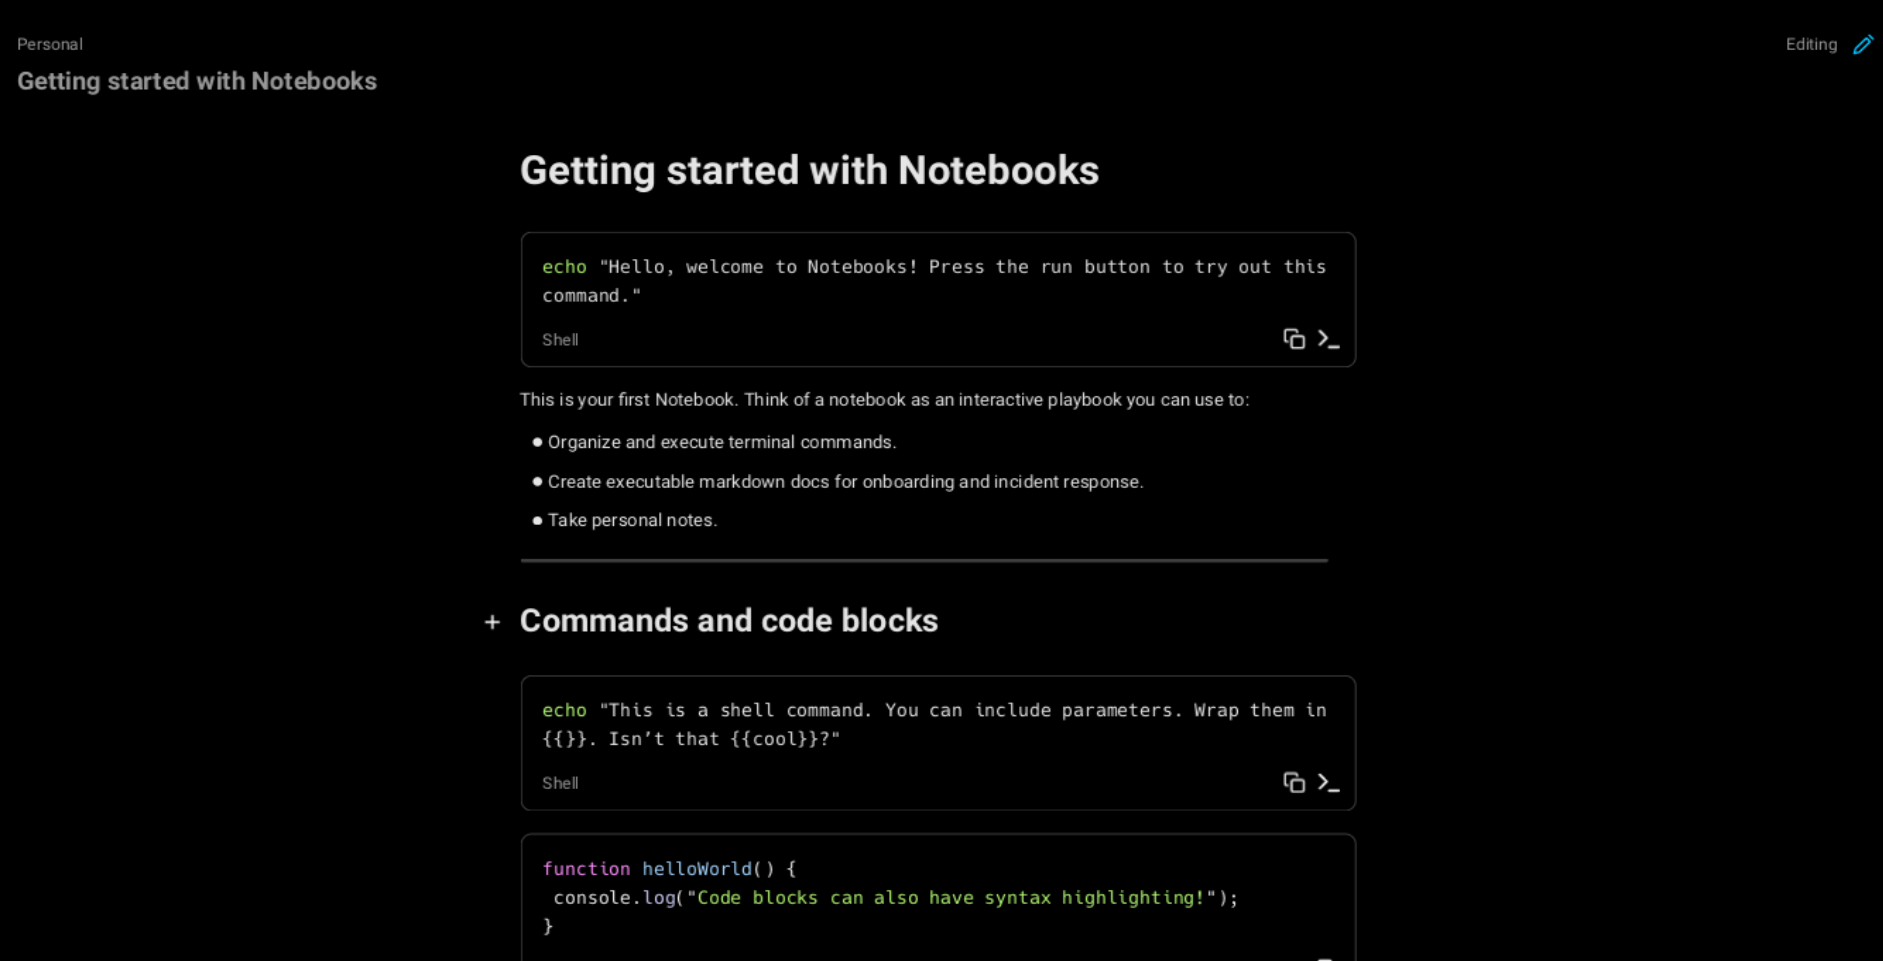
Being a Notion user myself, I really enjoyed this feature. Having a notebook feature built into the terminal where I can keep important documentation and notes means I don’t need to go back and forth between various resources.
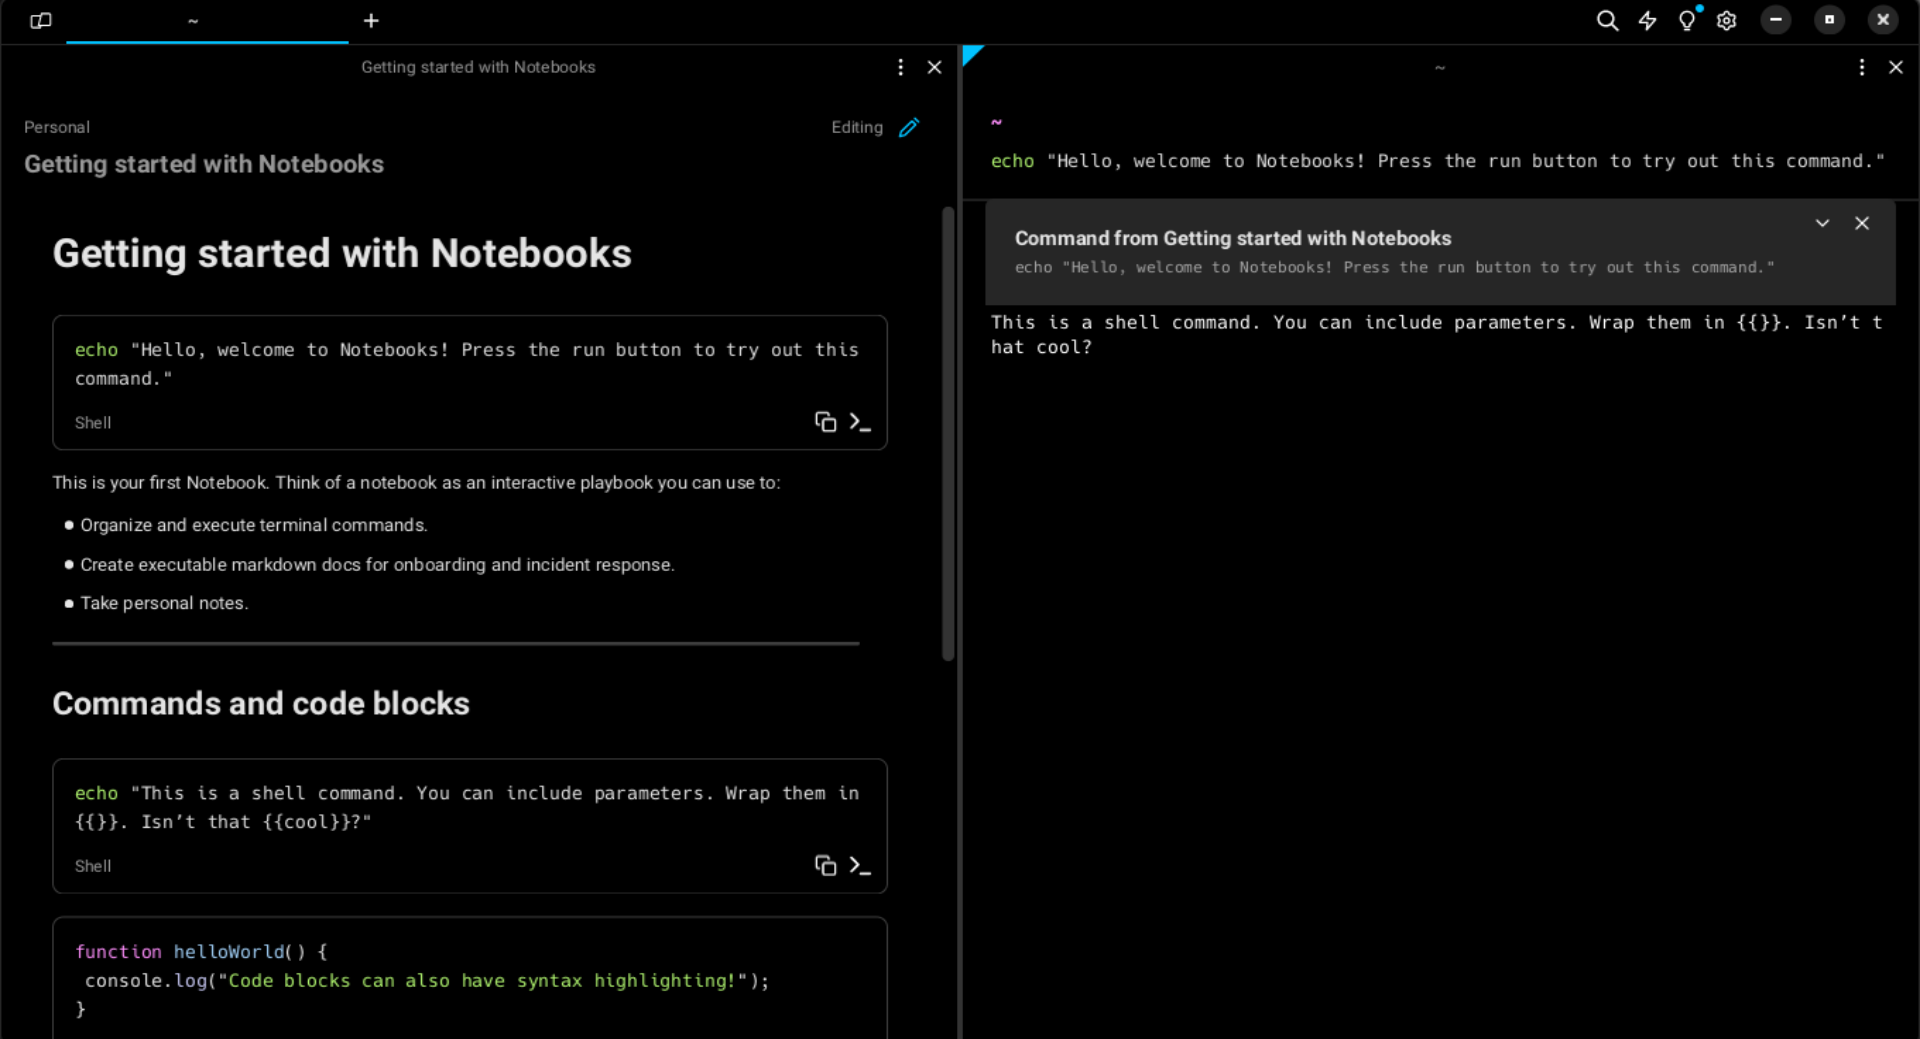
For code blocks and shell commands, you have a copy button that will copy that section with a button click. The code blocks support syntax highlighting and save the language it’s written in. For shell commands, you also have a “Run in terminal” button that automatically copies that command into the terminal prompt. Since you can divide the terminal into several window panes, you can keep your notebook on one side and the prompt screen on the other.
You Can Collaborate in the Terminal
Warp allows you to create teams and add members. To find this option, you need to go to the same menu as Warp Drive. You can give a name to your team.
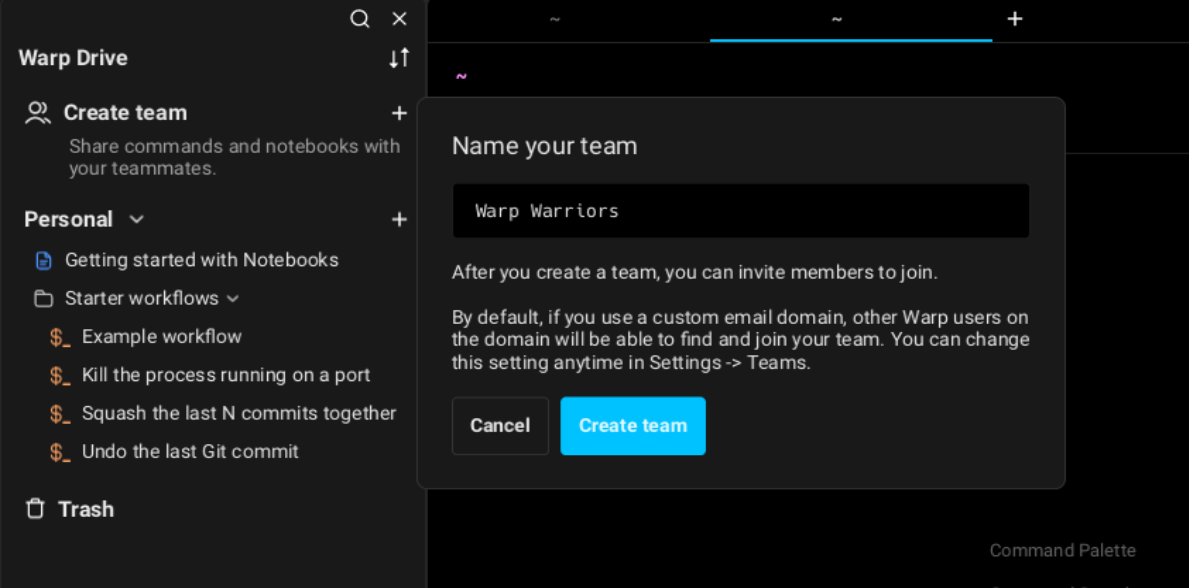
Once created, you can invite others via email or a custom link. Your team members can access workflows and notebooks you share with the team. On the free plan, you can have up to three members, and share up to three notebooks and 10 workflows. Moreover, you can share sessions, command-line controls, and terminal input-output blocks with members.
There Are Some Catches
A terminal emulator that requires signing up for an account might not stand well with many Linux users, especially when it’s closed-sourced. The bright side is, though, when you move to a different device altogether, you won’t lose any of your saved workflows because once you log in, you get access to everything.
The account requirement also helps with the collaboration features. Most services require an account nowadays, so that’s understandable. But the Warp developers could make it optional. Forced login is the biggest deal-breaker for the majority of people.
Without an internet connection, Warp Drive becomes limited. When you’re offline, files become read-only. You can create and edit files in your personal space, but they won’t be synced until Warp connects to the internet. Team features also can’t be used.
There’s also telemetry fitted into the tool. It collects your analytics and crash reports. You can turn these off from settings, but they’re turned on by default. Warp does claim they don’t collect your terminal input and output data. You can learn more from their privacy policy . Furthermore, they do plan on making their client-side code open-source in the future.
This might be nitpicking. By default, the prompt panel is stuck to the bottom of the terminal, which, in my opinion, is a bad position. When you’re accustomed to regular terminals, you need to look down a lot when typing the commands on Warp. Of course, you can change this easily from the settings and make it stick to the top.
Rocking Linux With a Powerful Terminal
So there you have it. My experience using Warp, an AI-powered terminal tool with block-type outputs, Notion-like notebooks, and collaboration features. While it can boost your productivity and make your terminal sessions much more efficient, the price of signing up for an account and being forced to log in might steer a lot of folks away from it. But if that’s not an issue for you, try Warp out and see it change how you use the command line.
- Title: Experiencing the Future with a Linux Terminal Powered by AI - My First Encounter
- Author: Nova
- Created at : 2024-08-26 14:39:14
- Updated at : 2024-08-29 12:52:19
- Link: https://blog-min.techidaily.com/experiencing-the-future-with-a-linux-terminal-powered-by-ai-my-first-encounter/
- License: This work is licensed under CC BY-NC-SA 4.0.