
How to find lost iPhone 7 Plus Backup files on Windows PC? | Stellar
How to find lost iPhone Backup files on Windows PC?
Summary: You have to restore iPhone data. But you cannot find backup files saved on your Windows PC or the backup files are unreadable. This post guides you to find iPhone backup on Windows PC and methods to restore it on your device.


You may get into a terrible iPhone data loss situation after a factory reset, stolen iPhone, jailbreak or physical damage to your device, etc. Backup is your only resort. But another shocker is waiting for you. You cannot find iPhone backup files once saved on your Windows PC.
Your backup files are not readable, and you have no clue how to access them.
In such a situation, keep calm and do not worry. If you have ever saved your iPhone backup on a Windows computer and are now unable to locate or access it, this post guides you to find an iPhone backup on a PC and how to restore it on your device.
Where are iPhone backups stored on Windows PC?
iPhone backups are safe copies of your complete device information. iTunes saves iPhone backup in the Users folder on a Windows computer. These backup files are not in a readable format. You can copy them but should never try to move files to a different drive, edit, rename or extract content. All such activities can ruin the backup files. However, you can make copies of your backup or delete backup that you do not require anymore.
Steps to find iPhone backup files on Windows PC:
- In the Search bar, enter %appdata% or %USERPROFILE% (if you downloaded iTunes from the Microsoft Store)
- Press Return
- Double-click these folders: Apple Computer > MobileSync > Backup
You can also locate iPhone backup in Windows 7, 8, 10 or 11 by following Users > (username) > AppData > Roaming > Apple Computer > MobileSync > Backup.
Cannot locate iPhone backup on Windows PC? Find and Restore data with iPhone data recovery software.
If you cannot find your iPhone backup data on your PC or cannot access the backup files, take refuge in third-party software – Stellar Data Recovery for iPhone.

How can Stellar Data Recovery for iPhone help you?
You can find, access, and restore lost iPhone backup files with Stellar Data Recovery for iPhone. It is a secure tool that efficiently scans the computer to find your iPhone backup. The recovered iPhone backup files are in readable form, and you can either save them on your PC or iPhone.
When you can use the Stellar iPhone data recovery solution
- You are unable to locate your iPhone backup files
- Your backup files are either lost or deleted.
- You cannot access iPhone backup files on Windows PC
- Not able to restore backup on your old/new iPhone
How can Stellar Data Recovery for iPhone recover lost backup files from PC?
The iPhone Data Recovery Tool by Stellar is a do-it-yourself software that quickly recovers complete iPhone data in a readable form from your Windows PC.
You can recover all your lost photos, videos, contacts, messages, Safari bookmarks, Call history, Reminders, Voice memos, Notes, WhatsApp, Kik, WeChat, Viber messages, etc.
It also offers a Deep Scan if your desired iPhone information is not recovered after the first scan. A deep scan does a comprehensive scan of the selected device or backup to recover every bit of lost or deleted backup information.
Benefits of Stellar iPhone Data Recovery
- Recovery of deleted or lost backup files
- Recovers data in a readable format
- Option to restore only that data from backup which you want to be in your iPhone
- Allows to save recovered backup on computer or iPhone
Step-by-step recovery of lost iPhone backup on Windows PC with Stellar Data Recovery for iPhone
Step 1: Connect your iPhone to your computer and launch the software.
Step 2: On the home screen, select Recover from iPhone. The scanning process begins.
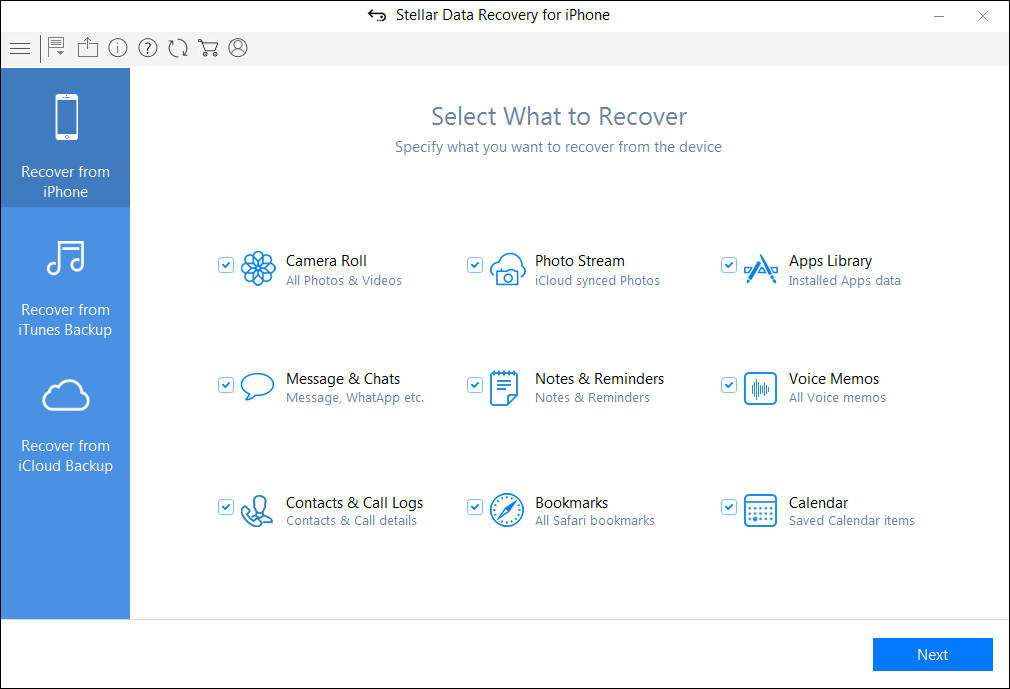
Step 3: After scanning, all the files on your iPhone are listed.

If you do not see the required files in the list, choose Deep Scan. It will scan for the backup stored on your computer system.
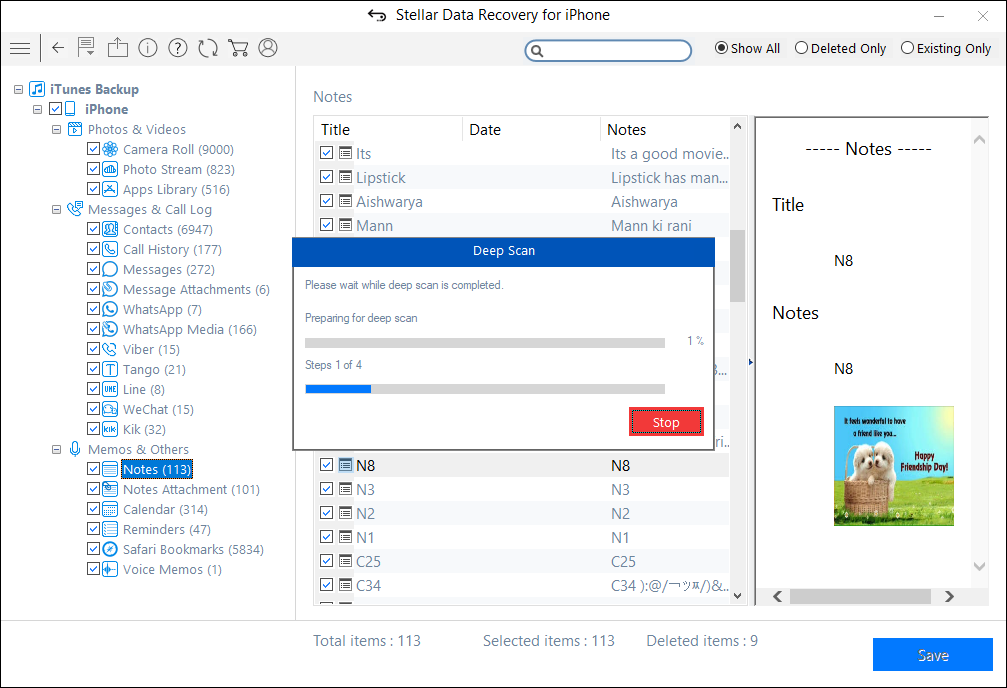
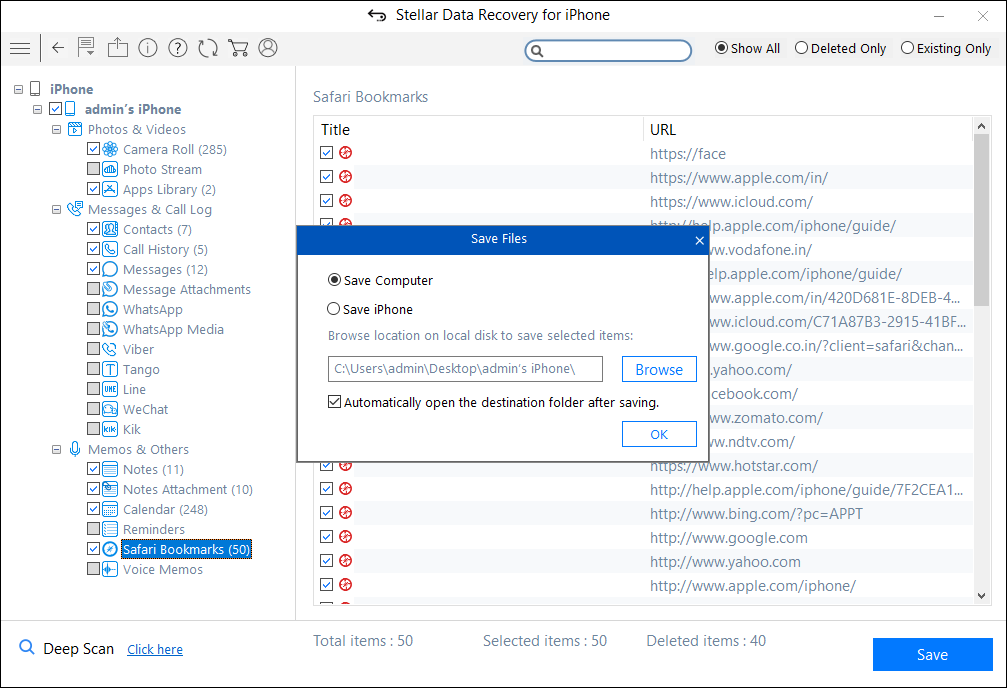
Step 4: Select and save the recovered iPhone data at your desired location. You can save it on your iPhone if you want to restore backup data on your device or save it on your computer.
Wrapping Up
Losing iPhone data after factory reset, jailbreak, being stuck in a boot loop or physical damage, etc., can get messier when you cannot find or retrieve information from iPhone backup files saved on your computer. Stellar Data Recovery for iPhone significantly relieves such data loss situations.
This iPhone utility not only finds the lost iPhone backup files on Windows PC, but it also makes them readable and allows you to save/restore them to your iPhone or computer. Moreover, it lets you selectively transfer iPhone data on your iPhone rather than complete a backup.
You can download the free trial version to evaluate its performance. It is undoubtedly not going to disappoint you.
Parental Control Software
## How to Recover Deleted Photos, Videos & Music Files from iPhoneSummary: Learn how to recover deleted photos, videos and music files from iPhone using the best recovery software —Stellar Data Recovery for iPhone.
There are zillions of tutorials one can find on how to take incredible photos with the A10 fusion chipped smartphone; however, few know how to recover deleted photos from iPhone. As a coin has two sides, through this post, we will explore the other untouched, unexplored side.
iPhone has been the epitome of perfection ever since it entered the smartphone realm. With stellar features and functionality, iPhone has become the highest selling property. There are some hidden iPhone camera features that users can utilize and take amazing photos and videos which leave a lasting impression.
Get Started Here!!!
Recovering deleted photos from iPhone is a straightforward process and do not involve much complexity, provided the right steps are implemented in the right manner.
Without much ado, you can recover deleted iPhone photos or videos with these simple steps. Let’s delve into it in detail.
Solution 1:
Apple has made it easy to recover deleted iPhone photos. Here’s what you need to follow:
- Go to the Albums and access your photos.
- Scroll down and select ‘Recently Deleted’ folder.
- In this folder, you will find all the photos that have been deleted.
- Simply tap the photo you want to recover and press “Recover.”
- To permanently delete a photo, press “Delete”.

Figure 1 represents how to recover photos from Recently Deleted folder
**Important: _In the ‘Recently Deleted’ folder, you’ll find photos, video & music files that have been deleted within the last 30 days only. To recover them before that period, either you have to restore from iTunes or iCloud backups or use iPhone photo recovery software _.
Solution 2:
iCloud Photo Library to Your Rescue:
You can recover iPhone photos or videos through iCloud Photo Library. iCloud Photo Library securely stores your photos and videos on iCloud. It automatically saves all your photos and videos in iCloud so that you can access the library from any device.
Follow these steps to turn on the iCloud Photo Library:
- Go to settings < [your name] < iCloud < Photos, then turn on iCloud Photo Library (iOS 10.3 or later).
- In iOS 10.2 or earlier, go to Settings < iCloud < Photos.
**Important: Ensure that you’re signed in to iCloud with the same Apple ID as on all of your devices. Things can be complicated as iCloud Photo Library is synced with your different Apple devices which means there could be multiple copies and if a photo, video or music file is deleted from a device, it will not be available on the other devices as well. Deletion sync across all the devices.
Solution 3:
iTunes Backup is there to recover all your photos.
- Click File menu, select Devices < Restore from Backup.
Or
- Open the iOS device’s Summary tab. There are two ways to access this:
- Click the device button in the upper right corner.
- In iTunes tab, click the View menu and select Show Sidebar. Select your iOS device in iTunes under Devices.
- Click the Restore Backup button.
Solution 4:
Use Stellar Data Recovery for iPhone:
iPhone Data Recovery Software by Stellar is an ideal tool to recover lost data from your Apple devices. Utilizing its advanced algorithm, you can scan and recover data (photos, videos, calendar, notes, messages, call history, etc.) from your device. Furthermore, you can recover data from iCloud and iTunes backup as well.
- Connect your iPhone to your system and launch “Stellar Data Recovery for iPhone” software.
- Select “Recover from iPhone” and the software will scan your device for the contents.
- Click on any file to see its preview.
- Finally, click “Save” to save the recovered file to the preferred location.
The Final Word
Apple reflects perfection in its design and innovation; therefore, it constantly thrives to provide its consumers with the best platform. One such feature is that iOS can back up your photos on cloud services automatically so that you have access to them at any given time.
Moreover, there are iTunes backup, iCloud backup options available along with iPhone Data Recovery Software as well; but, it is advisable to backup your iPhone photos or videos timely and manually to avoid unnecessary issues.
How to Reset iPhone Without Apple Password?
Summary: If you want to erase your iPhone data and reset the device to factory settings, you need to enter your Apple ID password. What if you forgot your registered Apple ID password? This blog explains a step-by-step method of how to reset an iPhone without a password. It also shares a professional erasure tool – Stellar Eraser for iPhone to factory reset your device without entering your Apple credentials.

If you have forgotten your Apple ID password and you wish to reset your iPhone, then it’s going to be a difficult task. However, there are various ways you can use to factory reset your iPhone without an Apple password.
In this blog post, we will explain how to reset your iPhone without password using iTunes or Finder or by using the iPhone Eraser tool .
How to Factory Reset iPhone without a password?
Let’s explore the methods to reset your iPhone without an Apple ID password.
How to Reset iPhone without a password via iTunes or Finder?
To reset your iPhone without using an Apple ID password, you can use iTunes or Finder app. You have to use your computer to access the recovery mode of your iPhone and reset the device to get it without using the password. This method will erase all your iPhone data, so ensure to take a backup of your device before proceeding.
Steps – How to Factory Reset iPhone without Password via iTunes or Finder
- Turn off your iPhone. This process will depend on the kind of iPhone you have.
| iPhone Model | How to Turn iPhone off? |
| All models of iPhone 15, 14, iPhone 13, iPhone 12, iPhone 11, iPhone X, iPhone 8, and iPhone SE (2nd generation). | Press and hold the Lock and Volume down buttons of the iPhone until the power slider appears, then swipe it. |
| All models of iPhone 7, iPhone 6, and iPhone SE (1st generation), | Press and hold the Lock button of the iPhone until the power slider appears and then swipe to turn it off. |
- Connect your iPhone to your computer via a USB cable and ensure iTunes or Finder is running on the system.
- If prompted, enter the device passcode or click Trust in the “Trust This Computer” dialog box.
- Then put your iPhone into recovery mode. To do this:
| iPhone Model | How to put iPhone into recovery mode? |
| All models of iPhone 15, 14, iPhone 13, iPhone 12, iPhone 11, iPhone X, iPhone 8, and iPhone SE (2nd and 3rd generation). | Press and hold the side button until the ‘Connect to computer’ screen appears on your iPhone |
| iPhone 7 and iPhone 7 Plus | Press and hold the Power and Volume Down buttons. Then release the Power button and continue pressing the Volume down button until iPhone has been detected appears. |
| All models iPhone 6, iPhone 5, iPhone 4, iPhone SE (1st generation) | Hold the Home button until a pop-up appears informing the iPhone has been detected in recovery mode. |
- Click on your iPhone when it appears in iTunes and then click Summary.
- Now, select the “Restore iPhone” option on the right pane.

- Click Restore to confirm and then follow the prompts to complete the restore process. This will erase all your iPhone data and install the latest iOS version.

- Once the restore process is complete, set up your iPhone as new or restore it from a backup.
Note– This method of reset will only work when Find My iPhone is disabled.
How to Factory Reset your iPhone without a Password via Stellar iPhone Eraser Tool?
Using the iPhone Eraser software like Stellar Eraser for iPhone is the best tool for resetting the iPhone without knowing the Apple ID login credentials. This tool can permanently erase All Content and Settings including photos, videos, audio, chats, call history, iMessage, texts, contacts, Safari browsing history, and other data on your iPhone.
Stellar Data Eraser Software is supported by all versions of iOS from the latest 16, 15, 14, 12, and below. It even erases content from all variants of iPhone, iPad, and iPod Touch. This tool erases the data permanently from your iOS devices making it unrecoverable by any data recovery software.
![]()
Steps – How to reset iPhone without password using Stellar Eraser for iPhone
- Download and install Stellar Eraser for iPhone on your Mac or Windows system.
- Launch the software and select Erase Data option from the home screen.

- On the Erase iPhone Data screen, click Next.

- Next, connect the iPhone that you want to reset to the computer when prompted. Click Erase.

- Click Yes in the Erase Process dialog box.

- Once the iPhone is completely wiped, click Yes in the Data Erase Complete dialog box.


Conclusion
If you forgot your Apple password and want to reset your iPhone, you can use any of the two methods mentioned above in the blog. You can reset your iPhone with iTunes/ Finder or by using a professional tool, such as Stellar Eraser for iPhone. However, make sure to backup up your iPhone data before proceeding to reset your device.
FAQ
1. How to remotely erase iPhone and iPad data?
If your iPhone is lost or stolen, then you can protect your iPhone data from misuse by remotely erasing its data. For more information, read this blog .
2. How to restore or set up your iPhone from iCloud backup after a factory reset?
If you want to restore your iPhone after a factory reset, you can use iCloud backup to set up your device. For more help, read this guide .
3. How to factory reset iPhone without a computer?
You can reset your iPhone without any computer by using the settings app of your device. To do so:
- Go to the Settings app > General > Reset > Erase all Content and Settings.
How to Put iPhone or iPad on Recovery mode? (Step by Step Tutorial)
Summary: DFU or Recovery mode is a way to recover your iPhone or iPad using a computer in case of technical issues. Read this post for a step-by-step process of how to enter and exit Recovery Mode and DFU mode on iPhone.
When you run out of solutions to troubleshoot your iPhone, Recovery Mode or DFU Mode comes as a rescue. Whether iPhone stops booting or fails to restore, you can use the functions in iPhone and fix the issue.
But the method to bring an iPhone in DFU or Recovery Mode varies in each iPhone model and iPad.
This post will guide you on how to enter and exit Recovery and DFU Modes in different iPhone and iPad variants. But first, understand what these iPhone functions are and their uses.

What is Recovery Mode and its use?
Recovery Mode uses iBoot to upgrade or restore your iPhone. iBoot is a bootloader program for iOS devices. Recovery Mode helps install the same or above iOS firmware version already on your iPhone. The iPhone screen in Recovery Mode prompts to connect iPhone to iTunes, showing a computer image.
Recovery Mode helps fix iPhone updates or restore issues, such as iPhone stuck at the Apple logo , unable to open the locked iPhone or want to reset iPhone but forgot iPhone passcode .
What is DFU Mode and its use?
Device Firmware Update or DFU mode lets your iPhone connect with iTunes on the computer without iBoot. As DFU mode doesn’t use iBoot, you can make changes in the operating system of the iOS device. An iPhone in DFU mode has a completely black screen.
Putting iPhone into DFU mode is the solution when Recovery Mode doesn’t resolve the problem. DFU mode can restore or upgrade iPhone. This mode is also commonly used to downgrade or jailbreak iPhone s.
Caution — you may lose all your iPhone data!
If you are entering DFU mode, make sure to back up your iPhone data . DFU mode permanently erases iPhone data . So always back up your videos, photos, messages, chats, Notes, etc., either to iCloud or iTunes.
However, if you have lost iPhone data and don’t have a backup, then immediately download iPhone data recovery software — Stellar Data Recovery for iPhone . The software helps to restore lost or deleted iPhone contacts, call logs, photos, videos, text, FaceTime, audio, chats, Calendar, Notes, Safari bookmarks, etc. It is quick to recover and extremely user-friendly.
What is required to perform Recovery and DFU modes in iPhone?
- Windows or Mac system.
- Lightning to USB cable.
- iTunes updated to the latest version on your computer.
How to put iPhone 6 and earlier versions in Recovery Mode
Follow the below steps to enter Recovery Mode on iPhone 6, iPhone 6s, iPhone 6s Plus, iPhone 5s, iPhone 5, iPhone 4s, and iPhone 4.
- Connect your iPhone to your PC using USB Lightning Cable and launch iTunes.
- Press and hold down the Home and Power button to turn the iPhone.

- Then connect the USB cable to iPhone and turn it on by holding the Home button.
- Continue to hold the Home button until a pop-up appears informing ‘an iPhone has been detected in recovery mode’ on your system.
- In Recovery mode, you can either restore the iPhone, set it up as new, or just recover your backups.

How to put iPhone 7 in Recovery Mode
It’s easy to enter Recovery Mode on iPhone 7 or iPhone 7 Plus. Follow the below steps:
- Turn off your iPhone 7 and connect it to your Mac or Windows computer.
- Ensure iTunes or Finder is running on the system.
- Press and hold the Power and Volume down button for 10 seconds.
- While continuing to hold the Volume down button, release the Power button.

- Release the button if you see the iTunes has detected an iPhone in recovery mode message on your system.
How to put iPhone 8 in Recovery Mode
If you want to enter the Recovery Mode on iPhone 8 and its variants, follow the below steps:
- Connect your iPhone 8 to your Mac or Windows system with a USB cable.
- Next, press and release the following buttons in a sequence Volume Up button, Volume Down, and Side button until your device reboots. Continue holding the Side button, even after seeing the Apple logo appear.
- Release the Side button once the Connect to iTunes logo appears on the iPhone’s display.

- Launch iTunes, and you should see a message stating, “There is a problem with the iPhone that requires it to be updated or restored.” You can choose to Update or Restore your iPhone’s software.
How to put iPhone 11 into Recovery Mode
To enter Recovery Mode on iPhone 11, iPhone 11 Pro, or iPhone 11 Pro Max, follow these steps:
- Connect your iPhone with your Mac or PC and launch iTunes.
- Force restart your iPhone with the following steps:
- Press and release the Volume Up button.
- Press and release the Volume Down button.
- Press and hold the Side button.
- Make sure to release these buttons if you see the recovery mode screen with the “Connect to iTunes” screen.
- Then choose your iPhone in iTunes, and you will see a pop-up saying that your iPhone is in Recovery Mode. Here, you can either update or restore your iPhone.
How to put iPhone 12 into Recovery Mode
Follow the below steps to enter Recovery Mode on iPhone 12, iPhone 12 mini, iPhone 12 Pro, and iPhone 12 Pro Max:
- Update iTunes to the latest version.
- Connect your iPhone to your PC or Mac via Lightning to a USB cable.
- Note: If you are connecting your iPhone to the computer for the first time, click on ‘Trust’ in the Trust This Computer dialog box and follow the prompts.
- Once your iPhone is paired with the computer, press the Volume up button followed by the Volume down button and release.
- Press and continue to hold the Side button until you see the ‘Connect to computer’ screen on your iPhone. While on your computer, you would see the iPhone Recovery Mode message in iTunes, confirming that your iPhone has entered into Recovery Mode. The computer asks you to either Update or Restore your iPhone**.** Click on any based on your requirement.
If you choose Update, iTunes will update your iPhone 12 to the latest iOS release. This won’t lead to any loss of data.
If you select Restore: It will erase iPhone data completely and renew your entire iPhone.
How to put Recovery Mode on iPhone 13
Entering Recovery Mode on iPhone 13 and iPhone 13 Pro has the same steps as iPhone 12. To enter the Recovery Mode, connect your iPhone to your computer and do the following steps in quick succession.
- Press the Volume up button and release.
- Press the Volume down button and release.
- Press and continue to hold the side button until the ‘Connect to iTunes’ screen appears on iPhone.

How to put Recovery Mode on iPhone 14
To use recovery mode on iPhone 14 and iPhone 14 Pro, follows these steps:
- Connect your iPhone to your system with a Lightning cable.
- Now on iPhone, press and quickly release the Volume up, Volume down, and side buttons until you see the recovery mode screen.
- Select your iPhone in the Finder/iTunes window and choose to update or restore your iPhone.

How to exit Recovery Mode on iPhone
It’s easy to exit Recovery Mode on iPhone. Follow the below steps:
- Hold the Home button and Lock button to exit DFU mode on iPhone 6 and earlier versions until your device reboots.
- To exit DFU mode on iPhone 7/7 Plus, hold the Side and Volume Down buttons until the device reboots.
- To exit the Recovery Mode on iPhone 8 or later version, press and hold the Side button until the “Connect to iTunes” screen disappears, and then iPhone should reboot back into iOS.
How to put Recovery Mode on iPad
To enter Recovery Mode on the iPad, follow these steps:
- Connect your iPad to Windows or Mac system using a USB cable.
- For iPad with a Home button: Press and hold the Home button and the Top/Side button until your iPad enters recovery mode.
- For iPad without a Home button: Quickly press and release the Volume Up button, Volume Down button, and the Top button. Keep holding the Top button until the iPad enters recovery mode.

How to put iPhone into DFU mode ?
Follow the below steps to enter DFU Mode on iPhone and its various version:
- Connect iPhone to PC or Mac via USB cable. Note: If the ‘Trust This Computer’ dialog box appears, follow the prompts.
- Once your iPhone is paired with a computer, follow these steps:
How to Enter DFU Mode on an iPhone 8 and later versions
- Press the Volume up button, then Volume down button, and release.
- Quickly press and hold the Side button for about 5 seconds.
- Along with the Side button, press and hold the Volume down button.
- Release the Side button and continue to hold the Volume down button for about 10 seconds.
- Once you see the ‘Recovery Mode’ screen in iTunes on your computer, you have successfully entered the DFU mode. However, the iPhone screen remains black in DFU Mode.
How to Enter DFU Mode on an iPhone 7
- Press and hold the Power and the Volume down buttons for 8–10 seconds.
- Release the Power button and continue to hold the Volume down button.
- Release the Volume down button once your iPhone has entered recovery mode.
How to Enter DFU Mode on an iPhone 6S or Earlier Versions
- Press and hold the Power/Sleep and Home buttons together for 10 seconds.
- Release the Power/Sleep button, but continue holding the Home button.
- Release the Home button once you see iTunes/Finder has detected an iPhone in recovery mode message.
Note: If you see the Apple logo on your iPhone, try again and repeat the above steps carefully.
How to exit DFU Mode on iPhone ?
If you want to exit DFU Mode on iPhone and its variants, follow the below steps:
How to Exit DFU Mode on an iPhone 8 or Later versions
- Press the Volume Up button and quickly release.
- Press the Volume Down button and quickly release.
- Now, press and hold the Side button until the Apple logo appears on iPhone. This indicates your iPhone has exited DFU Mode. Your iPhone would boot to the ‘Lock’ screen in a few seconds. Now, enter your passcode and continue to use your iPhone.
How to Exit DFU Mode on an iPhone 7
Press and hold the Power or Sleep button and the Volume down button until you see the Apple Logo.
How to Exit DFU Mode on iPhone 6 or Earlier versions
Hold the Home button and the Power button of the iPhone simultaneously until Apple’s logo appears on the screen.
Conclusion
Whenever your iPhone and its variants show problems like being stuck at the Apple logo, won’t upgrade, restore, or respond, you can use Recovery Mode and DFU Mode functions to resolve the problem. But don’t forget to back up your iPhone data before using these functions.
However, in any unfortunate incident of data loss while performing the functions, trust Stellar Data Recovery for iPhone – a software that brings back lost data on your iPhone securely.

FAQ
1. Does DFU Mode delete iPhone data?
If you use DFU mode to install something or restore your device, all your iPhone’s data will be erased.
2. Can you enter the recovery mode if your iPhone is disabled?
An iPhone is disabled when a user enters an incorrect password too many times on the lock screen. You should be able to enter the recovery mode using the same steps mentioned above and restore your iPhone to regain access.
3. How to put the iPhone in recovery mode without a computer?
A computer is not necessary to enter the recovery mode on an iPhone. You only need to press the right buttons, depending on your iPhone model, to enter the recovery mode. However, to restore your iPhone – you will need a computer.
- Title: How to find lost iPhone 7 Plus Backup files on Windows PC? | Stellar
- Author: Nova
- Created at : 2024-08-20 20:53:29
- Updated at : 2024-08-21 20:53:29
- Link: https://blog-min.techidaily.com/how-to-find-lost-iphone-7-plus-backup-files-on-windows-pc-stellar-by-stellar-data-recovery-ios-iphone-data-recovery/
- License: This work is licensed under CC BY-NC-SA 4.0.