
:max_bytes(150000):strip_icc():format(webp)/Flack-6b3c3167132c467db22bae39689c44ef.jpg)
How to Fix Excel 2003 Formulas Not Working Properly | Step-by-Step Guide | Stellar
How to Fix Excel Formulas Not Working Properly | Step-by-Step Guide
Summary: Excel formulas sometimes fail to function correctly and even return an error. This article explains what you might be doing wrong that prevents Excel formulas from working properly and solutions to resolve the issue. If your formulas have disappeared from the Excel spreadsheet and you are having trouble recovering them, you can use an Excel repair tool to recover the formulas.

When working with Excel formulas, situations may arise when the formula doesn’t calculate or update automatically. Or, you may receive errors by clicking on a formula.
Problems Causing the ‘Excel Formulas not Working Properly’ Issue and Solutions
Let’s check out the possible reasons that cause Excel formulas to work properly and solutions to resolve the issue.
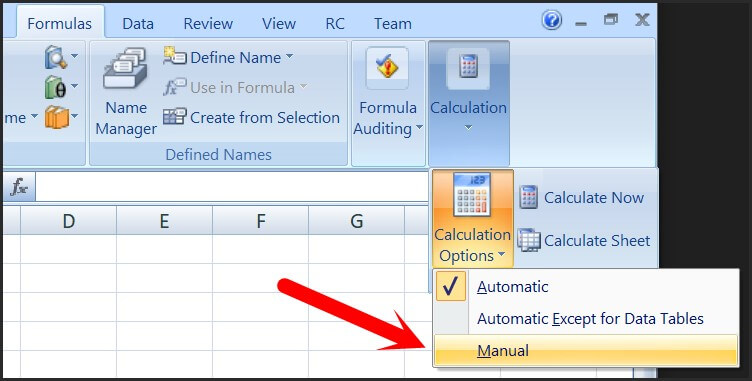
Problem 1 – Switching Automatic to Manual Calculation Mode
Automatic and manual are the two modes of calculation in Microsoft Excel.
By default, Excel is set to automatic calculation mode. Everything is recalculated automatically when any changes are made in a worksheet in this mode. You may switch from automatic to manual mode to disable the recalculation of formulas, particularly when working with a large Excel file with too many formulas.
Excel will not calculate automatically when set to manual calculation mode. And this may make you think that the Excel formula is not working properly.
Solution – Change Calculation Mode from Manual to Automatic
To do so, perform these steps:
- Click on the column with problematic formulas.
- Go to the Formulas tab, click the Calculation Options drop-down, and select Automatic.

Problem 2 – Missing or Mismatched Parentheses
It’s easy to miss or incorrectly place parentheses or include extra parentheses in a complex formula. If a parenthesis is missing or mismatched and you click Enter after entering a formula, Excel displays a message window suggesting to fix the issue (refer to the screenshot below).

Clicking ‘Yes’ might help fix the issue. But Excel might not fix the parentheses properly, as it tends to add the missing parentheses at the end of a formula which won’t always be the case.
Solution – Check for Visual Cues When Typing or Editing a Formula with Parentheses
When typing a formula or editing one, Excel provides visual cues to determine if there’s an issue with the parentheses inserted in a formula. Checking for these visual cues can help you fix missing/mismatched parentheses.
- Excel helps identify parenthesis pairs by highlighting them in different colors. For instance, the pair of parenthesis outside is black.
- Excel does not make the opening parentheses bold. So, if you’ve inserted the last closing parentheses in a formula, you can determine if your parentheses are mismatched.
- Excel helps identify parentheses pairs by highlighting and formatting them with the same color once you cross over them.
Problem 3 – Formatting Cells in an Excel Formula
When adding a number in an Excel formula, don’t add any decimal separator or special characters like $ or €. You may use a comma to separate a function’s argument in an Excel formula or use a currency sign like $ or € as part of cell references. Formatting the numbers may prevent the formula from functioning correctly.
Solution – Use Format Cells Option for Formatting
Use Format Cells instead of using a comma or currency signs for formatting a number in the formula. For instance, rather than entering a value of $10,000 in your formula, insert 10000, and click the ‘Ctrl+1’ keys together to open the Format Cells dialog box.

Problem 4 – Formatting Numbers as Text
Numbers are displayed as left-aligned in a sheet in a worksheet, and text formatted numbers are right-aligned in cells. Excel considers numbers formatted as text to be text strings. Thus, it leaves those numbers out of calculations. As a result, a formula won’t work as intended. For example, in the following screenshot, you can see that the SUM formula works correctly for normal numbers. But, when the SUM formula is applied to numbers formatted as text, the formula doesn’t return the correct value.

Sometimes, you may also see an apostrophe in the cells or green triangles in the top-left corner of all the cells when numbers in those cells are formatted as Text.
Solution – Do Not Format Numbers as Text
To fix the issue, do the following:
- Select the cells with numbers stored as text, right-click on them, and click Format Cells.
- From the Format Cells window, click on Number and then press OK.

Problem 5 – Double Quotes to Enclose Numbers
Avoid enclosing numbers in a formula in double-quotes, as the numbers are interpreted as a string value.
Meaning if you enter a formula like =IF(A1>B1, “1”), Excel will consider the output one as a string and not a number. So, you won’t be able to use 1’s in calculations.
Solution – Don’t Enclose Numbers in Double Quotes
Remove any double quotes around a number in your formula unless you want that number to be treated as text. For example, you can write the formula mentioned above as “1” =IF(A1>B1, 1).
Problem 6 – Extra Space at Beginning of the Formula
When entering a formula, you may end up adding an extra space before the equal (=) sign. You may also add an apostrophe (‘) in the formula at times. As a result, the calculation won’t be performed and may return an error. This usually happens when you use a formula copied from the web.
Solution – Remove Extra Space from the Formula
The fix to this issue is pretty simple. You need to look for extra space before the equal sign and remove it. Also, ensure there is an additional apostrophe added in the formula.
Other Things to Consider to Fix the ‘Excel Formulas not Working Properly’ Issue
- If your Excel formula is not showing the result as intended, see this blog .
- When you refer to other worksheets with spaces or any non-alphabetical character in their names, enclose the names in ‘single quotation marks’. For example, an external 5reference to cell A2 in a sheet named Data enclose the name in single quotes: ‘Data’!A1.
- You may see the formula instead of the result if you have accidentally clicked the ‘Show Formulas’ option. So, click on the problematic cell, click on the Formula tab, and then click Show Formulas.
- If you’re getting an error “Excel found a problem with one or more formula references in this worksheet”, find solutions to fix the error here .
Conclusion
This blog discussed some problems you might make causing an Excel formula to stop working properly. Read about these common problems and solutions to fix them. If a problem doesn’t apply in your case, move to the next one. If you cannot retrieve formulas in your Excel sheet, using an Excel file repair tool like Stellar Repair for Excel can help you restore all the formulas. It does so by repairing the Excel file (XLS/XLSX) and recovering all the components, including formulas.

How to Repair Excel Document on a Flash Drive
Summary: Microsoft Excel files are stored on flash drives if they need to be transferred between systems or if they need to be backed up. But sometimes unforeseen issues can corrupt the Excel sheets stored on flash drives. When that happens, it can be an arduous task to repair Excel documents on a flash drive. Through this post let us try to understand the reasons why Excel sheets stored on flash drives can get corrupted and how users can resolve them easily.
In this digital age, we all work with computers, files, and documents. Flash drives or USBs are common ways of storing data in an external place. Be it for a meeting or for a party playlist, these devices come handy when one wants to transfer data or access the files stored elsewhere.
You may need to access your data from another location. That’s when a USB flash drive might come in handy. And, that’s exactly why Excel sheets too end up on flash drives; either that or for backup purposes. However, there are many instances where an Excel file stored in a USB gets corrupted when one tries to access the file. The error message you get while trying to open the Excel file would be a great clue for figuring out the exact reason behind corruption.
This blog will provide insights into what are the reasons for the corruption of a USB and how the users can repair Excel on flash drive that has been corrupted.
Reasons for USB inaccessibility
Sometimes flash drives or USBs can become unresponsive due to numerous reasons. There are two types of corruption – logical and physical. Physical corruptions occur due to broken stems and connectors, broken circuits, NAND gate, not recognised, RAW, need to format, not accessible, and dead drives (no power supply).
One of the main reasons behind such an error could be that the USB drive has been infected by some virus. This can affect any file – not only the ones which are there in the USB drive but also the ones which are there in the PC/Laptop where you connect the USB drive. It is recommended that you scan the USB drive with reliable antivirus software to detect viruses.
There can be various other reasons that may make your USB corrupt or unresponsive. But there are very slim chances that you will be able to recover a flash drive that has physical damage. However, you can try to run the check disk on the USB drive to fix the drive. We will be discussing this as you read on.
Recovery Methods for Corrupted Flash Drives
There are 3 tried and tested recovery methods. Try them and see which one works out for you.
- Restoring Excel Files from Windows backup
To bring back your old Excel files, fixing up the corrupt file is your best option. Importantly note that this method would work only if your system’s Windows backup option has been enabled.
Step-by-step process for restoring your older Excel files:
- Connect your USB drive
- Go to “My Computer”->USB Drive->Check if the file exists
- Right click on the excel file and click on the restore previous versions

- You will now see a list of older versions which were created
- Select one the backups and click on “restore”
- Using Command Line to Recover Excel Files
In case you are looking to repair Excel on flash drive, you can also resolve it by using the command line. Just follow the below steps to see if you can recover the excel files.
- Connect your USB Flash drive
- Open “Run” (press Windows+R) and then open “cmd”

- Type “attrib -h -r -s /s /d (USB Drive Letter):\*.*” where the (USB Drive Letter) is the drive letter you can find using “My Computer”
- Once this has been completed, Windows will start repairing your files
- After the process gets over, try accessing the excel file to see if the data has been recovered
- Running a “Check Disk” on flash drives
Follow the below steps while the USB flash drive has been plugged into your computer:
- Open “Run” and then open “cmd”
- Type in “chkdsk /X /f (USB Drive Letter)” where the “(USB Drive Letter)” is the letter of the corrupted USB Drive. You can get this letter easily from the “My Computer”.

It will now check your disk to and correct any corrupted records.
What if none of these methods works?
In case none of the above methods works to repair Excel document on a flash drive, then you would need a professional Excel repair software such as Stellar Repair for Excel to restore your files. Such software not only help repair corrupted Excel files on flash drives but also help in recovering the data stored within them in their original format.
Stellar Repair for Excel resolves corruption problems in Excel files and recovers all formulas, charts, cell formatting, and more from them. It can repair multiple Excel files in one go. Equipped with a fully interactive GUI, working with this product is extremely easy.
To sum it up
Although flash drives are quite popularly used, they are not the most reliable of storage devices. These drives can fail anytime without warning. Thus, always back up your data on other more robust devices instead of flash drives. We hope that with the above tried and tested methods you will easily be able to repair Excel document on flash drive if need be. For any queries that you have, feel free to leave a comment below!
Excel Stuck at Opening File 0% - Resolve Performance Issues
Summary: If an Excel workbook is stuck at opening file 0%, it usually indicates a problem with the Excel file and its objects. This may happen due to Excel file corruption and a few other reasons. In this post, we have discussed these reasons along with the methods to fix and prevent ‘Excel stuck at opening file 0%’ issue.
When you open an Excel file (XLS/XLSX) in MS Excel, the program reads and then loads the file data along with all its objects and properties. While opening and loading an Excel file, MS Excel displays an “Opening percentage.” You won’t usually notice or see this Excel file opening progress percentage while accessing smaller worksheets.
It’s more noticeable when you open a large Excel file or workbook with multiple objects, formulae, formatting, etc. However, after opening an Excel file with double-click, if it is stuck at Splash Screen with a message “Opening: FileName.xlsx (0%)” for a while (say 15-30 minutes) and does not progress, it indicates a problem with the Excel file, MS Excel program, or the system.

Why Excel is Stuck at Opening File 0%?
If you have encountered this error, it may happen due to one of the following issues,
- Damaged or corrupt Excel file
- Incompatible or faulty Excel add-ins
- Problem with the system’s display driver
- Damaged MS Office (Excel) application
Methods to Fix ‘Excel Stuck at Opening File 0%’ Issue
Before fixing and troubleshooting the problem, check and confirm if the Excel file is working and not corrupt. For this, you can try opening it on another PC. Now there could be two scenarios,
Scenario 1: Excel File Does Not Open
If the Excel file doesn’t open on another PC also, it indicates Excel file corruption. In such cases, look for the backup copy of the file, if you have downloaded it from an email or a website.
However, if there’s no backup, then you need an Excel file repair software, such as Stellar Repair for Excel to repair the corrupt file. This software preserves Excel file properties, such as cell formatting, formula bar, freeze panes, gridlines, etc. and helps you restore the damaged or corrupt worksheets to its original state with 100% integrity.

To repair Excel file, download and launch Stellar Repair for Excel software on your PC, choose the corrupt Excel (XLS/XLSX) file and click ‘Repair’. You can see the preview of your Excel file with all data and then save the repaired file at your desired location on the system as a new Excel file.

Scenario 2: Excel File Is Accessible on Another PC
If the Excel file opens successfully on another PC, then follow the troubleshooting methods below to resolve the Excel file stuck opening at 0%.
Method 1: Open MS Excel in Safe Mode
To check if an incompatible or faulty add-in or setting is causing the error, restart MS Excel in safe mode and then open the worksheet from the MS Excel ‘File’ options. The steps are as follows,
- Press Windows+R and type excel.exe /safe
- Hit Enter or press ‘OK’ to open MS Excel in safe mode

- Go to File > Open and then choose the Excel file to open it
- If it opens, the problem is probably caused by the add-ins. Go to File > Options > Add-ins > Manage > COM Add-ins and disable all the third-party add-ins

- Restart MS Excel normally and then go to File > Open and open the same Excel file. If it opens, the problem is solved.
However, if you want to keep the add-ins, enable one add-in at a time and open the same file to find which add-in is causing the problem. When found, remove the faulty add-in.
If it doesn’t work, head to the next solution.
Method 2. Disable Hardware Graphics Acceleration
If you’re using hardware graphics acceleration adapter to run an external monitor, you may encounter problems with the Excel application. If the adapter is plugged in but doesn’t work correctly, Excel will usually hang on the loading screen. To resolve this problem, you will need to disable the hardware graphics acceleration adapter by following these steps,
- Quit all running instances of Excel from Task Manager

- Launch MS Excel directly, don’t double-click on the faulty workbook file to open MS Excel as it won’t open
- Click on File > Options > Advanced

- Under the ‘Display’ options, check the box ‘Disable hardware graphics acceleration’
- Click on ‘OK’
Try to open the Excel file now. If it still doesn’t work, move to the next solution.
Method 3. Repair MS Excel Application and Install the Latest Updates
Problems within MS Excel installation could also be a source of many unknown issues. Messed up registry settings, bugged updates, and even wrong user ‘Preferences’ can cause your Excel application to behave unusually. The fix for all such issues is to repair the Excel installation. To do so, follow these steps,
- Open Control Panel
- From Category view, under Programs, select Uninstall a program
- Click on the MS Office and then click ‘Change’

- When prompted, click on ‘Repair’ and then follow the instructions to complete the repair process

To update the MS Excel,
- Go to File > Account and click on Update options

- Then click ‘Update’

- MS Excel will start downloading the latest updates and then apply it, which might fix this Excel error

Still, Excel stuck on processing file at 0%? That means the Excel file you’re trying to open is severely corrupted. Thus, as mentioned earlier, use Stellar Repair for Excel software to repair corrupt or damaged Excel (XLS/XLSX) files and restore everything to a new Excel file. With the help of some best-in-class repair algorithms, this software enables you to fix problems within Excel files and recover tables, charts, cell comments, images, formulae, sorts, and filters. It is compatible with MS Excel 2019, 2016, 2013, 2010, 2007, and 2003.
Conclusion
Hopefully, one of the above-mentioned solutions has helped you overcome the “Excel stuck at Opening file 0%” error and Excel hangs on opening file issues. Also, you are able to access your MS Excel worksheet now. If you face any problems with your Excel workbooks in future, remember to get to the root of the issue first. Also, inculcate the habit of backing up your critical files regularly (if possible) and keep products like Stellar Repair for Excel in mind to save the day, when nothing else works.
How to fix Pivot Table Field Name is not Valid error in Excel?
The Pivot Table field name is not valid error can occur while creating, modifying, or refreshing data fields in the pivot table. It can also appear when using VBA code to modify the pivot table. It usually occurs when there is an issue with the field name in a code or if there is a hidden or empty column in the pivot table. However, there could be many other reasons behind this error.
Why the “Pivot Table Field Name is not Valid” Error Occurs?
You can get the “Pivot Table field name not valid” error in Excel due to several reasons. Some possible causes are:
- Excel file is corrupted
- Damaged fields in the pivot table
- Pivot table is corrupted/damaged
- Hidden columns in the pivot table
- Macro (referring to the pivot table) is corrupted
- Preserve formatting option is enabled
- Missing or incorrect fields in the VBA code
- Issue with workbook.RefreshAll method syntax (if using)
- Pivot Table contains empty columns
- Header values or header column is missing in the Pivot Table
- Pivot table is created without headers
- Columns/rows are deleted from the Pivot Table
Methods to Fix Pivot Table Field Name is not Valid Error in Excel
You can get this error if you have selected the complete data sheet and then trying to create the Pivot Table. Make sure you choose only the data fields that you want to insert in the Pivot Table. If this is not the case, then follow the troubleshooting methods mentioned below.
Method 1: Check the Header Value in the Pivot Table
The “Pivot table field name is not valid” error can occur if you have not set up the pivot table correctly. All the columns having data in them should have header and header values. A pivot table without a header value can create issues. You can check the header and its value from the Formula bar. Change the header if the header value is too lengthy or if it contains special characters.
Method 2: Check and Change the Data Range in the Pivot Table
The “Pivot Table field name is not valid” can occur while modifying a field in Pivot Table. It usually occurs if you’re trying to add or modify the field by selecting an incorrect data range in the Create PivotTable dialog box. The “Create PivotTable“ feature helps define how data would be displayed within the pivot table.
Let’s take a scenario to understand this. Open the Excel file with PivotTable. Click on the fields (you want to add), go to the Insert option, and click PivotTable.

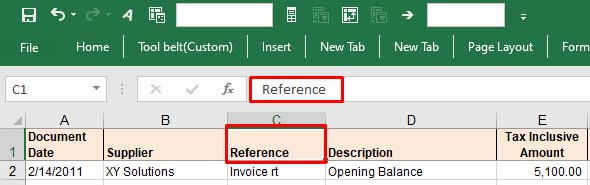
If you select an incorrect range, i.e. A1:E18, instead of correct range - “Expenses**!$A$3:Expenses!$A$4**,” you will immediately get the error message.
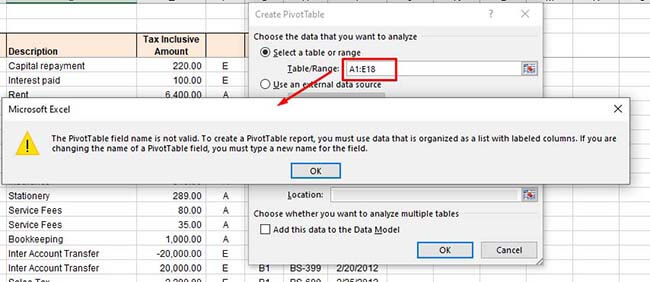
So, type the correct range under the Select a table or range option and click OK.
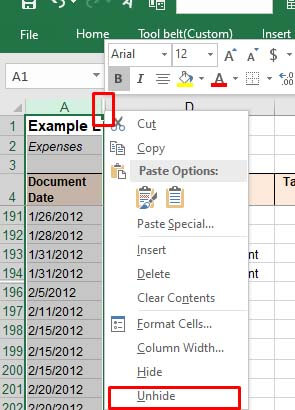
Method 3: Unhide Excel Columns/Rows
The error can also occur if some columns/rows of the Pivot Table’s data source are hidden. When you try to add a hidden column as a field in the PivotTable, the Excel application will fail to read the data of the hidden column. You can check and unhide the Excel columns by following these steps:
Open the Excel file.
Locate the hidden column number.
Move your cursor on the hidden column number and right-click on the space between the columns. Click Unhide.

Method 4: Check and Delete Empty Excel Columns
Sometimes, you can get the “Pivot Table field name is not valid” error if you are trying to use an empty column as a field in your Pivot Table. Check the columns with no values in all cells. If found, then delete the empty columns. This method is ideal for small-size Excel files. However, for large-sized files, it is a time-consuming process.
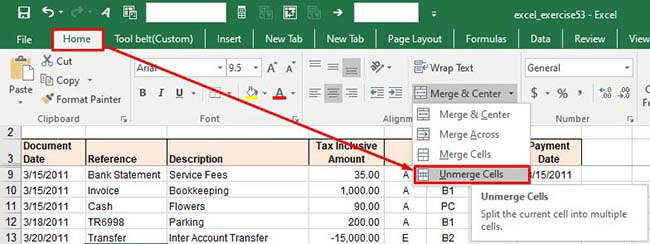
Method 5: Unmerge the Column Header (If Merged)
The “Pivot Table field name is not valid” error can also occur due to merged column headers. The pivot table references headers to identify the data inside the rows or columns. The merged headers can sometimes create data inconsistencies. You can try unmerging the column headers to fix the issue. Follow these steps:
In the Excel file, go to the Home
Click the Merge & Center option and select Unmerge Cells from the dropdown.
Method 6: Disable the Background Refresh Option
If the “background refresh” option in the Excel file is enabled, it may also create issues with Pivot Table. The Excel updates all the pivot tables in the background even after a small change if the background refresh option is enabled. This may create issues if the Excel file is large with too many tables. You can try turning off the “background refresh” option in the Excel file to troubleshoot the issue. Here is how to do so:
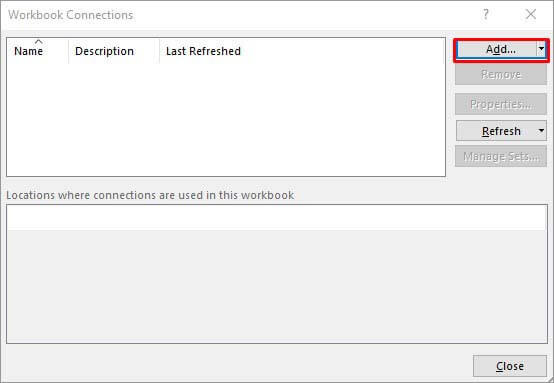
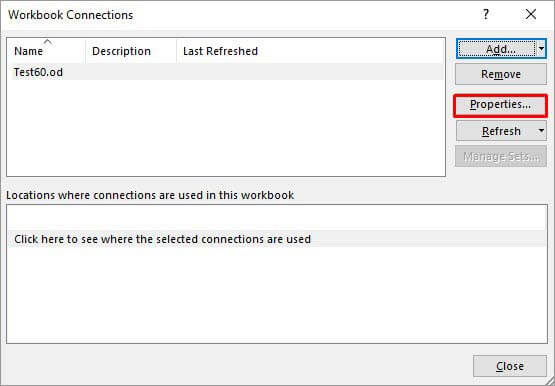
In the Excel file, go to the Data tab and then click Connections.
In the Workbook Connectionsdialog box, click on the ‘Add’ dropdown to add the workbook (in which you need to modify the refresh settings).
Once you have chosen the Excel file, click Properties.
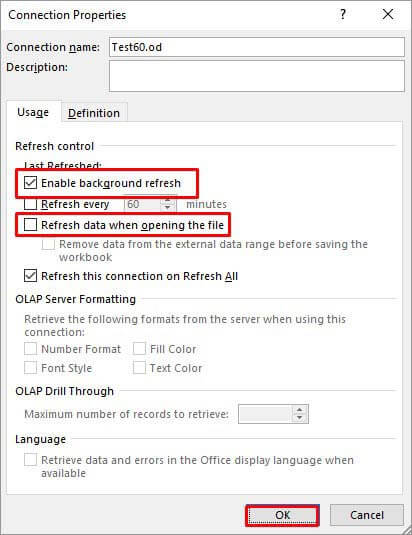
In the Connection Properties window, unselect the **”Enable background refresh”**option, select the “Refresh data when opening the file“, and click **OK.
**

Method 7: Check the VBA Code
The error can also occur when working with PivotTable using VBA code in Excel. Some Excel users reported this error on forums as run-time error 1004: The PivotTable field name is not valid. This error usually occurs when there are issues in the VBA code, affecting the PivotTable data source or field references. You can check field names referring to PivotTable or Workbook.RefreshAll function syntax and other errors in the code.
Method 8: Repair your Excel File
One of the reasons behind the “Pivot Table field name is not valid” error is corruption in the Excel file, containing the Pivot Table. You can repair your Excel file using Microsoft built-in utility - Open and Repair. Here’s how to use this utility:
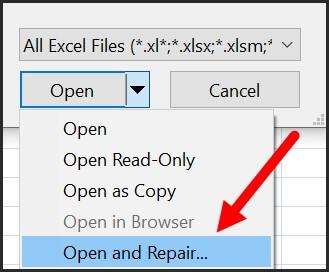
In Excel, navigate to File > Open.
Click Browse to choose the affected workbook.
The Open dialog box will appear. Click on the corrupted file.
Click the arrow next to the Openbutton and then select Open and Repair.
You will see a dialog box with three buttons - Repair, Extract Data, and Cancel.
Click on the Repair button to recover as much of the data as possible.
After repair, a message is displayed. Click Close.

Method 9: Use a Professional Excel Repair Tool
If the Excel file is heavily damaged or corrupted, then the “Open and Repair” utility may not work or provide the intended results. In such a case, you can opt for a professional Excel repair tool. Stellar Repair for Excel is an advanced Excel file repair tool, which is highly recommended by experts. It can repair severely corrupted Excel files and restore all the data from corrupt file, including pivot tables. This tool comes with a user-friendly interface that even a non-technical user can use. You can try the software’s demo version to check how it works. The software is fully compatible with all Excel versions, including Excel 2019.
Conclusion
The Excel error “Pivot Table field name is not valid” can occur due to hidden or merged column/row headers, empty columns/rows, corrupted pivot table, and various other reasons. You can try the methods mentioned above to fix the error. If this error has occurred due to corruption in the Excel file, then you can use Stellar Repair for Excel - an advanced tool to repair corrupted pivot table, macros, fields, or other elements in an Excel file. It is compatible with all Windows editions, including the latest Windows 11. It can help fix the error if the data source or Pivot table configuration is affected by corruption.
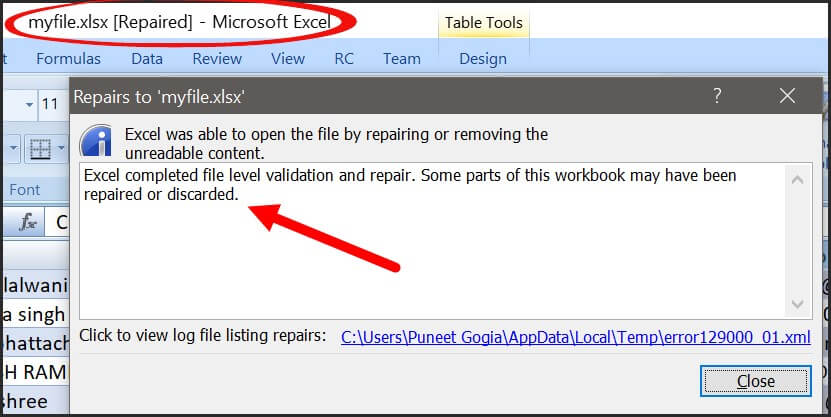
‘Open and Repair’ Doesn’t Work in MS Excel
Summary: In this Blog, we will go through Microsoft office most important product i.e Microsoft excel, let’s get into all possible Manual and an alternate method to deal with MS Excel open and Repair doesn’t work issue, read on to know more.
Whether you are a student or an entrepreneur, the features of Microsoft Excel do not delude anyone. Setting goals, creating budgets, analyzing data, calculating salaries, is there anything that Excel can’t do? All of us have used it and trusted it to calculate and provide a solution to our most difficult problems. However, like every other software application, this otherwise reliable application can sometimes fall prey to unexpected errors which can even threaten to make our critical data inaccessible.

A good idea to avoid loss of data when a Microsoft Excel file becomes corrupt is to take some proactive measures, such as saving a backup copy of your files and creating an automatic recovery file at periodic intervals. If you are faced with a corrupted Excel file, you know you can still use the ‘Open and Repair’ function provided by Microsoft to fix and open corrupt Excel file. However, what should a user do when ‘Open and Repair’ is not working? This is a query shared by millions of Excel users worldwide. Sometimes, the ‘Open and Repair’ functionality of Excel stops working due to unknown reasons. In such cases, if users face Excel file corruption, they get stuck with no idea how to fix the Excel file.
In this guide, we’re providing you with the solutions to this very problem. If Excel ‘Open and Repair’ is not working, read on to find out the procedures that you can perform to open corrupted files.
‘Open and Repair’ doesn’t work: Try an alternative solution i.e. Stellar Repair for Excel to recover everything from corrupt Excel files.
How to Fix Excel file that Won’t Open
If your workbook is opening in Excel, there are two options to recover its data. It would be best if you try to perform one, and if you are unsuccessful, move on to the next.
Revert the workbook to the version that was saved before the corruption
- Launch Excel and click File -> Open

- Select the file that is corrupted and open it
- Click ‘Yes’ to save the copy of the workbook that was saved before corruption
Important Note: If you use this method, you will lose all changes made to the file after it was corrupted.
Save the workbook in the SYLK file format
- Launch Excel and click File -> Save As.
- In the Save as Type field, select SYLK (Symbolic Link) from the drop-down menu, and click Save.

- To save only the active sheet in the workbook, click OK. The system will display a message that the sheet has features that are not compatible with the SYLK file format.
- Click Yes.
- In Excel click File -> Open.
- Select the file that you saved in SYLK file format and open it.
- In Excel click File -> Save As.
- In the Save as Type field, select Excel Workbook from the drop-down menu.
- In the File Name field, type a new name for your workbook and click Save.
The SYLK file format will filter out the corrupted elements from your workbook, thereby restoring your data.
Important Note: Using this method you only be able to salvage the active sheet in the workbook.
How to Open/Fix an Excel file that cannot be opened
In this case too, there are two options to recover the data. Try to perform one, and if you are unsuccessful, move on to the next.
Set the calculation option to Manual
- Launch Excel and click File -> New.

- From the Available Templates window, select Blank workbook.

- Click File -> Options.
- Under Formulas, in the Calculation options section, click Manual.

- Click OK.
- In Excel click File -> Open.
- Select the corrupted file and open it.
The system opens the corrupted file. Since the workbook won’t be calculated, it might open.
Link the workbook to external references
- Launch Excel and click File -> Open.
- Copy the name of the corrupted file and click Cancel.
- In Excel click File -> New.
- From the Available Templates window, select Blank workbook.
- In the new workbook, on cell A1, type the following:
=File Name!A1
In the above command, the filename is the name of the corrupted file.
- On the Update Values dialog box, select the corrupted file and click OK.
- On the Select Sheet dialog box, select the sheet and click OK.
- Select cell A1. Select the same range of rows and columns as occupied by the data in the corrupted sheet, including cell A1.
- Under the Home tab, in the Clipboard section, click Paste.
- While the range of rows and columns are still selected, click Copy.
- Click the Paste
- Under Paste Values, click Values.
Note: This method lets you recover only the data but not the values and formulas from the workbook.
Alternative Solution
In addition to the above-mentioned techniques, you can also use macros to extract data from a corrupted workbook. However, macros are generally risky, and executing them needs prior technical knowledge.
Thus, if the above methods do not yield the desired results, a quick and easy way for reconstructing Excel files is to use Excel Recovery Software . Stellar Repair for MS SQL software is the best choice for rebuilding damaged Excel files and restoring everything to a new Excel file. The product lets you recover table, chart, chart-sheet, cell comment, image, formula, sort and filter data from damaged workbooks and also allows you to fix multiple files at one go.
Wrapping it up
Though one of the above-mentioned techniques should recover Excel file if ‘_Open and Repair’ utility doesn’t work_, in case you’ve reached nowhere even after using them, contact Microsoft support for more help.
[Fixed]: Freeze Panes not Working in Excel
Summary: This blog discusses the “freeze panes not working” issue in Excel. It mentions the possible reasons behind the issue and offers workarounds and methods to fix it. If the issue is associated with corruption in the Excel file, you can use the specialized Excel repair tool mentioned in the blog to repair the affected file.
The freeze panes feature in Excel is used to freeze the row/column headings to keep them visible while scrolling the worksheet. It is a useful feature when you’re working on a large worksheet containing data that exceeds the rows and columns on the screen. Sometimes, you notice that the ‘Excel freeze panes feature is not working’. There could be numerous factors that can trigger this issue. Let’s know the reasons for the freeze pane not working issue in Excel and how to resolve this issue.
Why can’t I freeze panes in excel?
Several factors may contribute to the Excel freeze panes not working issue in Excel. A few of them are:
- The cell editing mode is enabled in the workbook in which you are trying to use the Freeze Panes feature.
- The Excel file is corrupted.
- The worksheet is protected.
- Advanced Options are disabled in Excel Settings.
- The Excel application is not up-to-date.
- You might be trying to lock rows in the middle of the worksheet.
- Your Excel workbook is not in normal file preview mode.
- Wrong/incorrect positioning of the frozen panes.
How to fix ‘Freeze Panes not Working’ in Excel?
The freeze panes option is available in the View bar. Sometimes, you’re unable to see the View option. It usually occurs if you are using the Excel Started version. Check and try to open the file in the advanced Excel version, which supports all the features. If you are using the advanced Excel version, then try the below workarounds to fix the freeze panes not working issue in Excel.
Workaround 1: Exit the Cell Editing Mode
If your Excel file is switched from normal file view mode to cell editing mode, you can encounter the freeze panes not working issue. In cell editing mode, certain features in Excel, such as the freeze panes, are temporarily disabled to prevent any conflicts. You can disable cell editing mode by pressing the ESC or Enter key. Now locate the View tab and check whether the freeze pane feature is working. If not, then try the next workaround.
Workaround 2: Change the Page Layout View
The Excel freeze panes not working issue can also occur if your workbook is opened in Page Layout view. The Page Layout view doesn’t support freeze panes. If you select page layout, the freeze panes option gets disabled.

To enable the freeze pane option, go to View and click the Page Break Preview tab.

Workaround 3: Check and Remove Options under the Data Tab
Sometimes, you can experience the “freeze panes not working” issue if Sorting, Data Filter, Group, and Subtotal options are enabled in Excel workbook. Such options, when enabled, can lead to unexpected problems with the freeze panes’ functionality. You can check and remove these features from your workbook. To do so, follow these steps:
- Open the Excel file in which you are getting the issue.
- Navigate to the Data tab.
- Check and remove the below features (if enabled):
- Sort
- Filter
- Group
- Subtotal

Workaround 4: Check and Unprotect Worksheet
The freeze panes feature may stop working if your worksheet is protected. You can try to disable the worksheet protection option. Here are the steps:
- In the Excel file, go to the Review tab.
- Click Unprotect Sheet.

After unprotecting the sheet, check whether the “freeze panes not working” issue is resolved. If not, follow the next workaround.
Workaround 5: Use Correct Cell Positioning
The freeze pane is not working issue in Excel can also occur when you use incorrect cell positioning to apply the freeze panes feature. Several users have reported facing this issue when trying to lock multiple rows with the wrong cell selection. So, use correct cell positioning to freeze the rows. For example, if you are trying to lock two rows in an Excel worksheet, then you need to click on 3rd row’s column.

What if the above Workarounds Fail to Fix the Freeze Panes not Working Issue?
If none of the above workarounds works, then there are chances that the workbook is damaged or corrupt. In such a case, you can try the below methods to repair the corrupt Excel workbook.
Run Open and Repair Utility
In case of corruption in the Excel file, you can use the Open and Repair tool in Excel to repair the file. To use this utility, follow these steps:
- In the Excel application, navigate to File and then click Open.
- Click Browse to select the workbook in which you are facing the issue.
- The Open dialog box is displayed. Click on the affected file.
- Click the arrow next to the Open option and then click Open and Repair.

- Click on the Repair option to recover as much data as possible.
- You can see a completion message once the repair process is complete. Click Close.
Use a Professional Excel Repair Tool
If the Open and Repair tool doesn’t work to resolve complex file-related issues and your Excel file is severely corrupted, you can opt for a reliable third-party Excel repair tool, such as Stellar Repair for Excel. This tool can help you repair the Excel file and recover all the data with complete integrity. You can try the software’s demo version to scan the affected file and preview the recoverable data. The software is compatible with all MS Excel versions and Windows operating systems, including Windows 11.
Closure
The “freeze panes not working” issue in Excel can occur due to several reasons, like protected worksheet, incompatible Excel version, and incorrect cell position. Try the workarounds shared in the blog to fix the issue. If the Excel file is corrupt, you can use Stellar Repair for Excel to fix the corruption issues in the file. This tool can quickly repair the Excel file and recover all the data from the file with 100% integrity.
How to Fix a Corrupted .xls File? The Everything Guide
Undoubtedly, Excel is so powerful that it can help you to process, analysis, and store data, in masses.
That’s the reason it has been there for years and helping this world in data.
But…
With all those powers comes some nasty problems which no Excel users like to face. Can you guess what I’m talking about?
Think about a Corrupted Excel File. Nightmare? Isn’t it?
And do you remember that last time when you have opened a workbook and you got a message that this workbook is might corrupt?
The TRUTH is, this is something which you cannot avoid, but, you can prepare yourself in the best way and deal with it like a PRO.
So today, in this post, I’d like to share with you to everything you need to know about a corrupt Excel file (.xls), why it happens, how to fix it like a PRO, and much more.
…let’s get started.

Note: In this post, we’ll be covering the .xls version (which is the extension for the file which is created in Excel 2007 or the earlier versions) and if you want to know about the new version, here’s the quick fix for that.
Why My Excel File Got Corrupted?
There can be one or multiple reasons for an Excel file to get corrupted. Below I have detailed about some of the major of them.
1. Large Excel File
You can store data in a workbook the way you want but sometimes using excessive thing can make an Excel file bigger in size.
And that kind of data files can crash at any point in time. Here are a few things which make the Excel files heavy, like
- Conditional Formatting.
- Colors formatting.
- Using merged cells in place of text alignment.
- Volatile functions: Formulae that iterate every time you open or change a cell value; OFFSET, NOW.
- Using a complete column or row as a reference than the data set range.
- Using complex formulas; VLOOKUP in place of Index/Match, Nested If in place of MAXIFS, MINIFS.
- Calculations or reference across workbooks.
Related: How to Fix Formatting Issues in Excel
2. Abrupt System Shutdown
Shutting down the system without following the procedure can corrupt your data file.
This shut down can be due to a power failure or any other unexpected technical challenges.
So it is always important to follow the procedures and shut down your system properly to avoid data losses.
3. Infected Excel File (Virus Attack)
This is the most common and obvious reason for Excel file corruption.
Although we always keep our system safe using various Antiviruses, still there is always a probability of virus attacks and loss of important files.
It is always advised to use a safe and strong antivirus compatible with your system requirements.
What are the Signs to Know When an Excel File is Corrupted?
In this section, we will discuss what are the signs which you can get when an Excel file is corrupted, let’s dig into it.
1. The File is Corrupt and Cannot Be Opened
This is one of the most common messages you can see when your workbook is corrupted.
But there is also a chance that it is just because of the version compatibility where you have a .xls file but you are using the latest version of Excel check out this detailed post by Priyanka
2. We Found a Problem with some Content in this File…
There’s another error message which you can get while opening a file:
We Found a Problem with some content in Do you want us to recover as much as we can? If you trust the source of this workbook, click yes.

There are a lot of applications out there (I think almost every) which exports the data as a .xls format. Those files have a greater chance of having this kind of error.
3. “Filename.xls” cannot be accessed
There can also be a situation where you get the error:
“Filename.xls” cannot be accessed. The file may be corrupted, located on a server that is not responding.
Well, this message is a bit misleading.
You won’t be able to decide that your file is actually corrupted or just not on the location.
My Excel File Got Corrupted, now What Should I Do?
There are many ways to recover the data from the corrupt excel files. But before you start, it is always advised to create a copy of the corrupted file.
You can save a lot of time with Stellar Repair for Excel, which make data recovery just with few clicks.
But before you go for a data recovery software, let’s try out some manual steps which can help.
When a workbook get corrupted the first thing comes to the mind is to recover data from it…
…and you what there’s a simple option there in the Excel which you can use to do this. Below are the steps you need to follow:
- First of all, open the Excel and click on the office icon.
![]()
After that, go to the “Open” and select the file which is corrupted.
Now, click on the open drop-down and select “Open and Repair”.
- At this point, you have two options:
- Repair File
- Extract Data

Let’s get into both of these options one by one…
1. Repair File
This option helps you to repair the file and the moment you click on it it takes a few seconds afterward and shows you the result with a message box and also provide you a log file.
And once it is done with repairing, you’ll get your file opened and you can save that file as a new copy.
Yes, that’s it.
2. Extract Data
If somehow you aren’t able to get your file repaired, you can also extract data from that file using “Extract Data” option.
Even in this option, you can get data in two ways.

- As Values
- With Formulas
In the first option, Excel simply extracts data as value ignoring all the formulas driving those value (which is the best way if you just need to have that data back ).
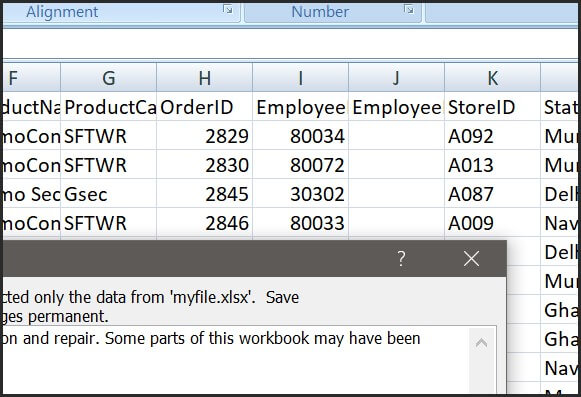
But in the second option, Excel tries to recover the formulas as much as possible.
Check out this smart technique by Jyoti which you can use it you aren’t able to recover data from the file.
Preventions to Not to have any Excel File Go Corrupt in Future
Future is fragile, what I’m trying to say is the more you work in Excel and process data there could be a chance that your workbook goes corrupt.
If there’s no security then what an EXCEL POWER user should do?
Well, there are few things which you can do or take care of while working with Excel so that you won’t have to worry about corruption of Excel workbooks.
Let’s see what you can do…
1. Change Recalculation Option
Now here’s the thing when you work with a hell lot of data, there a common thing that you gotta using formulas. Right?
But, the thing these formulas are something which makes your Excel file slows down sometimes make them go corrupt.
There’s one small tweak you can do in your workbook is change the calculation method.
Now with the manual calculation, you just need to whenever you open your file it won’t recalculate all the formulas.
And when you update your data you can simply click on the “Calculate Now” and it will calculate all the formulas again.
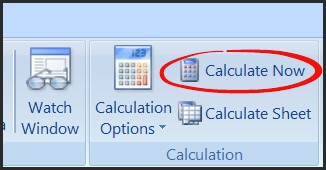
Quick Tip: Beware of Volatile Functions and use them with caution as recalculates them every time you change something in the worksheet.
2. Use VBA Codes Instead of Formulas
Now, this is what I do when I need to use complex formulas in a workbook.
Here’s how you can do this: Let’s say you have a formula in the cell A1, like below, which calculates the age.
=“You age is “& DATEDIF(Date-of-Birth,TODAY(),”y”) &” Year(s), “& DATEDIF(Date-of-Birth,TODAY(),”ym”)& “ Month(s) & “& DATEDIF(Date-of-Birth,TODAY(),”md”)& “ Day(s).”
Now, instead of simply entering it into the cell A1 which I would write a macro code which inserts this formula into the cell A1 and then convert it into the a value.
Here’s the code:
Sub CalculateAge()
Range(“B1”).Value = _
“=””Your age is “”” & _
“&DATEDIF(A1,TODAY(),””y””)” & _
“&”” Year(s), “”” & _
“&DATEDIF(A1,TODAY(),””ym””)” & _
“&”” Month(s), and “”” & _
“&DATEDIF(A1,TODAY(),””md””)” & _
“&”” Days(s).”””
Range(“B1”) = Range(“B1”).Value
End Sub

Note: To write these code you need to have basic understading of VBA (make sure check out this guide for this).
3. Use a File Recovery Application
Recently we asked a quick question to our readers on ExcelChamps that if they have ever faced a situation where they got a corruption message in Excel.
You’ll be astonied to hear that 50% percent of the people said “YES” they faced this thing in the past.

Now, this is alarming, if you are heading a team or you have a bunch of people in your company who use Excel…
…there’s a high probability that half of them gonna face this issue. So the best way to deal with this to have an App FIX your Excel file for you.
With STELLAR REPAIR FOR EXCEL, you just need a few clicks, yes that’s right. Let me show you with the below steps:
- First of all, download the app and install it (it’s simple).

- After that, open the app and click on the “Browse” and simply select the file which is corrupted.
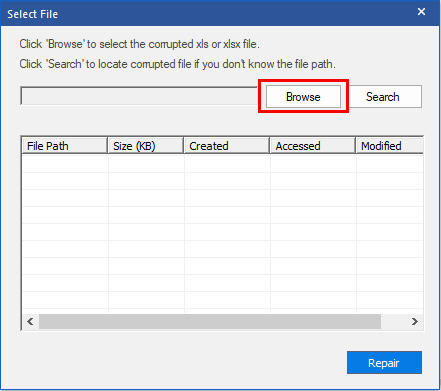
- In the end, click on the REPAIR to let the Excel repair software fix your file (it takes a few seconds).
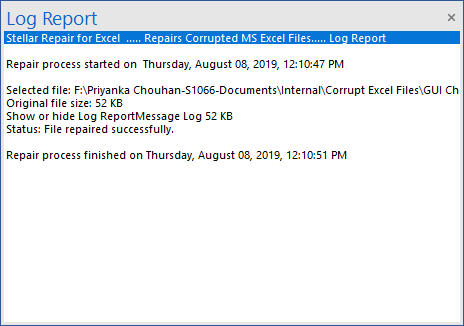
Once you complete repairing your file, you’ll get a message in your on the status bar and after that, you can open your file.
Final Thoughts
If you are a POWER Excel user then there’s a must for you to have known how to deal with a situation where you got a corrupt Excel file.
But I must recommend you to TRY OUT Stellar Repair for Excel so that’s you don’t have to worry about your Excel files anymore.

I’m sure you found this post helpful, and please don’t forget to share this tip with your colleagues, I’m sure they’ll appreciate it.
Also read:
- How To Restore Missing Contacts Files from Honor Magic Vs 2.
- How to recover deleted photos after deleting from Recently Deleted on iPhone 12 | Stellar
- How to Repair corrupt MP4 and AVI files of Honor Play 40C with Video Repair Utility on Mac?
- How To Restore Missing Contacts Files from Motorola G24 Power.
- How to Sign .docx file document with Digital Signature - (Tutorial)
- How To Restore Missing Photos Files from Samsung Galaxy Z Flip 5.
- How To Restore Missing Contacts Files from Samsung Galaxy S23 Tactical Edition.
- 5 Easy Ways to Copy Contacts from Xiaomi 14 Ultra to iPhone 14 and 15 | Dr.fone
- 4 Ways to Transfer Music from Realme Narzo N53 to iPhone | Dr.fone
- How to Retrieve deleted photos on Realme GT Neo 5 SE
- How to Fix iPhone SE (2022) Storage Not Loading/Showing | Stellar
- How to recover deleted photos from Android Gallery without backup on Infinix Note 30 Pro
- How to recover lost data from Oppo Find X7 Ultra?
- How to recover lost data from Nokia G42 5G?
- How to recover old messages from your Huawei Nova Y91
- 4 Ways to Transfer Music from Xiaomi Redmi Note 12 4G to iPhone | Dr.fone
- How to play MP4 files on Motorola Razr 40?
- How to Retrieve Deleted Calendar Events iPhone 13 mini? | Stellar
- How to recover old messages from your Xiaomi Redmi Note 13 5G
- How to restore wiped messages on Sony
- How to recover old videos from your Google Pixel 8
- 2 Ways to Transfer Text Messages from Vivo V27 to iPhone 15/14/13/12/11/X/8/ | Dr.fone
- How To Restore Missing Messages Files from Honor X50i
- How to recover old messages from your Asus ROG Phone 8
- How to recover deleted photos from Android Gallery after format on Lava Blaze Curve 5G
- How to recover old call logs from your Samsung Galaxy XCover 7?
- How To Transfer Data From iPhone 13 Pro Max To Other iPhone 15 Pro Max devices? | Dr.fone
- How to identify missing or malfunctioning hardware drivers with Windows Device Manager in Windows 11/10
- How to recover deleted photos from Android Gallery after format on Itel S23
- How to Recover iPhone 6s Plus Data From iOS iTunes? | Dr.fone
- How to Repair corrupt MP4 and AVI files of Google Pixel Fold with Video Repair Utility on Windows?
- How to Restore Deleted Nokia C12 Plus Photos An Easy Method Explained.
- How to restore wiped videos on Motorola Moto G84 5G
- How to Recover FaceTime Call History on iPhone 11 | Stellar
- Preparation to Beat Giovani in Pokemon Go For Poco C51 | Dr.fone
- How to Access Your Apple iPhone 12 Pro When You Forget the Passcode?
- How to Unlock Samsung Galaxy A23 5G Phone without PIN
- In 2024, How to Unlock Vivo S17t Phone with Broken Screen
- Can I Bypass a Forgotten Phone Password Of Poco C65?
- 5 Best Route Generator Apps You Should Try On Itel P40+ | Dr.fone
- How to Reset Tecno Spark 10 4G Without the Home Button | Dr.fone
- In 2024, Full Guide to Fix iToolab AnyGO Not Working On Sony Xperia 1 V | Dr.fone
- In 2024, How To Stream Anything From Honor Play 8T to Apple TV | Dr.fone
- Fake Android Location without Rooting For Your Nubia Red Magic 9 Pro+ | Dr.fone
- Guide to Mirror Your Samsung Galaxy F15 5G to Other Android devices | Dr.fone
- Infinix Zero 5G 2023 Turbo Not Receiving Texts? 10 Hassle-Free Solutions Here | Dr.fone
- 2024 Approved Elevate Your Storytelling 8 Leading Mac Video Creators
- In 2024, Dose Life360 Notify Me When Someone Checks My Location On Vivo V30? | Dr.fone
- Ways to trade pokemon go from far away On Oppo Find X7? | Dr.fone
- In 2024, How to Lock Apps on Itel to Protect Your Individual Information
- Title: How to Fix Excel 2003 Formulas Not Working Properly | Step-by-Step Guide | Stellar
- Author: Nova
- Created at : 2024-05-19 18:32:11
- Updated at : 2024-05-20 18:32:11
- Link: https://blog-min.techidaily.com/how-to-fix-excel-2003-formulas-not-working-properly-step-by-step-guide-stellar-by-stellar-guide/
- License: This work is licensed under CC BY-NC-SA 4.0.
