
:max_bytes(150000):strip_icc():format(webp)/tesla-bot-f6353f76ae214924916445da1da620ca.png)
How to Fix Excel 2010 has Encountered a Problem | Stellar
How to Fix Excel has Encountered a Problem
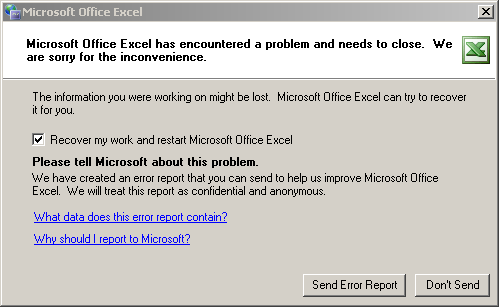
While working on MS Excel, you may encounter various errors that can hamper your work and productivity. One of the errors that you may receive is ‘Microsoft Excel has encountered a problem and needs to close’.Due to this error, your Excel program may stop and asks you to recover the data from Excel file.
What are the Reasons for ‘MS Excel has Encountered a Problem’ Error?
Following are some primary causes that may result in the ‘Microsoft Excel has encountered a problem and needs to close’ error:
- Corrupt Excel File: If you try to open a corrupt or damaged Excel file, the file may not open and displays this error message.
- File not Saved Properly: If Excel files aren’t saved correctly, this error may occur when you open the file.
- Incompatible File Version: If the MS Excel application version does not support the Excel file version, the file may not open and throws the error.
- Issues with MS Office/MS Excel Installation: This error can sometimes be caused due to damaged MS Office/MS Excel installation.
How to Fix ‘MS Excel has Encountered a Problem’ Error?
You can resolve the error by using the following methods:
1. Try to Open Excel in Safe Mode
Open the Excel application in safe mode and then try to open the Excel file. This will help you find out if the problem is caused by some incompatible add-ins. The steps are as follows:
- Hold Windows + R keys together to launch the Run dialog box.
- Type Excel /safe in the search box and hit Enter.
- If your Excel application opens in safe mode, it means that the issue is caused due to incompatible or faulty add-ins. In such a case, you need to disable the add-ins:
- Go to the File menu and click the Options menu. Further, choose the Add-ins option.
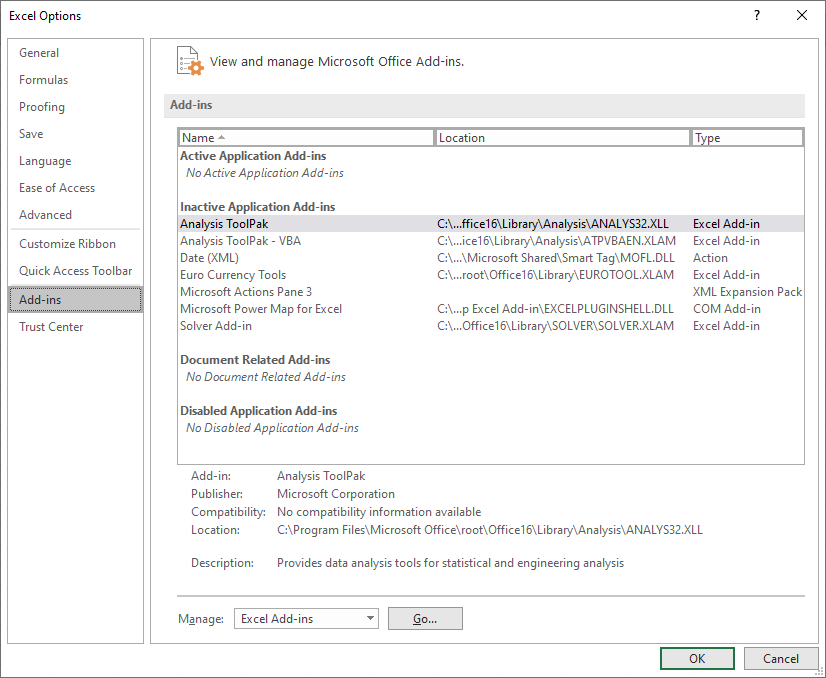
- Now, choose the Go button at the bottom of the Excel Options window.
- A list of available add-ins appears.
- Now, uncheck the boxes against the add-ins.
2. Disable Macros Using the Trust Center Settings
Sometimes, the Macros prevent Excel from managing the files. You can disable the Macros to resolve the issue. Follow these steps:
- Launch your MS Excel application.
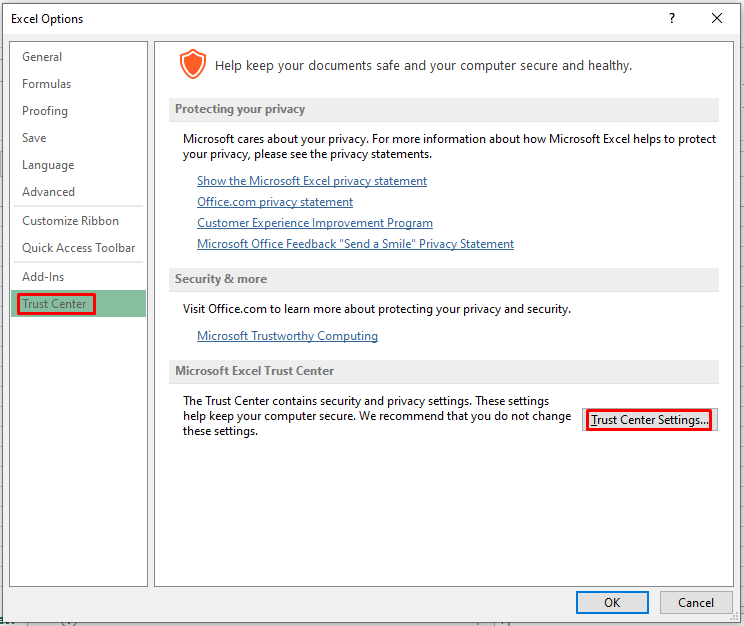
- Now, go to File > Options > Trust Center.
- Further, click the Trust Center Settings.
- Now, navigate to the Macro Settings option.
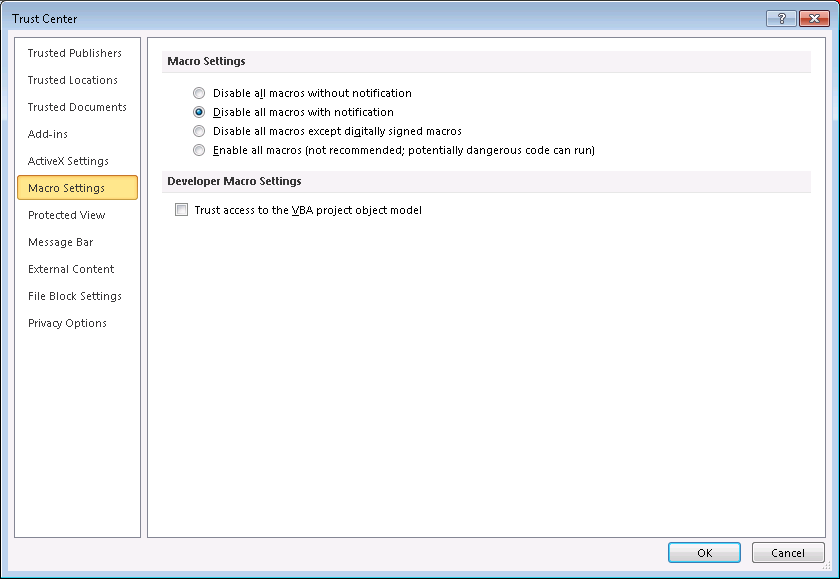
- Herein, select the ‘Disable all macros with notification’ radio button. Then, click OK.
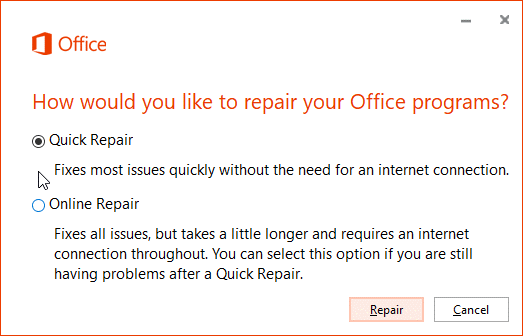
3. Repair MS Office Application
Sometimes, problems with your MS Office application may cause the Excel has encountered a problem error. In such a case, you need to repair your MS Office application. Here are the steps to do so:
- Launch Control Panel > Uninstall a Program.
- Find your MS Office application and click the Change option.
- A new window will appear. Herein, select the Repair option.
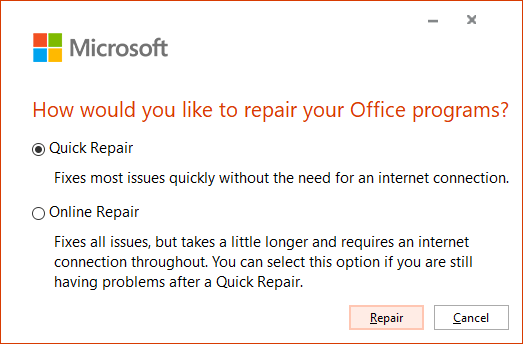
- Now, follow the MS Office installation wizard to finish the repair process.
What to do if the above methods don’t work?
If you have tried the solutions mentioned above and are still not able to resolve the ‘Excel has encountered a problem and need to close’ error, it indicates that the Excel file is corrupt. You can use a professional Excel repair software, such as Stellar Repair for Excel , to repair the corrupt file. The software repairs the file and retrieves all the data, including the tables, charts, formulas, etc. from the damaged workbook. It is compatible with all the MS Excel versions.

To know how Stellar Repair for Excel works, see the following video:
To Wrap Up
The ‘Excel has encountered a problem and needs to close’ error may occur due to different reasons. You can fix this error by following the methods mentioned in this post. If the error has occurred due to corruption in the Excel file, you can use a third-party Excel repair tool, like Stellar Repair for Excel. The software can repair damaged or corrupt Excel file of any size and retrieve all the data.
Repair Files using Stellar Toolkit for File Repair
Stellar Toolkit for File Repair Technician
The main interface of Stellar Toolkit for File Repair comprises four modules to repair MS Office and PDF files. These modules are:
- Repair Document
- Repair Spreadsheet
- Repair PowerPoint
- Repair PDF
Click on the desired tab to repair that file format.
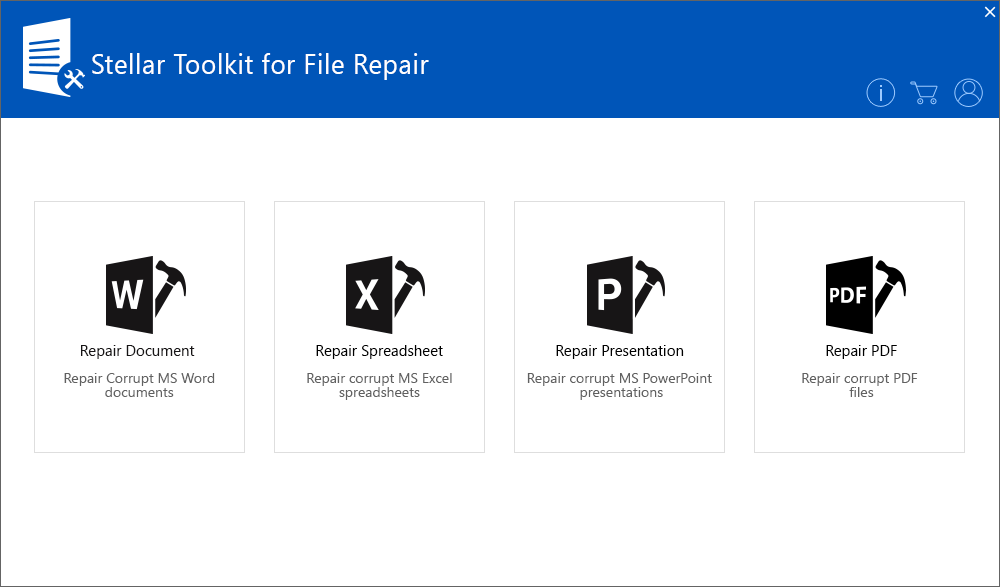
Figure 1 - Illustrates Homepage of the Stellar Toolkit for File Repair
Steps to Repair MS Word – .doc/.docx file
- Click Select File to select a single corrupt Word (.doc/.docx) file that you want to repair. Alternately, click Select Folder for selecting all Word files in a single folder.
Note: Click Find file(s) to search for the Word file, if the location is not known.
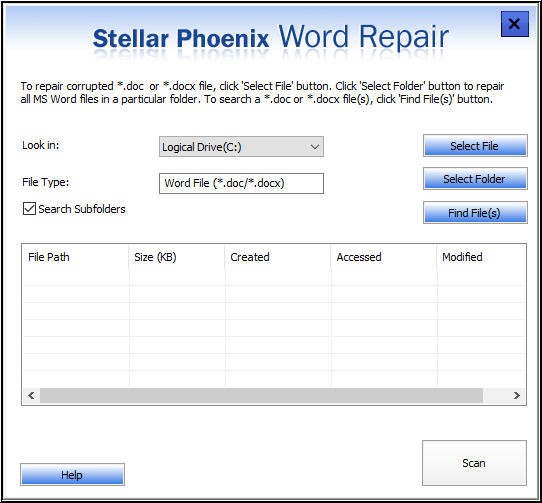
Figure 2 - Illustrates Selection of single doc/.docx file or multiple files
- Once the file is selected, click the Scan button to scan and repair the file.
- A preview of the repaired Word file is displayed on the screen. Verify the file contents from the right pane of the preview window.
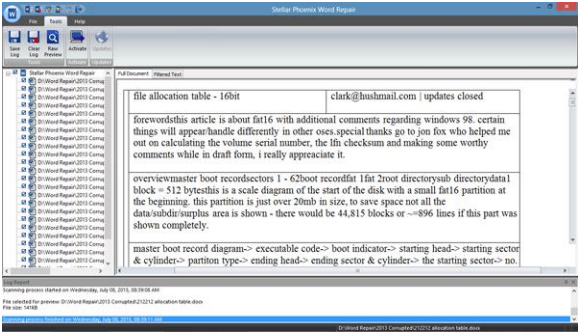
Figure 3 - Preview of Repaired Word Document
Note: If you’re unable to repair a corrupt .doc file, select ‘Advance Repair’ option from the File menu for repairing the .doc files.
- Click the Save icon on the File menu to save the repaired file.

Figure 4 - File Menu
In Save Document dialog box that appears, do the following:
Select default location or a new folder to save the repaired file.
Save the file in any of these formats: ‘Full Document’, ‘Filtered Text’ or ‘Raw Text’.
Click OK.
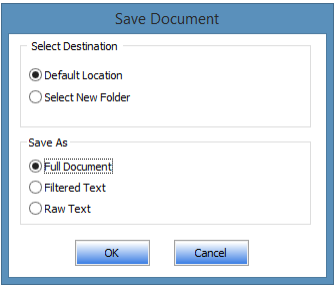
Figure 5 - Word Document Saving Options
The repaired file will be saved at your preferred location.
Steps to Repair Excel – .xls/.xlsx files
- In Select File window, click Browse to select the corrupt Excel file from the desired location. If you do not know the file location, click Search to find and select the corrupted spreadsheet.
- Once the Excel file is selected, start repairing the file by clicking the Repair button.
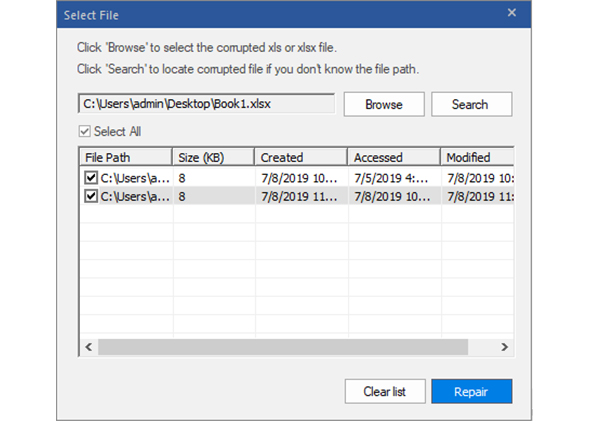
Figure 6 - Illustrates selection of one xls/xlsx file or multiple files in a folder
- After completion of the repair process, the software displays the repaired Excel file and its recoverable data in a preview window.
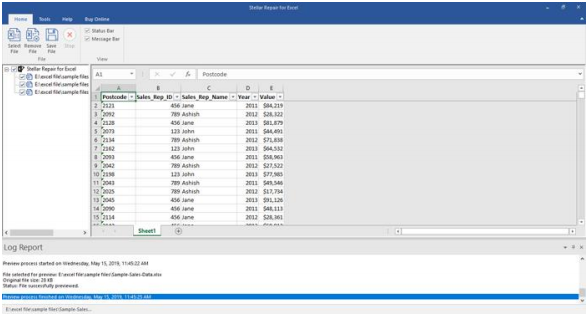
Figure 7 - Preview of Excel File
- Click on Save File icon on Home menu to save the repaired file.
- In Save File dialog box, choose Default location or Select New Folder for saving the file.
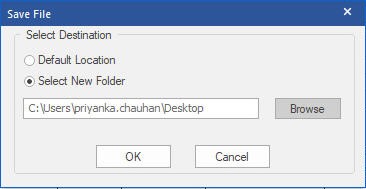
Figure 8 - Select Destination to Save Repaired Excel File
- Click OK to proceed with the saving process.
The repaired file gets saved at the preferred location.
Note: To recover the Engineering formulae, include ‘Analysis ToolPak’ Add-in.
Steps to Repair PowerPoint – ppt/pptx/pptm file
- Click Browse to select the corrupt PowerPoint file. Alternately, click on Search to search for the file, if the location is not known.
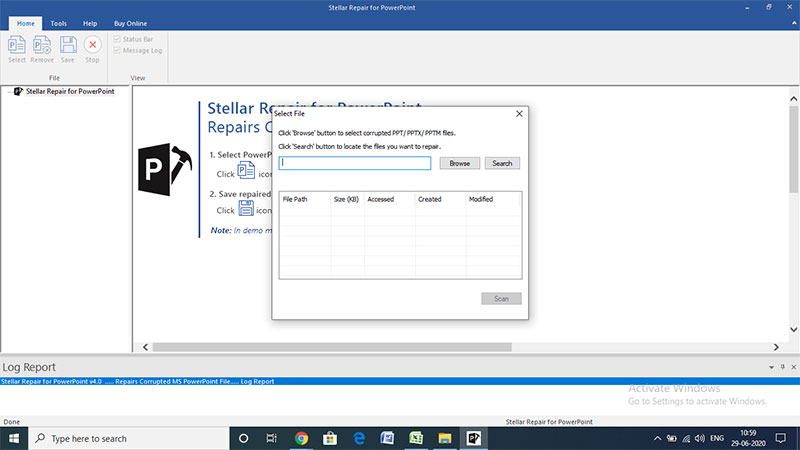
Figure 9 - Illustrates Selection of Single PowerPoint Presentation
- Once the corrupt PowerPoint file is selected, click Scan for scanning and repairing the file.
- A preview of scanned file gets displayed. Verify the file contents from the preview window.
- Click Save on Home menu to save the repaired PPT file.
- From the Save File dialog box, click Default location or Other location under Save As for saving the file.
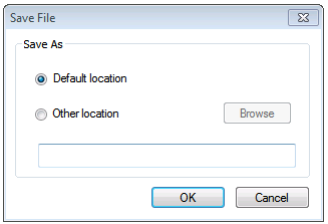
Figure 10 - Select Location to Save PPT File
- Click on the OK button and the repaired file is saved at preferred location.
Steps to Repair PDF file
- From the Stellar Repair for PDF main interface window, click Add File to select a single or multiple PDF files you want to repair.

Figure 11 - Illustrates adding of corrupt PDF Files
- A screen with recently added PDF file is displayed. Select the file and click Repair to start repairing it.
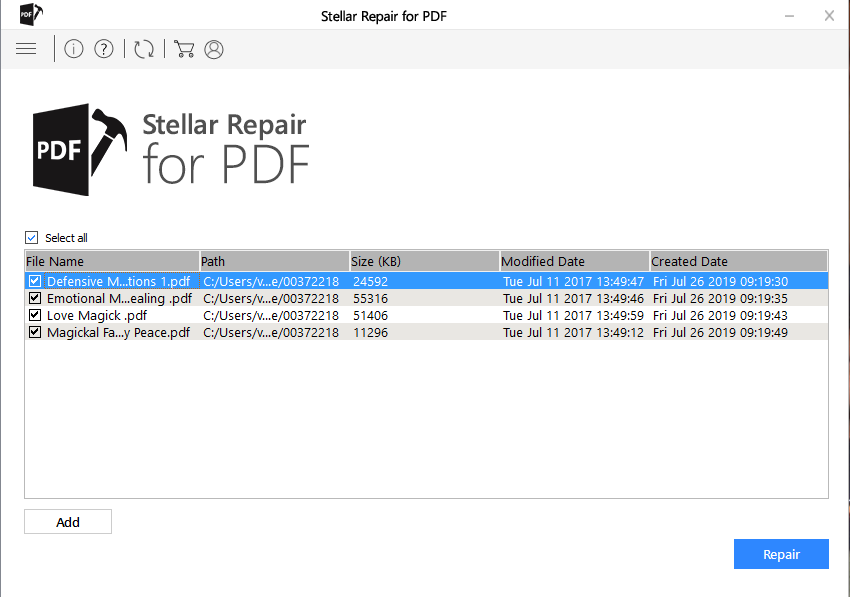
Figure 12 - Repair the Selected PDF File
- A screen showing the progress of the repair process appears.
- When the ‘Repair Complete’ window pops-up, click OK.
- Preview the repaired PDF file.
- Click the Save Repaired Files button to save the repaired file.
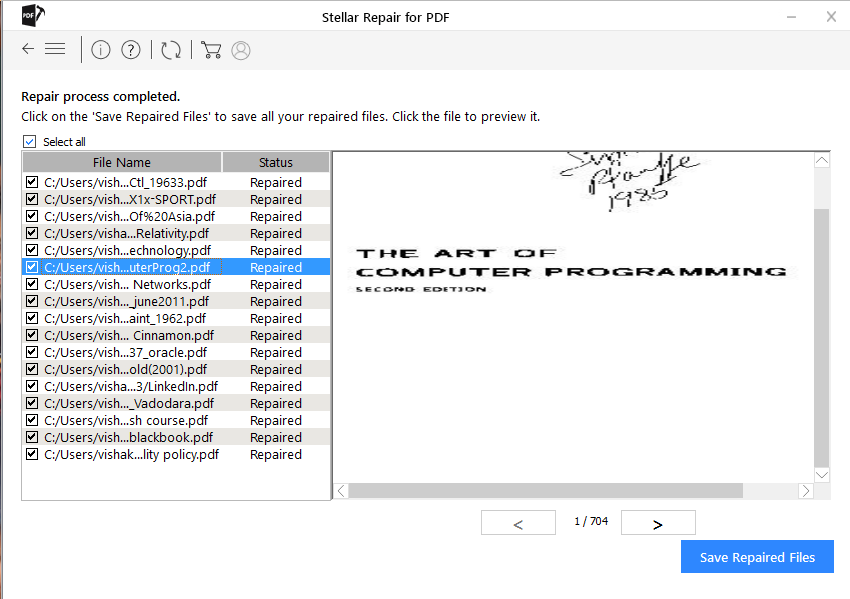
Figure 13 - Save Repaired File
- In Browse for Folder dialog box, select a folder for saving the file.
- From the Saving Complete dialog box, click the hyperlink to the folder containing the repaired PDF file.
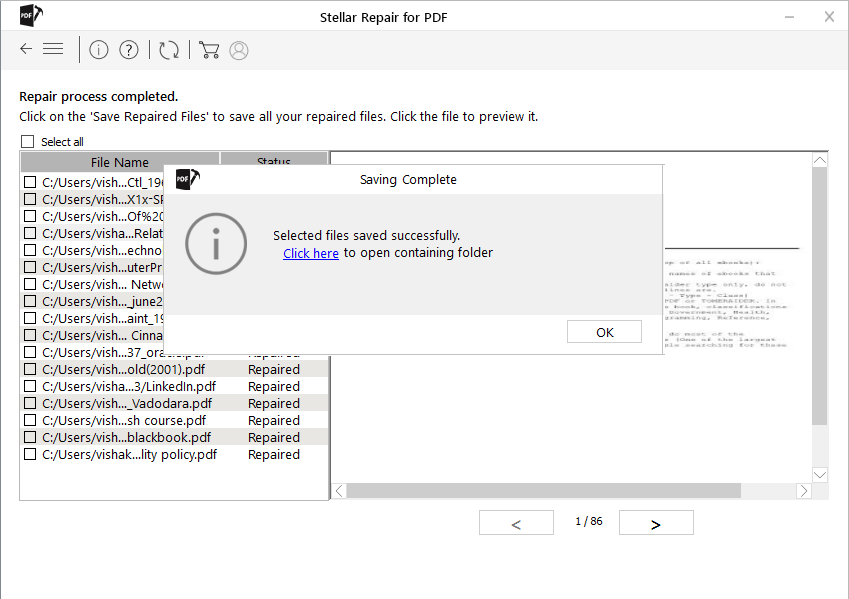
Figure 14 - Saving Complete Window
- Click OK.
Fix the Too many different cell formats Error in Excel?
Excel has set a limit on the number of unique cell formats within a workbook. Excel 2003 allows up to 4000 different cell format combinations, whereas Excel 2007 and later versions allow a maximum of 64000 combinations. When this limit exceeds, you may encounter errors, such as “Too many different cell formats”. It can prevent you from inserting or modifying workbook rows or columns. Sometimes, it prevents you to copy and paste the content within the same or different workbooks. This error may also occur due to various other reasons.
You can encounter the “Too many different cell formats” error due to the below reasons:
- Formatting is missing in the workbook.
- Size of your Excel file has increased due to excessive use of complex formatting (conditional formatting).
- Workbook contains a large number of merged cells.
- There are multiple built-in or custom cell styles.
- Excel workbook is corrupted.
- The unused styles are unexpectedly copied to new workbooks (when moving or copying a worksheet from one to another).
- Workbooks contain multiple worksheets with different cell formatting.
Methods to Fix the “Too many different cell formats” Error in Excel
First, check that your Excel application is up-to-date. It helps in preventing duplicate styles in workbooks. If the error persists, then follow the below methods:
Method 1: Simplify the Workbook Formatting
You can face the error in Excel - Too many different cell formats, if the size of your Excel file has increased due to excessive or unnecessary formatting. You can try to simplify the formatting of the affected workbook. While reducing the number of formatting combinations, you can follow the simplifying guidelines, such as using a standard font and applying borders consistently. Follow the below steps to remove unnecessary formatting in your worksheet:
- First, open the affected worksheet.
- Now, use the shortcut key (Ctrl+A) to select all the cells.
- In the Excel ribbon, navigate to the Home tab and click Clear.

- Then, select the Clear Formats option.

The above steps will remove all unnecessary formatting from the selected cells, thus reducing the number of cell formats. Besides this, you can try removing the cell patterns (if any) or use cell styles to remove unnecessary formatting in the workbook.
Method 2: Remove Conditional Formatting
Conditional formatting is also one of the reasons behind the “Too many different cell formats” error. It usually occurs if you have applied multiple rules to various cells or cell ranges within a workbook. Each rule has its own formatting settings. If you’ve applied a large number of conditional formatting to cells, it can increase the number of unique cell formats. You can check and remove the unnecessary conditional formatting. Here are the steps to do this:
- Open the Excel file in which you are getting the error.
- Go to the Home tab and locate Conditional Formatting.

- Select Manage Rules.
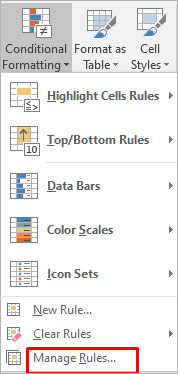
- The Conditional Formatting Rules Manager wizard is displayed. You can check the formatting rules and delete the unnecessary rule by clicking on the Delete Rule option.
Method 3: Repair your Excel Workbook
Corruption in the Excel workbook can also cause the “Too many different cell formats” error. You can try the Microsoft inbuilt utility to repair the file. Follow these steps to use this utility:
- Open your Excel application. Go to File > Open.
- Click Browse to choose the affected workbook.
- The Open dialog box will appear. Click on the corrupted file.
- Click the arrow next to the Open button and then select Open and Repair.
- You will see a dialog box with three buttons - Repair, Extract Data, and Cancel.

- Click on the Repair button to recover as much of the data as possible.
- After repair, a message is displayed. Click Close.
If the Open and Repair utility does not work or fails to repair the corrupted Excel file due to any reason, then you can use Stellar Repair for Excel to repair the Excel file. It is a simple-to-use third-party Excel repair tool with an intuitive UI that enables anyone to use it without much effort. The tool can help in fixing the “Too many different cell formats” error. It does so by repairing the Excel (XLS/XLSX) file and recovering all the components, including damaged cell style, without impacting the original formatting. You can download the software’s demo version and install it to check how it works.
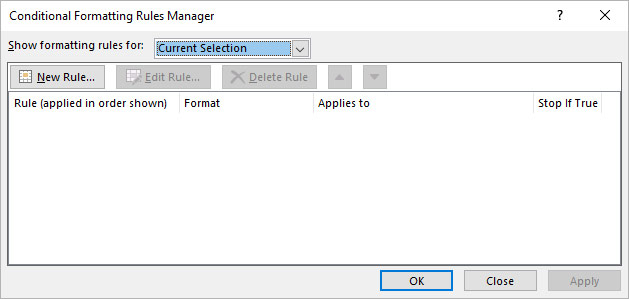
Method 4: Save the Excel File to a Binary Workbook (.xlsb) Format
You can also get the “excel too many cell formats” error if the size of the spreadsheet is too large. You can try saving the Excel file in binary (.xlsb) format to reduce the Excel file size. Here’s how to do so:
- In Excel, navigate to File > Save As.
- Select Excel Binary Workbook (*.xlsb) in the Save as type dialog box.
- Click Save.
Some Additional Solutions
Here are some additional methods you can try to fix the issue:
1. Check and Fix the Un-used Style Copy Issue
Many users have reported encountering the “Too many different cell formats” error when moving or copying the content of a workbook from one Excel to another and the unused styles being copied from one workbook to another. Microsoft has released a hotfix package which contains a fix for this issue. You can install this hotfix package (2598143 ) to resolve the issue.
2. Use Clean Excel Cell Formatting Option
You can check and enable the Excel cell formatting option to fix the “Too many cell formats” issue. This option will help you remove the excess formatting in your workbook. To locate this option, click on the Inquiabove steps willre tab. If you fail to see the Inquire tab, then check if the Inquire option is enabled in the Excel Com Add-ins settings.
3. Clean up Workbooks using Third-Party Tools
The “Too many different cell formats” issue can occur if your workbook contains a large number of unnecessary styles, as mentioned above. You can use third-party tools, such as XLStyles Tool or Remove Styles Add-in to clean up workbooks recommended in Microsoft Guide. However, Microsoft takes no guarantee of these tools.
Closure
If you’re getting the “Too many different cell formats” error in Excel, try the methods discussed in this post to resolve it. You can simplify the formatting by following standardized guidelines and clearing all the unnecessary conditional formatting. If the error has occurred due to corruption in Excel file, then you can use Stellar Repair for Excel to repair the Excel file. It is an advanced tool that can repair Excel worksheet and recover all its objects without losing the original formatting.
Solutions to open Excel Read Only Documents
‘Excel cannot open read-only documents’ is an error message that usually appears when you try to open an Excel (XLS or XLSX) file downloaded from the Internet, email, or the network server. It may also appear when you try to open an encrypted or password-protected Excel document. In such a case, MS Excel prevents the user from making any changes to the document.
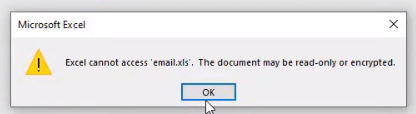
Reasons behind the “Excel cannot access ‘xxx.xls.’ The Document may be read-only or encrypted” Error
There could be several reasons that may cause the error. Some of them are as follows:
- Corrupt or damaged Excel workbook
- Incompatible or unsupported add-in
- Antivirus or malware software conflict
- Read-Only Excel file
- The file is encrypted
- File or drive read/write permissions issues
- Protected Excel workbook
- Damaged or missing MS Office (MS Excel) program files
Solutions to Open and Edit Read-Only Excel Documents
Below are a few solutions that can help you fix the ‘Excel cannot access ‘xxx.xls.’ The Document may be read-only or encrypted’ error and allow you to open and edit Excel documents.
- Remove Read-only Attribute from Excel File Properties
The ‘Excel cannot open read-only documents’ error message may appear when the Excel file property is set to read-only. To check if this is the case, follow these steps:
- Right-click on the particular Excel (xls/xlsx) document and select ‘Properties’.
- Uncheck the ‘Read-only’ attribute and then click the ‘OK’ button.
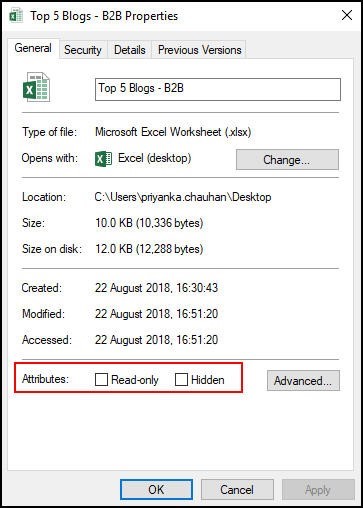
Now try to open the Excel document and check if the problem is fixed.
- Adjust Antivirus Settings
A few antivirus programs block Excel files and other Office documents by opening those in ‘read-only’ mode. In such cases, try adjusting the antivirus settings to open the Excel files normally. This will allow you to edit, modify, and save the Excel workbook without encountering the “Excel cannot access ‘xxx.xls.’ The Document may be a read-only or encrypted” error message.
- Disable Protected-View
The error may appear when you try to open an Excel file received as email attachments or downloaded from unsafe source. The file may potentially contain viruses, worms, or other types of malware that could damage the system or the server.
To safeguard the system, MS Excel opens such files in Protected View. It may also open an Excel workbook in Protected Mode when it detects a problem with the file. This security feature allows you to read or view Excel files and reduces the risks to the computer system or PC.
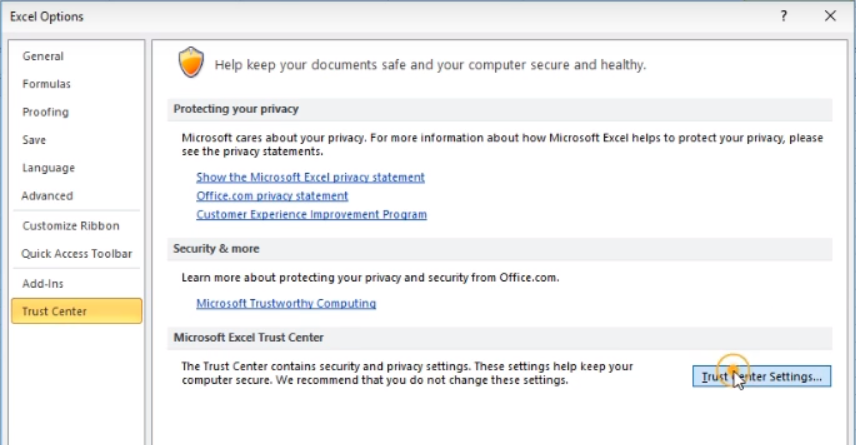
However, you can click File > Info and then click ‘Edit Anyway‘ to access and edit file content. You may also disable the Protected View setting via File > Options > Trust Center > Trust Center Settings…> Protected View. However, we do not recommend this.
- Renew/Activate Microsoft Office
If MS Office is in a deactivated state or its subscription has expired, the Office documents, including the Excel, could be in ‘read-only reduced functionality mode.’
In such a scenario, activate Microsoft Office or renew the Office subscription. Then open the Excel workbook and check if the problem of ‘Excel cannot open read-only documents’ is resolved.
- Check if OneDrive Storage is Full
If Excel files are saved on OneDrive with low or no storage space, you may encounter such issues with your files.
To know the amount of free space on OneDrive, follow these steps:
- On your PC, open Settings and navigate to OneDrive.
- Click ‘Sync Settings > File Storage‘ to see available space.
You may also visit onedrive.live.com, sign in to the account, and then check the available space. If there’s no space available or the drive is full, empty the storage space and see if the problem is resolved.
- Check and Update MS Office and Windows
Microsoft releases updates to fix known errors. Thus, it is critical to update both Windows and MS Office to the latest release and avoid issues, such as ‘Excel cannot access ‘xxx.xls.’ The Document may be read-only or encrypted.’
- Repair MS Office (MS Excel)
The error ‘Excel cannot open read-only documents’ may appear due to a problem with your MS Office (MS Excel) program. You can repair the MS Office program to resolve such errors. The steps are as follows:
- Open Control Panel and click Uninstall a Program link under Programs.
- Choose Microsoft Office from the list and click the Change button.
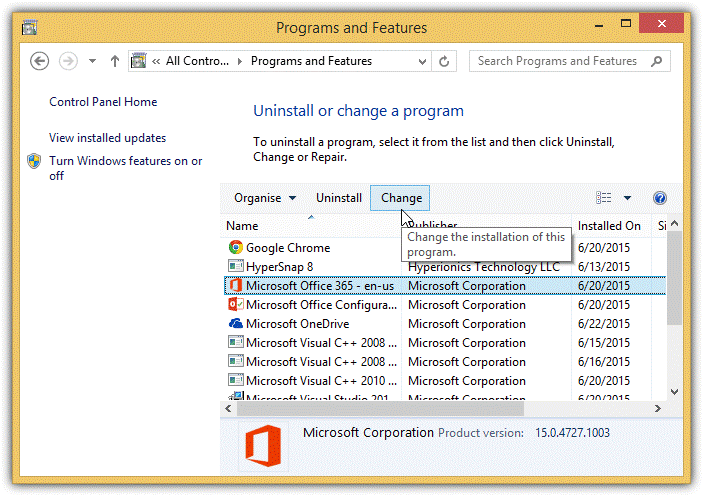
- Select Quick Repair and then click Repair to fix problems with MS Office and MS Excel. It will also restore any missing or damaged program files.
After the Repair, open the Excel workbook and check if the error is resolved.
- Check Permissions
The error message may also appear if you access an Excel workbook from a network or shared drive due to lack of write permission. Make sure you have read and write permissions assigned for the particular network drive. Alternatively, you can copy the file from the network drive and save it in your local folder to access and edit it without encountering this error message.
- Repair MS Excel File
If none of the solutions worked, the Excel workbook could be damaged or corrupt. To repair such damaged Excel workbook or spreadsheet, you can use the inbuilt ‘Open and Repair…’ option in MS Excel or install an Excel repair software , such as Stellar Repair for Excel. The software comes in handy when the Open and Repair option fails to fix the Excel workbook problems. It repairs the corrupt or damaged Excel workbook, extracts all components and content from the file with 100% integrity, and saves them in a new Excel workbook.
Conclusion
Sometimes, the ‘Excel cannot open read-only documents’ error can be resolved by a simple restart. But if it doesn’t work, you can follow the solutions discussed in this article to resolve the ‘Excel cannot open read-only documents’ issue. However, if the issue is caused due to a damaged or corrupt Excel workbook, these methods may not work. In such a case, you can use Excel’s inbuilt repair utility, i.e., Open and Repair, or install Stellar Repair for Excel software recommended by MVPs and industry experts to fix all kinds of problems with MS Excel workbooks.
Ways to Fix Personal Macro Workbook not Opening Issue
Many users have reported encountering issues while accessing personal macro workbook, such as personal macro workbook not opening, personal macro workbook not loading automatically, Excel personal macro workbook keeps getting disabled, etc.
Such issues may arise due to a problem with the directory where the personal workbook is stored. However, there are various other reasons that may lead to such issues. Below, we’ll discuss the reasons behind the personal macro workbook not opening issue and the solutions to troubleshoot and fix the issue. But before proceeding, let’s understand why personal macro workbook is used.
Why Personal Macro Workbook is used?
You can access macros in a specific Excel workbook. However, when you need to use the same macro in other Excel worksheets, then you can create a personal macro workbook. A personal macro workbook (Personal.xlsb) is a hidden workbook that is used to store all macros. It makes your macros available every time you open Excel.
Causes of Personal Macro Workbook not Opening Issue
You may encounter personal macro workbook is not opening issue when attempting to record macros. Some possible causes behind such an issue are:
- Personal macro workbook is stored at an untrusted location
- Location of xlsb is changed
- Personal macro workbook is hidden
- Personal macro workbook becomes corrupted
- Disabled items in add-ins
- Workbook is Read-only
Methods to Fix the “Personal Macro Workbook not Opening” Issue
Follow the given methods to fix the personal macro workbook is not opening issue:
Method 1: Check the Path of Personal.xlsb
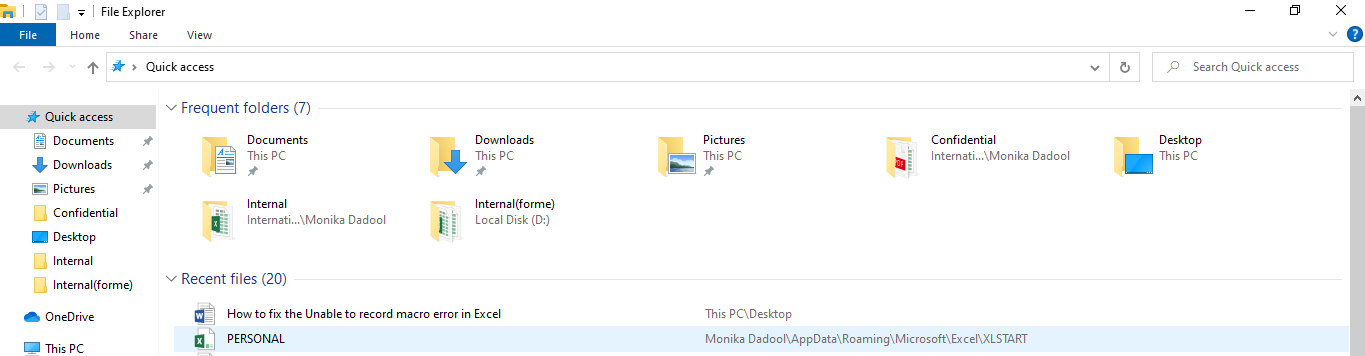
The personal macro workbook (Personal.xlsb) file is stored in XLStart folder. It opens automatically when you open your Excel application. However, sometimes it fails to load automatically. It usually occurs when you try to open the file from an incorrect path. You can check the path of Personal.xlsb by following these steps:
- Open the workbook.
- Click on the Developer tab.

- Press Alt + F11 to open Visual Basic Editor.
- Go to View > Immediate Window.
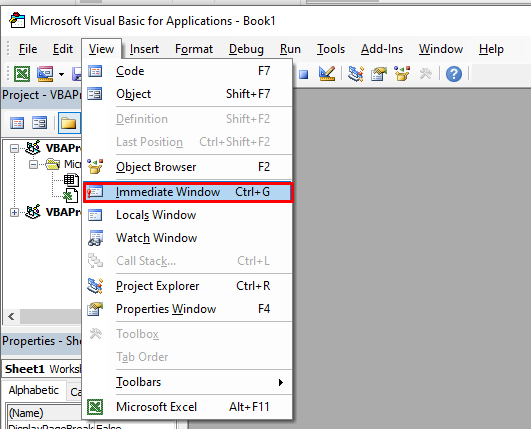
- In Immediate Window, type the following code to know the location of the workbook:
?thisworkbook.path.
- Then, hit Enter.
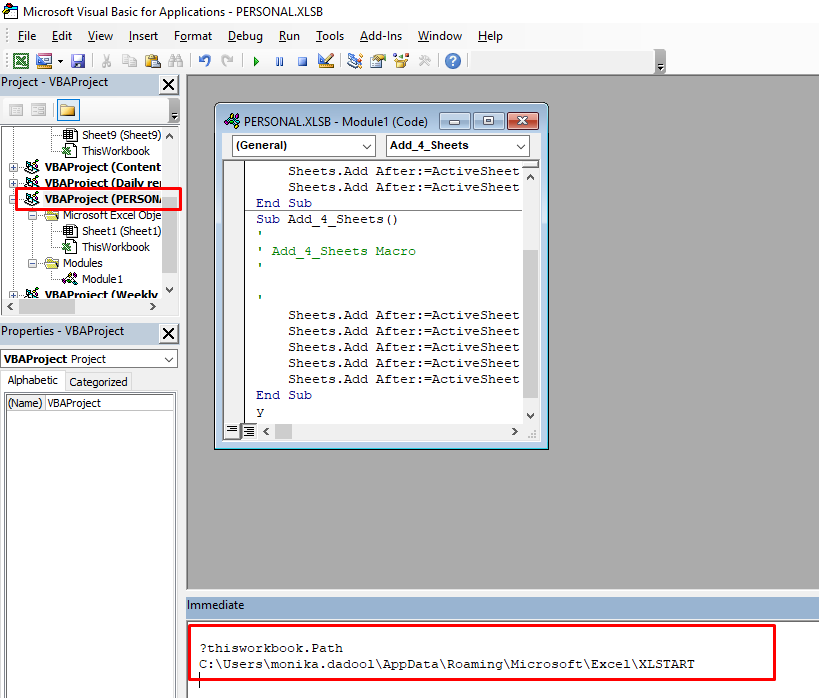
- You will see the path of the personal macro workbook.
- Copy the path and paste it into Quick Access field in File Explorer.
Method 2: Unhide Personal Macro Workbook
If personal macro workbook is hidden, you may unable to see and open the Personal.xlsb file. To unhide the personal Macro workbook, follow the below steps:
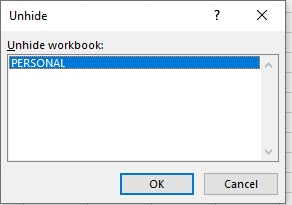
- In Microsoft Excel, go to View and then click Unhide

- The Unhide dialog box is displayed. Click PERSONAL and then OK.
Method 3: Enable the Macro Add-ins
You may unable to open the previously recorded macros in your personal macro workbook if the macros are disabled. To check and enable the items, follow these steps:
- Go to File > Options.
- In Excel Options, click on the Add-ins
- Select Disabled Items from the Manage section and click on Go.
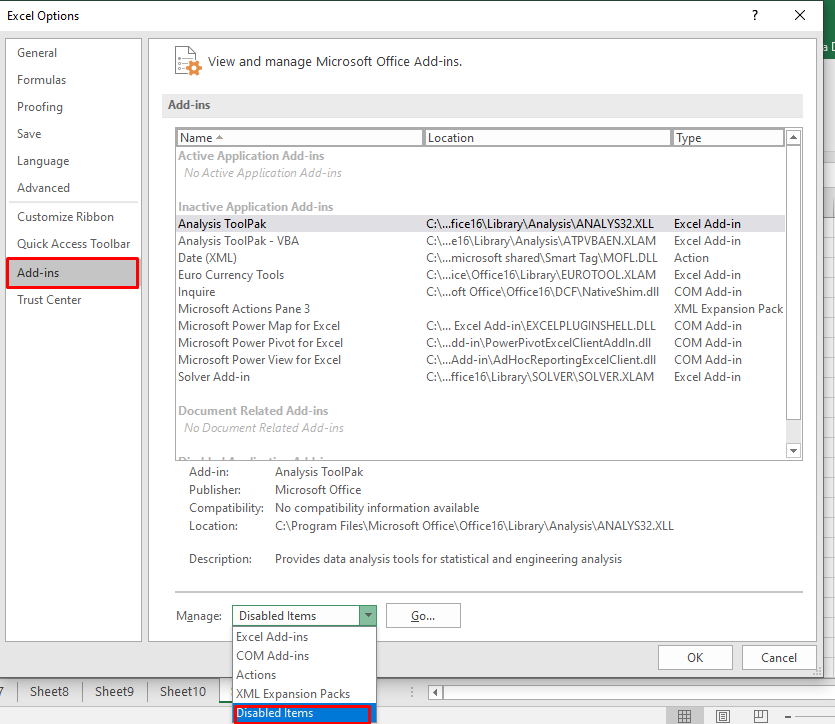
- The Disabled Items dialog box appears. Click on the disabled item and then click Enable.
Method 4: Change the Trusted Location
You may encounter the “personal macro workbook not opening” issue if the Personal.xlsb file is stored at an untrusted location. You can check and modify the path of XLSTART folder using the Trust Center window. Here are the steps:
- Open MS Excel. Go to File > Options.
- Click Trust Center > Trust Center Settings.
- In the Trust Center Settings dialog box, click on Trusted Locations.
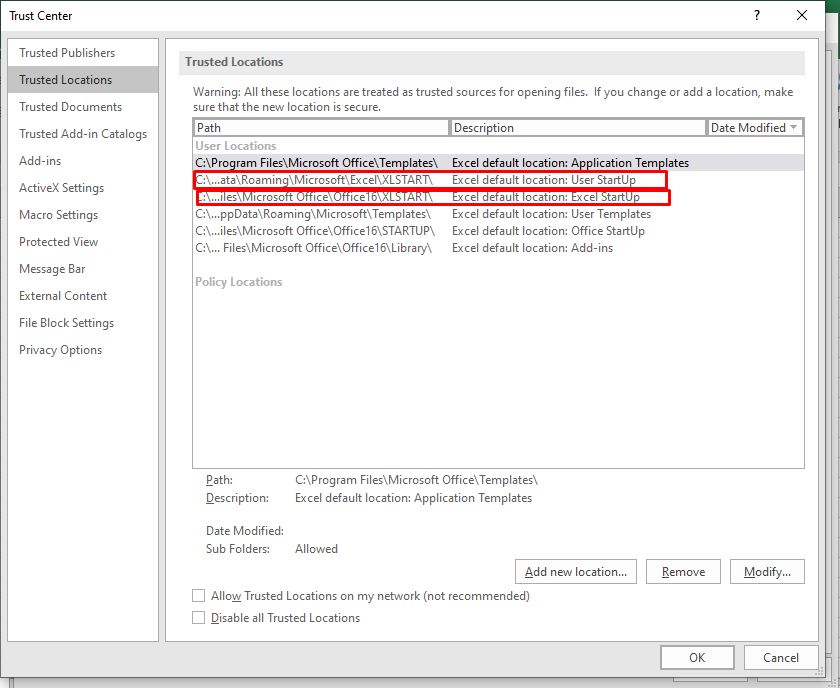
- Verify the path of the XLSTART If it is untrusted or there is any issue, then click Modify and then click OK.
Method 5: Repair your Excel File
You may fail to open personal macro workbook if it is corrupted. To repair the corrupt workbook, you can use the built-in Open and Repair utility in MS Excel. To use this tool, follow these steps:
- Open your Excel application.
- Click File > Open.

- Browse to the location where the corrupted file is stored.
- In the Open dialog box, select the corrupted workbook.
- From the Open dropdown list, click Open and Repair.
The dialog box appears with the Repair and Extract buttons. Click Repair to retrieve all possible data or the Extract option to recover the data without formulas and values.
If the Open and Repair utility fails to repair the corrupted Excel workbook, then you can use a professional Excel repair tool, such as Stellar Repair for Excel. It can easily repair severely corrupted Excel (XLSX and XLS) files and recover all the components. You can download the free trial version of the tool to preview the recoverable data.
Closure
This article discussed the ways to fix the personal macro workbook not opening issue. In case you are unable to open the personal macro workbook because of corruption in the workbook, you can use the Open and Repair utility in MS Excel. If it fails, then you can use Stellar Repair for Excel to fix corruption in the Excel file and recover all its data with complete integrity.
Top 5 Ways to Fix Excel File Not Opening Error
Summary: MS Excel users sometimes face issues while using the MS Excel application. One such issue is the Excel file not opening error. In this post, we’ve mentioned the reasons that may result in this error and the ways to resolve it. Also, you’ll find about an Excel repair software that can help you repair corrupt Excel files.

Several Microsoft Excel users have reported encountering the ‘Excel file not opening’ error when opening their Excel file. There are several reasons that may cause this error. In this post, we’ll be discussing the reasons that may lead to the ‘Excel file not opening’ error and the top 5 ways to fix this error.
Why Does the ‘Excel File Not Opening’ Error Appear?
Following are some possible causes that may result in the ‘Excel file not opening’ error:
- There may be a problem with an add-in that is preventing you from opening the Excel files.
- There’s a chance that your Excel application is faulty.
- Your Excel program is unable to communicate with other programs or the operating system.
- The file association might have been broken. This is a common problem faced by users who have upgraded their Excel application or operating system.
- The file you’re trying to open is corrupted.
5 Ways to Fix Excel File Not Opening Error
Let’s explore the ways to resolve the Excel file not opening error:
1. Uncheck the Ignore DDE Checkbox
Dynamic Data Exchange (DDE)allows Excel to communicate with other programs. The Excel error may occur due to incorrect DDE settings. You need to ensure that the correct DDE configuration is enabled. Follow the steps provided below:
- Launch your MS Excel file.
- Go to File > Options.

- Now click on Advanced.

- Further, find the General option on the screen.

- Uncheck the option **‘Ignore other applications that use Dynamic Data Exchange (DDE)**’.
- Click OK to save the changes.
2. Reset Excel File Associations
When you launch your Excel file, the file association ensures that the Excel application is used to open the file. You can try to reset these associations and see if Excel opens after this. Proceed with the following steps to do so:
- Navigate to Start Menu and launch Control Panel.
- Now, navigate to Programs > Default Programs > Set Your Default Programs.

- A new window will open. Herein, find the Excel program in the list and select it. Now, select the option ‘Choose defaults for this program’. Click OK.

- A new window for ‘Set Program Associations’ will open.
- Check the box against the ‘Select All’ option.
- Further, click Save to reset the Excel File Associations settings.

3. Disable Add-Ins
Many people install third-party add-ins to enhance the application’s functionality. Sometimes, these add-ins can create an issue. Follow the below-mentioned steps to disable the problem creating add-ins:
- Launch MS Excel application.
- Navigate to File > Options > Add-ins.

- In the window that opens, go to the Manage option at the bottom.
- Herein, select the COM Add-ins option from the dropdown list. Click Go.

- In the COM Add-ins window, uncheck all the boxes to disable the add-ins. Click OK.

4. Repair MS Office Program
Sometimes the issue is not with your Excel file. Instead, the reason for the error can be a corrupt MS Office application. You can repair the program to fix the Excel file not opening error. Here are the steps:
- Press the Windows + R keys to launch the ‘Run’ dialog box.

- Enter the text ‘appwiz.cpl’ to launch the program and features window.

- Find the MS Office program in the list of applications.

- Right-click on it and select Change.

- In the new window, select the Quick Repair radio button. Click Repair.

- Follow the on-screen instructions to repair the Office application. Once the repair process is completed, you can try opening the Excel file to see if the problem is resolved.
5. Disable Hardware Graphics Acceleration
The hardware graphics acceleration assists in the system’s better performance, especially when you use MS Office applications, like MS Excel or Word. Sometimes, this causes the Excel file not opening issue. You can disable this option to try to resolve the issue. Here are the steps:
- Launch your MS Excel application.
- Navigate to File > Options > Advanced.
- Herein, go to the Display option.
- Uncheck the Disable hardware graphics acceleration checkbox. Click OK.

What If These Solutions Do Not Work?
If you have applied all the methods mentioned above and still cannot open your Excel file, there are chances that your file is corrupted. You can use a specialized Excel repair tool , such as Stellar Repair for Excel to repair the corrupted Excel file. This software has powerful algorithms that can scan and repair even severely corrupt Excel files, without any file size limitation. After repairing the file, it restores all the data, including tables, charts, rules, etc. to a new Excel, with 100% integrity.
To know how the software works, see the video below:

Conclusion
Before you proceed with resolving the Excel file not opening error, try to find out the root cause of this error. If you know the real reason, you can try the method right away. If the reason for the error is corruption in the Excel file, the best option is to repair the file using a professional Excel repair tool, such as Stellar Repair for Excel .
[Fixed]: Freeze Panes not Working in Excel
Summary: This blog discusses the “freeze panes not working” issue in Excel. It mentions the possible reasons behind the issue and offers workarounds and methods to fix it. If the issue is associated with corruption in the Excel file, you can use the specialized Excel repair tool mentioned in the blog to repair the affected file.
The freeze panes feature in Excel is used to freeze the row/column headings to keep them visible while scrolling the worksheet. It is a useful feature when you’re working on a large worksheet containing data that exceeds the rows and columns on the screen. Sometimes, you notice that the ‘Excel freeze panes feature is not working’. There could be numerous factors that can trigger this issue. Let’s know the reasons for the freeze pane not working issue in Excel and how to resolve this issue.
Why can’t I freeze panes in excel?
Several factors may contribute to the Excel freeze panes not working issue in Excel. A few of them are:
- The cell editing mode is enabled in the workbook in which you are trying to use the Freeze Panes feature.
- The Excel file is corrupted.
- The worksheet is protected.
- Advanced Options are disabled in Excel Settings.
- The Excel application is not up-to-date.
- You might be trying to lock rows in the middle of the worksheet.
- Your Excel workbook is not in normal file preview mode.
- Wrong/incorrect positioning of the frozen panes.
How to fix ‘Freeze Panes not Working’ in Excel?
The freeze panes option is available in the View bar. Sometimes, you’re unable to see the View option. It usually occurs if you are using the Excel Started version. Check and try to open the file in the advanced Excel version, which supports all the features. If you are using the advanced Excel version, then try the below workarounds to fix the freeze panes not working issue in Excel.
Workaround 1: Exit the Cell Editing Mode
If your Excel file is switched from normal file view mode to cell editing mode, you can encounter the freeze panes not working issue. In cell editing mode, certain features in Excel, such as the freeze panes, are temporarily disabled to prevent any conflicts. You can disable cell editing mode by pressing the ESC or Enter key. Now locate the View tab and check whether the freeze pane feature is working. If not, then try the next workaround.
Workaround 2: Change the Page Layout View
The Excel freeze panes not working issue can also occur if your workbook is opened in Page Layout view. The Page Layout view doesn’t support freeze panes. If you select page layout, the freeze panes option gets disabled.

To enable the freeze pane option, go to View and click the Page Break Preview tab.

Workaround 3: Check and Remove Options under the Data Tab
Sometimes, you can experience the “freeze panes not working” issue if Sorting, Data Filter, Group, and Subtotal options are enabled in Excel workbook. Such options, when enabled, can lead to unexpected problems with the freeze panes’ functionality. You can check and remove these features from your workbook. To do so, follow these steps:
- Open the Excel file in which you are getting the issue.
- Navigate to the Data tab.
- Check and remove the below features (if enabled):
- Sort
- Filter
- Group
- Subtotal

Workaround 4: Check and Unprotect Worksheet
The freeze panes feature may stop working if your worksheet is protected. You can try to disable the worksheet protection option. Here are the steps:
- In the Excel file, go to the Review tab.
- Click Unprotect Sheet.

After unprotecting the sheet, check whether the “freeze panes not working” issue is resolved. If not, follow the next workaround.
Workaround 5: Use Correct Cell Positioning
The freeze pane is not working issue in Excel can also occur when you use incorrect cell positioning to apply the freeze panes feature. Several users have reported facing this issue when trying to lock multiple rows with the wrong cell selection. So, use correct cell positioning to freeze the rows. For example, if you are trying to lock two rows in an Excel worksheet, then you need to click on 3rd row’s column.

What if the above Workarounds Fail to Fix the Freeze Panes not Working Issue?
If none of the above workarounds works, then there are chances that the workbook is damaged or corrupt. In such a case, you can try the below methods to repair the corrupt Excel workbook.
Run Open and Repair Utility
In case of corruption in the Excel file, you can use the Open and Repair tool in Excel to repair the file. To use this utility, follow these steps:
- In the Excel application, navigate to File and then click Open.
- Click Browse to select the workbook in which you are facing the issue.
- The Open dialog box is displayed. Click on the affected file.
- Click the arrow next to the Open option and then click Open and Repair.

- Click on the Repair option to recover as much data as possible.
- You can see a completion message once the repair process is complete. Click Close.
Use a Professional Excel Repair Tool
If the Open and Repair tool doesn’t work to resolve complex file-related issues and your Excel file is severely corrupted, you can opt for a reliable third-party Excel repair tool, such as Stellar Repair for Excel. This tool can help you repair the Excel file and recover all the data with complete integrity. You can try the software’s demo version to scan the affected file and preview the recoverable data. The software is compatible with all MS Excel versions and Windows operating systems, including Windows 11.
Closure
The “freeze panes not working” issue in Excel can occur due to several reasons, like protected worksheet, incompatible Excel version, and incorrect cell position. Try the workarounds shared in the blog to fix the issue. If the Excel file is corrupt, you can use Stellar Repair for Excel to fix the corruption issues in the file. This tool can quickly repair the Excel file and recover all the data from the file with 100% integrity.
Also read:
- 4 Ways to Transfer Music from Tecno Spark 20 Pro to iPhone | Dr.fone
- How To Repair iPhone 6s Plus System? | Dr.fone
- How to rescue lost call logs from Moto G 5G (2023)
- How to Restore Deleted Sony Pictures An Easy Method Explained.
- How to Rescue Lost Messages from Huawei Nova Y91
- How to Realme C53 Get Deleted photos Back with Ease and Safety?
- How to recover old call logs from your Phantom V Fold?
- How to retrieve erased call logs from Redmi Note 13 5G?
- How to Recover Deleted Notes from iPhone 8 Plus? | Stellar
- How to get back lost photos from Samsung Galaxy A54 5G.
- How To Erase iPhone 7 Data Permanently | Dr.fone
- 4 Ways to Transfer Music from Vivo Y78 5G to iPhone | Dr.fone
- How to recover old call logs from your ZTE Blade A73 5G?
- How to recover deleted photos from Android Gallery after format on Xiaomi 14
- 5 Easy Ways to Copy Contacts from Vivo V30 Pro to iPhone 14 and 15 | Dr.fone
- How to Recover Deleted Data from iPhone SE using Stellar Data Recovery for iPhone? | Stellar
- How To Repair iOS System Issues of iPhone 12 Pro Max? | Dr.fone
- How To Restore Missing Music Files from Honor 90 Pro
- How to Repair Broken video files of Xiaomi Redmi Note 12 4G on Mac?
- How to recover old music from your Vivo Y78 5G
- 5 Easy Ways to Copy Contacts from Xiaomi Redmi Note 12 Pro 5G to iPhone 14 and 15 | Dr.fone
- How to Rescue Lost Videos from Nubia Z50 Ultra
- How to restore wiped music on Y27 5G
- How to restore wiped call history on Honor Magic 6 Lite?
- How To Restore Missing Photos Files from Vivo Y200.
- How to Rescue Lost Videos from Motorola Moto G Stylus 5G (2023)
- How to Electronically Sign a .docx file Using DigiSigner
- How to restore wiped music on Realme 11X 5G
- 4 Ways to Transfer Music from Nokia 130 Music to iPhone | Dr.fone
- How To Repair iOS of iPhone 12 Pro? | Dr.fone
- How to fix damage to the file was so extensive PDF error? | Stellar
- 5 Easy Ways to Copy Contacts from Oppo Find X6 Pro to iPhone 14 and 15 | Dr.fone
- 4 Ways to Transfer Music from Itel A05s to iPhone | Dr.fone
- 5 Easy Ways to Copy Contacts from Poco M6 5G to iPhone 14 and 15 | Dr.fone
- How to Retrieve Deleted Calendar Events iPhone? | Stellar
- How to get back lost contacts from Samsung Galaxy A25 5G.
- How to restore wiped call history on OnePlus 11 5G?
- How To Get Out of Recovery or DFU Mode on iPhone 15 Plus? | Dr.fone
- How to Fix Videos Not Playing on iPhone 15 Plus?
- How To Restore Missing Pictures Files from Nokia XR21.
- How to recover deleted photos on 90 Lite
- How to Downgrade iPhone 14 Pro to an Older Version? | Dr.fone
- How to Fix corrupt video files of Oppo using Video Repair Utility on Mac?
- How to recover deleted photos from Itel S23+.
- How to recover old messages from your Oppo
- 4 Ways to Transfer Music from Oppo F23 5G to iPhone | Dr.fone
- How to recover deleted photos after deleting from Recently Deleted on iPhone 12 Pro | Stellar
- In 2024, How To Unlink Apple ID From Apple iPhone X
- Updated In 2024, How to Add Customized Transitions to OBS
- In 2024, How to Turn Off Google Location to Stop Tracking You on OnePlus 12R | Dr.fone
- Easy Guide How To Bypass Vivo Y100i FRP Android 10/11/12/13
- Life360 Circle Everything You Need to Know On Motorola Razr 40 | Dr.fone
- Your Complete Guide To Reset Honor Magic5 Ultimate | Dr.fone
- In 2024, Top IMEI Unlokers for Your Oppo F23 5G Phone
- Hassle-Free Ways to Remove FRP Lock on Oppo Reno 8T 5G Phones with/without a PC
- Here are Some of the Best Pokemon Discord Servers to Join On Samsung Galaxy M54 5G | Dr.fone
- How To Get Out of DFU Mode on Apple iPhone 7? | Dr.fone
- How To Export Video in Filmora for 2024
- In 2024, Hassle-Free Ways to Remove FRP Lock from Vivo Y100 5G Phones with/without a PC
- How To Fix Unresponsive Touch Screen on Xiaomi Redmi Note 12R | Dr.fone
- Unlock Your Realme 10T 5G Phone with Ease The 3 Best Lock Screen Removal Tools
- In 2024, How to Bypass iCloud Lock on Apple iPhone 13 mini
- Full Guide to Fix iToolab AnyGO Not Working On Lava Blaze 2 5G | Dr.fone
- In 2024, iSpoofer is not working On Samsung Galaxy S21 FE 5G (2023)? Fixed | Dr.fone
- How to Unlock Apple iPhone 14 Plus Passcode without iTunes without Knowing Passcode?
- Split Your Videos with Ease Top Free MPEG Splitters
- Title: How to Fix Excel 2010 has Encountered a Problem | Stellar
- Author: Nova
- Created at : 2024-05-19 18:32:11
- Updated at : 2024-05-20 18:32:11
- Link: https://blog-min.techidaily.com/how-to-fix-excel-2010-has-encountered-a-problem-stellar-by-stellar-guide/
- License: This work is licensed under CC BY-NC-SA 4.0.
