
:max_bytes(150000):strip_icc():format(webp)/how-to-use-a-mobile-boarding-pass-eb61458058f44011ad7ed012566127e4.jpg)
How to Fix Excel 2019 Run Time Error 1004 | Stellar
How to Fix Excel Run Time Error 1004
Summary: Run-time errors are windows-specific issues that occur while the program is running. This blog will teach you how to fix Excel run-time error 1004. In addition, you’ll learn about an Excel repair tool that can help fix the error 1004 if it occurs due to corruption in Excel files.

VBA (Microsoft Visual Basic for Application) is an internal programming language in Microsoft Excel. Sometimes, when users try to run VBA or generate a Macro in Excel, the Run-time error 1004 may occur. This error may occur due to the presence of more legend entries in the chart, file conflict, incorrect Macro name, and corrupt Excel files. In this blog, we have discussed the reasons and shared some solutions to resolve run-time error 1004.
Why This Error Occurs?
The run time error 1004 usually occurs when you run a VBA macro with the Legend Entries method to modify the legend entries in the MS Excel chart. It happens when the chart contains more legend entries than the available space, macro name conflicts, corrupt Excel files, or data-types mismatch in the VBA code.
Ways to Fix Excel Run-Time Error 1004?
Try the below workarounds to fix Excel run-time error 1004:
Create a Macro to Reduce Chart Legend Font Size
Sometimes, Excel throws the run-time error when you try to run VBA macro to change the legend entries in a Microsoft Excel chart. This error usually occurs when Microsoft Excel truncates the legend entries because of the more legend entries and less space availability. To fix this, try to create a macro that shrinks/minimize the font size of the Excel chart legend text before the VBA macro, and then restore the font size of the chart legend. Here is the macro code:
1 | VBCopy |
Uninstall Microsoft Work
You may encounter a run-time error 1004 in Excel version 2009 or older versions due to conflicts between Microsoft works and Microsoft Excel. This error usually occurs if your system has both Microsoft Office and Microsoft Works. Uninstalling one of them will fix the issue. Try the below steps to uninstall Microsoft Work:
- First, open the Task Manager using the shortcut CTRL + ALT + DEL altogether
- The Task Manager window is displayed.

- Click the Process tab, right-click on each program you want to close, and then click End Task.
- Stop all the running programs.
- Open the Run window and type appwiz.cpl to open the Programs and Feature window.

- Search for Microsoft Works and click Uninstall.
Try Deleting GWXL97.Xla File
The Add-ins files with .xla extension in MS-EXCEL is used to provide additional functionality to Excel spreadsheets. Sometimes, deleting the GWXL97.XLA file fixes the run-time error. Here are the steps to delete this file:
- Make sure you have an Admins rights, open the Windows Explorer
- Follow the Path C:\Programs Files\MSOffice\Office\XLSTART.
- Find and right-click on the GWXL97.XLA file
- Click Delete.
Change Trust Center Settings
Sometimes, run-time errors might arise because of incorrect security settings. The Trust Center settings help you find the Privacy and security settings for Microsoft Excel. Follow the below steps to change the Trust center settings:
- Open Microsoft Excel.
- Go to File > Options.
- The Excel options window is displayed.
- Choose Trust Center, and click Trust Center Settings.
- Tap on the Macro Settings tab, and select Trust access to the VBA project object model.

- Click OK.
Run Open and Repair Tool
The Runtime error also arises when MS Excel detects a corrupted worksheet. It automatically begins the File recovery mode and starts repairing it. However, if the Recovery mode fails to start, use the Open and Repair tool with the below steps:
- Click File > Open.
- Click the location and folder with a corrupted workbook.
- In the Open dialog box, choose the corrupted workbook.
- Click the arrow next to the Open tab, and go to the Open and Repair tab.
- Click Repair.
You can also opt for Stellar Repair for Excel if the Microsoft Excel’s built-in tool cannot fix the error.
Use Stellar Repair for Excel
Stellar Repair for Excel is a professional software for repairing damage. xls, .xlsx, .xltm, .xltx, and .xlsm files and recovering all its objects. Here are the steps to fix the error using this tool:
- First, download, install, and run Stellar Repair for Excel.
- Click the Browse tab on the interface window to choose the corrupted Excel file you need to repair.
- Click Scan. You will see the scan progress in the scanning window.
- Click OK.
- The tool can let you preview all the recoverable Excel file components including tables, pivot tables, charts, formulas, etc.
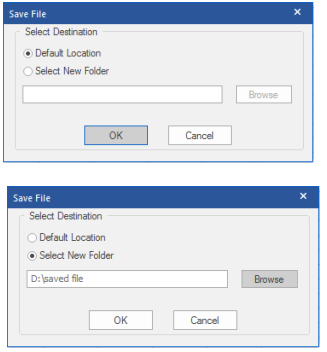
- Click Save to save the repaired file.
- A Save File dialog box will appear with the below two options:
- Default location
- New location
- Choose a suitable option.
- Click the Save option to repair the Excel file that you have chosen.
- Once the repair is complete, it will display a message “File repaired successfully.”
- Click OK.
Conclusion
Now you know the Excel run-time error 1004, its cause, and solutions. Follow the workarounds discussed in the blog to rectify the error quickly. However, Stellar Repair for Excel makes your task of removing run-time errors easy. It’s a powerful software to fix all the issues with Excel files. Also, it helps in extracting data from the damaged file and saves it to a new Excel workbook.
File Format and Extension of [filename] don’t Match in Excel File
Summary: The “File format and extension of [filename] don’t match. The file could be corrupted or unsafe” error message indicates that the Excel file you’re trying to open is unsupported, unsafe, or corrupted. Read this article to learn more about this error and how to fix this error. It also mentions an advanced Excel recovery tool to repair the corrupted Excel file and retrieve all its data in a few clicks.
You can encounter the “File format and extension of [filename] don’t match. The file could be corrupted or unsafe” error when the Excel application detects any issue with the file. This happens when you try to open an old version file format in a newer version or if the file is received from an unsafe destination. This can prevent you from opening the Excel file.
As indicated from the error message, this error occurs due to the following reasons:
- The file has incorrect file extension.
- The file is corrupted.
- The file you are trying to open is protected.
Now, let’s see how to resolve this Excel error.
Methods to Fix the “File format and extension of [filename] don’t match” Error
Try the following methods to troubleshoot the “File format and extension don’t match” error in Excel.
Method 1: Rename the Excel File
You can face the “File format and extension don’t match” issue if the file has incorrect extension. It can occur if the file extension has been altered or you’ve mistakenly saved the file with incorrect extension. To fix this, you can try renaming the Excel file with the correct file extension.
Method 2: Check the Default Excel File Format
Different versions of Microsoft Excel use different default file formats. For example, .xls is the default file format of older versions (2003 and lower) of Excel, whereas .xlsx format is used by the newer versions (2007 and later). Opening the Excel file with an incompatible extension can cause the “File format and extension don’t match” issue. You can check the Excel version you are using and ensure it’s compatible with the Excel file you are trying to open.
Method 3: Change the Protected View Settings
You may receive the “File format and extension of excel don’t match” error if the Excel file is protected. You can check and try disabling the Protected View settings .
Caution: Changing the Protected View settings can put your system at risk. If the Excel file is being downloaded from the internet, it may contain viruses that can infect your system. So be careful before disabling the Protected View settings.
Steps to Change Protected View Settings in Excel:
- In the Excel’s File menu, click on Options.
- Select Trust Center > Trust Center Settings.

- Under Trust Center, select Protected View and disable the below three options:
- Enable Protected View for files originating from the internet.
- Enable Protected View for files located in potentially unsafe locations.
- Enable Protected View for Outlook attachments.

- Click OK. Then, try to open the Excel file.
Method 4: Check and Provide the Excel File Permissions
Sometimes, you can get the error if you don’t have sufficient permissions to open the Excel file. This usually happens when you try to open the Excel file received from other sources. You can check and provide the desired permissions to fix the error. Here are the steps:
- Locate the affected Excel file, right-click on it, and select Properties.

- In the Properties window, click the Securities option and select Edit.

- In the Security window, under ‘Group or users name’, select the user names. Check the file permissions and make sure Full Control is enabled. If not, then click on the Add option.

- Click on the Advanced option in the Users, Computers, Service Accounts, or Groups window**.**

- Click the Find Now option. A list of all users and groups appears in the search field.

- Select “Everyone” from the list and then click OK.

- In the object names field, you will see ‘Everyone’. Click on OK.

- In the Permissions window, select “Everyone” and enable all options (Full Control, Modify, Read & Execute, Read, and Write) under Permissions for Everyone.

- Click Apply and then OK.
Method 4: Repair your Excel File
As the error message indicates, corruption is one of the causes of the “File format and extension of [filename] don’t match” error. If your file is corrupted, you can repair it using Microsoft’s built-in Open and Repair tool. Here are the steps to run the Open and Repair tool to repair corrupted Excel file:
- In Excel, click on File.
- Click Open and then click on Browse to select the corrupted Excel file.
- In the Open dialog box, click the Excel workbook (in which you are facing the error).
- Click the arrow next to the Open button and select Open and Repair.
- Then, click Repair to recover as much data as possible.
- The Excel prompts a message after the repair process is complete. Click Close.
The Open and Repair utility may fail to give the intended results. In such a case, you can repair the corrupted/damaged Excel file using a specialized Excel repair tool . Stellar Repair for Excel is one such tool that can repair severely corrupted Excel files. With the help of this tool, you can quickly recover all the objects from the Excel file. The tool has a simple user interface that even a non-technical can use to repair the Excel files. The tool can also repair multiple Excel files at once. You can check the tool’s functionality by downloading its demo version.
Closure
You can encounter the “File format and extension of [filename] don’t match” error due to different reasons. To resolve the issue, you can check the file extension, permissions, protected settings, etc. If you suspect the error has occurred due to corruption in the Excel file, you can try repairing the Excel file using the Open and Repair tool. If nothing works for you, then try Stellar Repair for Excel . It can repair highly damaged Excel files and recover all the data while preserving the file properties and cell formatting. The tool can help you fix all the common corruption-related errors quickly.
How to Repair Corrupt Pivot Table of MS Excel File?
Summary: If you are not able to perform any action on the Pivot Table of MS Excel file, it indicates Excel Pivot Table corruption. In such a case, you must repair the corrupt Pivot Table of MS Excel file by using an Excel repair software or manual troubleshooting steps discussed in this post.
MS Excel is equipped with several brilliant features and functions which make working with large volumes of data easy. In addition to helping users save data into well-organized cells and tables, the application helps users draw inferences from the data. Pivot Table is one such Excel feature that helps users extract the gist from a large number of rowed data. But often, the Pivot table may get corrupted and lead to unexpected errors or data loss.
Corrupt Pivot Tables can stop users from reopening previously saved Excel workbooks, raising the serious issue of data inaccessibility. Resolving such issues is an uphill task unless one gets to the actual root cause of the problem.
However, with Stellar Repair for Excel software, you can repair the corrupt Pivot table of MS Excel file while keeping the Excel file data, formatting, layout, etc. intact.

Excel Pivot Tables & Associated Problems
Pivot Tables in Microsoft Excel are created by applying an operation such as sorting, averaging, or summing to the data in certain tables. The results of the operation are saved as summarized data in other tables. Typically, working on the grouping of saved data, Pivot Tables are used in data processing and are found in data visualization programs, such as spreadsheets or business intelligence software.
Put simply, Pivot Tables in Excel allow you to extract the significance or the gist from a large, detailed data set by allowing you to slice-and-dice data, sort-and-filter data, or arrange it in any way you want.
Frequently Encountered Problems with Pivot Tables in MS Excel
Take a look at the most frequently encountered Pivot Table issues:
- You add new data into a pivot table but it doesn’t show up when you refresh
- Pivot Table contains Blanks instead of Zeros for fields that have no source data
- Automatic field names assigned by the Pivot Table can be inappropriate
- It doesn’t directly show the percentage of total
- Grouping one pivot table affects another
- Your number of formatting gets lost
- Refreshing a pivot table messes up column widths
- Field headings make no sense and add clutter
While some of the above problems seem minute and can easily be resolved using a few tweaks, bigger issues like unexpected Pivot Table error messages that an Excel throws can be troublesome.
Pivot Table Errors & Their Reasons
Excel users who have built new Pivot Tables in Excel often report the following errors when trying to reopen a previously saved workbook:
We found a problem with some content in

Naturally, users are prompted to click on ‘Yes’. But when they do, they get another error message saying:
Removed Part: /xl/pivotCache/pivotCacheDefinition1.xml part with XML error
(PivotTable cache) Load error. Line 2, column 0
Removed Feature: PivotTable report from /xl/pivotTables/pivotTable1.xml part (PivotTable view)
Such errors are indicative of the fact that the data within the Pivot Table still exists, but the table itself isn’t functioning anymore.
There could be two primary reasons behind such behavior:
- You’ve created the Pivot Table in an older version of Excel but are trying to open-refresh-save it through a newer Excel version
- The Pivot Table itself is corrupted
How to Repair the Pivot Table Quickly?
To solve the errors associated with Pivot Tables, you need to repair them. But Microsoft doesn’t offer any inbuilt technique or option to repair Pivot Tables. Thus, to fix the issue, you either need some sort of workaround or an Excel file repair software .
Methods to Fix Corrupt Pivot Table in MS Excel
Though there aren’t many options to fix the Pivot Table, you can follow these workarounds to try and repair a corrupt Pivot Table of MS Excel. However, before following these steps, create a backup copy of your Excel file.
Method 1: Open MS Excel in Safe Mode
First, try opening the Excel file in safe mode and then check if you can access the Pivot Table. If you can, save all its contents to a new Pivot Table in the latest version of Excel so that this problem doesn’t arise anymore.
Method 2: Use Pivot Table Options
If, however, above method doesn’t work, follow the below-mentioned steps:
- Right-click on the Pivot Table and click on Pivot Table Options
- On the Display tab, clear the checkbox labeled “Show Properties in ToolTips”
- Save the file (.xls, .xlsx) with the new settings intact
Method 3: Make Changes to Pivot Table
If the above method or steps didn’t work,
- Try opening the Pivot Table Options window by right-clicking on the Pivot Table within your Excel file
- Select Pivot Table Options from the pop-up menu and make appropriate changes to the options given there
- Then check if the issues go away
Method 4: Check and Set Data Source
If the problem in the Pivot table is related to data refresh,
- Go to Analyze > Change Data Source
- Check if the data source is set properly
- Also, try reselecting the data source and check if the refresh option is working properly
If not, resorting to Stellar Repair for Excel software might be your only hope.
Excel Pivot Table Repair by Using Excel Repair Software
When corruption strikes an Excel Pivot Table and no manual trick work, Stellar Repair for Excel is the best solution. This easy-to-use Excel Repair software repairs even the most severely corrupted Excel (XLS/XLSX) files to restore all data, properties, formatting, and preferences. It enables users to extract their saved data into new blank Excel files.
If you have this utility by your side, you don’t need to think twice about any Excel error.

What customer says about the Excel Repair Software?


Conclusion
Excel Pivot Table corruption may occur due to any unexpected errors or reasons. This can lead to inaccurate observation in data analysis and also cause data loss if not fixed quickly. However, you can prevent data loss due to problems caused by Pivot Table corruption by keeping a backup of all your critical Excel files and fix the Pivot Table corruption by using proper tools, such as Excel file repair software, that can help you get over any Excel corruption and errors quickly.
How Do I Restore Excel File ?
Excel (XLS/XLSX) file corruption is a common issue that may arise due to problems, such as abrupt system shutdown, system crash, malware or virus intrusion, unsupported add-in, etc. However, MS Excel comes with a recovery feature that allows users to recover or restore Excel files lost or corrupted when the MS Excel quits unexpectedly or computer crashes due to hardware or software-related issues.
But sometimes, the restored version of the Excel file may not contain all the data or changes you made recently. In such cases, you are left with the option to repair the damaged or corrupt Excel file with the help of an Excel repair software, such as Stellar Repair for Excel .

Solutions to Restore Excel File
Below we have discussed various solutions to repair, recover, and restore unsaved, lost, corrupt, or inaccessible Excel files with the help of MS Excel options and Excel repair software.
NOTE: Some of these methods work only if you had enabled or configured certain required settings or options before corruption or losing the Excel file.
1. Restore Lost or Unsaved Excel File via ‘Recover Unsaved Workbooks’ Option
The Recover Unsaved Workbooks option allows you to restore the Excel file that you forgot to save before closing MS Excel or it stopped working. The steps are as follows:
- Navigate to ‘_File > Open._’
- Scroll to the bottom and click on ‘Recover Unsaved Workbooks.’ This opens a File Explorer browser window.

- Now look for the Excel file that you lost and then double-click on it to open and restore the Excel file.
- Once the file is open, click on File > Save As and save it to your desired location.
However, this option works only if you had enabled and set up the ‘Save AutoRecover information every X minutes_’ option and enabled the ‘_Keep the last AutoRecovered version if I close without saving’ option.
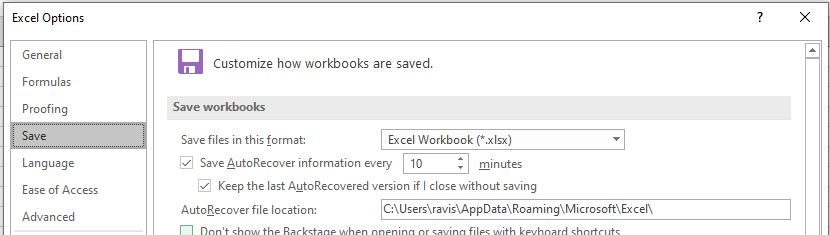
Also, this may not restore the most recent copy of your Excel file, but it will surely save your time that went into creating and editing the workbook.
2. Repair and Restore Corrupt or Inaccessible Excel File
If the Excel file you are trying to open or access is corrupt, MS Excel will display an error message. When MS Excel detects corruption, it starts ‘File Recovery Mode’ to repair the Excel workbook.
However, if it doesn’t start automatically, you can manually repair minor corruption error and restore the Excel file by following these steps:
- Navigate to File > Open and then navigate to the corrupt or damaged Excel file location.
- Select the file and then click on the arrow beside the ‘Open’ button to choose the ‘Open and Repair…’ option.
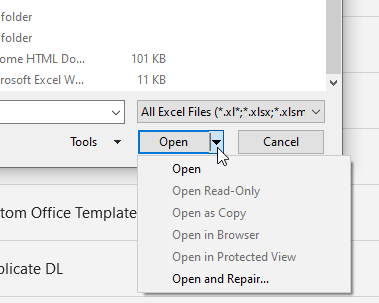
- Now click ‘Repair’ if you want to recover maximum data from a corrupt or inaccessible Excel workbook and restore it to a new Excel file.

If the ‘Repair’ option fails, use the Extract Data option that extracts values, data, and formulas from the Excel workbook.
3. Revert Excel File to Last Saved Version
When an Excel file gets corrupt or damaged while working, you may revert the Excel file to the last saved version. This allows you to restore the Excel file version that isn’t corrupt or damaged. The steps are as follows,
- Click File > Open.
- Double-click the name of the workbook that you have opened in Excel.
- Click Yes to reopen the workbook.
The workbook opens without any changes you’ve made that might have caused the workbook to become corrupted.
4. Use Excel Repair Software to Restore Excel File
If the corrupt or damaged Excel file isn’t repaired by using MS Excel options or you lost data after restoring the unsaved version or after reverting to the last version, you can rely on an Excel repair software, such as Stellar Repair for Excel.
The software repairs Excel files with 100% integrity and restores the Excel data, such as table, Pivot tables, charts, etc., while preserving the workbook properties and formatting. The software is safe as it doesn’t alter or make changes to the original Excel file and saves the repaired data to a new Excel workbook at your desired location.
It supports Excel files (XLS and XLSX), created in MS Excel 2019, 2016, or older versions. It resolves Excel corruption errors, such as Unable to open Excel file, in a few clicks.
To repair a corrupt or inaccessible Excel workbook by using Stellar Repair for Excel software, follow these 3 simple steps,
- Select the corrupt or damaged Excel workbook file (XLS/XLSX).
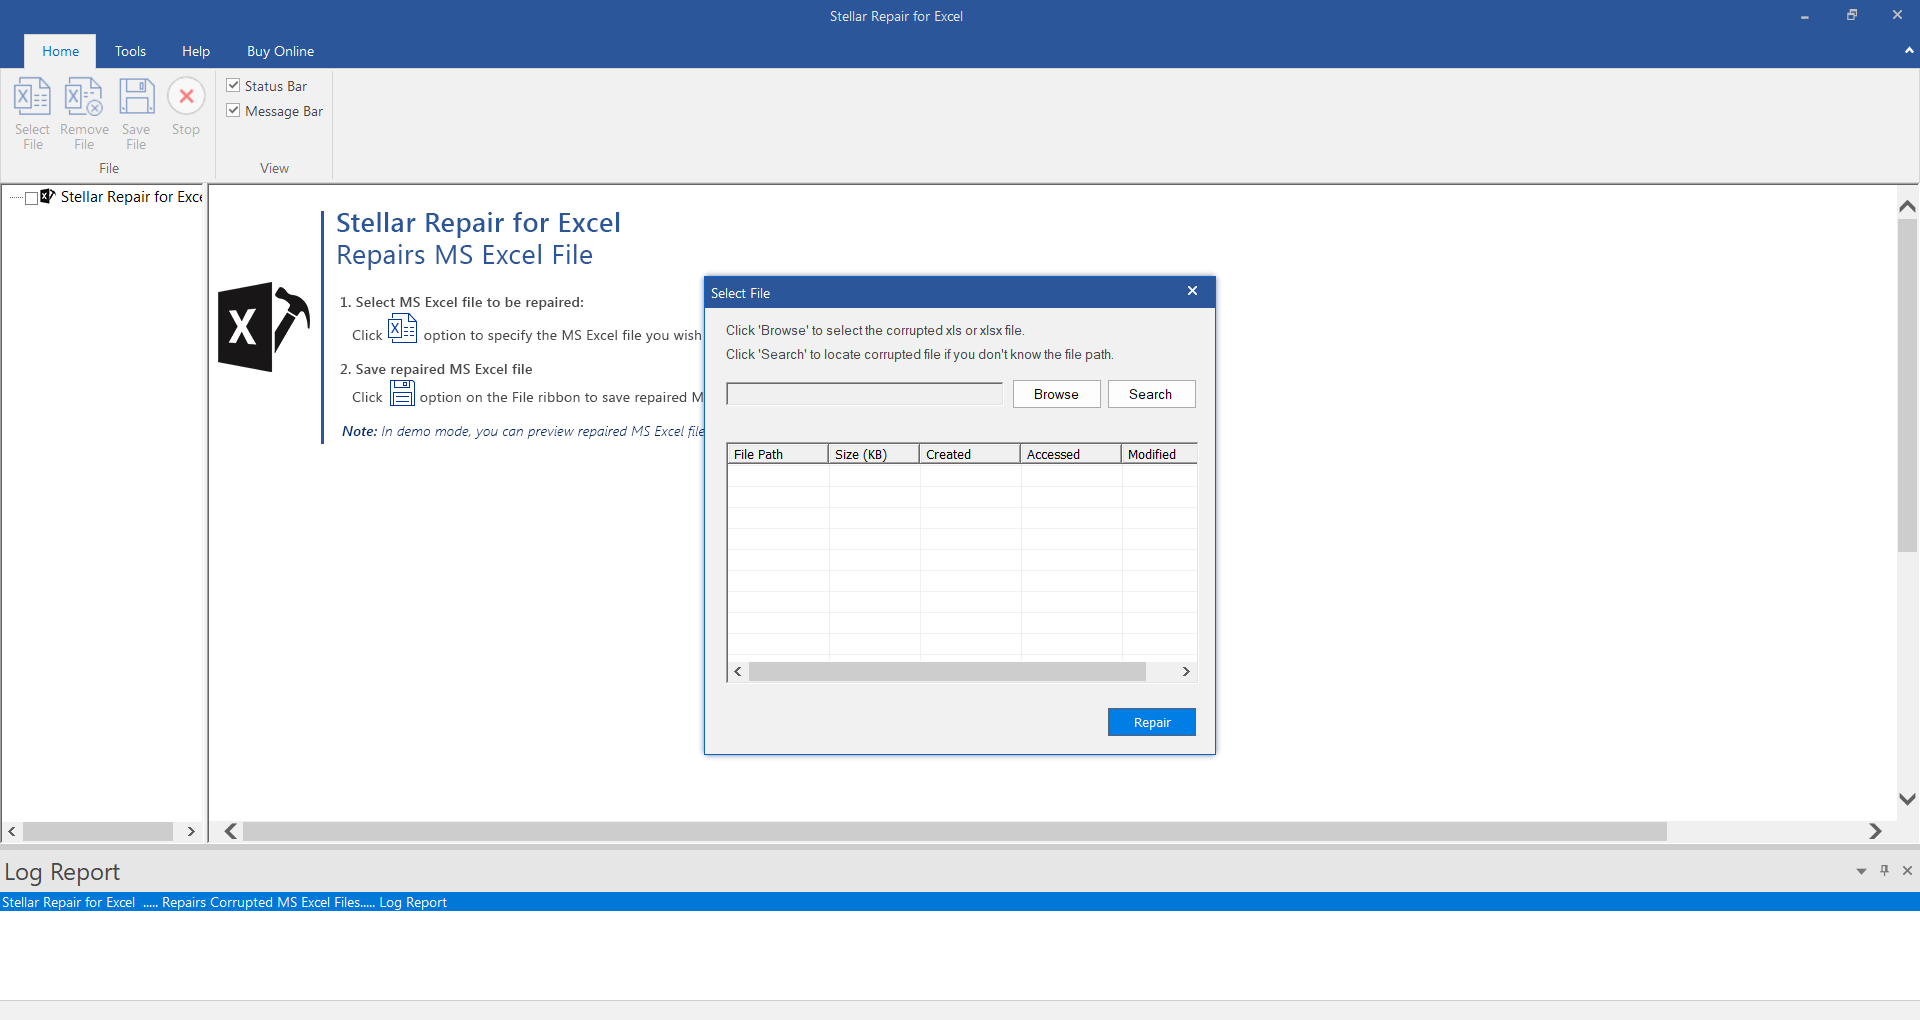
- Repair and then preview the Excel workbook.
- Save the workbook at default or your desired location.
Once saved, you can open and start editing or working on the Excel sheet. Make sure to enable AutoRecovery and AutoSave options to avoid data loss due to corruption.
Conclusion
In this article, we discussed methods and solutions to restore Excel file when it gets damaged or corrupt due to various issues. Although Excel can help you recover or restore Excel file after corruption, it can resolve only minor corruption errors. Thus, it may fail if the Excel file corruption is severe. In such cases, an Excel repair software, such as Stellar Repair for Excel, comes in handy. It resolves Excel corruption, repairs tables, charts, chart sheets, Pivot table, etc., and restores them to a new Excel sheet with 100% consistency.
Fix the Too many different cell formats Error in Excel?
Excel has set a limit on the number of unique cell formats within a workbook. Excel 2003 allows up to 4000 different cell format combinations, whereas Excel 2007 and later versions allow a maximum of 64000 combinations. When this limit exceeds, you may encounter errors, such as “Too many different cell formats”. It can prevent you from inserting or modifying workbook rows or columns. Sometimes, it prevents you to copy and paste the content within the same or different workbooks. This error may also occur due to various other reasons.
You can encounter the “Too many different cell formats” error due to the below reasons:
- Formatting is missing in the workbook.
- Size of your Excel file has increased due to excessive use of complex formatting (conditional formatting).
- Workbook contains a large number of merged cells.
- There are multiple built-in or custom cell styles.
- Excel workbook is corrupted.
- The unused styles are unexpectedly copied to new workbooks (when moving or copying a worksheet from one to another).
- Workbooks contain multiple worksheets with different cell formatting.
Methods to Fix the “Too many different cell formats” Error in Excel
First, check that your Excel application is up-to-date. It helps in preventing duplicate styles in workbooks. If the error persists, then follow the below methods:
Method 1: Simplify the Workbook Formatting
You can face the error in Excel - Too many different cell formats, if the size of your Excel file has increased due to excessive or unnecessary formatting. You can try to simplify the formatting of the affected workbook. While reducing the number of formatting combinations, you can follow the simplifying guidelines, such as using a standard font and applying borders consistently. Follow the below steps to remove unnecessary formatting in your worksheet:
- First, open the affected worksheet.
- Now, use the shortcut key (Ctrl+A) to select all the cells.
- In the Excel ribbon, navigate to the Home tab and click Clear.

- Then, select the Clear Formats option.

The above steps will remove all unnecessary formatting from the selected cells, thus reducing the number of cell formats. Besides this, you can try removing the cell patterns (if any) or use cell styles to remove unnecessary formatting in the workbook.
Method 2: Remove Conditional Formatting
Conditional formatting is also one of the reasons behind the “Too many different cell formats” error. It usually occurs if you have applied multiple rules to various cells or cell ranges within a workbook. Each rule has its own formatting settings. If you’ve applied a large number of conditional formatting to cells, it can increase the number of unique cell formats. You can check and remove the unnecessary conditional formatting. Here are the steps to do this:
- Open the Excel file in which you are getting the error.
- Go to the Home tab and locate Conditional Formatting.

- Select Manage Rules.
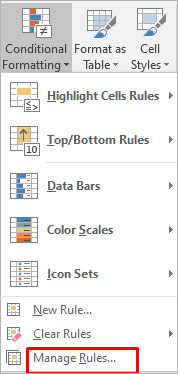
- The Conditional Formatting Rules Manager wizard is displayed. You can check the formatting rules and delete the unnecessary rule by clicking on the Delete Rule option.
Method 3: Repair your Excel Workbook
Corruption in the Excel workbook can also cause the “Too many different cell formats” error. You can try the Microsoft inbuilt utility to repair the file. Follow these steps to use this utility:
- Open your Excel application. Go to File > Open.
- Click Browse to choose the affected workbook.
- The Open dialog box will appear. Click on the corrupted file.
- Click the arrow next to the Open button and then select Open and Repair.
- You will see a dialog box with three buttons - Repair, Extract Data, and Cancel.

- Click on the Repair button to recover as much of the data as possible.
- After repair, a message is displayed. Click Close.
If the Open and Repair utility does not work or fails to repair the corrupted Excel file due to any reason, then you can use Stellar Repair for Excel to repair the Excel file. It is a simple-to-use third-party Excel repair tool with an intuitive UI that enables anyone to use it without much effort. The tool can help in fixing the “Too many different cell formats” error. It does so by repairing the Excel (XLS/XLSX) file and recovering all the components, including damaged cell style, without impacting the original formatting. You can download the software’s demo version and install it to check how it works.
Method 4: Save the Excel File to a Binary Workbook (.xlsb) Format
You can also get the “excel too many cell formats” error if the size of the spreadsheet is too large. You can try saving the Excel file in binary (.xlsb) format to reduce the Excel file size. Here’s how to do so:
- In Excel, navigate to File > Save As.
- Select Excel Binary Workbook (*.xlsb) in the Save as type dialog box.
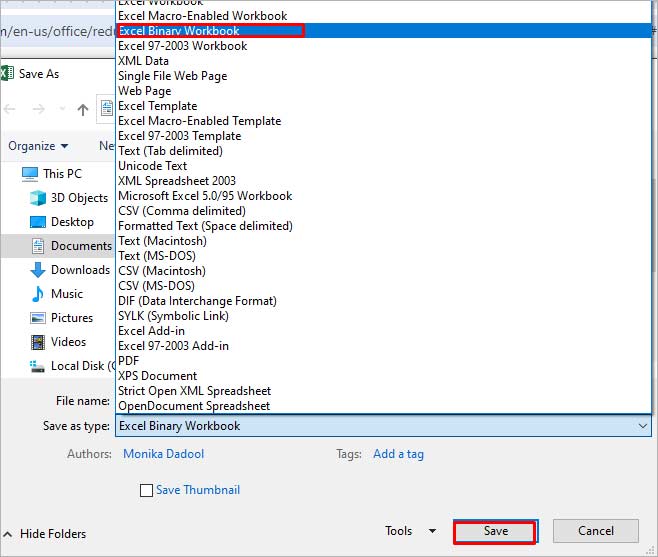
- Click Save.
Some Additional Solutions
Here are some additional methods you can try to fix the issue:
1. Check and Fix the Un-used Style Copy Issue
Many users have reported encountering the “Too many different cell formats” error when moving or copying the content of a workbook from one Excel to another and the unused styles being copied from one workbook to another. Microsoft has released a hotfix package which contains a fix for this issue. You can install this hotfix package (2598143 ) to resolve the issue.
2. Use Clean Excel Cell Formatting Option
You can check and enable the Excel cell formatting option to fix the “Too many cell formats” issue. This option will help you remove the excess formatting in your workbook. To locate this option, click on the Inquiabove steps willre tab. If you fail to see the Inquire tab, then check if the Inquire option is enabled in the Excel Com Add-ins settings.
3. Clean up Workbooks using Third-Party Tools
The “Too many different cell formats” issue can occur if your workbook contains a large number of unnecessary styles, as mentioned above. You can use third-party tools, such as XLStyles Tool or Remove Styles Add-in to clean up workbooks recommended in Microsoft Guide. However, Microsoft takes no guarantee of these tools.
Closure
If you’re getting the “Too many different cell formats” error in Excel, try the methods discussed in this post to resolve it. You can simplify the formatting by following standardized guidelines and clearing all the unnecessary conditional formatting. If the error has occurred due to corruption in Excel file, then you can use Stellar Repair for Excel to repair the Excel file. It is an advanced tool that can repair Excel worksheet and recover all its objects without losing the original formatting.
Quick Fixes to Repair Microsoft Excel 2013/2016 Content related error
Summary: The blog outlines some quick tips to fix ‘We found a problem with some content’ error in Microsoft Excel 2013/2016. It explains manual procedure to resolve the error and also suggests an automated tool to perform the repair process to retrieve all possible data from a corrupt workbook.
Sometimes, when opening an MS Excel file, you may receive an error message that reads:
“**We found a problem with some content in ‘filename.xlsx’. Do you want us to try to recover as much as we can? If you trust the source of this workbook, click Yes.**“

Figure 1 – Excel ‘found a problem with some content’ Error Message
What Causes ‘We Found a Problem with Some Content’ Error?
There is no clear answer as to what results in the Excel error – ‘**We found a problem with some content in <filename.xlsx>**’. However, based on some user experiences, it appears that the error occurs due to corruption in an Excel workbook. It may turn corrupt when:
- You try opening the Excel file saved on a network-shared drive.
- A string is added in a cell in Excel, instead of a numeric value.
- Text values in formulas exceed 255 characters.
How to Resolve ‘We Found a Problem with Some Content’ Error?
Follow these tips to fix the Excel error:
IMPORTANT! Before you follow the tips to resolve the Excel error, keep these points in mind: Make sure you have closed all of the opened Excel workbooks. Try restoring Excel file data from the most recent backup copy. If you don’t have a backup copy, make a copy of the corrupt Excel file and perform repair and recovery procedures on that backup copy.
Tip #1: Repair Corrupt Excel File
File Recovery mode is a native Excel recovery utility that automatically opens whenever any inconsistencies are found in the worksheet. If Microsoft doesn’t detect any issue or fails to open the File Recovery mode, you can start it manually to recover the corrupt Excel file. To do so, follow the steps below:
- Click on the File menu, and then select Open.
- In the Open dialog box, navigate to the folder location where the corrupt Excel file is saved.
- Select the corrupt file, and then click on arrow sign available next to Open button to select Open and Repair option.

Figure 2 – Open and Repair Feature in Excel
- Next, click Repair to recover maximum possible data.
- If the repair is not able to recover the data from the workbook, select Extract Data to extract all possible formulas and values from the workbook.
If repairing the corrupt Excel file doesn’t work, you can try an Excel file repair tool to fix corruption errors. You can also try to recover data from the corrupt file manually by following the next tips.
Read this: What to do when Open and Repair doesn’t work?
Tip #2: Set Calculation Option to Manual
To make the file accessible, try setting the calculation option in Excel from automatic to manual. As a result, the workbook will not be recalculated and may open in Excel. For this, perform the following:
- Click File, and then click New.
- Under New, click the Blank workbook option.
- When a blank workbook opens, click File > Options.
- Under the Formulas category, pick Manual in the Calculation options section, and then click OK.

Figure 3 – Select Manual in Calculation options
- Now, again click on the File menu and then click Open.
- Navigate to the corrupt workbook, and double-click it.
When the workbook opens, check if it contains all the data. If not, proceed to the next tip.
Tip #3: Copy Excel Workbook Contents to a New Workbook
Several users have reported that they were able to fix ‘We found a problem with some content in
- Open the Excel workbook in ‘read-only’ mode, and copy all its contents.
- Create a blank new workbook and paste the copied contents from the corrupt file to the new file.
Tip #4: Use External References to Link to the Damaged Workbook
Use external references to link to the corrupted workbook. By implementing this fix, data contents can be retrieved. However, it is not feasible to recover formulas or calculated values using this solution.
Follow the steps below:
- In Excel 2013/2016, click File > Open.
- Navigate to the folder where the corrupt file is saved.
- Right click the file, select Copy, and then click on Cancel.
- Again, click on File and then New.
- Under New option, click on Blank workbook.
- In the cell A1 of new workbook, type =File Name!A1 (where File Name indicates the name of the damaged workbook being copied in Step 3).
- If Update Values dialog box appears, click the corrupt workbook, and choose OK.
- If Select Sheet dialog box appears, click the appropriate sheet, and then click OK.
- Select cell A1.
- Next, click Home, and then click Copy (or, press Ctrl +C).
- Starting in cell A1, select area approximately the same size as that of the cell range that contains data in the damaged workbook.
- Next, click Home and select Paste (or click Ctrl + V).
- Keep the range of cells selected, click Home and then Copy.
- Finally, click on Home, click on the arrow associated with Paste and under Paste Values click on Values.
This will remove the link to the corrupt workbook and will retrieve data. But, keep in mind, the recovered data will no longer contain formulas or calculated values.
Alternative Solution – Stellar Repair for Excel
If the above manual methods fail to fix the ‘We found a problem with some content in Excel error’, try using the Stellar Repair for Excel software to resolve this error. The software helps repair and recover corrupt Excel files in just a few clicks. It can be used on a Windows 10/8/7/Vista/XP/NT machine to repair a corrupted workbook and recover every single bit of data from all the versions of the Excel workbook.

Read this: How to repair corrupt Excel file using Stellar Repair for Excel?
Conclusion
In this blog, we discussed some possible reasons behind Microsoft Excel 2013/2016 ‘We found a problem with some content’ error. The error may occur when an Excel file becomes corrupt. You may try repairing the corrupted Excel file manually by using the built-in ‘Open and Repair’ feature. Or, try the manual workarounds to extract data from the corrupt file discussed in this post. If the manual solutions don’t work for you, using Stellar Repair for Excel can come in handy in repairing the corrupt Excel (.xls/.xlsx) file and recovering the complete file data.
How to fix runtime error 424 object required error in Excel
The Runtime error 424: Object required occurs when Excel is not able to recognize an object that you are referring to in a VBA code. The object can be a workbook, worksheet, range, variable, class, macro, etc. Some users have also reported that this error occurred when they tried to copy the values of the cells from one workbook to another.
Let’s understand the error through a small scenario. Suppose, I want to check the last field row in a table in a spreadsheet named “First” using the VBA code. To do this, I have added a command button and double-clicked on it and entered the below code in the backend:
Private Sub CommandButton2_Click()
Dim LRow As Integer
LRow = Worksheets(“First”).Cells(Rows.Count, 2).End(xlUp).Row
MsgBox (“Last Row “ & LRow)
End Sub
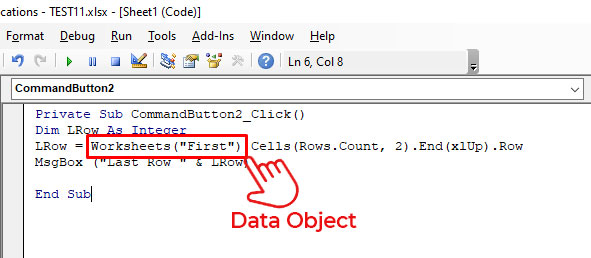
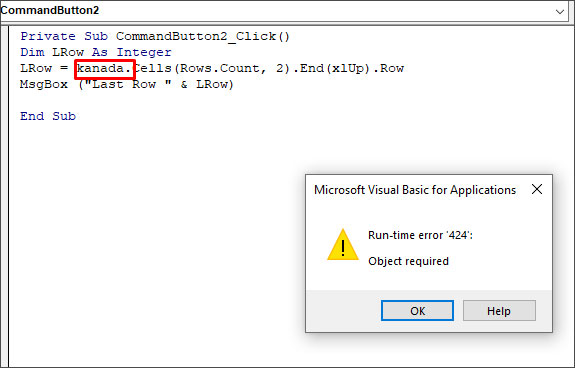
In this code, Worksheets(“First”) is a data object. If I mistakenly delete this data object and insert any random name (for example - kanada), then it will not be recognized by Excel. When I run this code, I will get the “Run-time error 424”.
Causes of Runtime Error 424 in Excel
The Runtime error 424: Object required can occur due to the following reasons:
- Incorrect name of the object you are trying to refer to in a code.
- You have provided an invalid qualifier to an object.
- You have not used the Set statement while assigning an object reference.
- The object is corrupted.
- Missing objects in a workbook.
- Objects you are trying to call in a code are mistakenly deleted or unavailable.
- You have used an incorrect syntax for object declaration.
- You are trying to perform an invalid action on an object in a code.
- Workbook is corrupted.
Solutions to Fix Runtime Error 424: Object Required in Excel
The VBA error ‘object required’ may occur due to different reasons. Based on the reason, you can follow the solutions mentioned below to fix the error.
1. Check the Name of the Object
The Runtime error 424 can occur when you run the VBA code using an incorrect name of the object. For example, the object name is ‘MyObject’ but you’re using “Backcolor”.
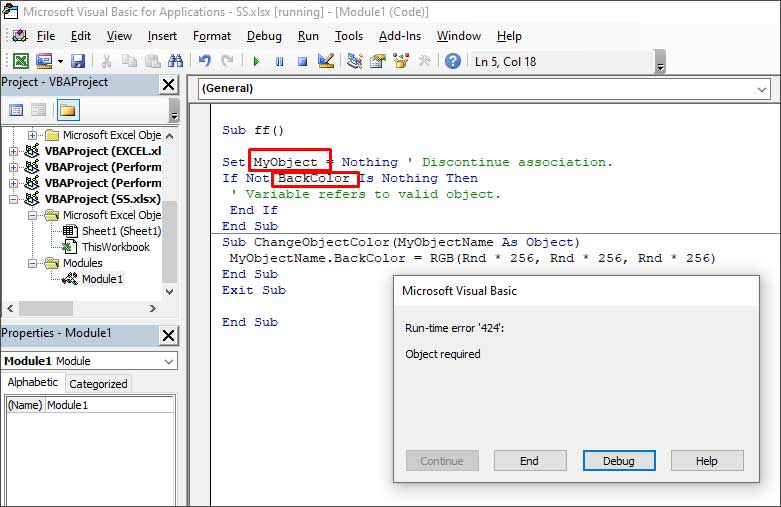
When you click the Debug button, the line with the error will highlight.

To fix the issue, you need to provide the correct name of the object.
2. Check if the Object is Missing
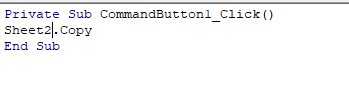
The Runtime error 424 can occur if the object you are referring to as a method is not available or you are using the wrong object in a code. In the below example, you can see that the error occurs when an object named “Employee” is not available in the Project list.
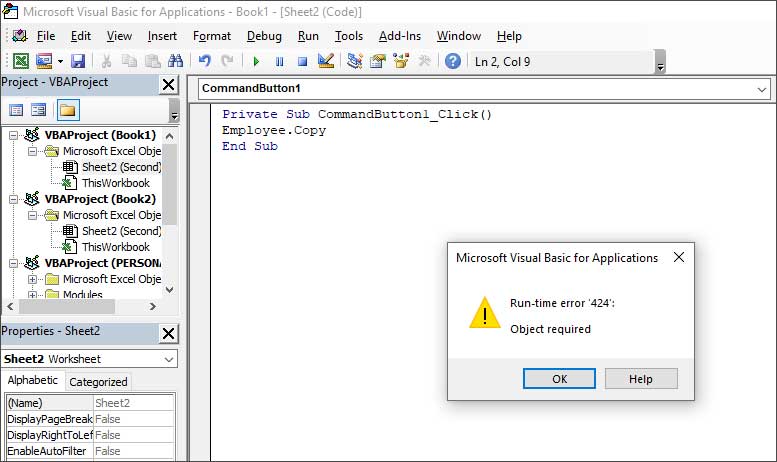
You can check and mention the object which is available. For instance, Sheet2 in the below code.
3. Check All References are Declared in the Code
You can get the Runtime error 424 if all the references are not declared. So, make sure you have declared all the references in the code. To verify this, you can use the debug mode by pressing F5 or clicking on the Debug option.

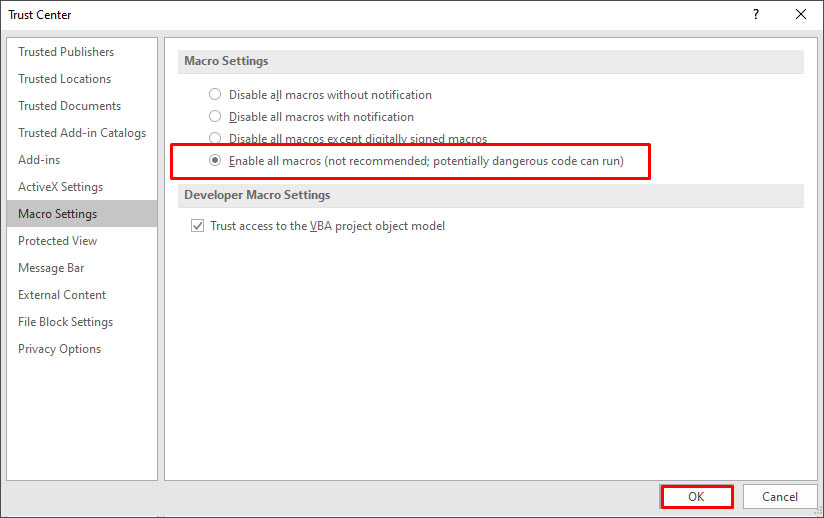
4. Check the Macro Security Settings
Sometimes, the error can occur if macros are disabled in the Macro Security settings. You can check and change the settings by following these steps:
- On the Developer tab, in the Code section, click Macro Security.
- In the Trust Center window, select Enable all macros.

- Click OK.
5. Repair your Workbook
Sometimes, the ‘Object required’ error can occur if your Excel file is damaged or corrupted. In such a case, you can try repairing the file using Microsoft’s in-built utility - Open and Repair. To use this utility, follow these steps:
- In Excel, go to File > Open > Browse.
- In the Open dialog box, click on the corrupted Excel file.
- Click the arrow next to the Open button and select Open and Repair from the dropdown.
- Select Repair to recover as much data from the file as possible.
If the Open and Repair utility fails or stops working, then you can try a professional Excel repair tool, such as Stellar Repair for Excel . It is an advanced tool that can repair severely corrupted Excel files (.xls, .xlsx, .xltm, .xltx, and .xlsm). It helps recover all the file components, including images, charts, tables, pivot tables, cell comments, chart sheets, formulas, etc., without impacting the original structure.
Conclusion
The Runtime error 424 usually occurs when there is an issue with the objects in your VBA code. In this article, we have covered some effective methods to resolve the “object required” error in Excel. If the error occurs due to corruption in Excel file, then you can repair the corrupt file using Stellar Repair for Excel. It is a reliable tool that can repair severely corrupted Excel file without changing its actual formatting. You can download the free trial version of the software to evaluate its functionality.
Also read:
- How to fix runtime error 424 object required error in Excel 2007
- 4 Ways to Transfer Music from Tecno Phantom V Fold to iPhone | Dr.fone
- How to Fix iPhone X Stuck at attempting data recovery Loop | Stellar
- How to Rescue Lost Music from Infinix Zero 30 5G
- How to rescue lost call logs from Vivo Y78+ (T1) Edition
- How to Retrieve deleted photos on Pop 8
- How To Repair iPhone 12 iOS? | Dr.fone
- How To Repair iOS System Issues of iPhone 13? | Dr.fone
- How to restore wiped messages on HTC U23
- How to Downgrade iPhone SE (2020) to the Previous iOS System Version? | Dr.fone
- 5 Easy Ways to Copy Contacts from Motorola Defy 2 to iPhone 14 and 15 | Dr.fone
- How to retrieve erased call logs from Realme C55?
- How to Repair Office Documents Effectively | Stellar
- How to get back lost photos from Vivo V29 Pro.
- How to sign Word 2000 document electronically
- How to fix error 1015 while restoring iPhone 15 Plus | Stellar
- How to retrieve lost files from Infinix Smart 8 HD?
- Authentication Error Occurred on Samsung Galaxy S23 Tactical Edition? Here Are 10 Proven Fixes | Dr.fone
- New From Novice to Pro 3 Easy Game Recording Options
- In 2024, How Can I Unlock My Apple iPhone 11 After Forgetting my PIN Code?
- In 2024, 7 Ways to Lock Apps on Apple iPhone 8 and iPad Securely | Dr.fone
- Fix the Error of Unfortunately the Process.com.android.phone Has Stopped on Realme C55 | Dr.fone
- How Do I Stop Someone From Tracking My Huawei P60? | Dr.fone
- Everything You Need to Know about Lock Screen Settings on your Honor 90 Pro
- Hard Reset OnePlus Nord CE 3 5G in 3 Efficient Ways | Dr.fone
- How to Simulate GPS Movement in AR games On Tecno Spark 20 Pro+? | Dr.fone
- Updated 2024 Approved Handy Tips From Adobe Animate Rigging Tutorial for All Learners
- All Must-Knows to Use Fake GPS GO Location Spoofer On Xiaomi Redmi Note 12R | Dr.fone
- In 2024, 5 Ways To Teach You To Transfer Files from Oppo K11x to Other Android Devices Easily | Dr.fone
- 2024 Approved Smooth Operator Best Free Video Stabilizer Apps for Android
- Title: How to Fix Excel 2019 Run Time Error 1004 | Stellar
- Author: Nova
- Created at : 2024-05-19 18:32:11
- Updated at : 2024-05-20 18:32:11
- Link: https://blog-min.techidaily.com/how-to-fix-excel-2019-run-time-error-1004-stellar-by-stellar-guide/
- License: This work is licensed under CC BY-NC-SA 4.0.
