
How to Fix iPhone 14 Stuck at attempting data recovery Loop | Stellar
How to Fix iPhone Stuck at ‘attempting data recovery’ Loop
Summary: If your iPhone gets stuck at ‘attempting data recovery’ loop screen while updating iOS, learn how to fix iPhone failed iOS update error and efficiently recover lost data using Stellar Data Recovery for iPhone.


Since the release of iOS 16, there are frequent complaints about flood updates leading to the ‘attempting data recovery’ loop. Moreover, users are concerned about data loss in such situations.
Users globally reported that their iPhone gets stuck in the ‘attempting data recovery’ loop while trying to install iOS updates. The issue occurs when they update to iOS 16 versions by using iTunes. It leaves the update in the lurch and erases some or all data from their iPhone.
iOS updates breathe new life into your device. However, the truth is that Apple’s every update brings some bug or new problem, like this one.
Read this post further if your iPhone screen gets stuck at the ‘attempting data recovery’ loop during an iOS update.
It shares how to fix iPhone ‘attempting data recovery’ failed problem and recover lost iPhone data in any case.
You can apply the methods on iPhone 14, 13, 12, SE, 11, XS, XR, X, 8, 7, 6, 5, and 4 series. They are relevant to iOS 16 and below versions.
Common causes of ‘attempting data recovery’ loop on iPhone
The attempting to data recovery failed problem usually occurs when iOS is updated with iTunes. The ‘attempting data recovery’ screen takes a long time and is often followed by a prompt ‘press home button to restore.’
Some of these occurrences were reported in the following scenarios:
- Users unplugged the iPhone from a PC or Mac during the update
- Downgrading from iOS 16 to 15 or below
- Updating iOS after jailbreak
How to fix iPhone stuck at the ‘Attempting Data Recovery’ loop
- Force Restart iPhone
- Put iPhone into Recovery Mode
Method 1: Force Restart iPhone
It’s essential to know that a force restart differs from a normal Restart. A force restart is advised when iPhone is not in its normal working condition. It is either hanged or stuck at the Apple logo or another screen in Recovery Mode or Restore Mode. It cuts the power and turns on the iPhone again. Force restart usually fixes many iPhone issues.
Steps to Force Restart iPhone 8 and earlier:
- Press and fast release the Volume Up button
- Press and fast release the Volume Down button
- Press and hold the Side button (power) until the Apple logo appears
Steps to Force Restart iPhone X and later:
- Press and quickly release the Volume Up button
- Press and quickly release the Volume Down button
- Press and hold the Side button until you see the recovery-mode screen.
Method 2: Put iPhone into Recovery Mode
If Force Restart doesn’t help, try this method. Recovery Mode helps in cases of failed iOS updates. Thus, whenever the iOS updates, the iPhone gets stuck at the ‘attempting data recovery,’ op put the device on Recovery Mode.
[Caution]: Recovery Mode erases the iPhone data, which can be restored with the help of iTunes backup. So, make sure that the iTunes version is the latest.
Steps to put iPhone on Recovery Mode:
- Connect iPhone to computer
- Open iTunes
- Force restart iPhone (with steps mentioned above)
- A dialog box appears. Select Update

5. After the Update process completes, set up your iPhone.
Fixed ‘attempting data recovery’ failed problem. Further, how to restore data on iPhone
Recovery Mode, though fixes iPhone’s ‘attempting data recovery’ issue but at the same time erases all information from the device. You can restore iPhone data from iTunes backup or iCloud backup.
In case, iTunes/iCloud backups are not able to restore iPhone or you discover that some of the data is still missing after restoring the device, choose Stellar Data Recovery for iPhone .
The software is also helpful when you don’t want to recover all the data from iTunes or iCloud unnecessarily. Instead, it. It lets you recover precisely what you want, by allowing you to choose specific files like photos, videos, WhatsApp chats, or memos, Calendar, etc., and restoring them on the device.
Additionally, Stellar Data Recovery for iPhone also restores the data lost and deleted after jailbreak, water damage, a Black screen of death, iPhone stuck at Apple logo , screen damage iPhone, factory reset, etc. It supports recovery from iPhone 15, 14, 13, 12, SE, 11, XS, XR, X, 8, 7, 6, 5, and 4 series.
Steps to Restore Data on iPhone with Stellar Data Recovery of iPhone
- Download Stellar Data Recovery for iPhone on PC/ Mac
- Connect iPhone to the computer
- Select iTunes from the software screen
- Follow the simple on-screen instructions
Wrapping Up
Users look forward to iOS updates. However, the experience can get irritating, when iPhone software updates fail. For example, iPhone ‘attempting data recovery’ loop is a common problem faced after attempts to upgrade to the latest iOS 16.
Force restart of the device often resolves the ‘attempting data recovery’ loop issue. If this doesn’t work, further try to get your iPhone on Recovery Mode. Later restore data via iTunes or Stellar Data Recovery for iPhone. The software approach is straightforward and lets you select and restore the informathat you want.
Apple will delete your photos in July. Here’s what you should do
Apple has recently announced that it will permanently delete photos from its users’ ‘My Photo Stream’ this month. This news has come as a surprise to the Apple community, as users struggle to understand the implications of this announcement and what necessary precautions can be taken. In this blog post, we will get into the details of this new move by Apple, explore the reasons behind it, and provide tips on how iPhone/iPad/Mac users can safeguard their precious photos.
The Announcement
_”_My Photo Stream is scheduled to be shut down on July 26, 2023. As part of this transition, new photo uploads to My Photo Stream from your devices will stop one month before, on June 26, 2023.
The photos in My Photo Stream are already stored on at least one of your devices, so as long as you have the device with your originals, you won’t lose any photos as part of this process. If a photo you want isn’t already in your Library on a particular iPhone, iPad, or Mac, make sure that you save it to your Library on that device…” Read more
What is Apple’s My Photo Stream?
My Photo Stream, launched in 2011, was designed to sync photos across multiple Apple devices such as iPhone, iPad, or Mac.
This feature automatically stores your most recent pictures (up to 1000) for approx. 30 days so you can view and download them easily from other Apple devices. After this period, photos are removed from My Photo Stream but remain in your device’s Photos app. However, this only shows photos and not your live images or videos.
How to Protect Your ‘My Photo Stream’ Pictures?
Apple, known for its commitment to user privacy and data security, has recommended several preventive measures to mitigate the risk of losing any important photo due to this update.
1. Move My Photo Stream images to your Library
Even if the pictures in My Photo Stream are already there on at least one of your Apple devices, you must save these pictures to your Photo Library to avoid losing them**.** Here’s how to copy My Photo Stream pictures to your Photo Library:
On your iPhone, iPad, or iPod Touch:
- Open the Photos app and tap Albums.
- Tap on My Photo Stream > Select.
- Select all the photos you want to save, then tap the Share button > Save Image.
On your Mac:
- Open the Photos app and then open the My Photo Stream
- Select the photos you want to save which aren’t currently in your photo library.
- Drag and drop them from the My Photo Stream album into your Library.

2. Move to iCloud Photos
To preserve your My Photo Stream images in their original and high-resolution version, you can transfer them to iCloud Photos.
If you already have an iCloud account, just enable iCloud Photos to automatically upload & sync every photo and video you capture on the device, making them accessible from anywhere.
To use the iCloud Photos service, you will require the following:
- iPhone running iOS 8.3 or later version.
- iPad with iPadOS 8.3 or later version.
- Mac running OS X Yosemite or later version.
How to set up iCloud Photos on your iPhone, iPad, or iPod touch?
- On your iPhone, iPad, or iPod touch, go to Settings.
- Next, click on [Your Name] > iCloud.
- Tap on Photos and do the following:
For iOS 16, iPadOS 16, or later versions: Toggle on the ‘Sync this [device]‘ option.
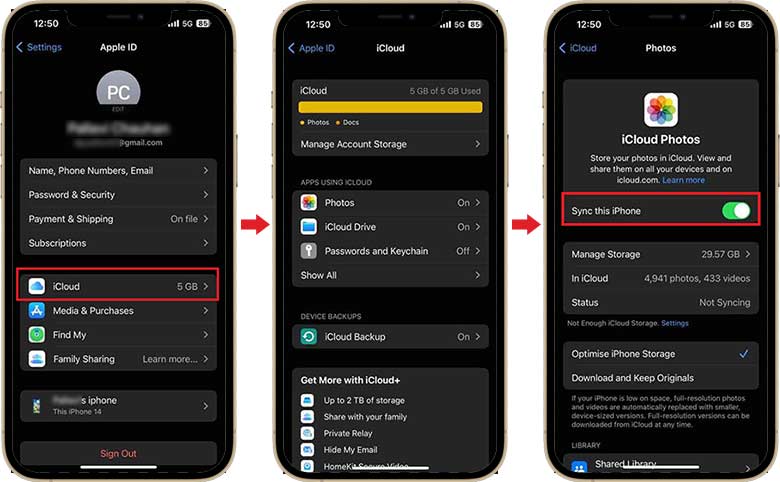
For iOS 15, iPadOS 15, or earlier versions: Turn on the iCloud Photos
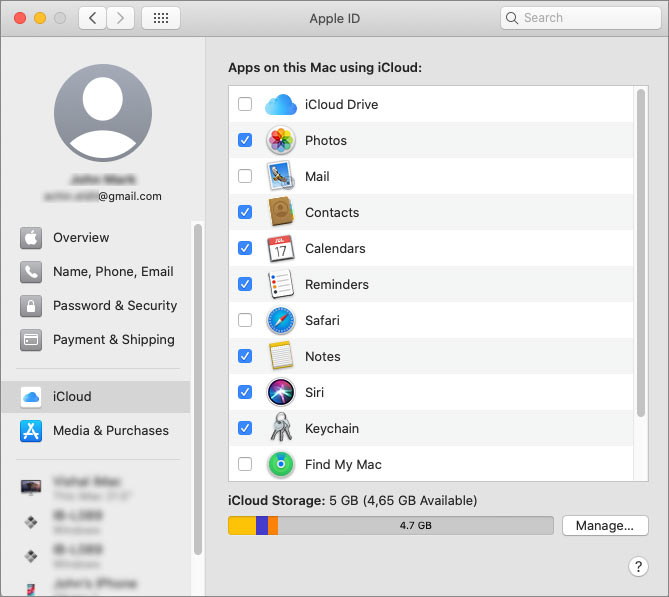
How to set up iCloud Photos on your Mac?
- On your Mac, go to Apple Menu and click on System Preferences.
- Click Apple ID and then select iCloud in the sidebar.
- Now, select Photos and turn on the switch next to Sync this Mac.

**
**

Don’t want to use iCloud Photos?
While iCloud Photos is a convenient option for many Apple users, it’s important to acknowledge that it is not the best fit for everyone. Limited free storage of 5GB or lack of cross-platform compatibility can compel Apple users to look for other alternatives.
Storage options, such as Google Photos, Microsoft OneDrive, Dropbox, external hard drives, etc., are available to ensure your iPhone Photos are safe and easily accessible.
The Bottom Line
Apple’s announcement of the potential discontinuation of My Photo Stream has understandably caused worry among its users. While a specific reason for this action remains undisclosed, they are actively addressing the issue to prevent data loss. In the meantime, iPhone users must take precautionary measures to safeguard their photos. They can simply move the My Photo Stream images to the Photo Library, iCloud Photos, or other backup folders.
How to Recover Data from Broken iPhone Screen
Summary: Struggling to recover data after your iPhone’s screen broke? Stellar Data Recovery for iPhone can help restore data efficiently from an iPhone with a broken screen.
Your iPhone is the most cherished personal gadget as it has become more innovative and influential due to its many valuable features. Moreover, information such as notes, contacts, iMessage, calendar entries, text messages, WhatsApp/Kik messages, pictures, and videos are readily available, making it even more lovable. This is why we need to know how to recover data from broken iPhone screens.
These days, though there are plenty of best ways to back up your data, users often overlook the importance of Backup. It happened with _Jacky Jainco; w_hile taking a DSLR-like photo on his iPhone 14 Pro Max, he accidentally dropped his iPhone and, consequently, broke it.
The real problem was not the broken iPhone but to recover data from iPhone as it was not synced with iTunes and iCloud Backup. As a result, he couldn’t access his files, more importantly, his pictures.
You might have dropped your iPhone several times, and luckily, the excellent cover has saved it on all occasions. However, any drop could cause potential damage putting your data at stake; therefore, leverage iTunes or iCloud backup to recover data from the damaged iPhone screen.
Bringing Back Your Data From Backup
You can restore your files from either iTunes or iCloud Backup. In addition, replacement screens are available; you can have an appointment with the genius bar, get your damaged iPhone fixed, and then recover your data. Also, when backup files are inaccessible, turn to an iPhone data recovery software for an easy solution.
Sorting backup files is unmanageable as they tend to be large, running into GBs. Moreover, the process can be tedious, especially when you have to sort all files, even when you need to recover only a specific file. So it is when iPhone Data Recovery Software by Stellar is fruitful. The software lets you recover deleted files from encrypted iTunes backup files or recover data from an iPhone that would not turn on. Stellar Data Recovery for iPhone supports broken iPhone data recovery from series of iPhone 15, 14, 13, 12, 11, XR, XS, X, 8 Plus, 8, 7 Plus, 7, 6S Plus, 6S, 6 Plus, 6, 5S, 5C, 5, 4S, and 4.
You can recover a specific file without the pain of going through all backup files as the software lists all the files in an organized structure, thus, saving your precious time and effort.
Watch how to recover photos from a broken iPhone:
Recover your data from iTunes Backup
Here’s how to recover your iTunes backup using Stellar Data Recovery for iPhone.
1. Select the ‘Recover from iTunes Backup’ option.

2. List of your iTunes backup files appears. Select the relevant iTunes backup

3. In the middle pane, select the files you wish to recover and click the ‘Save’ button.

Recover your data from iCloud Backup
Another effective way to recover data from broken iPhones is through iCloud Backup. For any reason, let’s suppose you cannot access your iCloud backup files; then, using the ‘Recover from iCloud Backup’ feature, you can restore all your essential files. The simple steps are as follows:
- Click ‘Recover from iCloud Backup.’
- Sign in to your iCloud account to view the list of available backup files.
- In the left pane, click on the supported file list categories to view files under them.
- Select the files that you wish to restore and click ‘Save.’
Stellar Data Recovery for iPhone recovers the deleted photos, contacts, messages, etc., from the backup files and restores them to the device.
That’s Not All
Apart from recovering data from damaged iPhones, Stellar Data Recovery for iPhone facilitates the option to import the recovered files to your new or fixed iPhone.
To import your recovered files, follow these steps:
- First, connect your iPhone to the system, run the software, and click the ‘Import file to iPhone’ option.
- Click ‘Browse’ and select the files you wish to import to your iPhone.
- Click ‘OK’ to preview the selected files.
- Click ‘Transfer to iPhone’ to transfer recovered files to your iPhone.
To Sum Up
When your iPhone is damaged, try the basics, i.e., restart it; if that works, back up as much data as possible. You can also restore your files from iTunes or iCloud Backup if there are any. Else, make an appointment with the genius bar and get your iPhone fixed. They might also help you recover data from the damaged iPhone, which comes with an asterisk. Therefore, turn to Stellar Data Recovery and save time and energy for efficient recovery of your data.
Recover Lost Photos during Transfer from iPhone to PC or Mac
Summary: Lost your precious photos during the transfer from iPhone to computer? Learn 4 ways to recover photos lost during transfer. These methods are applicable to all variants of iPhone and iPad or in short all iOS devices.
Transferring photos from iPhone 15, 14/13/12/X/8/7 to PC or Mac system is a simple task that can often get skewed causing serious photo loss situations. If you have also lost your valuable photos during one such event of photos transfer, then here’s a guide to get back photos lost during the transfer.
Photo loss while transferring from iPhone to a computer is a common problem faced by many. You try to transfer your photos from your iPhone to your computer and select the location to save them.
But when you check the drive folder in the system, to your shock the photos are not there! And if this is a ‘cut and paste’ transfer from iPhone, it’s a big jolt for you.
But do not worry, thankfully, data recovery technology is always there to recover lost photos in any situation.
There can be several reasons for the loss of photos during transfer, such as below:
- Sudden power failure during the transfer of photos
- Disconnecting iPhone from the PC/Mac while transferring photos
- Lack of enough space in the drive to save the photos
- Corruption of the drive in which you saved the photos
- Virus in the system
- Anti-virus on your PC/Mac scans and detects viruses in the photo resulting in photo loss
Typically, if you have not deleted the required photos from your iPhone, try transferring them again from the device to the PC or Mac. If already deleted then, try the below methods to recover the photos lost during transfer from iPhone 15, 14/13/12/11/X/8/7 to PC or Mac.
Solution 1: Search for missing photos in the PC/Mac hard drive
It might be possible you transferred the iPhone photos to the PC but forgot the location where you saved them. Try once searching the complete hard drive for your photos.
- Click on My PC or My Computer
- Type the command kind:=picture into the search box and press Enter
- The list of images will be displayed
- Right-click on the required photos from the search results, and click Open File Location to view where they are saved
For MAC follow the below steps:
- Open the Finder and go to your home directory
- Go to the Pictures folder
- Right-click on Photos Library.photoslibrary and select Show Package Contents
- Open the folder Masters to find the images in the Photos app. The Masters folder comprises the photos by date in subfolders. You can open the folders of the relevant dates to find your pictures.
Solution 2: Recover lost transferred photos from iTunes Backup
If you have synced your iPhone to iTunes, you can recover lost photos from this Apple’s backup utility.
Drawback: You cannot selectively pick the lost photos during the file transfer, rather complete data of iTunes is saved on your PC/Mac.
| Note: In Mac, the iTunes backup is stored in Library > Application Support > MobileSync > Backup.
In Windows 7, 8, 10, & 11 the iTunes backup is stored in Users > username > AppData > Roaming > Apple Computer > MobileSync > Backup.
|
| — |
Solution 3: Recover Lost Photos from iCloud
If you have iCloud backup of the iOS device, you can recover photos lost during transfer through the cloud facility.
Drawbacks: You cannot directly restore iCloud backup photos on your PC or Mac. It is saved only to an iOS device.
You have to reset your iPhone X/8/7 to factory settings to restore the iCloud backup on it.
How to recover data from iCloud Backup on a computer
- Take the backup of your iPhone data on iTunes
- Reset your iPhone to factory settings
- Go to the Apps & Data screen of your iPhone by pressing the Sleep/Wake button for a few seconds and following the onscreen instructions
- Under Apps & Data, click on Restore from iCloud Backup
- Sign in to iCloud by entering your Apple ID
- Select Choose Backup and pick the relevant one from the list of backups
- Tap After completion of the process, the iPhone restarts and recovers complete data including photos, apps, videos, etc.
- Select the required photos from the recovered data and transfer them again to your PC or Mac from iPhone
| Tip: For selective recovery of lost photos from iCloud/iTunes use Stellar Data Recovery for iPhone . It recovers missing Photos from Camera Roll and Photo Stream in iCloud/iTunes/iPhone. You can preview, select and save only the desired photos at your preferred location. |
|---|
Solution 4: Use the Best Photo Recovery Software
When no backup, take the help of a third-party photo recovery tool. This is regarded as the easiest way to recover lost photos during the transfer from iPhone 15, 14/13/12/11/XR/XS/X/8/7 to PC/Mac. Use a risk-free application – Stellar Photo Recovery to recover your lost photos from your PC or Mac
The do-it-yourself software recovers all types of media files lost due to deletion, corruption, virus infection or accidental formatting, etc.
How to recover lost photos using Stellar Photo Recovery?
- Launch Stellar Photo Recovery Software.
- On the home screen of the software – ‘Select What to Recover’. Click Next.
- Next, select the location from where you want to recover. Click Scan to start the scanning process
- A dialog box of ‘Scanning Completed Successfully!’ displays the scan results – the number of files found and the size of the data. In the left pane of the main window, all the recovered data is listed. You can preview them in the right pane.
Note: If you do not see the required photos in the list, opt for the Deep Scan option at the bottom. - Click Recover. You can also choose to recover only the selective files – select the photos that you need, right-click, and click Recover.
- In the dialog box, specify the location to save the image files. Click Save. All the files get saved at the specified location Click Save. All the files get saved at the specified location.
Conclusion
Backup is the undisputable solution to any kind of photo loss situation. However, if you have not taken your photos backup in iTunes, iCloud, or other storage media, recovery through Stellar Photo Recovery software is the best way to get back photos lost during transfer from iPhone 15, 14/13/12/XS/XR/X/7/8 to PC or Mac.
- Title: How to Fix iPhone 14 Stuck at attempting data recovery Loop | Stellar
- Author: Nova
- Created at : 2024-08-20 20:49:59
- Updated at : 2024-08-21 20:49:59
- Link: https://blog-min.techidaily.com/how-to-fix-iphone-14-stuck-at-attempting-data-recovery-loop-stellar-by-stellar-data-recovery-ios-iphone-data-recovery/
- License: This work is licensed under CC BY-NC-SA 4.0.