
How to Fix iPhone Stuck at attempting data recovery Loop | Stellar

How to Fix iPhone Stuck at ‘attempting data recovery’ Loop
Summary: If your iPhone gets stuck at ‘attempting data recovery’ loop screen while updating iOS, learn how to fix iPhone failed iOS update error and efficiently recover lost data using Stellar Data Recovery for iPhone.

Since the release of iOS 16, there are frequent complaints about flood updates leading to the ‘attempting data recovery’ loop. Moreover, users are concerned about data loss in such situations.
Users globally reported that their iPhone gets stuck in the ‘attempting data recovery’ loop while trying to install iOS updates. The issue occurs when they update to iOS 16 versions by using iTunes. It leaves the update in the lurch and erases some or all data from their iPhone.
iOS updates breathe new life into your device. However, the truth is that Apple’s every update brings some bug or new problem, like this one.
Read this post further if your iPhone screen gets stuck at the ‘attempting data recovery’ loop during an iOS update.
It shares how to fix iPhone ‘attempting data recovery’ failed problem and recover lost iPhone data in any case.
You can apply the methods on iPhone 14, 13, 12, SE, 11, XS, XR, X, 8, 7, 6, 5, and 4 series. They are relevant to iOS 16 and below versions.
Common causes of ‘attempting data recovery’ loop on iPhone
The attempting to data recovery failed problem usually occurs when iOS is updated with iTunes. The ‘attempting data recovery’ screen takes a long time and is often followed by a prompt ‘press home button to restore.’
Some of these occurrences were reported in the following scenarios:
- Users unplugged the iPhone from a PC or Mac during the update
- Downgrading from iOS 16 to 15 or below
- Updating iOS after jailbreak
How to fix iPhone stuck at the ‘Attempting Data Recovery’ loop
- Force Restart iPhone
- Put iPhone into Recovery Mode
Method 1: Force Restart iPhone
It’s essential to know that a force restart differs from a normal Restart. A force restart is advised when iPhone is not in its normal working condition. It is either hanged or stuck at the Apple logo or another screen in Recovery Mode or Restore Mode. It cuts the power and turns on the iPhone again. Force restart usually fixes many iPhone issues.
Steps to Force Restart iPhone 8 and earlier:
- Press and fast release the Volume Up button
- Press and fast release the Volume Down button
- Press and hold the Side button (power) until the Apple logo appears
Steps to Force Restart iPhone X and later:
- Press and quickly release the Volume Up button
- Press and quickly release the Volume Down button
- Press and hold the Side button until you see the recovery-mode screen.
Method 2: Put iPhone into Recovery Mode
If Force Restart doesn’t help, try this method. Recovery Mode helps in cases of failed iOS updates. Thus, whenever the iOS updates, the iPhone gets stuck at the ‘attempting data recovery,’ op put the device on Recovery Mode.
[Caution]: Recovery Mode erases the iPhone data, which can be restored with the help of iTunes backup. So, make sure that the iTunes version is the latest.
Steps to put iPhone on Recovery Mode:
- Connect iPhone to computer
- Open iTunes
- Force restart iPhone (with steps mentioned above)
- A dialog box appears. Select Update

5. After the Update process completes, set up your iPhone.
Fixed ‘attempting data recovery’ failed problem. Further, how to restore data on iPhone
Recovery Mode, though fixes iPhone’s ‘attempting data recovery’ issue but at the same time erases all information from the device. You can restore iPhone data from iTunes backup or iCloud backup.
In case, iTunes/iCloud backups are not able to restore iPhone or you discover that some of the data is still missing after restoring the device, choose Stellar Data Recovery for iPhone .
The software is also helpful when you don’t want to recover all the data from iTunes or iCloud unnecessarily. Instead, it. It lets you recover precisely what you want, by allowing you to choose specific files like photos, videos, WhatsApp chats, or memos, Calendar, etc., and restoring them on the device.
Additionally, Stellar Data Recovery for iPhone also restores the data lost and deleted after jailbreak, water damage, a Black screen of death, iPhone stuck at Apple logo , screen damage iPhone, factory reset, etc. It supports recovery from iPhone 15, 14, 13, 12, SE, 11, XS, XR, X, 8, 7, 6, 5, and 4 series.
Steps to Restore Data on iPhone with Stellar Data Recovery of iPhone
- Download Stellar Data Recovery for iPhone on PC/ Mac
- Connect iPhone to the computer
- Select iTunes from the software screen
- Follow the simple on-screen instructions
Wrapping Up
Users look forward to iOS updates. However, the experience can get irritating, when iPhone software updates fail. For example, iPhone ‘attempting data recovery’ loop is a common problem faced after attempts to upgrade to the latest iOS 16.
Force restart of the device often resolves the ‘attempting data recovery’ loop issue. If this doesn’t work, further try to get your iPhone on Recovery Mode. Later restore data via iTunes or Stellar Data Recovery for iPhone. The software approach is straightforward and lets you select and restore the informathat you want.
How to Fix iPhone Storage Not Loading/Showing
The majority of smartphones require a certain amount of storage to operate properly. When you receive a low storage message, you may instinctively check your storage space but encounter the iPhone Storage Not Loading issue.
What could be the cause of such a bothersome problem? The bad news is that the root reason for this problem is unclear, but we’ve offered some fixes you can try to fix this issue.
There is yet another way to check the storage on your iPhone if you face the “iPhone Storage Not Showing” issue, and we’ll go over it in the following section.
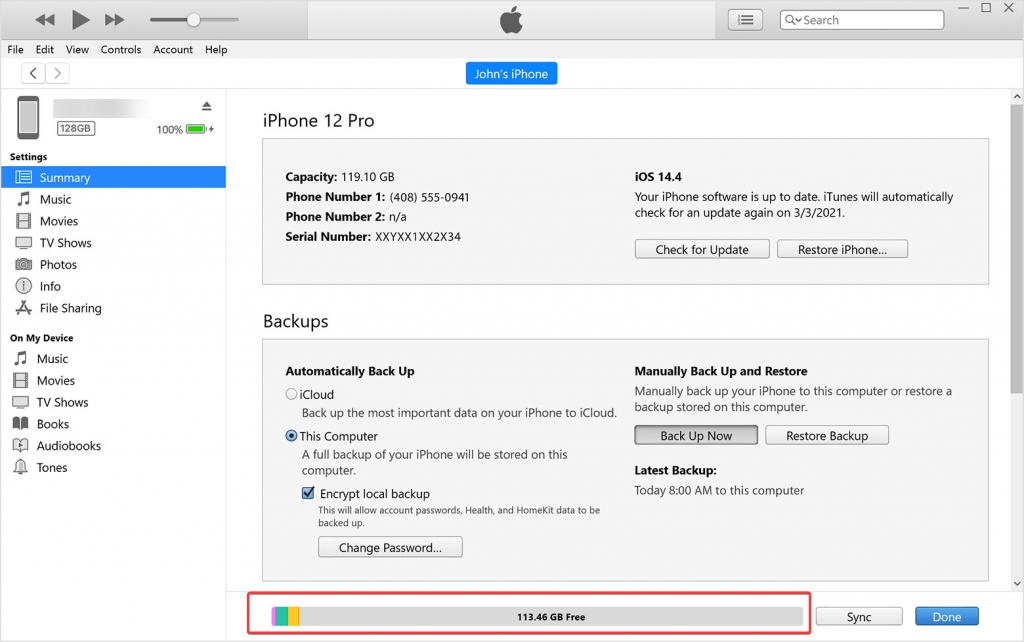
How can I use a computer to check my storage?
You can check your iPhone’s storage using a computer with iTunes or Finder app installed.
- On a Mac running macOS Catalina 10.15 or later, launch the Finder or open iTunes on a PC or Mac running macOS Mojave 10.14 or an earlier version.
- You should use a cable to connect your phone and computer.
- Select your device in iTunes or Finder.
- You can see how much storage each type of content takes up by hovering your mouse over the storage bar.
How can I fix iPhone Storage Not Loading/Showing?
1. Wait a bit more
Some computing operations take a while to finish. Your phone’s storage may overflow with tons of app data, images, and other files if you’ve been using it for a while.
And each of them would have to load before reporting their combined size to the OS. Usually, loading takes about three minutes.
2. Update iOS
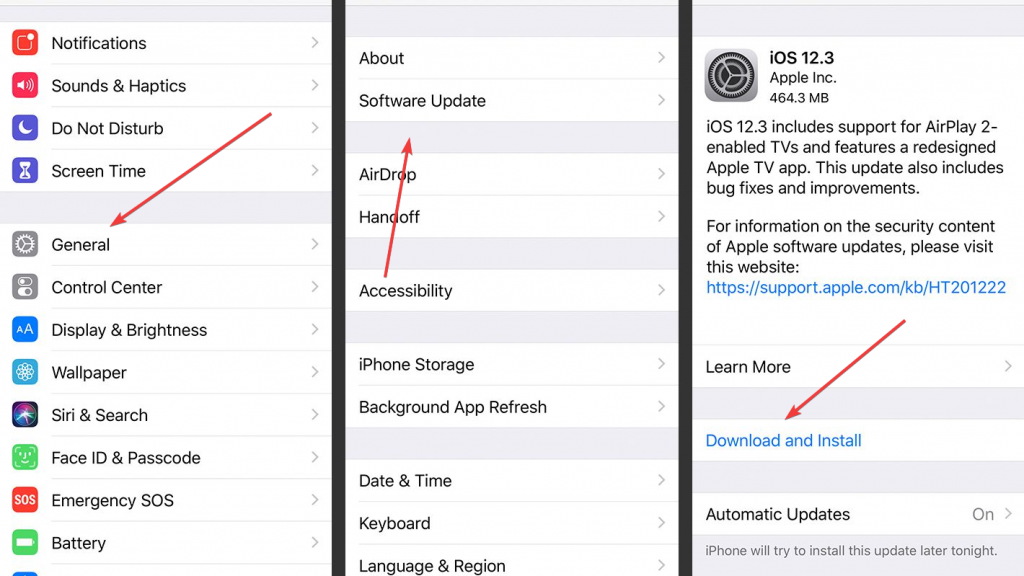
If your iOS version was outdated, your phone’s functionalities, including storage access, would not function properly. Additionally, updating the OS will get rid of any potential issues. Follow the procedures listed below to check and update your iOS version:
- Select General from the Settings menu.
- Click on Software Update. If any updates are available, download and install them.
3. Force Stops the App
The settings app itself can be the problem due to an app bug. Therefore, forcing the app to close is a valid option. This will make the software restart from scratch, wiping off part of the data and information it had in RAM.
- Access the app switcher (swipe up your finger from the bottom of the screen to bring up the menu or double-click the Home button on older iPhone models).
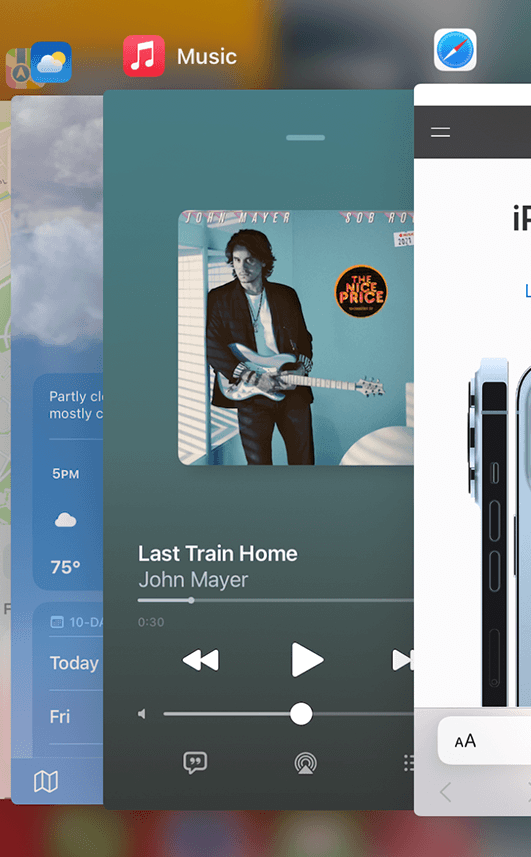
- Swipe up and drag the Settings card off the screen to force the app to close.
- Relaunch the Settings app to see if the problem persists.
4. Reconnect to iCloud
iOS has been designed in a way that it needs to be connected to iCloud to function flawlessly. Therefore, the storage loading error could also be linked to connectivity issues between these two. In this case, signing out of the service and then back in again might resolve the issue.
- Open the Settings application.
- Click your profile at the top. To sign out of the service, tap iCloud.
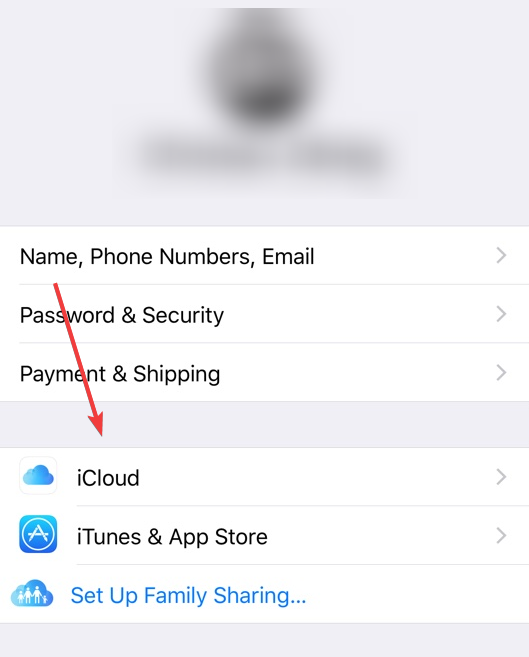
- Next, sign in once more using your iCloud password.
5. Fix the Issue Using Your PC
When you connect the cable, link your iPhone to your PC, and sync the storage, iTunes looks for any issues and either fixes them on its own or recommends methods to fix them by yourself. For any software-related issues with your phone, this is a great fix, and it may even repair your iPhone storage not updating problem.
- Connect your phone to computers that have iTunes installed on them with a lightning cord.
- The storage data should be able to sync with your smartphone automatically.
- If not, press the Sync button.
6. Factory Reset Your iPhone
You may fix any bugs that cause iPhone storage not to update by performing a factory reset. Furthermore, it would restore your OS version to its factory settings, resolving any problems that updates might have brought on.
The whole contents of your device will be deleted if you follow this method. You can either create a backup of your data or use a tool to restore it once your iPhone has been entirely deleted to prevent this.
- Go Settings app on your smartphone. Next, choose Reset after choosing General.
- Under Reset, among the few options, click Erase all Content and Settings.
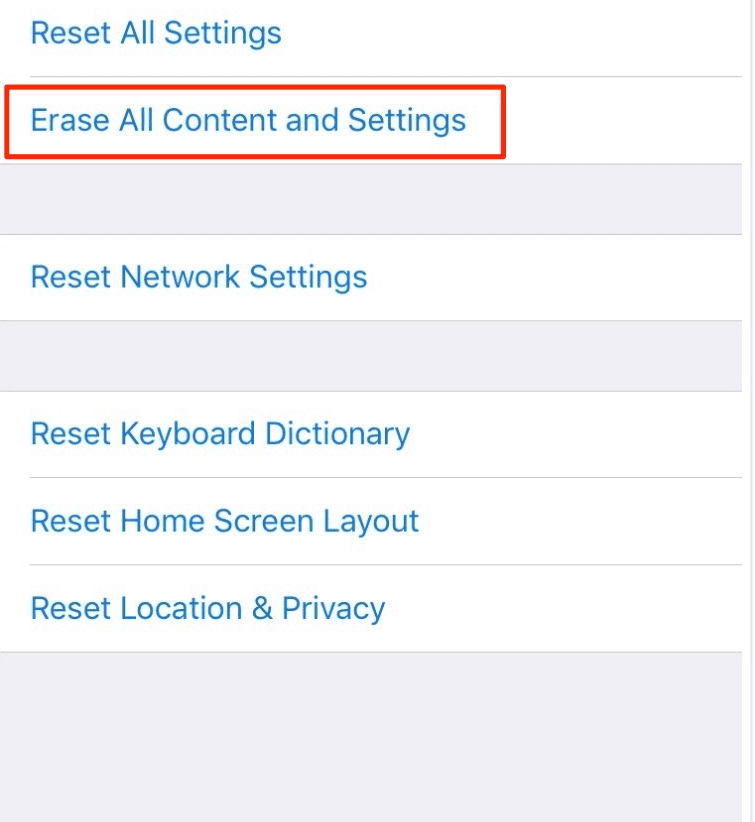
- Next, choose Erase iPhone. After that, your smartphone will return to its factory default settings.
Recover your data using Stellar data recovery for iPhone:
Stellar Data Recovery for iPhone is a powerful program that can retrieve files that have been erased unintentionally or on purpose. To guarantee that Stellar Data Recovery for iPhone will recover your data, it offers a variety of data recovery techniques. Furthermore, you wouldn’t need to check manuals or other documentation to understand how to use the software because of its basic user interface, which makes the recovery process easy.
With Stellar Data Recovery for iPhone, your files, including voice recordings, notes, and Safari bookmarks, will be restored. What you should do is:
- Download and install Stellar Data Recovery for iPhone from the official website.
- Connect your iPhone to the PC through a cable.
- Launch the Stellar Data Recovery for iPhone, choose the type of data you wish to recover from the list, and click Next.
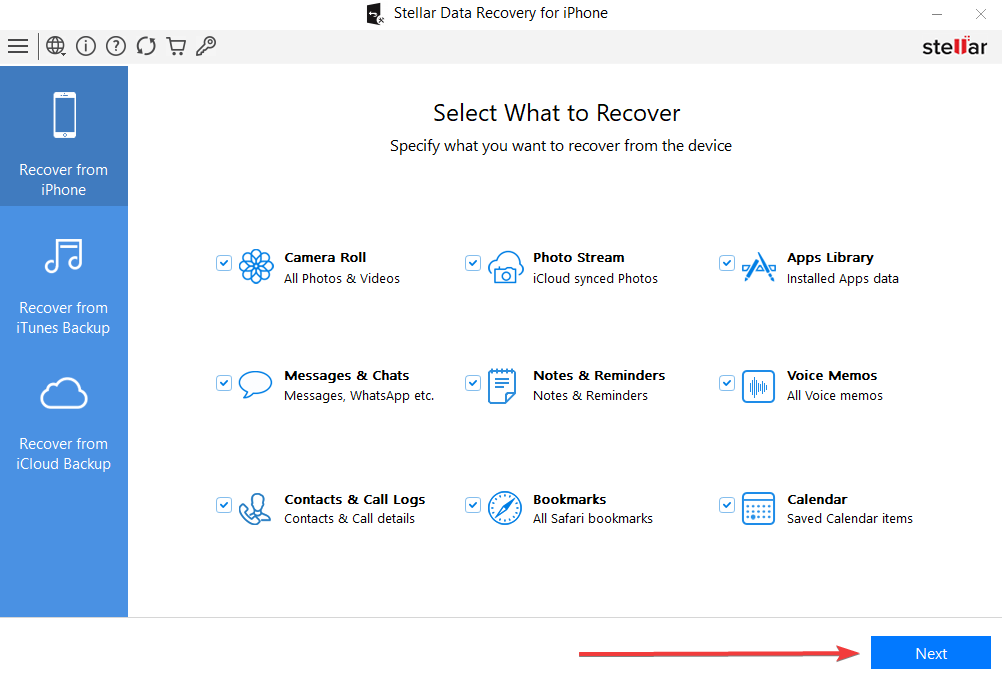
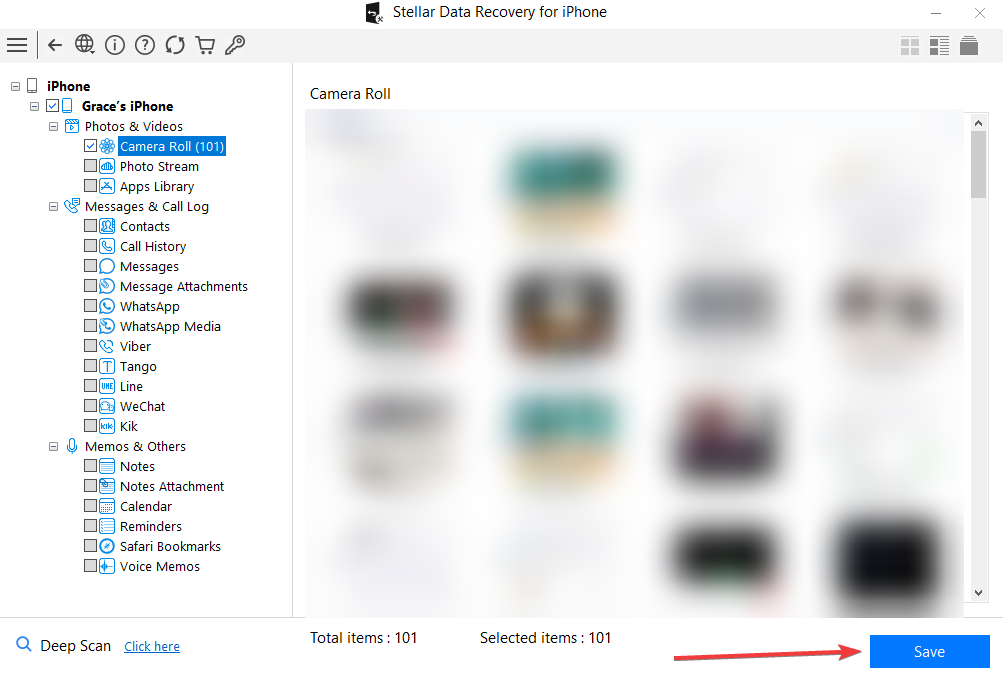
- Preview the recovered data, then Select and Save it to the chosen destination.
Why isn’t my iPhone storage loading?
When trying to check your iPhone’s storage, you will notice a small spinning wheel going back and forth if your phone is having storage problems since it cannot accurately represent the amount of storage that is accessible.
Furthermore, the loading issue may show an incorrect amount of storage. Some users reported this and other minor issues throughout the iOS 15 beta testing phase. Other factors contributing to this issue include iCloud service problems and application bugs.
Wrap up! Stellar is your ultimate backup
It is hard to download content or install apps on an iPhone with insufficient storage. Therefore, a factory reset would resolve your issue and clear the storage, enabling you to scan your device with Stellar Data Recovery for iPhone and retrieve any desired files.
And if a factory reset doesn’t fix iPhone storage not loading and showing problem, look for professional assistance with your problem. You can never be certain whether a storage issue results from faulty hardware or software.
FAQ:
- How do I create backups before wiping my iPhone clean?
Simply connect your phone to your computer, open iTunes, and choose the backup option, and the program will create a copy of your data that can be used to restore lost or deleted contents.
- Does Stellar Data Recovery for iPhone require a backup for successful file recovery?
Because the software searches iTunes for files, having a backup, there might be useful. However, the software can and will effortlessly restore your content even without any backups.
- Do I install the Stellar Data Recovery Software for iPhone on my smartphone?
The software cannot be installed or used on an iPhone or an Android smartphone. Because the software is compatible with the widely used Windows and Mac operating systems, you must first install it on a device using one of those operating systems before connecting your phone to it.
How to recover data from dead iPhone
Summary: Recovering data from a dead iPhone is precarious if you don’t acquire knowledge about your iOS device. Be wary of how your device works and its data backup options to avert data loss problems in the future. If your iPhone has turned dead because of a major technical glitch, you can recover the data stored in it using a reliable data recovery software. This blog encapsulates all such concrete details with a step-by-step guide to recover data from dead iPhone.
iPhone is one of the most affluent smartphones loaded with advanced features. Most people invest in it because its upbeat features and advanced technology intrigue them. Every time Apple announces a new upgrade or introduces new features to its iOS software upgrade, iPhone fans dig deep to learn more about it.
If your iPhone is dead and not working at all, and you want to learn how to recover data from dead iPhone, this blog is exclusively for you.
Why would an iPhone suddenly go dead?
These are the possible reasons why iPhone turns dead or blank for hours:
- A defective charging cable or adapter that doesn’t perfectly pair with your iOS device.
- A recent iOS update that triggered some unforeseen software error in your iPhone.
- Faulty or failed hardware, like a battery or a logic board that needs to be replaced.
In either of the above-mentioned conditions, your iPhone will stop responding to any command. Turning the device off and restarting works in rare circumstances, but not always. In such bleak situations, you can try to fix your dead iPhone using these tips:
- Keep a close watch over the charging cable or power adapter and fix the loose ends.
- Put your dead iPhone on charge for at least an hour.
- Connect your iPhone to iTunes or put it on Device Firmware Update (DFU) mode.
- Seek immediate assistance from Apple Support Services.
If these attempts won’t bring your iPhone back to life, certainly it has some major technical glitch that only Apple experts can address. Before submitting your device for the same, recover all the data stored in it. Follow these DIY solutions to recover data from dead iPhone:
Use iTunes to Recover Data from Dead iPhone
iTunes is one of the most coveted options to recover data recovery from dead iPhone. However, to use this method, your iPhone should be in sync with iTunes, and you have to periodically take data backup on it. Observe the steps to keep data backup on iTunes:
- Connect your iPhone to your computer and open iTunes to login.
- From the menu bar at the top of the iTunes window, select File > Library > Organize Library.
- Next, select Consolidate files to organize the Library screen and press OK.
- Once you do that, copies of any files that were not in the iTunes Media folder will be added to your iTunes Media folder.
- At the same time, take the opportunity to eliminate all the duplicate files taking unnecessary space on your hard drive. However, before making this move, save a copy of the original files in your iTunes Media Folder.
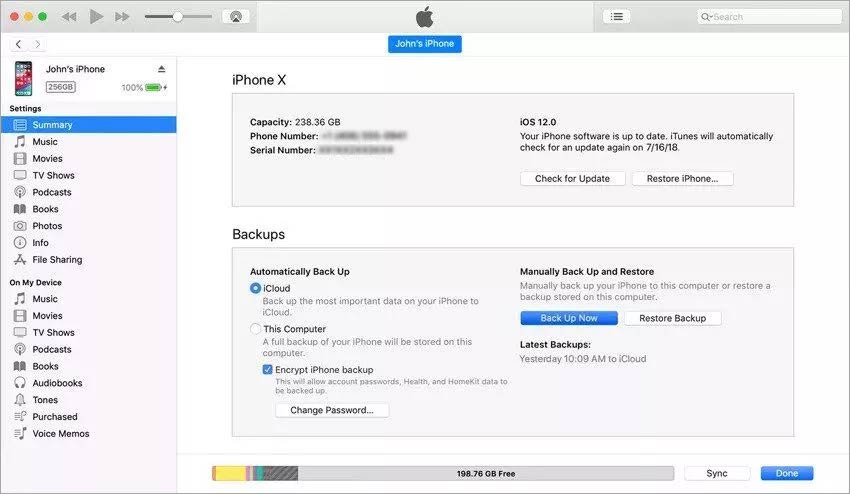
If you have been practicing the above steps for long, then simply connect your device with your computer using a USB cable and follow steps to recover data from iTunes backup:
- Connect your iPhone to your computer and open iTunes.
- Select your iPhone in the main iTunes window or select it from Finder.
- The move will prompt a new set of instructions on iTunes with options to backup data. You need to click on Restore Backup to retrieve your dead iPhone’s data.
- Several backup options will prompt on your computer. You can choose a selected set of files to restore a specific file or all of them.
- Once selected, the desired number of files/data to restore, press Restore, and wait. The move may restart your iPhone. If not, your device will suffer a more serious hardware failure that only technical experts can fix.
Pro Tip: If found dead, let your iPhone remain off for as long as possible to avoid data overwriting.
Use iCloud to Recover Data from Dead iPhone
If you are proactively using iCloud to maintain data backup, there is a fair chance to recover your dead phone’s data from it. You can directly recover data from iCloud on another iPhone that doesn’t necessarily require connection to a laptop or computer. All you need is an iPhone that can be turned on at least and let you through the initial steps to login to your iCloud. Don’t forget to erase your dead iPhone before continuing on the new one; otherwise, you won’t get to perform the initial set-up. Follow the steps below to restore dead iPhone’s data from iCloud Backup:
- Turn on the working iPhone and perform the initial setup procedures till you get through Apps & Data. Tap on Restore from iCloud Backup option and sign in with your Apple ID.
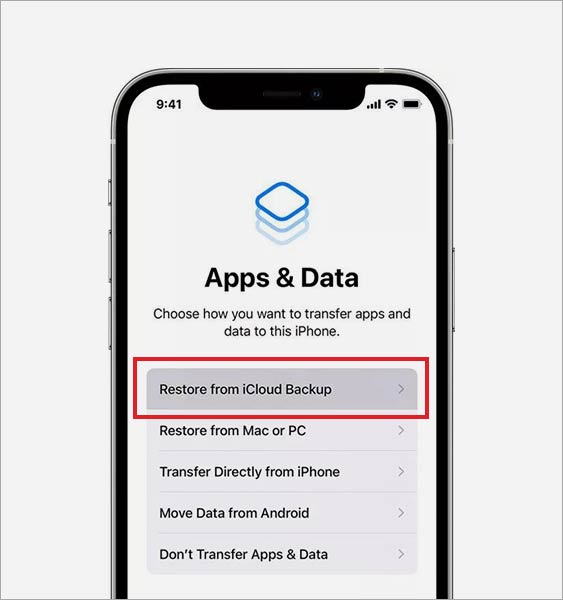
- A window will prompt you with all backups available for restoring. Select the most recent one that contains all the data you wish to retrieve from your dead iPhone.
- Patiently wait for the data transfer procedure to finish.
- In the data transfer procedure, at some point, you might be asked to enter your Apple ID once again. Enter details to keep the action going.
- Once done, you’ll get a notification of successful data transfer.
You can also transfer all your dead iPhone data to a new one by inserting its SIM card in the new iPhone. Learn here how to Transfer Data from Old iPhone to New iPhone .
Use a Reliable Data Recovery Software
Your last respite is a professional data recovery software in case a vast amount of data from dead iPhone, like photos, videos, messages, contacts, etc., remain missing after iCloud recovery. We recommend Stellar Data Recovery for iPhone because it guarantees absolute recovery of lost or deleted data from iPhone, iTunes, and iCloud. Listing some common situations where the software can help:
- If iTunes fails to restore data after unlocking the disabled iPhone.
- If some data is found missing after restoring data from iTunes or iCloud.
- Instead of restoring all files from the iPhone, you wish to recover only some selected files.
You can download the demo version of the software for assessment and buy the software to activate its key functionalities. It will activate via activation key that will be sent on your email once you purchase the software. Read this KB to learn How to Activate Stellar Data Recovery for iPhone . Additionally, using the Toolkit version of the software, identified as Stellar Eraser for iPhone , you can permanently remove all the sensitive data stored in your dead iPhone so it won’t fall into the wrong hands.
Conclusion:
Avid iPhone users know when to stop playing with their iOS device to let it reset in case of a technical glitch. Nevertheless, not all iPhone users are aware of this practice. Consequently, we panic and keep on switching off and on our smartphones when it hangs.
If your phone turns blank or dead, don’t panic and stop using your device for some time. Let it rest and resume its function. Otherwise, you’ll end up losing all the memories stored in it. This blog aimed to help you understand the grim consequences and smart ways to recover data from iPhone if your device turns dead. In case you are unable to recover data on your own using Stellar Data Recovery for iPhone, you can avail Data Recovery Lab-Services where our experts can recover all the data from your dead iPhone.
FAQs:
What to do if iPhone is not working?
If your iPhone has stopped responding to any command and you can’t even turn it off, then force shutdown and restart it. Swiftly press and release the volume up button first and repeat the same with volume down button. Now, press and hold the side button and once the Apple logo appears on the screen, release the side button too.
Why is my phone unresponsive?
Your iPhone’s touchscreen can be unresponsive for reasons like a brief hiccup or glitch that your smartphone’s inner system can’t detect or render it unresponsive. Sometimes, touch screen becomes unresponsive due to water damage or app glitch, or virus attack.
Why did my iPhone screen go black?
In iPhone, black screen appears due to software or hardware issues. Firmware modifications, dropping the iPhone, iOS upgrade/downgrade, and jailbreaking, are some other common reasons behind the black screen error. Learn some great solutions to overcome the black screen of death error .
How to Put iPhone or iPad on Recovery mode? (Step by Step Tutorial)
Summary: DFU or Recovery mode is a way to recover your iPhone or iPad using a computer in case of technical issues. Read this post for a step-by-step process of how to enter and exit Recovery Mode and DFU mode on iPhone.
When you run out of solutions to troubleshoot your iPhone, Recovery Mode or DFU Mode comes as a rescue. Whether iPhone stops booting or fails to restore, you can use the functions in iPhone and fix the issue.
But the method to bring an iPhone in DFU or Recovery Mode varies in each iPhone model and iPad.
This post will guide you on how to enter and exit Recovery and DFU Modes in different iPhone and iPad variants. But first, understand what these iPhone functions are and their uses.

What is Recovery Mode and its use?
Recovery Mode uses iBoot to upgrade or restore your iPhone. iBoot is a bootloader program for iOS devices. Recovery Mode helps install the same or above iOS firmware version already on your iPhone. The iPhone screen in Recovery Mode prompts to connect iPhone to iTunes, showing a computer image.
Recovery Mode helps fix iPhone updates or restore issues, such as iPhone stuck at the Apple logo , unable to open the locked iPhone or want to reset iPhone but forgot iPhone passcode .
What is DFU Mode and its use?
Device Firmware Update or DFU mode lets your iPhone connect with iTunes on the computer without iBoot. As DFU mode doesn’t use iBoot, you can make changes in the operating system of the iOS device. An iPhone in DFU mode has a completely black screen.
Putting iPhone into DFU mode is the solution when Recovery Mode doesn’t resolve the problem. DFU mode can restore or upgrade iPhone. This mode is also commonly used to downgrade or jailbreak iPhone s.
Caution — you may lose all your iPhone data!
If you are entering DFU mode, make sure to back up your iPhone data . DFU mode permanently erases iPhone data . So always back up your videos, photos, messages, chats, Notes, etc., either to iCloud or iTunes.
However, if you have lost iPhone data and don’t have a backup, then immediately download iPhone data recovery software — Stellar Data Recovery for iPhone . The software helps to restore lost or deleted iPhone contacts, call logs, photos, videos, text, FaceTime, audio, chats, Calendar, Notes, Safari bookmarks, etc. It is quick to recover and extremely user-friendly.
What is required to perform Recovery and DFU modes in iPhone?
- Windows or Mac system.
- Lightning to USB cable.
- iTunes updated to the latest version on your computer.
How to put iPhone 6 and earlier versions in Recovery Mode
Follow the below steps to enter Recovery Mode on iPhone 6, iPhone 6s, iPhone 6s Plus, iPhone 5s, iPhone 5, iPhone 4s, and iPhone 4.
- Connect your iPhone to your PC using USB Lightning Cable and launch iTunes.
- Press and hold down the Home and Power button to turn the iPhone.

- Then connect the USB cable to iPhone and turn it on by holding the Home button.
- Continue to hold the Home button until a pop-up appears informing ‘an iPhone has been detected in recovery mode’ on your system.
- In Recovery mode, you can either restore the iPhone, set it up as new, or just recover your backups.

How to put iPhone 7 in Recovery Mode
It’s easy to enter Recovery Mode on iPhone 7 or iPhone 7 Plus. Follow the below steps:
- Turn off your iPhone 7 and connect it to your Mac or Windows computer.
- Ensure iTunes or Finder is running on the system.
- Press and hold the Power and Volume down button for 10 seconds.
- While continuing to hold the Volume down button, release the Power button.

- Release the button if you see the iTunes has detected an iPhone in recovery mode message on your system.
How to put iPhone 8 in Recovery Mode
If you want to enter the Recovery Mode on iPhone 8 and its variants, follow the below steps:
- Connect your iPhone 8 to your Mac or Windows system with a USB cable.
- Next, press and release the following buttons in a sequence Volume Up button, Volume Down, and Side button until your device reboots. Continue holding the Side button, even after seeing the Apple logo appear.
- Release the Side button once the Connect to iTunes logo appears on the iPhone’s display.

- Launch iTunes, and you should see a message stating, “There is a problem with the iPhone that requires it to be updated or restored.” You can choose to Update or Restore your iPhone’s software.
How to put iPhone 11 into Recovery Mode
To enter Recovery Mode on iPhone 11, iPhone 11 Pro, or iPhone 11 Pro Max, follow these steps:
- Connect your iPhone with your Mac or PC and launch iTunes.
- Force restart your iPhone with the following steps:
- Press and release the Volume Up button.
- Press and release the Volume Down button.
- Press and hold the Side button.
- Make sure to release these buttons if you see the recovery mode screen with the “Connect to iTunes” screen.
- Then choose your iPhone in iTunes, and you will see a pop-up saying that your iPhone is in Recovery Mode. Here, you can either update or restore your iPhone.
How to put iPhone 12 into Recovery Mode
Follow the below steps to enter Recovery Mode on iPhone 12, iPhone 12 mini, iPhone 12 Pro, and iPhone 12 Pro Max:
- Update iTunes to the latest version.
- Connect your iPhone to your PC or Mac via Lightning to a USB cable.
- Note: If you are connecting your iPhone to the computer for the first time, click on ‘Trust’ in the Trust This Computer dialog box and follow the prompts.
- Once your iPhone is paired with the computer, press the Volume up button followed by the Volume down button and release.
- Press and continue to hold the Side button until you see the ‘Connect to computer’ screen on your iPhone. While on your computer, you would see the iPhone Recovery Mode message in iTunes, confirming that your iPhone has entered into Recovery Mode. The computer asks you to either Update or Restore your iPhone**.** Click on any based on your requirement.
If you choose Update, iTunes will update your iPhone 12 to the latest iOS release. This won’t lead to any loss of data.
If you select Restore: It will erase iPhone data completely and renew your entire iPhone.
How to put Recovery Mode on iPhone 13
Entering Recovery Mode on iPhone 13 and iPhone 13 Pro has the same steps as iPhone 12. To enter the Recovery Mode, connect your iPhone to your computer and do the following steps in quick succession.
- Press the Volume up button and release.
- Press the Volume down button and release.
- Press and continue to hold the side button until the ‘Connect to iTunes’ screen appears on iPhone.

How to put Recovery Mode on iPhone 14
To use recovery mode on iPhone 14 and iPhone 14 Pro, follows these steps:
- Connect your iPhone to your system with a Lightning cable.
- Now on iPhone, press and quickly release the Volume up, Volume down, and side buttons until you see the recovery mode screen.
- Select your iPhone in the Finder/iTunes window and choose to update or restore your iPhone.

How to exit Recovery Mode on iPhone
It’s easy to exit Recovery Mode on iPhone. Follow the below steps:
- Hold the Home button and Lock button to exit DFU mode on iPhone 6 and earlier versions until your device reboots.
- To exit DFU mode on iPhone 7/7 Plus, hold the Side and Volume Down buttons until the device reboots.
- To exit the Recovery Mode on iPhone 8 or later version, press and hold the Side button until the “Connect to iTunes” screen disappears, and then iPhone should reboot back into iOS.
How to put Recovery Mode on iPad
To enter Recovery Mode on the iPad, follow these steps:
- Connect your iPad to Windows or Mac system using a USB cable.
- For iPad with a Home button: Press and hold the Home button and the Top/Side button until your iPad enters recovery mode.
- For iPad without a Home button: Quickly press and release the Volume Up button, Volume Down button, and the Top button. Keep holding the Top button until the iPad enters recovery mode.

How to put iPhone into DFU mode ?
Follow the below steps to enter DFU Mode on iPhone and its various version:
- Connect iPhone to PC or Mac via USB cable. Note: If the ‘Trust This Computer’ dialog box appears, follow the prompts.
- Once your iPhone is paired with a computer, follow these steps:
How to Enter DFU Mode on an iPhone 8 and later versions
- Press the Volume up button, then Volume down button, and release.
- Quickly press and hold the Side button for about 5 seconds.
- Along with the Side button, press and hold the Volume down button.
- Release the Side button and continue to hold the Volume down button for about 10 seconds.
- Once you see the ‘Recovery Mode’ screen in iTunes on your computer, you have successfully entered the DFU mode. However, the iPhone screen remains black in DFU Mode.
How to Enter DFU Mode on an iPhone 7
- Press and hold the Power and the Volume down buttons for 8–10 seconds.
- Release the Power button and continue to hold the Volume down button.
- Release the Volume down button once your iPhone has entered recovery mode.
How to Enter DFU Mode on an iPhone 6S or Earlier Versions
- Press and hold the Power/Sleep and Home buttons together for 10 seconds.
- Release the Power/Sleep button, but continue holding the Home button.
- Release the Home button once you see iTunes/Finder has detected an iPhone in recovery mode message.
Note: If you see the Apple logo on your iPhone, try again and repeat the above steps carefully.
How to exit DFU Mode on iPhone ?
If you want to exit DFU Mode on iPhone and its variants, follow the below steps:
How to Exit DFU Mode on an iPhone 8 or Later versions
- Press the Volume Up button and quickly release.
- Press the Volume Down button and quickly release.
- Now, press and hold the Side button until the Apple logo appears on iPhone. This indicates your iPhone has exited DFU Mode. Your iPhone would boot to the ‘Lock’ screen in a few seconds. Now, enter your passcode and continue to use your iPhone.
How to Exit DFU Mode on an iPhone 7
Press and hold the Power or Sleep button and the Volume down button until you see the Apple Logo.
How to Exit DFU Mode on iPhone 6 or Earlier versions
Hold the Home button and the Power button of the iPhone simultaneously until Apple’s logo appears on the screen.
Conclusion
Whenever your iPhone and its variants show problems like being stuck at the Apple logo, won’t upgrade, restore, or respond, you can use Recovery Mode and DFU Mode functions to resolve the problem. But don’t forget to back up your iPhone data before using these functions.
However, in any unfortunate incident of data loss while performing the functions, trust Stellar Data Recovery for iPhone – a software that brings back lost data on your iPhone securely.
FAQ
1. Does DFU Mode delete iPhone data?
If you use DFU mode to install something or restore your device, all your iPhone’s data will be erased.
2. Can you enter the recovery mode if your iPhone is disabled?
An iPhone is disabled when a user enters an incorrect password too many times on the lock screen. You should be able to enter the recovery mode using the same steps mentioned above and restore your iPhone to regain access.
3. How to put the iPhone in recovery mode without a computer?
A computer is not necessary to enter the recovery mode on an iPhone. You only need to press the right buttons, depending on your iPhone model, to enter the recovery mode. However, to restore your iPhone – you will need a computer.
- Title: How to Fix iPhone Stuck at attempting data recovery Loop | Stellar
- Author: Nova
- Created at : 2024-08-20 20:48:55
- Updated at : 2024-08-21 20:48:55
- Link: https://blog-min.techidaily.com/how-to-fix-iphone-stuck-at-attempting-data-recovery-loop-stellar-by-stellar-data-recovery-ios-iphone-data-recovery/
- License: This work is licensed under CC BY-NC-SA 4.0.


