
:max_bytes(150000):strip_icc():format(webp)/GettyImages-81522363-5683a5573df78ccc15cabf56.jpg)
How to fix Microsoft Excel 2003 has stopped working error? | Stellar
How to fix Microsoft Excel has stopped working error?
Summary: This blog discusses the possible reasons behind ‘Microsoft Excel has stopped working’ error and solutions to resolve the error manually. You can use Stellar Repair for Excel to quickly repair the file and recover all its data in a hassle-free manner.

Has your Microsoft Excel program stopped working or is acting strange? Excel not responding is a common issue you may experience on launching the application or opening a spreadsheet.

Figure 1 – Microsoft Excel Has Stopped Working Error Message
Possible Causes behind ‘Microsoft Excel has Stopped Working’ Error, and Solutions Thereof
Note: Several users have reported about encountering the ‘Excel has stopped working’ issue on Windows 10, 8, and 7 OS after installing an update for Excel (KB3118373). If you too have installed the update, then uninstall it and check if it solves the error. For detailed information, refer to this link .
[Fix] Excel formula not showing result
Summary: Is your Excel spreadsheet showing text of a formula you’ve entered and not its result? This blog explains the possible reasons behind such an issue. Also, it describes solutions to fix the ‘Excel formula not showing result’ error. You can try Stellar Repair for Excel software to recover engineering and shared formulas.
Sometimes, when you type a formula in a cell of worksheet and press Enter, instead of showing the calculated result, it returns the formula as text. For instance, Excel cell shows:

But you should get the result as:

Why Does Excel Show or Display the Formula Not the Result?
Following are the possible reasons that may lead to the ‘Excel showing formula not result’ issue:
- You accidentally enabled “Show Formulas” in Excel.
- The cell format in a spreadsheet is set to text.
- ‘Automatic calculation’ feature in Excel is set to manual.
- Excel thinks your formula is text (Syntax are not followed).
- You type numbers in a cell with unnecessary formatting.
How to Fix ‘Excel Showing Formula Not Result’ Issue?
Solution 1 – Disable Show Formulas
If only the formula shows in Excel not result, check if you have accidentally or intentionally enabled ‘show formula’ feature of Excel. Instead of applying calculations and then showing results, this feature displays the actual text written by you.
You can use the ‘Show Formulas’ feature to quickly view all formulas, but if you are not aware of this feature, and enabled it accidentally, it can be a headache. To disable this mode, go to ‘Formulas’ and click on ‘Show formula enabled.’ If it’s previously enabled, it will be disabled by just clicking on it.

Solution 2 – Cell Format Set to Text
Another possible reason that only formula shows in Excel not result could be that the cell format is set to text. This means that anything written in any format in that cell will be treated as regular text. If so, change the format to General or any other. To get Excel to recognize the change in the format, you may need to enter cell edit mode by clicking into the formula bar or just press F2.

Solution 3 – Change Calculation Options from ‘Manual’ to ‘Automatic’
There is an “automatic calculation” feature in Excel, which tells Excel to do calculations automatically or manually. If ‘Excel formula is not showing results’, it may be because the automatic calculations feature is set to manual. This issue is not easily detected because it results in calculating formula in one cell but if you copy it to some other cell, it will retain the first calculation and will not recalculate on the base of the new location. To fix this, follow these steps:
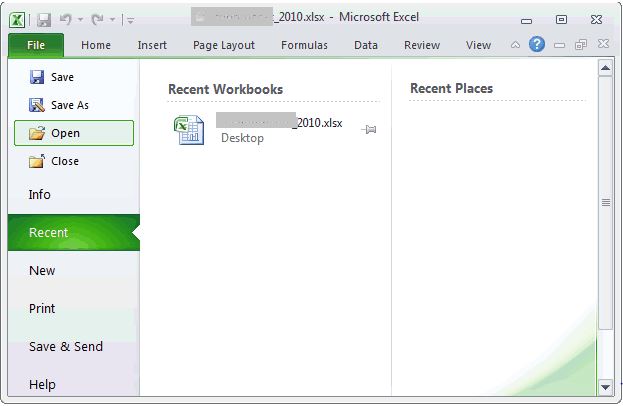
- In Excel, click on the ‘File’ tab on the top left corner of the screen.
- In the window that opens, click on ‘Options’ from the left menu bar.
- From ‘Excel Options’ dialog box, select ‘Formulas’ from the left side menu and then change the ‘Calculation options’ to ‘Automatic’ if it’s currently set as ‘Manual’.

- Click on ‘OK’. This will redirect you to your sheet.
Solution 4 – Type Formula in the Right Format
There is a proper way to tell Excel that your text is a formula. If you don’t write the formula in a particular format, Excel considers it as simple text and hence no calculations are performed according to it. For this reason, keep the following in mind when typing a formula:
Equal sign: Every formula in Excel should start with an equal sign (=). If you miss it, Excel will mistake your formula as regular text.
Space before equal sign: You are not supposed to enter any space before equal sign. Maybe a single space will be hard for us to detect, but it breaks the rule of writing formulas for Excel.
Formula wrapped in quotes: You need to make sure that your formula is not wrapped in quotes. People usually make this mistake of writing a formula in quotes, but in Excel, quotes are used to signify text. So your formula won’t be evaluated. But you can add quotes inside formula if required, for example: =SUMIFS(F5:F9,G5:G9,”>30″).
Match all parentheses in a formula: Arguments of Excel functions are entered in parenthesis. In complex cases, you may need to enter more sets of parenthesis. If those parentheses are not paired/closed properly, Excel may not be able to evaluate the entered formula.
Nesting limit: If you are nesting two or more Excel functions into each other, for example using nested IF loop, remember the following rules:
- Excel 2019, 2016, 2013, 2010, and 2007 versions only allow to use up to 64 nested functions.
- Excel 2003 and lower versions only allow up to 7 nested functions.
Solution 5 – Enter Numbers without any Formatting
When you use a number in the formula, make sure you don’t enter any decimal separator or currency sign, e.g. $, etc. In an Excel formula, a comma is used to separate arguments of a function and a dollar sign makes an absolute cell reference. Most of these special characters have built-in functions so avoid using them unnecessarily.
What to Do If the Manual Solutions Don’t Work?
If you’ve tried out the manual solutions mentioned above but still unable to resolve the ‘Excel formula not showing result’ issue, you can try repairing your Excel file with the help of an automated Excel repair software , such as Stellar Repair for Excel.
This reliable and competent software scans and repairs Excel files (.XLSX and .XLS). It also helps recover all the file components, like formulas, cell formatting, etc. Armed with an interactive GUI, this software is extremely easy to work with, and its advanced algorithms allow it to fend off Excel errors with ease.

Conclusion
This blog outlined the possible reasons that may cause ‘Excel not showing formula results’ issue. Check out these reasons and implement the manual fixes, depending on what resulted in the problem in the first place. If none of these fixes help resolve the issue, corruption in the Excel file might be preventing the formulas from showing the actual results. In that case, using Stellar Repair for Excel tool might help.
Recover Corrupted Excel File 2007, 2010 | Easy Methods
There are several reasons that can cause Microsoft Excel workbooks to turn corrupt, such as virus attack, bad sectors on a drive on which Excel file is saved, system shutdown without properly closing the Excel application, etc.
Corruption in an Excel workbook can result in data loss or render the workbook inaccessible. Fortunately, Excel automatically starts recovery upon opening a corrupted Excel file. But, if it fails, you can manually repair the file or extract data from the corrupt file.
Quick Solution: Performing 2007, 2010 Excel repair or recovery process manually can be time-consuming. Also, manual workarounds to recover corrupt Excel workbook does not guarantee recovering the complete workbook data. Use Stellar Repair for Excel software to repair single or multiple Excel (XLS/XLSX) files in 3 simple steps. The software also helps recover the Excel file, keeping the data intact.
.jpg)
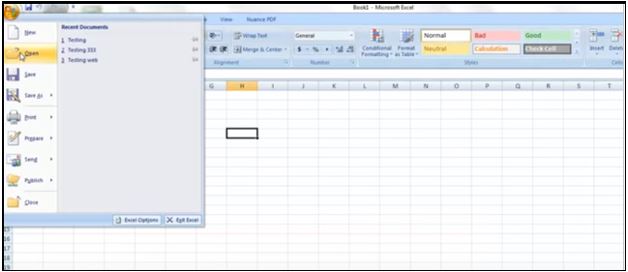
How to Fix Microsoft Excel 2010 & 2007 Files Corruption?
Microsoft Excel comes with an inbuilt repair utility, called ‘Open and Repair’, that helps fix and recover corrupted Excel files.
Steps to Repair MS Excel 2010 Files Manually
The detailed steps to open and repair Excel 2010 are as follows:
- Open Microsoft Excel 2010 and click File from the main menu.
- Next, click Open.
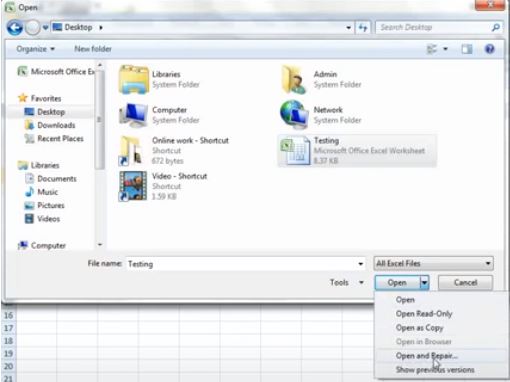
- Browse the corrupt Excel 2010 file on your computer and select it in the Open dialog.
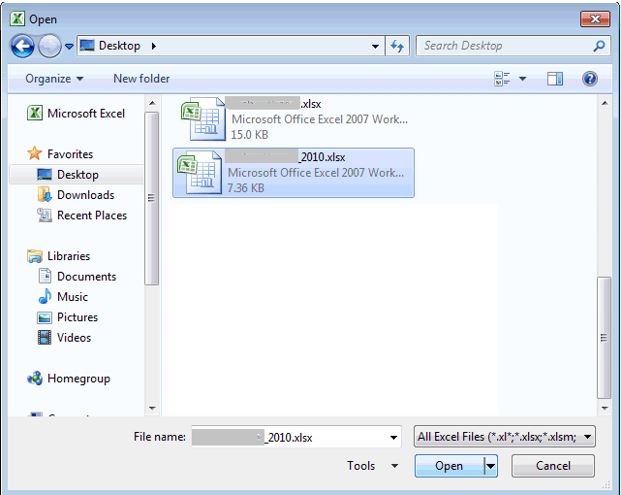
- Click the arrow next to the Open button and choose Open and Repair.
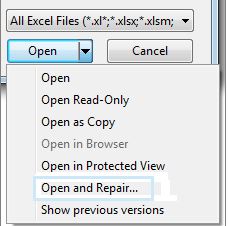
- Click Repair when prompted to recover data to the maximum.
- If Excel fails to repair, click Extract Data to extract values and formulas in the corrupt file.
- Excel prompts to ‘Convert to Values’ or ‘Recover Formulas’.
- Click Yes if it prompts the following error:
“The document file name caused a serious error the last time it was opened. Would you like to continue opening it?
- When Excel opens the last saved file, save it.
Once you’re able to access the last saved 2010 Excel file, try extracting the file contents.
Save Excel 2010 File in HTML Format
If you can open the Excel file, choose the HTML format to save it in filtered form. After that, close the Excel file as you have your data in the HTML file. The steps to save an Excel file in HTML format are as follows:
- Open Microsoft Excel 2010, click Save As, and then choose Web Page in the ‘Save as’ type drop-down list.
- Select the “Enable Entire Workbook” option, and then click the Save button.
- Close the Excel file and reopen your Microsoft Excel application. Browse the HTML file that you have saved.
- Click File from the main menu, and select Save As in the list.
- Type-in a different name, choose Microsoft Excel Workbook in the ‘Save as’ type drop-down menu, and then click the Save button.
With this, you would be able to access the data in the corrupt Excel file.
If the inbuilt tool fails to repair Excel 2010 file, a few methods can help you recover data from corrupted or lost workbook manually.
Steps to Repair Excel 2007 Files Manually
Follow these steps to repair a corrupted 2007 Excel file by using the inbuilt Microsoft Excel repair tool:
- Open Microsoft Excel 2007, click the Office button, and then select Open.
- In the Open dialog box that pops-up, browse and select the corrupt Excel 2007 file. Click the arrow next to the Open button and choose Open and Repair.
- Click Repair when prompted to recover as much data as you can from Excel 2007 file.

- If a repair fails, follow steps 1 till 3, and then click Extract Data to extract values and formulas from the corrupt file.
- In the window that appears, click Convert to Values or Recover Formulas to extract workbook data.

Note: The built-in Microsoft Excel 2007 repair tool may fail to resolve Excel corruption issue. Also, choosing to extract data from the workbook involves data loss risk. Using a professional Excel repair tool, however, can resolve all types of Excel file corruption errors and restore all its data.
Methods to Recover Data from Corrupt Excel 2010 & 2007 Files
If the ‘Open and Repair’ feature fails in getting your Excel 2010, 2007 file repaired, you can try retrieving the file contents by following some manual methods. However, the methods may vary depending on whether you can open a workbook or not.
Method 1 – Move Corrupt Excel File to another System
Move the corrupt Excel file to any other computer and try opening it in MS Excel 2010/2007. Doing so, may help you resolves disk or network-related errors leading to Excel file corruption.
Method 2 – Revert Unsaved Excel File to its Last Saved Version
If an Excel file turns corrupt while working on it but before saving any changes, try reverting it to its last saved version. To do so, perform the following:
- Open your Excel application, click the Office button, and then click Open from the menu.
- Browse the corrupt Excel file, click Yes when prompted to revert to its last saved version.
What if Nothing Works?
If you fail to recover a corrupt Excel 2007/2010 file, perform Excel file recovery with Stellar Excel repair software. The software is specially designed to help users fix their corrupted XLS/XLSX files quickly and easily without any technical assistance. It also helps restore all the file data to its original form.

Points to Remember
- Close all the MS Excel instances before using the software
- If the sheet you are repairing contains engineering formulas, please include ‘Analysis TooPak’ manually from Tools > Add-Ins
If you know the corrupt Excel 2007 or 2010 file location, click Browse to choose the file. Otherwise, click Search. Follow the below steps to recover data from corrupt Excel 2007/2010 file by using Stellar Excel repair tool:
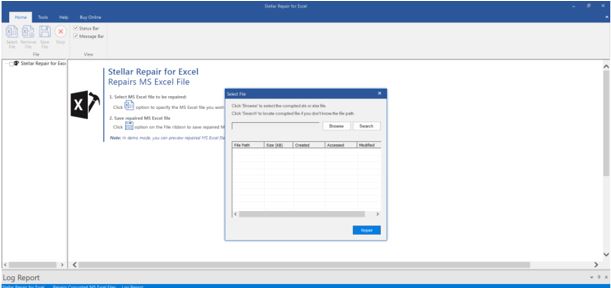
- Click the Repair button to scan the file.
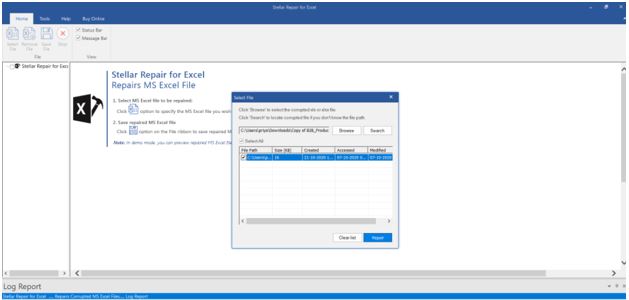
- Once the scanning process is complete, the software shows a preview of recoverable Excel file items.
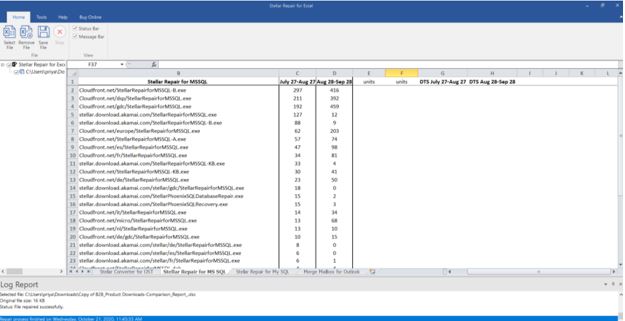
- To save the repaired file, click the Save File option on File menu.

- In ‘Save File’ dialog box, choose to recover Excel 2007 & 2010 data to either the Default or New location. Click OK.
The repaired Excel file gets saved at the specified location.
Preventive Measures to Avoid Losing Excel File Data
The above-discussed methods might help salvage your data. But, it is recommended that you must take some preventive measures to avoid losing the data. One such important measure is backing up a copy of your workbook automatically. Doing so, will help you get back data in case the workbook is accidentally deleted or corrupted.
Steps to Create Backup Copy Automatically
You can automatically create an Excel backup copy by following these steps:
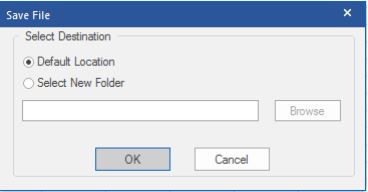
- Click Save As from the main menu of your Excel application.
- Browse to the location where the corrupt Excel 2010/2007 file is saved.

- In ‘Save As’ dialog box, click the arrow next to Tools button (given at the bottom left corner) and choose General Options.

- In ‘General Options’ box, check Always create backup checkbox, and then click OK.
With this, you instructed MS Excel to create a backup of every Excel file you create or open for work.
Conclusion
This article outlined the typical reasons resulting in a corrupt Excel 2010 or 2007 file, such as virus infection, bad sectors on drive, etc. It explained how to fix a corrupted Excel file by using the inbuilt MS ‘Open and Repair’ tool. The article also discussed methods to recover Excel files in MS Office 2010 & 2007 when the Microsoft Excel repair tool fails. Further, it explained how using a professional repair tool such as Stellar Repair for Excel can come in handy when the manual methods to repair and recover Excel 2007 and 2010 file fails. But, keep in mind, a workbook may get corrupt again. And so, make sure to automatically backup your workbook to avoid losing its data.
How to fix runtime error 424 object required error in Excel
The Runtime error 424: Object required occurs when Excel is not able to recognize an object that you are referring to in a VBA code. The object can be a workbook, worksheet, range, variable, class, macro, etc. Some users have also reported that this error occurred when they tried to copy the values of the cells from one workbook to another.
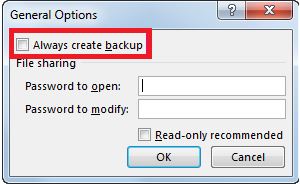
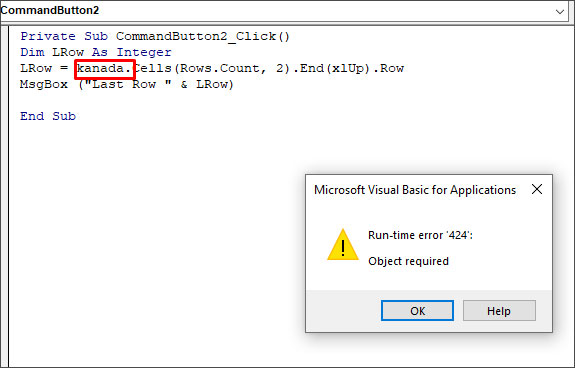
Let’s understand the error through a small scenario. Suppose, I want to check the last field row in a table in a spreadsheet named “First” using the VBA code. To do this, I have added a command button and double-clicked on it and entered the below code in the backend:
Private Sub CommandButton2_Click()
Dim LRow As Integer
LRow = Worksheets(“First”).Cells(Rows.Count, 2).End(xlUp).Row
MsgBox (“Last Row “ & LRow)
End Sub
In this code, Worksheets(“First”) is a data object. If I mistakenly delete this data object and insert any random name (for example - kanada), then it will not be recognized by Excel. When I run this code, I will get the “Run-time error 424”.
Causes of Runtime Error 424 in Excel
The Runtime error 424: Object required can occur due to the following reasons:
- Incorrect name of the object you are trying to refer to in a code.
- You have provided an invalid qualifier to an object.
- You have not used the Set statement while assigning an object reference.
- The object is corrupted.
- Missing objects in a workbook.
- Objects you are trying to call in a code are mistakenly deleted or unavailable.
- You have used an incorrect syntax for object declaration.
- You are trying to perform an invalid action on an object in a code.
- Workbook is corrupted.
Solutions to Fix Runtime Error 424: Object Required in Excel
The VBA error ‘object required’ may occur due to different reasons. Based on the reason, you can follow the solutions mentioned below to fix the error.
1. Check the Name of the Object
The Runtime error 424 can occur when you run the VBA code using an incorrect name of the object. For example, the object name is ‘MyObject’ but you’re using “Backcolor”.
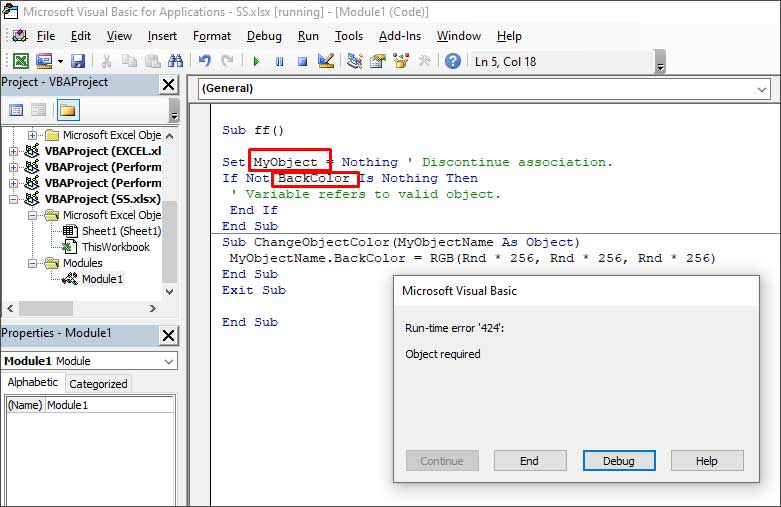
When you click the Debug button, the line with the error will highlight.

To fix the issue, you need to provide the correct name of the object.
2. Check if the Object is Missing
The Runtime error 424 can occur if the object you are referring to as a method is not available or you are using the wrong object in a code. In the below example, you can see that the error occurs when an object named “Employee” is not available in the Project list.
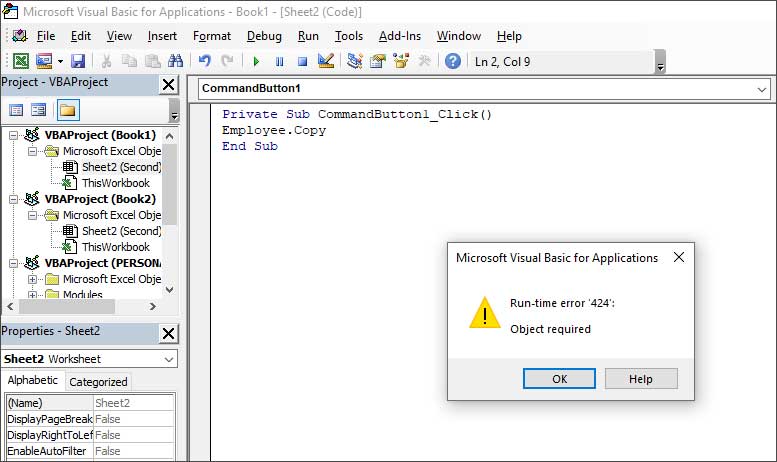
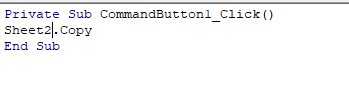
You can check and mention the object which is available. For instance, Sheet2 in the below code.
3. Check All References are Declared in the Code
You can get the Runtime error 424 if all the references are not declared. So, make sure you have declared all the references in the code. To verify this, you can use the debug mode by pressing F5 or clicking on the Debug option.

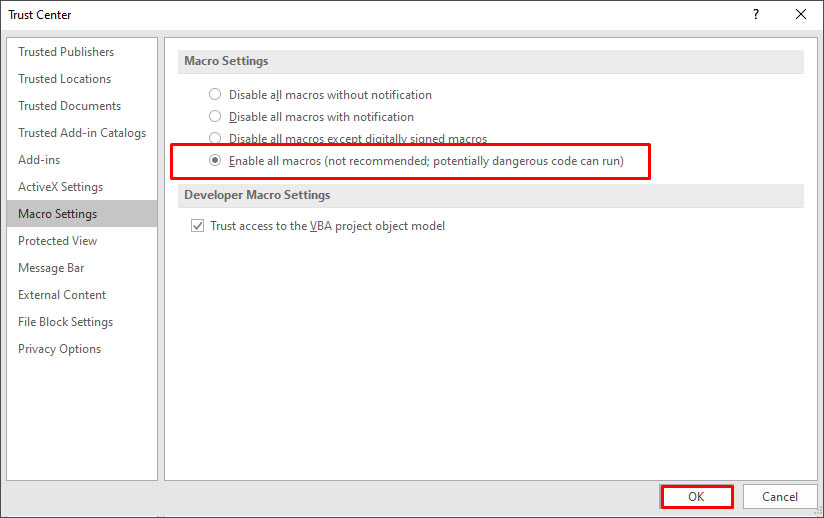
4. Check the Macro Security Settings
Sometimes, the error can occur if macros are disabled in the Macro Security settings. You can check and change the settings by following these steps:
- On the Developer tab, in the Code section, click Macro Security.
- In the Trust Center window, select Enable all macros.

- Click OK.
5. Repair your Workbook
Sometimes, the ‘Object required’ error can occur if your Excel file is damaged or corrupted. In such a case, you can try repairing the file using Microsoft’s in-built utility - Open and Repair. To use this utility, follow these steps:
- In Excel, go to File > Open > Browse.
- In the Open dialog box, click on the corrupted Excel file.
- Click the arrow next to the Open button and select Open and Repair from the dropdown.
- Select Repair to recover as much data from the file as possible.
If the Open and Repair utility fails or stops working, then you can try a professional Excel repair tool, such as Stellar Repair for Excel . It is an advanced tool that can repair severely corrupted Excel files (.xls, .xlsx, .xltm, .xltx, and .xlsm). It helps recover all the file components, including images, charts, tables, pivot tables, cell comments, chart sheets, formulas, etc., without impacting the original structure.
Conclusion
The Runtime error 424 usually occurs when there is an issue with the objects in your VBA code. In this article, we have covered some effective methods to resolve the “object required” error in Excel. If the error occurs due to corruption in Excel file, then you can repair the corrupt file using Stellar Repair for Excel. It is a reliable tool that can repair severely corrupted Excel file without changing its actual formatting. You can download the free trial version of the software to evaluate its functionality.
Fix Cannot Paste the Data Error in Microsoft Excel
When copying and pasting the cell contents or attributes from one workbook to another, you can encounter the “Cannot paste the data” error. The error indicates that the values you are trying to paste do not match the cell format (Currency, Date, Text, etc.) used in the column. The error can occur if you are attempting to paste information into a merged cell. You can also get this error if the data you are trying to paste contains more columns than the destination worksheet can accept or if the copy area and paste area aren’t the same size.
Why you cannot Paste the Data in Microsoft Excel?
You can experience the “Excel cannot paste the data” error due to one of the following reasons:
- Locked cells
- Data size limitation
- Formatting issues
- The file size is too large
- Overloaded clipboard
- Data type mismatch
- Invalid range
- Lack of permissions
- Excel file is corrupted
- Compatibility issues
- While pasting the merged cells
Methods to Fix MS Excel Cannot Paste the Data Error
The “Microsoft Excel cannot paste the data” error usually appears when copying and pasting data within the spreadsheet. It primarily affects the copy-and-paste feature within the Excel file. However, the impact of this error may vary with the data you are working with. When this error occurs, first try restarting the Excel application. Ensure that you’ve saved all your important data before restarting the application to prevent data loss. If, after performing this basic step, you still face the issue, then try the following troubleshooting methods.
Method 1: Check and Unlock Cells in Excel
You can get the Excel cannot paste the data error if the cells you are trying to paste in the Excel file are locked. You can check and unlock the specific cells in the Excel file using the below steps:
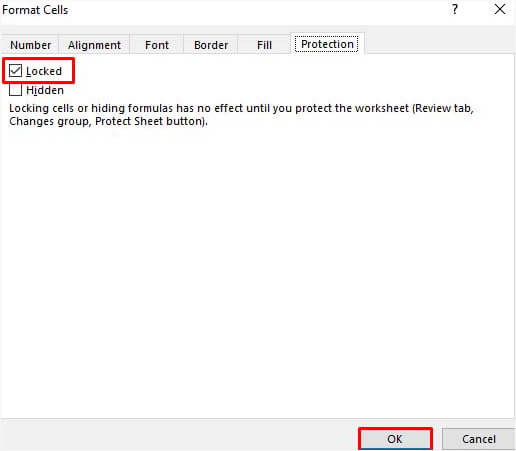
- Go to the Home tab in your Excel file and click Format Cell Font popup launcher.

- In the Format Cells dialog box, click Protection.
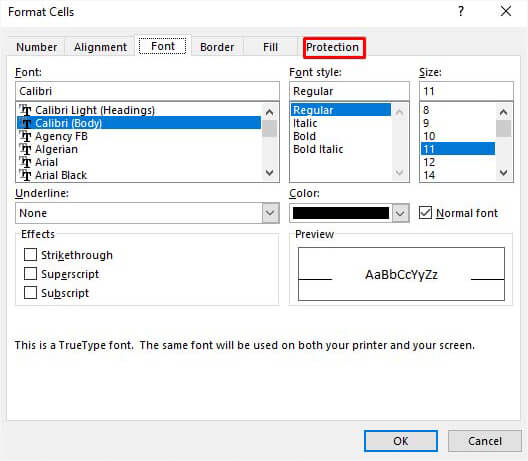
- Under the Protection option, unselect the locked field and then click OK.
Method 2: Check and Fix the Cell Format
Sometimes, you can get the “Cannot paste the data” error in Excel if there is an issue with the formatting of the cells in the column (in which you are trying to paste the data). You can check whether the cell formats of the columns of the source file (from where you are copying data) match the destination file (in which you are pasting the cell data). If not, then change the cell format. Here’s how to do so:
- In the Excel file, click on the affected column heading (whose cells you need to modify).
- Navigate to the Home tab and click the General dropdown menu.

- Click on the desired cell format that matches the values you are trying to paste into the column.
Method 3: Check Copy and Paste Area Size
The “data cannot be pasted” issue can also occur if Excel detects the copy area of the range of cells is not of the same size and shape as that of the paste area. So, make sure the size of the range of cells for the paste area is same as the copied area. To ensure this, you can try the following:
- Use Upper-left Cell
You can select the upper-left cell instead of the complete range to paste.
Use Paste Special Option
You can use the Paste Special option to paste the data. To use this option, go to Home > Paste Special.
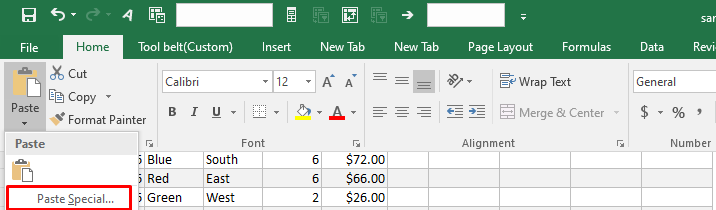
- You can choose from the different options, such as paste all, formulas, operations, Transpose, skip blanks, etc. to take control over how the data is pasted.
Method 4: Check and Unmerge Cells
The merged cells in the workbook can create discrepancies when copying and pasting data. These can create mismatch between the source and destination cell areas, resulting in errors. Make sure you are not pasting the data copied from merged cells. You can check and unmerge the cells using the below steps:
- Open the Excel file (in which you are copying data) and go to the Home tab.
- Click Merge & Center > Unmerge Cells.

Method 5: Unselect the Excel DDE (Dynamic Data Exchange) Option
Sometimes, you can get the Excel cannot paste the data error while copying and pasting data from Excel file to external data sources or applications. It usually appears if you have established DDE links between them. To resolve this, you can uncheck the “Ignore other applications that use Dynamic Data Exchange (DDE)” option. Follow the below steps to do so:
- Open your Excel file.
- Go to File > Options.
In Excel Options, click Advanced and unselect “Ignore other applications that use Dynamic Data Exchange (DDE). Click OK.
Here are some additional solutions you can try to fix the “Cannot paste the data” error in Excel
Check the Excel File Format
Sometimes, the copy and paste error can occur if you try to move data from an older version of Excel file (XLS) into a newer version file (XLSX) or vice versa. You can try to change or convert the file format to resolve the issue.
Clear Clipboard
Too many items on the clipboard can prevent you from copying and pasting the data. You can empty your clipboard by deleting all clips. To do this, go to Home and click the Clipboard option.
Change the Column’s Cell Format
You can get the “Cannot paste the data” error when the information you need to paste does not match the cell format in the column. In such a case, you can change the column’s cell format. To do this, navigate to the Home option and then click on the General menu arrow. Then, change the cell format suitable to the type of information you are trying to paste in that column.
Add Columns
The copy-and-paste error in Excel can also occur if there are not enough columns to accept the data that you are trying to paste. You can insert more columns and then try copying and pasting data. To insert additional columns, click on the column heading, click Home, and then select Insert.
Remove Incompatible Add-ins
Sometimes, incompatible or faulty add-ins can also create conflicts with Excel’s clipboard operations, leading to the error. To check if add-ins are causing the issue, open the Excel file in safe mode. In safe mode, if you are able to paste the data, then check and uninstall the incompatible Excel Add-ins.
What to do if Nothing Works?
If the above methods do not work, then corruption in the Excel file could be the cause of the “Cannot paste the data” error. In such a case, you can use Excel’s built-in Open and Repair utility to repair the corrupted file. Here’s how to use this utility to repair the Excel file:
- Open your Excel application.
- Navigate to File and then click Open.
- Click the Browse option to select the affected Excel file.
- The Open dialog box opens up. Click on the corrupted file.
- From the Open dropdown, select the Open and Repair option.
- The Excel will prompt you to choose one of the below options:
- Repair
- Extract
- Cancel
- Select the Repair option to extract maximum data from the file. If the Repair option fails, choose the Extract option to recover the data, excluding formulas and values.
The Open and Repair utility may not be able to repair your Excel file if it is severely corrupted. In such a situation, the best possible way out is to use a professional Excel repair software to repair the file. You can try Stellar Repair for Excel. It can repair highly damaged or corrupted Excel (.xls, .xlsx, .xltm, .xltx, or .xlsm) file and recover all the objects from the file by maintaining the original formatting. The tool supports 2007 and higher editions of MS Excel. You can download the demo version of the software to preview the repaired objects and verify its functionality.
Conclusion
The “Excel cannot paste the data” error in Excel can occur due to different factors. You can check and clear the clipboard, unmerge the cells, unlock the cells, and use various other methods mentioned above to troubleshoot the error. If you fail to copy and paste the data due to file corruption, then opt for an advanced Excel repair software, like Stellar Repair for Excel. It is a reliable tool that can help you repair highly damaged/corrupted Excel files. It enables you to recover all the objects from the corrupted Excel file, with complete integrity.
Ways to Fix Personal Macro Workbook not Opening Issue
Many users have reported encountering issues while accessing personal macro workbook, such as personal macro workbook not opening, personal macro workbook not loading automatically, Excel personal macro workbook keeps getting disabled, etc.
Such issues may arise due to a problem with the directory where the personal workbook is stored. However, there are various other reasons that may lead to such issues. Below, we’ll discuss the reasons behind the personal macro workbook not opening issue and the solutions to troubleshoot and fix the issue. But before proceeding, let’s understand why personal macro workbook is used.
Why Personal Macro Workbook is used?
You can access macros in a specific Excel workbook. However, when you need to use the same macro in other Excel worksheets, then you can create a personal macro workbook. A personal macro workbook (Personal.xlsb) is a hidden workbook that is used to store all macros. It makes your macros available every time you open Excel.
Causes of Personal Macro Workbook not Opening Issue
You may encounter personal macro workbook is not opening issue when attempting to record macros. Some possible causes behind such an issue are:
- Personal macro workbook is stored at an untrusted location
- Location of xlsb is changed
- Personal macro workbook is hidden
- Personal macro workbook becomes corrupted
- Disabled items in add-ins
- Workbook is Read-only
Methods to Fix the “Personal Macro Workbook not Opening” Issue
Follow the given methods to fix the personal macro workbook is not opening issue:
Method 1: Check the Path of Personal.xlsb
The personal macro workbook (Personal.xlsb) file is stored in XLStart folder. It opens automatically when you open your Excel application. However, sometimes it fails to load automatically. It usually occurs when you try to open the file from an incorrect path. You can check the path of Personal.xlsb by following these steps:
- Open the workbook.
- Click on the Developer tab.

- Press Alt + F11 to open Visual Basic Editor.
- Go to View > Immediate Window.
- In Immediate Window, type the following code to know the location of the workbook:
?thisworkbook.path.
- Then, hit Enter.
- You will see the path of the personal macro workbook.
- Copy the path and paste it into Quick Access field in File Explorer.

Method 2: Unhide Personal Macro Workbook
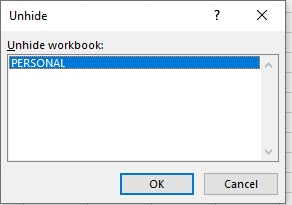
If personal macro workbook is hidden, you may unable to see and open the Personal.xlsb file. To unhide the personal Macro workbook, follow the below steps:
- In Microsoft Excel, go to View and then click Unhide

- The Unhide dialog box is displayed. Click PERSONAL and then OK.
Method 3: Enable the Macro Add-ins
You may unable to open the previously recorded macros in your personal macro workbook if the macros are disabled. To check and enable the items, follow these steps:
- Go to File > Options.
- In Excel Options, click on the Add-ins
- Select Disabled Items from the Manage section and click on Go.
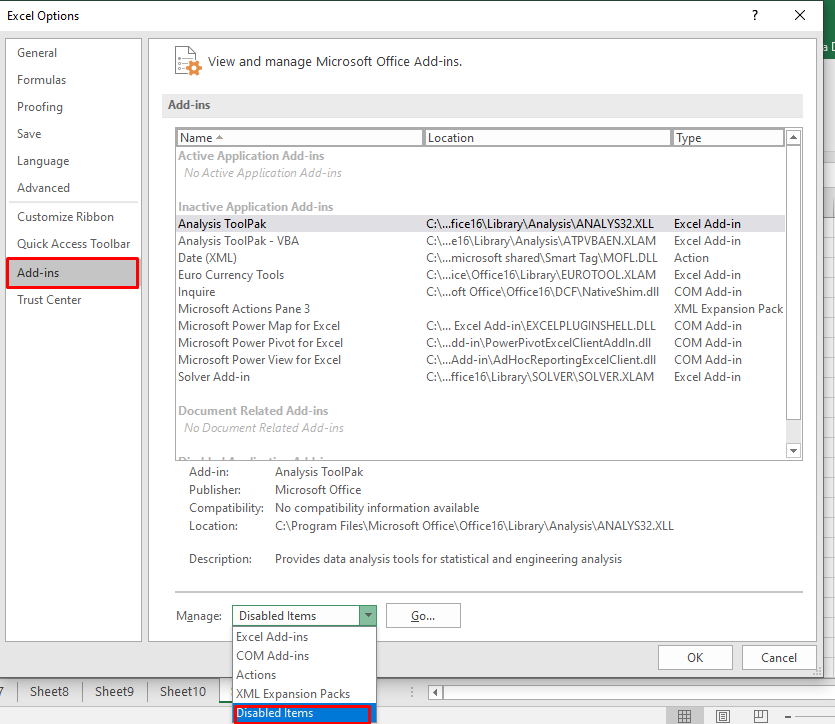
- The Disabled Items dialog box appears. Click on the disabled item and then click Enable.
Method 4: Change the Trusted Location
You may encounter the “personal macro workbook not opening” issue if the Personal.xlsb file is stored at an untrusted location. You can check and modify the path of XLSTART folder using the Trust Center window. Here are the steps:
- Open MS Excel. Go to File > Options.
- Click Trust Center > Trust Center Settings.
- In the Trust Center Settings dialog box, click on Trusted Locations.
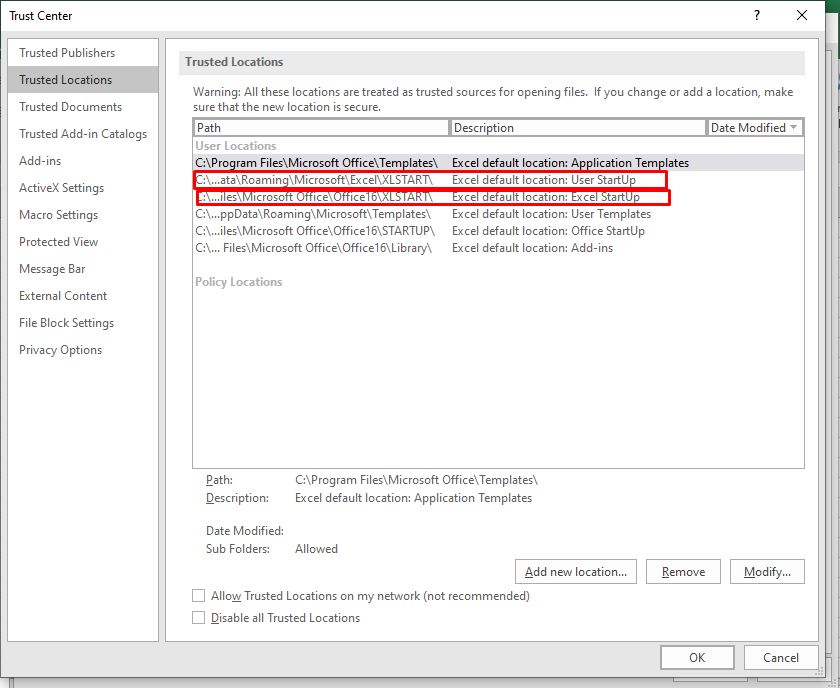
- Verify the path of the XLSTART If it is untrusted or there is any issue, then click Modify and then click OK.
Method 5: Repair your Excel File
You may fail to open personal macro workbook if it is corrupted. To repair the corrupt workbook, you can use the built-in Open and Repair utility in MS Excel. To use this tool, follow these steps:
- Open your Excel application.
- Click File > Open.

- Browse to the location where the corrupted file is stored.
- In the Open dialog box, select the corrupted workbook.
- From the Open dropdown list, click Open and Repair.
The dialog box appears with the Repair and Extract buttons. Click Repair to retrieve all possible data or the Extract option to recover the data without formulas and values.
If the Open and Repair utility fails to repair the corrupted Excel workbook, then you can use a professional Excel repair tool, such as Stellar Repair for Excel. It can easily repair severely corrupted Excel (XLSX and XLS) files and recover all the components. You can download the free trial version of the tool to preview the recoverable data.
Closure
This article discussed the ways to fix the personal macro workbook not opening issue. In case you are unable to open the personal macro workbook because of corruption in the workbook, you can use the Open and Repair utility in MS Excel. If it fails, then you can use Stellar Repair for Excel to fix corruption in the Excel file and recover all its data with complete integrity.
Quick Fixes to Repair Microsoft Excel 2013/2016 Content related error
Summary: The blog outlines some quick tips to fix ‘We found a problem with some content’ error in Microsoft Excel 2013/2016. It explains manual procedure to resolve the error and also suggests an automated tool to perform the repair process to retrieve all possible data from a corrupt workbook.
Sometimes, when opening an MS Excel file, you may receive an error message that reads:
“**We found a problem with some content in ‘filename.xlsx’. Do you want us to try to recover as much as we can? If you trust the source of this workbook, click Yes.**“

Figure 1 – Excel ‘found a problem with some content’ Error Message
What Causes ‘We Found a Problem with Some Content’ Error?
There is no clear answer as to what results in the Excel error – ‘**We found a problem with some content in <filename.xlsx>**’. However, based on some user experiences, it appears that the error occurs due to corruption in an Excel workbook. It may turn corrupt when:
- You try opening the Excel file saved on a network-shared drive.
- A string is added in a cell in Excel, instead of a numeric value.
- Text values in formulas exceed 255 characters.
How to Resolve ‘We Found a Problem with Some Content’ Error?
Follow these tips to fix the Excel error:
IMPORTANT! Before you follow the tips to resolve the Excel error, keep these points in mind: Make sure you have closed all of the opened Excel workbooks. Try restoring Excel file data from the most recent backup copy. If you don’t have a backup copy, make a copy of the corrupt Excel file and perform repair and recovery procedures on that backup copy.
Tip #1: Repair Corrupt Excel File
File Recovery mode is a native Excel recovery utility that automatically opens whenever any inconsistencies are found in the worksheet. If Microsoft doesn’t detect any issue or fails to open the File Recovery mode, you can start it manually to recover the corrupt Excel file. To do so, follow the steps below:
- Click on the File menu, and then select Open.
- In the Open dialog box, navigate to the folder location where the corrupt Excel file is saved.
- Select the corrupt file, and then click on arrow sign available next to Open button to select Open and Repair option.

Figure 2 – Open and Repair Feature in Excel
- Next, click Repair to recover maximum possible data.
- If the repair is not able to recover the data from the workbook, select Extract Data to extract all possible formulas and values from the workbook.
If repairing the corrupt Excel file doesn’t work, you can try an Excel file repair tool to fix corruption errors. You can also try to recover data from the corrupt file manually by following the next tips.
Read this: What to do when Open and Repair doesn’t work?
Tip #2: Set Calculation Option to Manual
To make the file accessible, try setting the calculation option in Excel from automatic to manual. As a result, the workbook will not be recalculated and may open in Excel. For this, perform the following:
- Click File, and then click New.
- Under New, click the Blank workbook option.
- When a blank workbook opens, click File > Options.
- Under the Formulas category, pick Manual in the Calculation options section, and then click OK.

Figure 3 – Select Manual in Calculation options
- Now, again click on the File menu and then click Open.
- Navigate to the corrupt workbook, and double-click it.
When the workbook opens, check if it contains all the data. If not, proceed to the next tip.
Tip #3: Copy Excel Workbook Contents to a New Workbook
Several users have reported that they were able to fix ‘We found a problem with some content in
- Open the Excel workbook in ‘read-only’ mode, and copy all its contents.
- Create a blank new workbook and paste the copied contents from the corrupt file to the new file.
Tip #4: Use External References to Link to the Damaged Workbook
Use external references to link to the corrupted workbook. By implementing this fix, data contents can be retrieved. However, it is not feasible to recover formulas or calculated values using this solution.
Follow the steps below:
- In Excel 2013/2016, click File > Open.
- Navigate to the folder where the corrupt file is saved.
- Right click the file, select Copy, and then click on Cancel.
- Again, click on File and then New.
- Under New option, click on Blank workbook.
- In the cell A1 of new workbook, type =File Name!A1 (where File Name indicates the name of the damaged workbook being copied in Step 3).
- If Update Values dialog box appears, click the corrupt workbook, and choose OK.
- If Select Sheet dialog box appears, click the appropriate sheet, and then click OK.
- Select cell A1.
- Next, click Home, and then click Copy (or, press Ctrl +C).
- Starting in cell A1, select area approximately the same size as that of the cell range that contains data in the damaged workbook.
- Next, click Home and select Paste (or click Ctrl + V).
- Keep the range of cells selected, click Home and then Copy.
- Finally, click on Home, click on the arrow associated with Paste and under Paste Values click on Values.
This will remove the link to the corrupt workbook and will retrieve data. But, keep in mind, the recovered data will no longer contain formulas or calculated values.
Alternative Solution – Stellar Repair for Excel
If the above manual methods fail to fix the ‘We found a problem with some content in Excel error’, try using the Stellar Repair for Excel software to resolve this error. The software helps repair and recover corrupt Excel files in just a few clicks. It can be used on a Windows 10/8/7/Vista/XP/NT machine to repair a corrupted workbook and recover every single bit of data from all the versions of the Excel workbook.

Read this: How to repair corrupt Excel file using Stellar Repair for Excel?
Conclusion
In this blog, we discussed some possible reasons behind Microsoft Excel 2013/2016 ‘We found a problem with some content’ error. The error may occur when an Excel file becomes corrupt. You may try repairing the corrupted Excel file manually by using the built-in ‘Open and Repair’ feature. Or, try the manual workarounds to extract data from the corrupt file discussed in this post. If the manual solutions don’t work for you, using Stellar Repair for Excel can come in handy in repairing the corrupt Excel (.xls/.xlsx) file and recovering the complete file data.
Also read:
- 4 Ways to Transfer Music from Nokia C300 to iPhone | Dr.fone
- 2 Ways to Transfer Text Messages from Nubia Red Magic 9 Pro+ to iPhone 15/14/13/12/11/X/8/ | Dr.fone
- How to recover deleted photos from Xiaomi .
- How to rescue lost call logs from Vivo S17
- How To Recover Lost Data on iPhone 14 Pro? | Dr.fone
- How To Repair iPhone SE (2022) iOS System Issues? | Dr.fone
- How to retrieve erased messages from Huawei Nova Y71
- How To Transfer Data From iPhone 12 Pro To Other iPhone 12 devices? | Dr.fone
- How to retrieve erased call logs from Vivo S18 Pro?
- How to recover deleted contacts from Google .
- How to Fix Corrupt video files of X6 Pro using Video Repair Utility?
- How To Restore Missing Call Logs from Lava Blaze 2
- How to Restore Deleted Nokia C12 Plus Pictures An Easy Method Explained.
- How to restore wiped messages on Oppo A38
- How To Exit DFU Mode on iPhone 6? | Dr.fone
- How To Repair iPhone 6s iOS System Issues? | Dr.fone
- How to retrieve lost files from X50i+?
- How to Rescue Lost Videos from Vivo S17 Pro
- How To Restore Missing Messages Files from Honor X7b
- How to identify some outdated hardware drivers with Windows Device Manager on Windows 7
- How to Recover iPhone 15 Pro Max Data From iOS iTunes? | Dr.fone
- How to Retrieve deleted photos on Itel A05s
- How to retrieve erased music from Honor 90 Pro
- How to Recover Deleted Photos from Android Gallery App on Samsung Galaxy A54 5G
- How to play HEVC H.265 video on Motorola ?
- How to retrieve lost files from Oppo A78?
- How to install and update device drivers manually in Windows 11 & 10 & 7
- How to retrieve lost files from Motorola Moto G 5G (2023)?
- How To Transfer Data From iPhone 11 Pro Max To Android devices? | Dr.fone
- How to Restore iPhone SE from Backup when iTunes Backup is Corrupt or not compatible | Stellar
- How to Put iPhone SE or iPad on Recovery mode? (Step by Step Tutorial) | Stellar
- How to remove Google FRP Lock on Nokia C12 Pro
- How to Motorola Moto G84 5G Get Deleted Phone Number Back with Ease and Safety
- How To Reset Your iPhone SE (2020) Without iTunes? | Dr.fone
- How to Electronically Sign a .xlb Using DigiSigner
- In 2024, Getting the Pokemon Go GPS Signal Not Found 11 Error in Nubia Red Magic 9 Pro+ | Dr.fone
- In 2024, Forgot Pattern Lock? Heres How You Can Unlock Xiaomi Civi 3 Pattern Lock Screen
- Is GSM Flasher ADB Legit? Full Review To Bypass Your OnePlus Nord CE 3 Lite 5G Phone FRP Lock
- In 2024, How Can You Transfer Files From Poco F5 5G To iPhone 15/14/13? | Dr.fone
- Top 11 Free Apps to Check IMEI on Lava Yuva 3 Phones
- In 2024, How to Unlock Nubia Z50 Ultra Phone without Google Account?
- Bricked Your Vivo G2? Heres A Full Solution | Dr.fone
- 6 Fixes to Unfortunately WhatsApp has stopped Error Popups On Xiaomi Redmi K70 | Dr.fone
- 3 Effective Ways to Unlock iCloud Account Without Password On Apple iPhone 14 Pro Max
- Unlock Apple iPhone 14 Pro Max With Forgotten Passcode Different Methods You Can Try
- 4 Easy Ways for Your Tecno Pova 5 Pro Hard Reset | Dr.fone
- Title: How to fix Microsoft Excel 2003 has stopped working error? | Stellar
- Author: Nova
- Created at : 2024-05-19 18:32:11
- Updated at : 2024-05-20 18:32:11
- Link: https://blog-min.techidaily.com/how-to-fix-microsoft-excel-2003-has-stopped-working-error-stellar-by-stellar-guide/
- License: This work is licensed under CC BY-NC-SA 4.0.
