
:max_bytes(150000):strip_icc():format(webp)/GettyImages-971165690-1e0af1d9299f4fdba1225c2d20c739f2.jpg)
How to Fix Microsoft Excel 2019 Error Code 0x800A03EC? | Stellar
How to Fix Microsoft Excel Error Code 0x800A03EC?
Summary: You can encounter the error code 0x800A03EC in Excel due to different reasons. This post discusses the causes of the error and the workarounds and methods to fix it. If the “Microsoft Excel error 0x800A03EC” prevents you from accessing the Excel file data, use the Excel repair file tool mentioned in this post to restore the data with complete integrity.

The error code 0x800A03EC in MS Excel can occur while exporting or importing Excel sheets to or from another application. It can occur when trying to execute a macro. It usually appears when the Excel application fails to read the queries in the VBA code, especially when using the PasteSpecial method (Range.PasteSpecial method) to paste cell data from the clipboard into an Excel sheet. It can occur if the cell data format is not compatible with the target data.
Causes of MS Excel Error Code 0x800A03EC
The error code 0x800A03EC in Excel can occur in different scenarios. There could be several reasons associated with this error. Some of them are:
- Incompatible data formats.
- Trying to paste an extensive range of cells into a smaller range of cells.
- Add-ins are interrupting the code operation.
- Issue with the VBA code (incorrect or incomplete queries).
- Excel file is corrupted/damaged.
- Corrupted macros.
- Trying to export large-sized Excel file which is more than the Excel’s prescribed limit.
- Outdated Excel version.
- Incompatible cell formats on source and destination (when copying/pasting cell data).
- Missing cell range (forget to specify the range while using PasteSpecial method in the VBA code).
- Trying to save Excel file to incorrect directory.
- File path contains invalid characters.
Solutions to Fix MS Excel Error Code 0x800A03EC
The error 0x800A03EC can appear if your Excel file is incompatible with your Excel application version. You can run the compatibility checker to review the compatibility issues in your Excel file. If this is not the issue, then follow the below methods.
Method 1: Review VBA Code
The exception from hresult 0x800a03ec excel can occur if you are trying to execute incorrect or incomplete queries in the Excel VBA code. It can also appear if the formulas do not contain the equal (=) symbol at the beginning. Verify the VBA code for any logical flaws, typo errors, syntax errors, or missing references.
Method 2: Check the Field Size
Excel has certain limits and specifications . If the Excel file’s data exceeds these designated size limits, you can get the MS Excel error code 0x800A03EC error. For example, this error occurs if you try to export a file with more rows than the limit of 65536 and columns than the limit of 256. Check and optimize the file size by minimizing complex formulas and other objects.
Method 3: Check Add-ins for Disabled Items
Sometimes, disabled items in Add-ins settings can prevent macros from functioning correctly. You can check and enable the disabled items in Add-ins using these steps:
- Navigate to File > Options.

- In Excel Options, click on the Add-ins option.
- Click the arrow corresponding to the Manage section.
- Select Disabled Items and click on the Go option.

- You will see a list of disabled items.
- Click on the disabled items and then click Enable.
- Restart Excel for the applied changes to take effect.
Method 4: Change Macro Settings
The error code 0x800A03EC can also occur if macros are disabled in the Macro Security settings. Follow these steps to change the macro settings in Excel:
- In MS Excel, go to File > Options > Trust Center.

- Under Trust Center, click on Macro Settings.

- Select Enable all macros and click OK.
Method 5: Check the OLE Objects
The Microsoft Excel error code 0x800A03EC can also appear if there is a connection disruption in the VBA. Such an issue can occur if there is an issue with Object Linking and Embedding (OLE) in an Excel workbook. The OLE objects are linked to external files. You can check and remove the unnecessary OLE objects from your Excel file to fix the issue.
Method 6: Check Methods in VBA
Excel can throw the “Exception from HRESULT: 0x800A03EC” error if you are trying to call an invalid method in a VBA code. Many users have reported this issue when trying to use ‘copy and paste’ feature using copy paste special method (range.pastespecial) in Excel. Paste special is an advanced option in Excel to smooth the copy-and-paste task. While using this method, the exception can usually occur when Excel application detects an invalid or misaligned range or mismatch data type in the syntax. To fix this, check the syntax of the paste special method.
Method 7: Repair your Excel File
Corruption in Excel file can create inconsistencies in the macro and lead to the “Exception from HRESULT 0x800a03ec Excel” error. In such a case, you can try repairing the Excel file using Microsoft’s inbuilt utility – Open and Repair. To use this utility, follow these steps:
- In the Excel application, go to the File tab and then click Open.
- Click Browse to select the Excel file in which you are getting this exception error.
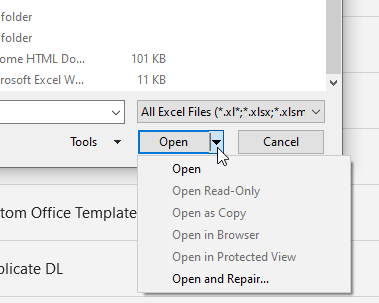
- The Open dialog box will appear. Click on the corrupted file.
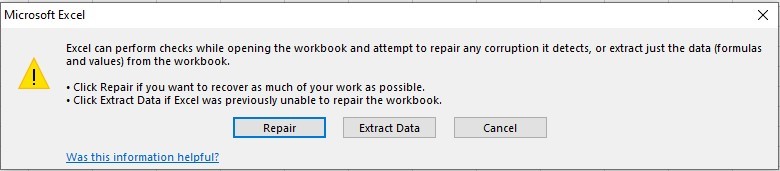
- Click the arrow next to the Open button and then select Open and Repair.
- You will see a dialog box with three buttons – Repair, Extract Data, and Cancel.

- Click on the Repair button to recover as much of the data as possible.
- After repair, a message is displayed. Click Close.
The Open and Repair tool works in significant scenarios. If Open and Repair tool fails to resolve the issue, try an Excel repair tool recommended by experts and MVPs to repair the corrupted Excel file. Stellar Repair for Excel is one of the recommended Excel repair tools for fixing issues caused by corrupt Excel files. It provides more features than the Open and Repair utility. It can even repair severely corrupted Excel files. The tool supports all the versions of Microsoft Excel, including 2019. Download the software’s demo version to scan the corrupted file and see the preview of all the recoverable components of the file.
Conclusion
There are numerous reasons, like invalid method, incorrect range, data type mismatch, etc., that could lead to the common exception error 0X800A03EC in Excel. Try the troubleshooting methods mentioned above to fix the issue. You can also encounter the error due to corruption in the Excel file. In such a case, you can try the professional software – Stellar Repair for Excel – to repair the severely corrupted Excel file. The Excel repair software can fix all the corruption-related issues in Excel files (XLS/XLSX).
[Fixed] Excel Cannot Open the File Because the File Format or File Extension Is Not Valid
When opening an older version of an Excel file in a newer version, you may encounter the “Excel cannot open the file because the extension is not valid” error. This happens if you have accidentally renamed the file with a different file format or an incorrect file extension. Also, you may get the ‘Excel cannot open the file’ error if the file has become unreadable or corrupted.
This is how the complete Excel error message looks like:
“Excel cannot open the file filename.xlsx because the file format or file extension is not valid. Verify that the file has not been corrupted and that the file extension matches the format of the file.”

Check out this video for a quick demonstration of how to fix “Excel Cannot Open the File Because the File Format or File Extension Is Not Valid”
How to Fix the ‘Excel Cannot Open the File Because the File Format or Extension Is Not Valid’ Error?
Try any of these workarounds to fix the error and regain access to your Excel file data:
Workaround 1 – Change the Default File Format
By default, an Excel file is saved in .xlsx or .xls file format. Trying to open the file with a different or incorrect extension may cause the ‘Excel cannot open the file because the extension is not valid’ error. To fix the error, try changing the Excel default file format by following these steps:
Note: Take a backup of the Excel file that you cannot open and try the steps on the backup copy.
- In Excel 2010 and newer versions, click on the File menu.
Note: For Excel 2007 and earlier versions, click on the Office button.
- On the left panel, click on Options.
- In ‘Excel Options’ window, under Save workbooks section, click on the Save files in this file format: drop-down. Select a file format (i.e., the one supported by your Excel version).
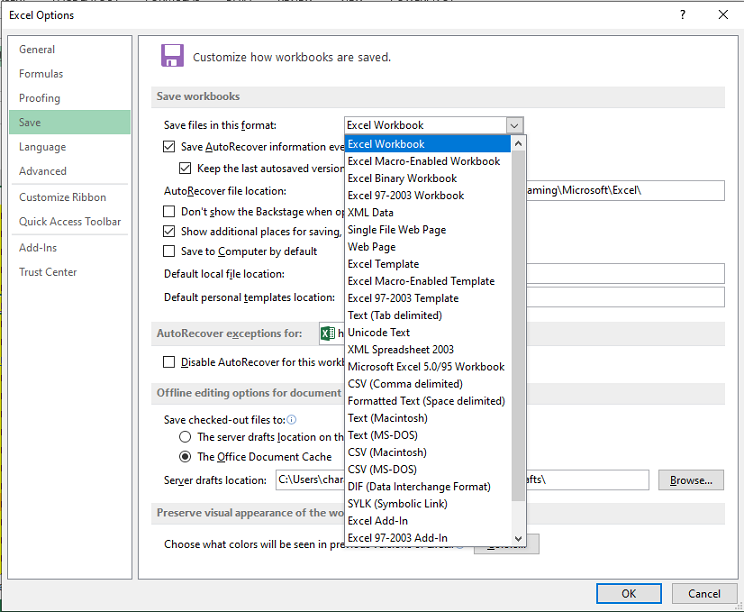
- Click OK.
Check if you can open your Excel file. If not, try the next workaround.
Workaround 2 – Edit the Excel File Permissions
You may receive the ‘Excel file format or file extension is not valid’ error if you lack sufficient permissions to open the file. Usually this happens when you try to open an Excel file received from some other user. Follow these steps to change the file permissions and see if it fixes the problem:
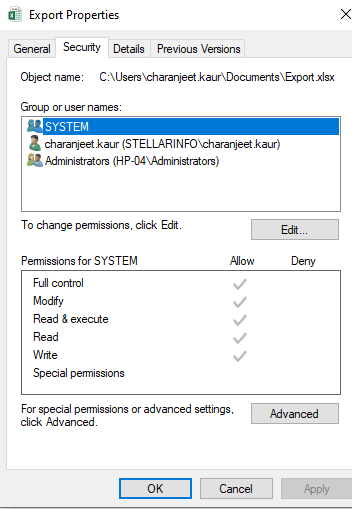
- Right-click on the file that won’t open and click Properties.
- In the file properties dialog box, click the Security tab and then hit the Edit button.
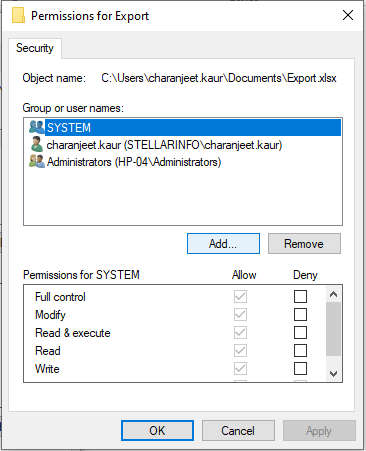
- When the file’s permissions dialog box appears, click on the Add button.
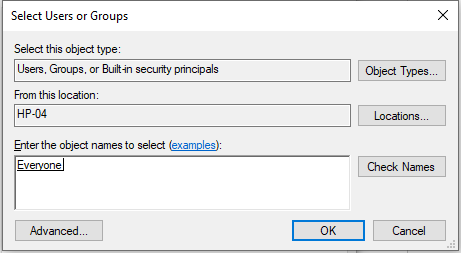
- Click on the Advanced button from the ‘Select Users or Groups’ window.
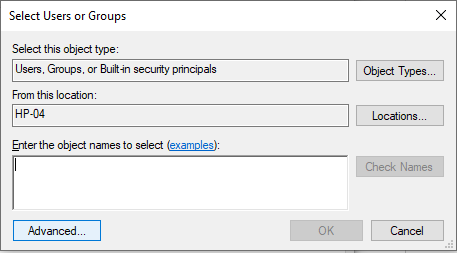
- Select Find Now. A list of all users and groups will get displayed in a search results box. Choose Everyone group from the list and hit OK.

- You can see the ‘Everyone’ group in the ‘Enter the object names to select’ textbox. Click OK once again to return to the file’s permission dialog box.
- Click Everyone from the Group or user names: box and check all the checkboxes under Allow.
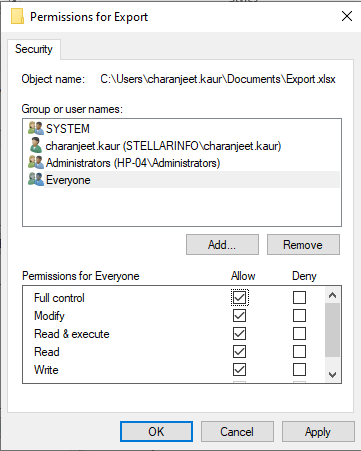
- Click on Apply and then OK.
Now try to open the Excel file. If you’re still getting the Excel file cannot open error, use the following workaround.
Workaround 3 – Recover Unsaved Workbook
If the ‘Excel file extension not valid error’ occurs when attempting to open an unsaved workbook, do the following to recover the unsaved workbook:
- In Excel, click File.
- From the Info screen, under Manage Versions, click Recover Unsaved Workbooks.
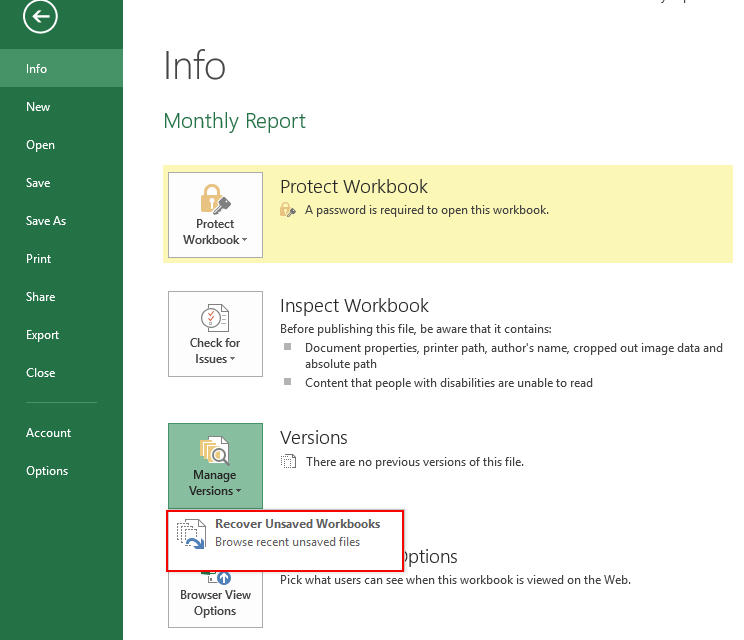
Excel will list any unsaved files. Try opening the file and save it. If this doesn’t work, skip to the next workaround.
Workaround 4 – Repair the Workbook
If none of the above workarounds has worked for you, chances are that the Excel file has become corrupted. Try to repair the file using the Excel inbuilt ‘Open and Repair’ utility by following these steps:
- In your Excel application, click on File > Open.
- In the ‘Open’ dialog box that pops-up, select the Excel file you want to repair and click the arrow next to the Open button.
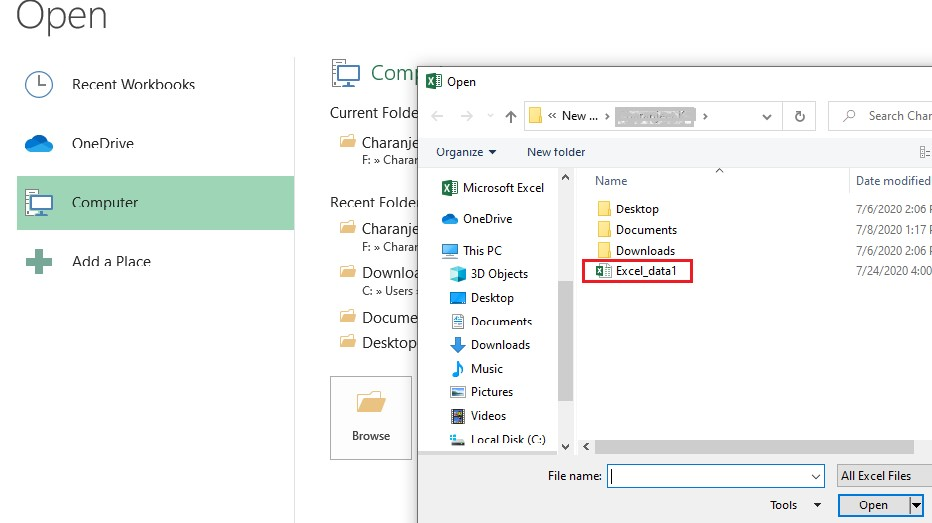
- From the dropdown list, select Open and Repair.
- Excel will ask you to attempt to repair the file or extract data from it. Click Repair to retrieve maximum data. If the Repair option fails, click on Extract Data to recover the data without formulas and values.
If the ‘Open and Repair’ utility doesn’t help fix the corrupted file and/or recover the data, use an Excel repair tool such as Stellar Repair for Excel to regain access to your file and its data.

Stellar Repair for Excel software can help repair severely corrupted XLS and XLSX files. Also, it helps recover all the file components, including tables, pivot tables, cell comments, charts, chart sheets, images, formulas, etc., without impacting the original structure of the Excel file.
To learn how the software works, read this: How to repair corrupt Excel file using Stellar Repair for Excel?
Conclusion
You may encounter the error ‘Excel cannot open the file because the extension is not valid’ when opening a workbook with a different file format or an incorrect file extension. Also, the error may occur if the Excel file has turned corrupt. This article has covered some of the most effective workarounds to resolve the error. But if nothing works, you can try to repair the Excel file and retrieve its data using the Stellar Repair for Excel software.
How to fix “damage to the file was so extensive that repairs were not possible” Excel error?
Summary: Unable to resolve “damage to the file was so extensive that repair was not possible” error in Excel? Read this post to discover more details about the error, possible causes, and how to rectify the error. To save time & efforts, you can also try an Excel file repair software to resolve the “damage to the file…” error in a few clicks.
When opening a workbook in Microsoft Excel 2003 or later, you may encounter an error message,
“Damage to the file was so extensive that repairs were not possible. Excel attempted to recover your formulas and values, but some data may have been lost or corrupted.”

The error message may also occur while exporting an Excel file. Let’s find out what causes this error and what we can do to fix it.
Reasons Behind “Damage to the File Was So Extensive That Repairs Were Not Possible” Error
Your Excel file may be corrupt, oversized, virus-afflicted, etc., which can trigger this error and make the repair impossible. Below are some common reasons.
- Large or oversized excel files hindering export
- Data restore errors
- Field length of a cell is more than 256 characters
- Software conflicts, viruses, network failure
- Unable to open files in upgraded versions
- Errors on output exceeding 64000 rows
- Limited system resources (such as RAM, internal memory)
In a nutshell, the error generally happens if Excel discovers unreadable content, which may also interrupt file saving in Excel.
How to Resolve “Damage to the File Was So Extensive That Repairs Were Not Possible” Error?
Here are a few methods you can follow to fix or resolve the Excel repair error.
Method 1: Perform Basic Troubleshooting
When opening a corrupt workbook, Microsoft Excel automatically initiates the file recovery mode to repair the corrupt file. However, if it fails to perform automatic recovery, then follow these basic troubleshooting steps:
- This error mainly happens when you try to open the Excel file in an upgraded version. Try to open the file in an older version of Excel. You might be able to open it.
- Try saving the file with a different file name.
- Use a different file extension to save the file.
- You can save the Excel file as HTML and then open it. However, an HTML file might not save conditional formatting.
- Close other opened applications on the system which may be causing the error.
- Select less data for export at once.
- Delete worksheets if copied from another document; for instance, delete any file or screenshots you have imported.
- Open the file on another system.
If the error persists, then use the manual method to repair a workbook using the below steps:
- Go to the “File” tab.

- Select Open and select the damaged spreadsheet from the Recent Workbooks section on the right, if listed. However, if you cannot find the file in the Recent Workbooks section, click on “Browse” and choose the corrupted workbook.

- Click the drop-down arrow on the Open tab and select Open and Repair.

Method 2: Check if exporting a Heavy File is Causing Resource Limitations in Excel
Sometimes, when you try to export an Excel sheet carrying a huge database, you may face memory errors in older Excel versions like Excel 2003. Here, you’ll have to decrease the amount of data as Excel 2003 does not permit exporting extensive data beyond a limit. However, modern versions such as Excel 2007, 2010 & 2016 allow exporting a large amount of data and utilize more RAM than the older versions.
Following are some other workarounds:
- Use a lesser number of query presentation fields to re-generate the query. Then, again re-enter those fields.
- Decrease the multi-line string field data text up to 8000 characters.
Method 3: Copy Macros and Data to Another Workbook (Empty) in an Advanced Excel version
If the issue is occurring due to version incompatibility, i.e., if the file opens easily in the older version but shows errors in the new version. You can:
Use the older version to open the file or copy the data or macros in an empty workbook of the new version of Excel.
Copying the Macros in the Workstation
In Microsoft Excel, you can use the Visual Basic Editor to open the workbook with macro on another workbook by copying the macro. Both VBA tools and Macros appear in the Developer section of the excel file. This option is disabled by default. So first, you need to enable it.
Follow the instructions to enable it:
- Open Excel and go to File > Options.

- Click “**Customize Ribbon.**”

- Look at the right side of the pane and ensure the Developer tab is checked.

- Click OK.
Once you have enabled the Developer tab, follow the steps to copy the macro from one workbook to another:
- First, open both the workbooks- the workbook containing the macro and the workbook in which you need to copy the macros.
- Locate the Developer tab.

- Select Visual Basic to display the “Visual Basic Editor.”

- Go to the View menu in the Visual Basic Editor.

- Select Project Explorer.

- In the Project Explorer window, drag the module you need to copy to the destination workbook. For example:

Module 1 has been copied from Book2.xlsm to Book1.xlsm
Method 4- Restore the backup file
The workbook backup helps to open the corrupted or mistakenly deleted file. Sometimes, the issue can be fixed using the Recover Unsaved Workbook option in Excel. Here’s the list of steps to recover the files in Microsoft Excel:
- Go to the File tab on Excel.

- Click Open.

- Search on the top-left of the screen to click Recent Workbooks as below:

- Next, scroll down to the bottom.
- Click the “Recover unsaved workbooks” button.

- Scroll and find the lost file.
- Now double-click on the file to open.
Conclusion
“Damage to the file was so extensive that repairs were not possible” error can be fixed with the above troubleshooting methods or by using a third-party Excel repair tool, like Stellar Repair for Excel . Although There are no standard resolutions to fix the excel error as they may vary with different scenarios. In some cases, the manual methods might be time-consuming or fail to fix the error or recover the excel file. Hence, using an excel file repair tool may be the best option! It extracts data from the corrupted file and saves it to a new Excel workbook, which you can open and edit.
How Do I Restore Excel File ?
Excel (XLS/XLSX) file corruption is a common issue that may arise due to problems, such as abrupt system shutdown, system crash, malware or virus intrusion, unsupported add-in, etc. However, MS Excel comes with a recovery feature that allows users to recover or restore Excel files lost or corrupted when the MS Excel quits unexpectedly or computer crashes due to hardware or software-related issues.
But sometimes, the restored version of the Excel file may not contain all the data or changes you made recently. In such cases, you are left with the option to repair the damaged or corrupt Excel file with the help of an Excel repair software, such as Stellar Repair for Excel .

Solutions to Restore Excel File
Below we have discussed various solutions to repair, recover, and restore unsaved, lost, corrupt, or inaccessible Excel files with the help of MS Excel options and Excel repair software.
NOTE: Some of these methods work only if you had enabled or configured certain required settings or options before corruption or losing the Excel file.
1. Restore Lost or Unsaved Excel File via ‘Recover Unsaved Workbooks’ Option
The Recover Unsaved Workbooks option allows you to restore the Excel file that you forgot to save before closing MS Excel or it stopped working. The steps are as follows:
- Navigate to ‘_File > Open._’
- Scroll to the bottom and click on ‘Recover Unsaved Workbooks.’ This opens a File Explorer browser window.

- Now look for the Excel file that you lost and then double-click on it to open and restore the Excel file.
- Once the file is open, click on File > Save As and save it to your desired location.
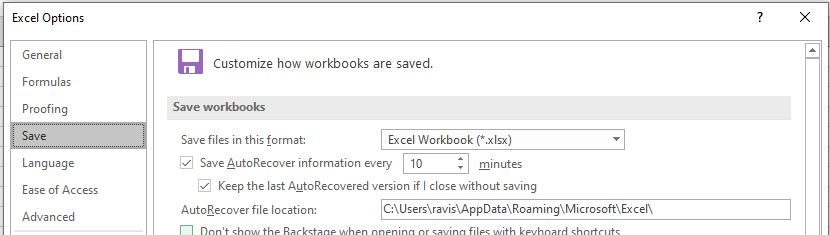
However, this option works only if you had enabled and set up the ‘Save AutoRecover information every X minutes_’ option and enabled the ‘_Keep the last AutoRecovered version if I close without saving’ option.
Also, this may not restore the most recent copy of your Excel file, but it will surely save your time that went into creating and editing the workbook.
2. Repair and Restore Corrupt or Inaccessible Excel File
If the Excel file you are trying to open or access is corrupt, MS Excel will display an error message. When MS Excel detects corruption, it starts ‘File Recovery Mode’ to repair the Excel workbook.
However, if it doesn’t start automatically, you can manually repair minor corruption error and restore the Excel file by following these steps:
- Navigate to File > Open and then navigate to the corrupt or damaged Excel file location.
- Select the file and then click on the arrow beside the ‘Open’ button to choose the ‘Open and Repair…’ option.
- Now click ‘Repair’ if you want to recover maximum data from a corrupt or inaccessible Excel workbook and restore it to a new Excel file.

If the ‘Repair’ option fails, use the Extract Data option that extracts values, data, and formulas from the Excel workbook.
3. Revert Excel File to Last Saved Version
When an Excel file gets corrupt or damaged while working, you may revert the Excel file to the last saved version. This allows you to restore the Excel file version that isn’t corrupt or damaged. The steps are as follows,
- Click File > Open.
- Double-click the name of the workbook that you have opened in Excel.
- Click Yes to reopen the workbook.
The workbook opens without any changes you’ve made that might have caused the workbook to become corrupted.
4. Use Excel Repair Software to Restore Excel File
If the corrupt or damaged Excel file isn’t repaired by using MS Excel options or you lost data after restoring the unsaved version or after reverting to the last version, you can rely on an Excel repair software, such as Stellar Repair for Excel.
The software repairs Excel files with 100% integrity and restores the Excel data, such as table, Pivot tables, charts, etc., while preserving the workbook properties and formatting. The software is safe as it doesn’t alter or make changes to the original Excel file and saves the repaired data to a new Excel workbook at your desired location.
It supports Excel files (XLS and XLSX), created in MS Excel 2019, 2016, or older versions. It resolves Excel corruption errors, such as Unable to open Excel file, in a few clicks.
To repair a corrupt or inaccessible Excel workbook by using Stellar Repair for Excel software, follow these 3 simple steps,
- Select the corrupt or damaged Excel workbook file (XLS/XLSX).
- Repair and then preview the Excel workbook.
- Save the workbook at default or your desired location.
Once saved, you can open and start editing or working on the Excel sheet. Make sure to enable AutoRecovery and AutoSave options to avoid data loss due to corruption.
Conclusion
In this article, we discussed methods and solutions to restore Excel file when it gets damaged or corrupt due to various issues. Although Excel can help you recover or restore Excel file after corruption, it can resolve only minor corruption errors. Thus, it may fail if the Excel file corruption is severe. In such cases, an Excel repair software, such as Stellar Repair for Excel, comes in handy. It resolves Excel corruption, repairs tables, charts, chart sheets, Pivot table, etc., and restores them to a new Excel sheet with 100% consistency.
Filter Not Working Error in Excel [Fix 2024]
Summary: The filter is not working issue in Excel can occur due to several reasons, like blank rows, hidden rows, merged cells, corrupted data, etc. In this post, we will mention the reasons why the filter is not working correctly in Excel and several fixes to resolve the issue. We will also mention an advanced Excel repair tool to repair the Excel file if corruption in file is the cause of the issue.
You can use the Filter function in Excel to filter data in large-sized Excel files quickly. While using Excel filters, sometimes, you face a situation where the filter is disabled or may fail to function properly.

The Excel filter usually fails to work if you have not selected the complete and correct range of data. Let’s learn more about the “Sort and Filter not working in Excel” issue and look at the possible methods to fix it.
Why the Filter is not Working in Excel?
You can face the “filter is not working” issue if you are applying the filter on a protected worksheet or trying to find the data from a hidden row. Besides this, there could be many other reasons contributing to this issue, such as:
- The data you are trying to filter is in merged cells.
- The Excel file automatically selected the data up to the first empty cell, excluding the remaining rows.
- Grouped sheets in Excel file.
- Blank row in the Excel sheet.
- You are trying to apply a filter on an invalid data range.
- The workbooks in which you’re facing the filter issues are corrupted.
- You are specifying incorrect criteria in the filter columns.
Solutions to Resolve the Filter is not Working Issue in Excel
There might be two scenarios: the Excel filter option is disabled/grayed out or the filters fail to function properly. You can follow the given troubleshooting solutions to resolve the issue based on the scenario you’re facing.
Scenario 1 – Filter Option is Disabled or Grayed Out
Method 1: Check and Un-group the Worksheet
When you apply filters to a single sheet in a grouped set, Excel disables the filter option in other sheets within the group. You can check the grouped sheets and try ungrouping them to enable the filter option. Here’s how to do so:
- In the Excel file, go to the Group section.

- Right-click on the Ungroup Sheets.
Alternatively, you can press the Shift + Alt + Left keys to ungroup the sheets.
Method 2: Unprotect Worksheet
The “disabled Excel filter” issue can also occur if your worksheet is protected. You can unprotect the worksheet to enable the filter option. To do so, go to the Review tab and then select Unprotect Sheet.

Method 3: Check and Uninstall Excel Add-ins
Sometimes, the Excel filter gets disabled due to faulty or corrupted Excel add-ins. You can run the Excel in Safe mode to check whether the issue has occurred due to add-ins. To do this, type excel /safe in the Run window and click OK.

In safe mode, if you see the filter option, it indicates some problematic Excel add-ins were causing the issue. In such a case, you can check and uninstall the faulty Excel add-ins to fix the issue.
Scenario 2 – Filter is not Working
Method 1: Try Clearing Filters
Sometimes, the Excel filter fails to work correctly if some filters from the previous sessions are still active. In such a case, you can clear the applied filters. Follow the below steps:
- In Excel file, click Sort & Filter option.
- Select clear.

Method 2: Select Entire Data
The filter not working issue in Excel can occur when the range selected for filtering is incomplete or incorrect. You need to make sure that you’ve selected the entire data range in Excel. You can use the Ctrl+A keys to select the entire content in the worksheet.
Method 3: Check and Delete Blank Cells from the Table’s Columns
When you apply a filter to the data, Excel expects data to be in a continuous range. Excel filters do not consider the blank cells, thereby resulting in incorrect functioning of the filter. To resolve this issue, check and delete all blank cells. In case your Excel file is too large to delete the blank cells, then you can add a “Serial number” row as an alternative. Adding serial number row creates a data continuity, thus helping in fixing the filter-related issue.
Method 4: Unhide Hidden Rows and Columns
Hidden rows or columns in worksheets can also affect the filter functionality. You can check and unhide rows/columns to troubleshoot the issue. Here is how to do so:
- In the affected Excel file, go to Home.
- Click on Format > Hide & Unhide.

- Click Unhide Rows or Unhide Columns (as required).

Method 5: Unmerge Cells
You can experience the filter in Excel is not working issue if you are using the filter to extract data from merged cells. Ensure to unmerge the “merged cells” before applying a filter in Excel. Follow the below steps to unmerge the merged cells in Excel:
- Navigate to the Home option.
- In the toolbar, select the Merge & Center option.
- Click Unmerge Cells.
Method 6: Repair the Workbook
Sometimes, the Filter Not Working in Excel issue can occur due to inconsistencies in file structure. If these issues occurred due to corruption in the worksheet, you can repair it using the Open and Repair tool. It is an in-built tool in Excel that is used to repair corrupted Excel files. Here are the steps to use this tool:
- In the Excel application, navigate to the File option.
- Click Open and then click Browse to choose the Excel file.
- In the Open dialog box, click the problematic Excel file.
- Click the arrow next to the Open option and select Open and Repair.
- Click Repair to recover as much data as possible.
- The application prompts a message after the repair process is complete. Click Close.
In most cases, the Open and Repair tool can easily fix corruption issues in the Excel file. However, for any reason, if the open and repair tool doesn’t work you can consider repairing the file using a professional Excel Repair tool. Stellar Repair for Excel is one such advanced and secure tool to repair Excel files. With this tool’s powerful scanning capabilities, you can repair highly corrupted Excel files and recover all their objects with complete integrity. The tool is compatible with all Windows editions, including the latest Windows 11.
Closure
Several reasons are associated with the filter not working issue in Excel. The filter option may not work as expected if you have not selected the complete and correct range of data or for many other reasons. You can follow the troubleshooting methods discussed above to fix the issue. If the filter fails to work due to corruption in the workbook, then try Stellar Repair for Excel . It is an advanced tool that can even repair severely damaged files. It also helps to recover all the data from corrupted files without changing the original formatting. You can check the tool’s functionality by downloading its demo version. It allows you to preview all the repairable objects in the corrupted Excel file.
[Fixed] “Microsoft Excel Cannot Access the File” Error
Summary: The “Microsoft Excel cannot access the file” error usually occurs when there is an issue with the Excel file you are trying to save. This post summarizes the causes behind the error and mentions some effective solutions to fix it. If you suspect the problem is encountered due to corruption in the Excel file, you can use the professional Excel repair tool mentioned in the post to repair the file.
You may experience the “Microsoft Excel cannot access the file” error when saving the Excel file. This happens when the Excel application fails to read the file you are attempting to save. The error message indicates that there is an issue with the file name or its path. Sometimes, the error occurs if the file you are trying to access is already in use by another application. Some other reasons for the “Excel cannot access the file” error are:
- Faulty or incompatible Excel add-ins.
- The file is in Protected View.
- The Excel file is damaged or corrupted.
- You do not have the required permissions to access the file.
- The Excel file is not in a compatible format.
Methods to Fix “Microsoft Excel Cannot Access the File” Error
Sometimes, changing the file location can fix the “Microsoft Excel cannot access the file” error. You can try changing the file location, if the location is incorrect. If moving the file to a different location didn’t work, then try the below troubleshooting methods.
Method 1: Check the File Name and Path
You can get the “Microsoft Excel cannot access file” error if there is an issue with the file path – either the path does not exist or it is too lengthy, thus creating conflicts. Make sure the file path is correct. If the file name is too long, you can rename the file with a short name and also move the file to the parent folder instead of a subfolder. After that, remove the file from the Recent list that is created by Excel based on your recent activity. Follow the below steps:
- Open the Excel application.
- In the Recent list, right-click on the affected Excel file.
- Now, select Remove from list.

- Close the Excel application.
Now, reopen the problematic file and check if the error exists. If yes, then follow the next solution.
Method 2: Try Clearing the Microsoft Office Cache
Sometimes, clearing the Microsoft Office cache can help eliminate the “Excel cannot access the file” error. To clear the Microsoft Office cache, follow the given steps:
- First, close all the Office applications.
- Press Windows+R to open the Run window.
- Type %localappdata%\Microsoft\Office\16.0\OfficeFileCache and press the Enter key. You can change ‘16.0’ with your Office version.

- In the OfficeFileCache window, clear all the temporary files.
Method 3: Check and Update Microsoft Excel
You can try updating your Microsoft Excel application. The latest updates include bug fixes, security patches, and other improvements. Updating the application can help fix several issues that might be causing the error. Here are the steps to update Microsoft Excel:
- Open your Excel application.
- Go to File and then select Account.
- Under Product information, click Update Options and then click Update Now.
Method 4: Disable Protected View
You may get the “Microsoft Excel cannot access the file” error if the Protected View option is enabled. You can try disabling the Protected View settings in Excel. This allows you to open the file without any restrictions. However, disabling the protected view can put your system at high risk. To disable the Protected View in Microsoft Excel, follow the below steps:
- In Excel, go to File and then click Options.
- In the Excel Options window, click Trust Center and then click Trust Center Settings.

- Click Protected View from the left pane in the Trust Center Settings window.
- Unselect the options under Protected View. Click OK.
Method 5: Check and Disable Add-ins
The “Excel cannot access the file” error can also occur due to faulty add-ins in Excel. To check if the error has occurred due to some faulty add-ins, open the application in safe mode (press Windows + R and typeexcel /safe in the Run window**)**. If you can save the file without any hiccups in safe mode, this indicates some problematic add-ins are behind the error. You can remove the Excel add-ins by following these steps:
Open your Excel application and go to File > Options.
In Excel Options, select Trust Center and then click Trust Center Settings.
In Trust Center Settings, click Add-ins and thenselect “Disable all applications Add-ins”. Click OK.

Method 6: Check File Permission
You can get the “Excel cannot access the file” error if you don’t have sufficient permissions to modify the Excel file. You can check and provide the write permissions to fix the issue. Here’s how to do so:
- Open Windows Explorer.
- Find the affected Excel file, right-click on it, and click Properties.

- In the Properties window, click the Securities option and click Edit.

- In the Security window, select the user names under ‘Group or users name’.
- Check the file permissions and make sure the write option is enabled. If not, then grant the permission. Click Apply and then OK.
Method 7: Check External Links
The “Excel cannot access the file” error can also occur due to broken external links in the Excel file. External links are references to the data or content in other files. The link usually breaks if the file has been moved to another location or the file name is changed. You can check and change the source of link.
Method 8: Repair your Excel File
Excel may fail to read the file if it is corrupted or damaged. If the error “Excel cannot access the file” has occurred due to file corruption, then try the Excel’s Open and Repair utility to repair the Excel file. Here are the steps:
- In the Excel application, click the File tab and then select Open.
- Click Browse to select the problematic workbook.
- The Open dialog box will appear. Click on the corrupted file.
- Click the arrow next to the Open button and then select Open and Repair.
- You will see a dialog box with three buttons – Repair, Extract Data, and Cancel.

- Click on the Repair button to recover as much of the data as possible.
- After repair, a message is displayed. Click Close.
If the Open and Repair utility fails to work , it indicates the Excel file is severely corrupted. Use Stellar Repair for Excel to repair severely corrupt Excel file. It helps recover all the components of the corrupted Excel file, such as charts, formulas, etc. without making any changes to the original file. It can also fix all types of corruption-related errors. You can use Stellar Repair for Excel to repair Excel files created in all Excel versions – from 2007 to 2023.
Closure
The “Microsoft Excel cannot access the file” error can occur due to numerous reasons. Follow the troubleshooting methods, such as checking file location, path, permissions, etc., as discussed above to fix this error. Sometimes, Excel throws this error if the file you are trying to save is corrupted. You can try repairing the file using the built-in utility – Open and Repair. If the file is severely corrupted, then you can use Stellar Repair for Excel . It can repair damaged Excel files (.xls, .xlsx, .xltm, .xltx, and .xlsm) with complete integrity.
How to Repair Multiple Excel Files by Using Stellar
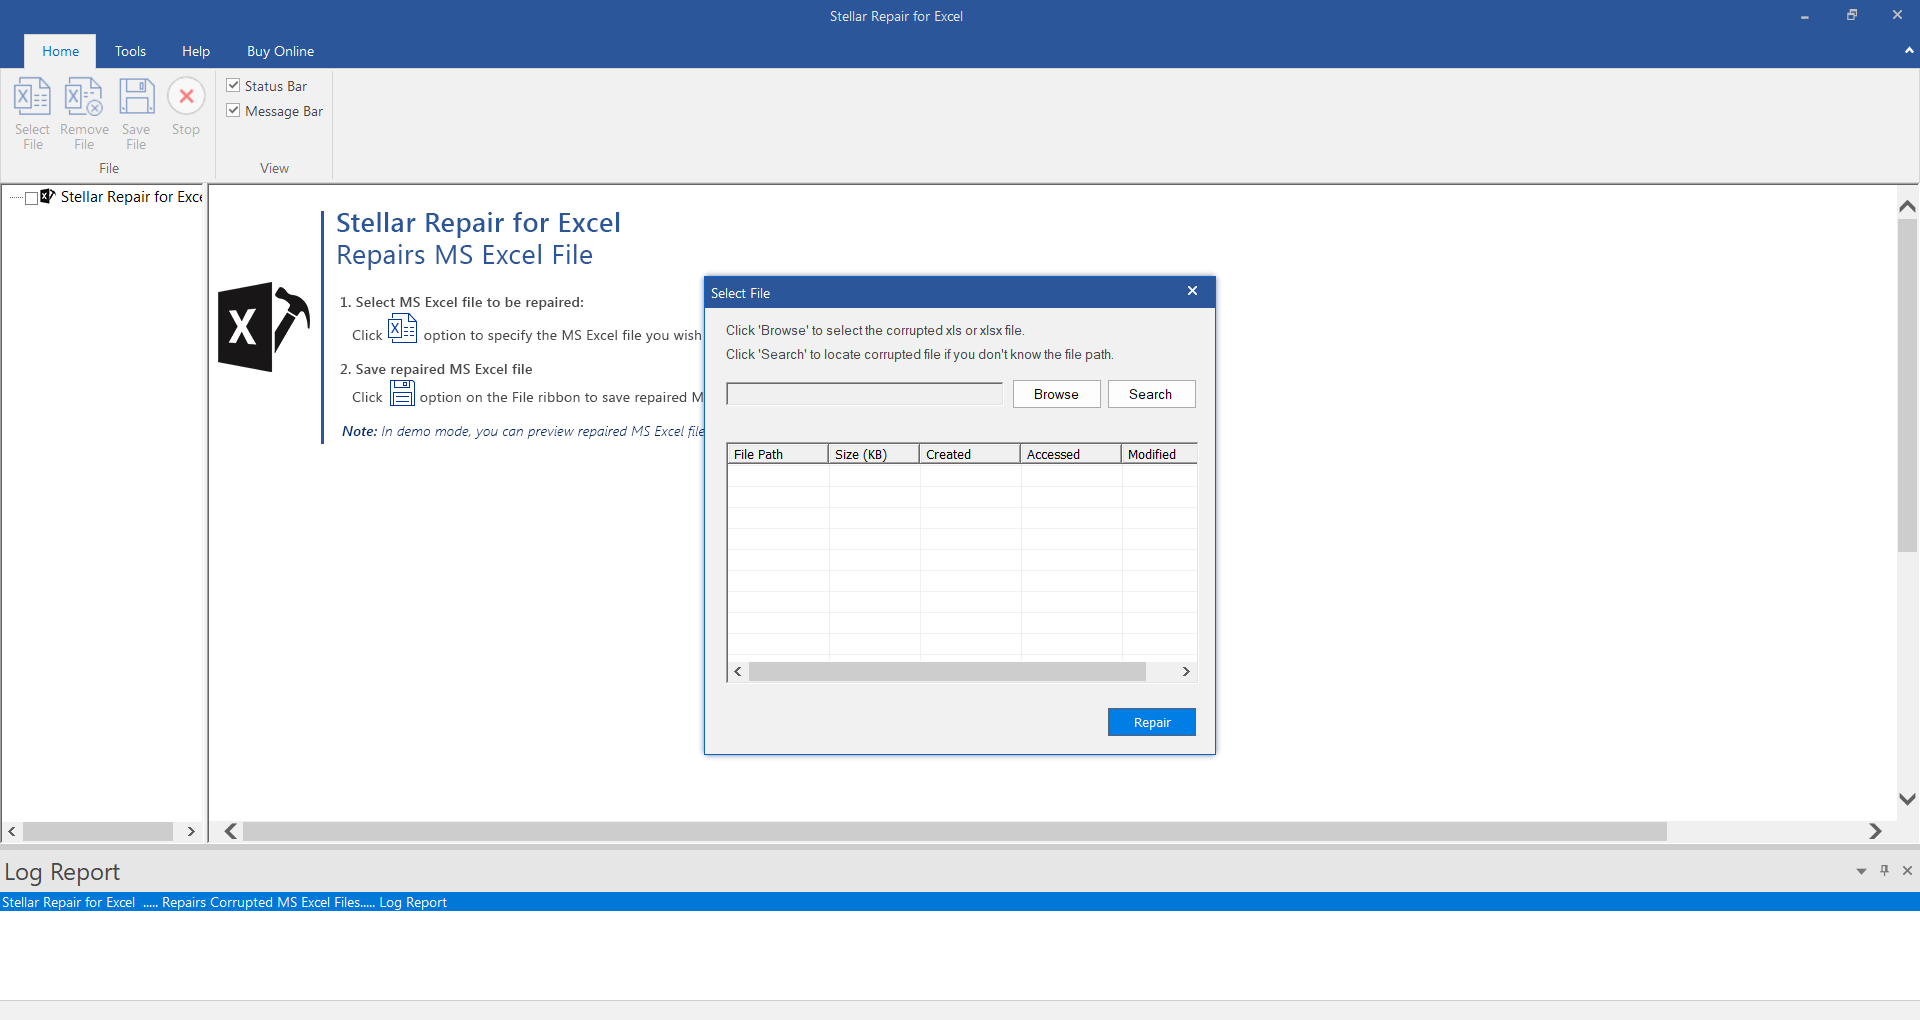
With Stellar Repair for Excel, it is quite easy and simple to repair multiple MS Excel (XLS and XLSX) files that are damaged. This is because the software has a self-explanatory interface and hence is a Do-it-yourself software. Nonetheless, when using this software to repair multiple Excel files, you would have to add all of the files into the software by following a few pre-defined steps. Follow the steps mentioned below:
- Launch Stellar Repair for Excel software.
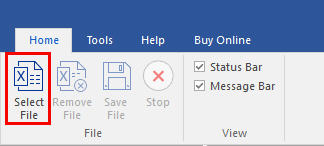
- Under Home menu, click Select file
- Click Browse and select corrupt Excel files. Select the checkbox to repair multiple files.
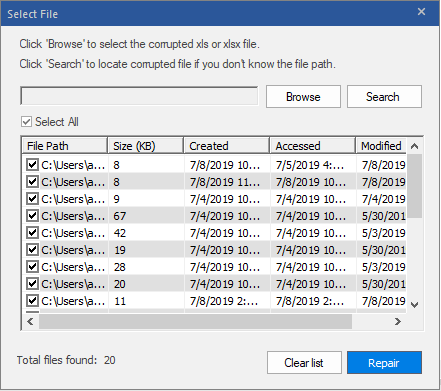
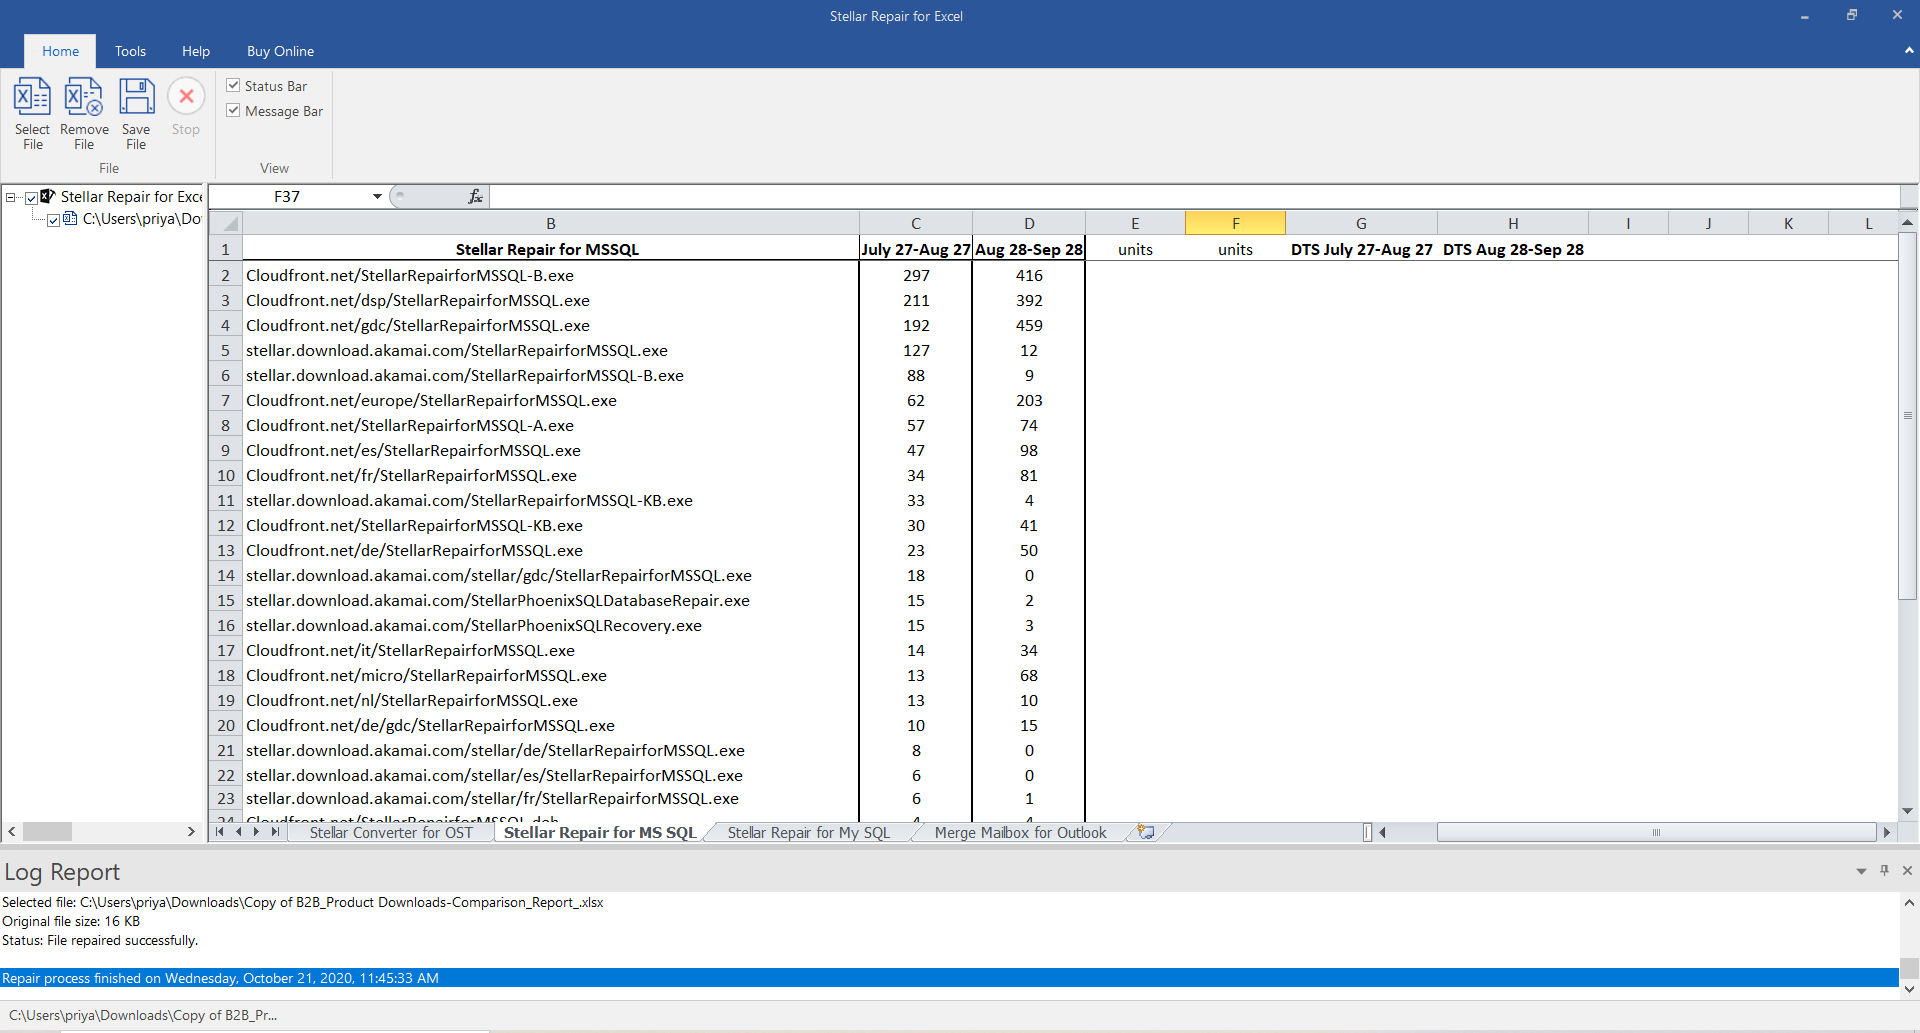
- Click Repair
- The software provides the preview facility. You can check the it on left pane.
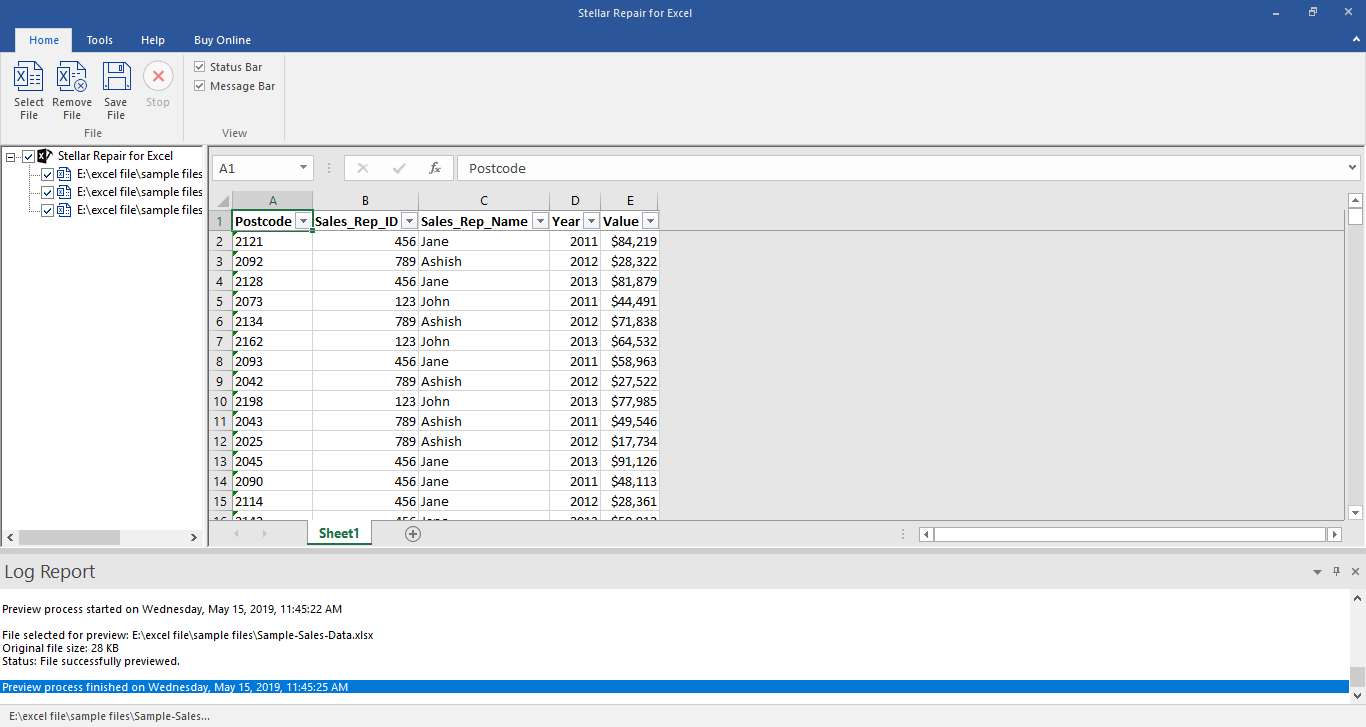
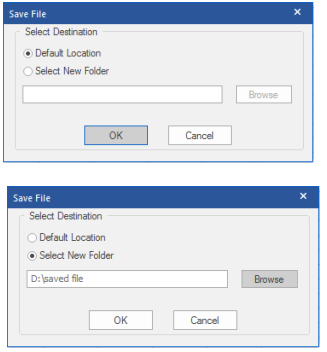
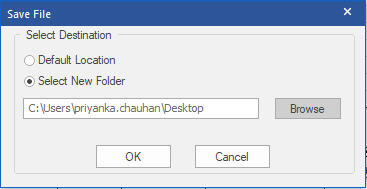
- Save the repired filr ether Default location or Select New Folder radio button.
Stellar Repair for Excel Stellar Repair for Excel is the best choice for repairing corrupt or damaged Excel (.XLS/.XLSX) files. This Excel recovery software restores everything from corrupt file to a new blank Excel file.
Also read:
- How To Restore Missing Call Logs from Tecno Spark 20 Pro
- How to Repair corrupt MP4 and MOV files of Lava Blaze 2 Pro using Video Repair Utility on Windows?
- How to Honor X50 Get Deleted photos Back with Ease and Safety?
- How to Downgrade iPhone 6 Plus without Losing Any Content? | Dr.fone
- How to identify missing or malfunctioning hardware drivers with Windows Device Manager in Windows 11/10
- How to Rescue Lost Videos from Narzo N53
- How to Recover Files after iPhone 8 Plus Factory Reset? | Stellar
- How to Remove MDM from iPhone 7 without a computer?
- How to Fix the Unable to Record Macro Error in Excel 2021? | Stellar
- How to restore wiped messages on Oppo Reno 11 5G
- How To Restore Missing Contacts Files from GT 3.
- How to restore wiped messages on Oppo A58 4G
- How to Recover Deleted Data from iPhone 6 Plus using Stellar Data Recovery for iPhone? | Stellar
- How to Remove MDM from iPhone X without a computer?
- How To Recover iPhone 6 Plus Data From iCloud? | Dr.fone
- How to Recover Deleted Notes from iPhone 14? | Stellar
- How to identify missing your drivers with Windows Device Manager in Windows 11
- How To Restore Missing Pictures Files from Tecno .
- How to Recover Deleted Screenshots on iPhone 8? | Stellar
- How to restore wiped music on C33 2023
- 5 Techniques to Transfer Data from Honor Play 7T to iPhone 15/14/13/12 | Dr.fone
- How To Restore Missing Contacts Files from Infinix GT 10 Pro.
- How to play HEVC H.265 video on Galaxy XCover 6 Pro Tactical Edition?
- How to Fix Corrupt video files of C67 4G using Video Repair Utility?
- How to Recover Deleted Excel 2003 Files on Mac Complete Guide
- How to Repair corrupt MP4 and AVI files of Samsung ?
- How To Restore Missing Pictures Files from Itel P55 5G.
- How To Restore Missing Call Logs from Tecno Spark 10 Pro
- 2 Ways to Transfer Text Messages from ZTE Nubia Z60 Ultra to iPhone 15/14/13/12/11/X/8/ | Dr.fone
- How to Fix corrupt video files of Smart 8 Pro using Video Repair Utility on Windows?
- How to restore wiped music on Tecno Camon 20 Pro 5G
- How to Recover Deleted Photos from Android Gallery App on A79 5G
- HD Video Editing Made Easy Top 5 Software Options
- New Creating Collages on Canva Is Simple and Quick. The Tool Lets You Create some Amazing Customized Collages as Needed. So, Get Ready to Explore the World of Canva Collages
- Updated How to Create Discord GIF Avatar in Depth Guide for 2024
- The Complete Guide to Nokia G42 5G FRP Bypass Everything You Need to Know
- In 2024, Will Pokémon Go Ban the Account if You Use PGSharp On Samsung Galaxy A14 5G | Dr.fone
- 11 Ways to Fix it When My Realme V30T Wont Charge | Dr.fone
- 10 Easy-to-Use FRP Bypass Tools for Unlocking Google Accounts On Realme Narzo 60 5G
- Updated Free Filmora Download A Step-by-Step Guide Virus-Free
- In 2024, 4 solution to get rid of pokemon fail to detect location On Samsung Galaxy A24 | Dr.fone
- Best iOS and Android Apps You Can Use to Create Animoji and Memoji Videos for 2024
- Can’t view MKV movies content on Samsung Galaxy A25 5G
- How Can I Catch the Regional Pokémon without Traveling On Realme V30T | Dr.fone
- In 2024, Forgot Pattern Lock? Heres How You Can Unlock Infinix Note 30 VIP Pattern Lock Screen
- Create Glitch Text Effect for 2024
- Updated Your Recorded Video Footage Has some Visible Grains Making Your Video Noisy and Thus Hampering the Overall Viewing Experience. No Worries, as There AI Video Denoiser and Other Software Available to Correct the Issue
- In 2024, How to Lock Apps on Itel A60 to Protect Your Individual Information
- Title: How to Fix Microsoft Excel 2019 Error Code 0x800A03EC? | Stellar
- Author: Nova
- Created at : 2024-04-30 01:44:53
- Updated at : 2024-05-01 01:44:53
- Link: https://blog-min.techidaily.com/how-to-fix-microsoft-excel-2019-error-code-0x800a03ec-stellar-by-stellar-guide/
- License: This work is licensed under CC BY-NC-SA 4.0.
