
How to fix Microsoft Excel 2019 has stopped working error? | Stellar
How to fix Microsoft Excel has stopped working error?
Summary: This blog discusses the possible reasons behind ‘Microsoft Excel has stopped working’ error and solutions to resolve the error manually. You can use Stellar Repair for Excel to quickly repair the file and recover all its data in a hassle-free manner.


Has your Microsoft Excel program stopped working or is acting strange? Excel not responding is a common issue you may experience on launching the application or opening a spreadsheet.

Figure 1 – Microsoft Excel Has Stopped Working Error Message
Possible Causes behind ‘Microsoft Excel has Stopped Working’ Error, and Solutions Thereof
Note: Several users have reported about encountering the ‘Excel has stopped working’ issue on Windows 10, 8, and 7 OS after installing an update for Excel (KB3118373). If you too have installed the update, then uninstall it and check if it solves the error. For detailed information, refer to this link .

How to Repair Corrupted or Damaged Excel File with Ease?
Summary: The Excel file is prone to corruption. Users can face several issues related to corruption. So here in this infographic, I am discussing a professional tool,- Stellar Repair for Excel, to easily repair corrupted Excel files.
Stellar Repair for Excel is among the top choices for repairing corrupt or damaged Excel (.XLS/.XLSX) files. This Excel recovery software restores everything from the corrupt file to a new blank Excel file. Incoming, the information graphics complete overview of the repair process is explained in step-by-step methodology. Explore and reap the benefits of recovering corrupt or damaged Excel files.

Very much sure about the result of using the excel file recovery tool, share your experience with us.
Recover Excel Files from Virus-Infected Pen Drives for Free
Summary: Imagine you lost your important Excel file on which you had been working since the morning and in the next moment you realized that the file was not saved and you just lost hours of work. Wondering how to deal with this situation? Read this blog to know how Stellar free data recovery software can help you.
From making annual reports to business growth representation figures, excel is a commonly used program for organizing data, creating pivot tables, charts etc. People from all walks of life, know the importance of Excel and the part it plays. Although it is a common file, there is a probability that you may accidentally delete excel files while working or are unable to access it due to unexpected errors. In addition, one of the major issues users face is to recover excel files from a virus infected pen drive.
Pen drives have made it possible to store and carry our important files such as excel, word document, photos, videos, etc. with us day in and day out. They just fit perfectly in our pockets and are compatible with almost every device; hence, they are widely used for transferring data from one system to another. But what if your pen drive is infected by a virus and due to it you end up losing your excel files, how will you recover your excel files for free?
A user reported that his pen drive got virus-infected and to remove the virus from it, he ran an antivirus program which removed the virus but also deleted excel files stored on it.
When your pen drive is infected by a virus, the first thing you ought to do is stop using it, even not for removing virus as an antivirus utility may remove your files as well. Further, if you have a backup, then you can recover your excel files from it, else you can use these free data recovery methods to recover your excel files.
1. Free File Recovery Software Approach
Stellar Windows Data Recovery – Free Edition is an easy to use tool to recover files from a virus-infected pen drive. The software is equipped with powerful utilities to recover lost and deleted files for free. Further, it supports a wide range of file systems and is efficient in recovering files such as Excel, emails, word files, photos, audio and video files.
Using Stellar Windows Data Recovery – Free Edition, you can recover your files from all storage devices for free. Here’s how the software works:
- From the website, download Stellar Windows Data Recovery – Free Edition. Connect your pen drive to your system and launch the software
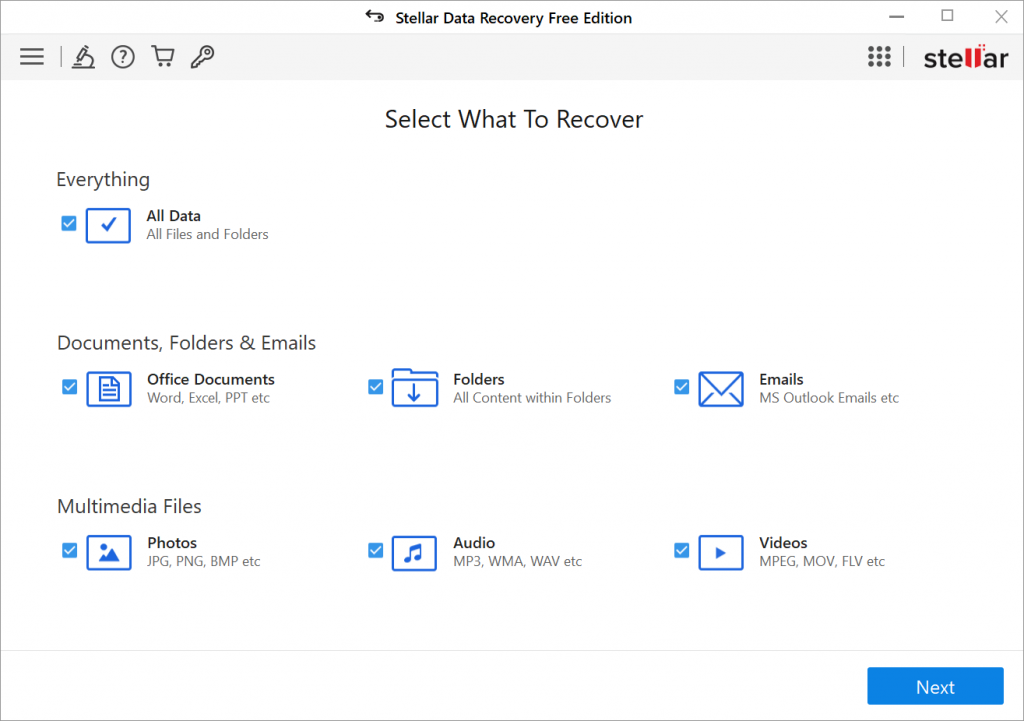
- On ‘Select What to Recover’ screen, select file types from the given option that you wish to recover. For instance, if you want to recover photos, then under Multimedia Files, select ‘Photos’ and click on ‘Next’
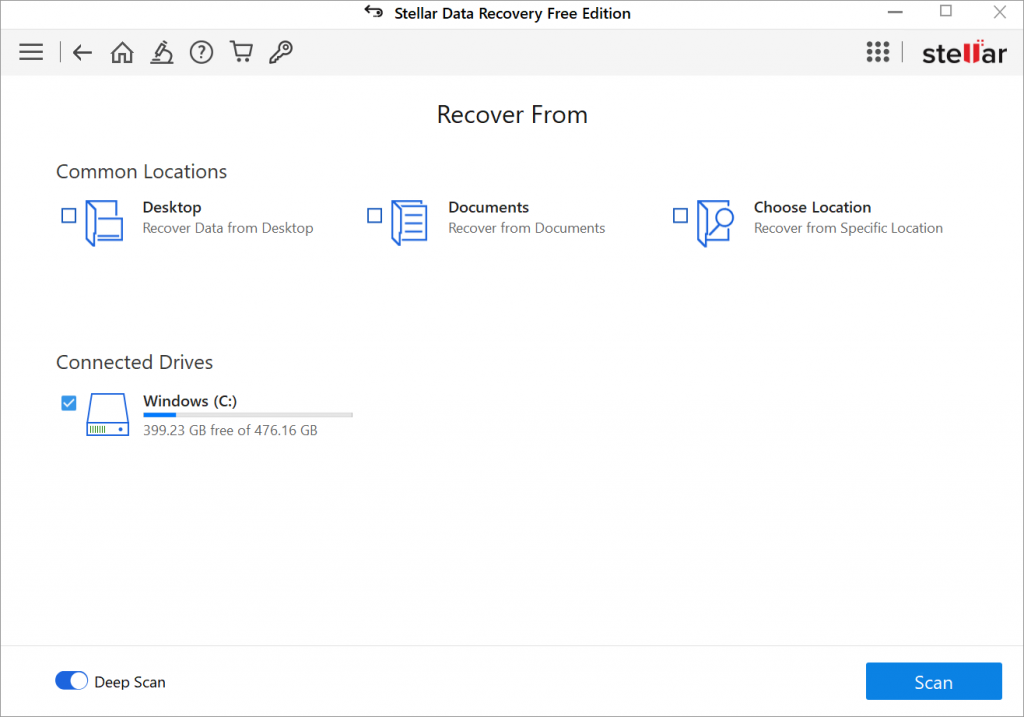
- From ‘Select Location’ screen, select the connected pen drive and click ‘Scan’
- The scanning process starts and once the process is complete, software lists all the recoverable files
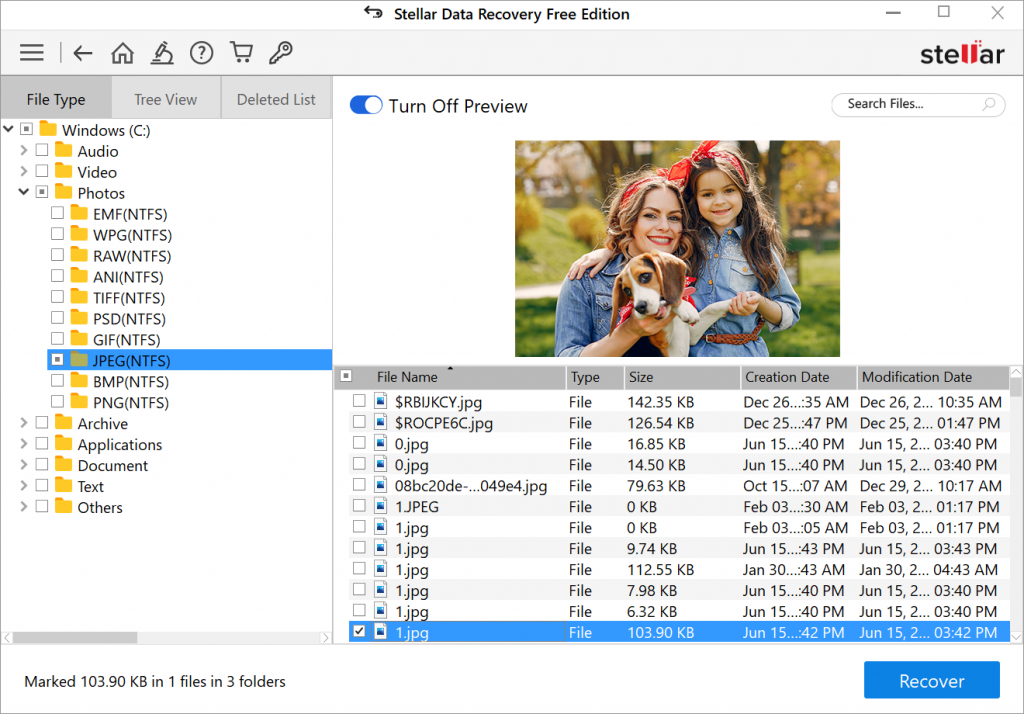
- Select the files from the list and click on ‘Recover’ to save the files
2. Restore Excel File from the Previous Version
If excel files are deleted from your pen drive or from your system; then you can recover them from the previous version. This feature works when Windows Backup option is enabled, else, it will not work.
Follow these steps to recover excel files:
- Connect your pen drive to your system, go to This PC and navigate to the folder of excel files
- Select the folder, right-click on it and select ‘Restore previous versions’
- From the available version of excel files, select the required one and click on ‘Restore’
3. Use Command Line to Recover Excel Files
The Command prompt should be your first choice to recover excel files from the virus-infected pen drive. Here’s how command prompt recovers your files:
- Connect your virus-infected pen drive to your system and then in the search box type ‘CMD’ and hit ‘Enter’
- In the command window, type in attrib –h-r-s /s/ drive letter:\*.*”, for example, “attrib -h -r -s /s /d G:\*.*” and hit ‘Enter’
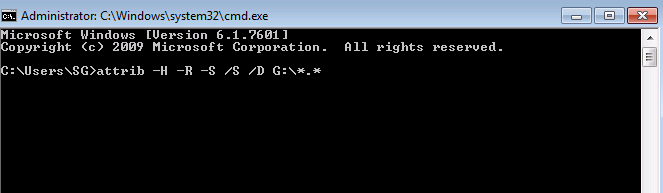
- Windows starts repairing the virus-infected pen drive and once the process is complete, you can access your pen drive and recover excel files.
Even after following the above-mentioned steps you’re unable to recover your excel files, then try a Home approach i.e. a data recovery tool.
To Sum Up
It is always a good idea to create a backup of important files since no one can anticipate what might go wrong. The scenario presented in the blog paints a clear picture of how you can recover your Microsoft excel files for free from a virus-infected pen drive. For quick and better results, you can always go with Stellar Windows Data Recovery – Free Edition.
[Fixed] Excel Cannot Open the File Because the File Format or File Extension Is Not Valid
When opening an older version of an Excel file in a newer version, you may encounter the “Excel cannot open the file because the extension is not valid” error. This happens if you have accidentally renamed the file with a different file format or an incorrect file extension. Also, you may get the ‘Excel cannot open the file’ error if the file has become unreadable or corrupted.
This is how the complete Excel error message looks like:
“Excel cannot open the file filename.xlsx because the file format or file extension is not valid. Verify that the file has not been corrupted and that the file extension matches the format of the file.”

Check out this video for a quick demonstration of how to fix “Excel Cannot Open the File Because the File Format or File Extension Is Not Valid”
How to Fix the ‘Excel Cannot Open the File Because the File Format or Extension Is Not Valid’ Error?
Try any of these workarounds to fix the error and regain access to your Excel file data:

Workaround 1 – Change the Default File Format
By default, an Excel file is saved in .xlsx or .xls file format. Trying to open the file with a different or incorrect extension may cause the ‘Excel cannot open the file because the extension is not valid’ error. To fix the error, try changing the Excel default file format by following these steps:
Note: Take a backup of the Excel file that you cannot open and try the steps on the backup copy.
- In Excel 2010 and newer versions, click on the File menu.
Note: For Excel 2007 and earlier versions, click on the Office button.
- On the left panel, click on Options.
- In ‘Excel Options’ window, under Save workbooks section, click on the Save files in this file format: drop-down. Select a file format (i.e., the one supported by your Excel version).
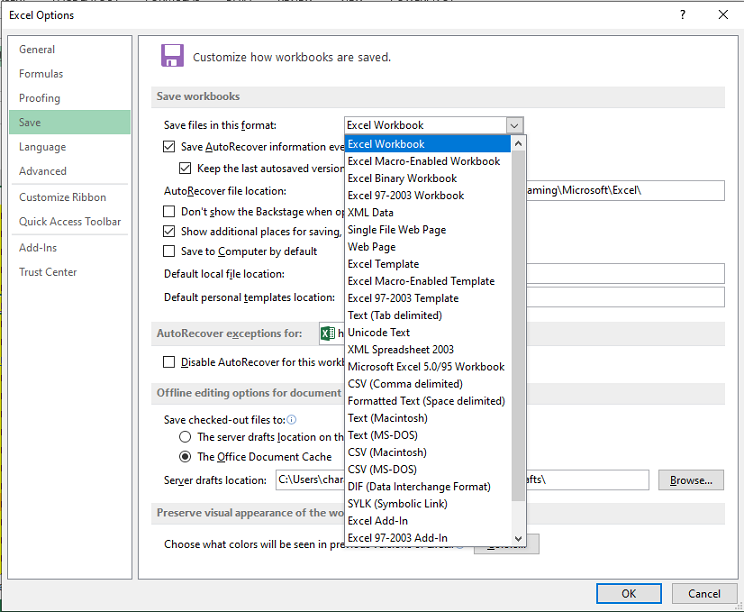
- Click OK.
Check if you can open your Excel file. If not, try the next workaround.

Workaround 2 – Edit the Excel File Permissions
You may receive the ‘Excel file format or file extension is not valid’ error if you lack sufficient permissions to open the file. Usually this happens when you try to open an Excel file received from some other user. Follow these steps to change the file permissions and see if it fixes the problem:
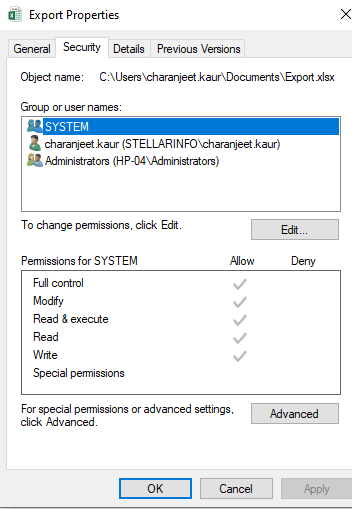
- Right-click on the file that won’t open and click Properties.
- In the file properties dialog box, click the Security tab and then hit the Edit button.
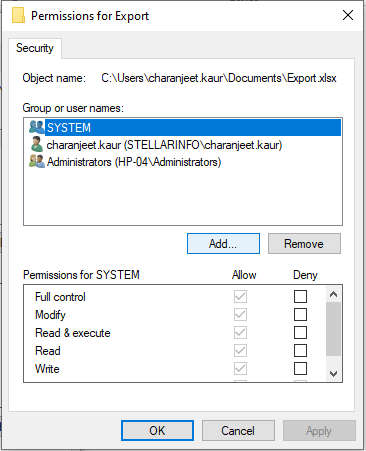
- When the file’s permissions dialog box appears, click on the Add button.
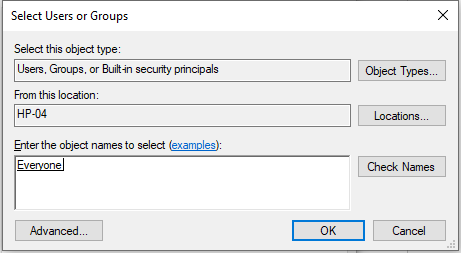
- Click on the Advanced button from the ‘Select Users or Groups’ window.
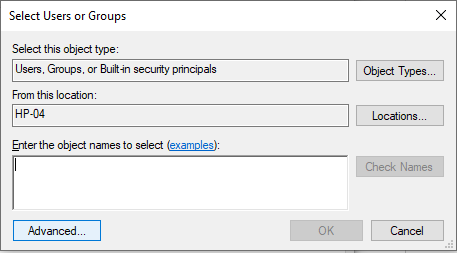
- Select Find Now. A list of all users and groups will get displayed in a search results box. Choose Everyone group from the list and hit OK.

- You can see the ‘Everyone’ group in the ‘Enter the object names to select’ textbox. Click OK once again to return to the file’s permission dialog box.
- Click Everyone from the Group or user names: box and check all the checkboxes under Allow.

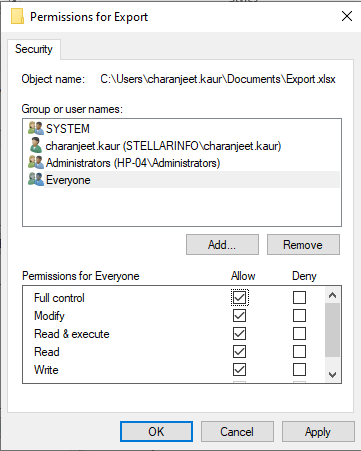
- Click on Apply and then OK.
Now try to open the Excel file. If you’re still getting the Excel file cannot open error, use the following workaround.
Workaround 3 – Recover Unsaved Workbook
If the ‘Excel file extension not valid error’ occurs when attempting to open an unsaved workbook, do the following to recover the unsaved workbook:
- In Excel, click File.
- From the Info screen, under Manage Versions, click Recover Unsaved Workbooks.
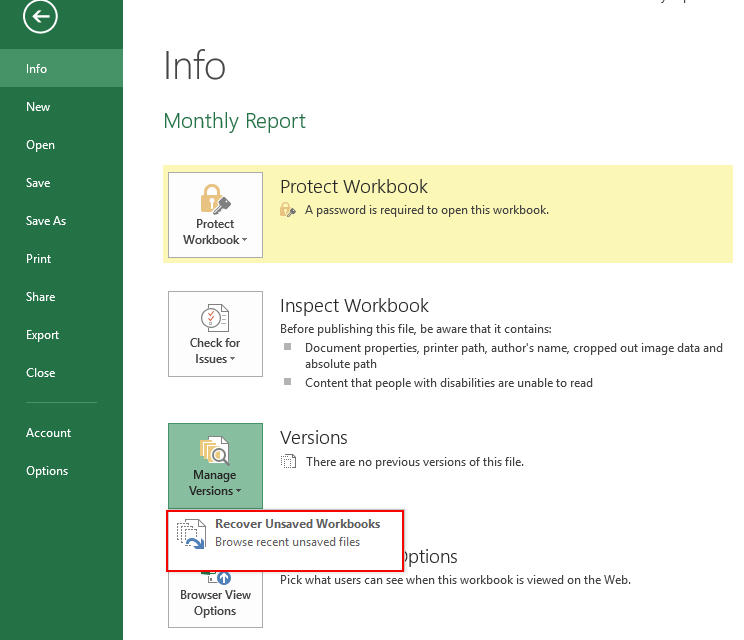
Excel will list any unsaved files. Try opening the file and save it. If this doesn’t work, skip to the next workaround.
Workaround 4 – Repair the Workbook
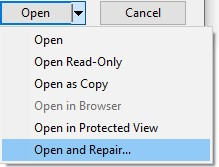
If none of the above workarounds has worked for you, chances are that the Excel file has become corrupted. Try to repair the file using the Excel inbuilt ‘Open and Repair’ utility by following these steps:
- In your Excel application, click on File > Open.
- In the ‘Open’ dialog box that pops-up, select the Excel file you want to repair and click the arrow next to the Open button.
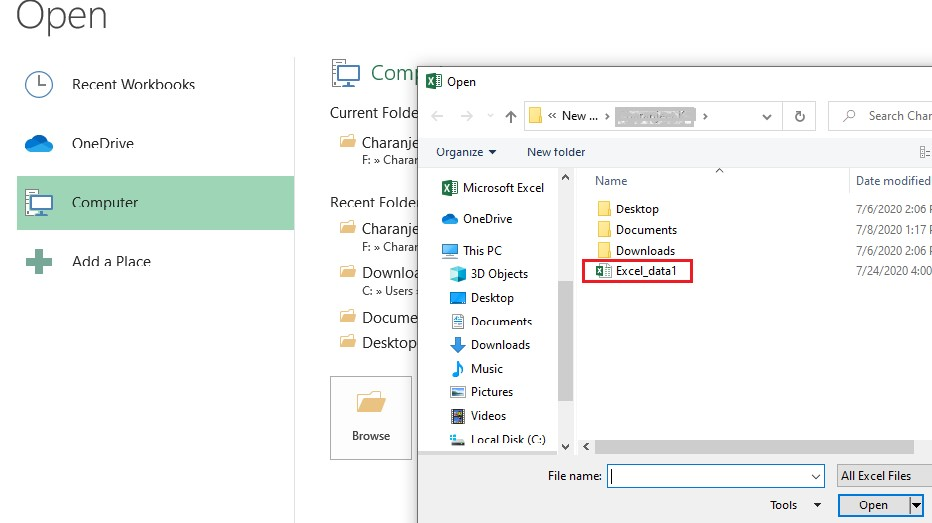
- From the dropdown list, select Open and Repair.
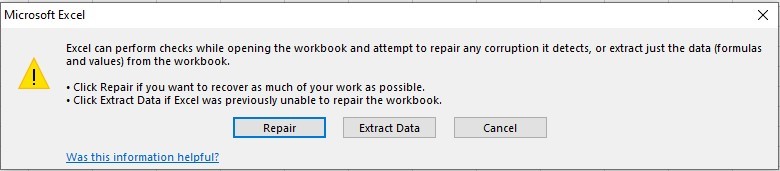
- Excel will ask you to attempt to repair the file or extract data from it. Click Repair to retrieve maximum data. If the Repair option fails, click on Extract Data to recover the data without formulas and values.
If the ‘Open and Repair’ utility doesn’t help fix the corrupted file and/or recover the data, use an Excel repair tool such as Stellar Repair for Excel to regain access to your file and its data.

Stellar Repair for Excel software can help repair severely corrupted XLS and XLSX files. Also, it helps recover all the file components, including tables, pivot tables, cell comments, charts, chart sheets, images, formulas, etc., without impacting the original structure of the Excel file.
To learn how the software works, read this: How to repair corrupt Excel file using Stellar Repair for Excel?
Conclusion
You may encounter the error ‘Excel cannot open the file because the extension is not valid’ when opening a workbook with a different file format or an incorrect file extension. Also, the error may occur if the Excel file has turned corrupt. This article has covered some of the most effective workarounds to resolve the error. But if nothing works, you can try to repair the Excel file and retrieve its data using the Stellar Repair for Excel software.
Filter Not Working Error in Excel [Fix 2024]
Summary: The filter is not working issue in Excel can occur due to several reasons, like blank rows, hidden rows, merged cells, corrupted data, etc. In this post, we will mention the reasons why the filter is not working correctly in Excel and several fixes to resolve the issue. We will also mention an advanced Excel repair tool to repair the Excel file if corruption in file is the cause of the issue.
You can use the Filter function in Excel to filter data in large-sized Excel files quickly. While using Excel filters, sometimes, you face a situation where the filter is disabled or may fail to function properly.

The Excel filter usually fails to work if you have not selected the complete and correct range of data. Let’s learn more about the “Sort and Filter not working in Excel” issue and look at the possible methods to fix it.
Why the Filter is not Working in Excel?
You can face the “filter is not working” issue if you are applying the filter on a protected worksheet or trying to find the data from a hidden row. Besides this, there could be many other reasons contributing to this issue, such as:
- The data you are trying to filter is in merged cells.
- The Excel file automatically selected the data up to the first empty cell, excluding the remaining rows.
- Grouped sheets in Excel file.
- Blank row in the Excel sheet.
- You are trying to apply a filter on an invalid data range.
- The workbooks in which you’re facing the filter issues are corrupted.
- You are specifying incorrect criteria in the filter columns.
Solutions to Resolve the Filter is not Working Issue in Excel
There might be two scenarios: the Excel filter option is disabled/grayed out or the filters fail to function properly. You can follow the given troubleshooting solutions to resolve the issue based on the scenario you’re facing.
Scenario 1 – Filter Option is Disabled or Grayed Out
Method 1: Check and Un-group the Worksheet
When you apply filters to a single sheet in a grouped set, Excel disables the filter option in other sheets within the group. You can check the grouped sheets and try ungrouping them to enable the filter option. Here’s how to do so:
- In the Excel file, go to the Group section.

- Right-click on the Ungroup Sheets.
Alternatively, you can press the Shift + Alt + Left keys to ungroup the sheets.
Method 2: Unprotect Worksheet
The “disabled Excel filter” issue can also occur if your worksheet is protected. You can unprotect the worksheet to enable the filter option. To do so, go to the Review tab and then select Unprotect Sheet.

Method 3: Check and Uninstall Excel Add-ins
Sometimes, the Excel filter gets disabled due to faulty or corrupted Excel add-ins. You can run the Excel in Safe mode to check whether the issue has occurred due to add-ins. To do this, type excel /safe in the Run window and click OK.

In safe mode, if you see the filter option, it indicates some problematic Excel add-ins were causing the issue. In such a case, you can check and uninstall the faulty Excel add-ins to fix the issue.
Scenario 2 – Filter is not Working
Method 1: Try Clearing Filters
Sometimes, the Excel filter fails to work correctly if some filters from the previous sessions are still active. In such a case, you can clear the applied filters. Follow the below steps:
- In Excel file, click Sort & Filter option.
- Select clear.

Method 2: Select Entire Data
The filter not working issue in Excel can occur when the range selected for filtering is incomplete or incorrect. You need to make sure that you’ve selected the entire data range in Excel. You can use the Ctrl+A keys to select the entire content in the worksheet.
Method 3: Check and Delete Blank Cells from the Table’s Columns
When you apply a filter to the data, Excel expects data to be in a continuous range. Excel filters do not consider the blank cells, thereby resulting in incorrect functioning of the filter. To resolve this issue, check and delete all blank cells. In case your Excel file is too large to delete the blank cells, then you can add a “Serial number” row as an alternative. Adding serial number row creates a data continuity, thus helping in fixing the filter-related issue.
Method 4: Unhide Hidden Rows and Columns
Hidden rows or columns in worksheets can also affect the filter functionality. You can check and unhide rows/columns to troubleshoot the issue. Here is how to do so:
- In the affected Excel file, go to Home.
- Click on Format > Hide & Unhide.

- Click Unhide Rows or Unhide Columns (as required).

Method 5: Unmerge Cells
You can experience the filter in Excel is not working issue if you are using the filter to extract data from merged cells. Ensure to unmerge the “merged cells” before applying a filter in Excel. Follow the below steps to unmerge the merged cells in Excel:
- Navigate to the Home option.
- In the toolbar, select the Merge & Center option.
- Click Unmerge Cells.
Method 6: Repair the Workbook
Sometimes, the Filter Not Working in Excel issue can occur due to inconsistencies in file structure. If these issues occurred due to corruption in the worksheet, you can repair it using the Open and Repair tool. It is an in-built tool in Excel that is used to repair corrupted Excel files. Here are the steps to use this tool:
- In the Excel application, navigate to the File option.
- Click Open and then click Browse to choose the Excel file.
- In the Open dialog box, click the problematic Excel file.
- Click the arrow next to the Open option and select Open and Repair.
- Click Repair to recover as much data as possible.
- The application prompts a message after the repair process is complete. Click Close.
In most cases, the Open and Repair tool can easily fix corruption issues in the Excel file. However, for any reason, if the open and repair tool doesn’t work you can consider repairing the file using a professional Excel Repair tool. Stellar Repair for Excel is one such advanced and secure tool to repair Excel files. With this tool’s powerful scanning capabilities, you can repair highly corrupted Excel files and recover all their objects with complete integrity. The tool is compatible with all Windows editions, including the latest Windows 11.
Closure
Several reasons are associated with the filter not working issue in Excel. The filter option may not work as expected if you have not selected the complete and correct range of data or for many other reasons. You can follow the troubleshooting methods discussed above to fix the issue. If the filter fails to work due to corruption in the workbook, then try Stellar Repair for Excel . It is an advanced tool that can even repair severely damaged files. It also helps to recover all the data from corrupted files without changing the original formatting. You can check the tool’s functionality by downloading its demo version. It allows you to preview all the repairable objects in the corrupted Excel file.
Summary: Recovering your unsaved Excel file on Windows 10 with some of our tested methods can truly save you a lot of time, money, and effort. Here’s how to do it!
Microsoft provides a wide range of applications to its users that cater to different purposes. Out of all the MS Office applications, Excel is considered the most used native application by several companies and individuals to store and process crucial data. Excel can also be called a go-to data analysis tool that offers great reliability, ease of use, and multiple features. But unfortunately, it’s not immune to human errors and system errors.
What if you accidentally close the Excel file without saving your work or Excel crashes suddenly? Or worse! Your system crashes without any warning and when you reboot your system, you can’t find the unsaved Excel file.
There could be different situations where you may lose access to your unsaved Excel workbook. There is no need to be anxious, though! We’ve covered some easy-to-follow DIY methods in this post to help you recover unsaved Excel files quickly.
4 Ways to Recover Unsaved Excel File
Irrespective of the circumstances, you can recover unsaved Excel files on Windows 10 using the following methods.
Method 1: Use the Search Option
If you remember the name of the Excel file, try to find it using the Search option. Following these steps:
- Go to Windows Search Box and type the name of the file.
- If you find the file there, click Open or Open file location.

- If you click Open file location, it will take you to the exact location of the file, and you’ll be able to regain access to lost/unsaved Excel file easily.
Method 2: Use AutoRecover Feature
Microsoft Excel comes with a built-in AutoRecover feature that saves copies of all open Excel files at a user-definable fixed interval. You can recover the file if you forget to save it and accidentally close it or it closes automatically due to an unexpected system breakdown or power failure. You can follow the given steps to recover unsaved Excel files with the AutoRecover feature:
- Open a new Excel file and go to File > Options.
- Then go to Save > Save workbooks.
- Next, ensure that the ‘Save AutoRecover information every’ and ‘Keep the last autosaved version if I close without saving’ option is already selected.


- Now, copy the file path given against the AutoRecover file location.
- Open the File Explorer, paste the Menu Bar file path there, and hit Enter.
- The unsaved file will appear with the .xlb extension.
- Double-click the file and choose Excel from apps to open the .xlb file.

- Finally, save the file to the desired location.
Method 3: Use the ‘Recover Unsaved Workbooks’ Option
Another way that you can choose is the ‘Recover Unsaved Workbooks’ option. To regain access to your Excel file, follow the given steps:
- Open an Excel sheet and then go to File > Open.
- Now, scroll down and click Recover Unsaved Workbooks.

- The list of unsaved files will show in the Document Recovery pane.
- Locate the file you lost and double-click on it to open.
- Finally, right-click on the version of the file you want to restore and click Save As.

And, save the file to the desired location
Method 4: Restore File with Previous Versions Utility
This feature will help you recover unsaved Excel files when you’ve saved the workbook earlier, but you end up losing access to the file due to an Excel or system crash. It’d help you save the previously saved version of your Excel file. To do so, follow the given steps:
- Open an Excel file and navigate to File > Info > Manage Versions.

- It will show the previously saved versions. You can choose the one you want to restore and click Save/Save As to store the file with a different name.
Hopefully, this blog has helped you learn how to recover unsaved Excel files. You can try any of the above methods.
FAQ
1. How can I repair a corrupted workbook?
Whenever Excel detects a corrupted workbook while opening, it automatically starts running the File Recovery mode and repairing the file. If the File Recovery mode doesn’t start automatically, you can manually repair the corrupted workbook .
[Fixed] “Microsoft Excel Cannot Access the File” Error
Summary: The “Microsoft Excel cannot access the file” error usually occurs when there is an issue with the Excel file you are trying to save. This post summarizes the causes behind the error and mentions some effective solutions to fix it. If you suspect the problem is encountered due to corruption in the Excel file, you can use the professional Excel repair tool mentioned in the post to repair the file.
You may experience the “Microsoft Excel cannot access the file” error when saving the Excel file. This happens when the Excel application fails to read the file you are attempting to save. The error message indicates that there is an issue with the file name or its path. Sometimes, the error occurs if the file you are trying to access is already in use by another application. Some other reasons for the “Excel cannot access the file” error are:
- Faulty or incompatible Excel add-ins.
- The file is in Protected View.
- The Excel file is damaged or corrupted.
- You do not have the required permissions to access the file.
- The Excel file is not in a compatible format.
Methods to Fix “Microsoft Excel Cannot Access the File” Error
Sometimes, changing the file location can fix the “Microsoft Excel cannot access the file” error. You can try changing the file location, if the location is incorrect. If moving the file to a different location didn’t work, then try the below troubleshooting methods.
Method 1: Check the File Name and Path
You can get the “Microsoft Excel cannot access file” error if there is an issue with the file path – either the path does not exist or it is too lengthy, thus creating conflicts. Make sure the file path is correct. If the file name is too long, you can rename the file with a short name and also move the file to the parent folder instead of a subfolder. After that, remove the file from the Recent list that is created by Excel based on your recent activity. Follow the below steps:
- Open the Excel application.
- In the Recent list, right-click on the affected Excel file.
- Now, select Remove from list.
- Close the Excel application.
Now, reopen the problematic file and check if the error exists. If yes, then follow the next solution.
Method 2: Try Clearing the Microsoft Office Cache
Sometimes, clearing the Microsoft Office cache can help eliminate the “Excel cannot access the file” error. To clear the Microsoft Office cache, follow the given steps:
- First, close all the Office applications.
- Press Windows+R to open the Run window.
- Type %localappdata%\Microsoft\Office\16.0\OfficeFileCache and press the Enter key. You can change ‘16.0’ with your Office version.

- In the OfficeFileCache window, clear all the temporary files.
Method 3: Check and Update Microsoft Excel
You can try updating your Microsoft Excel application. The latest updates include bug fixes, security patches, and other improvements. Updating the application can help fix several issues that might be causing the error. Here are the steps to update Microsoft Excel:
- Open your Excel application.
- Go to File and then select Account.
- Under Product information, click Update Options and then click Update Now.
Method 4: Disable Protected View
You may get the “Microsoft Excel cannot access the file” error if the Protected View option is enabled. You can try disabling the Protected View settings in Excel. This allows you to open the file without any restrictions. However, disabling the protected view can put your system at high risk. To disable the Protected View in Microsoft Excel, follow the below steps:
- In Excel, go to File and then click Options.
- In the Excel Options window, click Trust Center and then click Trust Center Settings.

- Click Protected View from the left pane in the Trust Center Settings window.
- Unselect the options under Protected View. Click OK.

Method 5: Check and Disable Add-ins
The “Excel cannot access the file” error can also occur due to faulty add-ins in Excel. To check if the error has occurred due to some faulty add-ins, open the application in safe mode (press Windows + R and typeexcel /safe in the Run window**)**. If you can save the file without any hiccups in safe mode, this indicates some problematic add-ins are behind the error. You can remove the Excel add-ins by following these steps:
Open your Excel application and go to File > Options.
In Excel Options, select Trust Center and then click Trust Center Settings.
In Trust Center Settings, click Add-ins and thenselect “Disable all applications Add-ins”. Click OK.

Method 6: Check File Permission
You can get the “Excel cannot access the file” error if you don’t have sufficient permissions to modify the Excel file. You can check and provide the write permissions to fix the issue. Here’s how to do so:
- Open Windows Explorer.
- Find the affected Excel file, right-click on it, and click Properties.
- In the Properties window, click the Securities option and click Edit.


- In the Security window, select the user names under ‘Group or users name’.
- Check the file permissions and make sure the write option is enabled. If not, then grant the permission. Click Apply and then OK.
Method 7: Check External Links
The “Excel cannot access the file” error can also occur due to broken external links in the Excel file. External links are references to the data or content in other files. The link usually breaks if the file has been moved to another location or the file name is changed. You can check and change the source of link.
Method 8: Repair your Excel File
Excel may fail to read the file if it is corrupted or damaged. If the error “Excel cannot access the file” has occurred due to file corruption, then try the Excel’s Open and Repair utility to repair the Excel file. Here are the steps:
- In the Excel application, click the File tab and then select Open.
- Click Browse to select the problematic workbook.
- The Open dialog box will appear. Click on the corrupted file.
- Click the arrow next to the Open button and then select Open and Repair.
- You will see a dialog box with three buttons – Repair, Extract Data, and Cancel.

- Click on the Repair button to recover as much of the data as possible.
- After repair, a message is displayed. Click Close.
If the Open and Repair utility fails to work , it indicates the Excel file is severely corrupted. Use Stellar Repair for Excel to repair severely corrupt Excel file. It helps recover all the components of the corrupted Excel file, such as charts, formulas, etc. without making any changes to the original file. It can also fix all types of corruption-related errors. You can use Stellar Repair for Excel to repair Excel files created in all Excel versions – from 2007 to 2023.
Closure
The “Microsoft Excel cannot access the file” error can occur due to numerous reasons. Follow the troubleshooting methods, such as checking file location, path, permissions, etc., as discussed above to fix this error. Sometimes, Excel throws this error if the file you are trying to save is corrupted. You can try repairing the file using the built-in utility – Open and Repair. If the file is severely corrupted, then you can use Stellar Repair for Excel . It can repair damaged Excel files (.xls, .xlsx, .xltm, .xltx, and .xlsm) with complete integrity.
- Title: How to fix Microsoft Excel 2019 has stopped working error? | Stellar
- Author: Nova
- Created at : 2024-08-20 20:48:45
- Updated at : 2024-08-21 20:48:45
- Link: https://blog-min.techidaily.com/how-to-fix-microsoft-excel-2019-has-stopped-working-error-stellar-by-stellar-guide/
- License: This work is licensed under CC BY-NC-SA 4.0.