

How to fix Microsoft Excel 2021 has stopped working error? | Stellar
How to fix Microsoft Excel has stopped working error?
Summary: This blog discusses the possible reasons behind ‘Microsoft Excel has stopped working’ error and solutions to resolve the error manually. You can use Stellar Repair for Excel to quickly repair the file and recover all its data in a hassle-free manner.

Has your Microsoft Excel program stopped working or is acting strange? Excel not responding is a common issue you may experience on launching the application or opening a spreadsheet.

Figure 1 – Microsoft Excel Has Stopped Working Error Message
Possible Causes behind ‘Microsoft Excel has Stopped Working’ Error, and Solutions Thereof
Note: Several users have reported about encountering the ‘Excel has stopped working’ issue on Windows 10, 8, and 7 OS after installing an update for Excel (KB3118373). If you too have installed the update, then uninstall it and check if it solves the error. For detailed information, refer to this link .
How to Fix “File Not Loaded Completely” Error in Excel?
Summary: You may get the “File not loaded completely” error when opening a large-sized Excel file. Read this post to understand the causes behind this issue and the troubleshooting solutions to fix this Excel error. Also, you’ll get to know about an Excel repair tool that can help fix the issue if the cause is corruption in the Excel file.
Several users have reported experiencing the “File not loaded completely” error while opening Excel spreadsheets or when importing CSV file into Excel. This error can occur if the worksheet has crossed the maximum rows and columns limit , i.e., 1048576 rows by 16,386 columns. However, this issue can also occur due to various other reasons. Let’s take a look at the possible causes behind this error.
Why this Error Occurs?
The “File not loaded completely” issue can occur due to one of the following reasons:
- The Excel file you are trying to open is corrupted.
- The Excel file is too large.
- The Excel file has crossed the rows limit.
- Memory issue in your system.
Methods to Resolve the “File not Loaded Completely” Error
Following are some methods you can try to fix the Excel file not loaded completely issue.
Method 1: Try to Import the Spreadsheet into MS Access
A large-sized Excel file takes time and memory to load. When you try opening a large file, you may get the “file not loaded completely” error. It indicates your file contains unwanted rows and columns. In such a case, you can try importing your spreadsheet into Access. By doing this, you can easily access the rows and columns in the database table, and then remove the extra rows. Follow the steps below to import your spreadsheet into Access:
- Open a blank database in Access application.
- Navigate to the External Data tab and then click on the Excel button.

- In the Get Data-Excel Spreadsheet window, click Browse.

- In the File Open dialog box, select the Excel file (in which you are getting the error) and click Open.

- Select Import the source data into a new table in the current database and click OK.

- In the Import Spreadsheet Wizard window, you’ll see all the rows and columns of your Excel file. Click Next.

- In the dialog box that appears, you can modify the field information (extra columns or rows).

Once you performed the changes, click on the Next button.
Provide a name to the table.

- Next, select the option “I would like a wizard to analyze my table after importing the data” (if you want to analyze the data) and click Finish.
- You will get a dialog box with a message. Click Yes.

- The Table Analyzer wizard will appear on the screen.


- Click on the Next button.

- Follow the instructions of the Table Analyzer wizard.
- Once you complete all the steps, select “Save import step” and click Close.

Method 2: Split Your Large Excel File
You may face the Excel file not loaded completely issue when importing a large Excel file. In such a case, you can try splitting your large file into smaller ones. To split the file, you can use VBA codes or the move or copy feature.
Method 3: Stop Unwanted Processes Running in the Background
Sometimes, you get the “File not loaded completely” error if you are running multiple files or programs simultaneously. You can check and stop unnecessary background processes in Windows using your system’s Task Manager. Here are the steps:
- Press the Ctrl+Shift+Esc keys to open the Task Manager window.

- Navigate to the Processes tab and check the Memory section.
- You can see the memory consumption of all the applications in your system.
- Select the unwanted applications and click on End Task.

Now, try to open the Excel file.
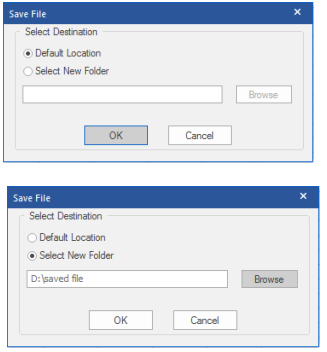
Method 4: Repair your Excel File
Sometimes, Excel throws the “File not loaded completely” error if it fails to read the data in your file. This might happen if your Excel file is corrupt. You can use the Open and Repair utility in Excel to repair your Excel file. Follow the below steps:
- In Excel, click the File tab and then click Open.
- Click Browse to select the desired file.
- In the Open dialog box, click on the corrupted file.
- Click on the arrow next to the Open button and then select Open and Repair.

- Click on the Repair button.

- After repair, you will see a message as shown in the below figure.

- Click Close.
An Alternative Solution
If your file gets corrupted, then repairing it using the “Open and Repair” utility is a good option. However, the Open and Repair utility may not work if the file is severely damaged or corrupted. In such a case, you can use a professional Excel repair tool, such as Stellar Repair for Excel. This tool is primarily designed to repair inaccessible or corrupted Excel files. It can effectively work even if your file is too large or severely damaged. It can recover all the data from the corrupted Excel file without impacting its actual format. The software supports Excel files of almost all Excel versions.
Conclusion
The File not loaded completely issue in Excel may occur due to numerous reasons. Try the troubleshooting methods listed above to resolve the issue. If the Excel file is corrupt, then you can try repairing your file using the Open and Repair tool. However, it can fix only minor corruption issues. If your file is severely corrupted, then use Stellar Repair for Excel . The software offers you the safest way to repair your Excel file without making any changes in the formatting. You can download the free trial version of the software today to scan and preview the Excel file.
How Do I Restore Excel File ?
Excel (XLS/XLSX) file corruption is a common issue that may arise due to problems, such as abrupt system shutdown, system crash, malware or virus intrusion, unsupported add-in, etc. However, MS Excel comes with a recovery feature that allows users to recover or restore Excel files lost or corrupted when the MS Excel quits unexpectedly or computer crashes due to hardware or software-related issues.
But sometimes, the restored version of the Excel file may not contain all the data or changes you made recently. In such cases, you are left with the option to repair the damaged or corrupt Excel file with the help of an Excel repair software, such as Stellar Repair for Excel .

Solutions to Restore Excel File
Below we have discussed various solutions to repair, recover, and restore unsaved, lost, corrupt, or inaccessible Excel files with the help of MS Excel options and Excel repair software.
NOTE: Some of these methods work only if you had enabled or configured certain required settings or options before corruption or losing the Excel file.
1. Restore Lost or Unsaved Excel File via ‘Recover Unsaved Workbooks’ Option
The Recover Unsaved Workbooks option allows you to restore the Excel file that you forgot to save before closing MS Excel or it stopped working. The steps are as follows:
- Navigate to ‘_File > Open._’
- Scroll to the bottom and click on ‘Recover Unsaved Workbooks.’ This opens a File Explorer browser window.

- Now look for the Excel file that you lost and then double-click on it to open and restore the Excel file.
- Once the file is open, click on File > Save As and save it to your desired location.
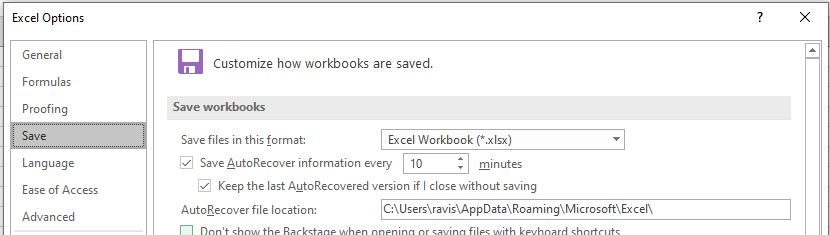
However, this option works only if you had enabled and set up the ‘Save AutoRecover information every X minutes_’ option and enabled the ‘_Keep the last AutoRecovered version if I close without saving’ option.
Also, this may not restore the most recent copy of your Excel file, but it will surely save your time that went into creating and editing the workbook.
2. Repair and Restore Corrupt or Inaccessible Excel File
If the Excel file you are trying to open or access is corrupt, MS Excel will display an error message. When MS Excel detects corruption, it starts ‘File Recovery Mode’ to repair the Excel workbook.
However, if it doesn’t start automatically, you can manually repair minor corruption error and restore the Excel file by following these steps:
- Navigate to File > Open and then navigate to the corrupt or damaged Excel file location.
- Select the file and then click on the arrow beside the ‘Open’ button to choose the ‘Open and Repair…’ option.
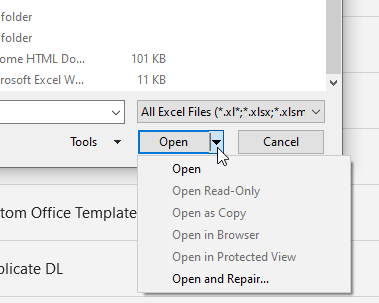
- Now click ‘Repair’ if you want to recover maximum data from a corrupt or inaccessible Excel workbook and restore it to a new Excel file.

If the ‘Repair’ option fails, use the Extract Data option that extracts values, data, and formulas from the Excel workbook.
3. Revert Excel File to Last Saved Version
When an Excel file gets corrupt or damaged while working, you may revert the Excel file to the last saved version. This allows you to restore the Excel file version that isn’t corrupt or damaged. The steps are as follows,
- Click File > Open.
- Double-click the name of the workbook that you have opened in Excel.
- Click Yes to reopen the workbook.
The workbook opens without any changes you’ve made that might have caused the workbook to become corrupted.
4. Use Excel Repair Software to Restore Excel File
If the corrupt or damaged Excel file isn’t repaired by using MS Excel options or you lost data after restoring the unsaved version or after reverting to the last version, you can rely on an Excel repair software, such as Stellar Repair for Excel.
The software repairs Excel files with 100% integrity and restores the Excel data, such as table, Pivot tables, charts, etc., while preserving the workbook properties and formatting. The software is safe as it doesn’t alter or make changes to the original Excel file and saves the repaired data to a new Excel workbook at your desired location.
It supports Excel files (XLS and XLSX), created in MS Excel 2019, 2016, or older versions. It resolves Excel corruption errors, such as Unable to open Excel file, in a few clicks.
To repair a corrupt or inaccessible Excel workbook by using Stellar Repair for Excel software, follow these 3 simple steps,
- Select the corrupt or damaged Excel workbook file (XLS/XLSX).
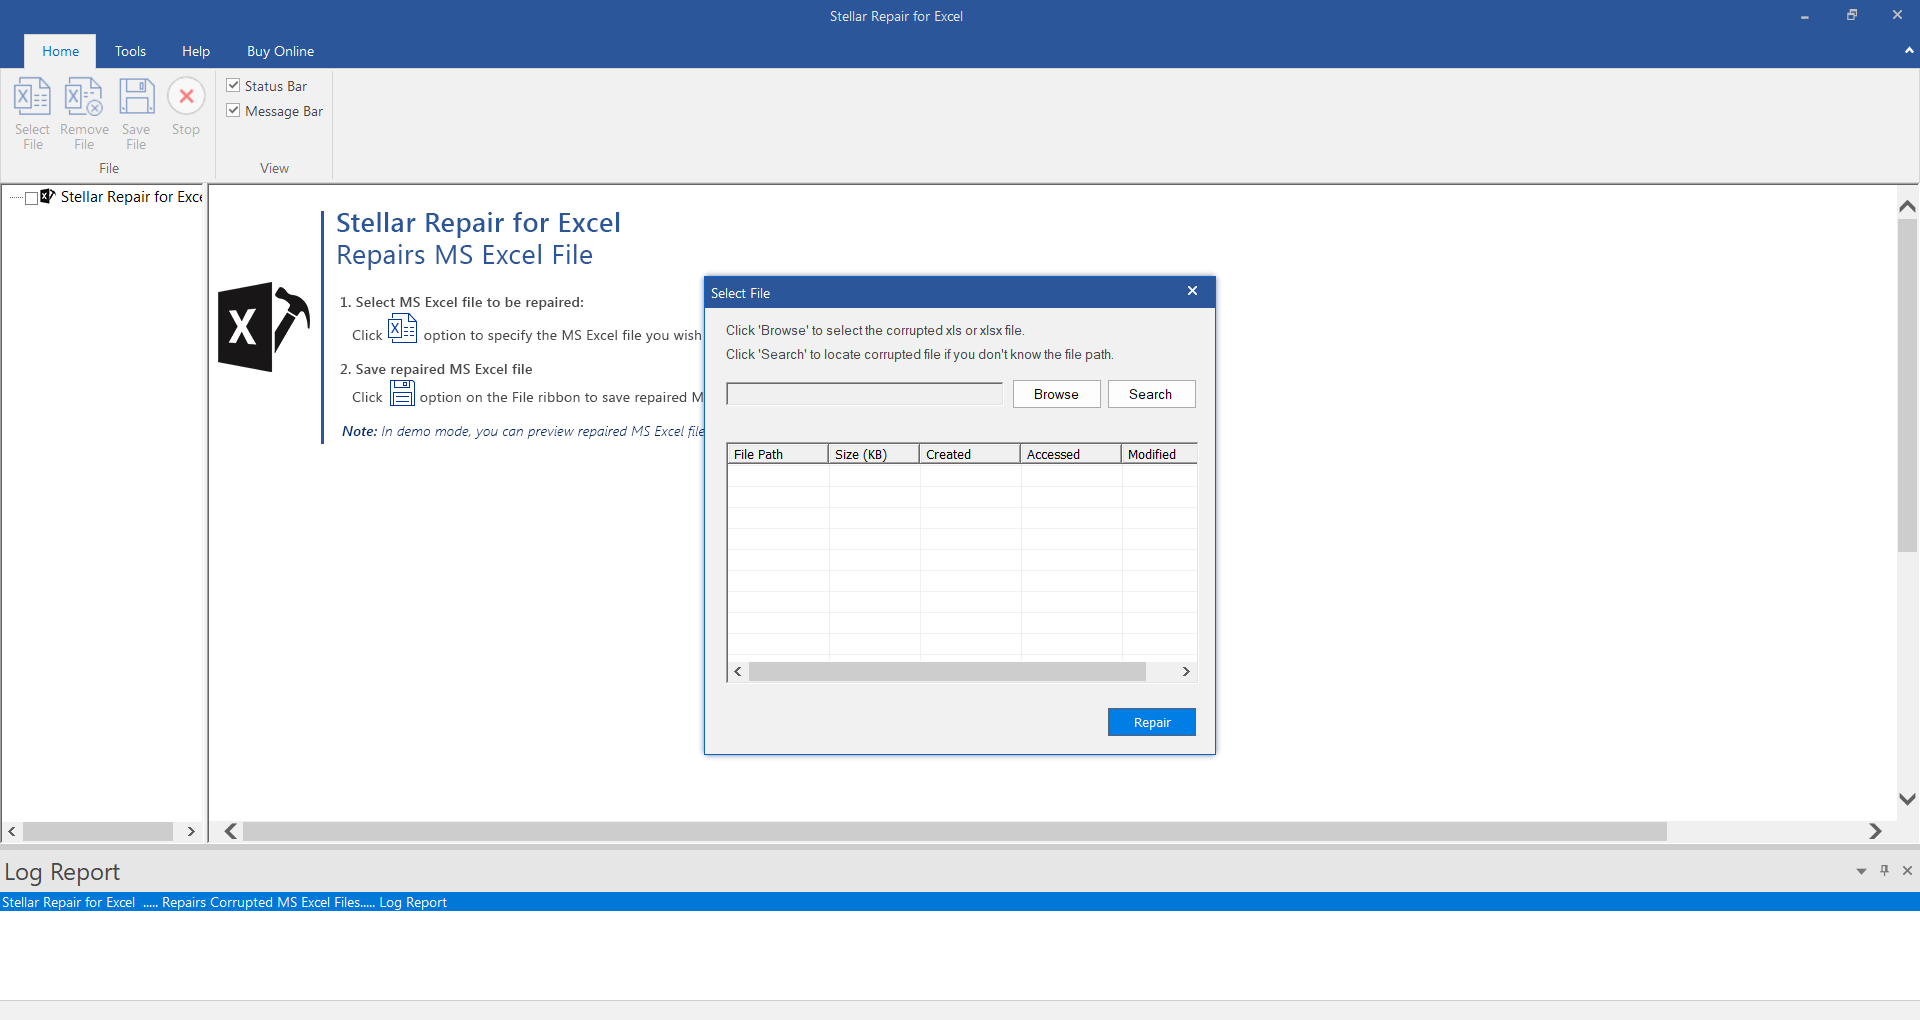
- Repair and then preview the Excel workbook.
- Save the workbook at default or your desired location.
Once saved, you can open and start editing or working on the Excel sheet. Make sure to enable AutoRecovery and AutoSave options to avoid data loss due to corruption.
Conclusion
In this article, we discussed methods and solutions to restore Excel file when it gets damaged or corrupt due to various issues. Although Excel can help you recover or restore Excel file after corruption, it can resolve only minor corruption errors. Thus, it may fail if the Excel file corruption is severe. In such cases, an Excel repair software, such as Stellar Repair for Excel, comes in handy. It resolves Excel corruption, repairs tables, charts, chart sheets, Pivot table, etc., and restores them to a new Excel sheet with 100% consistency.
Easy Steps to Make Excel Hyperlinks Working
Summary: This blog discusses why hyperlinks won’t work in Excel and solutions to fix it. If nothing works, try using Stellar Repair for Excel software to recover your workbook with hyperlinks and all the data intact.
Hyperlinks in your Excel file could be references to a file’s location on the computer or a location within the same worksheet. Or, hyperlinks might be pointing to a URL. Sometimes, the hyperlinks won’t work and any of the following errors may pop up on your screen on clicking a hyperlink:
‘Cannot open the specified file.’

‘This operation has been canceled due to restrictions in effect on this computer. Please contact your system administrator.’

Causes of ‘hyperlinks not working in Excel’ problem, and solutions thereof
Here are some of the possible causes behind the ‘hyperlinks not working’ issue and solutions to fix it:
Cause 1 – Change in the name of the hyperlinked file
If the file name that appears in the hyperlink text is different than the actual file name, it will prevent the hyperlink from working.
Solution – Link to the renamed file
Ensure that the links in the Excel file are updated and points to the renamed file. For this, right-click the hyperlink and select ‘Edit the hyperlink’. Next, in the hyperlink address, replace the current filename with the renamed one in the hyperlink address.
Cause 2 – File name has a pound (#) sign
When you create a hyperlink for a file in Excel, you cannot use a pound character (#) in the file name that appears in the hyperlink. That is because the pound sign is not accepted in hyperlinks and may lead to the ‘Cannot open the specified file’ error.
Note: While you can use a pound character in a file name, it cannot be used in hyperlinks in an MS Office document.
Solution – Rename the file name and remove the pound sign
Open the file that contains the ‘#’ sign and rename it by following these steps.
- Right-click the cell containing the hyperlink that is not working, and click Edit Hyperlink.
- From the Address box, copy the address of the file you are linking to.
- Go to the location where the file is stored, right-click on the file, and click Rename.
- Remove the ‘#’ character from the name of the file.
- Go back to the Excel file, right-click on the problematic hyperlink, and choose Edit Hyperlink. Next, browse and select the renamed file.
- The renamed file without the pound sign will be added in the Address box.
- Click OK.
Now try opening the hyperlink.
Cause 3 – Sudden system shutdown causes abrupt closing of Excel
There may be a discrepancy in the data in hyperlinks when a system shut down suddenly, without properly closing the Excel file. And so, when trying to open a link, it won’t open.
Solution – Enable the option to save hyperlinks
There is an inbuilt option in Excel to update hyperlinks every time the workbook is saved. Follow these steps to enable that option:
Note: The steps may vary based on the Excel version you are using.
For Excel 2013, 2016, or 2019:
- Open Excel Workbook -> Go to File->Options->Advanced
- Scroll down to find the General tab and click on Web Options
- Web Options Window pops-up
- In the Web Options Window, go to Files Tab and select the ‘Update Links on save‘ checkbox
- Click on OK button and your option is saved
The steps are also explained in the image below:

For Excel 2007:
- Click the Office button
- Select Excel Options, then follow Step 1) to Step 5), as mentioned above and get the Excel Hyperlinks to work again.
Still unable to open hyperlinks in Excel?
If you fail to make Excel hyperlinks work using the above-discussed solutions, use an Excel repair tool to fix the hyperlinks issue. Download the Stellar Repair for Excel to repair an XLS/XLSX file and restore the hyperlinks.

See the working of the tool here:
The tool recovers all components of the Excel file including tables, charts, chart sheets, cell comments, images, formulas, and more. You can repair multiple worksheets and fix all dysfunctional Excel hyperlinks across multiple worksheets in a single workbook. Click on the workbook, select all worksheets and start repairing
Conclusion
Carefully read the possible causes behind the ‘Excel Hyperlinks not working’ issue to understand what resulted in the issue in the first place. If nothing helps, use Stellar Repair for Excel to restore the hyperlinks and save the result in a new Excel file, without interfering with worksheet properties and cell formatting.
Ways to Fix Personal Macro Workbook not Opening Issue
Many users have reported encountering issues while accessing personal macro workbook, such as personal macro workbook not opening, personal macro workbook not loading automatically, Excel personal macro workbook keeps getting disabled, etc.
Such issues may arise due to a problem with the directory where the personal workbook is stored. However, there are various other reasons that may lead to such issues. Below, we’ll discuss the reasons behind the personal macro workbook not opening issue and the solutions to troubleshoot and fix the issue. But before proceeding, let’s understand why personal macro workbook is used.
Why Personal Macro Workbook is used?
You can access macros in a specific Excel workbook. However, when you need to use the same macro in other Excel worksheets, then you can create a personal macro workbook. A personal macro workbook (Personal.xlsb) is a hidden workbook that is used to store all macros. It makes your macros available every time you open Excel.
Causes of Personal Macro Workbook not Opening Issue
You may encounter personal macro workbook is not opening issue when attempting to record macros. Some possible causes behind such an issue are:
- Personal macro workbook is stored at an untrusted location
- Location of xlsb is changed
- Personal macro workbook is hidden
- Personal macro workbook becomes corrupted
- Disabled items in add-ins
- Workbook is Read-only
Methods to Fix the “Personal Macro Workbook not Opening” Issue
Follow the given methods to fix the personal macro workbook is not opening issue:
Method 1: Check the Path of Personal.xlsb
The personal macro workbook (Personal.xlsb) file is stored in XLStart folder. It opens automatically when you open your Excel application. However, sometimes it fails to load automatically. It usually occurs when you try to open the file from an incorrect path. You can check the path of Personal.xlsb by following these steps:
- Open the workbook.
- Click on the Developer tab.

- Press Alt + F11 to open Visual Basic Editor.
- Go to View > Immediate Window.
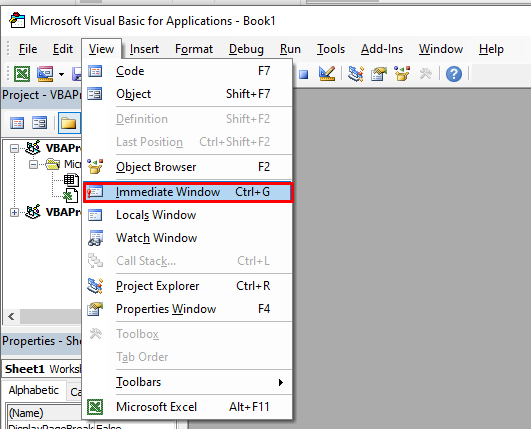
- In Immediate Window, type the following code to know the location of the workbook:
?thisworkbook.path.
- Then, hit Enter.
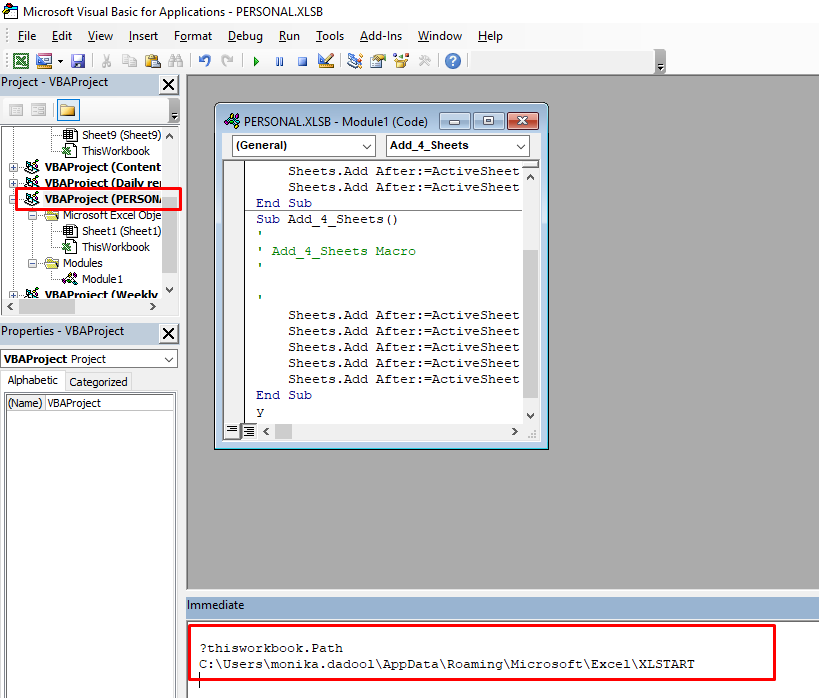
- You will see the path of the personal macro workbook.
- Copy the path and paste it into Quick Access field in File Explorer.

Method 2: Unhide Personal Macro Workbook
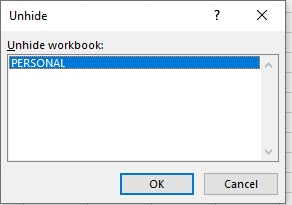
If personal macro workbook is hidden, you may unable to see and open the Personal.xlsb file. To unhide the personal Macro workbook, follow the below steps:
- In Microsoft Excel, go to View and then click Unhide

- The Unhide dialog box is displayed. Click PERSONAL and then OK.
Method 3: Enable the Macro Add-ins
You may unable to open the previously recorded macros in your personal macro workbook if the macros are disabled. To check and enable the items, follow these steps:
- Go to File > Options.
- In Excel Options, click on the Add-ins
- Select Disabled Items from the Manage section and click on Go.
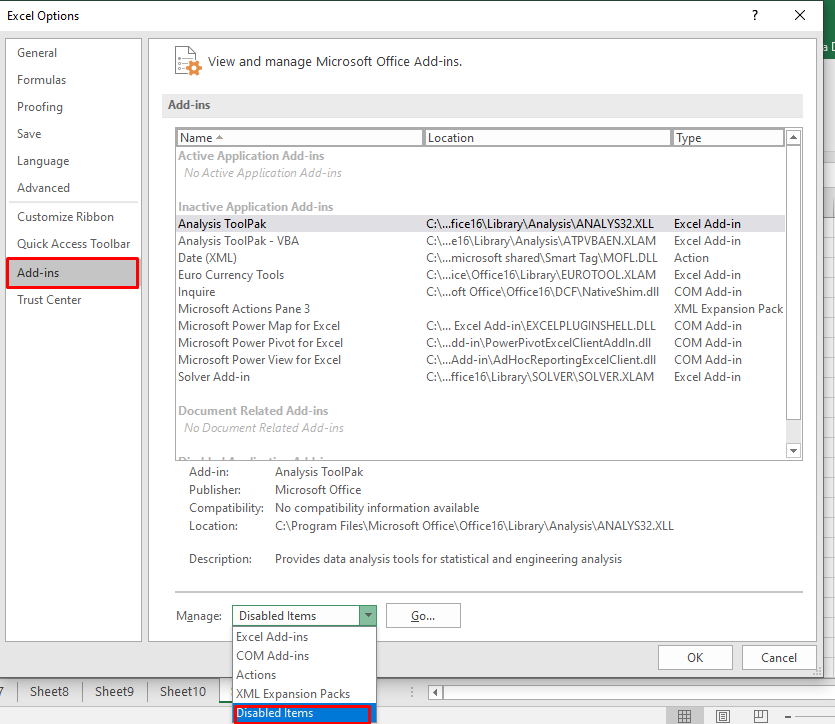
- The Disabled Items dialog box appears. Click on the disabled item and then click Enable.
Method 4: Change the Trusted Location
You may encounter the “personal macro workbook not opening” issue if the Personal.xlsb file is stored at an untrusted location. You can check and modify the path of XLSTART folder using the Trust Center window. Here are the steps:
- Open MS Excel. Go to File > Options.
- Click Trust Center > Trust Center Settings.
- In the Trust Center Settings dialog box, click on Trusted Locations.
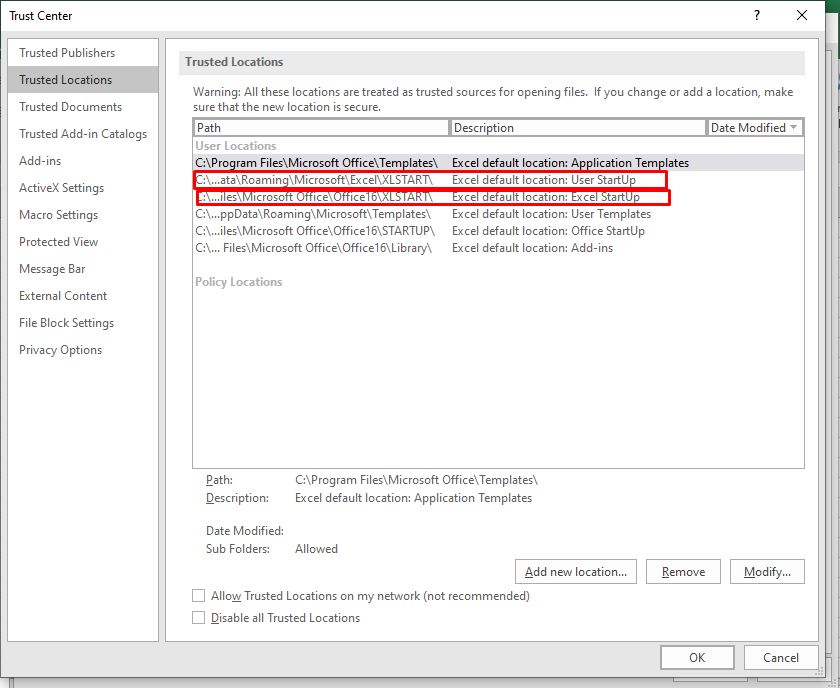
- Verify the path of the XLSTART If it is untrusted or there is any issue, then click Modify and then click OK.
Method 5: Repair your Excel File
You may fail to open personal macro workbook if it is corrupted. To repair the corrupt workbook, you can use the built-in Open and Repair utility in MS Excel. To use this tool, follow these steps:
- Open your Excel application.
- Click File > Open.

- Browse to the location where the corrupted file is stored.
- In the Open dialog box, select the corrupted workbook.
- From the Open dropdown list, click Open and Repair.
The dialog box appears with the Repair and Extract buttons. Click Repair to retrieve all possible data or the Extract option to recover the data without formulas and values.
If the Open and Repair utility fails to repair the corrupted Excel workbook, then you can use a professional Excel repair tool, such as Stellar Repair for Excel. It can easily repair severely corrupted Excel (XLSX and XLS) files and recover all the components. You can download the free trial version of the tool to preview the recoverable data.
Closure
This article discussed the ways to fix the personal macro workbook not opening issue. In case you are unable to open the personal macro workbook because of corruption in the workbook, you can use the Open and Repair utility in MS Excel. If it fails, then you can use Stellar Repair for Excel to fix corruption in the Excel file and recover all its data with complete integrity.
‘Open and Repair’ Doesn’t Work in MS Excel
Summary: In this Blog, we will go through Microsoft office most important product i.e Microsoft excel, let’s get into all possible Manual and an alternate method to deal with MS Excel open and Repair doesn’t work issue, read on to know more.
Whether you are a student or an entrepreneur, the features of Microsoft Excel do not delude anyone. Setting goals, creating budgets, analyzing data, calculating salaries, is there anything that Excel can’t do? All of us have used it and trusted it to calculate and provide a solution to our most difficult problems. However, like every other software application, this otherwise reliable application can sometimes fall prey to unexpected errors which can even threaten to make our critical data inaccessible.

A good idea to avoid loss of data when a Microsoft Excel file becomes corrupt is to take some proactive measures, such as saving a backup copy of your files and creating an automatic recovery file at periodic intervals. If you are faced with a corrupted Excel file, you know you can still use the ‘Open and Repair’ function provided by Microsoft to fix and open corrupt Excel file. However, what should a user do when ‘Open and Repair’ is not working? This is a query shared by millions of Excel users worldwide. Sometimes, the ‘Open and Repair’ functionality of Excel stops working due to unknown reasons. In such cases, if users face Excel file corruption, they get stuck with no idea how to fix the Excel file.
In this guide, we’re providing you with the solutions to this very problem. If Excel ‘Open and Repair’ is not working, read on to find out the procedures that you can perform to open corrupted files.
‘Open and Repair’ doesn’t work: Try an alternative solution i.e. Stellar Repair for Excel to recover everything from corrupt Excel files.
How to Fix Excel file that Won’t Open
If your workbook is opening in Excel, there are two options to recover its data. It would be best if you try to perform one, and if you are unsuccessful, move on to the next.
Revert the workbook to the version that was saved before the corruption
- Launch Excel and click File -> Open

- Select the file that is corrupted and open it
- Click ‘Yes’ to save the copy of the workbook that was saved before corruption
Important Note: If you use this method, you will lose all changes made to the file after it was corrupted.
Save the workbook in the SYLK file format
- Launch Excel and click File -> Save As.
- In the Save as Type field, select SYLK (Symbolic Link) from the drop-down menu, and click Save.

- To save only the active sheet in the workbook, click OK. The system will display a message that the sheet has features that are not compatible with the SYLK file format.
- Click Yes.
- In Excel click File -> Open.
- Select the file that you saved in SYLK file format and open it.
- In Excel click File -> Save As.
- In the Save as Type field, select Excel Workbook from the drop-down menu.
- In the File Name field, type a new name for your workbook and click Save.
The SYLK file format will filter out the corrupted elements from your workbook, thereby restoring your data.
Important Note: Using this method you only be able to salvage the active sheet in the workbook.
How to Open/Fix an Excel file that cannot be opened
In this case too, there are two options to recover the data. Try to perform one, and if you are unsuccessful, move on to the next.
Set the calculation option to Manual
- Launch Excel and click File -> New.

- From the Available Templates window, select Blank workbook.

- Click File -> Options.
- Under Formulas, in the Calculation options section, click Manual.

- Click OK.
- In Excel click File -> Open.
- Select the corrupted file and open it.
The system opens the corrupted file. Since the workbook won’t be calculated, it might open.
Link the workbook to external references
- Launch Excel and click File -> Open.
- Copy the name of the corrupted file and click Cancel.
- In Excel click File -> New.
- From the Available Templates window, select Blank workbook.
- In the new workbook, on cell A1, type the following:
=File Name!A1
In the above command, the filename is the name of the corrupted file.
- On the Update Values dialog box, select the corrupted file and click OK.
- On the Select Sheet dialog box, select the sheet and click OK.
- Select cell A1. Select the same range of rows and columns as occupied by the data in the corrupted sheet, including cell A1.
- Under the Home tab, in the Clipboard section, click Paste.
- While the range of rows and columns are still selected, click Copy.
- Click the Paste
- Under Paste Values, click Values.
Note: This method lets you recover only the data but not the values and formulas from the workbook.
Alternative Solution
In addition to the above-mentioned techniques, you can also use macros to extract data from a corrupted workbook. However, macros are generally risky, and executing them needs prior technical knowledge.
Thus, if the above methods do not yield the desired results, a quick and easy way for reconstructing Excel files is to use Excel Recovery Software . Stellar Repair for MS SQL software is the best choice for rebuilding damaged Excel files and restoring everything to a new Excel file. The product lets you recover table, chart, chart-sheet, cell comment, image, formula, sort and filter data from damaged workbooks and also allows you to fix multiple files at one go.

Wrapping it up
Though one of the above-mentioned techniques should recover Excel file if ‘_Open and Repair’ utility doesn’t work_, in case you’ve reached nowhere even after using them, contact Microsoft support for more help.
How to fix Pivot Table Field Name is not Valid error in Excel?
The Pivot Table field name is not valid error can occur while creating, modifying, or refreshing data fields in the pivot table. It can also appear when using VBA code to modify the pivot table. It usually occurs when there is an issue with the field name in a code or if there is a hidden or empty column in the pivot table. However, there could be many other reasons behind this error.
Why the “Pivot Table Field Name is not Valid” Error Occurs?
You can get the “Pivot Table field name not valid” error in Excel due to several reasons. Some possible causes are:
- Excel file is corrupted
- Damaged fields in the pivot table
- Pivot table is corrupted/damaged
- Hidden columns in the pivot table
- Macro (referring to the pivot table) is corrupted
- Preserve formatting option is enabled
- Missing or incorrect fields in the VBA code
- Issue with workbook.RefreshAll method syntax (if using)
- Pivot Table contains empty columns
- Header values or header column is missing in the Pivot Table
- Pivot table is created without headers
- Columns/rows are deleted from the Pivot Table
Methods to Fix Pivot Table Field Name is not Valid Error in Excel
You can get this error if you have selected the complete data sheet and then trying to create the Pivot Table. Make sure you choose only the data fields that you want to insert in the Pivot Table. If this is not the case, then follow the troubleshooting methods mentioned below.
Method 1: Check the Header Value in the Pivot Table
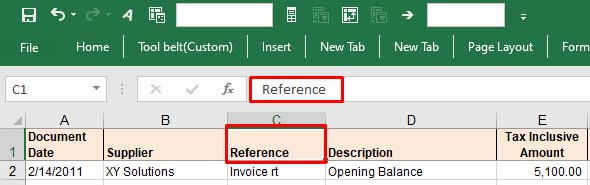
The “Pivot table field name is not valid” error can occur if you have not set up the pivot table correctly. All the columns having data in them should have header and header values. A pivot table without a header value can create issues. You can check the header and its value from the Formula bar. Change the header if the header value is too lengthy or if it contains special characters.
Method 2: Check and Change the Data Range in the Pivot Table
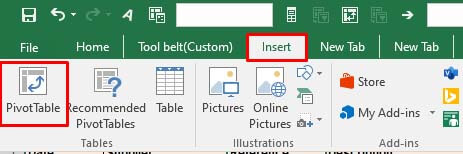
The “Pivot Table field name is not valid” can occur while modifying a field in Pivot Table. It usually occurs if you’re trying to add or modify the field by selecting an incorrect data range in the Create PivotTable dialog box. The “Create PivotTable“ feature helps define how data would be displayed within the pivot table.
Let’s take a scenario to understand this. Open the Excel file with PivotTable. Click on the fields (you want to add), go to the Insert option, and click PivotTable.
If you select an incorrect range, i.e. A1:E18, instead of correct range - “Expenses**!$A$3:Expenses!$A$4**,” you will immediately get the error message.
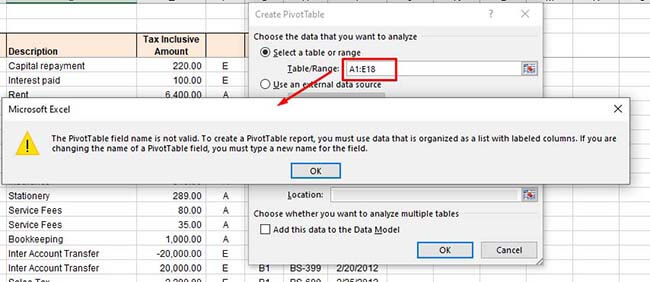
So, type the correct range under the Select a table or range option and click OK.
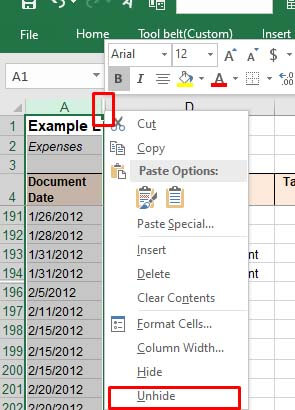
Method 3: Unhide Excel Columns/Rows
The error can also occur if some columns/rows of the Pivot Table’s data source are hidden. When you try to add a hidden column as a field in the PivotTable, the Excel application will fail to read the data of the hidden column. You can check and unhide the Excel columns by following these steps:
Open the Excel file.
Locate the hidden column number.
Move your cursor on the hidden column number and right-click on the space between the columns. Click Unhide.
Method 4: Check and Delete Empty Excel Columns
Sometimes, you can get the “Pivot Table field name is not valid” error if you are trying to use an empty column as a field in your Pivot Table. Check the columns with no values in all cells. If found, then delete the empty columns. This method is ideal for small-size Excel files. However, for large-sized files, it is a time-consuming process.
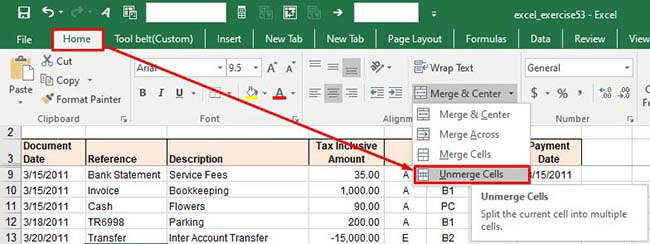
Method 5: Unmerge the Column Header (If Merged)
The “Pivot Table field name is not valid” error can also occur due to merged column headers. The pivot table references headers to identify the data inside the rows or columns. The merged headers can sometimes create data inconsistencies. You can try unmerging the column headers to fix the issue. Follow these steps:
In the Excel file, go to the Home
Click the Merge & Center option and select Unmerge Cells from the dropdown.
Method 6: Disable the Background Refresh Option
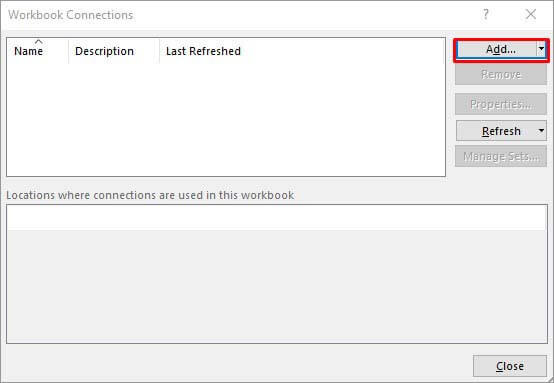
If the “background refresh” option in the Excel file is enabled, it may also create issues with Pivot Table. The Excel updates all the pivot tables in the background even after a small change if the background refresh option is enabled. This may create issues if the Excel file is large with too many tables. You can try turning off the “background refresh” option in the Excel file to troubleshoot the issue. Here is how to do so:
In the Excel file, go to the Data tab and then click Connections.
In the Workbook Connectionsdialog box, click on the ‘Add’ dropdown to add the workbook (in which you need to modify the refresh settings).
Once you have chosen the Excel file, click Properties.
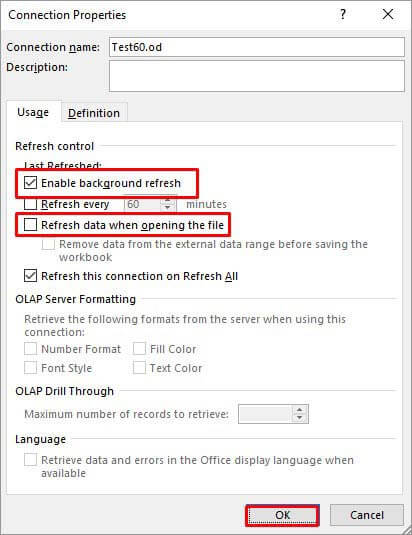
In the Connection Properties window, unselect the **”Enable background refresh”**option, select the “Refresh data when opening the file“, and click **OK.
**

Method 7: Check the VBA Code
The error can also occur when working with PivotTable using VBA code in Excel. Some Excel users reported this error on forums as run-time error 1004: The PivotTable field name is not valid. This error usually occurs when there are issues in the VBA code, affecting the PivotTable data source or field references. You can check field names referring to PivotTable or Workbook.RefreshAll function syntax and other errors in the code.
Method 8: Repair your Excel File
One of the reasons behind the “Pivot Table field name is not valid” error is corruption in the Excel file, containing the Pivot Table. You can repair your Excel file using Microsoft built-in utility - Open and Repair. Here’s how to use this utility:
In Excel, navigate to File > Open.
Click Browse to choose the affected workbook.
The Open dialog box will appear. Click on the corrupted file.
Click the arrow next to the Openbutton and then select Open and Repair.
You will see a dialog box with three buttons - Repair, Extract Data, and Cancel.
Click on the Repair button to recover as much of the data as possible.
After repair, a message is displayed. Click Close.

Method 9: Use a Professional Excel Repair Tool
If the Excel file is heavily damaged or corrupted, then the “Open and Repair” utility may not work or provide the intended results. In such a case, you can opt for a professional Excel repair tool. Stellar Repair for Excel is an advanced Excel file repair tool, which is highly recommended by experts. It can repair severely corrupted Excel files and restore all the data from corrupt file, including pivot tables. This tool comes with a user-friendly interface that even a non-technical user can use. You can try the software’s demo version to check how it works. The software is fully compatible with all Excel versions, including Excel 2019.
Conclusion
The Excel error “Pivot Table field name is not valid” can occur due to hidden or merged column/row headers, empty columns/rows, corrupted pivot table, and various other reasons. You can try the methods mentioned above to fix the error. If this error has occurred due to corruption in the Excel file, then you can use Stellar Repair for Excel - an advanced tool to repair corrupted pivot table, macros, fields, or other elements in an Excel file. It is compatible with all Windows editions, including the latest Windows 11. It can help fix the error if the data source or Pivot table configuration is affected by corruption.
Also read:
- How to recover old videos from your Xiaomi Redmi Note 13 5G
- How to recover old videos from your Realme GT 5
- How to restore wiped music on Samsung Galaxy S24
- How to play HEVC H.265 video on Xiaomi Redmi K70?
- 4 Ways to Transfer Music from Infinix Zero 5G 2023 Turbo to iPhone | Dr.fone
- How to retrieve lost files from Honor X50?
- How to Restore iPhone 14 without Backup | Stellar
- How to identify missing your drivers with Windows Device Manager on Windows 10
- How to Rescue Lost Photos from Vivo Y28 5G?
- How to recover deleted photos from Android Gallery after format on Xiaomi Redmi 12
- How to Recover iPhone 14 Data From iOS iCloud? | Dr.fone
- How to Recover Deleted Photos, Videos & Music Files from iPhone 14 Plus | Stellar
- How To Transfer Data From iPhone 12 Pro To Other iPhone 15 Pro Max devices? | Dr.fone
- 2 Ways to Transfer Text Messages from Motorola Moto G24 to iPhone 15/14/13/12/11/X/8/ | Dr.fone
- How to play MOV files on Civi 3 ?
- How to restore wiped music on Samsung Galaxy M34 5G
- How to rescue lost call logs from Poco F5 5G
- How to Downgrade iPhone 6 Plus to an Older iOS System Version? | Dr.fone
- How To Repair iOS of iPhone SE (2020)? | Dr.fone
- How to Fix Corrupt video files of Nubia Z50 Ultra using Video Repair Utility?
- How to recover deleted photos from Realme 11 5G.
- How to Retrieve deleted photos on Blaze 2 Pro
- How to Recover Deleted Photos from Android Gallery App on Poco M6 5G
- How to recover deleted photos from Nokia C300.
- How to Restore Deleted OnePlus Ace 2 Pro Pictures An Easy Method Explained.
- How to Fix iPhone 14 Stuck at attempting data recovery Loop | Stellar
- How to Restore Deleted Tecno Phantom V Flip Contacts An Easy Method Explained.
- How to get back lost photos from Vivo .
- How to Repair corrupt MP4 and AVI files of Galaxy M14 5G?
- How to Rescue Lost Photos from Play 40C?
- How to recover deleted photos from Android Gallery without backup on Nokia C110
- How to Rescue Lost Contacts from ZTE Blade A73 5G?
- 5 Techniques to Transfer Data from Infinix Smart 8 Plus to iPhone 15/14/13/12 | Dr.fone
- How to retrieve erased music from Motorola Edge+ (2023)
- How to get back lost photos from Y27 4G.
- How to recover old videos from your ZTE Axon 40 Lite
- How to play MOV files on Edge 40 ?
- How to Repair Broken video files of Vivo Y100 5G on Mac?
- 2 Ways to Transfer Text Messages from Oppo Reno 11 Pro 5G to iPhone 15/14/13/12/11/X/8/ | Dr.fone
- How to restore wiped call history on Samsung Galaxy XCover 7?
- How to Recover Deleted Photos from Android Gallery App on 13T
- How To Recover Lost Data on iPhone SE (2022)? | Dr.fone
- How To Transfer Data From iPhone 11 To Other iPhone 11 devices? | Dr.fone
- How to recover lost data from Motorola Edge+ (2023)?
- How to recover old call logs from your Nokia C210?
- In 2024, 3 Ways to Unlock Apple iPhone SE without Passcode or Face ID
- Oppo Reno 10 Pro+ 5G Bootloop Problem, How to Fix it Without Data Loss | Dr.fone
- In 2024, The Best Methods to Unlock the iPhone Locked to Owner for iPhone SE (2020)
- In 2024, 5 Ways To Teach You To Transfer Files from Oppo Reno 11 5G to Other Android Devices Easily | Dr.fone
- FRP Hijacker by Hagard Download and Bypass your Infinix FRP Locks
- In 2024, How to Transfer Data from Nokia G310 to BlackBerry | Dr.fone
- In 2024, Different Methods To Unlock Your Apple iPhone 8 | Dr.fone
- Sign Word 2010 Online - Add Signature to Word 2010 for Free
- In 2024, Why Apple Account Disabled On your iPhone SE? How to Fix
- How to Change Realme V30 Location on Skout | Dr.fone
- The Magnificent Art of Pokemon Go Streaming On Motorola Edge 40? | Dr.fone
- Can I use iTools gpx file to catch the rare Pokemon On Vivo V27 | Dr.fone
- 2024 Approved What Are The Stages Of Film Production
- Top 4 Hatsune Miku Voice AI Generators for All Times
- In 2024, 3 Methods to Mirror Vivo S17e to Roku | Dr.fone
- Updated In 2024, Replacing Sky Background Using Adobe Photoshop A Comprehensive Guide
- In 2024, A Guide Honor Magic 6 Pro Wireless and Wired Screen Mirroring | Dr.fone
- In 2024, Discover the Best Free 3D Animation Apps for Android and iOS Devices
- Updated Creating Motivational Videos with AI Comprehensive Guide 2024
- Top 4 Android System Repair Software for Honor X9a Bricked Devices | Dr.fone
- In 2024, Top-Notch Solutions for Disabled Apple ID From iPhone 15 Pro Max Making It Possible
- New In 2024, How To Stream Your Favorite Games Online
- Authentication Error Occurred on Asus ROG Phone 8 Pro? Here Are 10 Proven Fixes | Dr.fone
- Top 4 Ways to Trace OnePlus Nord N30 SE Location | Dr.fone
- In 2024, 11 Best Location Changers for Samsung Galaxy A05 | Dr.fone
- Get Started with Cartoon Videos Top 10 Beginner-Friendly Tools
- Best Online Lyrics Video Makers
- In 2024, How to Check Distance and Radius on Google Maps For your Motorola Edge 40 Pro | Dr.fone
- In 2024, Overview of the Best Motorola G24 Power Screen Mirroring App | Dr.fone
- In 2024, Ultimate Guide to Catch the Regional-Located Pokemon For Poco X5 Pro | Dr.fone
- In 2024, How To Unlock Apple iPhone 12 mini Without Swiping Up? 6 Ways
- How to Soft Reset OnePlus Open phone? | Dr.fone
- How to Delete iCloud Account On iPhone 13 Pro without Password?
- Updated In 2024, Movie Trailer Maker Software Top Picks for Mac and Windows
- 11 Ways to Fix it When My Samsung Galaxy S23 Wont Charge | Dr.fone
- In 2024, How to Use Google Assistant on Your Lock Screen Of Xiaomi Redmi Note 13 5G Phone
- In 2024, How to Transfer Data from Lava Yuva 3 to Any iOS Devices | Dr.fone
- New In 2024, Get To Know OpenAIs Sora and How To Use It
- A Guide Honor X9a Wireless and Wired Screen Mirroring | Dr.fone
- In 2024, The Ultimate Guide How to Bypass Swipe Screen to Unlock on Oppo Find N3 Device
- Cellular Network Not Available for Voice Calls On Samsung Galaxy A34 5G | Dr.fone
- In 2024, All You Need To Know About Mega Greninja For Realme GT 5 | Dr.fone
- Title: How to fix Microsoft Excel 2021 has stopped working error? | Stellar
- Author: Nova
- Created at : 2024-06-18 01:01:27
- Updated at : 2024-06-19 01:01:27
- Link: https://blog-min.techidaily.com/how-to-fix-microsoft-excel-2021-has-stopped-working-error-stellar-by-stellar-guide/
- License: This work is licensed under CC BY-NC-SA 4.0.
