
:max_bytes(150000):strip_icc():format(webp)/iOS-wwdc-7d655ca37a3b43b99fd9dac09bec13c4.jpg)
How to fix Pivot Table Field Name is not Valid error in Excel 2003? | Stellar
How to fix Pivot Table Field Name is not Valid error in Excel?
The Pivot Table field name is not valid error can occur while creating, modifying, or refreshing data fields in the pivot table. It can also appear when using VBA code to modify the pivot table. It usually occurs when there is an issue with the field name in a code or if there is a hidden or empty column in the pivot table. However, there could be many other reasons behind this error.
Why the “Pivot Table Field Name is not Valid” Error Occurs?
You can get the “Pivot Table field name not valid” error in Excel due to several reasons. Some possible causes are:
- Excel file is corrupted
- Damaged fields in the pivot table
- Pivot table is corrupted/damaged
- Hidden columns in the pivot table
- Macro (referring to the pivot table) is corrupted
- Preserve formatting option is enabled
- Missing or incorrect fields in the VBA code
- Issue with workbook.RefreshAll method syntax (if using)
- Pivot Table contains empty columns
- Header values or header column is missing in the Pivot Table
- Pivot table is created without headers
- Columns/rows are deleted from the Pivot Table
Methods to Fix Pivot Table Field Name is not Valid Error in Excel
You can get this error if you have selected the complete data sheet and then trying to create the Pivot Table. Make sure you choose only the data fields that you want to insert in the Pivot Table. If this is not the case, then follow the troubleshooting methods mentioned below.
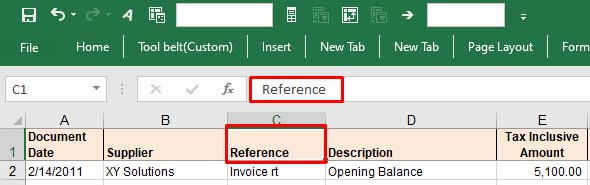
Method 1: Check the Header Value in the Pivot Table
The “Pivot table field name is not valid” error can occur if you have not set up the pivot table correctly. All the columns having data in them should have header and header values. A pivot table without a header value can create issues. You can check the header and its value from the Formula bar. Change the header if the header value is too lengthy or if it contains special characters.
Method 2: Check and Change the Data Range in the Pivot Table
The “Pivot Table field name is not valid” can occur while modifying a field in Pivot Table. It usually occurs if you’re trying to add or modify the field by selecting an incorrect data range in the Create PivotTable dialog box. The “Create PivotTable“ feature helps define how data would be displayed within the pivot table.
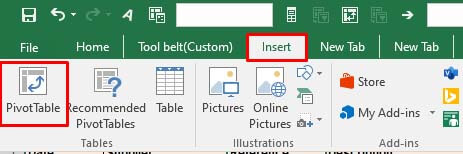
Let’s take a scenario to understand this. Open the Excel file with PivotTable. Click on the fields (you want to add), go to the Insert option, and click PivotTable.
If you select an incorrect range, i.e. A1:E18, instead of correct range - “Expenses**!$A$3:Expenses!$A$4**,” you will immediately get the error message.
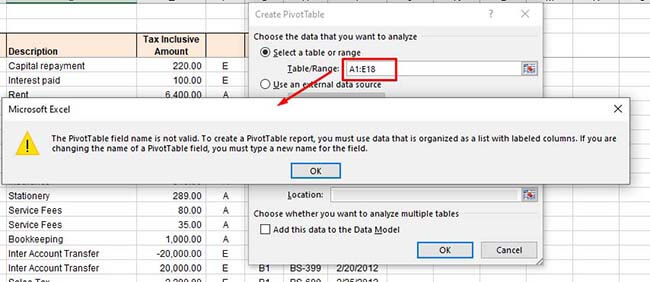
So, type the correct range under the Select a table or range option and click OK.
Method 3: Unhide Excel Columns/Rows
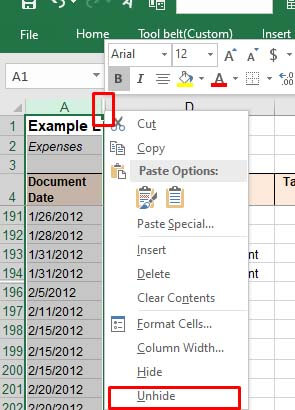
The error can also occur if some columns/rows of the Pivot Table’s data source are hidden. When you try to add a hidden column as a field in the PivotTable, the Excel application will fail to read the data of the hidden column. You can check and unhide the Excel columns by following these steps:
Open the Excel file.
Locate the hidden column number.
Move your cursor on the hidden column number and right-click on the space between the columns. Click Unhide.

Method 4: Check and Delete Empty Excel Columns
Sometimes, you can get the “Pivot Table field name is not valid” error if you are trying to use an empty column as a field in your Pivot Table. Check the columns with no values in all cells. If found, then delete the empty columns. This method is ideal for small-size Excel files. However, for large-sized files, it is a time-consuming process.
Method 5: Unmerge the Column Header (If Merged)
The “Pivot Table field name is not valid” error can also occur due to merged column headers. The pivot table references headers to identify the data inside the rows or columns. The merged headers can sometimes create data inconsistencies. You can try unmerging the column headers to fix the issue. Follow these steps:
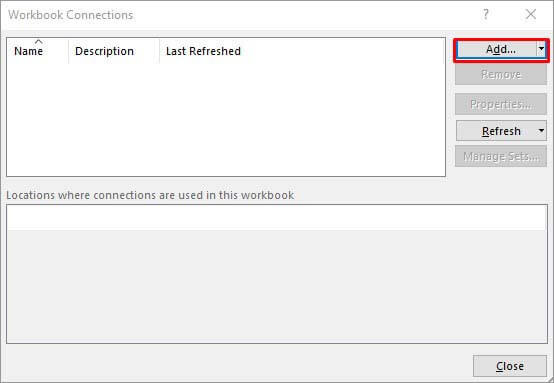
In the Excel file, go to the Home
Click the Merge & Center option and select Unmerge Cells from the dropdown.
Method 6: Disable the Background Refresh Option
If the “background refresh” option in the Excel file is enabled, it may also create issues with Pivot Table. The Excel updates all the pivot tables in the background even after a small change if the background refresh option is enabled. This may create issues if the Excel file is large with too many tables. You can try turning off the “background refresh” option in the Excel file to troubleshoot the issue. Here is how to do so:
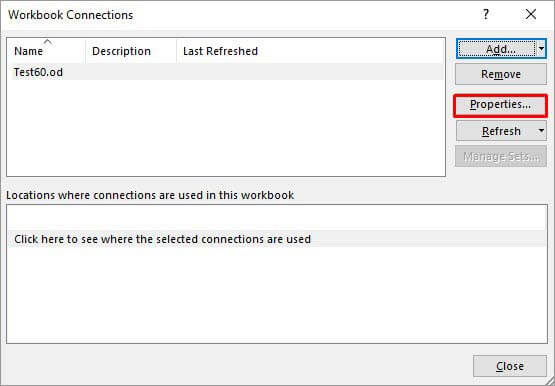
In the Excel file, go to the Data tab and then click Connections.
In the Workbook Connectionsdialog box, click on the ‘Add’ dropdown to add the workbook (in which you need to modify the refresh settings).
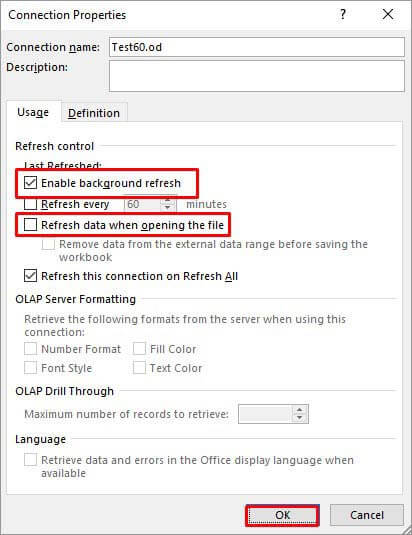
Once you have chosen the Excel file, click Properties.
In the Connection Properties window, unselect the **”Enable background refresh”**option, select the “Refresh data when opening the file“, and click **OK.
**

Method 7: Check the VBA Code
The error can also occur when working with PivotTable using VBA code in Excel. Some Excel users reported this error on forums as run-time error 1004: The PivotTable field name is not valid. This error usually occurs when there are issues in the VBA code, affecting the PivotTable data source or field references. You can check field names referring to PivotTable or Workbook.RefreshAll function syntax and other errors in the code.
Method 8: Repair your Excel File
One of the reasons behind the “Pivot Table field name is not valid” error is corruption in the Excel file, containing the Pivot Table. You can repair your Excel file using Microsoft built-in utility - Open and Repair. Here’s how to use this utility:
In Excel, navigate to File > Open.
Click Browse to choose the affected workbook.
The Open dialog box will appear. Click on the corrupted file.
Click the arrow next to the Openbutton and then select Open and Repair.
You will see a dialog box with three buttons - Repair, Extract Data, and Cancel.
Click on the Repair button to recover as much of the data as possible.
After repair, a message is displayed. Click Close.

Method 9: Use a Professional Excel Repair Tool
If the Excel file is heavily damaged or corrupted, then the “Open and Repair” utility may not work or provide the intended results. In such a case, you can opt for a professional Excel repair tool. Stellar Repair for Excel is an advanced Excel file repair tool, which is highly recommended by experts. It can repair severely corrupted Excel files and restore all the data from corrupt file, including pivot tables. This tool comes with a user-friendly interface that even a non-technical user can use. You can try the software’s demo version to check how it works. The software is fully compatible with all Excel versions, including Excel 2019.
Conclusion
The Excel error “Pivot Table field name is not valid” can occur due to hidden or merged column/row headers, empty columns/rows, corrupted pivot table, and various other reasons. You can try the methods mentioned above to fix the error. If this error has occurred due to corruption in the Excel file, then you can use Stellar Repair for Excel - an advanced tool to repair corrupted pivot table, macros, fields, or other elements in an Excel file. It is compatible with all Windows editions, including the latest Windows 11. It can help fix the error if the data source or Pivot table configuration is affected by corruption.
‘Unable to Save Excel Workbook’ Issue [Fix 2024]
Summary: You may unable to save your Excel Workbooks due to several reasons. Many users have reported this issue on the Tech Forums. This blog will discuss a few instances when users cannot save their Excel files. It lists the causes behind the issue and their possible solutions. It also mentions the Stellar Repair for Excel to fix the saving error if it is due to corruption in the Excel file.

It is easy to work with Microsoft Excel but sometimes, the application may create issues thereby hampering the smooth functioning of the workbook. One such issue is “unable to Save Excel Workbook”.
Let’s take a look at the issue of Unable to Save Excel Workbook
Instance 1:
In an organization, users connected to one of the servers (Windows 2008 R2) using Citrix – a Terminal Server configured with Windows 2008 R2 –and accessed their data through a File Server, also configured with Windows 2008R2. Since the connectivity to Shared Drive was established through a Terminal server, any conflict amongst the server configuration may create conflict in shared file.
This issue was discussed at length at one of the Tech Forums , where the users were unable to access their workbooks stored on the shared drive. The File menu did not work. As a result, the users were forced to save the workbook by creating quick access shortcuts or locally on the desktop. In many cases, the saving option was ruled out completely.
Instance 2:
A similar problem was reported, wherein the users received an error when saving an Excel workbook after inserting a chart in an existing workbook (previously saved) or copying values from an existing workbook. A system is configured with Windows 7 and Microsoft Office 10 configuration. The issue arises when the user is unable to save the changes after editing in a saved spreadsheet. The following message displays on the screen:

Figure: Unable to Save Excel WorkBook Issue
Further, if the user clicks ‘Continue’, the following error message is received:
“Excel encountered errors during save. However, Excel was able to minimally save your file to <**filename.xlsx**>”.
Note: This issue impacts build Version 1707 (Build 8326.2086) and later, and also only occurs with files that are stored locally, such as on the desktop. This problem does not occur if you manually enter values or insert a chart in a newly created workbook.
Plausible reasons for the ‘Unable to save Excel workbook’ Issue
- The issue was detected in Microsoft Office Professional Plus 2010 32-bit, Service Pack 14.0.6029.1000.
- Excel version on the user system may or may not match with Excel version on File server.
- The issue of ‘Unable to Save Excel Workbook’ impacts only the Build Version 1707 (Build 8326.2086) and later.
- In case of Issue 2, the problem surfaces when the user adds files, tables or charts in the locally saved excel files, such as on the desktop.
Methods to fix the ‘Unable to Save Excel Workbook’ Issue
There may be an issue with the Build version or the Registry Values settings may not be appropriate, which does not allow the Excel workbooks to save.
But, before starting to resolve the issue, verify the following:
- The location where the file is to be saved may not have enough space to save the Excel file: Check the available space and save again. You may also use the option of ‘Save As’ to save the file at a new location.
- Excel file may be a shared one where edits are not allowed by a specific user: There are restrictions attached to documents and other files shared over the network. Check for these restrictions.
- Antivirus may interrupt in during file saving: Antivirus in the system may not allow saving of the files. Request the system administrator to uninstall the antivirus and reinstall after saving.
- The file is not saved within 218 characters: If the file is not saved due to the naming issue, then check the character length and try again.
- Differences in Windows versions of the local system and those on network drive may cause excel not saved issues. Check that all the systems have the same configuration and are updated to the recently available versions.
- Excel spreadsheet is corrupt: If none of the above factors have not caused hindrance in saving the file, then there may be a probability of corruption in the Excel spreadsheet .
Once verified, look for a healthy and restorable backup. If backup is missing, resolve the issue of “Unable to open Excel File” with manual settings on local system or through a reliable Excel repair software.
Method 1: Modify Registry Entries
If multiple users are unable to access their workbooks stored on the shared drive and facing unable to save Excel file problem (see Instance 1 above), then follow the below steps:
- Go to ‘Registry Entry’. To do this, type ‘regedit’ in the Start Search box, and press ENTER

Figure: Edit Registry
- You are prompted for the administrator password or for a confirmation, type the password, or click Continue
- Locate the following registry subkey, and right-click it: HKEY_LOCAL_MACHINE\System\CurrentControlSet\Services\CSC

Figure: CSC Location
- Point the cursor to New, and click Key

Figure: Create new key
- Type ‘File Parameters’ in the available box

Figure: File parameters
- Right-click Parameters, point the cursor to New, and click DWORD (32-bit) Value

Figure: File parameter (DWORD – 32 bit) value
- Type ‘FormatDatabase’, and press ‘ENTER’. Right-click ‘FormatDatabase’, and click ‘Modify’

Figure: Modify format database
- In the Value data box, type ‘1’, and click ‘OK’

Figure: Value data
- Exit ‘Registry Editor’
- Restart the system and verify if the files can be saved now
Method 2: Try Google Uploads
If the user is unable to save the changes after editing in a locally saved spreadsheet (see Instance 2 above), then follow these steps:
- Upload the unsaved Excel file to Google Docs. Ensure that the file gets converted to Google Sheets format.
- Check if all the formulae are active and working.
- Make changes to the Google Sheet and verify that all the changes are working fine.
- Use the Google Sheets export feature to download the file in Excel format.
Method 3: Resolve manually with Open and Repair
If the Excel file is found to have corruption, try out the Excel Open and Repair utility:
- Open a blank Excel File. Go to File and Click Open.
- Go to Computers and click Browse.
- Access the Location and Folder and click the arrow icon beside Open followed by Open and Repair.

Figure: Illustrates Steps to use ‘Open and Repair’ method
The Open and Repair utility is not competitive enough and may not fix corruption in severely corrupted files. Hence, if you are unable to save Excel workbook after applying the manual methods, then you can search for a useful software-based repair utility.
Method 4: Excel File Repair Software
Specifically meant to resolve Excel file corruption. Stellar Repair for Excel helps you to repair every single object including charts, tables, their formatting, shared formulae and rules and more.
- Install and Open the software and select the corrupt Excel File. You can also click the Find option if the file location is not known.
- Click Scan and allow the software to scan and repair the corrupt Excel file.
- Once repaired, the software displays the fixed file components to verify its content.
- Click Save to save the file data in a blank new file as ‘Recovered_abc.xls’, where abc.xls is the name of the original file.
See the working of the software which has been declared as a tool that provides 100% integrity and precision.
The Excel repair software takes care to save the repaired data in a new file to minimize the chances of further corruption.
Conclusion
‘Unable to save Excel file’ is a generic problem that may appear due to various reasons. In this blog post, we presented some of the actual instances reported by users on community forums.
Windows updates, the Build versions, the Service Packs of the local systems and those on the network drive must be either similar or in sync with each other. Any deviation may cause issues in accessing or saving the Microsoft files, as reported in Instance 1 is caused where user is unable to save Microsoft Excel file on the Network Drive. In case, the user is unable to save the file on network drive then the problem lies with the Registry value.
Another case is when the users receive an error while saving an Excel workbook after they insert a chart in an existing workbook or copying values from an existing workbook. This issue is known to affect build Version 1707 (Build 8326.2086) and later, and only occurs with locally stored files.
When a user is unable to save a specific Excel file, then the problem can be resolved using the manual methods or the software based utility. The mode of repair depends upon the level of corruption in Excel file.
Hence, it is suggested to analyze the nature of the problem and decide an appropriate resolution method.
How to Fix Microsoft Excel Error Code 0x800A03EC?
Summary: You can encounter the error code 0x800A03EC in Excel due to different reasons. This post discusses the causes of the error and the workarounds and methods to fix it. If the “Microsoft Excel error 0x800A03EC” prevents you from accessing the Excel file data, use the Excel repair file tool mentioned in this post to restore the data with complete integrity.
The error code 0x800A03EC in MS Excel can occur while exporting or importing Excel sheets to or from another application. It can occur when trying to execute a macro. It usually appears when the Excel application fails to read the queries in the VBA code, especially when using the PasteSpecial method (Range.PasteSpecial method) to paste cell data from the clipboard into an Excel sheet. It can occur if the cell data format is not compatible with the target data.
Causes of MS Excel Error Code 0x800A03EC
The error code 0x800A03EC in Excel can occur in different scenarios. There could be several reasons associated with this error. Some of them are:
- Incompatible data formats.
- Trying to paste an extensive range of cells into a smaller range of cells.
- Add-ins are interrupting the code operation.
- Issue with the VBA code (incorrect or incomplete queries).
- Excel file is corrupted/damaged.
- Corrupted macros.
- Trying to export large-sized Excel file which is more than the Excel’s prescribed limit.
- Outdated Excel version.
- Incompatible cell formats on source and destination (when copying/pasting cell data).
- Missing cell range (forget to specify the range while using PasteSpecial method in the VBA code).
- Trying to save Excel file to incorrect directory.
- File path contains invalid characters.
Solutions to Fix MS Excel Error Code 0x800A03EC
The error 0x800A03EC can appear if your Excel file is incompatible with your Excel application version. You can run the compatibility checker to review the compatibility issues in your Excel file. If this is not the issue, then follow the below methods.
Method 1: Review VBA Code
The exception from hresult 0x800a03ec excel can occur if you are trying to execute incorrect or incomplete queries in the Excel VBA code. It can also appear if the formulas do not contain the equal (=) symbol at the beginning. Verify the VBA code for any logical flaws, typo errors, syntax errors, or missing references.
Method 2: Check the Field Size
Excel has certain limits and specifications . If the Excel file’s data exceeds these designated size limits, you can get the MS Excel error code 0x800A03EC error. For example, this error occurs if you try to export a file with more rows than the limit of 65536 and columns than the limit of 256. Check and optimize the file size by minimizing complex formulas and other objects.
Method 3: Check Add-ins for Disabled Items
Sometimes, disabled items in Add-ins settings can prevent macros from functioning correctly. You can check and enable the disabled items in Add-ins using these steps:
- Navigate to File > Options.

- In Excel Options, click on the Add-ins option.
- Click the arrow corresponding to the Manage section.
- Select Disabled Items and click on the Go option.

- You will see a list of disabled items.
- Click on the disabled items and then click Enable.
- Restart Excel for the applied changes to take effect.
Method 4: Change Macro Settings
The error code 0x800A03EC can also occur if macros are disabled in the Macro Security settings. Follow these steps to change the macro settings in Excel:
- In MS Excel, go to File > Options > Trust Center.

- Under Trust Center, click on Macro Settings.

- Select Enable all macros and click OK.
Method 5: Check the OLE Objects
The Microsoft Excel error code 0x800A03EC can also appear if there is a connection disruption in the VBA. Such an issue can occur if there is an issue with Object Linking and Embedding (OLE) in an Excel workbook. The OLE objects are linked to external files. You can check and remove the unnecessary OLE objects from your Excel file to fix the issue.
Method 6: Check Methods in VBA
Excel can throw the “Exception from HRESULT: 0x800A03EC” error if you are trying to call an invalid method in a VBA code. Many users have reported this issue when trying to use ‘copy and paste’ feature using copy paste special method (range.pastespecial) in Excel. Paste special is an advanced option in Excel to smooth the copy-and-paste task. While using this method, the exception can usually occur when Excel application detects an invalid or misaligned range or mismatch data type in the syntax. To fix this, check the syntax of the paste special method.
Method 7: Repair your Excel File
Corruption in Excel file can create inconsistencies in the macro and lead to the “Exception from HRESULT 0x800a03ec Excel” error. In such a case, you can try repairing the Excel file using Microsoft’s inbuilt utility – Open and Repair. To use this utility, follow these steps:
- In the Excel application, go to the File tab and then click Open.
- Click Browse to select the Excel file in which you are getting this exception error.
- The Open dialog box will appear. Click on the corrupted file.
- Click the arrow next to the Open button and then select Open and Repair.
- You will see a dialog box with three buttons – Repair, Extract Data, and Cancel.

- Click on the Repair button to recover as much of the data as possible.
- After repair, a message is displayed. Click Close.
The Open and Repair tool works in significant scenarios. If Open and Repair tool fails to resolve the issue, try an Excel repair tool recommended by experts and MVPs to repair the corrupted Excel file. Stellar Repair for Excel is one of the recommended Excel repair tools for fixing issues caused by corrupt Excel files. It provides more features than the Open and Repair utility. It can even repair severely corrupted Excel files. The tool supports all the versions of Microsoft Excel, including 2019. Download the software’s demo version to scan the corrupted file and see the preview of all the recoverable components of the file.
Conclusion
There are numerous reasons, like invalid method, incorrect range, data type mismatch, etc., that could lead to the common exception error 0X800A03EC in Excel. Try the troubleshooting methods mentioned above to fix the issue. You can also encounter the error due to corruption in the Excel file. In such a case, you can try the professional software – Stellar Repair for Excel – to repair the severely corrupted Excel file. The Excel repair software can fix all the corruption-related issues in Excel files (XLS/XLSX).
[Fixed] The Workbook Cannot Be Opened or Repaired By Microsoft Excel
An MS Excel workbook (.XLS/.XLSX) file may not open due to damage or corruption caused by various reasons, such as:
- Sudden power failure
- System crash
- Virus or malware intrusion
- Large or oversized Excel file
- Incompatible add-ins
- Drive errors
- Damaged MS Office/Excel program files
As a result, when you try to open or access a corrupt Excel document, the program displays errors, such as “The workbook cannot be opened or repaired by Microsoft Excel because it is corrupt.” This may lead to a data loss situation.

Methods to Fix ‘The Workbook Cannot Be Opened’ Error
When an Excel workbook gets corrupt, MS Excel automatically detects and starts the file recovery mode to open and repair the file. However, when it fails to repair the corruption or recover the Excel file automatically, it displays the error message, “The workbook cannot be opened or repaired by Microsoft Excel because it is corrupt.” In such a situation, you can follow these methods to repair and recover the Excel document manually.
If the manual methods fail to resolve the error, you can use an Excel repair software, such as Stellar Repair for Excel. The software repairs corrupt XLS/XLSX file, recovers all the data, and saves it in a new Excel document with 100% precision, while keeping the cell formatting and properties intact.
NOTE: Before performing the below methods to repair or recover Excel documents, create a backup copy of the original file. This will help you recover data by using an Excel repair tool and avoid permanent data loss.
1. Repair Excel Workbook Manually
If the automatic repair fails, you may try manual repair to fix the damage or extract the data from the damaged Excel workbook. The steps are as follows:
- Navigate to File > Open and then go to the location where the spreadsheet is located.
- In the Open window, select the corrupted workbook that you want to fix and then click on the arrow next to the Open button.
- From the available options, choose Open and Repair…

- Then click ‘Repair‘ if you want to recover maximum data from the workbook or click ‘Extract data‘ if the repair option fails to fix the issue. It will extract all the values, formulas, tables, etc., from the corrupt workbook.

If both options fail to fix the issue, head to the next method.
2. Remove Faulty or Incompatible Add-ins
Faulty or incompatible add-ins may also cause this error. To find and remove such add-ins, follow these steps:
- Press **Windows key + R.
**
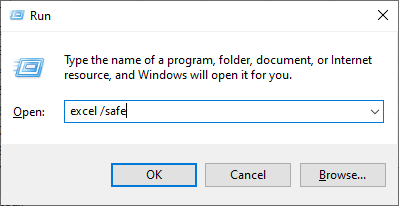
- Type Excel /safe and press ‘Enter‘ or click ‘OK.’ This opens MS Excel in Safe Mode.
- Go to File > Options and then select ‘Add-ins.‘
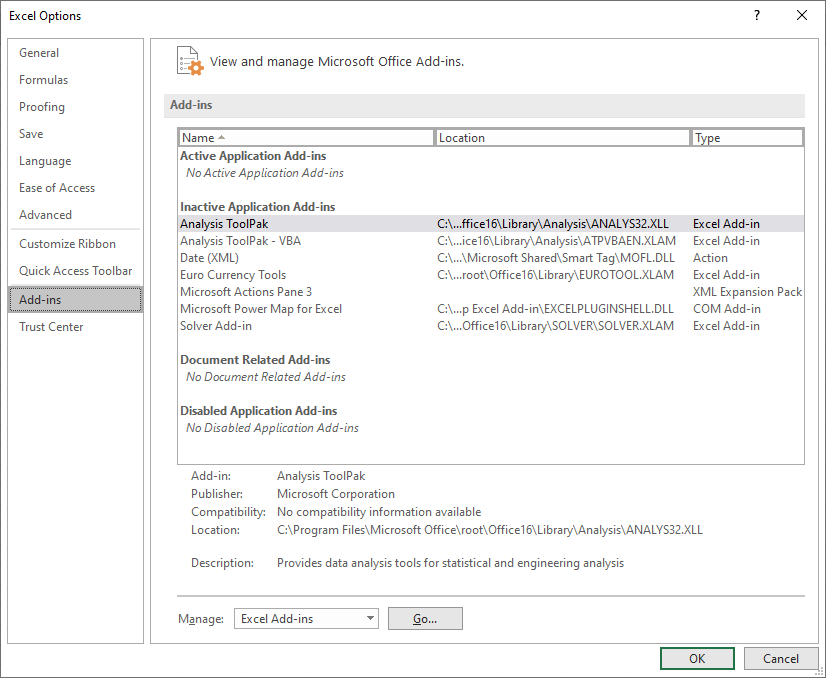
- Choose ‘Excel Add-ins‘ from Manage: option and then click on the Go button to view all Add-ins.
- Uncheck the checkboxes of Add-ins and then click ‘OK‘ to disable them.
Now close the Excel program and run it normally. Click ‘File > Open‘ and choose the Excel file you want to access.
3. Repair MS Office Installation
Damaged Excel program files may also lead to such errors. However, you can easily repair MS Office installation to fix the problem. The steps are as follows:
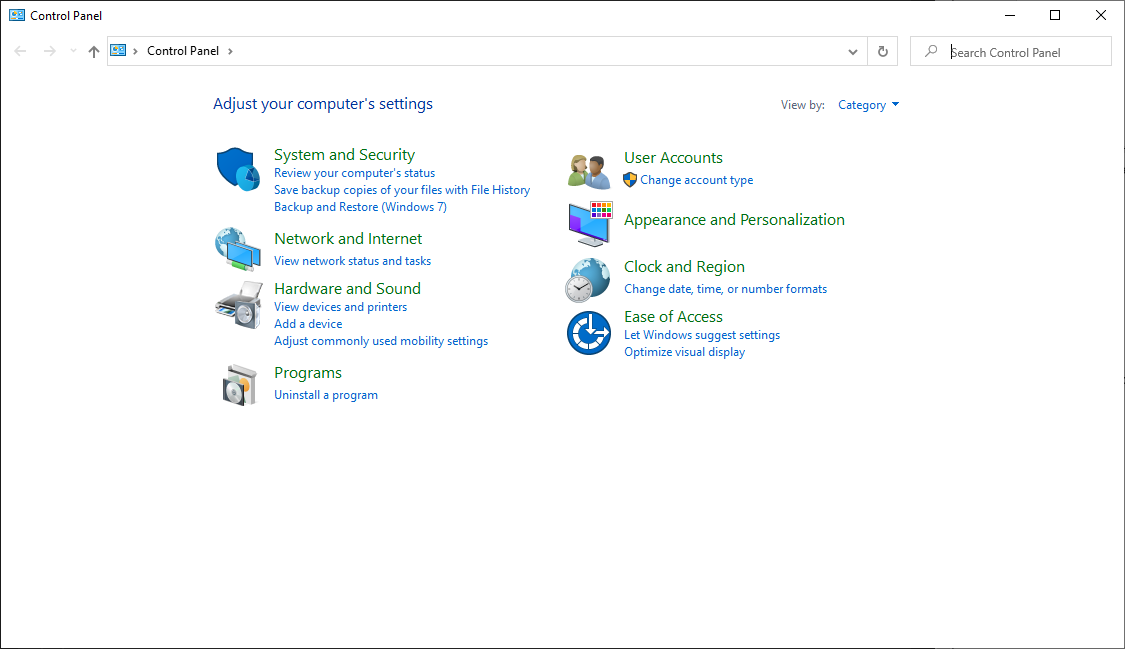
- Open Control Panel and select ‘Uninstall a program.‘
- Search and choose MS Office from the programs list. Then click on the ‘Change’ button.
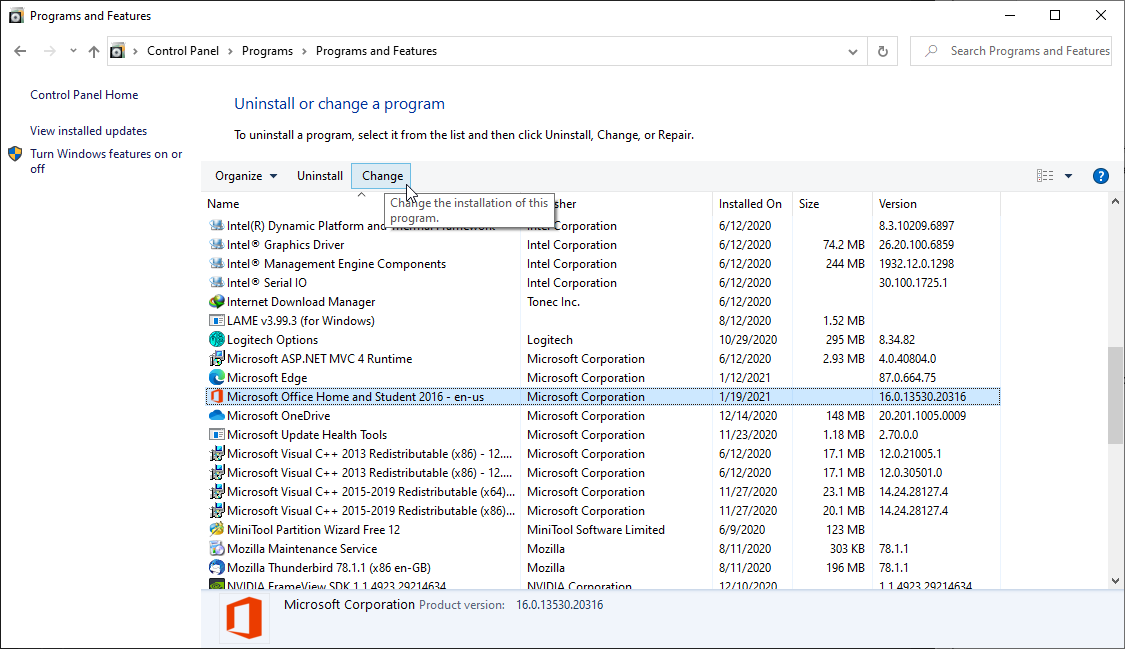
- Select ‘Repair’ and follow the wizard to fix the damaged program files.

If this fails to address the issue, you can uninstall and then fresh install MS Office on your system. Alternatively, try accessing the file on another PC.
4. Use Excel Repair Software
The best option is to use an Excel repair software, such as Stellar Repair for Excel , to repair the file, resolve the error, and access the Excel (XLS/XLSX) worksheet. The software can repair an Excel file without any size limitation.
After recovering the Excel file using the software, you can open it in any MS Excel program without encountering the error message.
Conclusion
A corrupt or damaged Excel workbook may lead to errors, such as “The workbook cannot be opened or repaired by Microsoft Excel because it is corrupt,” and cause a data loss situation. The most efficient way to fix such corrupt Excel files is to repair them by using an Excel repair tool, such as Stellar Repair for Excel.
Unlike manual methods that may fail to resolve the issue or lead to further damage, this software extracts the data from the damaged Excel file and saves it in a new Excel workbook. Thus, it is 100% safe to run on an original Excel file, as it does not overwrite or alter the original file.
The software is free to download. You can scan, repair, and preview a corrupt Excel file by using the demo version. Once you are satisfied with the results, activate the software to save the repaired Excel workbook data in a new sheet.
How to Repair Multiple Excel Files by Using Stellar
With Stellar Repair for Excel, it is quite easy and simple to repair multiple MS Excel (XLS and XLSX) files that are damaged. This is because the software has a self-explanatory interface and hence is a Do-it-yourself software. Nonetheless, when using this software to repair multiple Excel files, you would have to add all of the files into the software by following a few pre-defined steps. Follow the steps mentioned below:
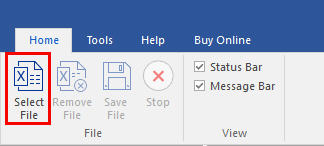
- Launch Stellar Repair for Excel software.
- Under Home menu, click Select file
- Click Browse and select corrupt Excel files. Select the checkbox to repair multiple files.
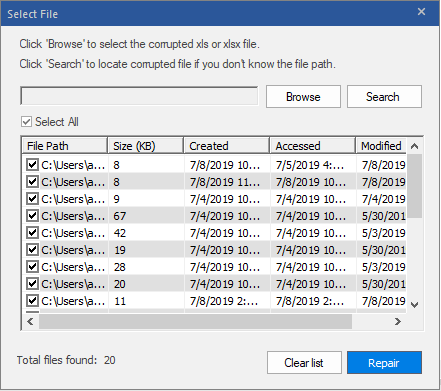
- Click Repair
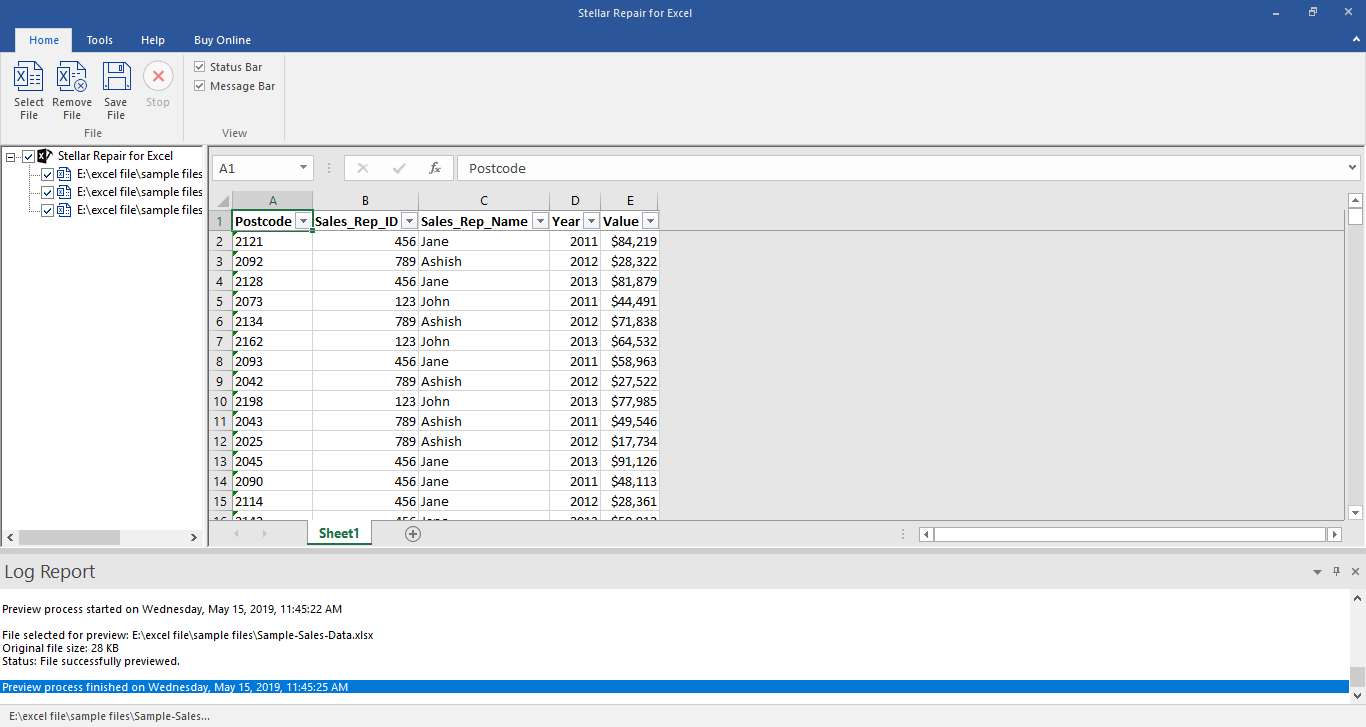
- The software provides the preview facility. You can check the it on left pane.
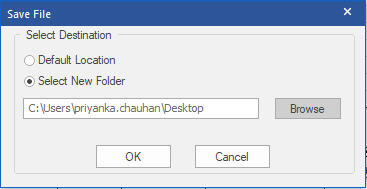
- Save the repired filr ether Default location or Select New Folder radio button.
Stellar Repair for Excel Stellar Repair for Excel is the best choice for repairing corrupt or damaged Excel (.XLS/.XLSX) files. This Excel recovery software restores everything from corrupt file to a new blank Excel file.
Fix Cannot Paste the Data Error in Microsoft Excel
When copying and pasting the cell contents or attributes from one workbook to another, you can encounter the “Cannot paste the data” error. The error indicates that the values you are trying to paste do not match the cell format (Currency, Date, Text, etc.) used in the column. The error can occur if you are attempting to paste information into a merged cell. You can also get this error if the data you are trying to paste contains more columns than the destination worksheet can accept or if the copy area and paste area aren’t the same size.
Why you cannot Paste the Data in Microsoft Excel?
You can experience the “Excel cannot paste the data” error due to one of the following reasons:
- Locked cells
- Data size limitation
- Formatting issues
- The file size is too large
- Overloaded clipboard
- Data type mismatch
- Invalid range
- Lack of permissions
- Excel file is corrupted
- Compatibility issues
- While pasting the merged cells
Methods to Fix MS Excel Cannot Paste the Data Error
The “Microsoft Excel cannot paste the data” error usually appears when copying and pasting data within the spreadsheet. It primarily affects the copy-and-paste feature within the Excel file. However, the impact of this error may vary with the data you are working with. When this error occurs, first try restarting the Excel application. Ensure that you’ve saved all your important data before restarting the application to prevent data loss. If, after performing this basic step, you still face the issue, then try the following troubleshooting methods.
Method 1: Check and Unlock Cells in Excel
You can get the Excel cannot paste the data error if the cells you are trying to paste in the Excel file are locked. You can check and unlock the specific cells in the Excel file using the below steps:
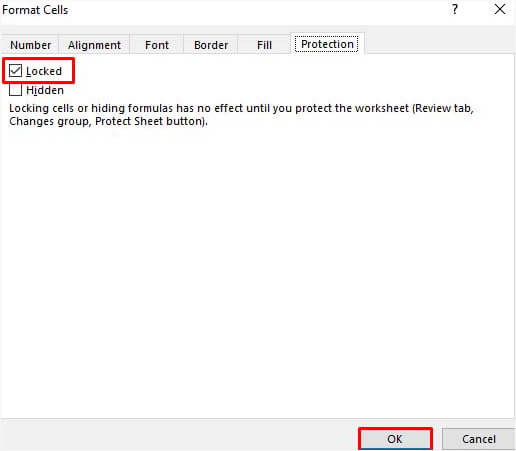
- Go to the Home tab in your Excel file and click Format Cell Font popup launcher.

- In the Format Cells dialog box, click Protection.
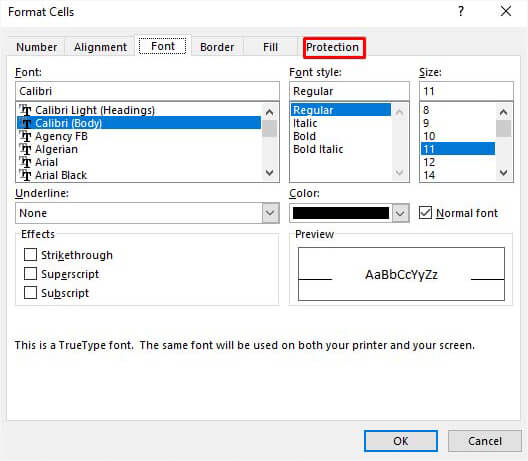
- Under the Protection option, unselect the locked field and then click OK.
Method 2: Check and Fix the Cell Format
Sometimes, you can get the “Cannot paste the data” error in Excel if there is an issue with the formatting of the cells in the column (in which you are trying to paste the data). You can check whether the cell formats of the columns of the source file (from where you are copying data) match the destination file (in which you are pasting the cell data). If not, then change the cell format. Here’s how to do so:
- In the Excel file, click on the affected column heading (whose cells you need to modify).
- Navigate to the Home tab and click the General dropdown menu.

- Click on the desired cell format that matches the values you are trying to paste into the column.
Method 3: Check Copy and Paste Area Size
The “data cannot be pasted” issue can also occur if Excel detects the copy area of the range of cells is not of the same size and shape as that of the paste area. So, make sure the size of the range of cells for the paste area is same as the copied area. To ensure this, you can try the following:
- Use Upper-left Cell
You can select the upper-left cell instead of the complete range to paste.
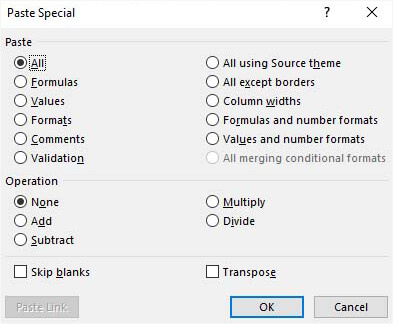
Use Paste Special Option
You can use the Paste Special option to paste the data. To use this option, go to Home > Paste Special.
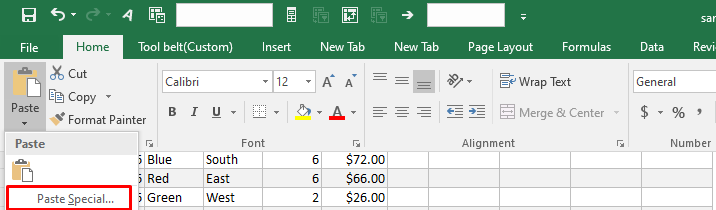
- You can choose from the different options, such as paste all, formulas, operations, Transpose, skip blanks, etc. to take control over how the data is pasted.
Method 4: Check and Unmerge Cells
The merged cells in the workbook can create discrepancies when copying and pasting data. These can create mismatch between the source and destination cell areas, resulting in errors. Make sure you are not pasting the data copied from merged cells. You can check and unmerge the cells using the below steps:
- Open the Excel file (in which you are copying data) and go to the Home tab.
- Click Merge & Center > Unmerge Cells.

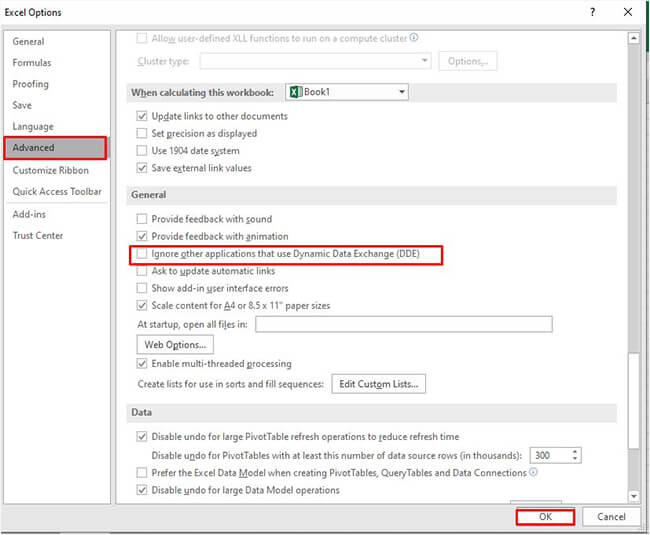
Method 5: Unselect the Excel DDE (Dynamic Data Exchange) Option
Sometimes, you can get the Excel cannot paste the data error while copying and pasting data from Excel file to external data sources or applications. It usually appears if you have established DDE links between them. To resolve this, you can uncheck the “Ignore other applications that use Dynamic Data Exchange (DDE)” option. Follow the below steps to do so:
- Open your Excel file.
- Go to File > Options.
In Excel Options, click Advanced and unselect “Ignore other applications that use Dynamic Data Exchange (DDE). Click OK.
Here are some additional solutions you can try to fix the “Cannot paste the data” error in Excel
Check the Excel File Format
Sometimes, the copy and paste error can occur if you try to move data from an older version of Excel file (XLS) into a newer version file (XLSX) or vice versa. You can try to change or convert the file format to resolve the issue.
Clear Clipboard
Too many items on the clipboard can prevent you from copying and pasting the data. You can empty your clipboard by deleting all clips. To do this, go to Home and click the Clipboard option.
Change the Column’s Cell Format
You can get the “Cannot paste the data” error when the information you need to paste does not match the cell format in the column. In such a case, you can change the column’s cell format. To do this, navigate to the Home option and then click on the General menu arrow. Then, change the cell format suitable to the type of information you are trying to paste in that column.
Add Columns
The copy-and-paste error in Excel can also occur if there are not enough columns to accept the data that you are trying to paste. You can insert more columns and then try copying and pasting data. To insert additional columns, click on the column heading, click Home, and then select Insert.
Remove Incompatible Add-ins
Sometimes, incompatible or faulty add-ins can also create conflicts with Excel’s clipboard operations, leading to the error. To check if add-ins are causing the issue, open the Excel file in safe mode. In safe mode, if you are able to paste the data, then check and uninstall the incompatible Excel Add-ins.
What to do if Nothing Works?
If the above methods do not work, then corruption in the Excel file could be the cause of the “Cannot paste the data” error. In such a case, you can use Excel’s built-in Open and Repair utility to repair the corrupted file. Here’s how to use this utility to repair the Excel file:
- Open your Excel application.
- Navigate to File and then click Open.
- Click the Browse option to select the affected Excel file.
- The Open dialog box opens up. Click on the corrupted file.
- From the Open dropdown, select the Open and Repair option.
- The Excel will prompt you to choose one of the below options:
- Repair
- Extract
- Cancel
- Select the Repair option to extract maximum data from the file. If the Repair option fails, choose the Extract option to recover the data, excluding formulas and values.
The Open and Repair utility may not be able to repair your Excel file if it is severely corrupted. In such a situation, the best possible way out is to use a professional Excel repair software to repair the file. You can try Stellar Repair for Excel. It can repair highly damaged or corrupted Excel (.xls, .xlsx, .xltm, .xltx, or .xlsm) file and recover all the objects from the file by maintaining the original formatting. The tool supports 2007 and higher editions of MS Excel. You can download the demo version of the software to preview the repaired objects and verify its functionality.
Conclusion
The “Excel cannot paste the data” error in Excel can occur due to different factors. You can check and clear the clipboard, unmerge the cells, unlock the cells, and use various other methods mentioned above to troubleshoot the error. If you fail to copy and paste the data due to file corruption, then opt for an advanced Excel repair software, like Stellar Repair for Excel. It is a reliable tool that can help you repair highly damaged/corrupted Excel files. It enables you to recover all the objects from the corrupted Excel file, with complete integrity.
How to Fix “File Not Loaded Completely” Error in Excel?
Summary: You may get the “File not loaded completely” error when opening a large-sized Excel file. Read this post to understand the causes behind this issue and the troubleshooting solutions to fix this Excel error. Also, you’ll get to know about an Excel repair tool that can help fix the issue if the cause is corruption in the Excel file.
Several users have reported experiencing the “File not loaded completely” error while opening Excel spreadsheets or when importing CSV file into Excel. This error can occur if the worksheet has crossed the maximum rows and columns limit , i.e., 1048576 rows by 16,386 columns. However, this issue can also occur due to various other reasons. Let’s take a look at the possible causes behind this error.
Why this Error Occurs?
The “File not loaded completely” issue can occur due to one of the following reasons:
- The Excel file you are trying to open is corrupted.
- The Excel file is too large.
- The Excel file has crossed the rows limit.
- Memory issue in your system.
Methods to Resolve the “File not Loaded Completely” Error
Following are some methods you can try to fix the Excel file not loaded completely issue.
Method 1: Try to Import the Spreadsheet into MS Access
A large-sized Excel file takes time and memory to load. When you try opening a large file, you may get the “file not loaded completely” error. It indicates your file contains unwanted rows and columns. In such a case, you can try importing your spreadsheet into Access. By doing this, you can easily access the rows and columns in the database table, and then remove the extra rows. Follow the steps below to import your spreadsheet into Access:
- Open a blank database in Access application.
- Navigate to the External Data tab and then click on the Excel button.

- In the Get Data-Excel Spreadsheet window, click Browse.

- In the File Open dialog box, select the Excel file (in which you are getting the error) and click Open.

- Select Import the source data into a new table in the current database and click OK.

- In the Import Spreadsheet Wizard window, you’ll see all the rows and columns of your Excel file. Click Next.

- In the dialog box that appears, you can modify the field information (extra columns or rows).

Once you performed the changes, click on the Next button.
Provide a name to the table.

- Next, select the option “I would like a wizard to analyze my table after importing the data” (if you want to analyze the data) and click Finish.
- You will get a dialog box with a message. Click Yes.
- The Table Analyzer wizard will appear on the screen.


- Click on the Next button.

- Follow the instructions of the Table Analyzer wizard.
- Once you complete all the steps, select “Save import step” and click Close.

Method 2: Split Your Large Excel File
You may face the Excel file not loaded completely issue when importing a large Excel file. In such a case, you can try splitting your large file into smaller ones. To split the file, you can use VBA codes or the move or copy feature.
Method 3: Stop Unwanted Processes Running in the Background
Sometimes, you get the “File not loaded completely” error if you are running multiple files or programs simultaneously. You can check and stop unnecessary background processes in Windows using your system’s Task Manager. Here are the steps:
- Press the Ctrl+Shift+Esc keys to open the Task Manager window.

- Navigate to the Processes tab and check the Memory section.
- You can see the memory consumption of all the applications in your system.
- Select the unwanted applications and click on End Task.

Now, try to open the Excel file.
Method 4: Repair your Excel File
Sometimes, Excel throws the “File not loaded completely” error if it fails to read the data in your file. This might happen if your Excel file is corrupt. You can use the Open and Repair utility in Excel to repair your Excel file. Follow the below steps:
- In Excel, click the File tab and then click Open.
- Click Browse to select the desired file.
- In the Open dialog box, click on the corrupted file.
- Click on the arrow next to the Open button and then select Open and Repair.

- Click on the Repair button.

- After repair, you will see a message as shown in the below figure.

- Click Close.
An Alternative Solution
If your file gets corrupted, then repairing it using the “Open and Repair” utility is a good option. However, the Open and Repair utility may not work if the file is severely damaged or corrupted. In such a case, you can use a professional Excel repair tool, such as Stellar Repair for Excel. This tool is primarily designed to repair inaccessible or corrupted Excel files. It can effectively work even if your file is too large or severely damaged. It can recover all the data from the corrupted Excel file without impacting its actual format. The software supports Excel files of almost all Excel versions.
Conclusion
The File not loaded completely issue in Excel may occur due to numerous reasons. Try the troubleshooting methods listed above to resolve the issue. If the Excel file is corrupt, then you can try repairing your file using the Open and Repair tool. However, it can fix only minor corruption issues. If your file is severely corrupted, then use Stellar Repair for Excel . The software offers you the safest way to repair your Excel file without making any changes in the formatting. You can download the free trial version of the software today to scan and preview the Excel file.
Also read:
- 4 Ways to Transfer Music from Vivo S17t to iPhone | Dr.fone
- How to retrieve erased videos from Redmi 12 5G
- How to retrieve erased music from Lava Blaze 2
- How To Restore Missing Music Files from Samsung Galaxy S24+
- How to Repair a Damaged video file of Honor 90?
- How to recover deleted photos after deleting from Recently Deleted on iPhone XS | Stellar
- How to Fix iPhone 15 Pro Stuck at attempting data recovery Loop | Stellar
- How to fix videos not playing with my Honor X7b?
- How To Install the Latest iOS Beta Version on iPhone 8 Plus? | Dr.fone
- 5 Easy Ways to Copy Contacts from Vivo T2 Pro 5G to iPhone 14 and 15 | Dr.fone
- How to Repair corrupt MP4 and AVI files of Xiaomi Redmi 12 with Video Repair Utility on Mac?
- How to Restore Deleted Motorola G24 Power Photos An Easy Method Explained.
- How to retrieve erased call logs from V29 Pro?
- How to retrieve erased messages from Narzo 60 5G
- How To Restore Missing Pictures Files from Nokia 105 Classic.
- How To Reset Your iPhone 11? | Dr.fone
- How to retrieve erased call logs from A60s?
- How To Repair iPhone 14 System Issues? | Dr.fone
- How to Recover Deleted Data from iPhone 6s Plus using Stellar Data Recovery for iPhone? | Stellar
- How to Reset iPhone 8 Plus without Losing Data? | Stellar
- How to recover old videos from your Oppo Find X7 Ultra
- How to retrieve lost files from Poco X6 Pro?
- How to Recover Deleted Photos from Android Gallery App on Nokia G42 5G
- How to Rescue Lost Music from Realme C67 5G
- How to Restore Deleted Motorola Moto G14 Contacts An Easy Method Explained.
- Fixed Cannot Insert Object Error in Excel 2003 | Step-by-Step Guide | Stellar
- In 2024, Does Life360 Notify When You Log Out On Motorola Edge 40? | Dr.fone
- In 2024, What Is a SIM Network Unlock PIN? Get Your Lava Yuva 3 Pro Phone Network-Ready
- AddROM Bypass An Android Tool to Unlock FRP Lock Screen For your Honor 70 Lite 5G
- In 2024, How to Change Netflix Location to Get More Country Version On Itel S23 | Dr.fone
- Unlock android phone if you forget the Samsung Galaxy M34 password or pattern lock
- Is GSM Flasher ADB Legit? Full Review To Bypass Your Itel P40 Phone FRP Lock
- Updated What Is the Best FPS for YouTube Videos?
- Top 4 Ways to Trace Poco M6 Pro 4G Location | Dr.fone
- In 2024, Easy Steps on How To Create a New Apple ID Account On iPhone SE | Dr.fone
- In 2024, Getting the Pokemon Go GPS Signal Not Found 11 Error in Sony Xperia 5 V | Dr.fone
- Easy Tutorial for Activating iCloud on Apple iPhone 12 Pro Max Safe and Legal
- Proven Ways to Fix There Was A Problem Parsing the Package on Oppo F23 5G | Dr.fone
- Does Airplane Mode Turn off GPS Location On Vivo X100 Pro? | Dr.fone
- How to Unlock Samsung Galaxy S24 Ultra Pattern Lock if Forgotten? 6 Ways
- In 2024, How to use iSpoofer on Tecno Camon 30 Pro 5G? | Dr.fone
- In 2024, Complete Guide For iPhone 13 Lock Screen
- Strategies for Apps That Wont Download From Play Store On Xiaomi 13 Ultra | Dr.fone
- How To Open Your iPhone 12 mini Without a Home Button
- How To Unlock A Found Apple iPhone SE? | Dr.fone
- Looking For A Location Changer On Vivo Y36? Look No Further | Dr.fone
- In 2024, Ultimate Guide from Infinix GT 10 Pro FRP Bypass
- Calls on Xiaomi Redmi 13C 5G Go Straight to Voicemail? 12 Fixes | Dr.fone
- The Power of Music in Videos (+Filmora Editing Tricks) for 2024
- How To Unlock Any Vivo Y56 5G Phone Password Using Emergency Call
- Title: How to fix Pivot Table Field Name is not Valid error in Excel 2003? | Stellar
- Author: Nova
- Created at : 2024-05-19 18:32:11
- Updated at : 2024-05-20 18:32:11
- Link: https://blog-min.techidaily.com/how-to-fix-pivot-table-field-name-is-not-valid-error-in-excel-2003-stellar-by-stellar-guide/
- License: This work is licensed under CC BY-NC-SA 4.0.
