
:max_bytes(150000):strip_icc():format(webp)/camera-56e0976d3df78c5ba0566b37.jpg)
How to fix Pivot Table Field Name is not Valid error in Excel 2016? | Stellar
How to fix Pivot Table Field Name is not Valid error in Excel?
The Pivot Table field name is not valid error can occur while creating, modifying, or refreshing data fields in the pivot table. It can also appear when using VBA code to modify the pivot table. It usually occurs when there is an issue with the field name in a code or if there is a hidden or empty column in the pivot table. However, there could be many other reasons behind this error.
Why the “Pivot Table Field Name is not Valid” Error Occurs?
You can get the “Pivot Table field name not valid” error in Excel due to several reasons. Some possible causes are:
- Excel file is corrupted
- Damaged fields in the pivot table
- Pivot table is corrupted/damaged
- Hidden columns in the pivot table
- Macro (referring to the pivot table) is corrupted
- Preserve formatting option is enabled
- Missing or incorrect fields in the VBA code
- Issue with workbook.RefreshAll method syntax (if using)
- Pivot Table contains empty columns
- Header values or header column is missing in the Pivot Table
- Pivot table is created without headers
- Columns/rows are deleted from the Pivot Table
Methods to Fix Pivot Table Field Name is not Valid Error in Excel
You can get this error if you have selected the complete data sheet and then trying to create the Pivot Table. Make sure you choose only the data fields that you want to insert in the Pivot Table. If this is not the case, then follow the troubleshooting methods mentioned below.
Method 1: Check the Header Value in the Pivot Table
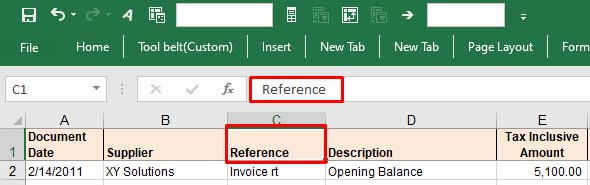
The “Pivot table field name is not valid” error can occur if you have not set up the pivot table correctly. All the columns having data in them should have header and header values. A pivot table without a header value can create issues. You can check the header and its value from the Formula bar. Change the header if the header value is too lengthy or if it contains special characters.
Method 2: Check and Change the Data Range in the Pivot Table
The “Pivot Table field name is not valid” can occur while modifying a field in Pivot Table. It usually occurs if you’re trying to add or modify the field by selecting an incorrect data range in the Create PivotTable dialog box. The “Create PivotTable“ feature helps define how data would be displayed within the pivot table.
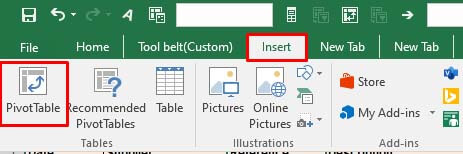
Let’s take a scenario to understand this. Open the Excel file with PivotTable. Click on the fields (you want to add), go to the Insert option, and click PivotTable.
If you select an incorrect range, i.e. A1:E18, instead of correct range - “Expenses**!$A$3:Expenses!$A$4**,” you will immediately get the error message.
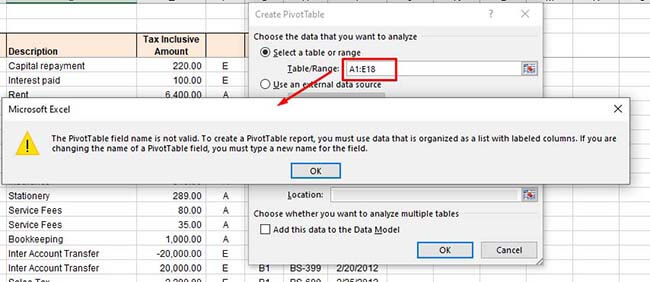
So, type the correct range under the Select a table or range option and click OK.
Method 3: Unhide Excel Columns/Rows
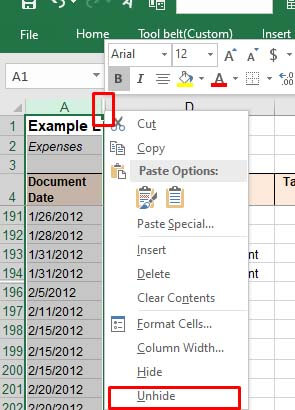
The error can also occur if some columns/rows of the Pivot Table’s data source are hidden. When you try to add a hidden column as a field in the PivotTable, the Excel application will fail to read the data of the hidden column. You can check and unhide the Excel columns by following these steps:
Open the Excel file.
Locate the hidden column number.
Move your cursor on the hidden column number and right-click on the space between the columns. Click Unhide.

Method 4: Check and Delete Empty Excel Columns
Sometimes, you can get the “Pivot Table field name is not valid” error if you are trying to use an empty column as a field in your Pivot Table. Check the columns with no values in all cells. If found, then delete the empty columns. This method is ideal for small-size Excel files. However, for large-sized files, it is a time-consuming process.
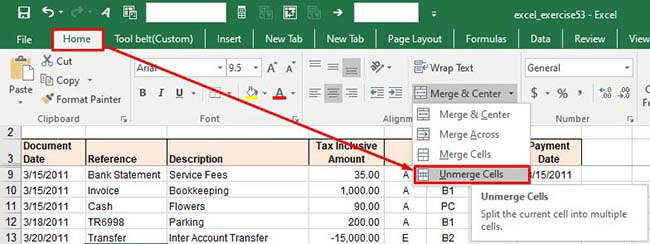
Method 5: Unmerge the Column Header (If Merged)
The “Pivot Table field name is not valid” error can also occur due to merged column headers. The pivot table references headers to identify the data inside the rows or columns. The merged headers can sometimes create data inconsistencies. You can try unmerging the column headers to fix the issue. Follow these steps:
In the Excel file, go to the Home
Click the Merge & Center option and select Unmerge Cells from the dropdown.
Method 6: Disable the Background Refresh Option
If the “background refresh” option in the Excel file is enabled, it may also create issues with Pivot Table. The Excel updates all the pivot tables in the background even after a small change if the background refresh option is enabled. This may create issues if the Excel file is large with too many tables. You can try turning off the “background refresh” option in the Excel file to troubleshoot the issue. Here is how to do so:
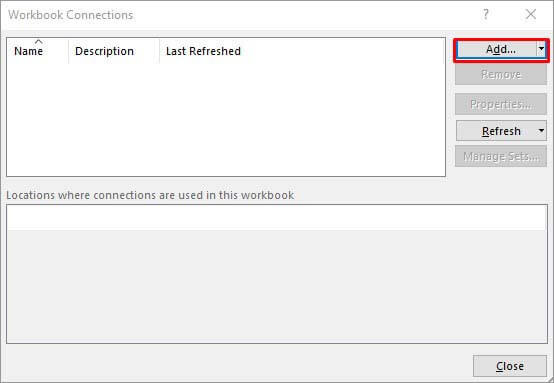
In the Excel file, go to the Data tab and then click Connections.
In the Workbook Connectionsdialog box, click on the ‘Add’ dropdown to add the workbook (in which you need to modify the refresh settings).
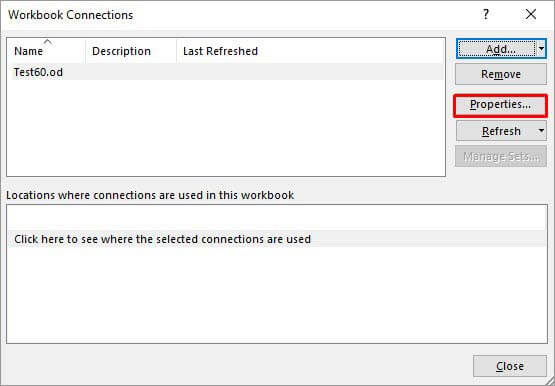
Once you have chosen the Excel file, click Properties.
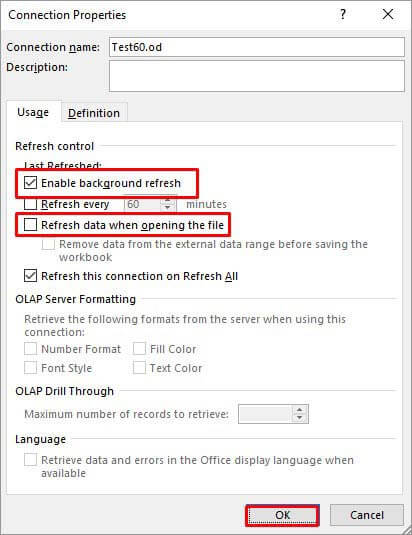
In the Connection Properties window, unselect the **”Enable background refresh”**option, select the “Refresh data when opening the file“, and click **OK.
**

Method 7: Check the VBA Code
The error can also occur when working with PivotTable using VBA code in Excel. Some Excel users reported this error on forums as run-time error 1004: The PivotTable field name is not valid. This error usually occurs when there are issues in the VBA code, affecting the PivotTable data source or field references. You can check field names referring to PivotTable or Workbook.RefreshAll function syntax and other errors in the code.
Method 8: Repair your Excel File
One of the reasons behind the “Pivot Table field name is not valid” error is corruption in the Excel file, containing the Pivot Table. You can repair your Excel file using Microsoft built-in utility - Open and Repair. Here’s how to use this utility:
In Excel, navigate to File > Open.
Click Browse to choose the affected workbook.
The Open dialog box will appear. Click on the corrupted file.
Click the arrow next to the Openbutton and then select Open and Repair.
You will see a dialog box with three buttons - Repair, Extract Data, and Cancel.
Click on the Repair button to recover as much of the data as possible.
After repair, a message is displayed. Click Close.

Method 9: Use a Professional Excel Repair Tool
If the Excel file is heavily damaged or corrupted, then the “Open and Repair” utility may not work or provide the intended results. In such a case, you can opt for a professional Excel repair tool. Stellar Repair for Excel is an advanced Excel file repair tool, which is highly recommended by experts. It can repair severely corrupted Excel files and restore all the data from corrupt file, including pivot tables. This tool comes with a user-friendly interface that even a non-technical user can use. You can try the software’s demo version to check how it works. The software is fully compatible with all Excel versions, including Excel 2019.
Conclusion
The Excel error “Pivot Table field name is not valid” can occur due to hidden or merged column/row headers, empty columns/rows, corrupted pivot table, and various other reasons. You can try the methods mentioned above to fix the error. If this error has occurred due to corruption in the Excel file, then you can use Stellar Repair for Excel - an advanced tool to repair corrupted pivot table, macros, fields, or other elements in an Excel file. It is compatible with all Windows editions, including the latest Windows 11. It can help fix the error if the data source or Pivot table configuration is affected by corruption.
How Do I Restore Excel File ?
Excel (XLS/XLSX) file corruption is a common issue that may arise due to problems, such as abrupt system shutdown, system crash, malware or virus intrusion, unsupported add-in, etc. However, MS Excel comes with a recovery feature that allows users to recover or restore Excel files lost or corrupted when the MS Excel quits unexpectedly or computer crashes due to hardware or software-related issues.
But sometimes, the restored version of the Excel file may not contain all the data or changes you made recently. In such cases, you are left with the option to repair the damaged or corrupt Excel file with the help of an Excel repair software, such as Stellar Repair for Excel .

Solutions to Restore Excel File
Below we have discussed various solutions to repair, recover, and restore unsaved, lost, corrupt, or inaccessible Excel files with the help of MS Excel options and Excel repair software.
NOTE: Some of these methods work only if you had enabled or configured certain required settings or options before corruption or losing the Excel file.
1. Restore Lost or Unsaved Excel File via ‘Recover Unsaved Workbooks’ Option
The Recover Unsaved Workbooks option allows you to restore the Excel file that you forgot to save before closing MS Excel or it stopped working. The steps are as follows:
- Navigate to ‘_File > Open._’
- Scroll to the bottom and click on ‘Recover Unsaved Workbooks.’ This opens a File Explorer browser window.

- Now look for the Excel file that you lost and then double-click on it to open and restore the Excel file.
- Once the file is open, click on File > Save As and save it to your desired location.
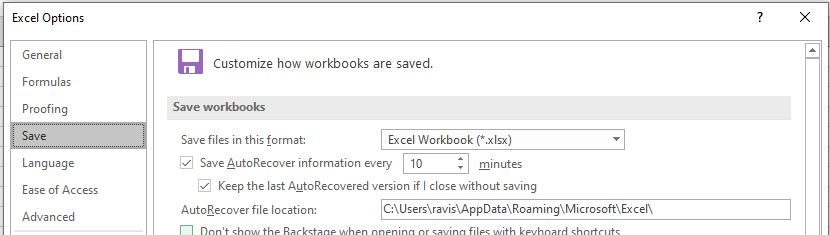
However, this option works only if you had enabled and set up the ‘Save AutoRecover information every X minutes_’ option and enabled the ‘_Keep the last AutoRecovered version if I close without saving’ option.
Also, this may not restore the most recent copy of your Excel file, but it will surely save your time that went into creating and editing the workbook.
2. Repair and Restore Corrupt or Inaccessible Excel File
If the Excel file you are trying to open or access is corrupt, MS Excel will display an error message. When MS Excel detects corruption, it starts ‘File Recovery Mode’ to repair the Excel workbook.
However, if it doesn’t start automatically, you can manually repair minor corruption error and restore the Excel file by following these steps:
- Navigate to File > Open and then navigate to the corrupt or damaged Excel file location.
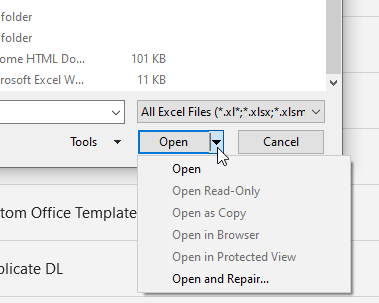
- Select the file and then click on the arrow beside the ‘Open’ button to choose the ‘Open and Repair…’ option.
- Now click ‘Repair’ if you want to recover maximum data from a corrupt or inaccessible Excel workbook and restore it to a new Excel file.

If the ‘Repair’ option fails, use the Extract Data option that extracts values, data, and formulas from the Excel workbook.
3. Revert Excel File to Last Saved Version
When an Excel file gets corrupt or damaged while working, you may revert the Excel file to the last saved version. This allows you to restore the Excel file version that isn’t corrupt or damaged. The steps are as follows,
- Click File > Open.
- Double-click the name of the workbook that you have opened in Excel.
- Click Yes to reopen the workbook.
The workbook opens without any changes you’ve made that might have caused the workbook to become corrupted.
4. Use Excel Repair Software to Restore Excel File
If the corrupt or damaged Excel file isn’t repaired by using MS Excel options or you lost data after restoring the unsaved version or after reverting to the last version, you can rely on an Excel repair software, such as Stellar Repair for Excel.
The software repairs Excel files with 100% integrity and restores the Excel data, such as table, Pivot tables, charts, etc., while preserving the workbook properties and formatting. The software is safe as it doesn’t alter or make changes to the original Excel file and saves the repaired data to a new Excel workbook at your desired location.
It supports Excel files (XLS and XLSX), created in MS Excel 2019, 2016, or older versions. It resolves Excel corruption errors, such as Unable to open Excel file, in a few clicks.
To repair a corrupt or inaccessible Excel workbook by using Stellar Repair for Excel software, follow these 3 simple steps,
- Select the corrupt or damaged Excel workbook file (XLS/XLSX).
- Repair and then preview the Excel workbook.
- Save the workbook at default or your desired location.
Once saved, you can open and start editing or working on the Excel sheet. Make sure to enable AutoRecovery and AutoSave options to avoid data loss due to corruption.
Conclusion
In this article, we discussed methods and solutions to restore Excel file when it gets damaged or corrupt due to various issues. Although Excel can help you recover or restore Excel file after corruption, it can resolve only minor corruption errors. Thus, it may fail if the Excel file corruption is severe. In such cases, an Excel repair software, such as Stellar Repair for Excel, comes in handy. It resolves Excel corruption, repairs tables, charts, chart sheets, Pivot table, etc., and restores them to a new Excel sheet with 100% consistency.
Easy Steps to Make Excel Hyperlinks Working
Summary: This blog discusses why hyperlinks won’t work in Excel and solutions to fix it. If nothing works, try using Stellar Repair for Excel software to recover your workbook with hyperlinks and all the data intact.

Hyperlinks in your Excel file could be references to a file’s location on the computer or a location within the same worksheet. Or, hyperlinks might be pointing to a URL. Sometimes, the hyperlinks won’t work and any of the following errors may pop up on your screen on clicking a hyperlink:
‘Cannot open the specified file.’

‘This operation has been canceled due to restrictions in effect on this computer. Please contact your system administrator.’

Causes of ‘hyperlinks not working in Excel’ problem, and solutions thereof
Here are some of the possible causes behind the ‘hyperlinks not working’ issue and solutions to fix it:
Cause 1 – Change in the name of the hyperlinked file
If the file name that appears in the hyperlink text is different than the actual file name, it will prevent the hyperlink from working.
Solution – Link to the renamed file
Ensure that the links in the Excel file are updated and points to the renamed file. For this, right-click the hyperlink and select ‘Edit the hyperlink’. Next, in the hyperlink address, replace the current filename with the renamed one in the hyperlink address.
Cause 2 – File name has a pound (#) sign
When you create a hyperlink for a file in Excel, you cannot use a pound character (#) in the file name that appears in the hyperlink. That is because the pound sign is not accepted in hyperlinks and may lead to the ‘Cannot open the specified file’ error.
Note: While you can use a pound character in a file name, it cannot be used in hyperlinks in an MS Office document.
Solution – Rename the file name and remove the pound sign
Open the file that contains the ‘#’ sign and rename it by following these steps.
- Right-click the cell containing the hyperlink that is not working, and click Edit Hyperlink.
- From the Address box, copy the address of the file you are linking to.
- Go to the location where the file is stored, right-click on the file, and click Rename.
- Remove the ‘#’ character from the name of the file.
- Go back to the Excel file, right-click on the problematic hyperlink, and choose Edit Hyperlink. Next, browse and select the renamed file.
- The renamed file without the pound sign will be added in the Address box.
- Click OK.
Now try opening the hyperlink.
Cause 3 – Sudden system shutdown causes abrupt closing of Excel
There may be a discrepancy in the data in hyperlinks when a system shut down suddenly, without properly closing the Excel file. And so, when trying to open a link, it won’t open.
Solution – Enable the option to save hyperlinks
There is an inbuilt option in Excel to update hyperlinks every time the workbook is saved. Follow these steps to enable that option:
Note: The steps may vary based on the Excel version you are using.
For Excel 2013, 2016, or 2019:
- Open Excel Workbook -> Go to File->Options->Advanced
- Scroll down to find the General tab and click on Web Options
- Web Options Window pops-up
- In the Web Options Window, go to Files Tab and select the ‘Update Links on save‘ checkbox
- Click on OK button and your option is saved
The steps are also explained in the image below:

For Excel 2007:
- Click the Office button
- Select Excel Options, then follow Step 1) to Step 5), as mentioned above and get the Excel Hyperlinks to work again.
Still unable to open hyperlinks in Excel?
If you fail to make Excel hyperlinks work using the above-discussed solutions, use an Excel repair tool to fix the hyperlinks issue. Download the Stellar Repair for Excel to repair an XLS/XLSX file and restore the hyperlinks.

See the working of the tool here:
The tool recovers all components of the Excel file including tables, charts, chart sheets, cell comments, images, formulas, and more. You can repair multiple worksheets and fix all dysfunctional Excel hyperlinks across multiple worksheets in a single workbook. Click on the workbook, select all worksheets and start repairing
Conclusion
Carefully read the possible causes behind the ‘Excel Hyperlinks not working’ issue to understand what resulted in the issue in the first place. If nothing helps, use Stellar Repair for Excel to restore the hyperlinks and save the result in a new Excel file, without interfering with worksheet properties and cell formatting.
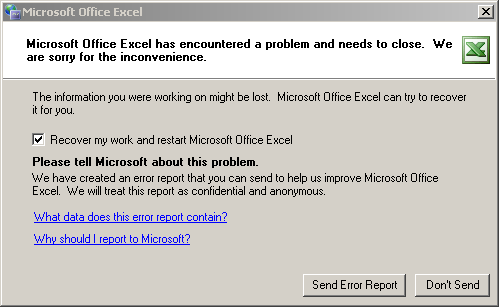
How to Fix Excel has Encountered a Problem
While working on MS Excel, you may encounter various errors that can hamper your work and productivity. One of the errors that you may receive is ‘Microsoft Excel has encountered a problem and needs to close’.Due to this error, your Excel program may stop and asks you to recover the data from Excel file.
What are the Reasons for ‘MS Excel has Encountered a Problem’ Error?
Following are some primary causes that may result in the ‘Microsoft Excel has encountered a problem and needs to close’ error:
- Corrupt Excel File: If you try to open a corrupt or damaged Excel file, the file may not open and displays this error message.
- File not Saved Properly: If Excel files aren’t saved correctly, this error may occur when you open the file.
- Incompatible File Version: If the MS Excel application version does not support the Excel file version, the file may not open and throws the error.
- Issues with MS Office/MS Excel Installation: This error can sometimes be caused due to damaged MS Office/MS Excel installation.
How to Fix ‘MS Excel has Encountered a Problem’ Error?
You can resolve the error by using the following methods:
1. Try to Open Excel in Safe Mode
Open the Excel application in safe mode and then try to open the Excel file. This will help you find out if the problem is caused by some incompatible add-ins. The steps are as follows:
- Hold Windows + R keys together to launch the Run dialog box.
- Type Excel /safe in the search box and hit Enter.
- If your Excel application opens in safe mode, it means that the issue is caused due to incompatible or faulty add-ins. In such a case, you need to disable the add-ins:
- Go to the File menu and click the Options menu. Further, choose the Add-ins option.
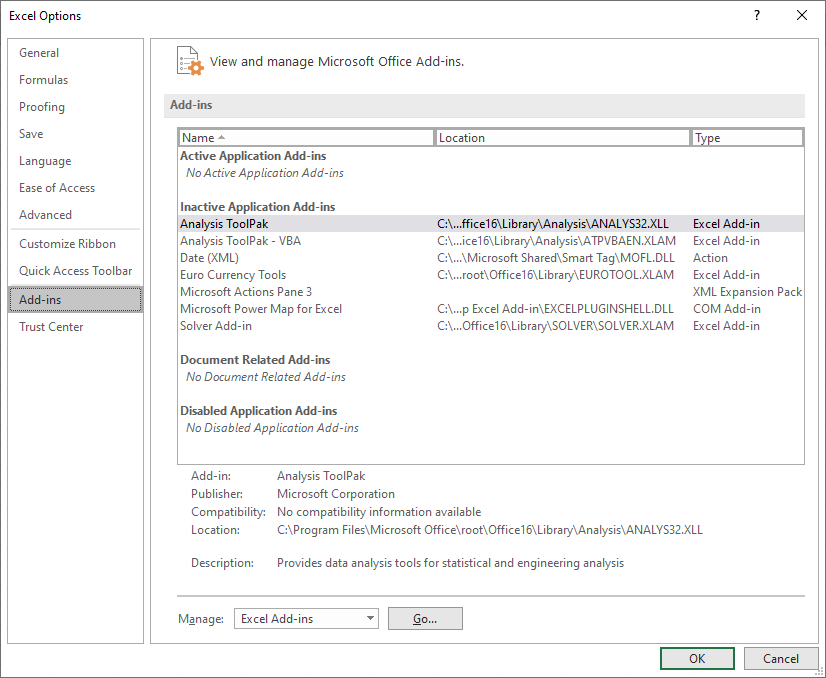
- Now, choose the Go button at the bottom of the Excel Options window.
- A list of available add-ins appears.
- Now, uncheck the boxes against the add-ins.
2. Disable Macros Using the Trust Center Settings
Sometimes, the Macros prevent Excel from managing the files. You can disable the Macros to resolve the issue. Follow these steps:
- Launch your MS Excel application.
- Now, go to File > Options > Trust Center.
- Further, click the Trust Center Settings.
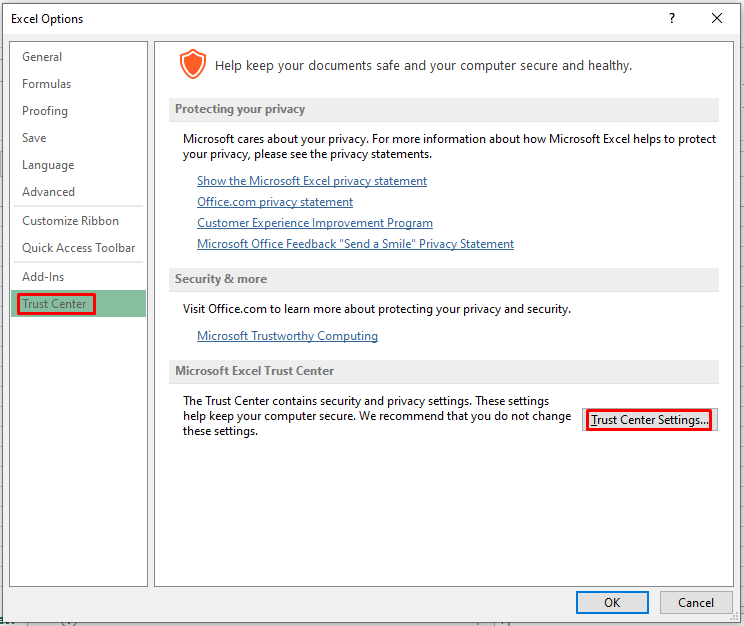
- Now, navigate to the Macro Settings option.
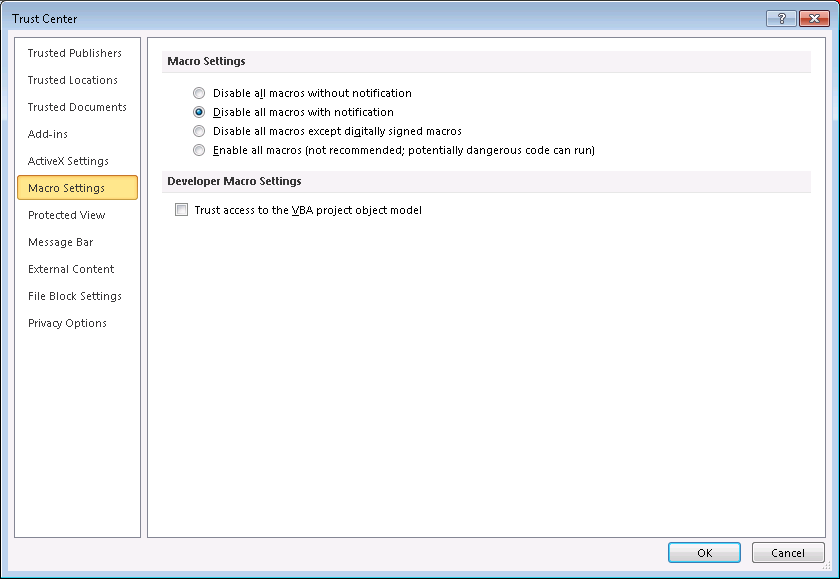
- Herein, select the ‘Disable all macros with notification’ radio button. Then, click OK.
3. Repair MS Office Application
Sometimes, problems with your MS Office application may cause the Excel has encountered a problem error. In such a case, you need to repair your MS Office application. Here are the steps to do so:
- Launch Control Panel > Uninstall a Program.
- Find your MS Office application and click the Change option.
- A new window will appear. Herein, select the Repair option.
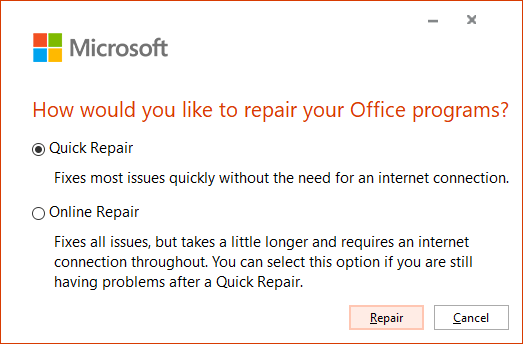
- Now, follow the MS Office installation wizard to finish the repair process.
What to do if the above methods don’t work?
If you have tried the solutions mentioned above and are still not able to resolve the ‘Excel has encountered a problem and need to close’ error, it indicates that the Excel file is corrupt. You can use a professional Excel repair software, such as Stellar Repair for Excel , to repair the corrupt file. The software repairs the file and retrieves all the data, including the tables, charts, formulas, etc. from the damaged workbook. It is compatible with all the MS Excel versions.

To know how Stellar Repair for Excel works, see the following video:
To Wrap Up
The ‘Excel has encountered a problem and needs to close’ error may occur due to different reasons. You can fix this error by following the methods mentioned in this post. If the error has occurred due to corruption in the Excel file, you can use a third-party Excel repair tool, like Stellar Repair for Excel. The software can repair damaged or corrupt Excel file of any size and retrieve all the data.
4 Ways to extract data from corrupt Excel file
Summary: Excel files can become corrupt due to numerous reasons. This blog will discuss the reasons behind the corrupted Excel files. Sometimes the file becomes inaccessible. This post includes four ways to extract data from a corrupt Excel file. It also mentioned Stellar Repair for Excel to repair severely corrupted files. The tool helps you recover data from damaged Excel files with complete integrity.
Imagine the frustration of an employee if an Excel workbook he took hours to complete became corrupted for some reason threatening to erase all the data saved in it. Not just that, a corrupted Excel workbook can wreak havoc for the organization too since it poses a risk of permanently deleting critical business information like work records or employee trackers.
Unless a backup of all important Excel files exists, recovering data lost due to damage/corruption to them is next to impossible. However, we’ve conducted some research and found some pretty neat hacks to help you extract data from corrupt excel files without much hassle.
Primary reasons triggering Excel file corruption
As we always point out, to solve a problem for good, getting to its root is imperative. Here are the main reasons that cause Excel file corruption. Knowing these reasons can help you keep Excel corruption at bay for a considerably long time.
- Abrupt system shutdown when you’re editing an Excel sheet
- Bugs / Defects in your Excel application or installation
- Hardware failures like bad sectors on the hard drive where Excel sheets are saved
- Virus Infection / Malware Attack
- Excessive data storage within a single Excel file
- Faulty Excel Macros and CSE Formulas
Depending upon the extent of damage, there can be several ways to perform corrupt Excel file repair.
How to repair corrupt Excel files?
There are a couple of manual methods that can help you repair corrupt Excel files .
- If the damaged Excel sheet can be opened, immediately save its copy; thereafter:
- Open it with a later version of Excel and save it as a new workbook.
- If this doesn’t work, open it in Excel’s latest version and save the workbook in HTML or HTM format.
- Once this is done, reopen the HTML file and save again in XLS format.
- Lastly, open the file and try saving it in SLK format (symbolic link)
Note: It is important to note that saving an Excel workbook in HTML format causes loss of features like custom views, scenarios, unused styles or number formats, natural language formulas, data consolidation settings, custom function categories, etc. In SYLK format only the active worksheet is saved so if using this method, you’ll need to repeat these steps for each worksheet.
- Use Excel’s inbuilt Repair function as follows:
- Launch Microsoft Excel and go to Office button -> Open
- In the Open dialog box, select the damaged Excel file
- On the bottom-right corner of the Open dialog box, you will find a drop-down next to Open Click on it and select Open and Repair
- This will launch the inbuilt Repair module of Excel and you’ll see a dialog box asking you to select an option from Repair or Extract Data
- Click on Repair to initiate the repair process.
- If this doesn’t work, repeat steps 1-4, and when Excel asks you to select an option, select Extract Data from corrupt excel file. Thereafter, follow the instruction Excel shows and you should be able to retrieve your data, but you may end up losing some formulas.
- If you cannot open the Excel, download Spreadsheet viewer from the Microsoft website and open the file using this program. Thereafter copy all data into a new Excel.
Note: This method will cause much of your formatting, formulas, and more to be lost.
- You can download Open Office from its official website OpenOffice.org and try opening the Excel in it. The two programs are very similar so all data should automatically align in the correct place and with the correct formatting.
Note: With this method, VBA code cannot be recovered due to incompatibility between OpenOffice.org and Excel.
Full-proof method for corrupt Excel file repair
If you find the above methods confusing, or you wish to perform Excel file repair without having to face any data and formula loss, or you cannot achieve the desired results with any of these methods, stop wasting any more time with methods that will only frustrate you more. Instead, download the sure-shot solution for dealing with severe Excel corruption –Stellar Repair for Excel and relax!
Stellar Repair for Excel is the best choice for repairing corrupt or damaged Excel (.XLS/.XLSX) files and restoring everything to a new blank Excel file. This competent software can skillfully repair single as well as multiple XLS/XLSX files while preserving worksheet properties and cell formatting. If you have this product by your side, you don’t need to worry about Excel corruption errors ever again.
To Conclude
Instead of giving up on corrupted Excel sheets, try repairing them with the simple tricks we’ve described. And if they don’t work, keep calm and turn to Stellar Repair for Excel.
How to Resolve ‘Excel found unreadable content in filename.xlsx’ Error in MS Excel?
When opening an Excel spreadsheet in MS Office 2010/2007, you may get the following error message:
“Excel found unreadable content in ‘[filename].xlsx’. Do you want to recover the contents of this workbook? If you trust the source of this workbook, click Yes.”

On clicking ‘Yes’, you may face any of these scenarios:
Note: If you choose to click ‘No’, then open your MS Excel application and click file > Open. When the Open dialog box opens, browse and select the file showing the ‘Excel found unreadable content’ error and then choose ‘Open and Repair’ option. If this didn’t help, try using a third-party Excel repair tool to save time troubleshooting the issue and restoring the file with all its data intact.
Scenario 1: The following message may pop-up.
“Excel was able to open the file by repairing or removing the unreadable content. Excel recovered your formulas and cell values, but
. Click to view log file listing repairs errorxxx.xml.”
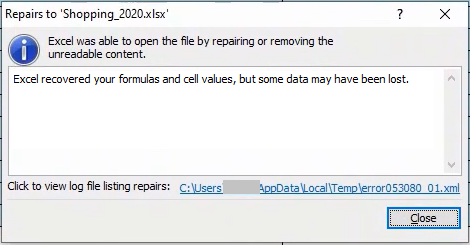
The message clearly states that your Excel file might open, but images may be lost and other such inconsistencies can crop up.
Scenario 2: The error is followed by another error message, like “The file is corrupt and cannot be opened“.
Watch our short video for a quick overview of the solutions to fix “Excel found unreadable content in filename.xlsx”
What Causes ‘Excel Unreadable Content’ Error?
You may encounter the ‘Excel file unreadable content’ error due to corruption of complete Excel file or corruption in certain areas (like Pivot Table, Formulas, Styles, or other objects) in the file. According to Microsoft, you may find it difficult to determine the root cause behind Excel file corruption. Corruption could occur in different scenarios, like power surge, a network glitch, copying and pasting corrupted data from another file, etc.
Also Read: How to recover data from corrupt or damaged Excel file 2010 & 2007?
Workarounds to Resolve the ‘Excel found unreadable content in filename.xls’ Error
There is no permanent solution to fix the ‘Excel found unreadable content’ error. But, following are some workarounds you can try to resolve the error.
Note: Before you try any of these workarounds, run Excel with administrator privileges and try opening the Excel file that is throwing the ‘unreadable content’ error. If this doesn’t fix the error, proceed with the workarounds below.
Workaround 1 – Try Opening the File in Excel 2003
Sometimes a problem in the current Excel version might prevent a file from opening. To resolve this error, try opening the problematic file in Excel 2003. If the file opens, save the data in a web page file format (.html) and then try opening the .html file in MS Excel 2010/2007. The detailed step-wise instructions are as follows:
- Open the .xls file in Excel 2003.
- When the file opens, click on File > Save.
- In the ‘Save As’ dialog box, choose Web Page (.html) as the ‘Save as type’ and then click ‘Save.’ Doing so will save everything from your .xls file, opened with 2003, in .html file format.
- Open the .html file in Excel 2010/2007. And then, save the file with .xlsx extension with a new name to avoid overwriting the original file.
Now, open the Excel 2010/2007 file and check if the error is fixed. If not, use the next workaround.
Workaround 2 – Make the Excel File ‘Read-only’
Try to open your ‘.xlsx’ file by making it ‘read-only’. Follow these steps:
- In Excel, click ‘File’ from the main menu.
- Select ‘Save’ for a new document or ‘Save As’ for a previously saved document in the screen that appears.
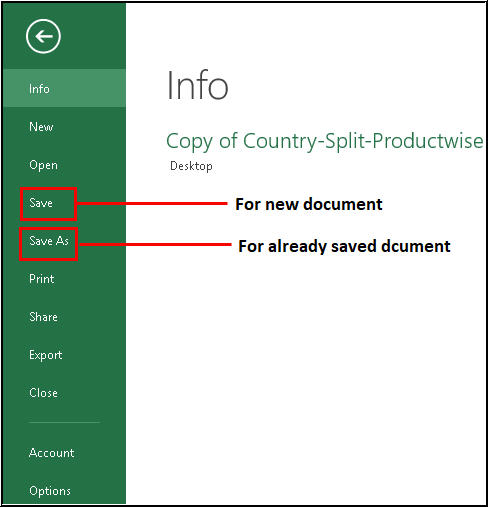
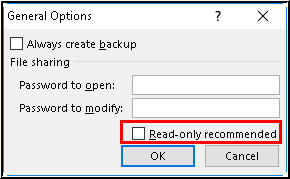
- From the ‘Save As’ dialog box, click Tools > General Options.
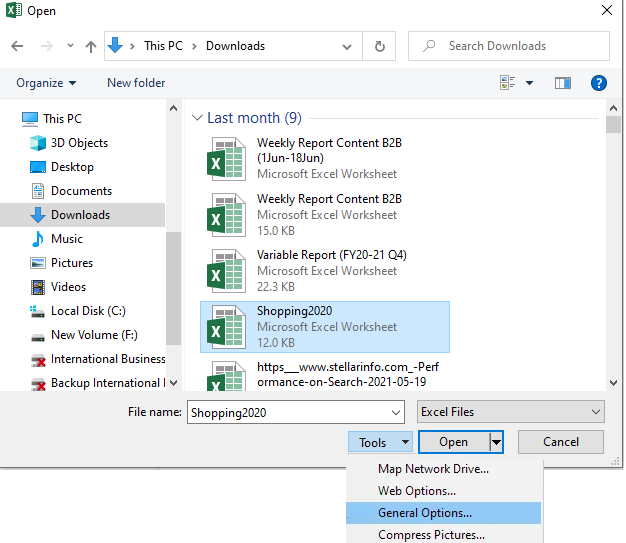
- Click on the ‘Read-only recommended’ checkbox to make the document read-only and then click ‘OK’.
Now open a new ‘.xlsx’ file and copy everything from the corrupt Excel file to this new file. Finally, save this file and try to open it again.
Workaround 3 – Move Excel File to a New Folder
Some users have reported that they could open their Excel file, following the ‘Excel unreadable content’ error, by simply moving the file to a different folder and saving it under a new name. You can also move the affected file to a new folder and try opening it. If this didn’t help resolve the error, follow the next workaround.
Workaround 4 – Install Visual Basic Component
At times, it is seen that installing the ‘Visual Basic’ component of MS Office 2010 resolves the ‘Excel found unreadable content 2010’ error. To do so, follow these steps:
- Navigate to Control Panel > Programs and select Microsoft Office 2010.
- Click ‘Change’ and then select ‘Add or Remove Programs’.
- Next, click the ‘plus’ sign provided next to Office Shared Features.
- Click ‘Visual Basic for Applications’. After that, right-click and choose ‘Run from My Computer’ and hit the ‘Continue’ button.
- Reboot your system when this process finishes.
Now check if the issue has been resolved or not.
What Next?
If none of the workarounds mentioned above works for you, use a professional Excel repair software, such as Stellar Repair for Excel. The software repairs corrupt MS Excel sheets without modifying their original content and formatting. In addition, it can repair single or multiple Excel (XLS/XLSX) files in a few simple steps.

Steps to Repair Corrupt Excel File using Stellar Repair for Excel Software
Install and run Stellar Repair for Excel software.
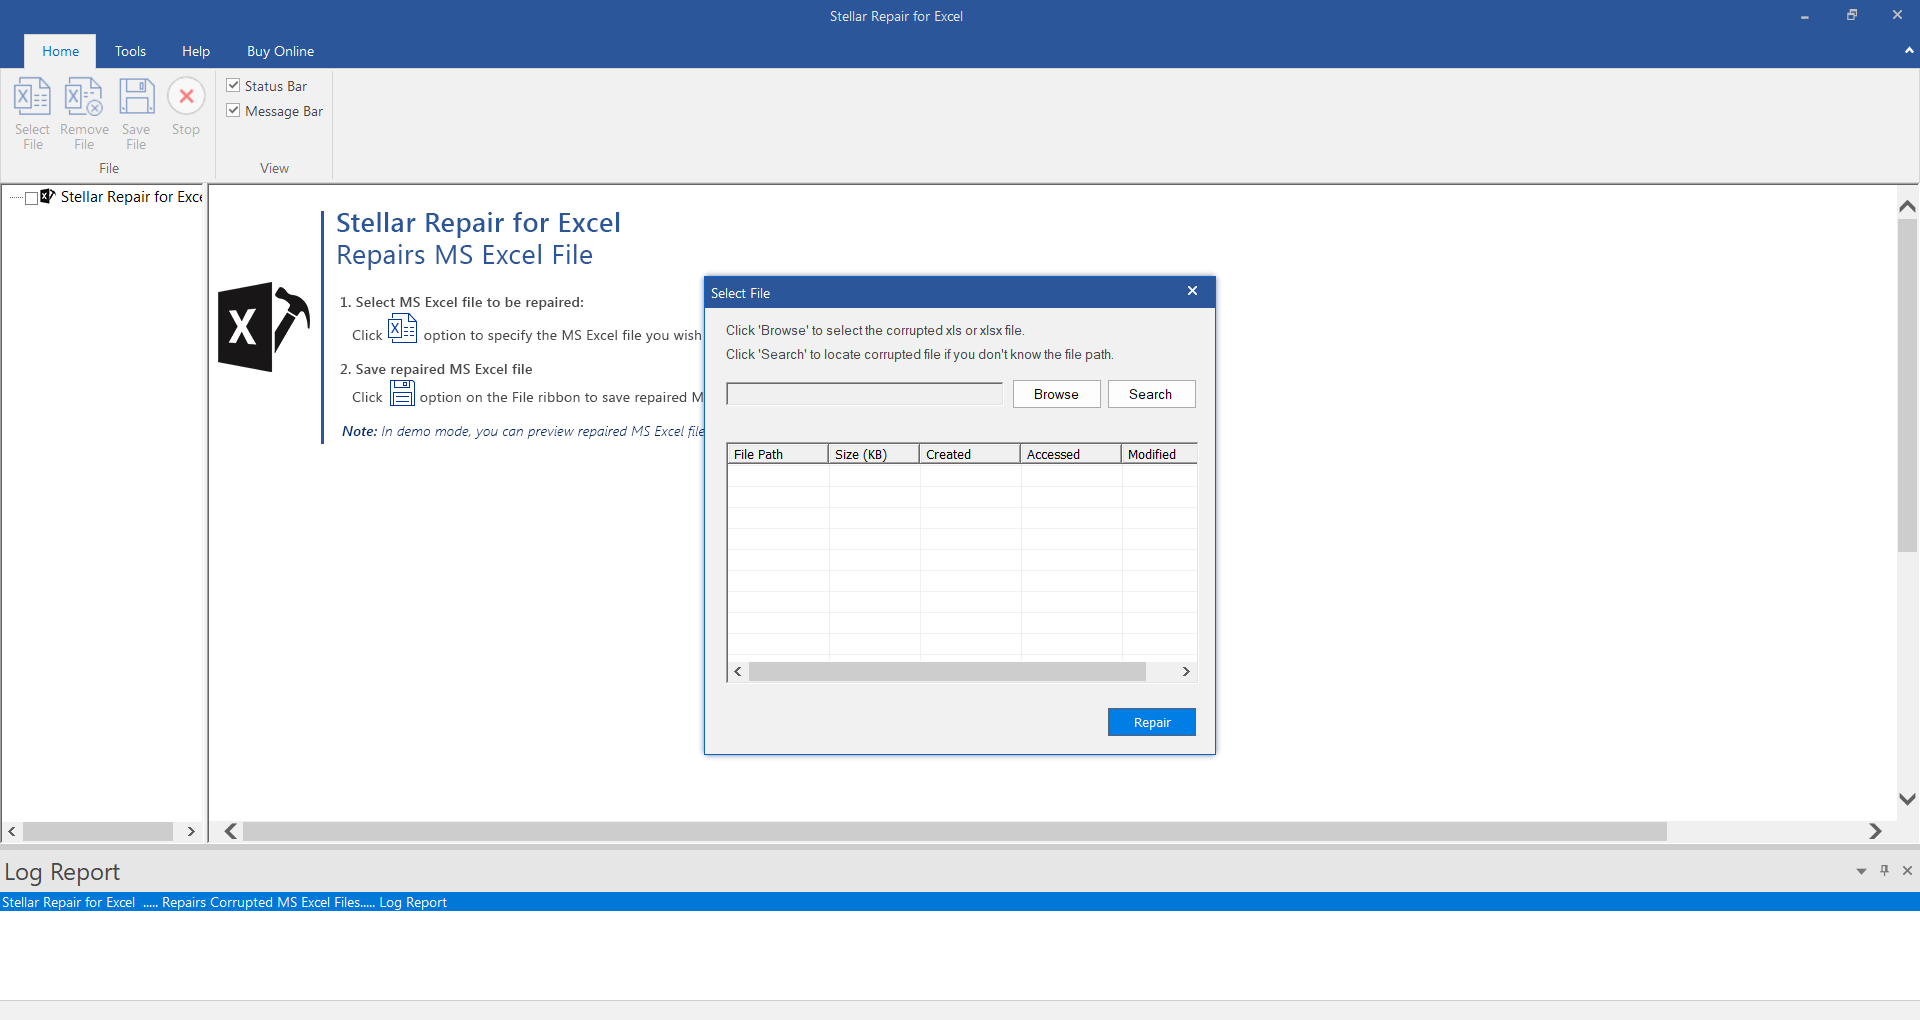
From the software main interface window, click ‘Browse’ to select the corrupt file. If you are not aware of the corrupt Excel file location, click on the ‘Search’ button.
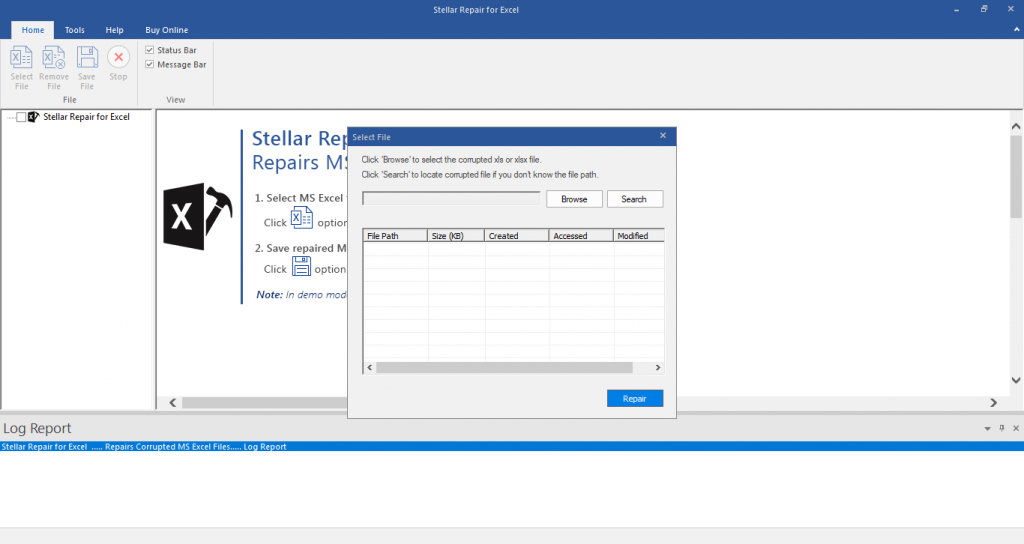
- Click on the ‘Repair’ button to scan and repair the selected file.

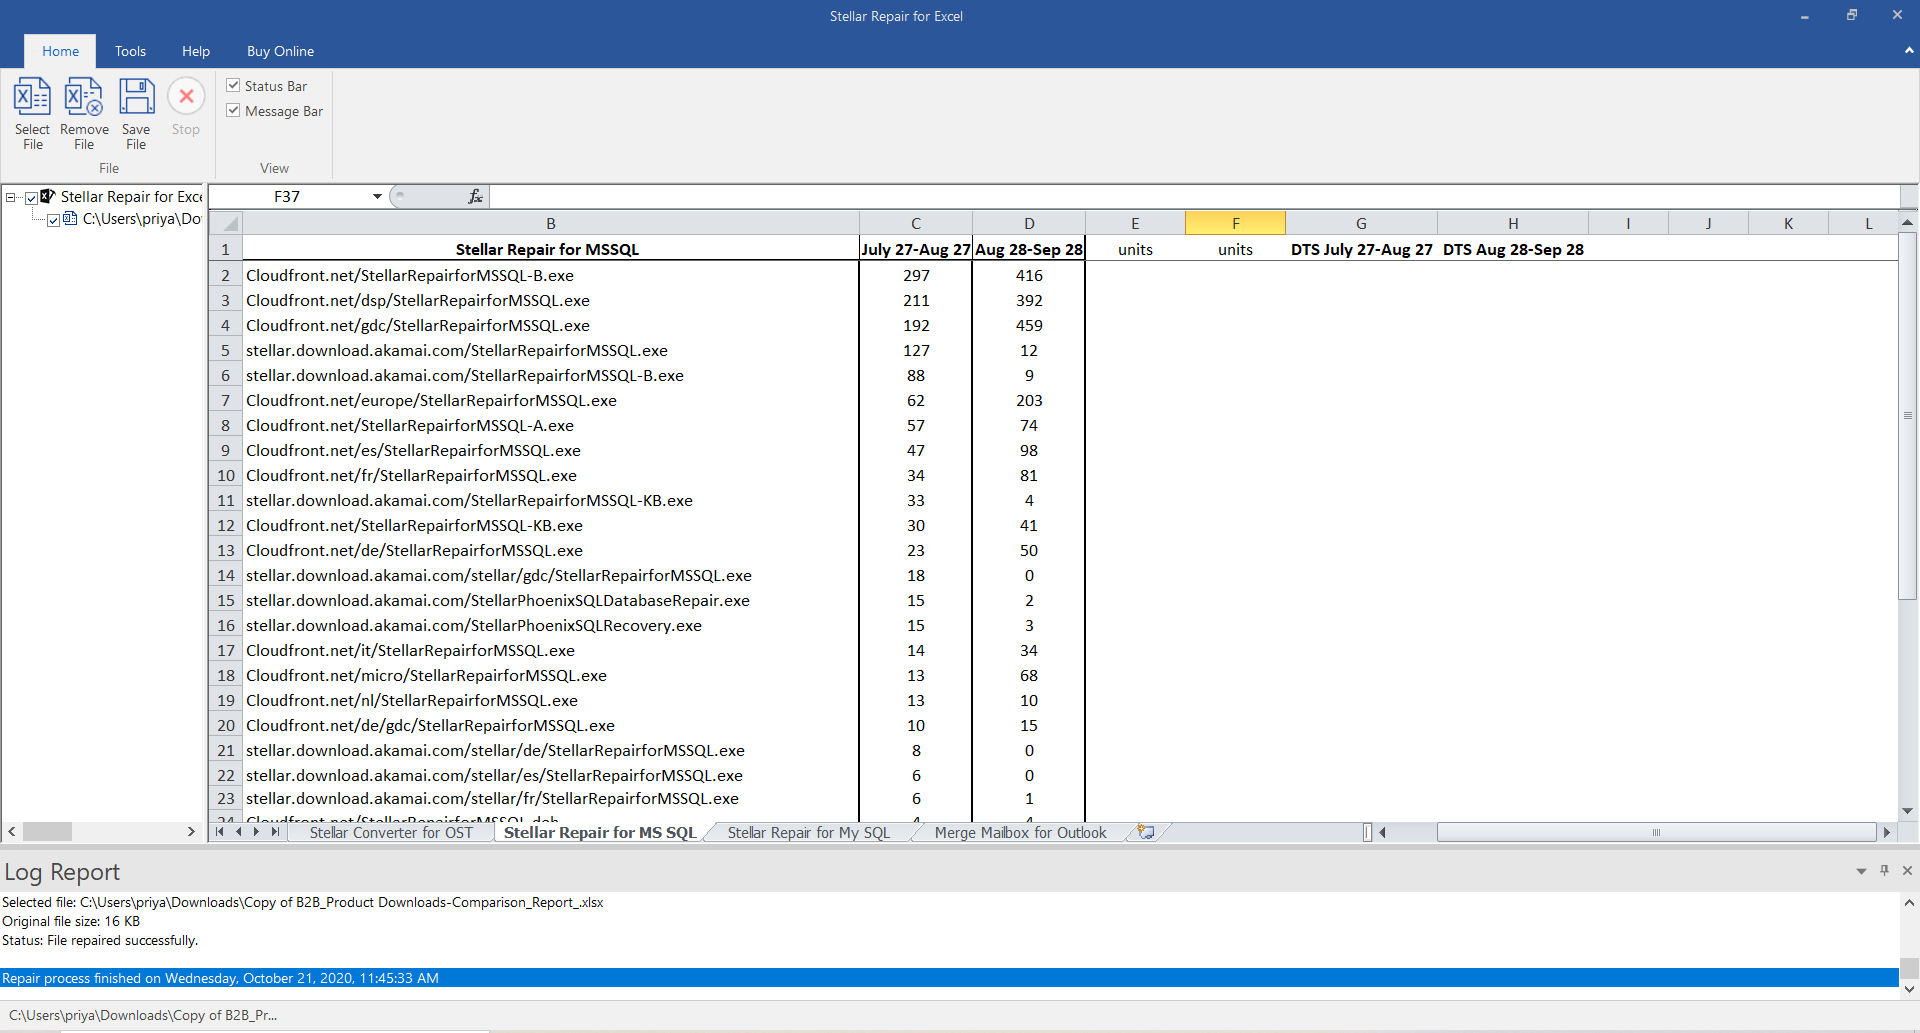
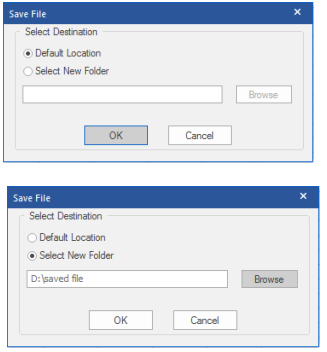
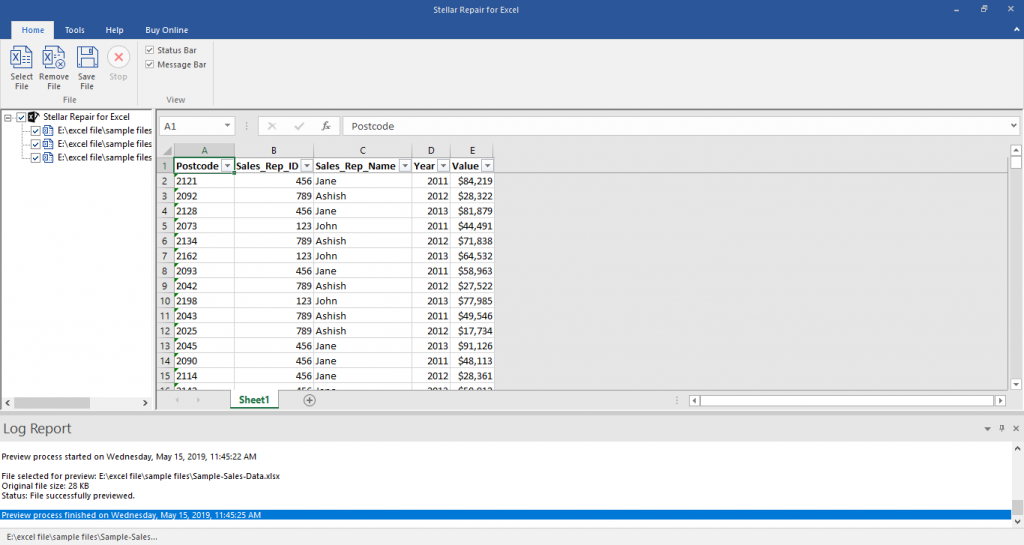
- A preview window will open with recoverable Excel file data. Once satisfied with the preview result, click on the ‘Save File’ button on the ‘File’ menu to start the repair process.
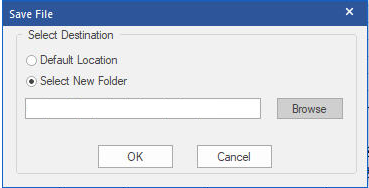
- Select the destination to save the file.
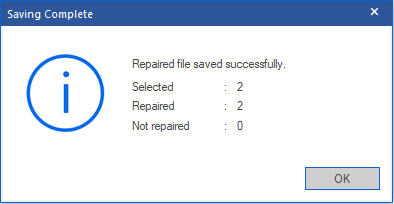
- Click ‘OK’ when the ‘Repaired file saved successfully’ message appears.
The repaired Excel file will get saved at the selected location.
‘Unable to Save Excel Workbook’ Issue [Fix 2024]
Summary: You may unable to save your Excel Workbooks due to several reasons. Many users have reported this issue on the Tech Forums. This blog will discuss a few instances when users cannot save their Excel files. It lists the causes behind the issue and their possible solutions. It also mentions the Stellar Repair for Excel to fix the saving error if it is due to corruption in the Excel file.
It is easy to work with Microsoft Excel but sometimes, the application may create issues thereby hampering the smooth functioning of the workbook. One such issue is “unable to Save Excel Workbook”.
Let’s take a look at the issue of Unable to Save Excel Workbook
Instance 1:
In an organization, users connected to one of the servers (Windows 2008 R2) using Citrix – a Terminal Server configured with Windows 2008 R2 –and accessed their data through a File Server, also configured with Windows 2008R2. Since the connectivity to Shared Drive was established through a Terminal server, any conflict amongst the server configuration may create conflict in shared file.
This issue was discussed at length at one of the Tech Forums , where the users were unable to access their workbooks stored on the shared drive. The File menu did not work. As a result, the users were forced to save the workbook by creating quick access shortcuts or locally on the desktop. In many cases, the saving option was ruled out completely.
Instance 2:
A similar problem was reported, wherein the users received an error when saving an Excel workbook after inserting a chart in an existing workbook (previously saved) or copying values from an existing workbook. A system is configured with Windows 7 and Microsoft Office 10 configuration. The issue arises when the user is unable to save the changes after editing in a saved spreadsheet. The following message displays on the screen:

Figure: Unable to Save Excel WorkBook Issue
Further, if the user clicks ‘Continue’, the following error message is received:
“Excel encountered errors during save. However, Excel was able to minimally save your file to <**filename.xlsx**>”.
Note: This issue impacts build Version 1707 (Build 8326.2086) and later, and also only occurs with files that are stored locally, such as on the desktop. This problem does not occur if you manually enter values or insert a chart in a newly created workbook.
Plausible reasons for the ‘Unable to save Excel workbook’ Issue
- The issue was detected in Microsoft Office Professional Plus 2010 32-bit, Service Pack 14.0.6029.1000.
- Excel version on the user system may or may not match with Excel version on File server.
- The issue of ‘Unable to Save Excel Workbook’ impacts only the Build Version 1707 (Build 8326.2086) and later.
- In case of Issue 2, the problem surfaces when the user adds files, tables or charts in the locally saved excel files, such as on the desktop.
Methods to fix the ‘Unable to Save Excel Workbook’ Issue
There may be an issue with the Build version or the Registry Values settings may not be appropriate, which does not allow the Excel workbooks to save.
But, before starting to resolve the issue, verify the following:
- The location where the file is to be saved may not have enough space to save the Excel file: Check the available space and save again. You may also use the option of ‘Save As’ to save the file at a new location.
- Excel file may be a shared one where edits are not allowed by a specific user: There are restrictions attached to documents and other files shared over the network. Check for these restrictions.
- Antivirus may interrupt in during file saving: Antivirus in the system may not allow saving of the files. Request the system administrator to uninstall the antivirus and reinstall after saving.
- The file is not saved within 218 characters: If the file is not saved due to the naming issue, then check the character length and try again.
- Differences in Windows versions of the local system and those on network drive may cause excel not saved issues. Check that all the systems have the same configuration and are updated to the recently available versions.
- Excel spreadsheet is corrupt: If none of the above factors have not caused hindrance in saving the file, then there may be a probability of corruption in the Excel spreadsheet .
Once verified, look for a healthy and restorable backup. If backup is missing, resolve the issue of “Unable to open Excel File” with manual settings on local system or through a reliable Excel repair software.
Method 1: Modify Registry Entries
If multiple users are unable to access their workbooks stored on the shared drive and facing unable to save Excel file problem (see Instance 1 above), then follow the below steps:
- Go to ‘Registry Entry’. To do this, type ‘regedit’ in the Start Search box, and press ENTER

Figure: Edit Registry
- You are prompted for the administrator password or for a confirmation, type the password, or click Continue
- Locate the following registry subkey, and right-click it: HKEY_LOCAL_MACHINE\System\CurrentControlSet\Services\CSC

Figure: CSC Location
- Point the cursor to New, and click Key

Figure: Create new key
- Type ‘File Parameters’ in the available box

Figure: File parameters
- Right-click Parameters, point the cursor to New, and click DWORD (32-bit) Value

Figure: File parameter (DWORD – 32 bit) value
- Type ‘FormatDatabase’, and press ‘ENTER’. Right-click ‘FormatDatabase’, and click ‘Modify’

Figure: Modify format database
- In the Value data box, type ‘1’, and click ‘OK’

Figure: Value data
- Exit ‘Registry Editor’
- Restart the system and verify if the files can be saved now
Method 2: Try Google Uploads
If the user is unable to save the changes after editing in a locally saved spreadsheet (see Instance 2 above), then follow these steps:
- Upload the unsaved Excel file to Google Docs. Ensure that the file gets converted to Google Sheets format.
- Check if all the formulae are active and working.
- Make changes to the Google Sheet and verify that all the changes are working fine.
- Use the Google Sheets export feature to download the file in Excel format.
Method 3: Resolve manually with Open and Repair
If the Excel file is found to have corruption, try out the Excel Open and Repair utility:
- Open a blank Excel File. Go to File and Click Open.
- Go to Computers and click Browse.
- Access the Location and Folder and click the arrow icon beside Open followed by Open and Repair.

Figure: Illustrates Steps to use ‘Open and Repair’ method
The Open and Repair utility is not competitive enough and may not fix corruption in severely corrupted files. Hence, if you are unable to save Excel workbook after applying the manual methods, then you can search for a useful software-based repair utility.
Method 4: Excel File Repair Software
Specifically meant to resolve Excel file corruption. Stellar Repair for Excel helps you to repair every single object including charts, tables, their formatting, shared formulae and rules and more.
- Install and Open the software and select the corrupt Excel File. You can also click the Find option if the file location is not known.
- Click Scan and allow the software to scan and repair the corrupt Excel file.
- Once repaired, the software displays the fixed file components to verify its content.
- Click Save to save the file data in a blank new file as ‘Recovered_abc.xls’, where abc.xls is the name of the original file.
See the working of the software which has been declared as a tool that provides 100% integrity and precision.
The Excel repair software takes care to save the repaired data in a new file to minimize the chances of further corruption.
Conclusion
‘Unable to save Excel file’ is a generic problem that may appear due to various reasons. In this blog post, we presented some of the actual instances reported by users on community forums.
Windows updates, the Build versions, the Service Packs of the local systems and those on the network drive must be either similar or in sync with each other. Any deviation may cause issues in accessing or saving the Microsoft files, as reported in Instance 1 is caused where user is unable to save Microsoft Excel file on the Network Drive. In case, the user is unable to save the file on network drive then the problem lies with the Registry value.
Another case is when the users receive an error while saving an Excel workbook after they insert a chart in an existing workbook or copying values from an existing workbook. This issue is known to affect build Version 1707 (Build 8326.2086) and later, and only occurs with locally stored files.
When a user is unable to save a specific Excel file, then the problem can be resolved using the manual methods or the software based utility. The mode of repair depends upon the level of corruption in Excel file.
Hence, it is suggested to analyze the nature of the problem and decide an appropriate resolution method.
Also read:
- How to Repair Broken video files of Nokia C02?
- How to Downgrade iPhone 12 without Losing Any Data? | Dr.fone
- How to Repair Broken video files of Infinix Note 30 5G on Mac?
- How to Remove MDM from iPhone 12 without Apple ID?
- How to recover deleted photos from Lava Storm 5G.
- 2 Ways to Transfer Text Messages from Poco F5 Pro 5G to iPhone 15/14/13/12/11/X/8/ | Dr.fone
- How To Repair iPhone 6 Plus iOS System? | Dr.fone
- How to Retrieve deleted photos on Itel A70
- How to identify some outdated drivers with Windows Device Manager on Windows 10 & 7
- How to recover deleted photos from Android Gallery after format on Lava Blaze 2
- How to recover deleted photos from Android Gallery after format on Vivo Y36i
- How To Repair iOS of iPhone 6s? | Dr.fone
- How to Rescue Lost Contacts from P55 5G?
- How to Restore Deleted Honor Magic Vs 2 Photos An Easy Method Explained.
- How to Restore iPhone 15 Plus from Backup when iTunes Backup is Corrupt or not compatible | Stellar
- How to repair corrupted PDF v1.2 file when manual method fails | Stellar
- 5 Easy Ways to Copy Contacts from Infinix Hot 40i to iPhone 14 and 15 | Dr.fone
- 5 Easy Ways to Copy Contacts from Vivo T2 5G to iPhone 14 and 15 | Dr.fone
- How to get back lost photos from Motorola Edge 40 Neo.
- How to retrieve erased videos from Oppo Reno 10 5G
- How to recover lost data from Honor Play 7T?
- How to restore wiped videos on Infinix Note 30 VIP Racing Edition
- 5 Easy Ways to Copy Contacts from Samsung Galaxy M14 4G to iPhone 14 and 15 | Dr.fone
- How to Retrieve deleted photos on Xiaomi
- How To Repair System of iPhone 12 mini? | Dr.fone
- How to Rescue Lost Messages from Infinix Note 30 VIP Racing Edition
- How to Sign Word document with Digital Signature - (Tutorial)
- How to Recover deleted pictures on iPhone 11? 5 Best Solutions | Stellar
- How to restore wiped call history on Xiaomi ?
- 2 Ways to Transfer Text Messages from Nokia G310 to iPhone 15/14/13/12/11/X/8/ | Dr.fone
- How to Repair a Damaged video file of Huawei Nova 12 using Video Repair Utility on Windows?
- How to identify missing your drivers with Windows Device Manager on Windows 10 & 7
- How to insert sign in word
- How To Install the Latest iOS/iPadOS Beta Version on iPhone 15 Plus? | Dr.fone
- How to insert signature in .xltm files
- 2 Ways to Transfer Text Messages from Realme C55 to iPhone 15/14/13/12/11/X/8/ | Dr.fone
- How to fix Pivot Table Field Name is not Valid error in Excel 2023?
- How To Repair iPhone XS System Issues? | Dr.fone
- How to recover deleted photos from Xiaomi .
- 2 Ways to Transfer Text Messages from Honor Magic 6 Lite to iPhone 15/14/13/12/11/X/8/ | Dr.fone
- 2 Ways to Transfer Text Messages from Tecno Spark 10 Pro to iPhone 15/14/13/12/11/X/8/ | Dr.fone
- How to Fix Pokemon Go Route Not Working On Nubia Red Magic 9 Pro+? | Dr.fone
- In 2024, How to Bypass FRP on Tecno Camon 20 Premier 5G?
- In 2024, What is the best Pokemon for pokemon pvp ranking On Realme GT 5 (240W)? | Dr.fone
- In 2024, Top 10 AirPlay Apps in Realme Narzo N55 for Streaming | Dr.fone
- In 2024, How to Change Lock Screen Wallpaper on Samsung Galaxy A05s
- Best Android Data Recovery - Undelete Lost Messages from Oppo A59 5G
- 5 Ways to Restart Oppo Find X7 Ultra Without Power Button | Dr.fone
- How to Find iSpoofer Pro Activation Key On Samsung Galaxy A24? | Dr.fone
- 7 Ways to Unlock a Locked Tecno Spark 10 4G Phone
- Hassle-Free Ways to Remove FRP Lock on Xiaomi Redmi Note 12 Pro 5G Phones with/without a PC
- In 2024, Ultimate guide to get the meltan box pokemon go For Honor V Purse | Dr.fone
- Top 10 AI-Talking Avatars Revolutionizing Communication for 2024
- Which Pokémon can Evolve with a Moon Stone For Realme C33 2023? | Dr.fone
- In 2024, How to Bypass Google FRP Lock on OnePlus Nord N30 5G Devices
- How to Downgrade Apple iPhone XS Max to an Older Version? | Dr.fone
- Play HEVC H.265 on Galaxy XCover 7, is it possible?
- All You Need To Know About Mega Greninja For Realme Narzo 60x 5G | Dr.fone
- In 2024, FRP Hijacker by Hagard Download and Bypass your Motorola Moto G14 FRP Locks
- Quickly Remove Google FRP Lock on Honor Play 8T
- Play HEVC H.265 on Sony Xperia 5 V, is it possible?
- In 2024, How To Bypass iCloud By Checkra1n Even From Apple iPhone SE (2022) If Youve Tried Everything
- In 2024, Best Pokemons for PVP Matches in Pokemon Go For Oppo K11 5G | Dr.fone
- How do you play MKV files on Galaxy XCover 7?
- In 2024, How to Remove an AirTag from Your Apple ID Account From iPhone 13 mini?
- New 2024 Approved Record Like a Pro Top 10 Webcam Software for Windows 10
- Top 11 Free Apps to Check IMEI on Samsung Galaxy A15 4G Phones
- In 2024, 5 Easy Ways to Copy Contacts from Nokia C02 to iPhone 14 and 15 | Dr.fone
- Play Store Stuck on Downloading Of Infinix Smart 7? 7 Ways to Resolve | Dr.fone
- Three Ways to Sim Unlock OnePlus Nord CE 3 Lite 5G
- What You Should Know About Speech-to-Text Technology
- In 2024, How To Change Itel P40 Lock Screen Password?
- Proven Ways in How To Hide Location on Life360 For Itel S23 | Dr.fone
- Updated In 2024, Best Video Translator App for PC You Cannot Miss
- In 2024, Forgot Locked Apple iPhone 6 Password? Learn the Best Methods To Unlock | Dr.fone
- In 2024, How to use Snapchat Location Spoofer to Protect Your Privacy On Tecno Spark 10C? | Dr.fone
- Methods to Change GPS Location On Nokia G310 | Dr.fone
- The Updated Method to Bypass Lava FRP
- In 2024, How to Remove Forgotten PIN Of Your Vivo Y02T
- How do I reset my Huawei Nova Y71 Phone without technical knowledge? | Dr.fone
- Title: How to fix Pivot Table Field Name is not Valid error in Excel 2016? | Stellar
- Author: Nova
- Created at : 2024-05-19 18:32:11
- Updated at : 2024-05-20 18:32:11
- Link: https://blog-min.techidaily.com/how-to-fix-pivot-table-field-name-is-not-valid-error-in-excel-2016-stellar-by-stellar-guide/
- License: This work is licensed under CC BY-NC-SA 4.0.
