
:max_bytes(150000):strip_icc():format(webp)/family-hanging-out-watching-videos-online-1166432791-309c6f7ac8cb4cc99875db5a77fd6f35.jpg)
How to fix Pivot Table Field Name is not Valid error in Excel 2021? | Stellar
How to fix Pivot Table Field Name is not Valid error in Excel?
The Pivot Table field name is not valid error can occur while creating, modifying, or refreshing data fields in the pivot table. It can also appear when using VBA code to modify the pivot table. It usually occurs when there is an issue with the field name in a code or if there is a hidden or empty column in the pivot table. However, there could be many other reasons behind this error.
Why the “Pivot Table Field Name is not Valid” Error Occurs?
You can get the “Pivot Table field name not valid” error in Excel due to several reasons. Some possible causes are:
- Excel file is corrupted
- Damaged fields in the pivot table
- Pivot table is corrupted/damaged
- Hidden columns in the pivot table
- Macro (referring to the pivot table) is corrupted
- Preserve formatting option is enabled
- Missing or incorrect fields in the VBA code
- Issue with workbook.RefreshAll method syntax (if using)
- Pivot Table contains empty columns
- Header values or header column is missing in the Pivot Table
- Pivot table is created without headers
- Columns/rows are deleted from the Pivot Table
Methods to Fix Pivot Table Field Name is not Valid Error in Excel
You can get this error if you have selected the complete data sheet and then trying to create the Pivot Table. Make sure you choose only the data fields that you want to insert in the Pivot Table. If this is not the case, then follow the troubleshooting methods mentioned below.
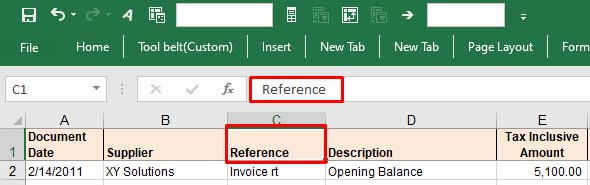
Method 1: Check the Header Value in the Pivot Table
The “Pivot table field name is not valid” error can occur if you have not set up the pivot table correctly. All the columns having data in them should have header and header values. A pivot table without a header value can create issues. You can check the header and its value from the Formula bar. Change the header if the header value is too lengthy or if it contains special characters.
Method 2: Check and Change the Data Range in the Pivot Table
The “Pivot Table field name is not valid” can occur while modifying a field in Pivot Table. It usually occurs if you’re trying to add or modify the field by selecting an incorrect data range in the Create PivotTable dialog box. The “Create PivotTable“ feature helps define how data would be displayed within the pivot table.
Let’s take a scenario to understand this. Open the Excel file with PivotTable. Click on the fields (you want to add), go to the Insert option, and click PivotTable.

If you select an incorrect range, i.e. A1:E18, instead of correct range - “Expenses**!$A$3:Expenses!$A$4**,” you will immediately get the error message.
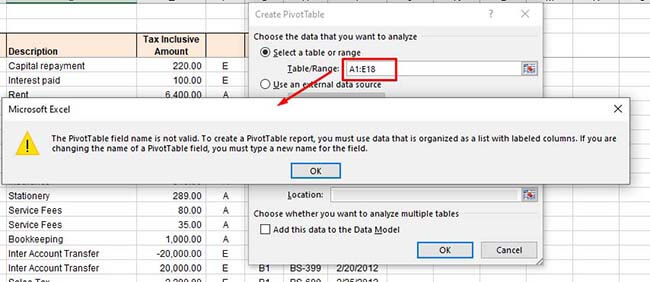
So, type the correct range under the Select a table or range option and click OK.
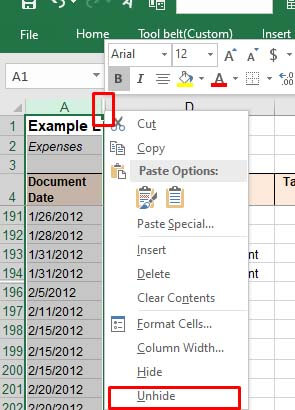
Method 3: Unhide Excel Columns/Rows
The error can also occur if some columns/rows of the Pivot Table’s data source are hidden. When you try to add a hidden column as a field in the PivotTable, the Excel application will fail to read the data of the hidden column. You can check and unhide the Excel columns by following these steps:
Open the Excel file.
Locate the hidden column number.
Move your cursor on the hidden column number and right-click on the space between the columns. Click Unhide.

Method 4: Check and Delete Empty Excel Columns
Sometimes, you can get the “Pivot Table field name is not valid” error if you are trying to use an empty column as a field in your Pivot Table. Check the columns with no values in all cells. If found, then delete the empty columns. This method is ideal for small-size Excel files. However, for large-sized files, it is a time-consuming process.
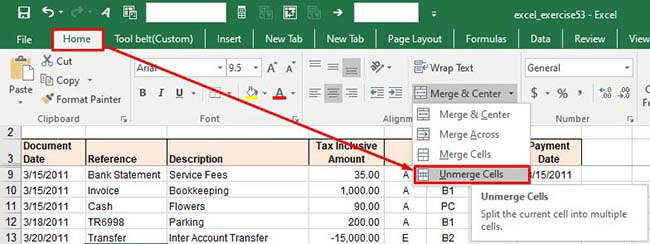
Method 5: Unmerge the Column Header (If Merged)
The “Pivot Table field name is not valid” error can also occur due to merged column headers. The pivot table references headers to identify the data inside the rows or columns. The merged headers can sometimes create data inconsistencies. You can try unmerging the column headers to fix the issue. Follow these steps:
In the Excel file, go to the Home
Click the Merge & Center option and select Unmerge Cells from the dropdown.
Method 6: Disable the Background Refresh Option
If the “background refresh” option in the Excel file is enabled, it may also create issues with Pivot Table. The Excel updates all the pivot tables in the background even after a small change if the background refresh option is enabled. This may create issues if the Excel file is large with too many tables. You can try turning off the “background refresh” option in the Excel file to troubleshoot the issue. Here is how to do so:
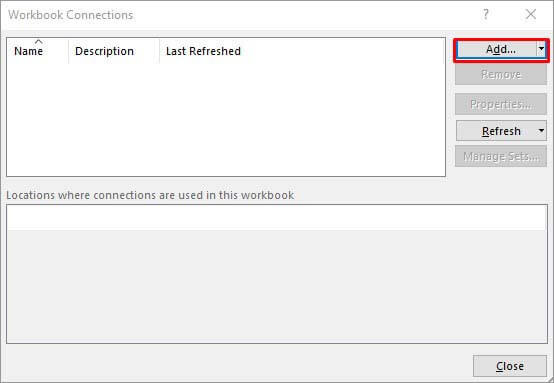
In the Excel file, go to the Data tab and then click Connections.
In the Workbook Connectionsdialog box, click on the ‘Add’ dropdown to add the workbook (in which you need to modify the refresh settings).
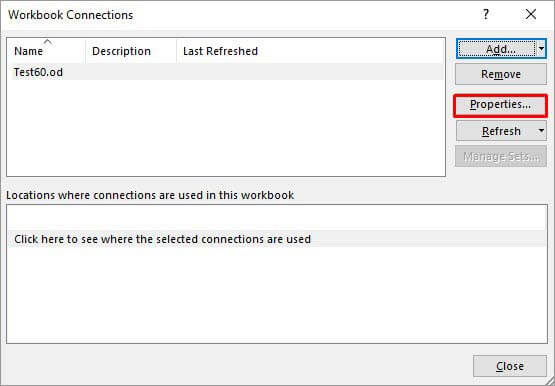
Once you have chosen the Excel file, click Properties.
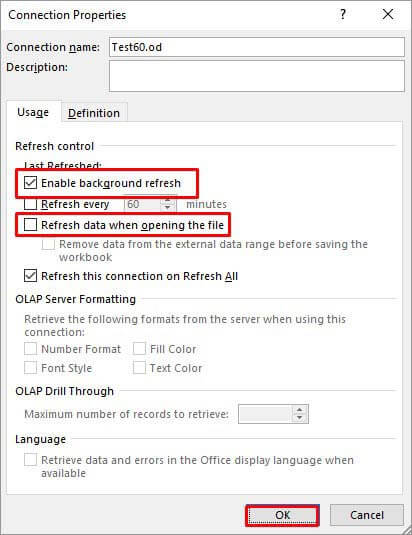
In the Connection Properties window, unselect the **”Enable background refresh”**option, select the “Refresh data when opening the file“, and click **OK.
**

Method 7: Check the VBA Code
The error can also occur when working with PivotTable using VBA code in Excel. Some Excel users reported this error on forums as run-time error 1004: The PivotTable field name is not valid. This error usually occurs when there are issues in the VBA code, affecting the PivotTable data source or field references. You can check field names referring to PivotTable or Workbook.RefreshAll function syntax and other errors in the code.
Method 8: Repair your Excel File
One of the reasons behind the “Pivot Table field name is not valid” error is corruption in the Excel file, containing the Pivot Table. You can repair your Excel file using Microsoft built-in utility - Open and Repair. Here’s how to use this utility:
In Excel, navigate to File > Open.
Click Browse to choose the affected workbook.
The Open dialog box will appear. Click on the corrupted file.
Click the arrow next to the Openbutton and then select Open and Repair.
You will see a dialog box with three buttons - Repair, Extract Data, and Cancel.
Click on the Repair button to recover as much of the data as possible.
After repair, a message is displayed. Click Close.

Method 9: Use a Professional Excel Repair Tool
If the Excel file is heavily damaged or corrupted, then the “Open and Repair” utility may not work or provide the intended results. In such a case, you can opt for a professional Excel repair tool. Stellar Repair for Excel is an advanced Excel file repair tool, which is highly recommended by experts. It can repair severely corrupted Excel files and restore all the data from corrupt file, including pivot tables. This tool comes with a user-friendly interface that even a non-technical user can use. You can try the software’s demo version to check how it works. The software is fully compatible with all Excel versions, including Excel 2019.
Conclusion
The Excel error “Pivot Table field name is not valid” can occur due to hidden or merged column/row headers, empty columns/rows, corrupted pivot table, and various other reasons. You can try the methods mentioned above to fix the error. If this error has occurred due to corruption in the Excel file, then you can use Stellar Repair for Excel - an advanced tool to repair corrupted pivot table, macros, fields, or other elements in an Excel file. It is compatible with all Windows editions, including the latest Windows 11. It can help fix the error if the data source or Pivot table configuration is affected by corruption.
[Fixed] Excel PivotTable Overlap Error | Troubleshooting Guide
In Excel, you need to refresh the pivot table data source after adding new data. However, sometimes, while refreshing the pivot table, you may experience an error “PivotTable Report cannot Overlap.” This issue usually appears when there are multiple pivot tables in a single worksheet. It often occurs when you try to place one pivot table on top of another or if you try to set a common cell range to multiple pivot tables. However, there are many other causes associated with the error.
Reasons for a pivot table report cannot overlap another pivot table report issue:
- Merged cells in a pivot table may cause the overlap issue
- Using the same range of cells for multiple pivot tables
- Hidden columns
- Preserve formatting option is enabled
- Modifying the pivot table using a macro that is corrupted
- Using the workbook.RefreshAll method incorrectly
- Number of pivot items goes beyond the number of cells available
- Excel file is corrupt
- Corrupted Pivot table
- Some columns are labeled with the same name
Methods to Fix Excel PivotTable Report Cannot Overlap Error
You can get the pivot table overlapping issue if the field in pivot table crossed the maximum items limit. According to the Microsoft guide, you can specify up to 1,048,576 items to return per field. Check the cell fields in your pivot table. Also, make sure each column’s label is unique. Sometimes, the hidden columns or hidden sheets can also prevent you from modifying the pivot tables. You can check for hidden columns in the Data view.
If the error still persists, then try the below-mentioned methods to fix the error.
1. Move the Pivot Table to a New Worksheet
The “PivotTable Report cannot Overlap” error can occur if there is an issue with the columns in the pivot table. In this case, you can try moving the pivot table to a new worksheet. Moving the pivot table to a different worksheet automatically resets the column width according to the new sheet and creates space that can help in preventing the overlapping issue. Here are the steps to do so:
2. Disable the Background Refresh Option
When the background refresh option is enabled, then Excel updates the pivot table in the background after every minor change. It may create issue if you have a large-sized Excel file with multiple pivot tables. You can try disabling the background refresh option. Here’s how:
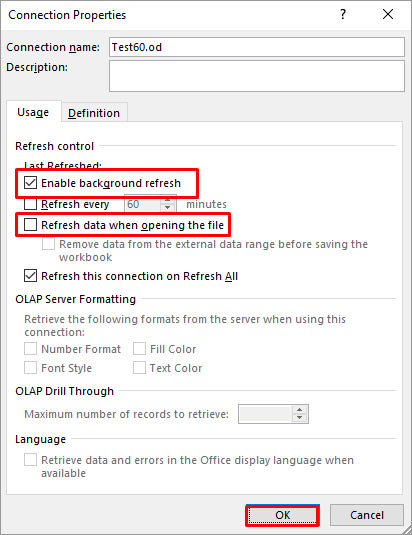
The Connection Properties dialog box is displayed. Unselect the “Enable background refresh” option and select the “Refresh data when opening the file”
Click **OK.
**
3. Disable Autofit Column Widths
When the Autofit column widths option is enabled, Excel automatically resizes the pivot table whenever you make changes to it. These automatic adjustments can sometimes add or remove fields which can result in the PivotTable Report cannot Overlap issue. To fix this, you can disable the “Autofit column widths on update” option. To do this, follow these steps:
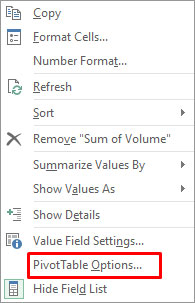
Right-click on any field on the pivot table.
Select **PivotTable Options.
**
In the PivotTable Options window, unselect Autofit column widths on update.
Click on the OK.

4. Check the Workbook.RefreshAll Method
Several users have reported experiencing the “Excel PivotTable Report cannot Overlap” error when using the Workbook.RefreshAll method. This method is used to refresh data ranges in the pivot report. Sometimes, the error can occur due to missing variable that is representing an object (workbook) in a query. So, make sure you’re using the Workbook.RefreshAll function correctly.
5. Repair your Excel File
You may also encounter the “A PivotTable Report cannot Overlap” error if the Excel file is corrupted. You can use the inbuilt utility in Excel - Open and Repair to repair the corrupt file. Here’s how:
- In your Excel application, click on the File tab and then click Open.
- Click Browse to select the desired file.
- In the Open dialog box, click on the corrupted file.
- Click on the arrow next to the Open button and then click Open and Repair.
- Click on the Repair
- In the displayed message, click Close.
If the “Open and Repair” utility fails to fix the issue, then it means there is high level of corruption in the Excel file. To tackle this, you can take the help of a professional Excel file repair tool, such as Stellar Repair for Excel. The tool can easily repair severely corrupted Excel file and recover all the objects of the file, such as pivot tables, macros, charts, etc. with 100% integrity. You can download the free trial version of the tool to check its functionality.
Conclusion
In this article, we have discussed the possible reasons behind the “PivotTable Report cannot overlap” error in Excel. You can follow the methods mentioned above to fix the issue. The error may also occur if the Excel file gets corrupted. In this case, you can try repairing the corrupted Excel file using the Open and Repair utility or consider using Stellar Repair for Excel . The tool makes the process of repairing the Excel file smooth and quick.
Excel AutoRecover not working, what is next?
Consider a Scenario
A professional with Windows 10 computer had MS Office 2016 installed on it. For an official purpose, he worked on an Excel workbook and saved it as an XLSX file. After working for hours on it, which was saved with a file name, a power outage occurred in his building for quite some time. After the power was back, he reopened Excel to find a list of recovered files in ‘Document Recovery’ section on the screen’s left side. However, the file that he had worked on recently was the ‘Original version,’ i.e. the last version saved by him and not the auto-saved Excel file. This meant the Excel document did not have any new data that was entered since the last time he saved it. Consequently, he lost hours of work. According to him, this happened despite the fact that the ‘AutoRecover’ feature was enabled. (Still, this needs to be checked and ensured.)
The ‘AutoRecover’ feature might not work in any of these cases:
- AutoRecover Feature is disabled - With this feature disabled, the Excel files are not auto-saved if the document is closed without saving, or the document closes unexpectedly due to an untoward incidence. To check, see if ‘Save AutoRecover information every * minutes’ and ‘Keep the last auto-saved version if I close without saving’ checkboxes are checked or unchecked. If either one is unchecked or both are unchecked, it signifies that the AutoRecover feature is disabled. Else, the AutoRecover is enabled.
- Corruption in the Excel XLSX file – If ‘AutoRecover’ is enabled, most probably the cause is ‘damaged Excel XLSX file.’
Before discussing solutions to resolve the ‘Excel AutoRecover not working’ issue, let’s have an overview of the ‘AutoRecover’ and ‘AutoSave’ features.
A Brief Overview of Excel AutoRecover and AutoSave Feature
AutoRecover is an inbuilt feature in MS Excel 2019, 2016, 2013, 2010, 2003, and 2007 that allows saving all of the ‘open Excel files’ at a fixed-interval in a user-specified location or AutoRecover file location. Besides, AutoSave is an add-in that exists in Excel 2002 and earlier versions to save all open Excel files in case of a crash, power outage, or accidental closure of Excel files without saving. Users can recover these files if Excel closes suddenly, for instance, at the time of power outage or failure. The auto-recovered Excel files are saved at a default location.
Methods to Fix ‘Excel AutoRecover Not Working’ Issue
Manual Methods
Method 1 - Enable the ‘AutoRecover’ Feature if Disabled
Make sure that you have the ‘AutoRecover’ feature enabled in your Excel application. If not, follow these steps to enable it:
- Open Excel with MS Excel 2016/2019
- Click on File and then on Options tab
- In ‘Excel Options’, click on Save tab
- Check ‘Save AutoRecover information every * minutes’ and ‘Keep the last auto saved version if I close without saving’ box
- Set the time in ‘Save AutoRecover information every * minutes’
- Click on the OK button
Note: With this method, it is not possible to recover data from the current Excel file. From next time onwards, the AutoRecover feature starts working following which Excel shall start auto-saving Excel files as per the time set in ‘Save AutoRecover information every * minute’.
Method 2 - Repair Corrupt Excel File
If corruption in Excel XLSX file has resulted in ‘Excel AutoRecover not working’ issue, you will need to repair Excel file . Use ‘Open and Repair’ inbuilt utility to fix and repair the damaged (corrupt) Excel file and extract its data. To use the inbuilt utility, execute the following steps:
- Go to location “C:\Users\AppData\Local\Microsoft\Office\UnsavedFiles” to find Excel TMP files and save it as XLSX file
Note: In Windows 8, the location is the same as mentioned above that is for Windows 10. In Windows 7, the location is “C:\Users\name\AppData\Roaming\Microsoft\Excel\”
- Open a blank Excel sheet; click File >> Open
- Go to the location and folder containing the damaged Excel file
- In the Open dialog box, choose the damaged Excel file and click the arrow next to the Open button, and then click Open and Repair
- In the window that appears, click Repair to recover as much data as possible
Now, open the Excel (XLSX) file to check if the Excel file is repaired and its data is recovered.
Use a Professional Excel File Repair Tool
Using a third-party Excel file repair tool can help you repair damaged Excel XLSX file and recover all the data. Stellar Repair for Excel is one tool you can rely on to repair severely corrupt Excel files (XLSX or XLS).
Here are a few other reasons why you should choose Stellar Repair for Excel software:
- Repairs Excel file while keeping the worksheet properties and cell formatting same as before.
- Recovers all of the Excel file components like tables, forms, reports, charts, chart sheets, cell comments, formulas, images, etc.
- Can batch repair multiple Excel files simultaneously
- Supports Excel 2019 and earlier versions

Conclusion
To help resolve the problem of ‘AutoRecover not working’, different methods have been discussed, depending on the cause of the problem. These solutions can be implemented to check the possibility of getting back maximum data added in last saved version of the Excel file. However, to fix corruption in the excel file, using a specialized tool such as Stellar Repair for Excel software recommended by MS Excel Experts and MVPs can help. The software can repair severely damaged Excel file easily and efficiently.
Quick Fixes to Repair Microsoft Excel 2013/2016 Content related error
Summary: The blog outlines some quick tips to fix ‘We found a problem with some content’ error in Microsoft Excel 2013/2016. It explains manual procedure to resolve the error and also suggests an automated tool to perform the repair process to retrieve all possible data from a corrupt workbook.

Sometimes, when opening an MS Excel file, you may receive an error message that reads:
“**We found a problem with some content in ‘filename.xlsx’. Do you want us to try to recover as much as we can? If you trust the source of this workbook, click Yes.**“

Figure 1 – Excel ‘found a problem with some content’ Error Message
What Causes ‘We Found a Problem with Some Content’ Error?
There is no clear answer as to what results in the Excel error – ‘**We found a problem with some content in <filename.xlsx>**’. However, based on some user experiences, it appears that the error occurs due to corruption in an Excel workbook. It may turn corrupt when:
- You try opening the Excel file saved on a network-shared drive.
- A string is added in a cell in Excel, instead of a numeric value.
- Text values in formulas exceed 255 characters.
How to Resolve ‘We Found a Problem with Some Content’ Error?
Follow these tips to fix the Excel error:
IMPORTANT! Before you follow the tips to resolve the Excel error, keep these points in mind: Make sure you have closed all of the opened Excel workbooks. Try restoring Excel file data from the most recent backup copy. If you don’t have a backup copy, make a copy of the corrupt Excel file and perform repair and recovery procedures on that backup copy.
Tip #1: Repair Corrupt Excel File
File Recovery mode is a native Excel recovery utility that automatically opens whenever any inconsistencies are found in the worksheet. If Microsoft doesn’t detect any issue or fails to open the File Recovery mode, you can start it manually to recover the corrupt Excel file. To do so, follow the steps below:
- Click on the File menu, and then select Open.
- In the Open dialog box, navigate to the folder location where the corrupt Excel file is saved.
- Select the corrupt file, and then click on arrow sign available next to Open button to select Open and Repair option.

Figure 2 – Open and Repair Feature in Excel
- Next, click Repair to recover maximum possible data.
- If the repair is not able to recover the data from the workbook, select Extract Data to extract all possible formulas and values from the workbook.
If repairing the corrupt Excel file doesn’t work, you can try an Excel file repair tool to fix corruption errors. You can also try to recover data from the corrupt file manually by following the next tips.
Read this: What to do when Open and Repair doesn’t work?
Tip #2: Set Calculation Option to Manual
To make the file accessible, try setting the calculation option in Excel from automatic to manual. As a result, the workbook will not be recalculated and may open in Excel. For this, perform the following:
- Click File, and then click New.
- Under New, click the Blank workbook option.
- When a blank workbook opens, click File > Options.
- Under the Formulas category, pick Manual in the Calculation options section, and then click OK.

Figure 3 – Select Manual in Calculation options
- Now, again click on the File menu and then click Open.
- Navigate to the corrupt workbook, and double-click it.
When the workbook opens, check if it contains all the data. If not, proceed to the next tip.
Tip #3: Copy Excel Workbook Contents to a New Workbook
Several users have reported that they were able to fix ‘We found a problem with some content in
- Open the Excel workbook in ‘read-only’ mode, and copy all its contents.
- Create a blank new workbook and paste the copied contents from the corrupt file to the new file.
Tip #4: Use External References to Link to the Damaged Workbook
Use external references to link to the corrupted workbook. By implementing this fix, data contents can be retrieved. However, it is not feasible to recover formulas or calculated values using this solution.
Follow the steps below:
- In Excel 2013/2016, click File > Open.
- Navigate to the folder where the corrupt file is saved.
- Right click the file, select Copy, and then click on Cancel.
- Again, click on File and then New.
- Under New option, click on Blank workbook.
- In the cell A1 of new workbook, type =File Name!A1 (where File Name indicates the name of the damaged workbook being copied in Step 3).
- If Update Values dialog box appears, click the corrupt workbook, and choose OK.
- If Select Sheet dialog box appears, click the appropriate sheet, and then click OK.
- Select cell A1.
- Next, click Home, and then click Copy (or, press Ctrl +C).
- Starting in cell A1, select area approximately the same size as that of the cell range that contains data in the damaged workbook.
- Next, click Home and select Paste (or click Ctrl + V).
- Keep the range of cells selected, click Home and then Copy.
- Finally, click on Home, click on the arrow associated with Paste and under Paste Values click on Values.
This will remove the link to the corrupt workbook and will retrieve data. But, keep in mind, the recovered data will no longer contain formulas or calculated values.
Alternative Solution – Stellar Repair for Excel
If the above manual methods fail to fix the ‘We found a problem with some content in Excel error’, try using the Stellar Repair for Excel software to resolve this error. The software helps repair and recover corrupt Excel files in just a few clicks. It can be used on a Windows 10/8/7/Vista/XP/NT machine to repair a corrupted workbook and recover every single bit of data from all the versions of the Excel workbook.

Read this: How to repair corrupt Excel file using Stellar Repair for Excel?
Conclusion
In this blog, we discussed some possible reasons behind Microsoft Excel 2013/2016 ‘We found a problem with some content’ error. The error may occur when an Excel file becomes corrupt. You may try repairing the corrupted Excel file manually by using the built-in ‘Open and Repair’ feature. Or, try the manual workarounds to extract data from the corrupt file discussed in this post. If the manual solutions don’t work for you, using Stellar Repair for Excel can come in handy in repairing the corrupt Excel (.xls/.xlsx) file and recovering the complete file data.
Best Excel Repair Software till Date - Try Now
Summary: In this blog, we overview and conclude Stellar Repair for Excel as Best Excel Repair software till date – based on its distinctive features and capabilities. Also, you’ll get to know what makes it the top Excel repair software from the perspective of recognized review websites, tech community forums, and users. In addition, you’ll find the simple and step-wise process of repairing Excel by using the software.
Corruption in Excel files can hamper workflow, bringing productivity to a halt. And what can be more concerning is that you may lose sensitive data if the corrupt or damaged file is not repaired on time. An Excel file may get corrupted due to various reasons.
Common Reasons Behind Excel File Corruption
- Abrupt system shutdown
- Human errors such as accidental deletion, formatting, or overwriting an Excel workbook
- Damaged Excel installation
- Hardware failure
- Virus infection or malware attack
- Bad sectors on the hard drive on which Excel files reside
- Large-sized Excel file
Regardless of the reason, manually troubleshooting corruption errors in an Excel file can drain time, resources and may even cause data loss. However, using a third-party professional tool such as Stellar Repair for Excel can save you the manual efforts and time in repairing Excel files, keeping the original data intact.
What Makes Stellar Repair for Excel the Best Software?
While there is no dearth of Excel file repair tools, Stellar Repair for Excel software has garnered considerable interest and positive reviews by MVPs . The software has remarkable features that make it the Excel file repair specialist.
Key Features of Stellar Repair for Excel Software
Though the software encompasses several great features and a simple-to-use and intuitive user interface, some of the key features that make it the best Excel repair software are:
- Restores Excel (XLS / XLSX) File in Original, Intact State
The software repairs corrupt Excel files and restores all the data in the original format. Also, it helps restore the original properties of cell formatting of the workbook.
- Capability to Resolve all Excel Related Errors
Most errors that crop up unexpectedly while working with Excel files are the result of damages caused due to human errors, virus infection, power surges, etc. The software can help you easily fix corrupted Excel files to get rid of errors such as “Excel is not responding ”, “Excel found unreadable content in name.xls ”, “Excel cannot open the file filename.xlsx”, etc.
- Real-Time Pre-Recovery Preview
It provides users with the opportunity to preview recoverable Excel file items before saving them. This helps users estimate how much data they will be able to salvage by using the tool, thus helping them make an informed decision about investing in the software.
Besides these features, some other aspects that make the software a recommended choice for Excel repair are as follows:
- 100% Secure****: Downloading and installing this software is 100% safe and secure, since Norton antivirus security comes installed with it.
- Tested by MVPs****: Stellar Repair for Excel software is tried and tested by credible MVPs.
- Allows Testing before Purchase: The software’s demo version lets you understand the tool and its advantages before buying it.
- Stellar is Microsoft Gold Partner****: The software’s vendor, Stellar Data Recovery, is a certified Gold partner for Microsoft.
Stellar Repair for Excel – The Most Recommended Software
Check out the user ratings and reviews to understand why Stellar Repair for Excel ranks as the top Excel file repair software, and why you should choose it over its competitors:
- Capterra – 4/5
A user has shared how effectively the Stellar Repair for Excel software repaired and restored the corrupted Excel file.

- g2.com – 4.5/5
The Excel Repair software got a rating of 4.5/5 on g2.com based on the positive reviews of the users.

- Softpedia – 3.5/5
Softpedia gave the product a rating of 3.5/5 and reported it as 100% clean (meaning without malware).

Support and Compatibility
Stellar Repair for Excel software supports the latest MS Excel versions 2019, 2016, 2013, and lower versions. It can operate smoothly on Windows 11, 10, 8.1, 8, 7, and earlier operating systems.
System Requirements
Stellar Repair for Excel requires a minimum Pentium Class Processor with 2 GB minimum memory and 250 MB of free storage drive space.

How to Use Stellar Repair for Excel Software to Repair Excel Files?
Follow these steps for repairing damaged or corrupt Excel files:
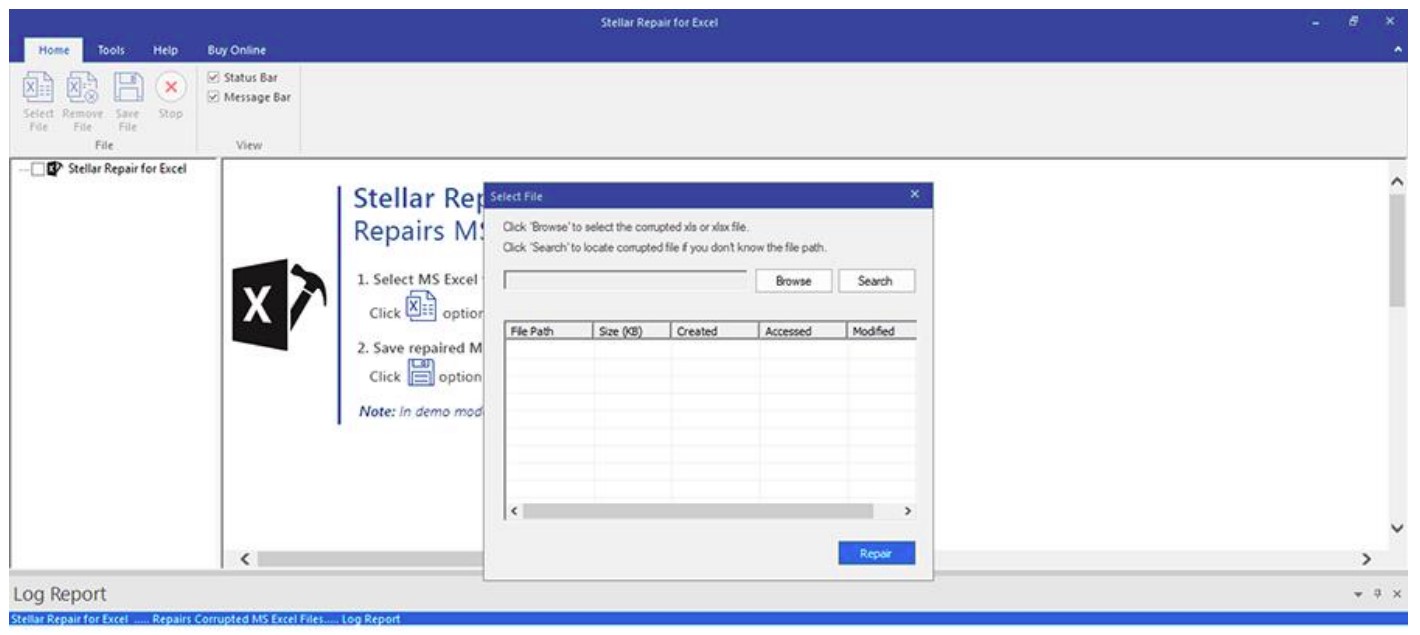
- Run the software and from the main software screen, select the corrupt Excel files you want to repair by clicking Browse or Search.

- Once the file is selected, click Repair to begin repairing the corrupt file.

- When the scanning finishes, all recoverable data is displayed in the left-pane of the preview window. Click on any item to preview its content in the right-pane.

- For saving the file, click the Save File button on the Home menu.
- When prompted, select a target location to save the repaired file and click OK.

The repaired Excel file will now get saved in the selected target location.
Concluding Lines
Stellar Repair for Excel software empowers users to repair Excel (.XLS/.XLSX) files and restore worksheet data in the event of file corruption and data loss. More importantly, the software performs granular-level recovery to restore the complete file items while preserving worksheet properties and visual representation.
[Solved] : How to Fix MS Excel Crash Issue
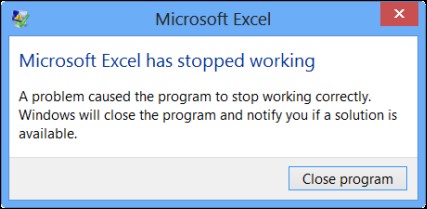
Microsoft Excel may stop responding , hang, freeze, or stop working due to several reasons, such as in compatible add-ins. In such a case, you may receive one of the following error messages.
- Excel has stopped working

- Excel is not responding
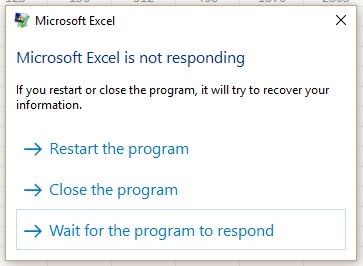
- A problem caused the program to stop working correctly. Windows will close the program and notify you if a solution is available.
Why Does Excel Keep Crashing?
If Excel keeps crashing on your PC while opening a workbook, saving Excel file, scrolling or editing cells, etc., it indicates a problem with your Excel program or the Excel file.
Microsoft Excel may crash due to any one or more reasons given below,
- Incompatible Add-Ins
- Outdated MS Excel program
- Conflict with other programs or antivirus tool
- Excel file created by third party software
- Problem with network connection
- Combination of Cell formatting and stylings
- Problem with MS Office installation
- Partially damaged or corrupt Excel file
Problems Caused by Excel Crash Issue
Microsoft Excel crash may cause damage to Excel file and also lead to Excel (XLS/XLSX) file corruption.
Such corrupt Excel files can’t be opened or accessed via MS Excel app. If you try to access a corrupt Excel file, MS Excel may fail to open the file or stop responding and crash. Additionally, you may receive the following or similar error message,
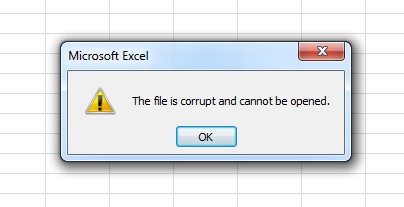
In such a case, you should immediately try to recover the Excel file. You may do so by restoring the Excel file from backup or by using an Excel File Repair software. Otherwise, continue following this guide.
How to Solve Excel Crash Issue?
Before heading to solutions, follow these troubleshooting steps to resolve the Excel Crash issue.
Step 1: Copy File to Local Drive
If you are trying to access and edit or view an Excel file from a network drive, try moving the file to local drive. This will help you find if there is something wrong with the file or the network.
Step 2: Ensure Sufficient Memory
Excel files can grow fairly large when you start adding lots of formatting and shapes. Make sure that your system has enough RAM to run the application.

If you often work with large Excel files and complex data values& formulas, then install 64-bit versions of MS Office. It will give you an advantage of larger processing capacities and prevent Excel from crash or freeze.
Step 3: Check If Excel is Open and In Use by Another Process
Open Task Manager and close all processes or apps (tasks) that may be using or have access to your Excel file that you are working on. You can find this detail in status bar of Excel program at the bottom of program window.
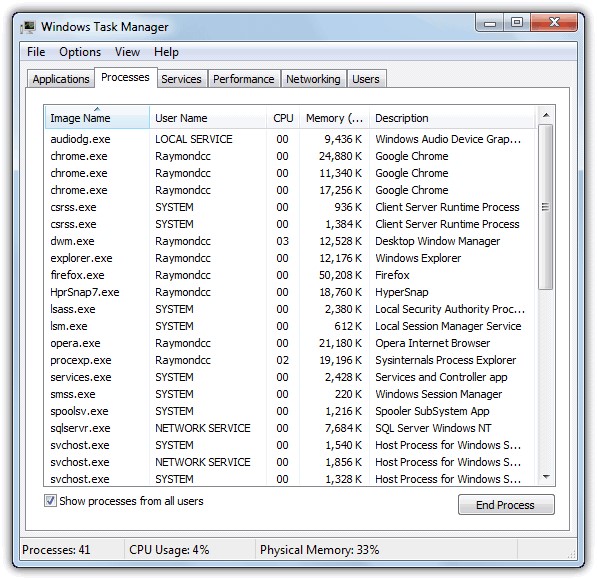
After closing the tasks, try to access the Excel file and check if this fixes the performance and crash problem in Excel.
Step 4: Test and Repair Excel File
Create a copy of the Excel file and install Stellar Repair for Excel software. It’s free to download. Scan and repair your Excel file using the software. After repair, save the Excel file at your desired location and then open the Excel file in the MS Excel program.
This should ideally fix all the issues with Excel.
However, if the Excel program still crashes, the problem lies within the system or program. Follow the solutions discussed in this guide to try to fix the Excel crash issue.
NOTE: To save repaired Excel file using the mentioned software, you must purchase the activation key and activate it.
Solutions to Fix MS Excel Crash Issue
Following are some solutions to resolve problems with MS Excel such as,
- Excel not responding
- Excel won’t open
- Excel keeps crashing
Follow these solutions in the given order. In case a method doesn’t work, move to the next one.
Solution 1: Restart Excel in Safe Mode
By starting MS Excel in safe mode, you can run the program without loading the Excel add-ins and with limited features. But COM add-ins are excluded.
To launch Excel in safe mode, close MS Excel and follow these steps,
- Create a shortcut of MS Excel (.exe) on Desktop
- Press and hold the Ctrl key while launching the program
- Click ‘Yes’ when a prompt appears to confirm
Alternatively, press Windows+R, type excel /safe and press ‘Enter’. Use this to open Excel in safe mode on Windows 10, 8.1, 8, or 7 system.

Now try to open and access the Excel file and check if the issue is resolved. If it’s not, head on to the next solution.
Solution 2: Check and Remove Faulty Add-ins
In case Excel doesn’t crash in Safe Mode, it’s possible that some faulty add-ins are the culprit behind frequent Excel crash and freeze. These Excel add-ins may interfere or conflict with the Excel program.
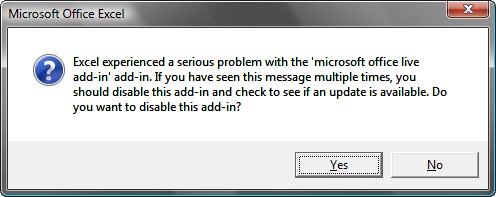
Find and remove the faulty add-in. It can resolve the issue. To do so, follow these steps,
- Restart Excel in normal mode and go to File> Options> Add-ins
- Choose COM Add-ins from the drop-down and click Go

- Uncheck all the checkboxes and click OK
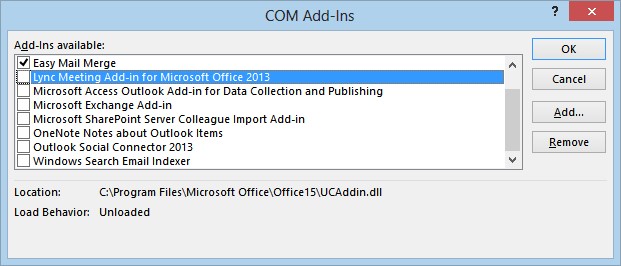
- Restart Excel and check if the issue is resolved
- If Excel doesn’t crash or freeze anymore, open COM Add-ins and enable one add-in at a time followed by Excel restart. Then observe Excel for freeze or crash problem
This will help you find out the faulty add-in, which is causing the problem. Remove the add-in which is causing the problem to resolve the issue. If that doesn’t fix, move to the next solution.
Solution 3: Check and Install the Latest Updates
If you haven’t set Windows to Download and Install Updates automatically, do it now.
Apart from updating the operating system, latest Windows updates sometimes fixes bugs for other applications installed on the system such as MS Office. Often installing an important update that you might have missed may correct the Excel crash problem.
You can also update MS Office manually. Follow these steps,
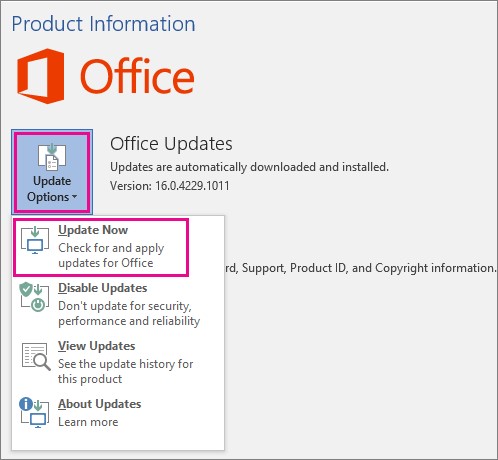
Go to File > Account
Under Product Information, select Update Options and click Update Now
If you have installed MS Excel from Microsoft Store, open the store and update your Office applications.
NOTE: This also works if you can’t open Excel file or Excel crashes after Windows upgrade from Windows 7 or Windows 8/8.1 to Windows 10.
After installing the latest MS Office updates, check if Excel works fine. If not, head to the next solution.
Solution 4: Clear Conditional Formatting Rules
If a sheet is causing Excel to freeze or crash, there might be a problem with that particular sheet. In such a case, you may try clearing the Conditional Formatting rules. The steps are as follows,
- Under Home, click ‘Conditional Formatting > Clear Rules> Clear Rules from Entire Sheet’
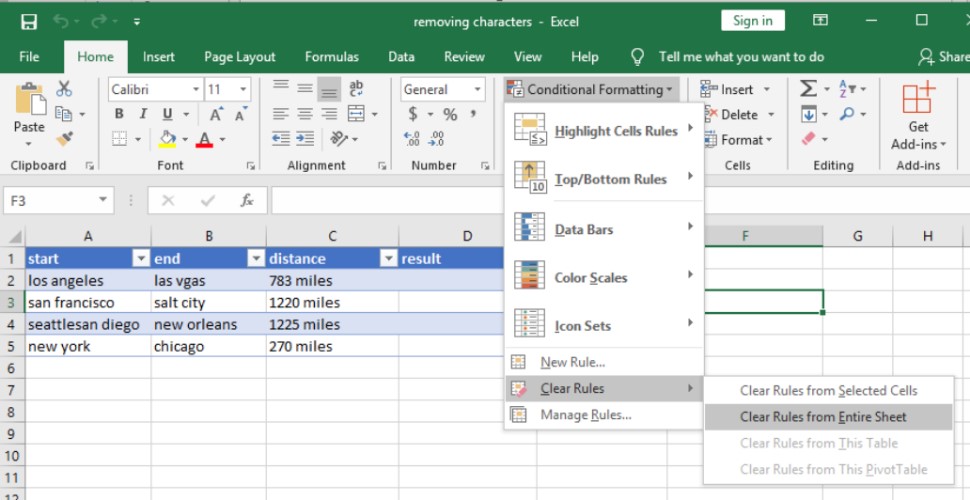
- You may repeat this step for all other sheets in the Excel workbook
- Then click File> Save as and save the Sheet as a new file at a different location
This avoids overwriting or making changes to the original Excel file. Once done, try working on the sheet.
If this doesn’t work out, move to the next solution.
Solution 5: Remove Multiple Cell Formatting and Styles
If a workbook is being shared and edited by others on different platforms then it’s possible that many cells are formatted differently. This can cause issues with Excel such as crash and freeze. It can also lead to Excel file corruption. The problem mostly occurs when a workbook contains multiple worksheets using different formatting.
You can follow this guide to remove different cell formats and styles, and then open the Excel file.
Solution 6: Disable Microsoft Excel Animation
Animations require additional processing power and resources. By disabling animations in Excel, you may resolve Excel freeze and crash issue. This also improves MS Excel performance.
To disable the animations in MS Excel, follow these steps:
- Go to File > Options
- Click ‘Advanced’ and check ‘Disable hardware graphics acceleration’animation
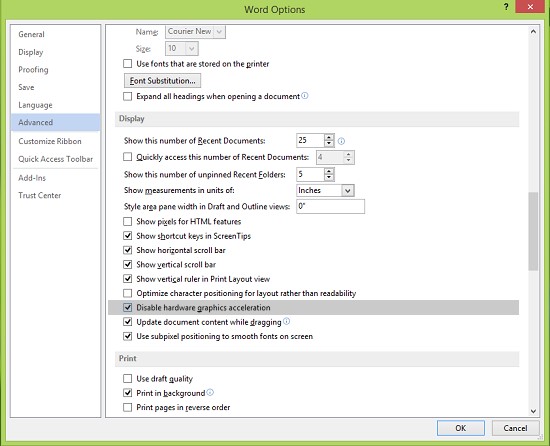
- Click ‘OK’ to close the window and then restart MS Excel
This has helped many users in fixing the Excel crash issue. If it doesn’t work for you, head to the next solution.
Solution 7: Check If Excel File is Generated by a Third-Party Application
There are applications which you may have used to generate Excel files to fetch data. For instance, downloading data from Google Analytics in Excel format.
Sometimes, these Excel files are not generated correctly by such third-party apps. Thus, some features in Excel may not work as intended when you access the files in MS Excel.
In such a case, you should get in touch with the app developer for help with the file or use Stellar Repair for Excel to repair such Excel files.
Solution 8: Check If Antivirus or Other Apps are Conflicting with MS Excel
Ensure your antivirus is up-to-date and not conflicting with MS Excel. An outdated antivirus tool may conflict with Excel which can cause the application to hang, freeze, or crash.
- Update your antivirus
- Try disabling the add-in or integration between Excel and antivirus. See if it works
Alternatively, you may disable the anti-virus tool temporarily to check if it is the culprit behind Excel performance issue and crash. If that resolves the problem, get in touch with your antivirus vendor and report the problem.
They might provide you with a better solution or workaround to fix this problem without disabling the antivirus protection.
IMPORTANT NOTE: Disabling or altering antivirus protection makes your PC vulnerable to malicious attacks and virus or malware intrusion.
Solution 9: Clean Boot Windows to Inspect the Cause Behind Excel Crash
When Windows boot, it starts several processes, services, and application during start up automatically, which runs in the background.
These startup apps and services can interfere with other applications such as MS Excel. To find out if that’s the cause behind Excel crash, you can perform a Clean Boot.
This helps you identify processes, services, or applications that are conflicting with Excel. Steps to perform Clean Boot are as follows,
- Press Windows key + R, type MSConfig, and press ‘Enter’
- In System Configuration window, click on the General tab and choose Selective startup
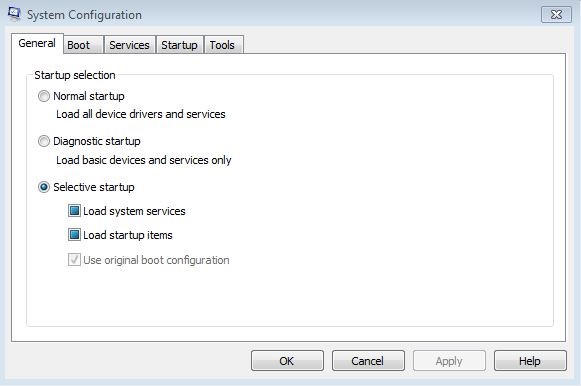
Uncheck ‘Load startup items’ and click ‘OK’
After this, close all running applications and restart your PC
Check if the crash problem with Excel is resolved. Uninstall the conflicting apps or update them. If your issue is not resolved, follow the next solution.
Solution 10: Repair or Reinstall MS Office
Repairing Office programs may also resolve Excel crash issues if caused by damaged MS Excel program or MS Office files. The steps are as follow,
- Close all MS Office apps and open the Control Panel
- Click Uninstall a program under Programs
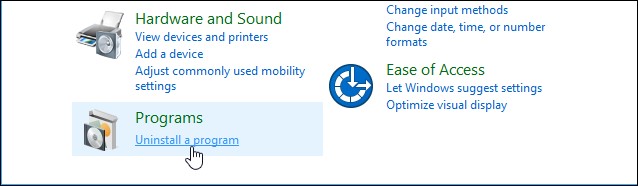
- Click on Microsoft Office and then click on the Change option
- Choose ‘Quick repair’ and then select ‘Repair’
- Click ‘Continue’ to repair MS Office installation
You may also try ‘Online Repair’ if this fails to fix the issue. After repair, if the Excel issue persists, reinstall MS Office.
Need More Help?
If none of the above-mentioned solutions worked for you, it indicates that the problem is not with the Excel program but with the Excel file. If you haven’t tried the Stellar Repair for Excel software, do it now.
Select the Excel file which is causing the problem and repair it with the software. It’s a powerful Excel repair software that can fix all the problems with Excel files (XLS/XLSX). It repairs corrupt and severely damaged Excel files.
The software is compatible with all Excel files created using MS Excel 2019, 2016, 2013, 2010, 2007, 2003 or 2000.
After repairing and saving the Excel file, you can open it in your MS Excel program and work on it without any performance issue. To know more about this software, visit this page.
[Fixed]: Freeze Panes not Working in Excel
Summary: This blog discusses the “freeze panes not working” issue in Excel. It mentions the possible reasons behind the issue and offers workarounds and methods to fix it. If the issue is associated with corruption in the Excel file, you can use the specialized Excel repair tool mentioned in the blog to repair the affected file.
The freeze panes feature in Excel is used to freeze the row/column headings to keep them visible while scrolling the worksheet. It is a useful feature when you’re working on a large worksheet containing data that exceeds the rows and columns on the screen. Sometimes, you notice that the ‘Excel freeze panes feature is not working’. There could be numerous factors that can trigger this issue. Let’s know the reasons for the freeze pane not working issue in Excel and how to resolve this issue.
Why can’t I freeze panes in excel?
Several factors may contribute to the Excel freeze panes not working issue in Excel. A few of them are:
- The cell editing mode is enabled in the workbook in which you are trying to use the Freeze Panes feature.
- The Excel file is corrupted.
- The worksheet is protected.
- Advanced Options are disabled in Excel Settings.
- The Excel application is not up-to-date.
- You might be trying to lock rows in the middle of the worksheet.
- Your Excel workbook is not in normal file preview mode.
- Wrong/incorrect positioning of the frozen panes.
How to fix ‘Freeze Panes not Working’ in Excel?
The freeze panes option is available in the View bar. Sometimes, you’re unable to see the View option. It usually occurs if you are using the Excel Started version. Check and try to open the file in the advanced Excel version, which supports all the features. If you are using the advanced Excel version, then try the below workarounds to fix the freeze panes not working issue in Excel.
Workaround 1: Exit the Cell Editing Mode
If your Excel file is switched from normal file view mode to cell editing mode, you can encounter the freeze panes not working issue. In cell editing mode, certain features in Excel, such as the freeze panes, are temporarily disabled to prevent any conflicts. You can disable cell editing mode by pressing the ESC or Enter key. Now locate the View tab and check whether the freeze pane feature is working. If not, then try the next workaround.
Workaround 2: Change the Page Layout View
The Excel freeze panes not working issue can also occur if your workbook is opened in Page Layout view. The Page Layout view doesn’t support freeze panes. If you select page layout, the freeze panes option gets disabled.

To enable the freeze pane option, go to View and click the Page Break Preview tab.

Workaround 3: Check and Remove Options under the Data Tab
Sometimes, you can experience the “freeze panes not working” issue if Sorting, Data Filter, Group, and Subtotal options are enabled in Excel workbook. Such options, when enabled, can lead to unexpected problems with the freeze panes’ functionality. You can check and remove these features from your workbook. To do so, follow these steps:
- Open the Excel file in which you are getting the issue.
- Navigate to the Data tab.
- Check and remove the below features (if enabled):
- Sort
- Filter
- Group
- Subtotal

Workaround 4: Check and Unprotect Worksheet
The freeze panes feature may stop working if your worksheet is protected. You can try to disable the worksheet protection option. Here are the steps:
- In the Excel file, go to the Review tab.
- Click Unprotect Sheet.

After unprotecting the sheet, check whether the “freeze panes not working” issue is resolved. If not, follow the next workaround.
Workaround 5: Use Correct Cell Positioning
The freeze pane is not working issue in Excel can also occur when you use incorrect cell positioning to apply the freeze panes feature. Several users have reported facing this issue when trying to lock multiple rows with the wrong cell selection. So, use correct cell positioning to freeze the rows. For example, if you are trying to lock two rows in an Excel worksheet, then you need to click on 3rd row’s column.

What if the above Workarounds Fail to Fix the Freeze Panes not Working Issue?
If none of the above workarounds works, then there are chances that the workbook is damaged or corrupt. In such a case, you can try the below methods to repair the corrupt Excel workbook.
Run Open and Repair Utility
In case of corruption in the Excel file, you can use the Open and Repair tool in Excel to repair the file. To use this utility, follow these steps:
- In the Excel application, navigate to File and then click Open.
- Click Browse to select the workbook in which you are facing the issue.
- The Open dialog box is displayed. Click on the affected file.
- Click the arrow next to the Open option and then click Open and Repair.

- Click on the Repair option to recover as much data as possible.
- You can see a completion message once the repair process is complete. Click Close.
Use a Professional Excel Repair Tool
If the Open and Repair tool doesn’t work to resolve complex file-related issues and your Excel file is severely corrupted, you can opt for a reliable third-party Excel repair tool, such as Stellar Repair for Excel. This tool can help you repair the Excel file and recover all the data with complete integrity. You can try the software’s demo version to scan the affected file and preview the recoverable data. The software is compatible with all MS Excel versions and Windows operating systems, including Windows 11.
Closure
The “freeze panes not working” issue in Excel can occur due to several reasons, like protected worksheet, incompatible Excel version, and incorrect cell position. Try the workarounds shared in the blog to fix the issue. If the Excel file is corrupt, you can use Stellar Repair for Excel to fix the corruption issues in the file. This tool can quickly repair the Excel file and recover all the data from the file with 100% integrity.
Also read:
- How to recover old videos from your Realme GT 5
- How to Remove iPhone XS Face ID?
- How to recover old videos from your Honor 100 Pro
- How to Rescue Lost Music from Motorola Edge+ (2023)
- How to Downgrade iPhone 8 Plus to the Previous iOS Version? | Dr.fone
- How to Fix iPhone 15 Plus Storage Not Loading/Showing | Stellar
- How To Repair iPhone 13 System? | Dr.fone
- How to recover old videos from your Yuva 3
- How to solve MKV lagging problem in Razr 40 Ultra?
- How To Restore Missing Pictures Files from Yuva 2.
- How to recover deleted photos from Google Pixel Fold.
- How to restore wiped videos on Magic 6 Lite
- How to insert sign in .rtf file
- 4 Ways to Transfer Music from Xiaomi Redmi A2 to iPhone | Dr.fone
- How to retrieve erased messages from Vivo V27e
- Can I view AVCHD .mts files on Motorola Moto G84 5G?
- Does Nokia C12 Have Find My Friends? | Dr.fone
- Why Does My Poco C51 Keep Turning Off By Itself? 6 Fixes Are Here | Dr.fone
- In 2024, How To Unlock iPhone 6 Plus Without Passcode? 4 Easy Methods
- In 2024, About Huawei P60 FRP Bypass
- The Jaycut Handbook Mastering Free Online Video Editing in No Time for 2024
- How to Create Realistic Fire Effects
- New 2024 Approved Proxy Perfection Top Video Editing Software for 4K Creators
- Samsung Galaxy S23+ Screen Unresponsive? Heres How to Fix It | Dr.fone
- In 2024, How to Unlock Samsung Galaxy M34 5G Phone Pattern Lock without Factory Reset
- Title: How to fix Pivot Table Field Name is not Valid error in Excel 2021? | Stellar
- Author: Nova
- Created at : 2024-05-19 18:32:11
- Updated at : 2024-05-20 18:32:11
- Link: https://blog-min.techidaily.com/how-to-fix-pivot-table-field-name-is-not-valid-error-in-excel-2021-stellar-by-stellar-guide/
- License: This work is licensed under CC BY-NC-SA 4.0.
