
:max_bytes(150000):strip_icc():format(webp)/001_the-best-teen-movies-on-netflix-october-2023-5104880-3c4ee21786b64df693bfeebd65701d8e.jpg)
How to Fix the
How to Fix the #Value! Error in Excel?
Summary: #Value! is a common error that occurs when using formulas in Excel. It can be due to an issue with the cells you are referencing or use of formulas in the wrong type or format. This blog will discuss some cases when this error may occur and the solutions to fix the issue. You’ll also find about an Excel repair software that can help fix the error if it has occurred due to corruption in Excel file.

You may experience the #Value! error in Excel when trying to enter invalid data type into the formulas. Sometimes, it appears when a value is not the expected type or when dates are given a text value. This Excel error may occur due to several reasons. However, the exact cause of this error is difficult to find. Below, we will be discussing some cases where you may get this error and the solutions to resolve the issues.
Case 1: Wrong Argument Data Type in Formulas
Sometimes, Excel throws the “#Value!” error if it recognizes incompatible arguments in the formulas.
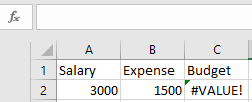
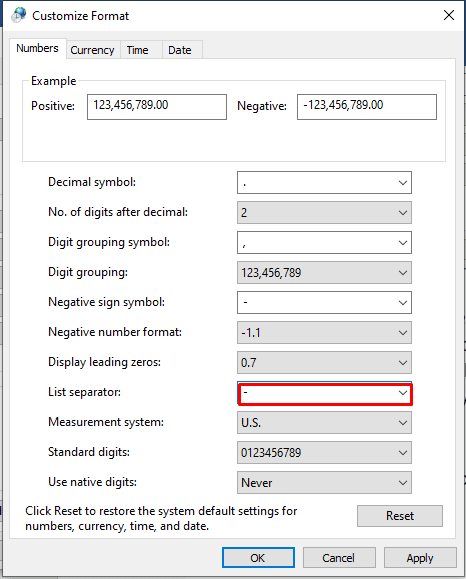
For example: The Date function in the sheet expects only numerical values as arguments. In the below image you can see that when the formula’s string value is used in the month (January), it resulted in the #VALUE! error.

Solution
To fix the issue,
- Double-click the formula to verify the type of arguments.

- Correct the argument in the cell (B2).
The formula will work as expected.
Case 2: Using the Basic Subtraction Formula
Users often experience the #Value! error, when using the basic subtraction formula in Excel.
Solution
Check the formula and the type of values in the cell. If these are correct and the error persists, then follow these steps:

- Go to the Start button on Windows, type Control Panel, and double-click on it.
- Click Clock and Region > Region.

- On the Format tab, click Additional Settings.
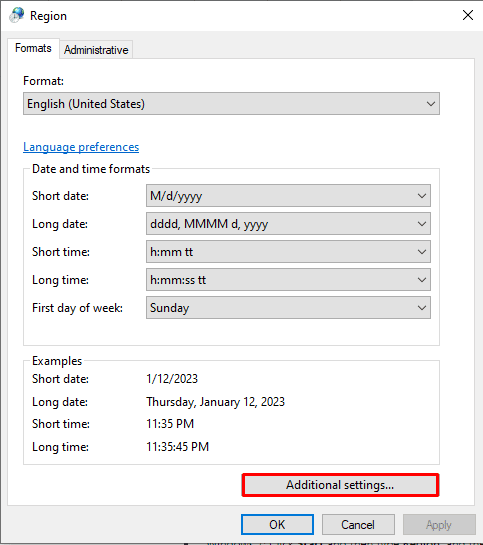
- In the Customized Format window, search for List Separator.
- Check if the List Separator is set to minus (-). Change it to comma (,).
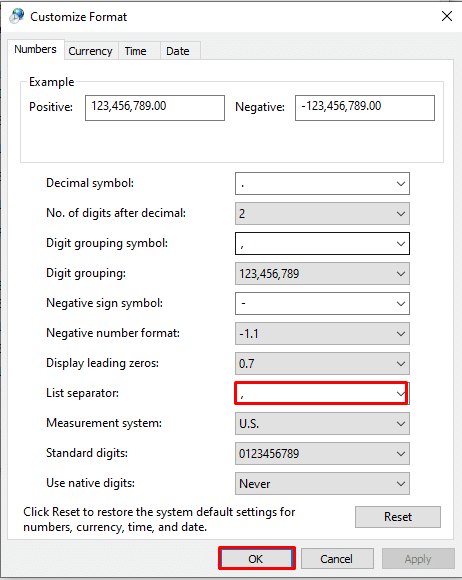
- Click OK.
- Now, open the Excel file and again try to use the formula.
Case 3: Wrong Text Value
The #Value! error can also occur due to the formula’s wrong value.
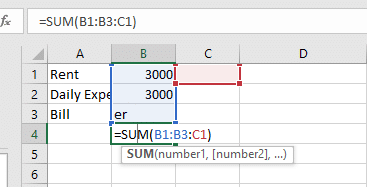
For example: If you are using the formula to add values in cells and Excel recognizes the unexpected text value, you may get a #Value error.

Solution
To fix the issue, you can correct the value or use the SUM function. It is recommended to use functions instead of operations to reduce the errors. In Excel, the formulas with math operators may not able to calculate the text in the cells. The SUM function automatically ignores the text value(er), calculates everything as numbers, and displays the result without the #Value! error.
Case 4: Blank Space in Cells
You may get the #Value! error if your formula refers to other cells with space or hidden space. Sometimes, spaces that make a cell display blank but actually they are not blank.

Solution
You can either delete the space or replace the blank space. Here’s how:
1. Delete the Blank Space
First, check if a cell is blank or not. To do this,
- Select the cell that looks blank.
- Press F2.

The blank cell won’t show space.
Then, press the Backspace key to delete the space. It will fix the error.

2. Replace Blank Space
You can also use the “Find and Select” option to replace the blank space in Excel. Here are the steps:
- Open the Excel file that shows #Value! error.
- On the Home tab, click Find & Select > Replace.

- In the Find what field, type a single space and delete everything in the “Replace with” field.
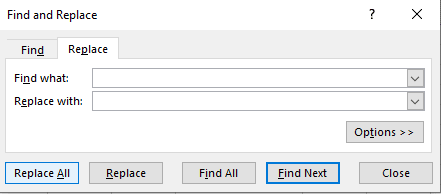
- Click Replace All > OK.

Case 4: Problem with Network Connection
Many users have reported experiencing errors when using Excel online due to problems with the network connection.
Solution
Check your Internet connection and see if it is working properly.
Case 5: Wrong Formula Format
If you enter the wrong formula with a missing parenthesis or comma, then Excel can throw the #Value! error. The error can also occur if the application finds a special character within a cell.
Solution
Correct the formula and use the ISTEXT function to find the cells with issues.
Case 6: Corruption in the Excel File
If none of the above works, then it indicates the Excel file is corrupt. The formulas in the Excel file do not work due to corruption.
Solution
You can use the Open and Repair utility in Excel if you are getting the error due to corruption in Excel file. In case the utility fails or the Excel file is severely corrupt, you can use a third-party Excel repair software, such as Stellar Repair for Excel. It is a powerful tool to repair corrupted or damaged Excel files and recover all its data, with 100% integrity. The tool supports Excel 2019, 2016, and older versions.
Closure
There are several reasons that can trigger Excel to throw the #Value! error. It can occur if there is an incorrect argument data type in formulas or blank space, text, or special characters within a cell. This blog discussed the possible scenarios when this error occurs. You can apply the solutions mentioned above to fix the error. If the #Value! error occurs due to corruption in the Excel file, then you can use Stellar Repair for Excel . It is a reliable tool that helps in fixing corruption-related errors in Excel.
[Error Solved] Excel file is not in recognizable format
Summary: Microsoft’s Excel is one of the most widely used spreadsheet tools, however, it isn’t entirely free of errors. There are in fact quite a large number of problems that can crop up in this user-friendly application which can put all work to halt. One such error occurs when Excel does not recognize the file format of .xls or .xlsx file and the error message says “Excel file is not in recognizable format” error. Let us explore this annoying error in detail.

Figure: Error message
From a small shop to the global industry giants, everyone relies on Microsoft Excel to complete their work. Quite a few businesses not only use Excel for their inventory tracking purposes but also to manage task lists and timesheets for their employees and project management charts. With high programming proficiency, one can create macros in excel which help in automating a lot of things. You can create quite a few variations, such as pie charts, bar charts, line graphs, area charts, and many more to showcase the data both in a tabular column as well as in a pictorial representation.
While Excel enjoys wild popularity, thanks to its powerful design and features, it doesn’t mean that Excel is all free of errors. There are actually repetition a few errors that one can encounter. One you might have come across is the error stating “Excel file is not in a recognizable format”.
What is this error all about?
The “Excel file in unrecognizable format error” occurs when the Excel file you are trying to load is corrupted. Microsoft has ensured that the workbook will be recoverable when the file is imported into excel but there are times when the automatic recovery does not happen. That’s where the challenge really lies. In such cases, getting to the root of the issue becomes necessary to be able to solve it.
Reasons behind the error
- One of the main reasons for the error is that the file must have got corrupted while being transferred from one machine to another.
- Another reason can be that the latest service pack might not be in use on your system.
- There could be MS Excel version change.
- Corruption of the file due to virus infection, extremely large databases, or multiple locks on the file at the same time can also trigger this error.
If you have ever faced this error, you do not need to panic. We have a couple of solutions listed for you when you face the Excel file in an unrecognizable format error.
How do you go about fixing this?
Solution 1: Use MOC.exe file to convert the workbook and then open it in Excel:
- Right-click on .XLS (you can use any .XLS files in your system).
- A new dialogue will appear. Here, click on “Choose another app” to select it.

Figure: choose another app
- You will now be presented with a number of applications which the OS thinks the file format will be compatible with.
- You do not have to choose any of the prepopulated apps from the list.

Figure: Look for another app
- Navigate using the Look for another app on this PC to the path “C:\Program Files\Microsoft Office\OfficeVersion”
- You will see a file name MOC.exe
- Choose that and complete your export.
- Try opening the workbook in Excel and the error should now be resolved.
Solution 2: Opening the file from within the Excel:
- Open a new Excel workbook.
- Press “Alt + F” or alternatively, go to the menu.
- Once you are in the menu, go to Options.
- You will be able to see a number of tabs on the left side of the options.
- Under the ‘Formulas’ tab, ensure that the calculation is in Manual mode – this setting is in the automatic mode, by default.

Figure: Manual option
- Click OK and save the changes to the workbook.
- Now, browse for the file which was corrupted.
- Click on the file and then select the option “Open and Repair”. You will find it in the drop down Menu.

Figure: Open and Repair
- Once the file has been imported, click on “Repair” to recover the data from the selected workbook.

Figure: Repair option
Solution 3: Use automated Excel repair software
If none of the above mentioned manual methods works to eliminate the ‘Excel file in unrecognizable format’ error, it means your Excel file has been severely corrupted and needs professional assistance. In such a scenario, quickly download reliable and competent software Stellar Repair for Excel. Backed by powerful scanning and repair algorithms, this product guarantees up to 100% Excel file repair regardless of the amount of damage in it.
- Download, install and launch Stellar Repair for Excel.
- Allow the software to scan the corrupted Excel file.
- All recoverable data will be listed in a tree-view list. You can select and preview any item from here.
- Select and recover individual or entire data from the file and save as a new Excel.
This method is currently the easiest and most convenient to resolve miscellaneous Excel errors.
Wrapping it up
Excel is one of the most powerful tools which can easily reduce your workload by more than 75% if used in a proper way. However, if you face complex errors like “Excel file is not in recognizable format”, you can use the methods mentioned above to get rid of it and resume your working in MS Excel. Remember, if the manual solutions don’t work, you can always rely on a proficient software like Stellar Repair for Excel to complete the job with finesse.
Summary: Recovering your unsaved Excel file on Windows 10 with some of our tested methods can truly save you a lot of time, money, and effort. Here’s how to do it!
Microsoft provides a wide range of applications to its users that cater to different purposes. Out of all the MS Office applications, Excel is considered the most used native application by several companies and individuals to store and process crucial data. Excel can also be called a go-to data analysis tool that offers great reliability, ease of use, and multiple features. But unfortunately, it’s not immune to human errors and system errors.
What if you accidentally close the Excel file without saving your work or Excel crashes suddenly? Or worse! Your system crashes without any warning and when you reboot your system, you can’t find the unsaved Excel file.
There could be different situations where you may lose access to your unsaved Excel workbook. There is no need to be anxious, though! We’ve covered some easy-to-follow DIY methods in this post to help you recover unsaved Excel files quickly.
4 Ways to Recover Unsaved Excel File
Irrespective of the circumstances, you can recover unsaved Excel files on Windows 10 using the following methods.
Method 1: Use the Search Option
If you remember the name of the Excel file, try to find it using the Search option. Following these steps:
- Go to Windows Search Box and type the name of the file.
- If you find the file there, click Open or Open file location.

- If you click Open file location, it will take you to the exact location of the file, and you’ll be able to regain access to lost/unsaved Excel file easily.
Method 2: Use AutoRecover Feature
Microsoft Excel comes with a built-in AutoRecover feature that saves copies of all open Excel files at a user-definable fixed interval. You can recover the file if you forget to save it and accidentally close it or it closes automatically due to an unexpected system breakdown or power failure. You can follow the given steps to recover unsaved Excel files with the AutoRecover feature:
- Open a new Excel file and go to File > Options.
- Then go to Save > Save workbooks.
- Next, ensure that the ‘Save AutoRecover information every’ and ‘Keep the last autosaved version if I close without saving’ option is already selected.

- Now, copy the file path given against the AutoRecover file location.
- Open the File Explorer, paste the Menu Bar file path there, and hit Enter.
- The unsaved file will appear with the .xlb extension.
- Double-click the file and choose Excel from apps to open the .xlb file.

- Finally, save the file to the desired location.
Method 3: Use the ‘Recover Unsaved Workbooks’ Option
Another way that you can choose is the ‘Recover Unsaved Workbooks’ option. To regain access to your Excel file, follow the given steps:
- Open an Excel sheet and then go to File > Open.
- Now, scroll down and click Recover Unsaved Workbooks.

- The list of unsaved files will show in the Document Recovery pane.
- Locate the file you lost and double-click on it to open.
- Finally, right-click on the version of the file you want to restore and click Save As.

And, save the file to the desired location
Method 4: Restore File with Previous Versions Utility
This feature will help you recover unsaved Excel files when you’ve saved the workbook earlier, but you end up losing access to the file due to an Excel or system crash. It’d help you save the previously saved version of your Excel file. To do so, follow the given steps:
- Open an Excel file and navigate to File > Info > Manage Versions.

- It will show the previously saved versions. You can choose the one you want to restore and click Save/Save As to store the file with a different name.
Hopefully, this blog has helped you learn how to recover unsaved Excel files. You can try any of the above methods.
FAQ
1. How can I repair a corrupted workbook?
Whenever Excel detects a corrupted workbook while opening, it automatically starts running the File Recovery mode and repairing the file. If the File Recovery mode doesn’t start automatically, you can manually repair the corrupted workbook .
How to repair corrupt Excel file
Stellar Repair for Excel is an excellent tool to repair corrupt or damaged MS Excel files. Mentioned below are the steps to perform Excel repair with this tool:
- Download & Run the Stellar Repair for Excel.

- A dialog box appears on your screen, click ‘OK’ to proceed.
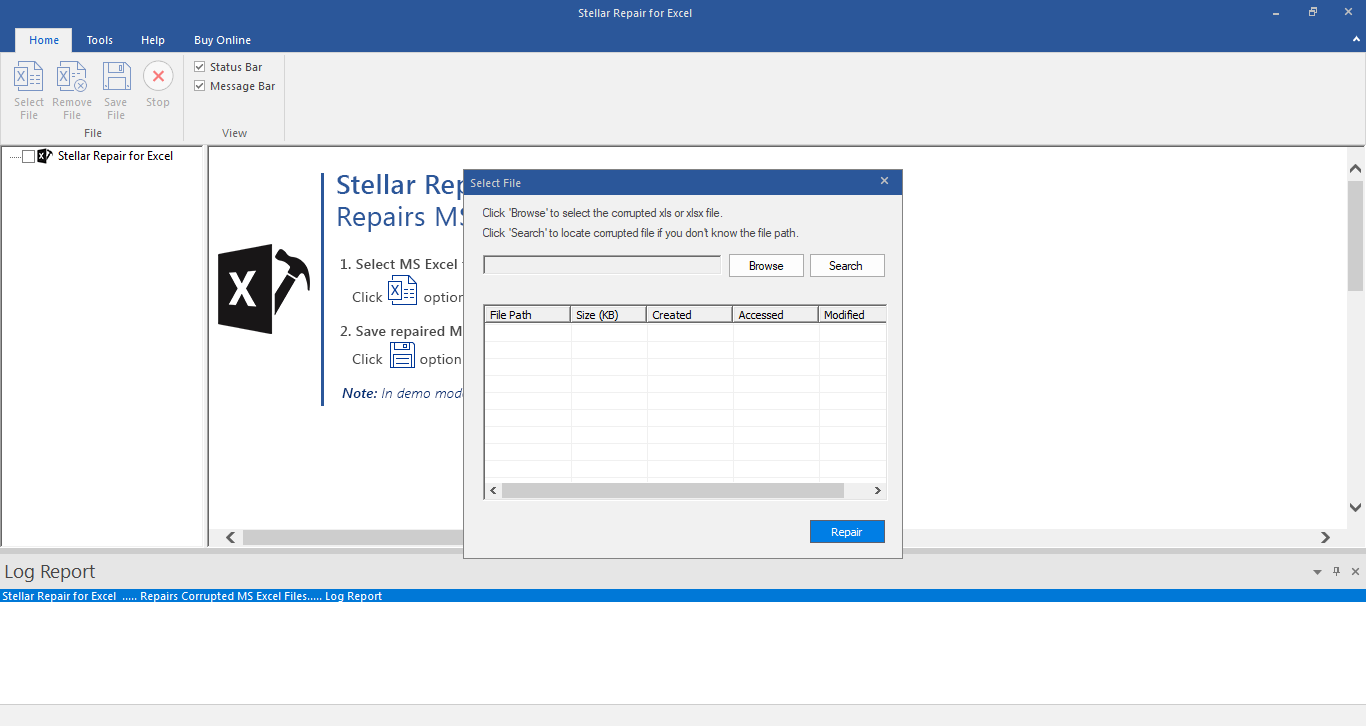
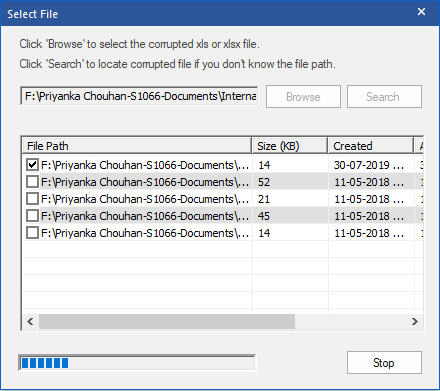
- To select your corrupt .XLS or .XLSX file, click ‘Browse’ button. However, if you do not know the location of your .XLS or .XLSX file, the software provides you the option ‘Search’ to search for your corrupt Excel files.

- Select the checkboxes against the files that you want to repair and click ‘Repair’. This starts the scanning process.
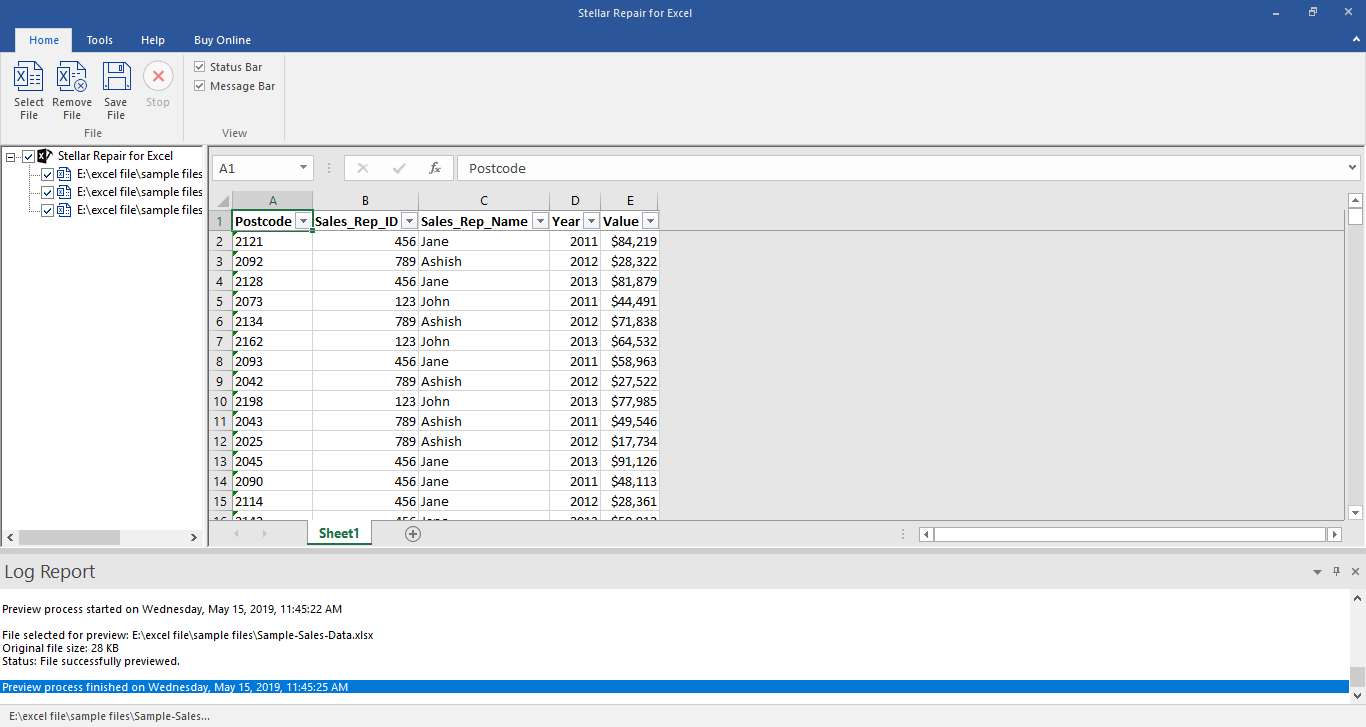
- The list of all the files that the software has scanned is displayed in the tree-view in the left pane. Click on a file from this tree-view to see its preview in the middle pane. From this list, you can select the file that you want to recover.
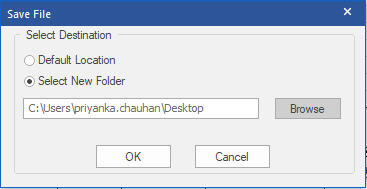
- You can either select the ‘Default location of file’ or ‘Select New Folder’ in the ‘Save Document’ dialog box to save the repaired files.
Stellar Repair for Excel Stellar Repair for Excel is the best choice for repairing corrupt or damaged Excel (.XLS/.XLSX) files. This Excel recovery software restores everything from corrupt file to a new blank Excel file.
[Solved] Excel Spreadsheet Disappears after Opening
Several Excel users have reported about experiencing ‘Excel spreadsheet disappears after opening’ issue. The problem occurs when attempting to open an Excel file by double-clicking on the file icon or name. The Excel file opens blank grey screen.

Figure 1 - Excel Blank Screen
User Instances of ‘Excel Open But Can’t See Spreadsheet’ Issue
Instance 1: The user said that “Excel 2016 opens to a blank screen and everything is greyed out. Ribbons at the top of Excel are also not present”.
Instance 2: The user reported that “Attempting to open a spreadsheet, either by double-clicking the file or by opening Excel, it opens but only a blank Excel window is visible. When trying to save that particular file, Excel behaves as though there is no file open at all and all the file saving options, such as save, save as, print, etc. are greyed out.”
Causes Behind ‘Excel Open But Can’t See Spreadsheet’ Issue & the Solutions Thereof
Following are some of the possible reasons behind the ‘Excel open but can’t see spreadsheet’ issue, along with their solutions:
Cause 1: Excel File is Hidden
You may have saved the Excel sheet as a hidden document.
Solution: Unhide Excel File
Verify if your Excel worksheet is hidden by following these steps:
- In Excel, click the View tab, and then click Unhide.
Note: If the ‘Hide’ tab under the View menu is greyed out, the sheet you’re trying to open is not hidden. In that case, proceed to the next workaround.

Figure 2 - Unhide Excel File
- A dialog box will pop-up showing the worksheet name that can be unhidden. For instance, below is an image of Unhide box that lists ‘Daily_Reports’ spreadsheet under Unhide workbook.

Figure 3 – Select and Unhide Excel Workbook
- Click OK to unhide your Excel sheet.
If this fails to work, there’s a possibility that the spreadsheet window pane may have slided to one side of the visible desktop. To bring back the displayed area, click the ‘Arrange All’ option under the View tab. If the issue persists, try the next solution.
Cause 2: Ignore Dynamic Data Exchange (DDE) Option is Enabled
Another reason behind the ‘Excel opens to a blank screen’ issue could be that the “Ignore other applications that use Dynamic Data Exchange (DDE)” checkbox is checked in Excel options.
Usually, when you double-click an Excel file, a DDE message is sent to Excel instructing it to open that particular file. But, if you have the ‘Ignore DDE’ option selected, the DDE message sent to Excel to open a workbook is ignored. As a result, the Excel workbook opens a blank screen.
Solution: Uncheck the Ignore DDE Option
Make sure that the ‘Ignore DDE’ option is unchecked by performing these steps:
Note: Skip these steps for Excel 2019 and Excel Office 365.
- In your Excel window, click File > Options.

Figure 4 - Select Excel Options
- From the left-side of the ‘Options’ window, choose Advanced.
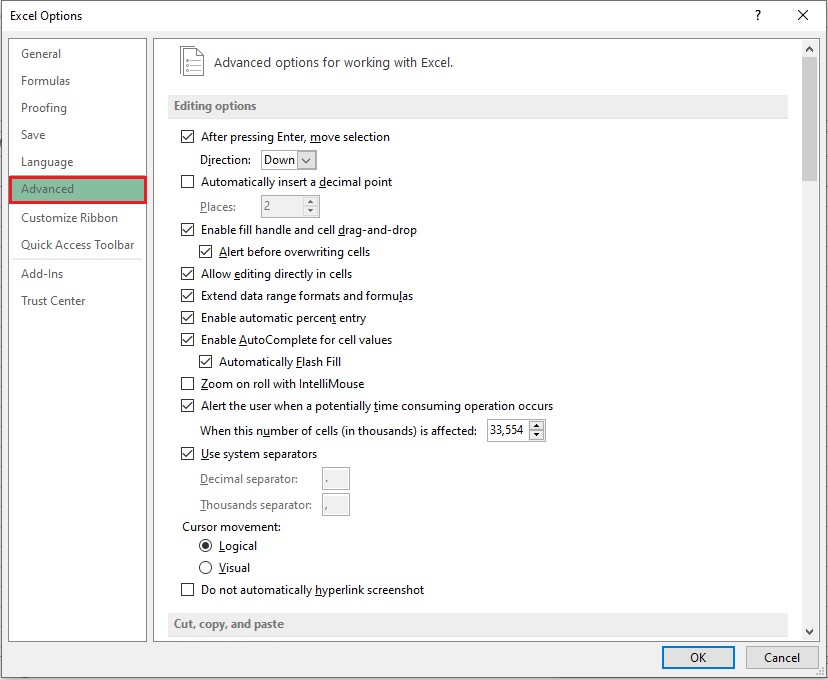
Figure 5 - Excel Options Window
- In ‘Advanced’ window, locate the General section, and then uncheck the “Ignore other applications that use Dynamic Data Exchange (DDE)” checkbox.
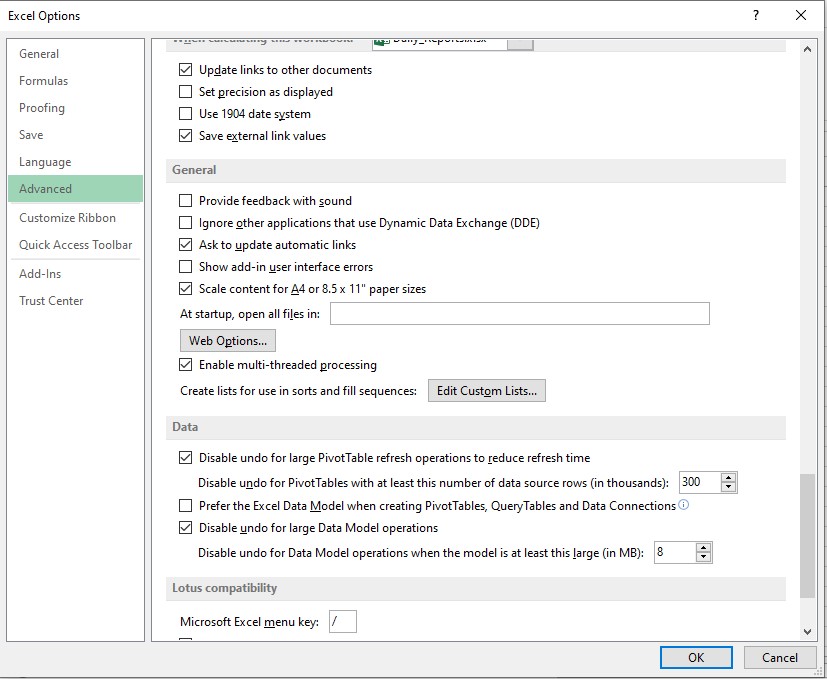
Figure 6 - Uncheck Ignore Other Applications that use DDE
- Click OK to apply the changes.
If these steps don’t work, proceed to the next workaround.
Cause 3: Issue within Office Program
Sometimes, problem within your Microsoft Office program might cause Excel to behave oddly and may result in an Excel spreadsheet disappeared issue.
Solution: Repair Office Program
Try repairing your Office program by executing the steps listed below, based on your Windows OS:
For Windows 10:
- Type Settings in the Windows search box.
- Click Settings.
- In ‘Windows Settings’ screen, select Apps.
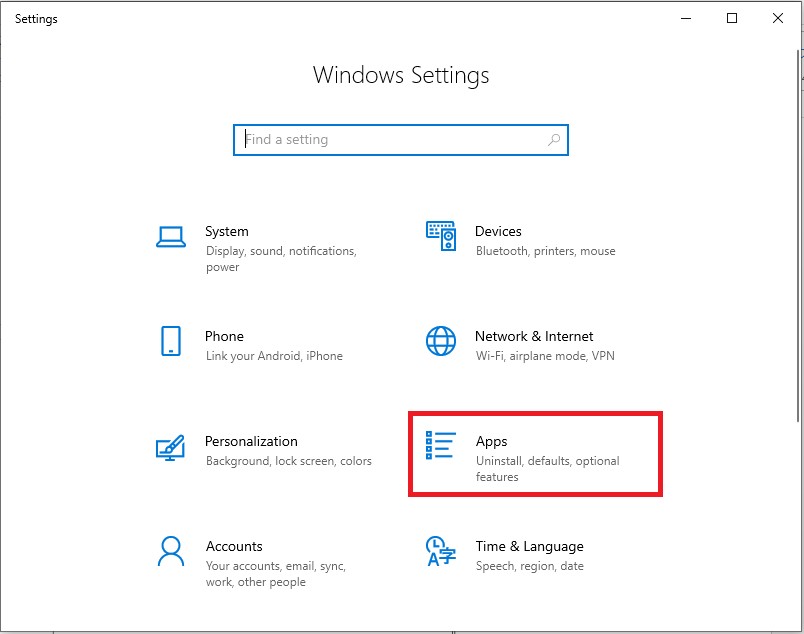
Figure 7 - Windows Settings Screen
- In ‘Apps & features’ screen, scroll down to your Microsoft Office program and tap on it, and then click the Modify

Figure 8 - Modify MS Office Program
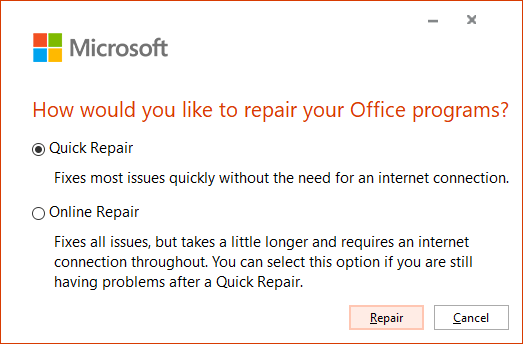
- In ‘How would you like to repair your Office programs’ dialog box, select the Online Repairradio button, and then click the Repair
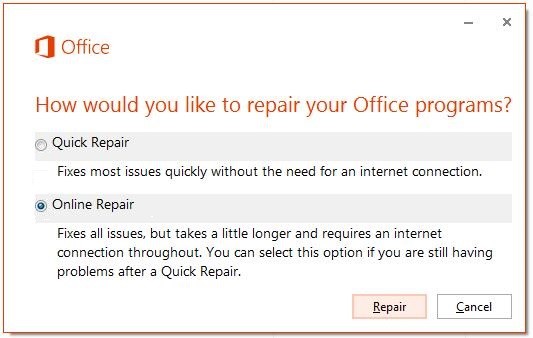
Figure 9 - Repair MS Office Program
For Windows 8:
- Open Control Panel and click the Uninstall a program option under Programs.
- Select Microsoft Office 365 and then click Change.
- In the window that opens, select Online Repair and then hit the Repair
You may be asked to restart your system after completion of the repair process.
For Windows 7:
- In ‘Control Panel’ window, double-click Programs and Features.
- Under Uninstall or change a program section, select the Office program, and then select Change.
- In the dialog box that appears, choose Online Repair and then choose Repair.
If repairing your Office installation fails to resolve the issue, continue to solution 4.
Cause 4: Problematic Excel and COM Add-ins
Sometimes, Excel and COM add-ins may cause Excel file open a blank grey screen problem.
Solution: Disable the Add-ins
Disabling the Excel and COM add-ins one at a time may help resolve the problem. The steps are as follows:
- Click the File menu in your Excel file and select
- From ‘Excel Options’ left-side panel, click Add-Ins, and then choose COM Add-ins from the ‘Manage’ drop-down. Click the Go
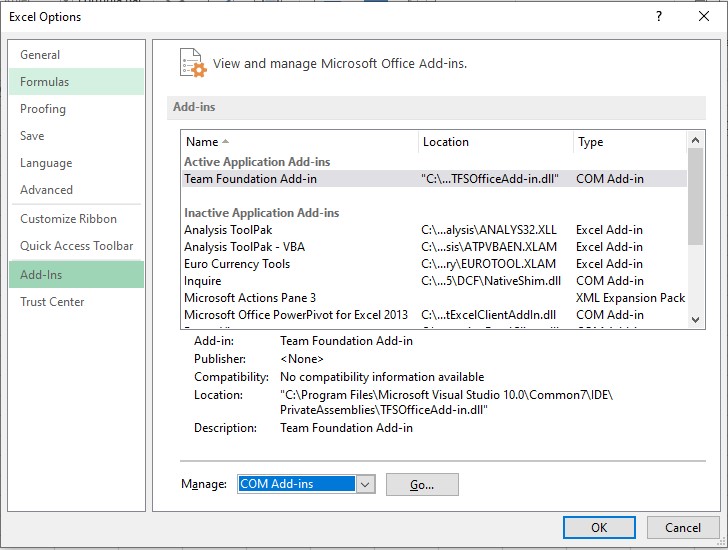
Figure 10 - Select COM Add-ins
- Uncheck one of the add-ins checkbox from the COM Add-ins window, then select OK.
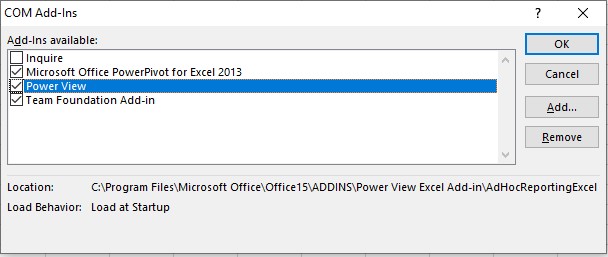
Figure 11 - Uncheck and Disable COM Add-ins
- Restart your Excel program.
If the issue persists, repeat the above steps (1 till 4), except that you need to choose a different add-in in step 3.
If you’re still experiencing the same problem after unchecking all the COM add-ins, repeat all the above steps, except choose ‘Excel Add-ins’ in step 2.
If Excel can load the file, then the add-in that you disabled last leads to the problem. If turning off add-ins does not work, try the next solution.
Cause 5: Problem with Excel File Associations
The Excel file opening a blank screen problem may occur if the file associations are not performing correctly.
Solution: Reset Excel File Associations
Try resetting the file associations in Excel to their default settings. For this, follow the below steps based on your OS.
For Windows 10 and Windows 8.1:
- Select the file that is opening incorrectly and copy it to the desktop.
- Right-click the file and click Properties.
- In the File’s ‘Properties’ window, check your file type next to Type of Filefrom the General tab. For instance, (.docx), (.csv), or (.pdf).
- Next, check to which app your file is associated with from the Opens withoption
If the file type is different than .xlsx, open the file in a different application by following these steps:
- Click the Change button next to the ‘Opens with’ option.
- Click More apps.
- From the list of applications, select the desired app and then check the Always use this app Click OK.
For Windows 8:
- Open Control Panel, click Default Programs, and then select Set your default programs.
- Choose Excel and then tap the Choose default for this program
- In ‘Set Program Associations’ window, choose Select All and then click Save.
For Windows 7:
- In Control Panel, choose Default Programs.
- Click the Associate a file type or protocol with a specific program
- Choose Microsoft Excel Worksheet and click on change program.
- Choose Microsoft Excel under Recommended Programs.
- If you’re unable to find Excel, browse the Excel installation folder.
- Select exe and then choose Excel.
What Next? Use Stellar Repair for Excel to Recover Your File
If the above solutions don’t help recover your Excel file, use an Excel file repair tool, such as Stellar Repair for Excel to recover it. The software can restore the Excel spreadsheet and its components, including tables, pivot tables, charts, formulas, etc. while preserving the spreadsheet properties and formatting.
Check out the video to recover Excel file by using Stellar Repair for Excel software.
Conclusion
This article described the possible causes behind the ‘Excel open but can’t see spreadsheet’ issue, along with their solutions. The manual solutions to resolve the issue require time and efforts. But, if you need to access your Excel file without any delay, use Stellar Repair for Excel software to recover your .xlsx/.xls file in just a few clicks.
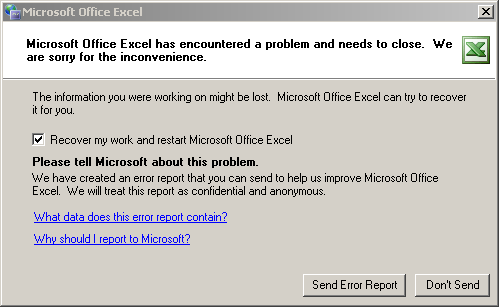
How to Fix Excel has Encountered a Problem
While working on MS Excel, you may encounter various errors that can hamper your work and productivity. One of the errors that you may receive is ‘Microsoft Excel has encountered a problem and needs to close’.Due to this error, your Excel program may stop and asks you to recover the data from Excel file.
What are the Reasons for ‘MS Excel has Encountered a Problem’ Error?
Following are some primary causes that may result in the ‘Microsoft Excel has encountered a problem and needs to close’ error:
- Corrupt Excel File: If you try to open a corrupt or damaged Excel file, the file may not open and displays this error message.
- File not Saved Properly: If Excel files aren’t saved correctly, this error may occur when you open the file.
- Incompatible File Version: If the MS Excel application version does not support the Excel file version, the file may not open and throws the error.
- Issues with MS Office/MS Excel Installation: This error can sometimes be caused due to damaged MS Office/MS Excel installation.
How to Fix ‘MS Excel has Encountered a Problem’ Error?
You can resolve the error by using the following methods:
1. Try to Open Excel in Safe Mode
Open the Excel application in safe mode and then try to open the Excel file. This will help you find out if the problem is caused by some incompatible add-ins. The steps are as follows:
- Hold Windows + R keys together to launch the Run dialog box.
- Type Excel /safe in the search box and hit Enter.
- If your Excel application opens in safe mode, it means that the issue is caused due to incompatible or faulty add-ins. In such a case, you need to disable the add-ins:
- Go to the File menu and click the Options menu. Further, choose the Add-ins option.
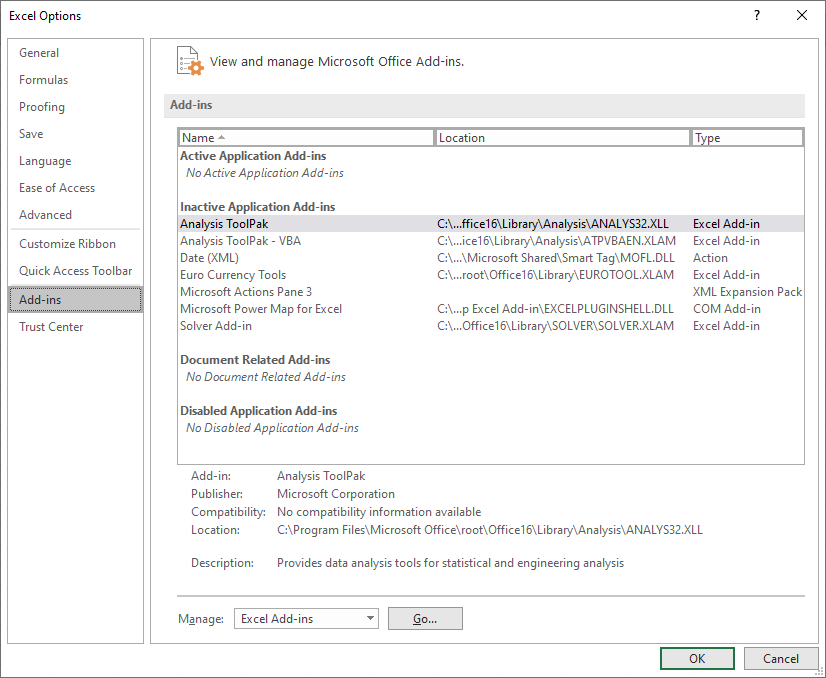
- Now, choose the Go button at the bottom of the Excel Options window.
- A list of available add-ins appears.
- Now, uncheck the boxes against the add-ins.
2. Disable Macros Using the Trust Center Settings
Sometimes, the Macros prevent Excel from managing the files. You can disable the Macros to resolve the issue. Follow these steps:
- Launch your MS Excel application.
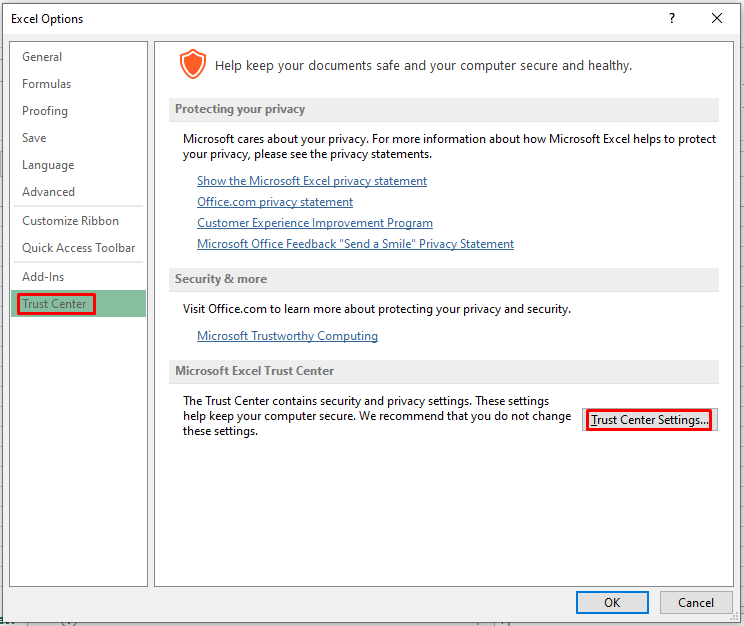
- Now, go to File > Options > Trust Center.
- Further, click the Trust Center Settings.
- Now, navigate to the Macro Settings option.
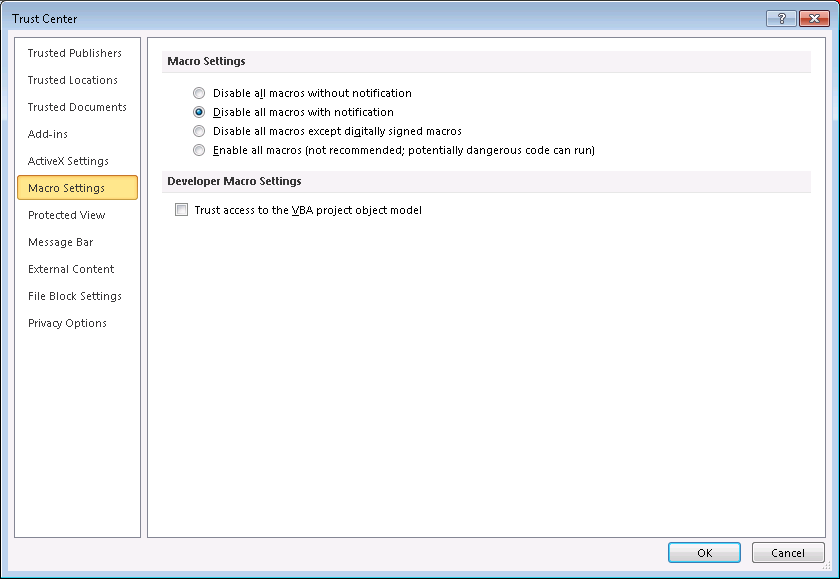
- Herein, select the ‘Disable all macros with notification’ radio button. Then, click OK.
3. Repair MS Office Application
Sometimes, problems with your MS Office application may cause the Excel has encountered a problem error. In such a case, you need to repair your MS Office application. Here are the steps to do so:
- Launch Control Panel > Uninstall a Program.
- Find your MS Office application and click the Change option.
- A new window will appear. Herein, select the Repair option.
- Now, follow the MS Office installation wizard to finish the repair process.
What to do if the above methods don’t work?
If you have tried the solutions mentioned above and are still not able to resolve the ‘Excel has encountered a problem and need to close’ error, it indicates that the Excel file is corrupt. You can use a professional Excel repair software, such as Stellar Repair for Excel , to repair the corrupt file. The software repairs the file and retrieves all the data, including the tables, charts, formulas, etc. from the damaged workbook. It is compatible with all the MS Excel versions.

To know how Stellar Repair for Excel works, see the following video:
To Wrap Up
The ‘Excel has encountered a problem and needs to close’ error may occur due to different reasons. You can fix this error by following the methods mentioned in this post. If the error has occurred due to corruption in the Excel file, you can use a third-party Excel repair tool, like Stellar Repair for Excel. The software can repair damaged or corrupt Excel file of any size and retrieve all the data.
Solutions to Repair Corrupt Excel File
Summary: MS Excel can throw various errors due to corrupted Excel files. This blog discusses the error messages that indicate Excel file corruption and the methods to prevent data loss due to a corrupt file. It also discusses the reasons behind the corruption in Excel file and their solutions. It also mentions a “Stellar repair for Excel” tool that can help to repair the corrupt or damaged Excel file.
Is your Excel file corrupted? And you don’t have backup of your data? There is no need to worry. There are some simple solutions to repair Excel file 2019. But before heading towards the solutions, let’s discuss the possible reasons for Excel file corruption and how you can prevent losing your data.
Error Messages that Indicate Excel File Corruption
When an Excel file gets corrupted, different error messages appear. For example:
- “Excel found unreadable content in
. Do you want to recover the content of this workbook, click Yes.” - “Can’t find project and library.”
- “The workbook cannot be opened or repaired by Microsoft Excel because it is corrupted.”
- “Microsoft Excel has stopped working.”
Reasons Behind Excel File Corruption
The reasons for corruption in Excel file could be any of the following:
- Improper system shutdown
- Computer virus/malware attack/Hacker attack
- Outdated anti-virus definition
- Hardware failure
- Unintentional deletion of files
- Large Excel files
- Bad sectors on storage media
How to Avoid Data Loss Due to Excel File Corruption?
Excel users should follow the below precautionary measures to prevent data loss due to Excel file corruption:
1. Create an Automatic Backup Copy
When you create an Excel spreadsheet, it is advised to Save As your document, as follows:
- In Save As window, click Tools next to Save option.
- Select General Options from the drop-down menu.
- Then check the dialogue box Always create back up and click OK.

This will always create a backup of your Excel. If it’s deleted or corrupted at any time, it can be recovered.
2. Create Recovery File at Different Time Periods
Steps are as follows:
- Go to File and then click Excel Options.
- Click Save and then select the Save Auto Recover information every checkbox
- Add the required minutes and location. Ensure that Disable AutoRecover for this workbook only box is unchecked.

Methods to Repair Corrupted Excel 2019 File
Try using these 5 methods to restore your Excel file and recover data:
Method 1: ‘Open and Repair’ Excel Files
Excel automatically opens the corrupted file in Recovery Mode. If not, you can repair Excel file manually through the following steps:
- Click on the File and select Open.

- Go to the location where the corrupt workbook is stored. In the Open window, select the corrupt file.
- Click Open and then select Open and Repair.
- In the window that opens, click Repair.
If the Repair option doesn’t work, you can select Extract Data and try to extract the values and formulae safely from the corrupt file.
Method 2: Recover Data from Open Workbook
If you face issues while working in an Excel file, you can choose to return to the last saved version of the Excel file. For this:
- Click File. Then select Open.
- Double click on the name of the workbook (the one that is open in your Excel).
- Click Yes to reopen it.

- The workbook will now appear.
Please note that it will show the last saved version and changes made after that won’t be recovered.
Method 3: Set Calculation Option as Manual
You can also recover data from Excel workbooks that you’re unable to open. For this, you need to configure the calculation option as manual in Excel. You can do this through the following steps:
- Click on File. Select New and open a Blank workbook.
- From File, select Excel Options.

- From the Formulas category, under the section Calculation options, select Manual. Now click OK.

- Then click File, and select Open to open the corrupted or damaged Excel file.
Method 4: Recover Content by Using External Links
You can also recover specifically the content (leaving formulas/calculated values) from the workbook by using external references (to link Excel workbook). For this:
- Click on File, Select Open.
- Navigate to the folder that contains the corrupted workbook.
- Now, right-click on the file name of the corrupted workbook and click Copy.
- Click File button. Then, select New and create another blank workbook.
- In the first cell (A1), type =!A1 and press Enter.
- Select the corrupted workbook in the Update Values dialogue (if it appears). Then click OK.
- Select the relevant sheet in the Select Sheet dialogue (if it appears). Then click OK.

- Again, select the cell A1, go to Home and select Copy.
- Now select (start from the cell A1) an area equal to that of the data in the original workbook.
- Go to Home now and select Paste.
- Again, go to Home, and Copy the data (the same selection of cells).
- Go to Home, and then click on the arrow below Paste. Then click on Values.
By pasting values, you removed the links to the corrupted workbook and only the data is left behind.
Method 5: Excel Repair Software
If the above-mentioned methods do not help in repairing the corrupt Excel file, try an Excel repair software.
One of the most commonly used Excel repair tools is Stellar Repair for Excel. Its trial version is available for free download, which lets you scan and preview the repaired Excel files. Once you’ve ascertained the effectiveness of the software, you can save the file after activating the software.
Here’s the complete repairing process of the corrupt Excel file
Conclusion
This post shared the reasons behind Excel file corruption and precautionary measures to prevent data loss. It also outlined different methods to repair corrupt Excel file 2019. There are several in-built utilities in Microsoft Excel to repair corrupt workbooks and recover data from it. In case these methods didn’t work, you can use Stellar Repair for Excel – an easy-to-use DIY tool that can fix all Excel corruption errors and restore data with all original properties.
Also read:
- How To Restore Missing Pictures Files from Nokia C02.
- How to Recover FaceTime Call History on iPhone 13 | Stellar
- How To Reset iPhone 13 Pro Max Without iTunes? | Dr.fone
- How to recover old videos from your Vivo S17t
- How to Recover iPhone 15 Pro Data From iOS iTunes Backup? | Dr.fone
- How to play HEVC H.265 video on Sony ?
- 4 Ways to Transfer Music from Sony Xperia 10 V to iPhone | Dr.fone
- How To Repair iOS System of iPhone 15? | Dr.fone
- How to Repair corrupt MP4 and MOV files of Motorola Moto G73 5G?
- How to recover deleted pictures from ZTE Blade A73 5G.
- How to Reset iPhone 13 Pro Without Apple Password? | Stellar
- How to Restore Deleted Infinix Hot 40 Photos An Easy Method Explained.
- How to Factory Reset iPhone 14 and iPad Without Apple ID | Stellar
- How to identify missing or malfunctioning hardware drivers with Windows Device Manager on Windows 7
- How To Restore Missing Call Logs from Google Pixel Fold
- How to retrieve lost files from Honor Magic V2?
- How to Rescue Lost Messages from GT 5
- How to play HEVC H.265 video on Civi 3 Disney 100th Anniversary Edition?
- How to Fix Errors were detected while saving PDF?
- How to get back lost contacts from Itel P55+.
- How To Repair iOS System Issues of iPhone 14 Pro Max? | Dr.fone
- How to get back lost contacts from S17t.
- How to recover data from dead iPhone 11 Pro Max | Stellar
- 5 Easy Ways to Copy Contacts from Xiaomi Mix Fold 3 to iPhone 14 and 15 | Dr.fone
- How to retrieve erased call logs from Honor V Purse?
- How to retrieve lost files from Tecno ?
- How To Restore Missing Messages Files from Infinix Note 30 VIP Racing Edition
- How to Repair a Damaged video file of Reno 10 Pro 5G using Video Repair Utility on Windows?
- How to Rescue Lost Messages from Motorola G54 5G
- How to recover lost data from Realme C53?
- How to fix Pivot Table Field Name is not Valid error in Excel 2021?
- How to retrieve lost files from OnePlus ?
- How to fix Pivot Table Field Name is not Valid error in Excel 2023?
- How to get back lost photos from Y77t.
- How To Repair System Issues of iPhone SE (2020)? | Dr.fone
- How to recover lost data from Google ?
- How To Restore Missing Call Logs from T2 5G
- How to Reset iPhone XR without Losing Data? | Stellar
- How to recover old music from your 11 Pro+
- 2 Ways to Transfer Text Messages from Huawei P60 to iPhone 15/14/13/12/11/X/8/ | Dr.fone
- M6 Pro 4G Unlock Tool - Remove android phone password, PIN, Pattern and fingerprint
- In 2024, Network Locked SIM Card Inserted On Your Asus ROG Phone 7 Phone? Unlock It Now
- In 2024, Mastering Lock Screen Settings How to Enable and Disable on Infinix Hot 40
- New 2024 Approved Edit On-the-Go Top Mobile Video Editing Apps
- Unleash Creativity with the Best Resource-Friendly Video Editors
- In 2024, How to use Snapchat Location Spoofer to Protect Your Privacy On Infinix Note 30i? | Dr.fone
- In 2024, 3 Solutions to Find Your Apple iPhone 15 Current Location of a Mobile Number | Dr.fone
- In 2024, Top 7 Phone Number Locators To Track OnePlus 11 5G Location | Dr.fone
- Top 6 Apps/Services to Trace Any Oppo Reno 11 5G Location By Mobile Number | Dr.fone
- Handy Tip From Adobe Animate Rigging Tutorial for All Learners
- In 2024, How to Use Pokémon Emerald Master Ball Cheat On Poco C51 | Dr.fone
- Title: How to Fix the
- Author: Nova
- Created at : 2024-05-19 18:32:11
- Updated at : 2024-05-20 18:32:11
- Link: https://blog-min.techidaily.com/how-to-fix-the-value-error-in-excel-2000-stellar-by-stellar-guide/
- License: This work is licensed under CC BY-NC-SA 4.0.
