
:max_bytes(150000):strip_icc():format(webp)/duet-c82ee94b39e24788bcfd51d1eea24288.jpg)
How to Fix the
How to Fix the #Value! Error in Excel?
Summary: #Value! is a common error that occurs when using formulas in Excel. It can be due to an issue with the cells you are referencing or use of formulas in the wrong type or format. This blog will discuss some cases when this error may occur and the solutions to fix the issue. You’ll also find about an Excel repair software that can help fix the error if it has occurred due to corruption in Excel file.

You may experience the #Value! error in Excel when trying to enter invalid data type into the formulas. Sometimes, it appears when a value is not the expected type or when dates are given a text value. This Excel error may occur due to several reasons. However, the exact cause of this error is difficult to find. Below, we will be discussing some cases where you may get this error and the solutions to resolve the issues.
Case 1: Wrong Argument Data Type in Formulas
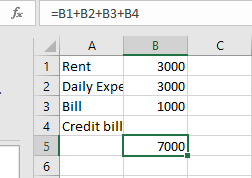
Sometimes, Excel throws the “#Value!” error if it recognizes incompatible arguments in the formulas.
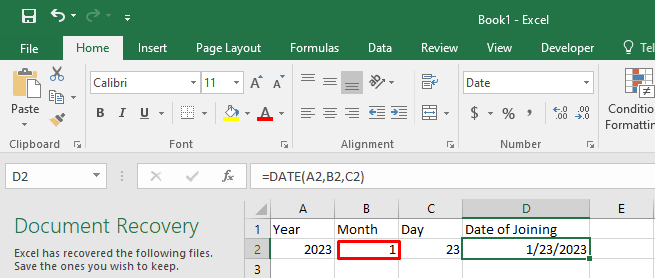
For example: The Date function in the sheet expects only numerical values as arguments. In the below image you can see that when the formula’s string value is used in the month (January), it resulted in the #VALUE! error.

Solution
To fix the issue,
- Double-click the formula to verify the type of arguments.

- Correct the argument in the cell (B2).
The formula will work as expected.
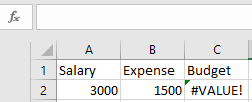
Case 2: Using the Basic Subtraction Formula
Users often experience the #Value! error, when using the basic subtraction formula in Excel.
Solution
Check the formula and the type of values in the cell. If these are correct and the error persists, then follow these steps:

- Go to the Start button on Windows, type Control Panel, and double-click on it.
- Click Clock and Region > Region.

- On the Format tab, click Additional Settings.
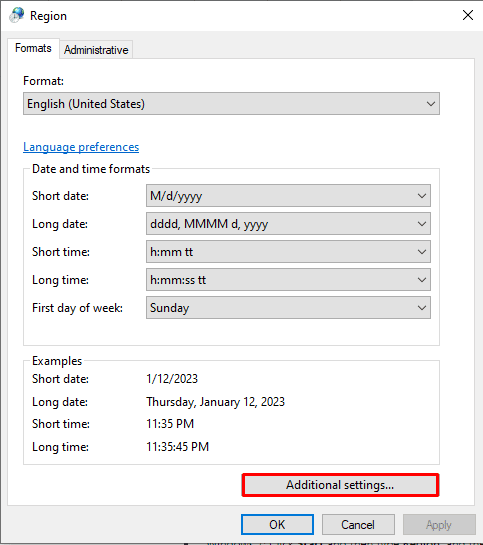
- In the Customized Format window, search for List Separator.
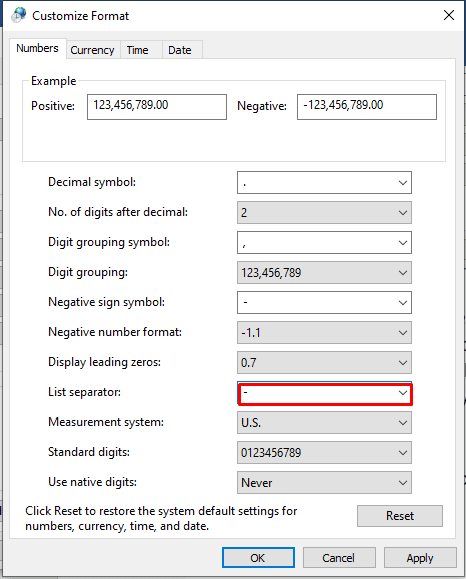
- Check if the List Separator is set to minus (-). Change it to comma (,).
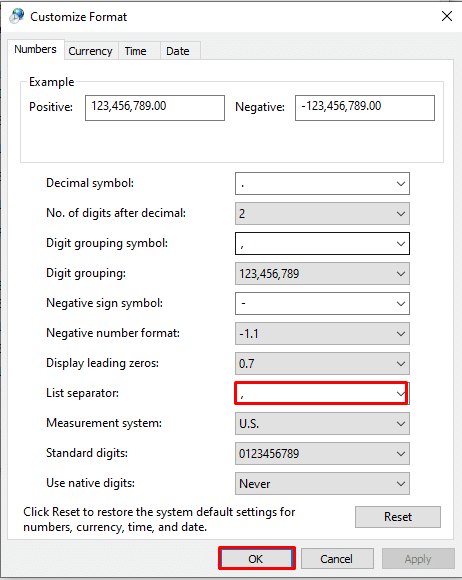
- Click OK.
- Now, open the Excel file and again try to use the formula.
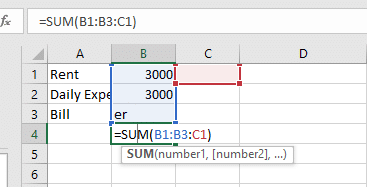
Case 3: Wrong Text Value
The #Value! error can also occur due to the formula’s wrong value.
For example: If you are using the formula to add values in cells and Excel recognizes the unexpected text value, you may get a #Value error.

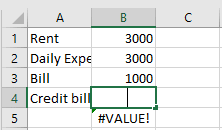
Solution
To fix the issue, you can correct the value or use the SUM function. It is recommended to use functions instead of operations to reduce the errors. In Excel, the formulas with math operators may not able to calculate the text in the cells. The SUM function automatically ignores the text value(er), calculates everything as numbers, and displays the result without the #Value! error.
Case 4: Blank Space in Cells
You may get the #Value! error if your formula refers to other cells with space or hidden space. Sometimes, spaces that make a cell display blank but actually they are not blank.
Solution
You can either delete the space or replace the blank space. Here’s how:
1. Delete the Blank Space
First, check if a cell is blank or not. To do this,
- Select the cell that looks blank.
- Press F2.
The blank cell won’t show space.
Then, press the Backspace key to delete the space. It will fix the error.
2. Replace Blank Space
You can also use the “Find and Select” option to replace the blank space in Excel. Here are the steps:
- Open the Excel file that shows #Value! error.
- On the Home tab, click Find & Select > Replace.

- In the Find what field, type a single space and delete everything in the “Replace with” field.
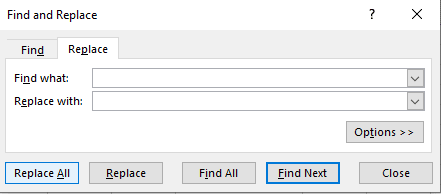
- Click Replace All > OK.

Case 4: Problem with Network Connection
Many users have reported experiencing errors when using Excel online due to problems with the network connection.
Solution
Check your Internet connection and see if it is working properly.
Case 5: Wrong Formula Format
If you enter the wrong formula with a missing parenthesis or comma, then Excel can throw the #Value! error. The error can also occur if the application finds a special character within a cell.
Solution
Correct the formula and use the ISTEXT function to find the cells with issues.
Case 6: Corruption in the Excel File
If none of the above works, then it indicates the Excel file is corrupt. The formulas in the Excel file do not work due to corruption.
Solution
You can use the Open and Repair utility in Excel if you are getting the error due to corruption in Excel file. In case the utility fails or the Excel file is severely corrupt, you can use a third-party Excel repair software, such as Stellar Repair for Excel. It is a powerful tool to repair corrupted or damaged Excel files and recover all its data, with 100% integrity. The tool supports Excel 2019, 2016, and older versions.
Closure
There are several reasons that can trigger Excel to throw the #Value! error. It can occur if there is an incorrect argument data type in formulas or blank space, text, or special characters within a cell. This blog discussed the possible scenarios when this error occurs. You can apply the solutions mentioned above to fix the error. If the #Value! error occurs due to corruption in the Excel file, then you can use Stellar Repair for Excel . It is a reliable tool that helps in fixing corruption-related errors in Excel.
How to repair corrupt Excel file
Stellar Repair for Excel is an excellent tool to repair corrupt or damaged MS Excel files. Mentioned below are the steps to perform Excel repair with this tool:
- Download & Run the Stellar Repair for Excel.

- A dialog box appears on your screen, click ‘OK’ to proceed.
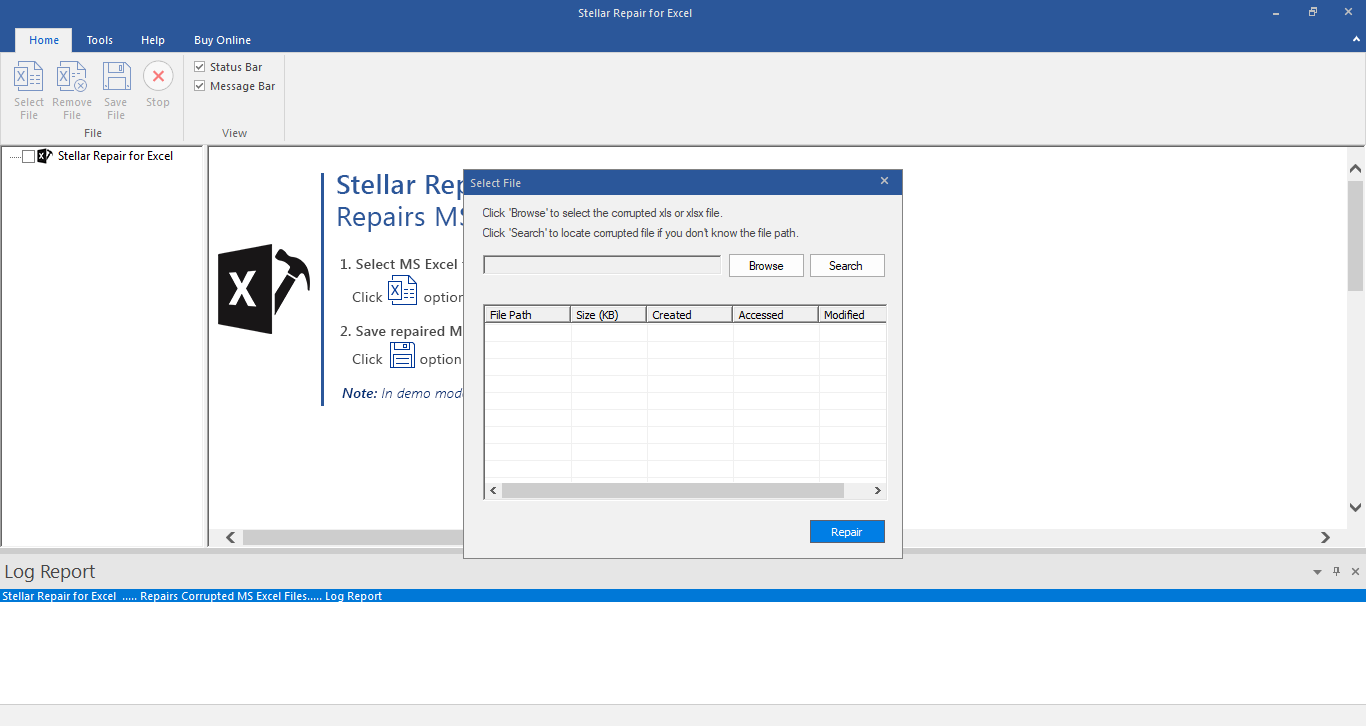
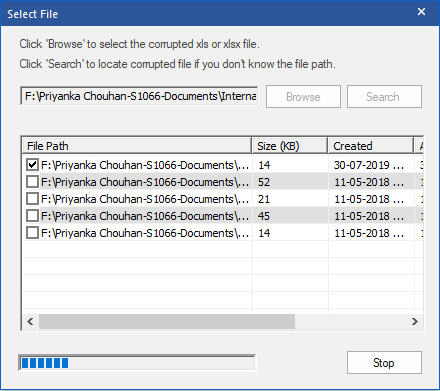
- To select your corrupt .XLS or .XLSX file, click ‘Browse’ button. However, if you do not know the location of your .XLS or .XLSX file, the software provides you the option ‘Search’ to search for your corrupt Excel files.

- Select the checkboxes against the files that you want to repair and click ‘Repair’. This starts the scanning process.
- The list of all the files that the software has scanned is displayed in the tree-view in the left pane. Click on a file from this tree-view to see its preview in the middle pane. From this list, you can select the file that you want to recover.
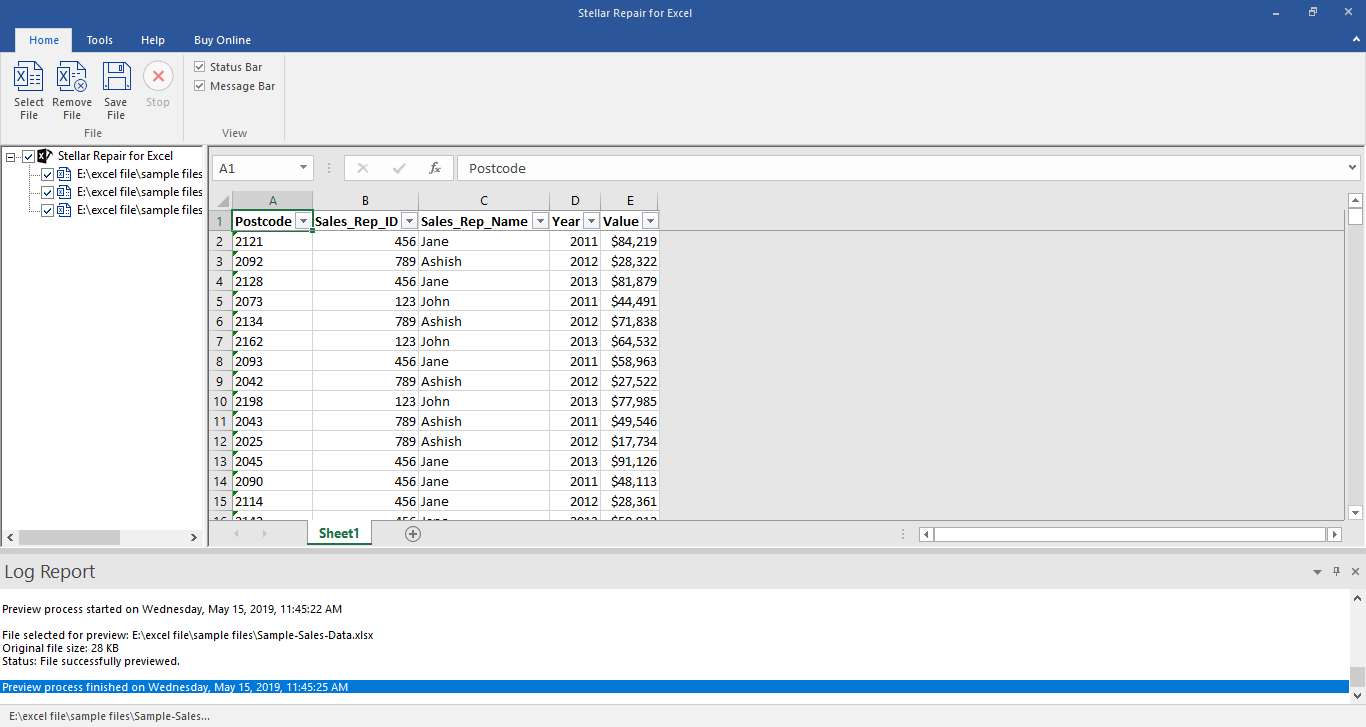
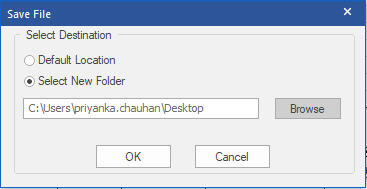
- You can either select the ‘Default location of file’ or ‘Select New Folder’ in the ‘Save Document’ dialog box to save the repaired files.
Stellar Repair for Excel Stellar Repair for Excel is the best choice for repairing corrupt or damaged Excel (.XLS/.XLSX) files. This Excel recovery software restores everything from corrupt file to a new blank Excel file.
How to Fix Excel Formulas Not Working Properly | Step-by-Step Guide
Summary: Excel formulas sometimes fail to function correctly and even return an error. This article explains what you might be doing wrong that prevents Excel formulas from working properly and solutions to resolve the issue. If your formulas have disappeared from the Excel spreadsheet and you are having trouble recovering them, you can use an Excel repair tool to recover the formulas.
When working with Excel formulas, situations may arise when the formula doesn’t calculate or update automatically. Or, you may receive errors by clicking on a formula.
Problems Causing the ‘Excel Formulas not Working Properly’ Issue and Solutions
Let’s check out the possible reasons that cause Excel formulas to work properly and solutions to resolve the issue.
Problem 1 – Switching Automatic to Manual Calculation Mode
Automatic and manual are the two modes of calculation in Microsoft Excel.
By default, Excel is set to automatic calculation mode. Everything is recalculated automatically when any changes are made in a worksheet in this mode. You may switch from automatic to manual mode to disable the recalculation of formulas, particularly when working with a large Excel file with too many formulas.
Excel will not calculate automatically when set to manual calculation mode. And this may make you think that the Excel formula is not working properly.
Solution – Change Calculation Mode from Manual to Automatic
To do so, perform these steps:
- Click on the column with problematic formulas.
- Go to the Formulas tab, click the Calculation Options drop-down, and select Automatic.

Problem 2 – Missing or Mismatched Parentheses
It’s easy to miss or incorrectly place parentheses or include extra parentheses in a complex formula. If a parenthesis is missing or mismatched and you click Enter after entering a formula, Excel displays a message window suggesting to fix the issue (refer to the screenshot below).

Clicking ‘Yes’ might help fix the issue. But Excel might not fix the parentheses properly, as it tends to add the missing parentheses at the end of a formula which won’t always be the case.
Solution – Check for Visual Cues When Typing or Editing a Formula with Parentheses
When typing a formula or editing one, Excel provides visual cues to determine if there’s an issue with the parentheses inserted in a formula. Checking for these visual cues can help you fix missing/mismatched parentheses.
- Excel helps identify parenthesis pairs by highlighting them in different colors. For instance, the pair of parenthesis outside is black.
- Excel does not make the opening parentheses bold. So, if you’ve inserted the last closing parentheses in a formula, you can determine if your parentheses are mismatched.
- Excel helps identify parentheses pairs by highlighting and formatting them with the same color once you cross over them.
Problem 3 – Formatting Cells in an Excel Formula
When adding a number in an Excel formula, don’t add any decimal separator or special characters like $ or €. You may use a comma to separate a function’s argument in an Excel formula or use a currency sign like $ or € as part of cell references. Formatting the numbers may prevent the formula from functioning correctly.
Solution – Use Format Cells Option for Formatting
Use Format Cells instead of using a comma or currency signs for formatting a number in the formula. For instance, rather than entering a value of $10,000 in your formula, insert 10000, and click the ‘Ctrl+1’ keys together to open the Format Cells dialog box.

Problem 4 – Formatting Numbers as Text
Numbers are displayed as left-aligned in a sheet in a worksheet, and text formatted numbers are right-aligned in cells. Excel considers numbers formatted as text to be text strings. Thus, it leaves those numbers out of calculations. As a result, a formula won’t work as intended. For example, in the following screenshot, you can see that the SUM formula works correctly for normal numbers. But, when the SUM formula is applied to numbers formatted as text, the formula doesn’t return the correct value.

Sometimes, you may also see an apostrophe in the cells or green triangles in the top-left corner of all the cells when numbers in those cells are formatted as Text.
Solution – Do Not Format Numbers as Text
To fix the issue, do the following:
- Select the cells with numbers stored as text, right-click on them, and click Format Cells.
- From the Format Cells window, click on Number and then press OK.

Problem 5 – Double Quotes to Enclose Numbers
Avoid enclosing numbers in a formula in double-quotes, as the numbers are interpreted as a string value.
Meaning if you enter a formula like =IF(A1>B1, “1”), Excel will consider the output one as a string and not a number. So, you won’t be able to use 1’s in calculations.
Solution – Don’t Enclose Numbers in Double Quotes
Remove any double quotes around a number in your formula unless you want that number to be treated as text. For example, you can write the formula mentioned above as “1” =IF(A1>B1, 1).
Problem 6 – Extra Space at Beginning of the Formula
When entering a formula, you may end up adding an extra space before the equal (=) sign. You may also add an apostrophe (‘) in the formula at times. As a result, the calculation won’t be performed and may return an error. This usually happens when you use a formula copied from the web.
Solution – Remove Extra Space from the Formula
The fix to this issue is pretty simple. You need to look for extra space before the equal sign and remove it. Also, ensure there is an additional apostrophe added in the formula.
Other Things to Consider to Fix the ‘Excel Formulas not Working Properly’ Issue
- If your Excel formula is not showing the result as intended, see this blog .
- When you refer to other worksheets with spaces or any non-alphabetical character in their names, enclose the names in ‘single quotation marks’. For example, an external 5reference to cell A2 in a sheet named Data enclose the name in single quotes: ‘Data’!A1.
- You may see the formula instead of the result if you have accidentally clicked the ‘Show Formulas’ option. So, click on the problematic cell, click on the Formula tab, and then click Show Formulas.
- If you’re getting an error “Excel found a problem with one or more formula references in this worksheet”, find solutions to fix the error here .
Conclusion
This blog discussed some problems you might make causing an Excel formula to stop working properly. Read about these common problems and solutions to fix them. If a problem doesn’t apply in your case, move to the next one. If you cannot retrieve formulas in your Excel sheet, using an Excel file repair tool like Stellar Repair for Excel can help you restore all the formulas. It does so by repairing the Excel file (XLS/XLSX) and recovering all the components, including formulas.

‘Unable to Save Excel Workbook’ Issue [Fix 2024]
Summary: You may unable to save your Excel Workbooks due to several reasons. Many users have reported this issue on the Tech Forums. This blog will discuss a few instances when users cannot save their Excel files. It lists the causes behind the issue and their possible solutions. It also mentions the Stellar Repair for Excel to fix the saving error if it is due to corruption in the Excel file.
It is easy to work with Microsoft Excel but sometimes, the application may create issues thereby hampering the smooth functioning of the workbook. One such issue is “unable to Save Excel Workbook”.
Let’s take a look at the issue of Unable to Save Excel Workbook
Instance 1:
In an organization, users connected to one of the servers (Windows 2008 R2) using Citrix – a Terminal Server configured with Windows 2008 R2 –and accessed their data through a File Server, also configured with Windows 2008R2. Since the connectivity to Shared Drive was established through a Terminal server, any conflict amongst the server configuration may create conflict in shared file.
This issue was discussed at length at one of the Tech Forums , where the users were unable to access their workbooks stored on the shared drive. The File menu did not work. As a result, the users were forced to save the workbook by creating quick access shortcuts or locally on the desktop. In many cases, the saving option was ruled out completely.
Instance 2:
A similar problem was reported, wherein the users received an error when saving an Excel workbook after inserting a chart in an existing workbook (previously saved) or copying values from an existing workbook. A system is configured with Windows 7 and Microsoft Office 10 configuration. The issue arises when the user is unable to save the changes after editing in a saved spreadsheet. The following message displays on the screen:

Figure: Unable to Save Excel WorkBook Issue
Further, if the user clicks ‘Continue’, the following error message is received:
“Excel encountered errors during save. However, Excel was able to minimally save your file to <**filename.xlsx**>”.
Note: This issue impacts build Version 1707 (Build 8326.2086) and later, and also only occurs with files that are stored locally, such as on the desktop. This problem does not occur if you manually enter values or insert a chart in a newly created workbook.
Plausible reasons for the ‘Unable to save Excel workbook’ Issue
- The issue was detected in Microsoft Office Professional Plus 2010 32-bit, Service Pack 14.0.6029.1000.
- Excel version on the user system may or may not match with Excel version on File server.
- The issue of ‘Unable to Save Excel Workbook’ impacts only the Build Version 1707 (Build 8326.2086) and later.
- In case of Issue 2, the problem surfaces when the user adds files, tables or charts in the locally saved excel files, such as on the desktop.
Methods to fix the ‘Unable to Save Excel Workbook’ Issue
There may be an issue with the Build version or the Registry Values settings may not be appropriate, which does not allow the Excel workbooks to save.
But, before starting to resolve the issue, verify the following:
- The location where the file is to be saved may not have enough space to save the Excel file: Check the available space and save again. You may also use the option of ‘Save As’ to save the file at a new location.
- Excel file may be a shared one where edits are not allowed by a specific user: There are restrictions attached to documents and other files shared over the network. Check for these restrictions.
- Antivirus may interrupt in during file saving: Antivirus in the system may not allow saving of the files. Request the system administrator to uninstall the antivirus and reinstall after saving.
- The file is not saved within 218 characters: If the file is not saved due to the naming issue, then check the character length and try again.
- Differences in Windows versions of the local system and those on network drive may cause excel not saved issues. Check that all the systems have the same configuration and are updated to the recently available versions.
- Excel spreadsheet is corrupt: If none of the above factors have not caused hindrance in saving the file, then there may be a probability of corruption in the Excel spreadsheet .
Once verified, look for a healthy and restorable backup. If backup is missing, resolve the issue of “Unable to open Excel File” with manual settings on local system or through a reliable Excel repair software.
Method 1: Modify Registry Entries
If multiple users are unable to access their workbooks stored on the shared drive and facing unable to save Excel file problem (see Instance 1 above), then follow the below steps:
- Go to ‘Registry Entry’. To do this, type ‘regedit’ in the Start Search box, and press ENTER

Figure: Edit Registry
- You are prompted for the administrator password or for a confirmation, type the password, or click Continue
- Locate the following registry subkey, and right-click it: HKEY_LOCAL_MACHINE\System\CurrentControlSet\Services\CSC

Figure: CSC Location
- Point the cursor to New, and click Key

Figure: Create new key
- Type ‘File Parameters’ in the available box

Figure: File parameters
- Right-click Parameters, point the cursor to New, and click DWORD (32-bit) Value

Figure: File parameter (DWORD – 32 bit) value
- Type ‘FormatDatabase’, and press ‘ENTER’. Right-click ‘FormatDatabase’, and click ‘Modify’

Figure: Modify format database
- In the Value data box, type ‘1’, and click ‘OK’

Figure: Value data
- Exit ‘Registry Editor’
- Restart the system and verify if the files can be saved now
Method 2: Try Google Uploads
If the user is unable to save the changes after editing in a locally saved spreadsheet (see Instance 2 above), then follow these steps:
- Upload the unsaved Excel file to Google Docs. Ensure that the file gets converted to Google Sheets format.
- Check if all the formulae are active and working.
- Make changes to the Google Sheet and verify that all the changes are working fine.
- Use the Google Sheets export feature to download the file in Excel format.
Method 3: Resolve manually with Open and Repair
If the Excel file is found to have corruption, try out the Excel Open and Repair utility:
- Open a blank Excel File. Go to File and Click Open.
- Go to Computers and click Browse.
- Access the Location and Folder and click the arrow icon beside Open followed by Open and Repair.

Figure: Illustrates Steps to use ‘Open and Repair’ method
The Open and Repair utility is not competitive enough and may not fix corruption in severely corrupted files. Hence, if you are unable to save Excel workbook after applying the manual methods, then you can search for a useful software-based repair utility.
Method 4: Excel File Repair Software
Specifically meant to resolve Excel file corruption. Stellar Repair for Excel helps you to repair every single object including charts, tables, their formatting, shared formulae and rules and more.
- Install and Open the software and select the corrupt Excel File. You can also click the Find option if the file location is not known.
- Click Scan and allow the software to scan and repair the corrupt Excel file.
- Once repaired, the software displays the fixed file components to verify its content.
- Click Save to save the file data in a blank new file as ‘Recovered_abc.xls’, where abc.xls is the name of the original file.
See the working of the software which has been declared as a tool that provides 100% integrity and precision.
The Excel repair software takes care to save the repaired data in a new file to minimize the chances of further corruption.
Conclusion
‘Unable to save Excel file’ is a generic problem that may appear due to various reasons. In this blog post, we presented some of the actual instances reported by users on community forums.
Windows updates, the Build versions, the Service Packs of the local systems and those on the network drive must be either similar or in sync with each other. Any deviation may cause issues in accessing or saving the Microsoft files, as reported in Instance 1 is caused where user is unable to save Microsoft Excel file on the Network Drive. In case, the user is unable to save the file on network drive then the problem lies with the Registry value.
Another case is when the users receive an error while saving an Excel workbook after they insert a chart in an existing workbook or copying values from an existing workbook. This issue is known to affect build Version 1707 (Build 8326.2086) and later, and only occurs with locally stored files.
When a user is unable to save a specific Excel file, then the problem can be resolved using the manual methods or the software based utility. The mode of repair depends upon the level of corruption in Excel file.
Hence, it is suggested to analyze the nature of the problem and decide an appropriate resolution method.
How to repair ‘recovered’ Excel file that won’t open
Summary: You may unable to open the Excel file after file recovery. When you try to open the file you may prompt up with error messages. This blog will discuss those errors and their solutions. Besides this, it also mentions Stellar Repair for Excel to repair and recover the severely corrupted Excel file with no data loss.
Consider a scenario: A Windows 10 user accidentally deletes a folder containing multiple Excel (XLSX) files created in Excel 2013. The worst part was all the deleted files were important, and he did not have a backup, which would help him in restoring the data. Nonetheless, he was able to recover those data using a professional data recovery software. Next, he tried opening each of the recovered Excel files one by one. In doing so, his happiness turned into disappointment. And the reason was, some of the recovered Excel files failed to open prompting error messages, of course, due to corruption. In this scenario, all he needed was to repair ‘recovered’ Excel files that did not open. Know how to fix damaged Excel files that were recovered after deletion in this blog!
Before delving into the Excel file repair methods, acquaint yourself with the probable causes leading to damaged or corrupt Excel files. Although not essential, it shall be an added advantage in helping you to prevent Excel file corruption issues in the future.
The standard Excel file(s) Corruption Causes
- Power Outage – A power outage due to which a system closes suddenly or unexpectedly is a common cause of damaged Excel files.
- Forced System Shutdown – Shutting down the system forcibly without closing MS Excel files is another common cause of corrupt Excel files.
- PC Virus or Bug – Computer viruses or bugs may affect one or more data file if owners do not protect their PCs with powerful updated antivirus. Same is the case with malware attacks. The chances are that your computer is infected with one of these and has affected a few Excel files.
- Issues with Storage Devices – Damaged or corrupted Excel files can also be the outcome of hard drive issues in the data storage systems. Logical hard drive damage is one of the most significant issues.
The damaged Excel files may prompt up with error messages. These may be:
- ‘Excel unable to read file’
- ‘Filename is not valid’
- ‘This file is not in a recognizable format’
- ‘abc.xls file cannot be accessed. The file may be read-only’
- ‘Excel found unreadable content in (filename)’, ‘The file is corrupt and cannot be opened’
- ‘Microsoft Excel has encountered a problem and needs to close’
There exist multiple methods to repair Excel files which got damaged after recovery, and are as follows: XML method,
- Open Excel files with HTML
- Inbuilt ‘Open and Repair’ feature/tool in Excel
- Repair damaged Excel file from TMP file by using Excel AutoRecover and AutoBackup features
- Recover data by configuring ‘calculation option’ as manual
- Moving/copying or transferring data to a different location
- Stellar Repair for Excel software
Taking Stellar software versus other methods, the former is a software solution that repairs damaged (XLS and XLSX) file quickly in major three steps: Select->Repair->Save, whereas others fall into the category of manual processes and consume both time and resources. Among the manual processes ‘Open and Repair’ method is the least time and resource consuming, which you can try quickly by following the below steps:
Open and Repair method
- Click MS Excel tab and then the Open tab
- Select the damaged Excel file for repairing purpose
- Click the arrow present beside the Open Next, click Open and Repair tab
- Click either of the following:
- Repair tab (recovers maximum data)
- Extract Data tab (Recovers values and formulas if the repair process fails in recovering the complete data.)
Note – Use ‘Extract Data’ if ‘Repair’ is not successful.
If the Manual method is not competent enough to repair recovered Excel files that don’t open then opt for a software-based solution of deploying Stellar Repair for Excel software.
Software with 100% integrity and precision
Conclusion
As an automated software, Stellar Repair for Excel is easy-to-use. You do not need technical know-how and skill set, as required to execute the manual processes. On analyzing all these methods, it is suggested to use Stellar Repair for Excel having a user-friendly GUI to repair Excel files that became damaged after recovery, or if the recovered Excel file(s) that you once deleted accidentally has become corrupt now. Above all, it is an excellent software with multiple features and advantages. Use it to address all your MS Excel issues or if any recovered Excel file is corrupt.
How to fix runtime error 424 object required error in Excel
The Runtime error 424: Object required occurs when Excel is not able to recognize an object that you are referring to in a VBA code. The object can be a workbook, worksheet, range, variable, class, macro, etc. Some users have also reported that this error occurred when they tried to copy the values of the cells from one workbook to another.
Let’s understand the error through a small scenario. Suppose, I want to check the last field row in a table in a spreadsheet named “First” using the VBA code. To do this, I have added a command button and double-clicked on it and entered the below code in the backend:
Private Sub CommandButton2_Click()
Dim LRow As Integer
LRow = Worksheets(“First”).Cells(Rows.Count, 2).End(xlUp).Row
MsgBox (“Last Row “ & LRow)
End Sub
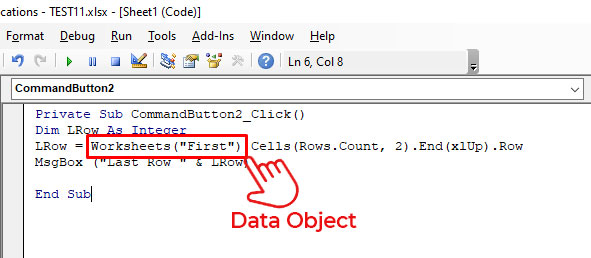
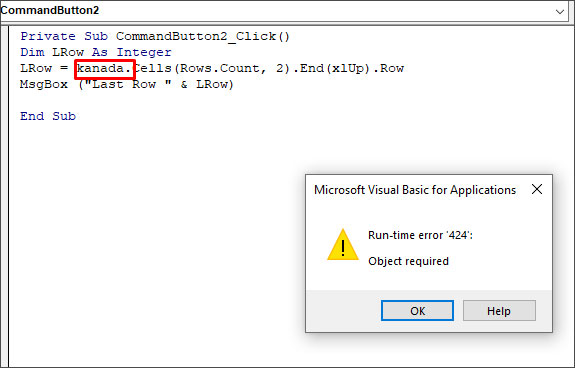
In this code, Worksheets(“First”) is a data object. If I mistakenly delete this data object and insert any random name (for example - kanada), then it will not be recognized by Excel. When I run this code, I will get the “Run-time error 424”.
Causes of Runtime Error 424 in Excel
The Runtime error 424: Object required can occur due to the following reasons:
- Incorrect name of the object you are trying to refer to in a code.
- You have provided an invalid qualifier to an object.
- You have not used the Set statement while assigning an object reference.
- The object is corrupted.
- Missing objects in a workbook.
- Objects you are trying to call in a code are mistakenly deleted or unavailable.
- You have used an incorrect syntax for object declaration.
- You are trying to perform an invalid action on an object in a code.
- Workbook is corrupted.
Solutions to Fix Runtime Error 424: Object Required in Excel
The VBA error ‘object required’ may occur due to different reasons. Based on the reason, you can follow the solutions mentioned below to fix the error.
1. Check the Name of the Object
The Runtime error 424 can occur when you run the VBA code using an incorrect name of the object. For example, the object name is ‘MyObject’ but you’re using “Backcolor”.
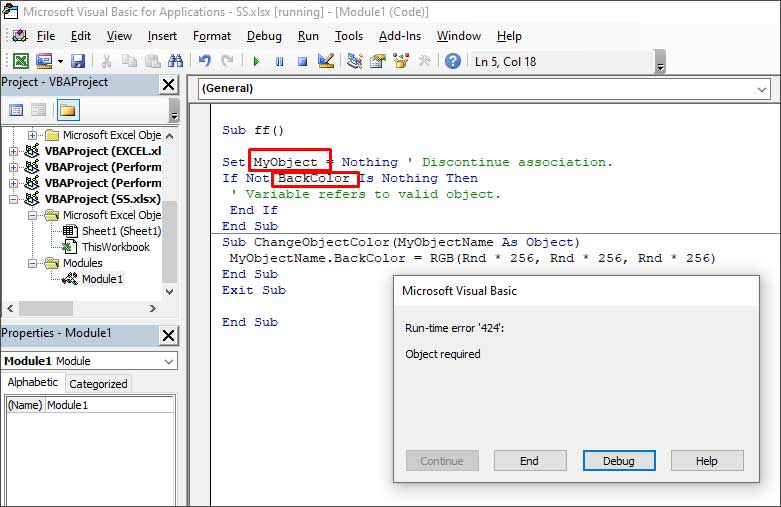
When you click the Debug button, the line with the error will highlight.

To fix the issue, you need to provide the correct name of the object.
2. Check if the Object is Missing
The Runtime error 424 can occur if the object you are referring to as a method is not available or you are using the wrong object in a code. In the below example, you can see that the error occurs when an object named “Employee” is not available in the Project list.
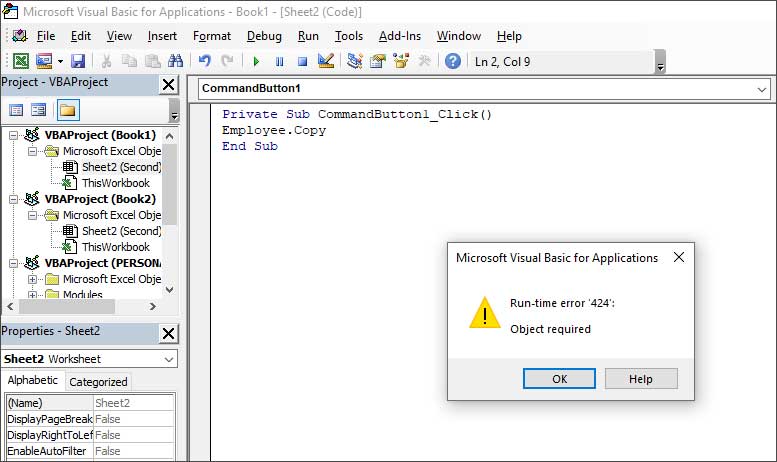
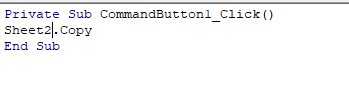
You can check and mention the object which is available. For instance, Sheet2 in the below code.
3. Check All References are Declared in the Code
You can get the Runtime error 424 if all the references are not declared. So, make sure you have declared all the references in the code. To verify this, you can use the debug mode by pressing F5 or clicking on the Debug option.

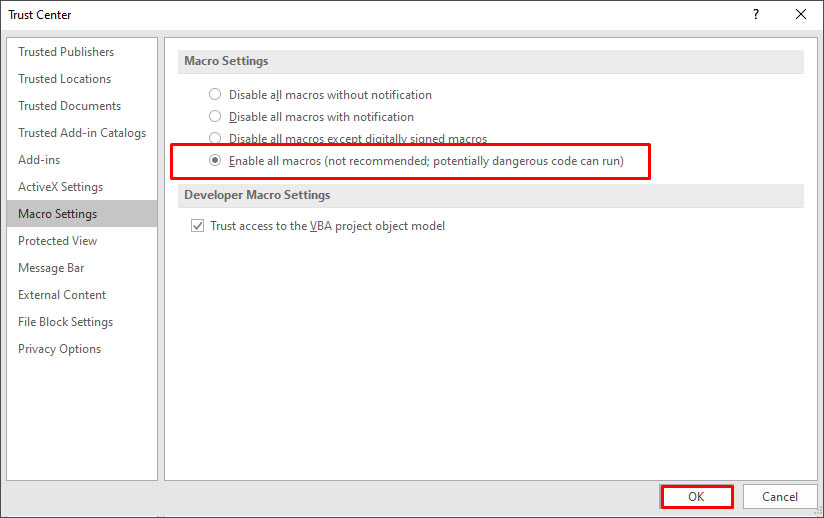
4. Check the Macro Security Settings
Sometimes, the error can occur if macros are disabled in the Macro Security settings. You can check and change the settings by following these steps:
- On the Developer tab, in the Code section, click Macro Security.
- In the Trust Center window, select Enable all macros.

- Click OK.
5. Repair your Workbook
Sometimes, the ‘Object required’ error can occur if your Excel file is damaged or corrupted. In such a case, you can try repairing the file using Microsoft’s in-built utility - Open and Repair. To use this utility, follow these steps:
- In Excel, go to File > Open > Browse.
- In the Open dialog box, click on the corrupted Excel file.
- Click the arrow next to the Open button and select Open and Repair from the dropdown.
- Select Repair to recover as much data from the file as possible.
If the Open and Repair utility fails or stops working, then you can try a professional Excel repair tool, such as Stellar Repair for Excel . It is an advanced tool that can repair severely corrupted Excel files (.xls, .xlsx, .xltm, .xltx, and .xlsm). It helps recover all the file components, including images, charts, tables, pivot tables, cell comments, chart sheets, formulas, etc., without impacting the original structure.
Conclusion
The Runtime error 424 usually occurs when there is an issue with the objects in your VBA code. In this article, we have covered some effective methods to resolve the “object required” error in Excel. If the error occurs due to corruption in Excel file, then you can repair the corrupt file using Stellar Repair for Excel. It is a reliable tool that can repair severely corrupted Excel file without changing its actual formatting. You can download the free trial version of the software to evaluate its functionality.
Fix the Too many different cell formats Error in Excel?
Excel has set a limit on the number of unique cell formats within a workbook. Excel 2003 allows up to 4000 different cell format combinations, whereas Excel 2007 and later versions allow a maximum of 64000 combinations. When this limit exceeds, you may encounter errors, such as “Too many different cell formats”. It can prevent you from inserting or modifying workbook rows or columns. Sometimes, it prevents you to copy and paste the content within the same or different workbooks. This error may also occur due to various other reasons.
You can encounter the “Too many different cell formats” error due to the below reasons:
- Formatting is missing in the workbook.
- Size of your Excel file has increased due to excessive use of complex formatting (conditional formatting).
- Workbook contains a large number of merged cells.
- There are multiple built-in or custom cell styles.
- Excel workbook is corrupted.
- The unused styles are unexpectedly copied to new workbooks (when moving or copying a worksheet from one to another).
- Workbooks contain multiple worksheets with different cell formatting.
Methods to Fix the “Too many different cell formats” Error in Excel
First, check that your Excel application is up-to-date. It helps in preventing duplicate styles in workbooks. If the error persists, then follow the below methods:
Method 1: Simplify the Workbook Formatting
You can face the error in Excel - Too many different cell formats, if the size of your Excel file has increased due to excessive or unnecessary formatting. You can try to simplify the formatting of the affected workbook. While reducing the number of formatting combinations, you can follow the simplifying guidelines, such as using a standard font and applying borders consistently. Follow the below steps to remove unnecessary formatting in your worksheet:
- First, open the affected worksheet.
- Now, use the shortcut key (Ctrl+A) to select all the cells.
- In the Excel ribbon, navigate to the Home tab and click Clear.

- Then, select the Clear Formats option.

The above steps will remove all unnecessary formatting from the selected cells, thus reducing the number of cell formats. Besides this, you can try removing the cell patterns (if any) or use cell styles to remove unnecessary formatting in the workbook.
Method 2: Remove Conditional Formatting
Conditional formatting is also one of the reasons behind the “Too many different cell formats” error. It usually occurs if you have applied multiple rules to various cells or cell ranges within a workbook. Each rule has its own formatting settings. If you’ve applied a large number of conditional formatting to cells, it can increase the number of unique cell formats. You can check and remove the unnecessary conditional formatting. Here are the steps to do this:
- Open the Excel file in which you are getting the error.
- Go to the Home tab and locate Conditional Formatting.

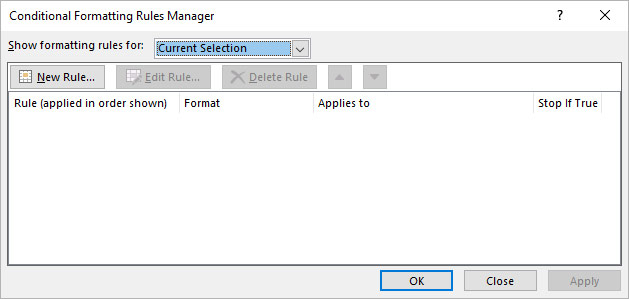
- Select Manage Rules.
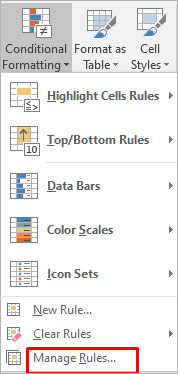
- The Conditional Formatting Rules Manager wizard is displayed. You can check the formatting rules and delete the unnecessary rule by clicking on the Delete Rule option.
Method 3: Repair your Excel Workbook
Corruption in the Excel workbook can also cause the “Too many different cell formats” error. You can try the Microsoft inbuilt utility to repair the file. Follow these steps to use this utility:
- Open your Excel application. Go to File > Open.
- Click Browse to choose the affected workbook.
- The Open dialog box will appear. Click on the corrupted file.
- Click the arrow next to the Open button and then select Open and Repair.
- You will see a dialog box with three buttons - Repair, Extract Data, and Cancel.

- Click on the Repair button to recover as much of the data as possible.
- After repair, a message is displayed. Click Close.
If the Open and Repair utility does not work or fails to repair the corrupted Excel file due to any reason, then you can use Stellar Repair for Excel to repair the Excel file. It is a simple-to-use third-party Excel repair tool with an intuitive UI that enables anyone to use it without much effort. The tool can help in fixing the “Too many different cell formats” error. It does so by repairing the Excel (XLS/XLSX) file and recovering all the components, including damaged cell style, without impacting the original formatting. You can download the software’s demo version and install it to check how it works.
Method 4: Save the Excel File to a Binary Workbook (.xlsb) Format
You can also get the “excel too many cell formats” error if the size of the spreadsheet is too large. You can try saving the Excel file in binary (.xlsb) format to reduce the Excel file size. Here’s how to do so:
- In Excel, navigate to File > Save As.
- Select Excel Binary Workbook (*.xlsb) in the Save as type dialog box.
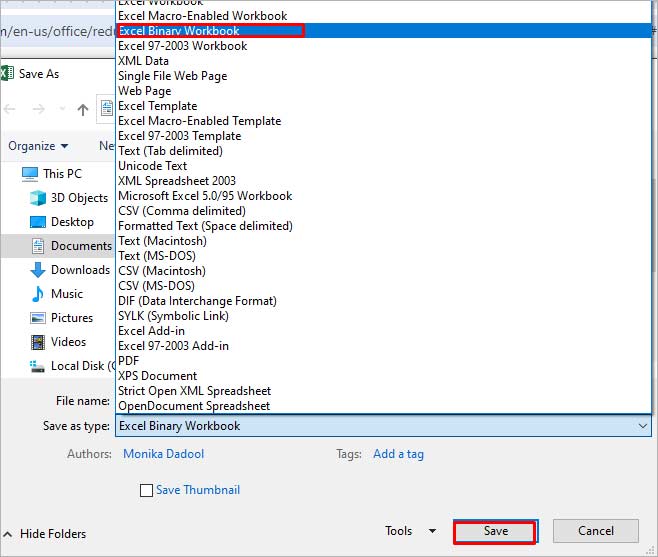
- Click Save.
Some Additional Solutions
Here are some additional methods you can try to fix the issue:
1. Check and Fix the Un-used Style Copy Issue
Many users have reported encountering the “Too many different cell formats” error when moving or copying the content of a workbook from one Excel to another and the unused styles being copied from one workbook to another. Microsoft has released a hotfix package which contains a fix for this issue. You can install this hotfix package (2598143 ) to resolve the issue.
2. Use Clean Excel Cell Formatting Option
You can check and enable the Excel cell formatting option to fix the “Too many cell formats” issue. This option will help you remove the excess formatting in your workbook. To locate this option, click on the Inquiabove steps willre tab. If you fail to see the Inquire tab, then check if the Inquire option is enabled in the Excel Com Add-ins settings.
3. Clean up Workbooks using Third-Party Tools
The “Too many different cell formats” issue can occur if your workbook contains a large number of unnecessary styles, as mentioned above. You can use third-party tools, such as XLStyles Tool or Remove Styles Add-in to clean up workbooks recommended in Microsoft Guide. However, Microsoft takes no guarantee of these tools.
Closure
If you’re getting the “Too many different cell formats” error in Excel, try the methods discussed in this post to resolve it. You can simplify the formatting by following standardized guidelines and clearing all the unnecessary conditional formatting. If the error has occurred due to corruption in Excel file, then you can use Stellar Repair for Excel to repair the Excel file. It is an advanced tool that can repair Excel worksheet and recover all its objects without losing the original formatting.
Also read:
- How to Sign Excel 2016 document with Digital Signature - (Tutorial)
- How to Repair corrupt MP4 and AVI files of Samsung with Video Repair Utility on Windows?
- How to Rescue Lost Photos from Motorola Moto G Stylus (2023)?
- How To Reset Your iPhone 7 Plus? | Dr.fone
- How to Rescue Lost Music from Samsung Galaxy S23 FE
- 2 Ways to Transfer Text Messages from Nokia G22 to iPhone 15/14/13/12/11/X/8/ | Dr.fone
- How to Repair Corrupt Excel 2007 Workbook? | Stellar
- How to restore wiped videos on Tecno
- How to identify missing or malfunctioning your hardware drivers with Windows Device Manager on Windows 11/10
- How to recover deleted photos from Android Gallery without backup on OnePlus 12
- How to retrieve erased messages from Samsung Galaxy M34 5G
- 2 Ways to Transfer Text Messages from Vivo S17 to iPhone 15/14/13/12/11/X/8/ | Dr.fone
- How to Repair Broken video files of Z50S Pro?
- How to Sign .odt file Online with DigiSigner
- How to fix videos not playing with my Xperia 10 V?
- How to Reset iPhone 15 to Factory Settings? | Dr.fone
- How to remove Google FRP Lock on C53
- How to recover deleted pictures from Xiaomi Redmi Note 13 Pro 5G.
- In 2024, Pokemon Go No GPS Signal? Heres Every Possible Solution On OnePlus 12 | Dr.fone
- In 2024, FCPX Hacks Smooth Skin without Breaking the Bank (or Using Plugins)
- Looking For A Location Changer On Xiaomi Redmi K70? Look No Further | Dr.fone
- Remove FRP Lock on Xiaomi 14 Ultra
- What are Location Permissions Life360 On Honor Magic 5 Lite? | Dr.fone
- Ultimate Guide on iPhone 14 iCloud Activation Lock Bypass
- 3 Things You Must Know about Fake Snapchat Location On Vivo X Fold 2 | Dr.fone
- 3 Ways to Change Location on Facebook Marketplace for Vivo S17 | Dr.fone
- In 2024, How to Screen Mirroring Nubia Red Magic 9 Pro+ to PC? | Dr.fone
- New Unleash Your Creativity How to Edit Videos with Windows Movie Maker for 2024
- FRP Hijacker by Hagard Download and Bypass your Samsung Galaxy A14 4G FRP Locks
- The way to recover deleted photos on ZTE Nubia Z60 Ultra without backup.
- VN Video Editor PC Edition A Brief Inspection
- Updated Do You Waste Time Making Transparent Background in Paint for 2024
- In 2024, Unleash Your Creativity Best Mobile Video Editing Apps
- Title: How to Fix the
- Author: Nova
- Created at : 2024-05-19 18:32:12
- Updated at : 2024-05-20 18:32:12
- Link: https://blog-min.techidaily.com/how-to-fix-the-value-error-in-excel-2019-stellar-by-stellar-guide/
- License: This work is licensed under CC BY-NC-SA 4.0.
