
How to Migrate Android Data From Vivo Y78t to New Android Phone? | Dr.fone
How to Migrate Android Data From Vivo Y78t to New Android Phone?
While getting a brand new smartphone is certainly exciting, the process of phone migration is pretty tiresome. Too many times, users spend a lot of time and efforts to migrate Android to a new smartphone. If you wish to Android migrate to new phone without experiencing any data loss then you can take the assistance of a dedicated tool. There are plenty of ways to migrate Android to Android. In this guide, we will teach you how to migrate Android in three different ways.
Part 1: How to migrate Android using Google Drive?
Since Google Drive is already available on all the Vivo Y78t devices, it can readily be used to migrate Android to Android without much trouble. Firstly, you need to sync your data from the source device and later log-in to the same account to sync your new phone with the Drive. To perform phone migration using Google Drive, follow these steps:
1. To start with, go to Settings > Backup & Reset on the source device and turn on the option of “Backup my Data”.
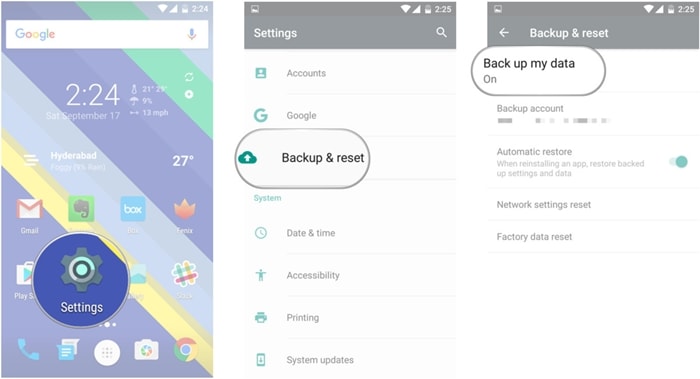
2. Furthermore, you can select the kind of data you wish to sync with your Google Drive. You can simply turn on the feature for Automatic backup to make the most of the space on Google Drive.
3. Wait for a while as your device will backup its content on the Drive. You can even go to your account’s Drive to view the backup.
4. Now, in order to Android migrate to new phone, simply turn on the target device and proceed to perform its setup.
5. Agree to the terms and conditions and sign-in to your Google account. Make sure this is the same account that is linked to your source device.

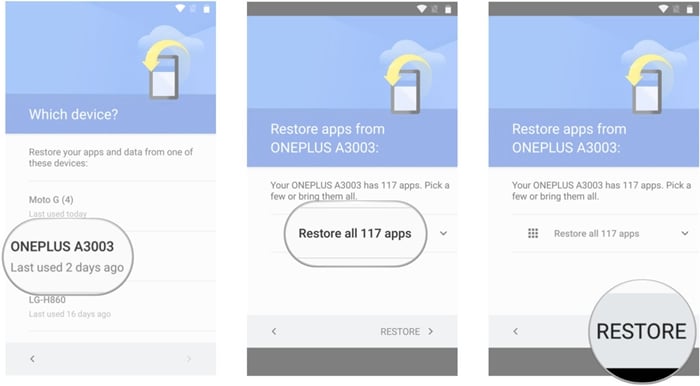
6. As you would sign-in to the account, it will display a list of available backup files. Simply select the recent backup file.
7. Furthermore, you can pick the apps that you wish to restore from here or restore all content at once.
8. To migrate Android to Android, just click on the “Restore” button and move your data from your old to new device.
Part 2: How to migrate Android data using Dr.Fone - Phone Transfer?
One of the most secure and fastest ways to migrate Android device to another phone is by using Dr.Fone Switch . Compatible with all the major Android, iOS, and Windows devices, it can easily be used to perform phone migration between different platforms. The tool performs a direct phone to phone transfer. It can Android migrate to new phone all kinds of data like contacts, call logs, bookmarks, messages, photos, videos, music, and more. To migrate Android to Android with no data loss, perform these steps:

Dr.Fone - Phone Transfer
Migrate Android Data to New Android Phone in 1 Click.
- Easy, fast, and safe.
- Move data between devices with different operating systems, i.e iOS to Android.
- Supports iOS devices that run the latest iOS
- Transfer photos, text messages, contacts, notes, and many other file types.
- Supports over 8000+ Android devices. Works for all models of iPhone, iPad and iPod.

3981454 people have downloaded it
1. Firstly, download Dr.Fone - Phone Transfer on your Windows PC or Mac from its official website. In order to perform Android phone migration, connect your old and new device to the system and wait for them to be detected.
2. Launch Dr.Fone toolkit and select the option of “Switch” from the welcome screen. Make sure that both the Vivo Y78t devices are connected to your system in a secure way.

3. This will provide the following interface. As you can see, Dr.Fone will intuitively detect the source and the target device. Though, you can click on the “Flip” button to interchange the position of the Vivo Y78t devices as well.

4. Select the kind of data you wish to move from the source to the destination device. You can even erase all the content on the target device by selecting the “Clear data before copy” option.
5. After selecting the type of data you wish to move, click on the “Start Transfer” button. This will initiate the phone migration process by moving your selected content to the target device.
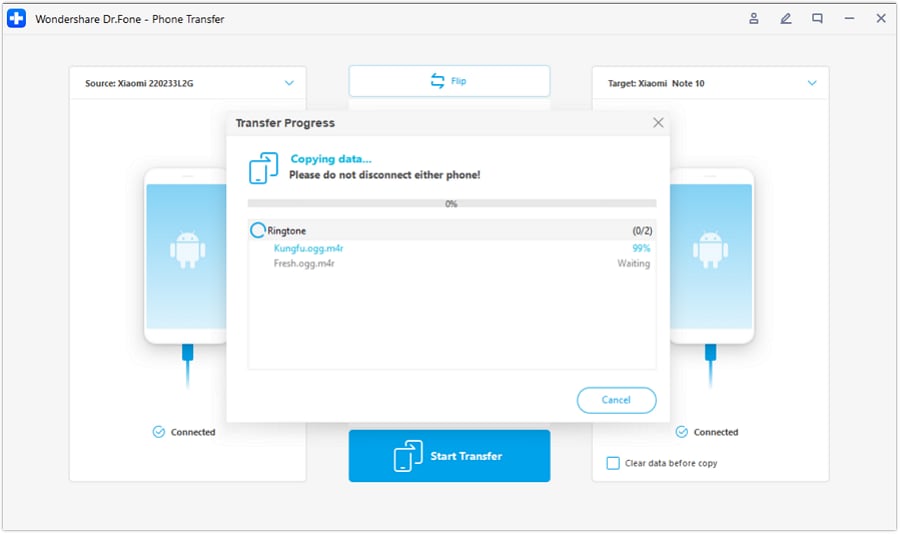
6. Wait for a while as Dr.Fone will migrate Android device to any other phone. Don’t close this window or disconnect the Vivo Y78t device during this stage.
7. Once your Android migrate to new phone, you will be notified by displaying the following prompt.
That’s it! After following these steps, you would be able to migrate Android to Android easily. Just disconnect your Vivo Y78ts safely and use them the way you like.
Part 3: How to migrate Android data manually?
By using Dr.Fone Switch or Google Drive, you would be able to perform phone migration in an effortless manner. Nevertheless, if there is no free space on your Drive and you wish to manually migrate Android, then you can also make it work. Following are certain ways to migrate Android to Android using different tools and techniques.
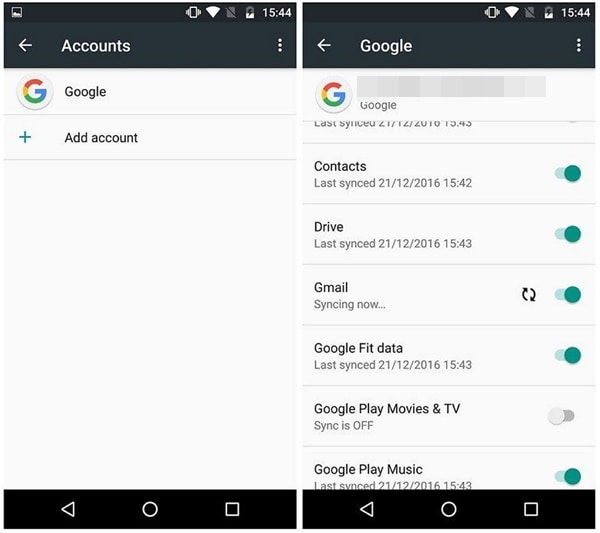
Contacts, Gmail, Fit Data, Play Store, etc.
To migrate Android device’s crucial content like its contacts, Google Fit data, Google Play Store data, Music data, etc. you can go to the respective Account and turn on the sync option. Later, you can use the same account and sync these files to the new device.

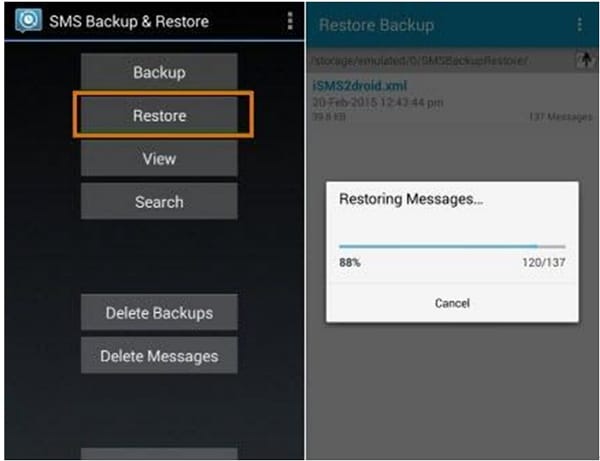
SMS transfer
There are plenty of ways to move your messages from one device to another. Just download a reliable SMS Backup & Restore app from Google Play store and sync your messages. Install the app on the new device to complete phone migration.
SMS Backup & Restore Download URL: https://play.google.com/store/apps/details?id=com.riteshsahu.SMSBackupRestore&hl=en
 Screensaver Factory, Create stunning professional screensavers within minutes. Create screensavers for yourself, for marketing or unlimited royalty-free commercial distribution. Make screensavers from images, video and swf flash, add background music and smooth sprite and transition effects. Screensaver Factory is very easy to use, and it enables you to make self-installing screensaver files and CDs for easy setup and distribution. Screensaver Factory is the most advanced software of its kind.
Media content
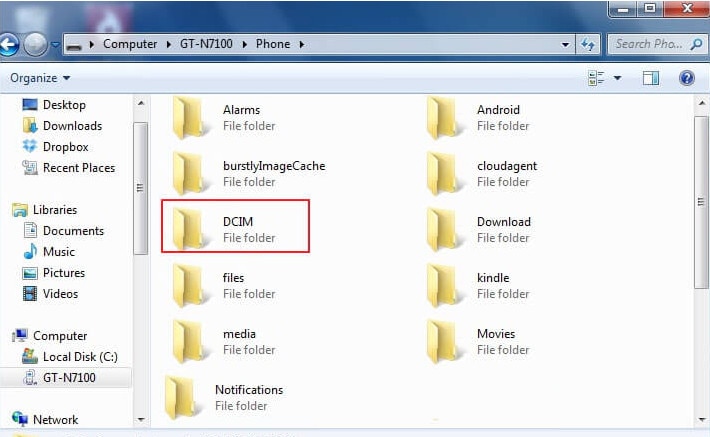
The smartest way to Android migrate to new phone your media files (like photos, videos, music, etc.) is by syncing them with Google Drive. If your Drive has limited free space, then you need to manually transfer this data. Connect your device to your system and open its storage. From here, you can manually copy the files having your media content and paste them to a safe location (or directly to the new device’s storage).

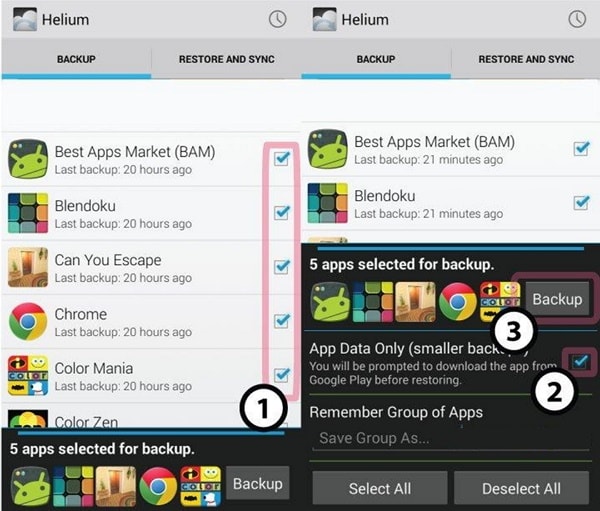
Transfer apps
You can also move your important apps while performing phone migration. There are dedicated third-party solutions that you can use for this. For instance, Helium can help you move your important apps and app data from one device to another.
Helium Download URL: https://play.google.com/store/apps/details?id=com.koushikdutta.backup&hl=en
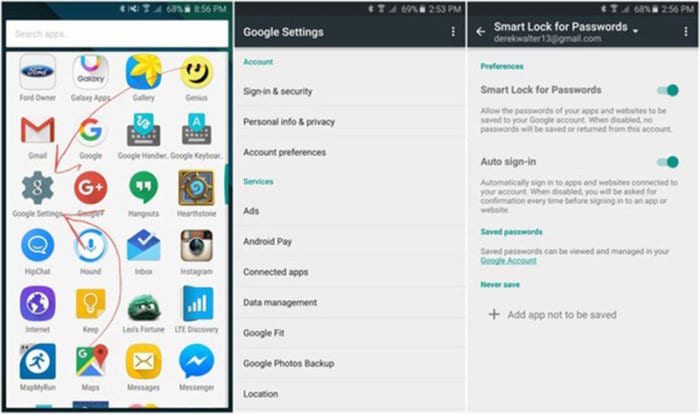
Bookmarks and passwords
If you use Google Chrome to store your passwords and bookmarks, then you can also migrate Android this content. Just go to Google Settings on the Vivo Y78t device and turn on the option of “Smart Lock for Passwords”. In this way, you won’t have to enter your passwords over and over again.
As you can see, the manual phone migration method will consume a lot of time and effort of yours. Therefore, we recommend using Dr.Fone Switch to migrate Android to Android without any data loss. It is a highly secure and reliable tool that will let you migrate Android to any other platform without any hassle.

4 Ways to Transfer Music from Vivo Y78t to iPhone
You switch from an Android device to an iPhone but can’t find an ideal solution to transfer music from Vivo Y78t to iPhone.
Welcome to the club! A while back, I was facing the same issue as iOS devices come with numerous restrictions. Unlike an Android to Android transfer, it can be tough to move music from Android to a new iPhone , such as iPhone 13. Thankfully, I discovered some quick fixes for this problem, which I’m going to share with all of you right here. Read on and learn how to transfer music from Vivo Y78t to iPhone in 4 surefire ways.
Part 1: How to transfer music from Vivo Y78t to iPhone, including in 1 click?
Yes – you have read it right. You can learn how to send music from Vivo Y78t to iPhone using Dr.Fone - Phone Transfer with just one click. This remarkable tool by Dr.Fone can help you switch from one device to another in a few minutes. A highly advanced tool, it supports data transfer between Android and iPhone, iPhone and iPhone, and Android and Android. Since a cross-platform data transfer is supported, you won’t face any trouble moving music from Vivo Y78t to iPod, iPad, or iPhone.
Dr.Fone - Phone Transfer
Transfer music from Vivo Y78t to iPhone in 1 Click!
- Easily transfer every type of data from Vivo Y78t to iPhone, including music, videos, photos, messages, contacts, apps data, call logs, etc.
- Works perfectly with most smartphones and tablets, including Apple, Samsung, HTC, LG, Sony, Google, HUAWEI, Motorola, ZTE, Nokia, and more.
- Fully compatible with major network providers such as AT&T, T-mobile, Verizon & Sprint.
- Compatible with the latest mobile phone operating system, including iOS & Android.
- Fully compatible with the latest computer system Windows and Mac
3981454 people have downloaded it
A user-friendly tool is compatible with most Android and iOS devices. The desktop application is available for Windows and Mac, which comes with a free trial as well. Besides music, you can also move your contacts, messages, photos, call logs, and other important content. Follow the steps below to get started:
Firstly, launch the Dr.Fone toolkit on your computer and go to the “Switch” option from its welcome screen.
 The Tube Sites Submitter is a fast and efficient tool for anyone who needs to upload videos quickly, easily and automatically to hundreds of tube sites in mere minutes .
 Now, you need to connect two devices to the system. Once the Vivo Y78t devices are detected, authenticate them and select the media transfer option.
Both of your devices will automatically be detected by the application. Ideally, your Vivo Y78t will be listed as “Source” while the iPhone should be the “Destination” device. If not, you can click on the Flip button to interchange their positions.
Choose the data that you would like to transfer. To move music from Vivo Y78t to iPhone, make sure the option of “Music” is enabled before clicking on the “Start Transfer” button.

 PaperScan Professional: PaperScan Scanner Software is a powerful TWAIN & WIA scanning application centered on one idea: making document acquisition an unparalleled easy task for anyone.
- As Dr.Fone - Phone Transfer will move the selected data from Vivo Y78t to iPhone, wait for a while. Once it is completed, you will be notified.

That’s it! With just one click, you can now move music from Vivo Y78t to iPhone. After that, you can safely disconnect both of the Vivo Y78t devices.
Part 2: How to transfer music from Vivo Y78t to iPhone selectively?
Another user-friendly way to learn how to send music from Vivo Y78t to iPhone is by using Dr.Fone - Phone Manager (Android) . A part of the Dr.Fone toolkit, it can be a complete Android device manager. You can transfer your data between Android and computer and from an Android to an iOS device. You can even move songs from your Vivo Y78t to iTunes without using iTunes itself.
Dr.Fone - Phone Manager (Android)
Transfer Media from Vivo Y78t to iPhone/iTunes
- Transfer contacts, music, messages, and more data between Android and computer.
- Manage, export & import the data easily.
- Transfer your data between iTunes & Android.
- Manage the data on your Vivo Y78t on a computer.
- Compatible with the newest Android and iPhone.
3981454 people have downloaded it
Since it is a complete Android phone manager, you can use it to transfer all the other kinds of data (like photos, videos, contacts, messages, and more) from one source to another. Unlike Dr.Fone - Phone Transfer that moves all the music files at once, you can perform a selective data transfer. The interface will provide a preview of your data so that you can choose the files you wish to move. To learn how to transfer music from Vivo Y78t to iPhone selectively, follow these steps:
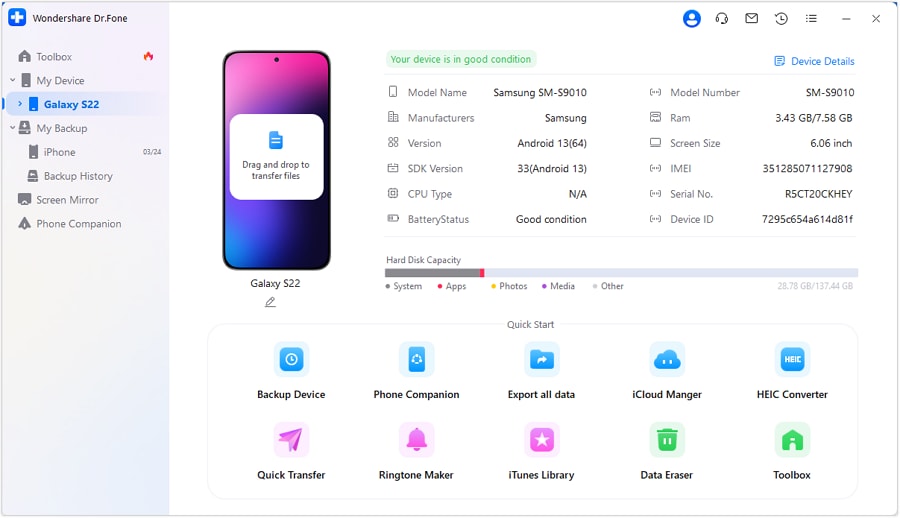
Install and open the Dr.Fone toolkit on your computer and click on the “Phone Manager” option from the home screen.
Connect both Android phones and iPhone to software and let them be detected automatically. From the top-left option, make sure you have selected your Vivo Y78t as a default/source device. The interface will provide its snapshot with some shortcuts.
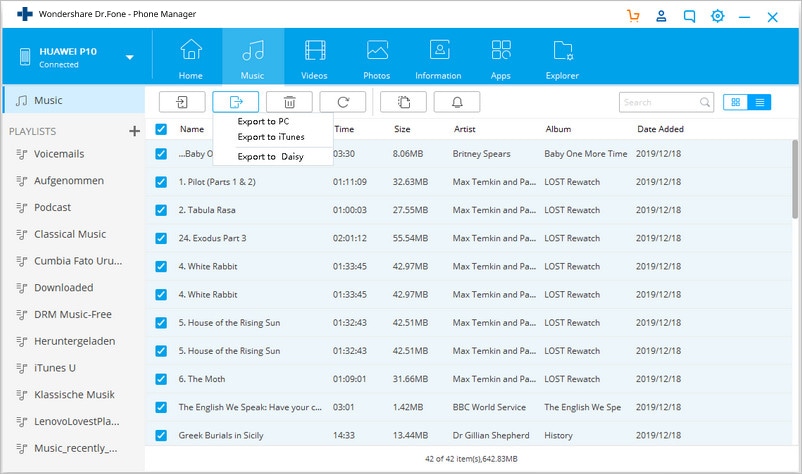
To manage the music files stored on the Android device, go to the “Music” tab on the interface. Here, you can view all music files, podcasts, audiobooks, songs, etc., listed in different categories.
Choose the files and then select the export button on the toolbar. From here, select the connected iPhone as a source.
Wait a moment and let the application automatically transfer your selected music files from your Vivo Y78t to your iPhone.
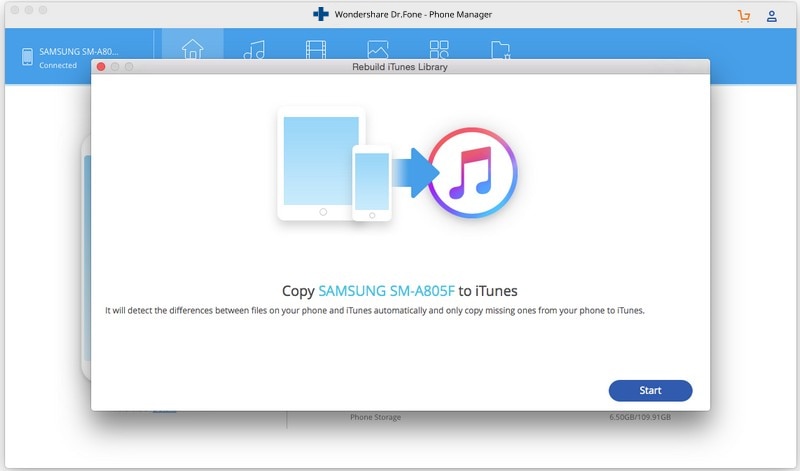
Besides performing a direct transfer of data from one smartphone to another, you can also use the application to transfer music from Vivo Y78t to iTunes as well. To do this, you need to select the “Transfer Device Media to iTunes” option from its home page. This will launch a pop-up window and let you move your music files from the Android device to iTunes directly.
In this way, you can selectively transfer music from Vivo Y78t to iPhone in a hassle-free manner.

Part 3: How to transfer music from Vivo Y78t to iPhone using Android File Transfer?
If you use a Mac, then you can use Android File Transfer to move your data from your Vivo Y78t to your system. Though, to transfer music from Vivo Y78t to iPhone, you would later need to take the assistance of iTunes. This is because you can’t simply drag and drop your data from your system to the iPhone. While the solution is free, it is certainly quite complicated and is not direct like Dr.Fone.
To start with, download and install Android File Transfer from its official website on your Mac. It is compatible with macOS 10.7 and higher versions.
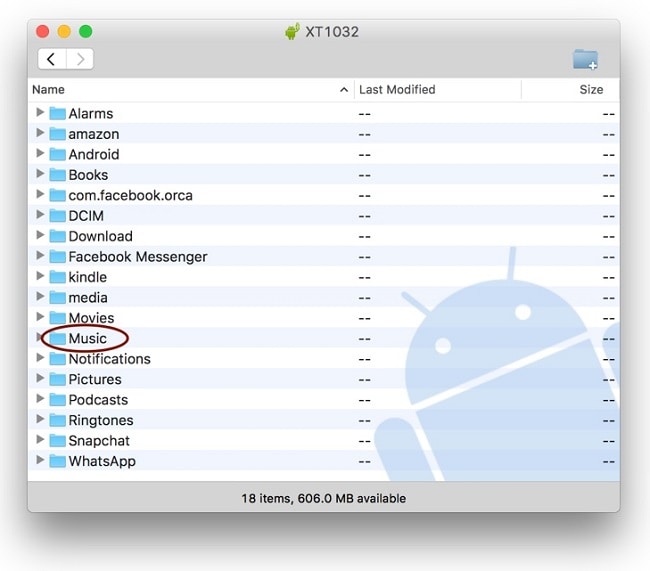
Now, connect your Vivo Y78t to your Mac and launch Android File Transfer (if it won’t automatically launch already).
Go to the Music folder, copy your favorite songs, and save them to your Mac. After that, you can transfer music from your Vivo Y78t to your Mac.
Advanced Find and Replace for Google Sheets, Lifetime subscription
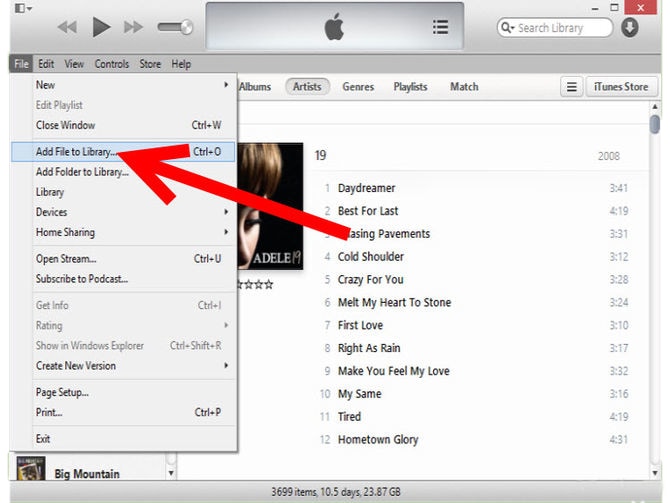
Great! You are halfway there. Launch iTunes on your Mac and add the newly transferred music to it. You can drag and drop it from the Finder to iTunes. Alternatively, you can also go to its options and click on “Add files to Library”. In this way, you can manually add new music to your iTunes library.
Once you have transferred the newly added music to iTunes, connect your target iPhone to the system, and let iTunes detect it automatically.
Select your iPhone from the Vivo Y78t devices and go to its “Music” tab. From here, you can enable the “Sync Music” options. Select the playlists and songs you wish to move and click on the “Apply” button to initiate the process.


Needless to say, the process is a bit complicated. Furthermore, you might face some compatibility issues between your devices and iTunes as well. To avoid all this unwanted hassle, you can simply take Dr.Fone applications’ assistance and transfer music from Vivo Y78t to iPhone effortlessly. In this way, you can learn how to send music from Vivo Y78t to iPhone through iTunes and Android File Transfer.


Part 4: How to transfer streaming music from Vivo Y78t to iPhone?
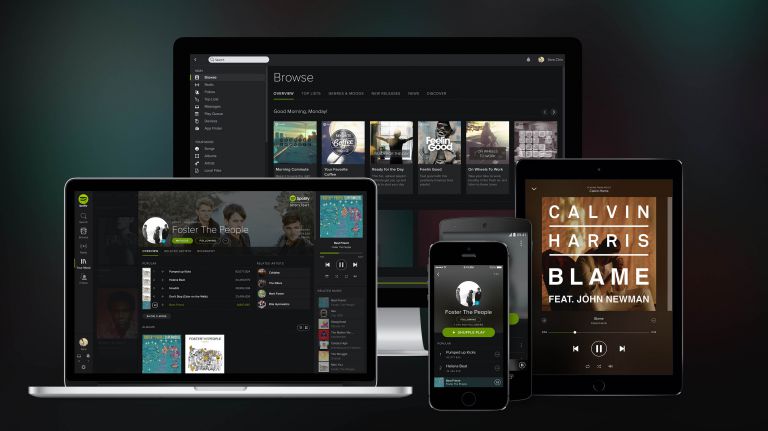
These days, many people use streaming services like Apple Music, Google Play Music, Spotify, etc., to listen to their favorite songs without the hassle of downloading them. The good thing about these streaming services is that you can access your music from multiple devices. For instance, let’s consider the example of Spotify.
Once you have created a playlist on your Spotify account, you can access it from any other device. You can even access your music by visiting its website because it will be stored on Spotify’s server and not your device itself.
If you are moving from an Android to an iPhone, you can follow these steps to ensure your Spotify music won’t be lost.
- Launch Spotify on your Vivo Y78t and go to the Playlist tab. From here, you can create a playlist. Later, you can add your favorite songs to this playlist as well. You can even create multiple playlists on the app.

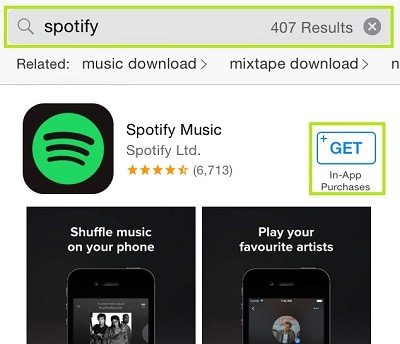
- Afterward, unlock your iPhone and go to the App store. Look for the music streaming app and download it on your phone.
- Once you log in to your Spotify account using your credentials, you can access “My Music” and access all your saved playlists.
The same drill can be followed for all the other streaming services as well. While you can sync your music using these streaming services, the songs you have made available offline will not be listed here. Therefore, you need to make sure that you have saved them in a playlist beforehand.
When you know how to move music from Vivo Y78t to iPhone, you can easily make this transition. Go ahead and pick a preferred option to transfer music from Vivo Y78t to iPhone. For a one-click transfer of data, you can use Dr.Fone - Phone Transfer , while to make a selective transfer, you can try Dr.Fone - Phone Manager (Android) . Both of these are user-friendly and reliable tools that will come handy to you on numerous occasions.

5 Ways To Teach You To Transfer Files from Vivo Y78t to Other Android Devices Easily
Transferring data from one phone to another when switching devices is a complex and tough task. The data stored in their old phone is one of the major reasons why people are hesitant to switch devices. However, it is only the case when you don’t know the right method. If you plan to switch to a new Android device, this article will help you transfer files from Vivo Y78t to Other Android Devices.
There are multiple ways to transfer files from one Android to another, but we have chosen the easiest 5 methods in this article. Stick with the article to find different methods for Android-to-Android file transfer, along with their pro, cons, and best-case scenarios.
Parental Control Software
## Part 1: Transfer Files Between Android via BluetoothWhen trying to transfer files between Android phones, Bluetooth is available as the in-built option. It is part of all Android devices, and you don’t need any internet, computer, or cable to use it. Although newer and faster transfer methods have overshadowed Bluetooth as a data transfer option, it is still among the reliable options.
Steps To Transfer Files via Bluetooth
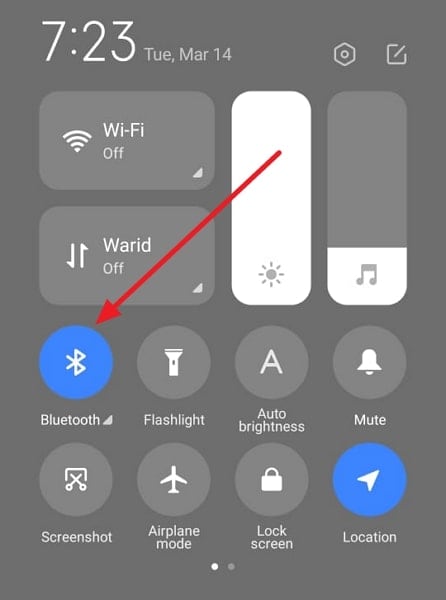
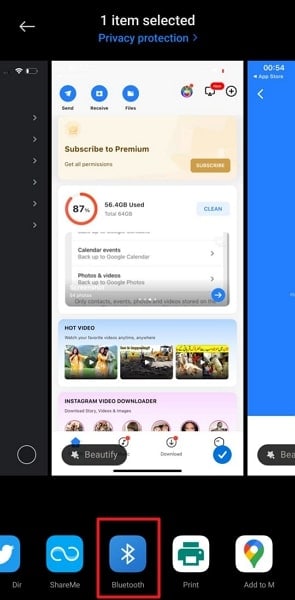
Step 1: Start by enabling Bluetooth on both Android devices and ensuring their visibility is set to all. Afterward, select the targeted files on the old Android phone.
Step 2: Now, press the “Share” icon and select “Bluetooth.” Choose your new Android device from the available devices on the next screen.
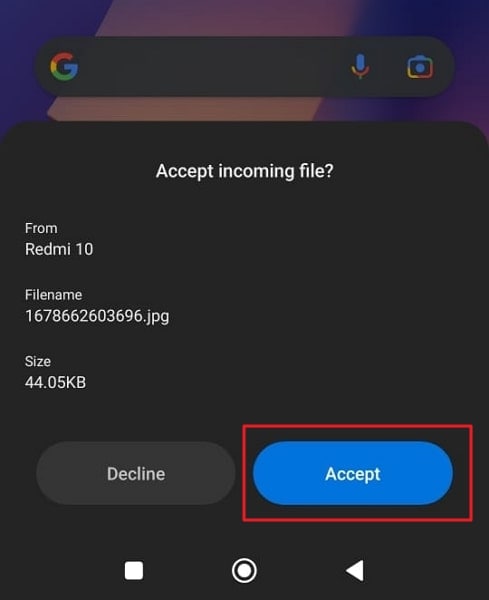
Step 3: Move to your new Android phone and hit “Accept” to start the transfer process. The transfer time will be depended on the size of the files.

Pros and Cons
| Pros | Cons |
|---|---|
| · It is an in-built option for all Android devices. | · It is an extremely slow method for transferring files |
| · You don’t need internet, cable, or Wi-Fi to send files via Bluetooth. | · If you send large files using this method, the process frequently fails, which can corrupt the files. |
| · Using Bluetooth doesn’t require any special knowledge or skills |
Best For
Using Bluetooth is best for transferring small to medium, size files. It is also convenient when you can’t access the internet.
Part 2: Transfer Files from Vivo Y78t to Other Android Devices by Nearby Share
Nearby Share is a method developed by Google to share files between Android phones. It can be considered Google’s answer to Apple’s AirDrop, though, unlike AirDrop, it doesn’t require Wi-Fi. This method is available for all Android devices though you should use the latest Android OS for smoother working. Moreover, Bluetooth needs to be enabled to use this method.
 With Screensaver Wonder you can easily make a screensaver from your own pictures and video files. Create screensavers for your own computer or create standalone, self-installing screensavers for easy sharing with your friends. Together with its sister product Screensaver Factory, Screensaver Wonder is one of the most popular screensaver software products in the world, helping thousands of users decorate their computer screens quickly and easily.
Step-by-Step Guide To Transfer Files via Nearby Share
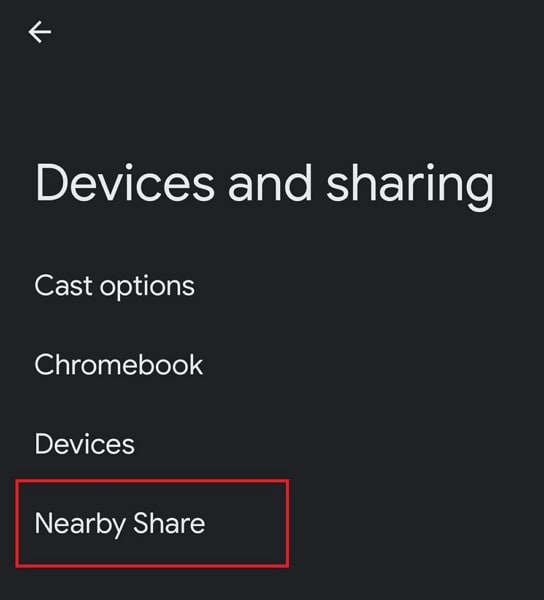
Step 1: You will need to activate “Nearby Share” on both devices first. To do that, go to the phone’s “Settings” and access the “Google” settings. Here, tap “Devices and Sharing,” and from the next appearing screen, choose “Nearby Share.”
 Allavsoft Batch Download Online Videos, Music Offline to MP4, MP3, MOV, etc format
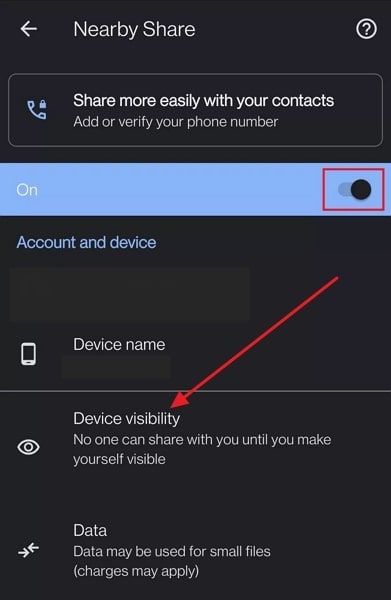
Step 2: In the “Nearby Share” screen, toggle it on and set device visibility to “Everyone.” Once you activate it on both Android devices, find and select the files you want to transfer on the old Android phone.
Step 3: After selecting the required files, press the “Share” button and select “Nearby Share” from the options. It will detect nearby devices and select your new Android device once it appears. A prompt will appear on both phones with a matching PIN. Accept the files on the new phone to start the transfer process.


WPS Office Premium ( File Recovery, Photo Scanning, Convert PDF)–Yearly
Pros and Cons
| Pros | Cons |
|---|---|
| · It is a fast and secure way of transferring files between Android devices. | · You can only send limited types of files through this method. |
| · You do not need Wi-Fi to use this feature. | · This feature consumes a lot of battery if you use it for a long time or transfer large-size files. |
| · Nearby Share is available on a wide range of Android devices. |
Best For
Using Nearby Share is recommended when you don’t have access to a computer or the internet, and you need to share large files.
Part 3: Transfer Files Between Android by USB Cable
If you have access to a computer, you can use it to transfer files from Vivo Y78t to Other Android Devices. All you need is a USB cable, and you are set. In this method, you will first copy data from the old phone to the computer and then copy it to the new phone from the computer. It works by default on Windows, but for Mac, you need Android File Transfer.
Instructions To Transfer Files by USB Cable
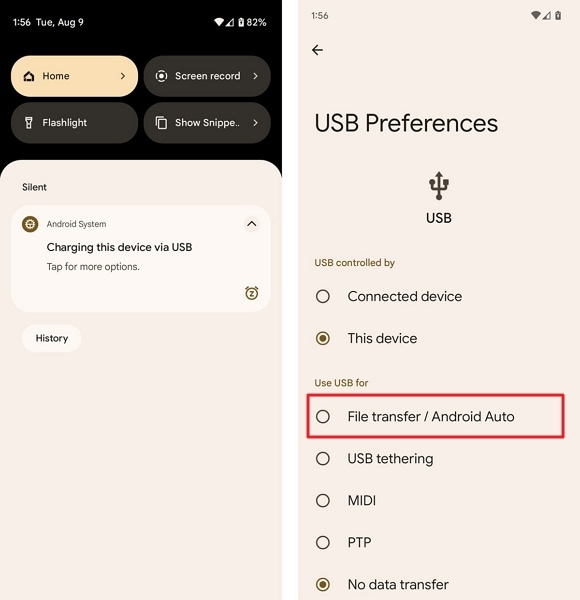
Step 1: First, connect your old Android phone to your computer using a USB cable. A prompt will appear on your asking for the USB purpose. Here, select “File Transfer/Android Auto.” It will give your computer access to the phone data.
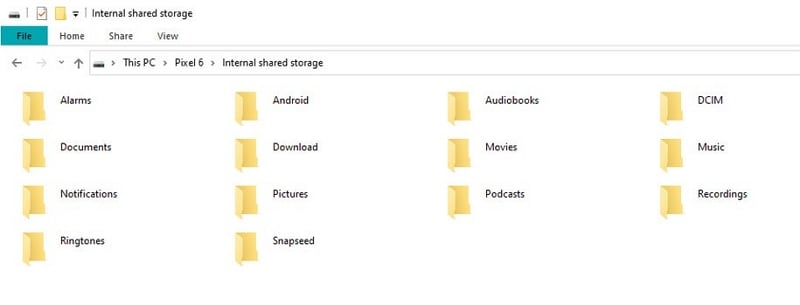
Step 2: Now copy all the data you want to transfer to your computer and disconnect the old device. Afterward, connect the new Android device to the computer, give access permission, and copy the data you took from the old phone to the new phone.
Pros and Cons
| Pros | Cons |
|---|---|
| · You do not need to use any third-party app for this method | · This method can be time-consuming as you need to transfer the same data two times. |
| · It is a reliable and secure method. | · It only works well on Windows; on Mac, it becomes a hassle. |
| · Only a USB cable is needed to transfer the data. |
Best For
Using a USB cable is best for transferring data when you have large files and don’t have any better options.
 Jet Profiler for MySQL, Enterprise Version: Jet Profiler for MySQL is real-time query performance and diagnostics tool for the MySQL database server. Its detailed query information, graphical interface and ease of use makes this a great tool for finding performance bottlenecks in your MySQL databases.
 Part 4: Sync Files from Vivo Y78t to Other Android Devices With Google Account
Google Account is another great way for Android-to-Android file transfer if you haven’t set up the new phone yet. It allows you to back up all your data on the old device and restore it to the new Android device. With this method, you can transfer most of the data from the old phone, including settings, contacts, notes, etc.
 PDF application, powered by AI-based OCR, for unified workflows with both digital and scanned documents.
 Step-by-Step Guide To Transfer Files With Google Account
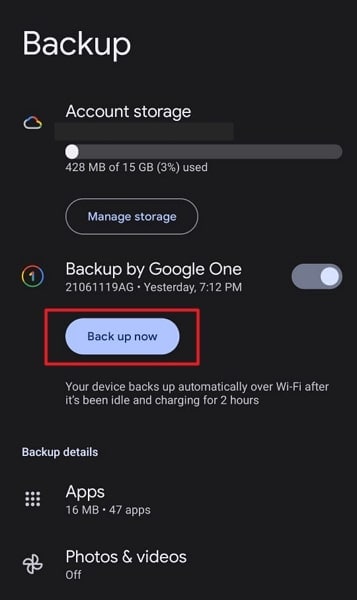
Step 1: On your old Android device, go to “Settings” and tap “Google.” In the Google settings, select “Backup” and tap “Backup Now” to back up your phone. Once the backup is complete, move to the new device.
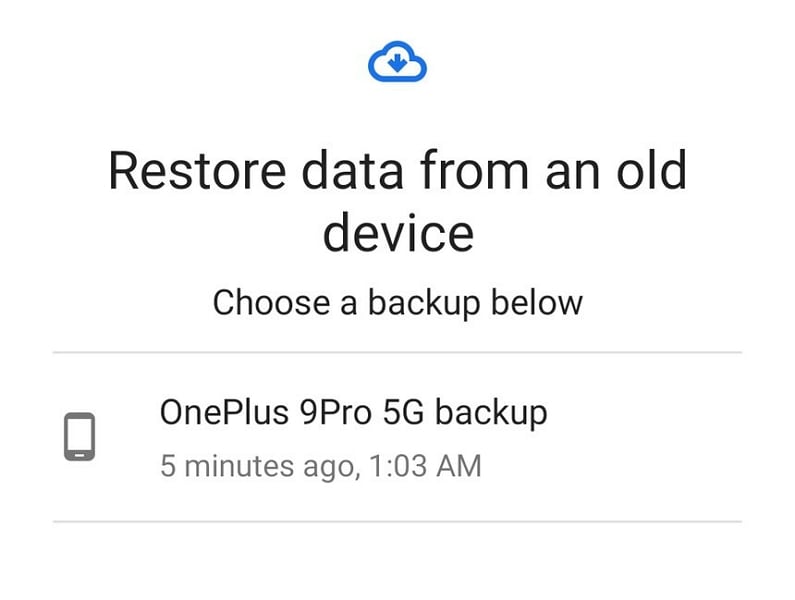
Step 2: When setting up the new Android device, sign in using the same Google Account. Afterward, select “Restore from Google Backup” when the option appears to restore the backup from the old phone.

Pros and Cons
| Pros | Cons |
|---|---|
| · It can transfer most of the phone data to the new Android phone. | · If your old device data is larger than 15GB, then you have to buy the storage because Google only provides 15GB free storage. |
| · Using Google Account is also secure, as your backup is encrypted. | · It requires you to use the same Google Account on both devices. |
| · The devices don’t need to be near each other. |
Best For
Using Google Account to transfer files from Vivo Y78t to Other Android Devices is best when you still haven’t set up the new Android device.
Part 5: Best choice: The Fastest Way to Transfer Files from Vivo Y78t to Other Android Devices with Dr.Fone
Want to find the best and fast way to transfer files from Vivo Y78t to Other Android Devices? If you don’t want to go through any time-consuming or complex transfer process, we recommend you use Wondershare Dr.Fone. It is a complete toolbox for smartphones and includes all the necessary solutions. Regarding Android data transfer, it can quickly transfer data between 8000+ Android devices, including the latest ones.
Key Features of Dr.Fone
- Using the Dr.Fone app, you can transfer data to Android devices with the latest Android 13 OS.
- This tool allows you to transfer, back up, and restore your entire WhatsApp data from chats to emojis to locations.
- If you have lost your phone data, you can recover it back using the Dr.Fone app safely and quickly.
- With this tool, you can also repair system issues in your device in a secure environment.

Steps To Transfer Files from Vivo Y78t to Other Android Devices With Dr.Fone
Aside from being the fastest way to transfer files between Android phones, it also has the simplest transfer process. You only need Dr.Fone installed on your system and a couple of USB cables to use this method. Here is how you can transfer files from phone to phone via Dr.Fone:
Step 1: Establish the Connection Between Android Devices
Use USB cables to connect both Android devices to the computer and launch Dr.Fone app. From the “Home” screen, click “Phone Transfer” and wait for the program to assign devices to the correct positions.
Step 2: Assign Android Devices to their Correct Positions
For transferring data from the old Android device to the new one, the old device should be at the “Source” position and the new device at the “Destination” position. If the positions assigned by the program are incorrect, use the “Flip” button to correct them.

Step 3: Select the Desired Data and Complete the Transfer Process
Now select the data you want to transfer and click “Start Transfer” to begin the transfer process. In case you want to delete data on the new device, select “Clear Data before Copy” before pressing “Start Transfer.”
Pros and Cons
| Pros | Cons |
|---|---|
| · It can transfer over 15 types of data from one phone to another. | · You will need a computer to transfer data through Dr.Fone |
| · The transfer process of this method is extremely fast and gets completed within minutes. | · It also needs USB cables to connect your Vivo Y78ts. |
| · You do not need the internet to use this method. |
Best For
It is best for all sorts of data transfer situations. Whether you are transferring a few files or moving all the data, it is a perfect tool.
Conclusion
To summarize, while it may seem troublesome to transfer files from Vivo Y78t to Other Android Devices, in reality, it isn’t. This has been well demonstrated through the article using 5 of the easiest transfer methods. It includes methods suited for a few files, like Bluetooth, to the best method of using Dr.Fone. With Dr.Fone, you can transfer all types of data from Vivo Y78t to Other Android Devices in the shortest time possible.
- Title: How to Migrate Android Data From Vivo Y78t to New Android Phone? | Dr.fone
- Author: Nova
- Created at : 2024-08-30 01:22:37
- Updated at : 2024-08-31 01:22:37
- Link: https://blog-min.techidaily.com/how-to-migrate-android-data-from-vivo-y78t-to-new-android-phone-drfone-by-drfone-transfer-from-android-transfer-from-android/
- License: This work is licensed under CC BY-NC-SA 4.0.