
How to Put iPhone 11 or iPad on Recovery mode? (Step by Step Tutorial) | Stellar
How to Put iPhone or iPad on Recovery mode? (Step by Step Tutorial)
Summary: DFU or Recovery mode is a way to recover your iPhone or iPad using a computer in case of technical issues. Read this post for a step-by-step process of how to enter and exit Recovery Mode and DFU mode on iPhone.


When you run out of solutions to troubleshoot your iPhone, Recovery Mode or DFU Mode comes as a rescue. Whether iPhone stops booting or fails to restore, you can use the functions in iPhone and fix the issue.
But the method to bring an iPhone in DFU or Recovery Mode varies in each iPhone model and iPad.
This post will guide you on how to enter and exit Recovery and DFU Modes in different iPhone and iPad variants. But first, understand what these iPhone functions are and their uses.

What is Recovery Mode and its use?
Recovery Mode uses iBoot to upgrade or restore your iPhone. iBoot is a bootloader program for iOS devices. Recovery Mode helps install the same or above iOS firmware version already on your iPhone. The iPhone screen in Recovery Mode prompts to connect iPhone to iTunes, showing a computer image.
Recovery Mode helps fix iPhone updates or restore issues, such as iPhone stuck at the Apple logo , unable to open the locked iPhone or want to reset iPhone but forgot iPhone passcode .
What is DFU Mode and its use?
Device Firmware Update or DFU mode lets your iPhone connect with iTunes on the computer without iBoot. As DFU mode doesn’t use iBoot, you can make changes in the operating system of the iOS device. An iPhone in DFU mode has a completely black screen.
Putting iPhone into DFU mode is the solution when Recovery Mode doesn’t resolve the problem. DFU mode can restore or upgrade iPhone. This mode is also commonly used to downgrade or jailbreak iPhone s.

Caution — you may lose all your iPhone data!
If you are entering DFU mode, make sure to back up your iPhone data . DFU mode permanently erases iPhone data . So always back up your videos, photos, messages, chats, Notes, etc., either to iCloud or iTunes.
However, if you have lost iPhone data and don’t have a backup, then immediately download iPhone data recovery software — Stellar Data Recovery for iPhone . The software helps to restore lost or deleted iPhone contacts, call logs, photos, videos, text, FaceTime, audio, chats, Calendar, Notes, Safari bookmarks, etc. It is quick to recover and extremely user-friendly.
What is required to perform Recovery and DFU modes in iPhone?
- Windows or Mac system.
- Lightning to USB cable.
- iTunes updated to the latest version on your computer.
How to put iPhone 6 and earlier versions in Recovery Mode
Follow the below steps to enter Recovery Mode on iPhone 6, iPhone 6s, iPhone 6s Plus, iPhone 5s, iPhone 5, iPhone 4s, and iPhone 4.
- Connect your iPhone to your PC using USB Lightning Cable and launch iTunes.
- Press and hold down the Home and Power button to turn the iPhone.

- Then connect the USB cable to iPhone and turn it on by holding the Home button.
- Continue to hold the Home button until a pop-up appears informing ‘an iPhone has been detected in recovery mode’ on your system.
- In Recovery mode, you can either restore the iPhone, set it up as new, or just recover your backups.

How to put iPhone 7 in Recovery Mode
It’s easy to enter Recovery Mode on iPhone 7 or iPhone 7 Plus. Follow the below steps:
- Turn off your iPhone 7 and connect it to your Mac or Windows computer.
- Ensure iTunes or Finder is running on the system.
- Press and hold the Power and Volume down button for 10 seconds.
- While continuing to hold the Volume down button, release the Power button.

- Release the button if you see the iTunes has detected an iPhone in recovery mode message on your system.
How to put iPhone 8 in Recovery Mode
If you want to enter the Recovery Mode on iPhone 8 and its variants, follow the below steps:
- Connect your iPhone 8 to your Mac or Windows system with a USB cable.
- Next, press and release the following buttons in a sequence Volume Up button, Volume Down, and Side button until your device reboots. Continue holding the Side button, even after seeing the Apple logo appear.
- Release the Side button once the Connect to iTunes logo appears on the iPhone’s display.

- Launch iTunes, and you should see a message stating, “There is a problem with the iPhone that requires it to be updated or restored.” You can choose to Update or Restore your iPhone’s software.
How to put iPhone 11 into Recovery Mode
To enter Recovery Mode on iPhone 11, iPhone 11 Pro, or iPhone 11 Pro Max, follow these steps:
- Connect your iPhone with your Mac or PC and launch iTunes.
- Force restart your iPhone with the following steps:
- Press and release the Volume Up button.
- Press and release the Volume Down button.
- Press and hold the Side button.
- Make sure to release these buttons if you see the recovery mode screen with the “Connect to iTunes” screen.
- Then choose your iPhone in iTunes, and you will see a pop-up saying that your iPhone is in Recovery Mode. Here, you can either update or restore your iPhone.
How to put iPhone 12 into Recovery Mode
Follow the below steps to enter Recovery Mode on iPhone 12, iPhone 12 mini, iPhone 12 Pro, and iPhone 12 Pro Max:
- Update iTunes to the latest version.
- Connect your iPhone to your PC or Mac via Lightning to a USB cable.
- Note: If you are connecting your iPhone to the computer for the first time, click on ‘Trust’ in the Trust This Computer dialog box and follow the prompts.
- Once your iPhone is paired with the computer, press the Volume up button followed by the Volume down button and release.
- Press and continue to hold the Side button until you see the ‘Connect to computer’ screen on your iPhone. While on your computer, you would see the iPhone Recovery Mode message in iTunes, confirming that your iPhone has entered into Recovery Mode. The computer asks you to either Update or Restore your iPhone**.** Click on any based on your requirement.
If you choose Update, iTunes will update your iPhone 12 to the latest iOS release. This won’t lead to any loss of data.
If you select Restore: It will erase iPhone data completely and renew your entire iPhone.
How to put Recovery Mode on iPhone 13
Entering Recovery Mode on iPhone 13 and iPhone 13 Pro has the same steps as iPhone 12. To enter the Recovery Mode, connect your iPhone to your computer and do the following steps in quick succession.
- Press the Volume up button and release.
- Press the Volume down button and release.
- Press and continue to hold the side button until the ‘Connect to iTunes’ screen appears on iPhone.

How to put Recovery Mode on iPhone 14
To use recovery mode on iPhone 14 and iPhone 14 Pro, follows these steps:
- Connect your iPhone to your system with a Lightning cable.
- Now on iPhone, press and quickly release the Volume up, Volume down, and side buttons until you see the recovery mode screen.
- Select your iPhone in the Finder/iTunes window and choose to update or restore your iPhone.

How to exit Recovery Mode on iPhone
It’s easy to exit Recovery Mode on iPhone. Follow the below steps:
- Hold the Home button and Lock button to exit DFU mode on iPhone 6 and earlier versions until your device reboots.
- To exit DFU mode on iPhone 7/7 Plus, hold the Side and Volume Down buttons until the device reboots.
- To exit the Recovery Mode on iPhone 8 or later version, press and hold the Side button until the “Connect to iTunes” screen disappears, and then iPhone should reboot back into iOS.
How to put Recovery Mode on iPad
To enter Recovery Mode on the iPad, follow these steps:
- Connect your iPad to Windows or Mac system using a USB cable.
- For iPad with a Home button: Press and hold the Home button and the Top/Side button until your iPad enters recovery mode.
- For iPad without a Home button: Quickly press and release the Volume Up button, Volume Down button, and the Top button. Keep holding the Top button until the iPad enters recovery mode.

How to put iPhone into DFU mode ?
Follow the below steps to enter DFU Mode on iPhone and its various version:
- Connect iPhone to PC or Mac via USB cable. Note: If the ‘Trust This Computer’ dialog box appears, follow the prompts.
- Once your iPhone is paired with a computer, follow these steps:
How to Enter DFU Mode on an iPhone 8 and later versions
- Press the Volume up button, then Volume down button, and release.
- Quickly press and hold the Side button for about 5 seconds.
- Along with the Side button, press and hold the Volume down button.
- Release the Side button and continue to hold the Volume down button for about 10 seconds.
- Once you see the ‘Recovery Mode’ screen in iTunes on your computer, you have successfully entered the DFU mode. However, the iPhone screen remains black in DFU Mode.
How to Enter DFU Mode on an iPhone 7
- Press and hold the Power and the Volume down buttons for 8–10 seconds.
- Release the Power button and continue to hold the Volume down button.
- Release the Volume down button once your iPhone has entered recovery mode.
How to Enter DFU Mode on an iPhone 6S or Earlier Versions
- Press and hold the Power/Sleep and Home buttons together for 10 seconds.
- Release the Power/Sleep button, but continue holding the Home button.
- Release the Home button once you see iTunes/Finder has detected an iPhone in recovery mode message.
Note: If you see the Apple logo on your iPhone, try again and repeat the above steps carefully.
How to exit DFU Mode on iPhone ?
If you want to exit DFU Mode on iPhone and its variants, follow the below steps:
How to Exit DFU Mode on an iPhone 8 or Later versions
- Press the Volume Up button and quickly release.
- Press the Volume Down button and quickly release.
- Now, press and hold the Side button until the Apple logo appears on iPhone. This indicates your iPhone has exited DFU Mode. Your iPhone would boot to the ‘Lock’ screen in a few seconds. Now, enter your passcode and continue to use your iPhone.
How to Exit DFU Mode on an iPhone 7
Press and hold the Power or Sleep button and the Volume down button until you see the Apple Logo.
How to Exit DFU Mode on iPhone 6 or Earlier versions
Hold the Home button and the Power button of the iPhone simultaneously until Apple’s logo appears on the screen.
Conclusion
Whenever your iPhone and its variants show problems like being stuck at the Apple logo, won’t upgrade, restore, or respond, you can use Recovery Mode and DFU Mode functions to resolve the problem. But don’t forget to back up your iPhone data before using these functions.
However, in any unfortunate incident of data loss while performing the functions, trust Stellar Data Recovery for iPhone – a software that brings back lost data on your iPhone securely.

FAQ
1. Does DFU Mode delete iPhone data?
If you use DFU mode to install something or restore your device, all your iPhone’s data will be erased.
2. Can you enter the recovery mode if your iPhone is disabled?
An iPhone is disabled when a user enters an incorrect password too many times on the lock screen. You should be able to enter the recovery mode using the same steps mentioned above and restore your iPhone to regain access.
3. How to put the iPhone in recovery mode without a computer?
A computer is not necessary to enter the recovery mode on an iPhone. You only need to press the right buttons, depending on your iPhone model, to enter the recovery mode. However, to restore your iPhone – you will need a computer.
How to Delete All Photos from iPhone Beyond Scope of Recovery?
Summary: Learn how to delete all photos from your iPhone beyond the scope of recovery with this comprehensive guide. We’ve also mentioned an iPhone eraser software that securely erases your photos for good and safeguards your privacy.

Are you planning to sell or discard your iPhone? If yes, it’s important to ensure that your personal data, such as photos and videos, etc. is deleted and cannot be recovered even by a professional data recovery tool. To protect your privacy and prevent unauthorized access to your deleted iPhone photos, make sure your iPhone is wiped clean of all your previous photos before you sell, donate, or discard it.
In this blog, we will talk about different ways to delete photos from iPhones beyond the scope of recovery.
How to Delete All Photos from iPhone?
Before deleting all photos from the iPhone, it’s important to take a backup of all photos to avoid any accidental data loss situation. There are various ways to back up your iPhone photos:
1. iCloud
Use iCloud to back up all your photos automatically. To sync iCloud with Photos –
- Go to Settings > [your name] > iCloud > Photos, and turn on iCloud Photos.

Your photos will be backed up to iCloud automatically if your device has enough storage space and is connected to Wi-Fi.
2. iTunes:
You can even use iTunes to back up your iPhone photos. To do this,
- Connect your iPhone to your system.
- Launch iTunes and then select your device.
- Click Summary > “Back Up Now” to create a backup of all your data, including photos.

Once you have backed up all your photos, proceed forward with deleting them from your iPhone.
Method 1: Delete Images From Photos and Recently Deleted Folder
Photos app saves images shot from iPhone as well as those received on chats. You can delete all the photos from your iPhone via the Photos app. Here’s how to do it.
- Open the Photos app on your iPhone.
- Go to the Library tab, tap All Photos, and then tap Select.
- Select one or multiple photos you want to delete.
- Tap on the Trash icon and then confirm to delete the photos.

When you delete a photo from the iPhone, it’s not deleted permanently. Instead, it is moved to the Recently Deleted folder, where the deleted photos stay for 30 days before being permanently deleted.
To permanently delete photos from the Recently Deleted folder, follow these steps:
- Open the Photos app > Albums.
- Scroll down, then tap on Recently Deleted.
- Next, tap Select and choose the photos that you want to delete permanently.
- Tap Delete and then confirm to delete the photos.
Remember, if iCloud sync is enabled, photos deleted from iPhone will be deleted on iCloud. That is why if you want to delete photos from your iPhone but not on iCloud, make sure iCloud sync is disabled for Photos.
Method 2: Factory Reset Your iPhone
Apple’s brilliant feature of the ‘Erase All Content and Settings’ option brings your device to default settings by erasing all your iPhone data, etc.
The factory reset will delete all the settings, photos, audio, videos, messages, notes, call history, search history, app history, passcodes, and any other data on your iPhone.
However, remember erasing your iPhone data with the ‘Erase All Content and Settings’ doesn’t delete your data permanently. It means that all your iPhone data including photos are still recoverable with the help of robust iPhone data recovery software .
Steps to Factory Reset iPhone
- Open Settings on your iPhone.
- Go to General and tap on Transfer or Reset iPhone.
- Click on the Erase All Content and Settings options.
- Click Continue and enter your iPhone passcode.
- Next, click Erase iPhone. This will fully wipe your device clean.


Note: Don’t forget to back up your iPhone data on iCloud or iTunes before initiating the factory reset. Because this backed-up data can be accessed on your computer or new iPhone.
Stellar Eraser for iPhone is the best way to delete permanently erase all photos as well as other data of the iPhone. The software erases all your photos, contacts, videos, chats, iMessage, browser search history, third-party apps data, and more from your iPhone.
The Stellar iPhone Eraser tool is the best way to clean or delete iPhone data. This tool deletes iPhone data permanently making it impossible to recover it from any software. It is the best data erasure tool for iOS devices before you exchange, sell, recycle, or give them away.
The software works with all iPhones and iPad versions, such as iPhone 14 to lower versions till iPhone 4 and supports iOS versions from iOS 6.0 to iOS 16.
![]()
Steps- How to Delete All Photos From iPhone via Stellar Eraser for iPhone
- Download and install Stellar Eraser for iPhone on your Windows and Mac systems.
- Launch the software and click on the Erase Data option.

- In the next Erase iPhone Data screen, click Next.


- Connect your iPhone to the system when prompted and click Erase.

- Click Yes to start the process of erasure.

- Click OK, once all the data is successfully erased.

All the data including photos and videos get permanently erased from iPhone beyond the scope of recovery.

Conclusion
Deleting all photos from your iPhone beyond the scope of recovery is crucial to protect your privacy and prevent unauthorized access to your personal data. By following the methods above, you can ensure that all your photos are deleted permanently from your iPhone. However, the best way to delete all photos from iPhone is by using Stellar Eraser for iPhone. The software will help you erase photos and other data from your iPhone so that it is impossible to recover it using any data recovery software.
![]()
FAQ
1. How to Delete Photos from iCloud?
To delete Photos from iCloud, follow these steps:
- Open Settings > tap on your Apple ID > iCloud.
- Then tap Manage Storage and select Photos.
- Next tap Disable and Delete. It will disable your photos from being saved on your iCloud account.
2. How to delete apps on iPhone permanently?
If you want to delete apps on your iPhone for managing the storage space then you directly remove it from Home Screen or delete it from App Library.
3. How to delete documents and data on iPhone?
Documents and Data folder may contain browsing history, cookies, cache, temporary files, database files and other information specific to the app. You can delete them easily by following this detailed guide .
How to find lost iPhone Backup files on Windows PC?
Summary: You have to restore iPhone data. But you cannot find backup files saved on your Windows PC or the backup files are unreadable. This post guides you to find iPhone backup on Windows PC and methods to restore it on your device.
You may get into a terrible iPhone data loss situation after a factory reset, stolen iPhone, jailbreak or physical damage to your device, etc. Backup is your only resort. But another shocker is waiting for you. You cannot find iPhone backup files once saved on your Windows PC.
Your backup files are not readable, and you have no clue how to access them.
In such a situation, keep calm and do not worry. If you have ever saved your iPhone backup on a Windows computer and are now unable to locate or access it, this post guides you to find an iPhone backup on a PC and how to restore it on your device.
Where are iPhone backups stored on Windows PC?
iPhone backups are safe copies of your complete device information. iTunes saves iPhone backup in the Users folder on a Windows computer. These backup files are not in a readable format. You can copy them but should never try to move files to a different drive, edit, rename or extract content. All such activities can ruin the backup files. However, you can make copies of your backup or delete backup that you do not require anymore.
Steps to find iPhone backup files on Windows PC:
- In the Search bar, enter %appdata% or %USERPROFILE% (if you downloaded iTunes from the Microsoft Store)
- Press Return
- Double-click these folders: Apple Computer > MobileSync > Backup
You can also locate iPhone backup in Windows 7, 8, 10 or 11 by following Users > (username) > AppData > Roaming > Apple Computer > MobileSync > Backup.
Cannot locate iPhone backup on Windows PC? Find and Restore data with iPhone data recovery software.
If you cannot find your iPhone backup data on your PC or cannot access the backup files, take refuge in third-party software – Stellar Data Recovery for iPhone.
How can Stellar Data Recovery for iPhone help you?
You can find, access, and restore lost iPhone backup files with Stellar Data Recovery for iPhone. It is a secure tool that efficiently scans the computer to find your iPhone backup. The recovered iPhone backup files are in readable form, and you can either save them on your PC or iPhone.
When you can use the Stellar iPhone data recovery solution
- You are unable to locate your iPhone backup files
- Your backup files are either lost or deleted.
- You cannot access iPhone backup files on Windows PC
- Not able to restore backup on your old/new iPhone
How can Stellar Data Recovery for iPhone recover lost backup files from PC?
The iPhone Data Recovery Tool by Stellar is a do-it-yourself software that quickly recovers complete iPhone data in a readable form from your Windows PC.
You can recover all your lost photos, videos, contacts, messages, Safari bookmarks, Call history, Reminders, Voice memos, Notes, WhatsApp, Kik, WeChat, Viber messages, etc.
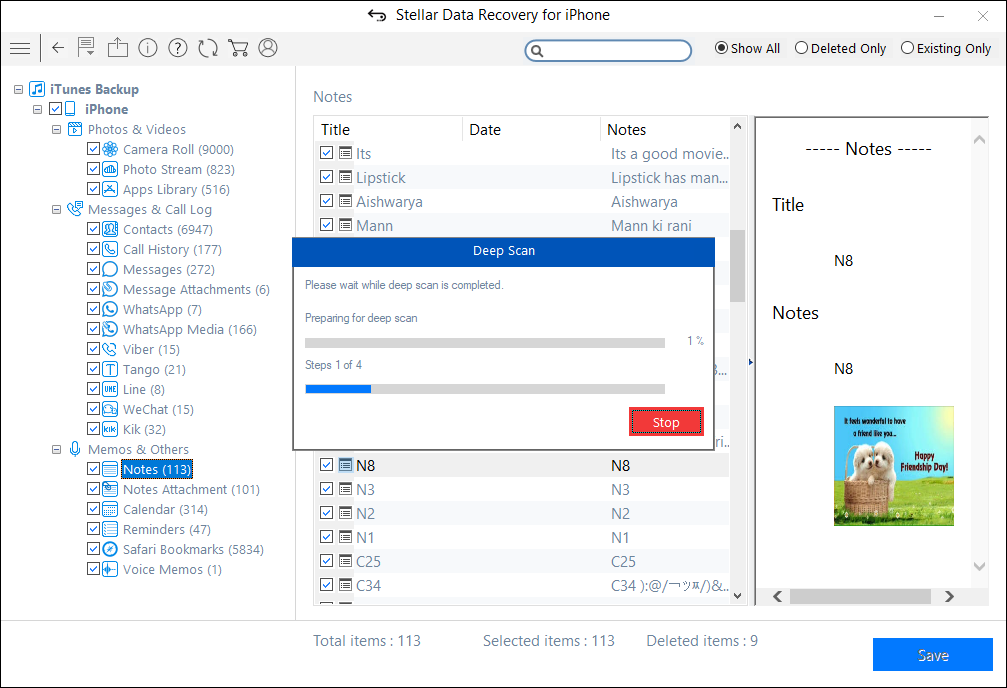
It also offers a Deep Scan if your desired iPhone information is not recovered after the first scan. A deep scan does a comprehensive scan of the selected device or backup to recover every bit of lost or deleted backup information.
Benefits of Stellar iPhone Data Recovery
- Recovery of deleted or lost backup files
- Recovers data in a readable format
- Option to restore only that data from backup which you want to be in your iPhone
- Allows to save recovered backup on computer or iPhone
Step-by-step recovery of lost iPhone backup on Windows PC with Stellar Data Recovery for iPhone
Step 1: Connect your iPhone to your computer and launch the software.
Step 2: On the home screen, select Recover from iPhone. The scanning process begins.
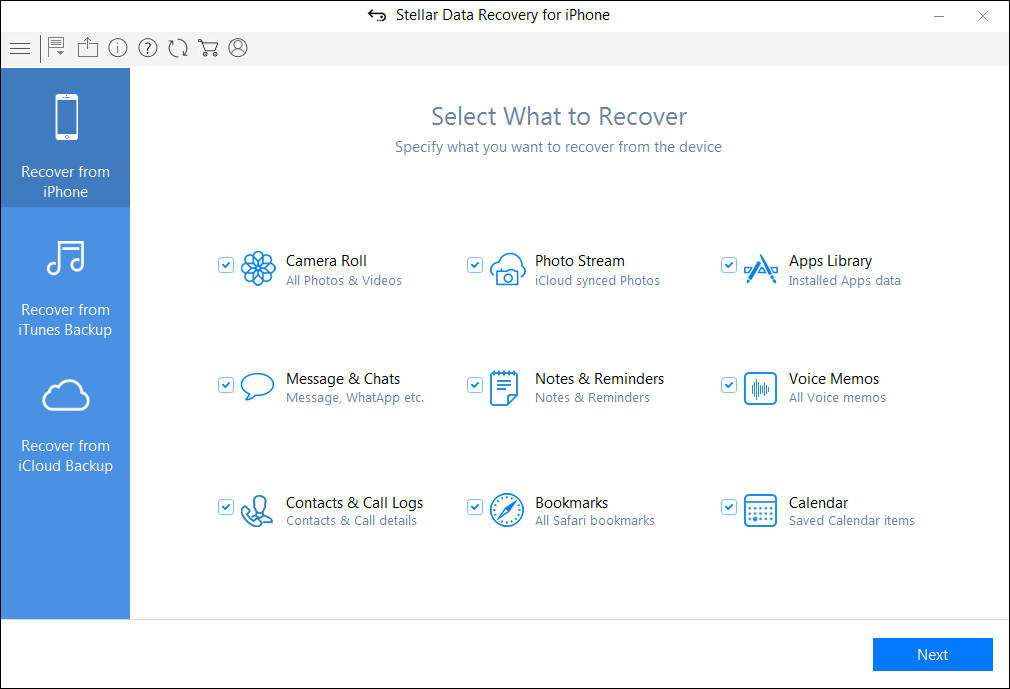
Step 3: After scanning, all the files on your iPhone are listed.


If you do not see the required files in the list, choose Deep Scan. It will scan for the backup stored on your computer system.
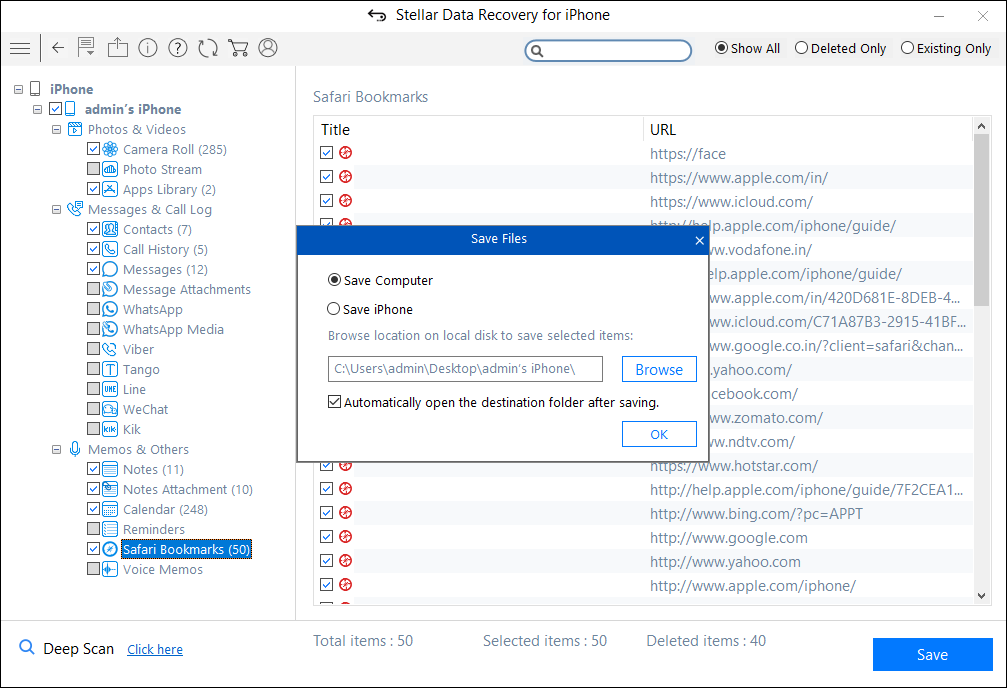
Step 4: Select and save the recovered iPhone data at your desired location. You can save it on your iPhone if you want to restore backup data on your device or save it on your computer.
Wrapping Up
Losing iPhone data after factory reset, jailbreak, being stuck in a boot loop or physical damage, etc., can get messier when you cannot find or retrieve information from iPhone backup files saved on your computer. Stellar Data Recovery for iPhone significantly relieves such data loss situations.
This iPhone utility not only finds the lost iPhone backup files on Windows PC, but it also makes them readable and allows you to save/restore them to your iPhone or computer. Moreover, it lets you selectively transfer iPhone data on your iPhone rather than complete a backup.
You can download the free trial version to evaluate its performance. It is undoubtedly not going to disappoint you.
How to fix ‘Unable to load Video: An Error Occurred’
Summary: Are you facing ‘unable to load video’ error message while trying to play videos on iPhone or iPad? No worries. This post guides you how to fix the error and watch your videos on the iOS device without any issue.
‘I am frequently facing ‘unable to load video’ error message ever since iOS 16 update. Its annoying as I cannot watch videos on iPhone. How to fix the issue?’
‘Since I upgraded to iPhone14 Pro from iPhone 11, I have problem playing a few videos. It states ‘error loading video’. I even bought more iCloud storage but no luck. Please help.’
Videos not loading on iPhone or show ‘Unable to load video, an error occurred’ message is a persistent issue faced by iPhone users, even after successive iOS upgrades, irrespective of the iPhone model.
As the annoying error stops you from watching your favorite videos on iPhone, you want to fix it soon. But before that its’ important to understand what could be the cause of this ‘unable to load video’ error, to troubleshoot the problem accordingly.
## **Why iPhone shows unable to load videos error?**There is no single reason for video loading error. Usually, videos saved in iCloud would display unable to load error on iPhone, if the Internet is off or you have slow connection.
Another common reason behind videos not loading on iPhone is that the ‘optimize storage’ option is enabled on your iOS device. Apple offers this feature to save space on your iOS device and stores the full resolution videos to iCloud. However, this often results in the video loading problem on the device.
Its’ also possible that your iPhone has insufficient space, which prevents videos from loading. There could also be a bug that can be fixed with iPhone update.
Right 9 ways to Fix ‘Unable to load Video, an error occurred’ on iPhone, iPad

Method 1: Restart iPhone
Restart, also called soft reset can fix error in loading video on iPhone or iPad. Close all the applications and restart your iPhone or iPad.
Method 2: Turn on Internet of the iOS device
If you are watching YouTube, Netflix, or other online videos, ensure cellular data of your device is turned on. In case you are facing the error ‘unable to load video: an error occurred’ while loading a higher quality version of the video on iPhone, try by switching to uninterrupted Wi-Fi connection. Note that high speed Internet is necessary for streaming videos on iOS device.
Method 3: Update your iOS device
You can update the device to fix ‘unable to load video’ error on iPhone or iPad. To update your iPhone or iPad follow the given steps. Before that make sure Wi-Fi is turned on.
- Go to Settings > General > Software Update.
- Click Download and Install followed by Install Now.
Method 4: Turn off the Optimize Storage option
When ‘optimize storage’ option is enabled on your iOS device, all the full-resolution high quality videos and photos get saved in iCloud while only the compressed space-saving versions are on your iPhone.
Thus, when you try to open a video on the iOS device, it takes time eventually to load it from iCloud. While sometimes, the video may not load at all. Try to fix unable to load video on iPhone by turning off this feature. Here are steps to disable optimize storage’ option:
- Open Settings. Click on your name.
- Tap on iCloud > Photos.
- Below Optimize iPhone Storage, tap on Download and Keep Originals option.

Figure: Disable Optimise iPhone Storage Option
Wait until the iPhone downloads all the videos from iCloud. You should now be able to open videos without loading error.
Method 5: Update the app that shows video load error on iPhone
If the video loading issue error pops up in a particular app like YouTube, Instagram, then update the application. If the update doesn’t help, you can reinstall the app also. This should fix videos not loading error or buffering issues. App update are available in App Store. To update any iPhone app follow the given steps:
- Open the App Store.
- Now click on your profile icon on top.

Figure: Update app in App Store
- Scroll to find your app and click on the Update button next to it. You can also click on Update All on top.
Method 6: Create free space on your iPhone
High quality videos may not load and show error if there is no space on your iPhone. Check your iOS device, if it has enough free space. Its’ essential to have 2GB free space available in the device to play high quality and large size videos.
You can check the available space on your iPhone or iPad by navigating to: Settings > General > iPhone Storage.

Figure: iPhone storage screen
On the top right, you will see the amount of space used on your iOS device. If the space is less, remove the useless videos, photos, apps and other data on your iPhone or iPad.
Method 7: Access video from iCloud.com
If the videos don’t load on iPhone and show error, try to access them via iCloud.com on your computer by following the below steps:
- Open iCloud.com and enter Apple ID credentials to sign in.
- Click on the Photos or iCloud Drive app where the video is saved.
- Find your video and click on it to open.
There’s also the options in icloud.com to share the video via email or download to save it on your computer.
Method 8: Repair video not loading on iPhone
If you face ‘unable to load video’ an error occurred in Camera Roll videos of iPhone, the file may have corrupted.
Copy or transfer the problem video to your PC or Mac. Download and install a video repair software—Stellar Repair for Video . It can fix file corruption in the error throwing iPhone video. The software is compatible with MP4, MOV, HEVC, video files formats used in iPhone and iPad.
The software also offers a free trail wherein you can repair the corrupt video and watch its preview.
Method 9: Restore iPhone to factory settings
If ‘unable to load video’ error is perpetual on your iPhone or iPad, in spite of trying the above methods, then factory reset can be your last bet.
As all know, factory reset will delete everything on your iOS device , make sure you create the latest backup of the iPhone in iCloud or iTunes.
Follow the below steps to factory reset iPhone and fix unable to load video error:
- Open Settings > General > Reset.
- Click on Erase All Content and Settings.
- Enter Apple passcode. Click on Erase iPhone and follow the prompts.
Now check if the video error problem is resolved or not.
Wrapping Up & FAQ
Usually one of the methods shared in this post fixes the error – ‘unable to load video‘, an error occurred’ on iPhone. However, unfortunately if none works and you cannot play videos on iPhone, contact Apple support .
FAQ
- Why does my iPhone say ‘an error occurred while loading a higher quality version of this photo’?
High quality photos/videos require more storage space to open. Less free storage is one of the for the media file loading error.
Hence, delete some useless photos, videos, or apps to free up space. Now you can open the high quality photo/video smoothly without any error.
2. Why my iPhone videos not playing on PC?
Your iPhone videos may not play on Windows PC due to many reasons— the media player doesn’t support videos file format; virus in your PC; or the video has turned corrupt during transfer. However, you can fix the problem and play iPhone videos on Windows .
3. Why I cannot view my video in icloud.com?
In iCloud.com, select the Photos app and click Photos. In the side bar, you will see the thumbnails of all your photos and videos. Find your video and click on it to view.
- Title: How to Put iPhone 11 or iPad on Recovery mode? (Step by Step Tutorial) | Stellar
- Author: Nova
- Created at : 2024-08-20 20:21:07
- Updated at : 2024-08-21 20:21:07
- Link: https://blog-min.techidaily.com/how-to-put-iphone-11-or-ipad-on-recovery-mode-step-by-step-tutorial-stellar-by-stellar-data-recovery-ios-iphone-data-recovery/
- License: This work is licensed under CC BY-NC-SA 4.0.