
How to Put iPhone or iPad on Recovery mode? (Step by Step Tutorial) | Stellar
How to Put iPhone or iPad on Recovery mode? (Step by Step Tutorial)
Summary: DFU or Recovery mode is a way to recover your iPhone or iPad using a computer in case of technical issues. Read this post for a step-by-step process of how to enter and exit Recovery Mode and DFU mode on iPhone.


When you run out of solutions to troubleshoot your iPhone, Recovery Mode or DFU Mode comes as a rescue. Whether iPhone stops booting or fails to restore, you can use the functions in iPhone and fix the issue.
But the method to bring an iPhone in DFU or Recovery Mode varies in each iPhone model and iPad.
This post will guide you on how to enter and exit Recovery and DFU Modes in different iPhone and iPad variants. But first, understand what these iPhone functions are and their uses.

What is Recovery Mode and its use?
Recovery Mode uses iBoot to upgrade or restore your iPhone. iBoot is a bootloader program for iOS devices. Recovery Mode helps install the same or above iOS firmware version already on your iPhone. The iPhone screen in Recovery Mode prompts to connect iPhone to iTunes, showing a computer image.
Recovery Mode helps fix iPhone updates or restore issues, such as iPhone stuck at the Apple logo , unable to open the locked iPhone or want to reset iPhone but forgot iPhone passcode .
What is DFU Mode and its use?
Device Firmware Update or DFU mode lets your iPhone connect with iTunes on the computer without iBoot. As DFU mode doesn’t use iBoot, you can make changes in the operating system of the iOS device. An iPhone in DFU mode has a completely black screen.
Putting iPhone into DFU mode is the solution when Recovery Mode doesn’t resolve the problem. DFU mode can restore or upgrade iPhone. This mode is also commonly used to downgrade or jailbreak iPhone s.
Caution — you may lose all your iPhone data!
If you are entering DFU mode, make sure to back up your iPhone data . DFU mode permanently erases iPhone data . So always back up your videos, photos, messages, chats, Notes, etc., either to iCloud or iTunes.
However, if you have lost iPhone data and don’t have a backup, then immediately download iPhone data recovery software — Stellar Data Recovery for iPhone . The software helps to restore lost or deleted iPhone contacts, call logs, photos, videos, text, FaceTime, audio, chats, Calendar, Notes, Safari bookmarks, etc. It is quick to recover and extremely user-friendly.
What is required to perform Recovery and DFU modes in iPhone?
- Windows or Mac system.
- Lightning to USB cable.
- iTunes updated to the latest version on your computer.
How to put iPhone 6 and earlier versions in Recovery Mode
Follow the below steps to enter Recovery Mode on iPhone 6, iPhone 6s, iPhone 6s Plus, iPhone 5s, iPhone 5, iPhone 4s, and iPhone 4.
- Connect your iPhone to your PC using USB Lightning Cable and launch iTunes.
- Press and hold down the Home and Power button to turn the iPhone.


- Then connect the USB cable to iPhone and turn it on by holding the Home button.
- Continue to hold the Home button until a pop-up appears informing ‘an iPhone has been detected in recovery mode’ on your system.
- In Recovery mode, you can either restore the iPhone, set it up as new, or just recover your backups.

How to put iPhone 7 in Recovery Mode
It’s easy to enter Recovery Mode on iPhone 7 or iPhone 7 Plus. Follow the below steps:
- Turn off your iPhone 7 and connect it to your Mac or Windows computer.
- Ensure iTunes or Finder is running on the system.
- Press and hold the Power and Volume down button for 10 seconds.
- While continuing to hold the Volume down button, release the Power button.

- Release the button if you see the iTunes has detected an iPhone in recovery mode message on your system.
How to put iPhone 8 in Recovery Mode
If you want to enter the Recovery Mode on iPhone 8 and its variants, follow the below steps:
- Connect your iPhone 8 to your Mac or Windows system with a USB cable.
- Next, press and release the following buttons in a sequence Volume Up button, Volume Down, and Side button until your device reboots. Continue holding the Side button, even after seeing the Apple logo appear.
- Release the Side button once the Connect to iTunes logo appears on the iPhone’s display.


- Launch iTunes, and you should see a message stating, “There is a problem with the iPhone that requires it to be updated or restored.” You can choose to Update or Restore your iPhone’s software.
How to put iPhone 11 into Recovery Mode
To enter Recovery Mode on iPhone 11, iPhone 11 Pro, or iPhone 11 Pro Max, follow these steps:
- Connect your iPhone with your Mac or PC and launch iTunes.
- Force restart your iPhone with the following steps:
- Press and release the Volume Up button.
- Press and release the Volume Down button.
- Press and hold the Side button.
- Make sure to release these buttons if you see the recovery mode screen with the “Connect to iTunes” screen.
- Then choose your iPhone in iTunes, and you will see a pop-up saying that your iPhone is in Recovery Mode. Here, you can either update or restore your iPhone.
How to put iPhone 12 into Recovery Mode
Follow the below steps to enter Recovery Mode on iPhone 12, iPhone 12 mini, iPhone 12 Pro, and iPhone 12 Pro Max:
- Update iTunes to the latest version.
- Connect your iPhone to your PC or Mac via Lightning to a USB cable.
- Note: If you are connecting your iPhone to the computer for the first time, click on ‘Trust’ in the Trust This Computer dialog box and follow the prompts.
- Once your iPhone is paired with the computer, press the Volume up button followed by the Volume down button and release.
- Press and continue to hold the Side button until you see the ‘Connect to computer’ screen on your iPhone. While on your computer, you would see the iPhone Recovery Mode message in iTunes, confirming that your iPhone has entered into Recovery Mode. The computer asks you to either Update or Restore your iPhone**.** Click on any based on your requirement.
If you choose Update, iTunes will update your iPhone 12 to the latest iOS release. This won’t lead to any loss of data.
If you select Restore: It will erase iPhone data completely and renew your entire iPhone.
How to put Recovery Mode on iPhone 13
Entering Recovery Mode on iPhone 13 and iPhone 13 Pro has the same steps as iPhone 12. To enter the Recovery Mode, connect your iPhone to your computer and do the following steps in quick succession.
- Press the Volume up button and release.
- Press the Volume down button and release.
- Press and continue to hold the side button until the ‘Connect to iTunes’ screen appears on iPhone.

How to put Recovery Mode on iPhone 14
To use recovery mode on iPhone 14 and iPhone 14 Pro, follows these steps:
- Connect your iPhone to your system with a Lightning cable.
- Now on iPhone, press and quickly release the Volume up, Volume down, and side buttons until you see the recovery mode screen.
- Select your iPhone in the Finder/iTunes window and choose to update or restore your iPhone.

How to exit Recovery Mode on iPhone
It’s easy to exit Recovery Mode on iPhone. Follow the below steps:
- Hold the Home button and Lock button to exit DFU mode on iPhone 6 and earlier versions until your device reboots.
- To exit DFU mode on iPhone 7/7 Plus, hold the Side and Volume Down buttons until the device reboots.
- To exit the Recovery Mode on iPhone 8 or later version, press and hold the Side button until the “Connect to iTunes” screen disappears, and then iPhone should reboot back into iOS.
How to put Recovery Mode on iPad
To enter Recovery Mode on the iPad, follow these steps:
- Connect your iPad to Windows or Mac system using a USB cable.
- For iPad with a Home button: Press and hold the Home button and the Top/Side button until your iPad enters recovery mode.
- For iPad without a Home button: Quickly press and release the Volume Up button, Volume Down button, and the Top button. Keep holding the Top button until the iPad enters recovery mode.

How to put iPhone into DFU mode ?
Follow the below steps to enter DFU Mode on iPhone and its various version:
- Connect iPhone to PC or Mac via USB cable. Note: If the ‘Trust This Computer’ dialog box appears, follow the prompts.
- Once your iPhone is paired with a computer, follow these steps:
How to Enter DFU Mode on an iPhone 8 and later versions
- Press the Volume up button, then Volume down button, and release.
- Quickly press and hold the Side button for about 5 seconds.
- Along with the Side button, press and hold the Volume down button.
- Release the Side button and continue to hold the Volume down button for about 10 seconds.
- Once you see the ‘Recovery Mode’ screen in iTunes on your computer, you have successfully entered the DFU mode. However, the iPhone screen remains black in DFU Mode.
How to Enter DFU Mode on an iPhone 7
- Press and hold the Power and the Volume down buttons for 8–10 seconds.
- Release the Power button and continue to hold the Volume down button.
- Release the Volume down button once your iPhone has entered recovery mode.
How to Enter DFU Mode on an iPhone 6S or Earlier Versions
- Press and hold the Power/Sleep and Home buttons together for 10 seconds.
- Release the Power/Sleep button, but continue holding the Home button.
- Release the Home button once you see iTunes/Finder has detected an iPhone in recovery mode message.
Note: If you see the Apple logo on your iPhone, try again and repeat the above steps carefully.
How to exit DFU Mode on iPhone ?
If you want to exit DFU Mode on iPhone and its variants, follow the below steps:
How to Exit DFU Mode on an iPhone 8 or Later versions
- Press the Volume Up button and quickly release.
- Press the Volume Down button and quickly release.
- Now, press and hold the Side button until the Apple logo appears on iPhone. This indicates your iPhone has exited DFU Mode. Your iPhone would boot to the ‘Lock’ screen in a few seconds. Now, enter your passcode and continue to use your iPhone.
How to Exit DFU Mode on an iPhone 7
Press and hold the Power or Sleep button and the Volume down button until you see the Apple Logo.
How to Exit DFU Mode on iPhone 6 or Earlier versions
Hold the Home button and the Power button of the iPhone simultaneously until Apple’s logo appears on the screen.
Conclusion
Whenever your iPhone and its variants show problems like being stuck at the Apple logo, won’t upgrade, restore, or respond, you can use Recovery Mode and DFU Mode functions to resolve the problem. But don’t forget to back up your iPhone data before using these functions.
However, in any unfortunate incident of data loss while performing the functions, trust Stellar Data Recovery for iPhone – a software that brings back lost data on your iPhone securely.
Parental Control Software
### **FAQ**1. Does DFU Mode delete iPhone data?
If you use DFU mode to install something or restore your device, all your iPhone’s data will be erased.
2. Can you enter the recovery mode if your iPhone is disabled?
An iPhone is disabled when a user enters an incorrect password too many times on the lock screen. You should be able to enter the recovery mode using the same steps mentioned above and restore your iPhone to regain access.
3. How to put the iPhone in recovery mode without a computer?
A computer is not necessary to enter the recovery mode on an iPhone. You only need to press the right buttons, depending on your iPhone model, to enter the recovery mode. However, to restore your iPhone – you will need a computer.
iPhone users adore its camera. Capturing priced memories using its compelling features is one of the biggest attraction of the iOS device. However, like any other phone, the digital photos may get lost from iPhone too.
And the situation can be devastating if the lost photos include your precious memories — of a vacation, wedding, your child’s first birthday or a friend’s party, which you wanted to keep with you for a lifetime.
Helping you out in such a situation, here we bring the methods to recoup your memories back into your iPhone.
Why are your photos lost from iPhone?
There could be many possible reasons for the loss of photos from iPhone. Some common reasons are listed below:
- Accidental deletion
- Factory reset
- Camera Roll or Photo Stream crash
- Failed iOS update
- iPhone jailbreak
- Water damaged, stolen iPhone, and others
Methods to recover permanently deleted photos from iPhone
Different situations call for distinct methods to restore lost photos from iPhone.
Since with iCloud and iTunes, Apple ensures a backup for the iPhone photos, if available, get back the lost iPhone photos from there.
Wherein in absence of backup, an iPhone photo recovery software is the best way to get back the deleted or missing photos on your iPhone and iPad. An efficient iPhone recovery software , works regardless of the reason of the photo loss.
Other methods such as photo recovery from ‘Recently Deleted’ folder or turning on iCloud Photos can also work in specific situations.
These methods can be applied on all iPhone models including series of iPhone 15, 14, 13, 12, 11, XS, XS Max, XR, X, 8 Plus, 8, 7 Plus, 7, 6S Plus, 6S, 6 Plus, 6, 5S, 5c, 5, 4S and 4.
1. Recover photos from ‘Recently Deleted’ on iPhone

The ‘Recently Deleted’ folder on iPhone keeps all the deleted photos for 30 days. Beyond this duration, the photos are automatically deleted from iPhone and this time permanently.
You can find the deleted photos from Camera Roll, Photo Stream, WhatsApp, SnapChat or Instagram etc., in this folder.
Check the ‘Recently Deleted’ folder on your iPhone. Find the required photos and move them back to your album.
Steps to restore photos from ‘Recently Deleted’ on iPhone:
- Go to the Photos app > Albums > Recently Deleted
- Find the missing photo and tap on it to Recover
2. Use iPhone Photo Recovery tool
In case of absence of photos backup, download and install Stellar Data Recovery for iPhone on your Mac or PC. Stellar Data Recovery for iPhone works with all the iPhone models including series of iPhone 6, 7, 8, X, XS, XR, 11, 12, 13, and 14. It supports latest iOS 16.
Situations when you should use Stellar Data Recovery for iPhone:
- No backup of photos
- Permanently deleted photos from iPhone
- Accidentally deleted photos
- Unable to restore photos from iCloud
- Unable to restore photos from iTunes
- Photos lost after iOS update, Factory reset or jailbreak
- Photos lost after iPhone black screen of death
- Stolen iPhone, water/ liquid damaged iPhone etc.
Note: Apart from photos, Stellar Data Recovery for iPhone can recover your deleted Videos, Contacts, Texts, Calendar, text messages, Notes, and other data.
Try the Free Demo Version of the software to recover your lost and deleted photos in Mac System or in Windows Desktop/Tablet
Step-by-step: Recover deleted photos from iPhone
- Connect your iPhone to the computer
- Launch Stellar Data Recovery for iPhone
- On the first screen select Recover from iPhone
- Select Camera Roll and Photo Stream. To recover Instagram, SnapChat or other App’s photos, select Apps Library

- Click Next
- Preview and choose the photos you want to recover from the list
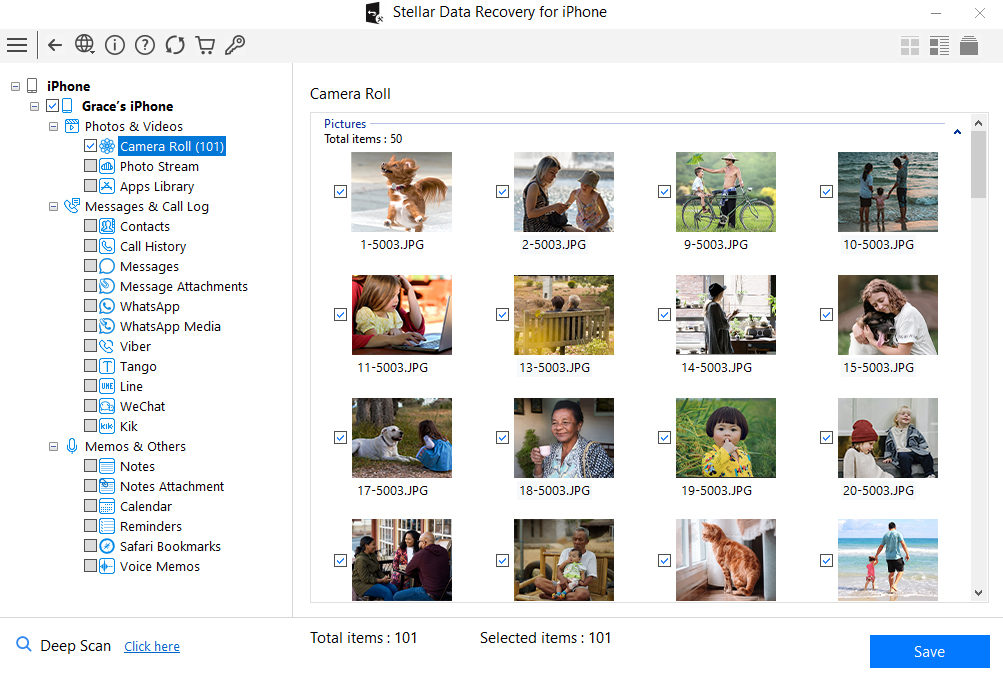
- Click Save
3. Recover from iCloud backup
Do you maintain iCloud backup of your photos? Then bring back the deleted photos on your iPhone via iCloud. iCloud photos recovery is possible in situations of accidentally or permanently deleted photos from iPhone. You can also recover photos lost after your iPhone is set on factory reset, damaged, or stolen.
Steps to restore photos from iCloud on iPhone:
- Click to follow Settings > General > Reset> Erase all Contents and Settings
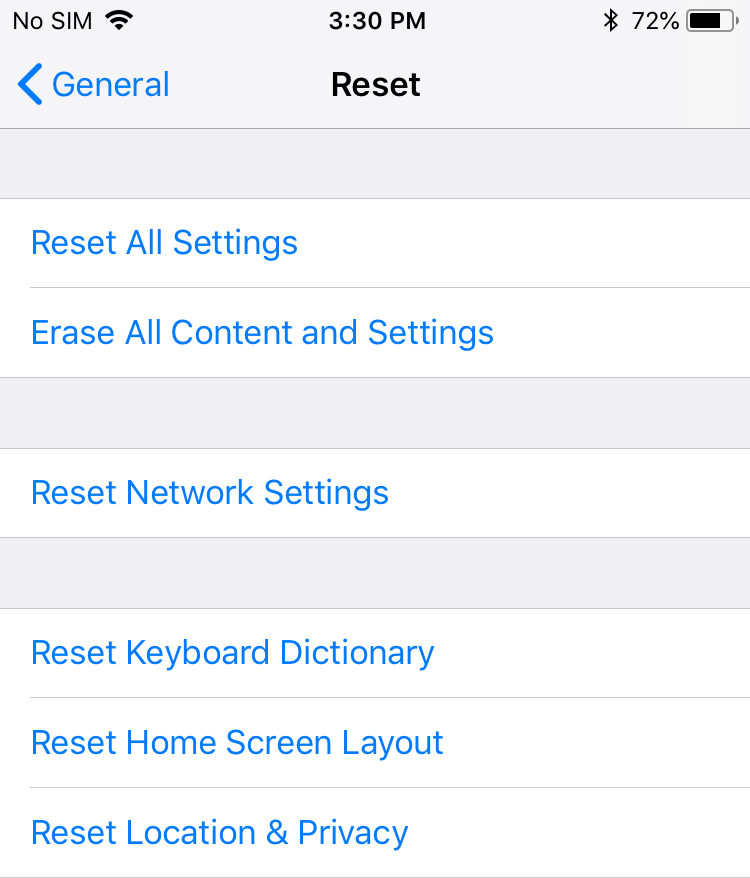
- A dialog box pops up, choose Erase Now
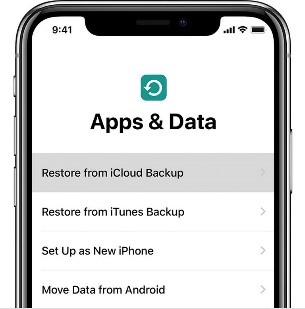
- Follow the instructions until you get on to the Apps & Data screenTap Restore from iCloud Backup
- Sign in to your iCloud account
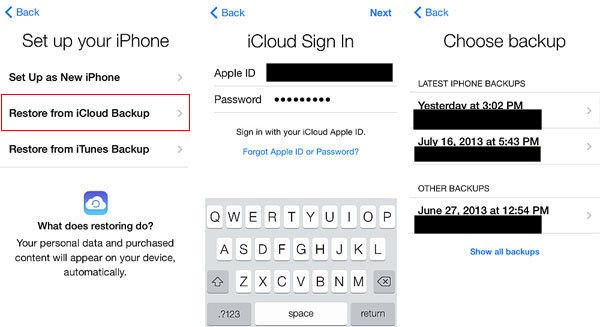
- Choose the recent backup and click Restore to get back the deleted photos on iPhone
How to recover Photos from iCloud without losing existing iPhone data
This method of iCloud photo recovery protects your existing iPhone data. It also allows you to select and recover only the lost photos from iCloud instead of complete backup data.
Follow the below steps to restore only the lost/deleted photos from iCloud:
- Download and launch Stellar Data Recovery for iPhone on your computer. Note: You don’t need to connect your iPhone for recovering photos from iCloud backup files.
- Select Recover from iCloud Backup on main screen of software.
.png)
- Select Camera Roll and Photo Stream and click Next.
- Enter the Apple ID and password.

- List of all available iCloud backup files appears. Select the relevant backup of your iPhone and click Scan.
- Click Camera Roll and Photo Stream in the iCloud backup files list on the left window. Preview the existing and deleted photos or search for a specific photo by typing a keyword in the search box. If the desired photo is not in the recovered files list, click Deep Scan.
- Click Save. In the dialog box select either computer or iPhone to save the recovered photos. To save the photos on iPhone, make sure the iOS device is connected to the computer.
4. Recover deleted photos from iTunes
For those of you who maintain iTunes backup, it is the easiest way to retrieve the deleted photos of iPhone. iTunes backup also helps to restore photos lost due to deletion or after factory reset.
Steps to restore photos from iTunes backup:
- Connect iPhone to your PC/Mac
- Launch iTunes
- Select your iPhone under the device list
- Select the recent backup date
- Click Restore Backup
All your lost and deleted photos will be restored on your iPhone.

How to recover Photos from iTunes without losing the existing iPhone data
Use Stellar Data Recovery for iPhone to protect your current data on iPhone. The software allows you to select and recover only the lost photos from iTunes. With this method, you can prevent unnecessary data recovery on your iOS device.
Follow the below steps to recover only the lost/deleted photos via iTunes:
- Download and launch Stellar Data Recovery for iPhone software. Note: You can connect your iPhone to computer, if want to save the recovered photos in the iOS device.
- Select Recover from iTunes Backup on the main screen of the application.
- Select Camera Roll and Photo Stream option. Click Next.

.png)
- From the list of the iTunes backup files, select the relevant iTunes backup from which you want to restore photos.
- If your iTunes backup is encrypted, a dialog box will open prompting you to enter the password. Enter the password and click OK.
- From the backup files list in the left pane, click Camera Roll and Photo Stream. Preview the existing and deleted photos or search for a specific photo by typing a keyword in the search box. Click Deep Scan at the bottom left side, if your desired photos are not in the list.
.png)
- Click Save. A dialog box appears asking to select the location to save photos. You can save the recovered photos either onto your iPhone or computer.
5. Enable iCloud Photos
Sometimes you could see the photos on iPhone but not on your synced iPad, iPod Touch, or Mac. To view these missing iPhone pictures on the synced iOS devices turn on iCloud Photos.
iCloud Photos stores the photos in iCloud. It ensures you can view them on your synced devices. If you can’t find a photo on your synced iPad, iPhone, or Mac etc., enable iCloud Photos under Settings of the iOS device.
Steps to turn on iCloud Photos on iPhone/iPad/ iPod Touch
- Click to follow Settings > [your name] > iCloud
- Tap Photos
- Toggle on iCloud Photos.
To turn on iCloud Photos on Mac
- Go to System Preferences > iCloud.

- Next to Photos, click Options
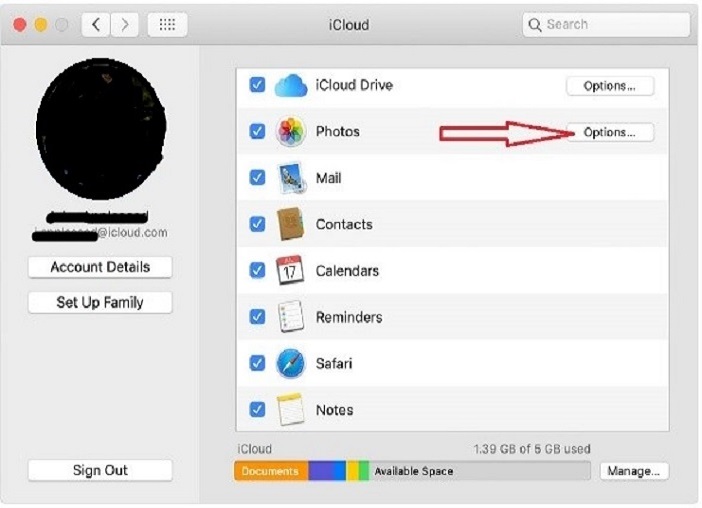
- Select iCloud Photos
Next, connect to Wi-Fi and wait for some time until your photos appear again on the synced devices.
Tip: When you turn on iCloud Photos, photos upload to iCloud but they are not duplicated in your iCloud backup. So make backup of your photo library. You can download your photos from iCloud.com to your PC/Mac and store them as a separate library or store them on a separate drive.
Comparison — iPhone Photo Recovery Methods
|
| Stellar Data Recovery for iPhone | Recover from iCloud | Recover from iTunes | Recently Deleted folder | Enable iCloud Photos |
| — | — | — | — | — | — |
| Success Rate | High | Medium | Medium | Low | Medium |
| Photo Recovery without backup | Yes | No | No | Yes | Yes |
| Effect on iPhone’s existing photos & other data after recovery | Existing data remains in iPhone | Deletes the existing iPhone data | Deletes the existing iPhone data | Existing data remains in iPhone | Existing data remains in iPhone |
| Select Photo and restore | Yes | No | No | Yes | Not applicable |
| Preview photos before recovery | Yes | No | No | Yes | Yes |
| Difficulty level | Nil | Medium | Medium | Nil | Medium |
| Recovery options | Recovers from iPhone, iPad, iCloud & iTunes | Recovers from iCloud only | Recovers from iTunes only | Recover from iPhone & iPad (within 30 days of photo deletion) | Recover on iPhone synced devices |
Top 8 iPhone SMS/Message/Text Recovery Software
Summary: Sometimes, we accidentally delete important text messages from our iPhone. An iPhone SMS/message recovery software helps you in such situations by recovering your messages in an instant. In this post, we will see what factors to consider while looking for an iPhone text messages’ recovery software and reviewing some iPhone data recovery available on the market, which can help the users to recover deleted iPhone texts.

Is it possible to recover deleted iPhone text messages? Can I restore text messages deleted from my iPhone?
These are some questions that are quite common among iPhone users. Smartphones, especially iPhones, have become an inseparable part of our lives. We use them to stay connected with our friends and family, stay up to date with the latest trends, stream media, and store a huge amount of photos and videos. While the newer iPhones come preloaded with a host of intelligent features to keep our data safe and backed up in a difficult situation, they are still vulnerable to data loss. We have curated a list of the 8 best iPhone data recovery software, which anyone can use to restore and recover iPhone text messages and data deleted from an iPhone or another iOS device.
Factors to Consider While Choosing a Deleted iPhone Texts Recovery Software
Before looking at the list of the best iPhone data recovery software to recover deleted text messages, let’s take a look at various factors that one should keep in mind while choosing the right data recovery software.

- Reliability –It is best to choose an iPhone data recovery software from a reliable brand as they have the expertise to back their claim.
- Features – Various iPhone recovery software can recover various types of deleted data like photos, videos, messages, etc. They can also be used to perform deleted SMS recovery for recovering deleted text messages. As iPhone data is precious and important, selecting a brand that could help us recover deleted iPhone data from other sources like external storage media is wise.
- User Reviews – User reviews help new users and potential buyers in making their choice. Reviews are also helpful as they add to the legitimacy of software and its claims. Therefore, one should always read the reviews and select the right iPhone data recovery software.
- Data Recovery Performance – This is an important factor that everyone should consider before choosing the right iPhone data recovery software. Great performance always makes the software stand out from the rest. Key factors to look for are speed of data recovery, available modes of data recovery, supported file types, etc. A user should check these before choosing a data recovery software.
- User Interface – In this minimalistic age, a dated and complicated interface with complicated commands and menus is sure to put the users off due to a bad user experience. A simple UI enhances your user experience and enables you to use the software with ease. Hence, this is also an important factor to consider.
- Pricing – While most of the ‘free’ iPhone data recovery software claims to offer the best experience, the best deals offering value for the money spent are usually found amidst the list of paid software. This software not only helps the user recover deleted iPhone texts but also provides an interface to save the recovered data safely and securely post-data recovery.
List of the Best iPhone Data & Texts Recovery Software
Now that we have come to know about various factors to consider while choosing an iPhone data recovery software to recover and restore SMS/text messages, let’s take a look at some of the best iPhone data recovery software available on the market.
1. Stellar Data Recovery for iPhone (Writer’s Choice)
After trying and comparing a long list of iPhone data recovery software available, we have selected Stellar Data Recovery for iPhone as the best software for performing deleted text recovery along with data recovery from an iPhone/iPad/iPod Touch. This software supports a wide range of iPhone files like photos, videos, text, etc. It can easily recover and restore iPhone text messages and other data.
It is compatible with all the latest iPhones running on the latest iOS 16 and below, like the iPhone 14, 13, and more. It can even recover data from any iPad or iPod Touch. This software also gives the users support for recovering data from encrypted iTunes backups. Finally, it even offers 24×5 support from the Professional Team. We recommend this to every iOS user to use it in case of accidental data deletion as it is a reliable software with great features and an easy-to-use UI.
There is also a Toolkit version available for Stellar Data Recovery for iPhone that offers a complete suite of 4 advanced tools – iPhone Data Recovery, iOS System Repair, iPhone Data Erasure, and Remove Apple ID from iPhone, iPad, or iPod Touch. The Stellar Toolkit for iPhone is available in 2 variants – Toolkit for $49.99/Year and Toolkit Plus for $149.99/Year.
Pros –
- Fast data recovery speed*
- Recover a wide range of deleted/lost files like photos, texts, contacts, etc.
- Easily recovers deleted texts from an iPhone.
- Specifically recover videos from WhatsApp, Viber, Tango, etc.
- Simple and clean user interface
- Preview the files before recovery
- Allows selective file recovery
- Offers 2 modes of scanning, Quick Scan and Deep Scan
- Data recovery via iTunes and iCloud backup is possible
- Compatible with both Windows and Mac OS
- 24×5 availability of professional support team
- Value for Money
Cons –
- The free version allows software walkthroughs along with file scan and preview functionalities. The paid version adds data recovery functionality to the list.
Pricing –
- $39.99/Year for Standard
- $49.99/Year for Toolkit
Note – *Data recovery speed is dependent on various factors like the size of the data to be recovered, system configuration, and many more.
2. PhoneRescue for iOS
PhoneRescue for iOS is another great software that can recover iPhone text messages accidentally deleted from an iPhone. In addition, it can recover & restore iPhone data in various circumstances like system crashes, water damage, etc. It also offers some additional features like data preview before final data recovery.
Pros –
- Preview option
- Option to select specific data to be recovered
- Round-the-clock tech support
Cons –
- Limited usability in the trial version
Pricing –
- $45.99 + VAT for 3 Months License or $49.99 + VAT for 1 Year License
3. Dr. Fone for iOS
Dr. Fone for iOS is an iPhone data recovery software that allows its users to recover lost or deleted data like iMessages, call logs, contacts, etc., from an iPhone. In addition, it can recover deleted text messages, photos, videos, and other type of data from an iOS device.
Pros –
- Fast processing speed
- Recover data from iTunes, iCloud, and iPhone
- Compatible with almost all iPhones
Cons –
- Recovery functionality is not available in the trial version
- Pricier upgrade options
Pricing –
- $59.95 for 1-Year License
- $69.95 for a Perpetual license
4. EaseUS Mobisaver
EaseUS Mobisaver is an iOS data recovery software that allows users to restore iPhone text messages and recover common data like photos, videos, etc. It is supported by both Mac and Windows OS and can be used to recover data in case of jailbreak damage.
Pros –
- Common data like contacts, SMS, photos, etc. can be recovered
- Can recover data from a jailbroken iPhone
- Clean interface with simple steps for recovering data
Cons –
- Data recovery functionality is limited in the free version
- Occasional connectivity issues between the iOS device and the system
Pricing –
- Free (with limited data recovery)
- Pro Edition for $59.95/month
- $79.95/Year or $99.95 for Lifetime Upgrades
5. Joyoshare iPhone Data Recovery
Joyoshare iPhone Data Recovery can recover a lot of file types from an iPhone like iPhone text messages. This software allows the user to select different types of files to recover along with an option to preview the files to be recovered. It offers a clean UI, which is simple to understand and is easy-to-use
Pros –
- Fast data recovery process speed using recovery image creation.
- Compatible with all the latest iPhones running on iOS 16.
- Free users can scan, analyze, and preview the files that need to be recovered.
Cons –
- Need to buy the full version to recover the lost data.
Pricing –
- $49.95 for a Lifetime Single License
- $69.95 for a Lifetime Family license
- Lifetime multi-user license starting at $79.95
6. iSkysoft Toolbox – Dr.Fone Data Recovery (iOS)
iSkysoft Toolbox allows its users to recover lost data from an iOS device like deleted iPhone texts, iMessage, call logs, etc. from any iPhone/iPad/iPod Touch. It can easily recover any data from a damaged or stolen iPhone.
Pros –
- Fast
- Simple to use
- Safe and Secure
Cons –
- Unable to recover overwritten data
- Stands on the pricier side
Pricing –
- $59.95/Year
- $69.95 for a Perpetual License
7. Primo iPhone Data Recovery
Primo iPhone Data Recovery is another quality addition to this list. This software allows its users to recover deleted messages from an iPhone due to any reason like device crash, forgotten password, etc.
Pros –
- Three recovery modes increase the rate of data recovery
- Simple and easy-to-use
- Compatible with iPad, iPod Touch, and iPhone
Cons –
- Takes a bit of time to launch.
Pricing –
- $39.99 for a Personal License
- $59.99 for Family License
8. Disk Drill
Disk Drill is a simple software that offers the easiest way to deal with lost iPhone data. It does the job of recovering almost every type of deleted data like deleted iPhone texts, photos, contacts, etc. Users simply have to launch the software and click the Recover button to recover lost data from the connected iOS device. It offers a long list of features. However, they come at a hefty cost.
Pros –
- Simple to use
- Supports a wide range of file formats
- Extra tools come bundled with the paid version
Cons –
- Data recovery functionality is not available in the trial version.
- Hefty price tag
Pricing –
- Basic – Free
- Pro – $89
- Enterprise – $499
Verdict
Like all other smartphones, iPhones have become an important part of our lives. We use them to store important data like SMS, contacts, photos, etc. In this guide, we listed the 8 best software you can use for recovering deleted text messages from an iPhone. We know how important your data and especially text messages are to you. But before moving on to choosing an iPhone data recovery software, it is important to understand the reasons behind this issue and the factors that one should consider before choosing the right software.
While there are numerous iPhone data recovery software available in the market, we would recommend going for Stellar Data Recovery for iPhone. The software boasts of a long list of advanced features and a pocket-friendly price, making it highly versatile and easy to use. We hope that our guide will help you choose the right iPhone data recovery software and restore your deleted text messages.
Frequently Asked Questions
Can I recover deleted messages from my iPhone?
You can use Stellar iPhone Recovery software to recover deleted messages.
I accidentally deleted some important text messages from my iPhone. Can Stellar iPhone Recovery help me to recover them back?
Absolutely. Stellar iPhone Recovery can easily recover and restore deleted text messages from your iPhone. It can also recover other iPhone data and restore it.
How To Recover Data From Lost or Stolen iPhone In Easy Steps
Summary: Lost your iPhone and now worried about your precious data on it? This post shares how efficiently Stellar Data Recovery for iPhone can recover lost data from a lost or stolen iPhone using iCloud Backup.
When we lose our phone, then the only thing we worry about is the valuable data stored on it. To recover all our critical data (contacts, messages, photos, videos, voice memo, etc.) all we need to do is restore them either from iTunes or iCloud backup. What if due to some unknown reasons, we are unable to access the backup? Well, in such cases we can still recover our files from the backup via Stellar Data Recovery for iPhone software.
Apple is known for its flagship features and, one of them being able to automatically backup the iPhone data. ICloud and iTunes automatically back up iPhone data and updates it whenever you sync it to your Mac. The advantage of these backup systems is that you can recover your data when your iOS device is lost or stolen.
Speaking of which, a friend of mine lost his iPhone and was looking for ways to restore his critical data. As he had saved the information by backing it up, all he had to do was transfer the information to the new iOS device. However, as luck would have it, he was unable to access the backup files either.
To get rid of the deadlock, he decided to look for a third-party application which can recover iPhone data, and after some analysis, he opted for iPhone Data Recovery Software by Stellar.
Stellar Data Recovery for iPhone (Ultimate Solution to Recover iPhone Data)
If your backup is accessible, you can recover data from the backup files. If you cannot access the backup files, then you need a third-party iPhone Data Recovery Software to recover data from your lost or stolen iPhone.
Stellar Data Recovery for iPhone provides you with 2 options to recover iPhone data i.e. either from iTunes backup files or iCloud backup files. It is easy to use and deploys a robust scanning algorithm so as to recover as much data as possible.
Irrespective of how you lost your iPhone data, you can get back your data in two Recovery modes namely:
- from iTunes Backup
- from iCloud Backup
Let’s look at each —
Recovery Mode 1: iTunes Backup Files
You can recover iPhone data if you have synchronised your iPhone with iTunes earlier. To recover data from iTunes Backup files, follow these steps:
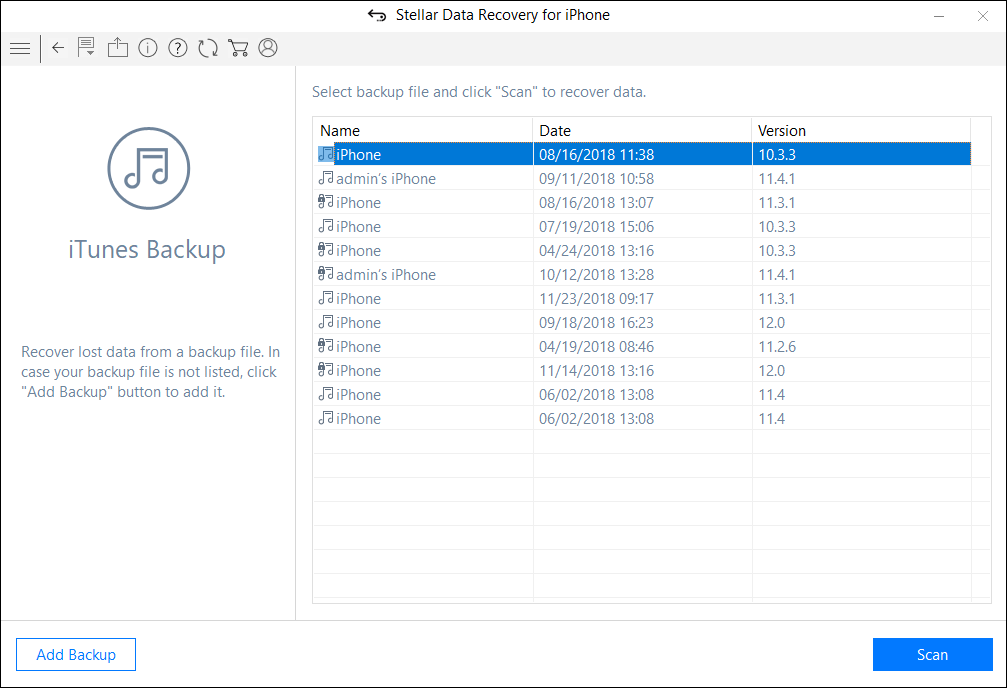
i. Run Stellar Data Recovery for iPhone and select “Recover from iTunes Backup” tab

Figure 1 illustrates the main screen of the software
ii. The software displays the list of all iTunes backup files. Select the required backup file to recover

Figure 2 illustrates the entire list of the backup files
iii. From the Tree view, select the supported file categories which will list all the items under that category head.
iv. Preview the selected backup files and save the files

Figure 3 represents the preview of the files
**Note: You can preview the existing and deleted files. Moreover, type the keyword or filename in the search box to search for a particular file.
v. Click the Save button to recover the file.
Recovery Mode 2: iCloud Backup files
You can restore your iPhone data from iCloud Backup files as well. Follow the steps given below:
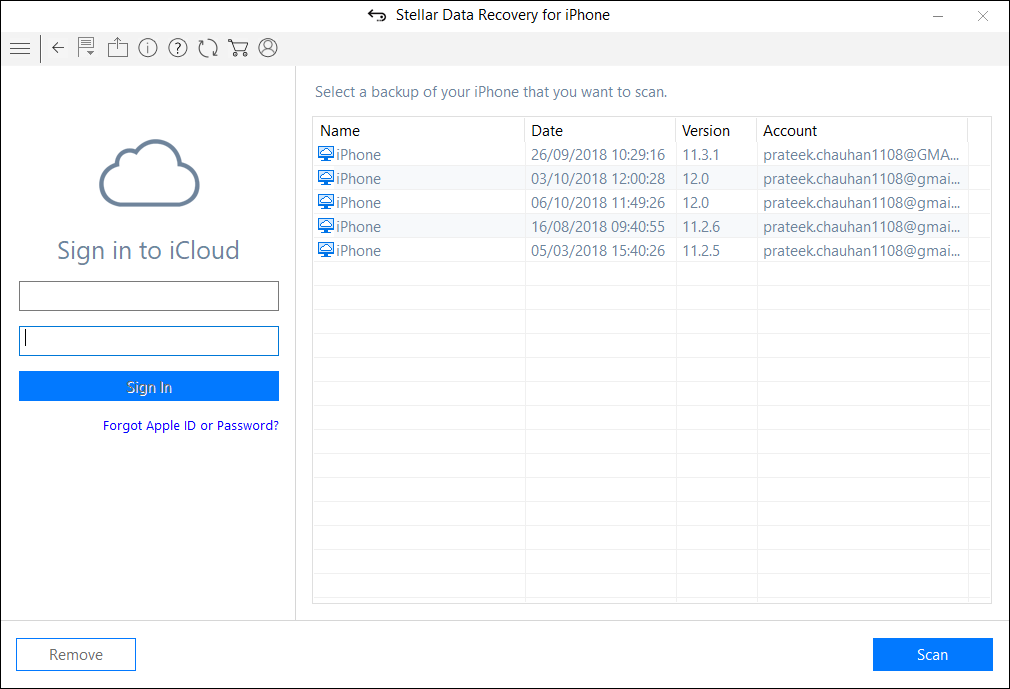
i. Install and Run Stellar Data Recovery for iPhone and select “Recover from iCloud Backup” tab.

Figure 5 represents the home screen of the software
ii. Next, enter the Apple ID and Password and sign in to iCloud.

Figure 6 illustrates the credential page
iii. After entering the necessary credentials, the software displays the list of all the backup files. Select the required files and press the Scan button

Figure 7 Represents the list of all files
iv. Preview the selected files and press the Save button which you can save to the desired location.

Figure 8 illustrates the preview of the files
The Process is over!!
What does Stellar Data Recovery for iPhone offers?
- Supports latest iOS 17, 16 15, 14, 13, 12 and below
- Recovers data from iTunes/iCloud Backup files
- Supports multiple device connections
- Data recovery from encrypted iTunes Backup files
- Provides option to import files to iPhones

Concluding Note
Simplicity is one of the several major aspects that are frequently sought by users. On that note, the interface of Stellar Data Recovery for iPhone software is quite simple and intuitive, and users can quickly and accurately recover iPhone data. With that said, do make it necessary to regularly backup your iPhone data.
- Title: How to Put iPhone or iPad on Recovery mode? (Step by Step Tutorial) | Stellar
- Author: Nova
- Created at : 2024-08-20 20:20:39
- Updated at : 2024-08-21 20:20:39
- Link: https://blog-min.techidaily.com/how-to-put-iphone-or-ipad-on-recovery-mode-step-by-step-tutorial-stellar-by-stellar-data-recovery-ios-iphone-data-recovery/
- License: This work is licensed under CC BY-NC-SA 4.0.