
How to Recover Data from Broken iPhone 6s Plus Screen | Stellar
How to Recover Data from Broken iPhone Screen
Summary: Struggling to recover data after your iPhone’s screen broke? Stellar Data Recovery for iPhone can help restore data efficiently from an iPhone with a broken screen.
Your iPhone is the most cherished personal gadget as it has become more innovative and influential due to its many valuable features. Moreover, information such as notes, contacts, iMessage, calendar entries, text messages, WhatsApp/Kik messages, pictures, and videos are readily available, making it even more lovable. This is why we need to know how to recover data from broken iPhone screens.
These days, though there are plenty of best ways to back up your data, users often overlook the importance of Backup. It happened with _Jacky Jainco; w_hile taking a DSLR-like photo on his iPhone 14 Pro Max, he accidentally dropped his iPhone and, consequently, broke it.
The real problem was not the broken iPhone but to recover data from iPhone as it was not synced with iTunes and iCloud Backup. As a result, he couldn’t access his files, more importantly, his pictures.
You might have dropped your iPhone several times, and luckily, the excellent cover has saved it on all occasions. However, any drop could cause potential damage putting your data at stake; therefore, leverage iTunes or iCloud backup to recover data from the damaged iPhone screen.

Bringing Back Your Data From Backup
You can restore your files from either iTunes or iCloud Backup. In addition, replacement screens are available; you can have an appointment with the genius bar, get your damaged iPhone fixed, and then recover your data. Also, when backup files are inaccessible, turn to an iPhone data recovery software for an easy solution.
Sorting backup files is unmanageable as they tend to be large, running into GBs. Moreover, the process can be tedious, especially when you have to sort all files, even when you need to recover only a specific file. So it is when iPhone Data Recovery Software by Stellar is fruitful. The software lets you recover deleted files from encrypted iTunes backup files or recover data from an iPhone that would not turn on. Stellar Data Recovery for iPhone supports broken iPhone data recovery from series of iPhone 15, 14, 13, 12, 11, XR, XS, X, 8 Plus, 8, 7 Plus, 7, 6S Plus, 6S, 6 Plus, 6, 5S, 5C, 5, 4S, and 4.
You can recover a specific file without the pain of going through all backup files as the software lists all the files in an organized structure, thus, saving your precious time and effort.
Watch how to recover photos from a broken iPhone:
Recover your data from iTunes Backup
Here’s how to recover your iTunes backup using Stellar Data Recovery for iPhone.
1. Select the ‘Recover from iTunes Backup’ option.

2. List of your iTunes backup files appears. Select the relevant iTunes backup


3. In the middle pane, select the files you wish to recover and click the ‘Save’ button.

Recover your data from iCloud Backup
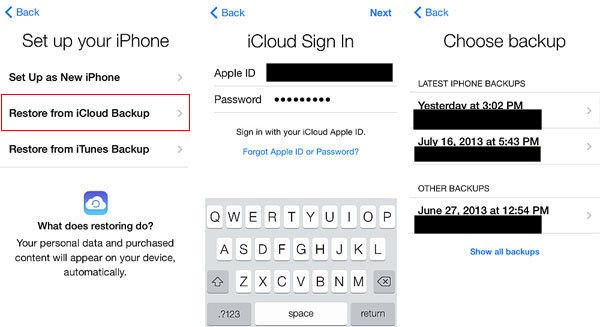
Another effective way to recover data from broken iPhones is through iCloud Backup. For any reason, let’s suppose you cannot access your iCloud backup files; then, using the ‘Recover from iCloud Backup’ feature, you can restore all your essential files. The simple steps are as follows:
- Click ‘Recover from iCloud Backup.’
- Sign in to your iCloud account to view the list of available backup files.
- In the left pane, click on the supported file list categories to view files under them.
- Select the files that you wish to restore and click ‘Save.’
Stellar Data Recovery for iPhone recovers the deleted photos, contacts, messages, etc., from the backup files and restores them to the device.
That’s Not All
Apart from recovering data from damaged iPhones, Stellar Data Recovery for iPhone facilitates the option to import the recovered files to your new or fixed iPhone.
To import your recovered files, follow these steps:
- First, connect your iPhone to the system, run the software, and click the ‘Import file to iPhone’ option.
- Click ‘Browse’ and select the files you wish to import to your iPhone.
- Click ‘OK’ to preview the selected files.
- Click ‘Transfer to iPhone’ to transfer recovered files to your iPhone.
To Sum Up
When your iPhone is damaged, try the basics, i.e., restart it; if that works, back up as much data as possible. You can also restore your files from iTunes or iCloud Backup if there are any. Else, make an appointment with the genius bar and get your iPhone fixed. They might also help you recover data from the damaged iPhone, which comes with an asterisk. Therefore, turn to Stellar Data Recovery and save time and energy for efficient recovery of your data.
How to Fix iPhone Stuck at ‘attempting data recovery’ Loop
Summary: If your iPhone gets stuck at ‘attempting data recovery’ loop screen while updating iOS, learn how to fix iPhone failed iOS update error and efficiently recover lost data using Stellar Data Recovery for iPhone.


Since the release of iOS 16, there are frequent complaints about flood updates leading to the ‘attempting data recovery’ loop. Moreover, users are concerned about data loss in such situations.
Users globally reported that their iPhone gets stuck in the ‘attempting data recovery’ loop while trying to install iOS updates. The issue occurs when they update to iOS 16 versions by using iTunes. It leaves the update in the lurch and erases some or all data from their iPhone.
iOS updates breathe new life into your device. However, the truth is that Apple’s every update brings some bug or new problem, like this one.
Read this post further if your iPhone screen gets stuck at the ‘attempting data recovery’ loop during an iOS update.
It shares how to fix iPhone ‘attempting data recovery’ failed problem and recover lost iPhone data in any case.
You can apply the methods on iPhone 14, 13, 12, SE, 11, XS, XR, X, 8, 7, 6, 5, and 4 series. They are relevant to iOS 16 and below versions.
Common causes of ‘attempting data recovery’ loop on iPhone
The attempting to data recovery failed problem usually occurs when iOS is updated with iTunes. The ‘attempting data recovery’ screen takes a long time and is often followed by a prompt ‘press home button to restore.’
Some of these occurrences were reported in the following scenarios:
- Users unplugged the iPhone from a PC or Mac during the update
- Downgrading from iOS 16 to 15 or below
- Updating iOS after jailbreak
How to fix iPhone stuck at the ‘Attempting Data Recovery’ loop
- Force Restart iPhone
- Put iPhone into Recovery Mode
Method 1: Force Restart iPhone
It’s essential to know that a force restart differs from a normal Restart. A force restart is advised when iPhone is not in its normal working condition. It is either hanged or stuck at the Apple logo or another screen in Recovery Mode or Restore Mode. It cuts the power and turns on the iPhone again. Force restart usually fixes many iPhone issues.
Steps to Force Restart iPhone 8 and earlier:
- Press and fast release the Volume Up button
- Press and fast release the Volume Down button
- Press and hold the Side button (power) until the Apple logo appears
Steps to Force Restart iPhone X and later:
- Press and quickly release the Volume Up button
- Press and quickly release the Volume Down button
- Press and hold the Side button until you see the recovery-mode screen.
Method 2: Put iPhone into Recovery Mode
If Force Restart doesn’t help, try this method. Recovery Mode helps in cases of failed iOS updates. Thus, whenever the iOS updates, the iPhone gets stuck at the ‘attempting data recovery,’ op put the device on Recovery Mode.
[Caution]: Recovery Mode erases the iPhone data, which can be restored with the help of iTunes backup. So, make sure that the iTunes version is the latest.
Steps to put iPhone on Recovery Mode:
- Connect iPhone to computer
- Open iTunes
- Force restart iPhone (with steps mentioned above)
- A dialog box appears. Select Update

5. After the Update process completes, set up your iPhone.
Fixed ‘attempting data recovery’ failed problem. Further, how to restore data on iPhone
Recovery Mode, though fixes iPhone’s ‘attempting data recovery’ issue but at the same time erases all information from the device. You can restore iPhone data from iTunes backup or iCloud backup.
In case, iTunes/iCloud backups are not able to restore iPhone or you discover that some of the data is still missing after restoring the device, choose Stellar Data Recovery for iPhone .
The software is also helpful when you don’t want to recover all the data from iTunes or iCloud unnecessarily. Instead, it. It lets you recover precisely what you want, by allowing you to choose specific files like photos, videos, WhatsApp chats, or memos, Calendar, etc., and restoring them on the device.
Additionally, Stellar Data Recovery for iPhone also restores the data lost and deleted after jailbreak, water damage, a Black screen of death, iPhone stuck at Apple logo , screen damage iPhone, factory reset, etc. It supports recovery from iPhone 15, 14, 13, 12, SE, 11, XS, XR, X, 8, 7, 6, 5, and 4 series.
Steps to Restore Data on iPhone with Stellar Data Recovery of iPhone
- Download Stellar Data Recovery for iPhone on PC/ Mac
- Connect iPhone to the computer
- Select iTunes from the software screen
- Follow the simple on-screen instructions
Wrapping Up
Users look forward to iOS updates. However, the experience can get irritating, when iPhone software updates fail. For example, iPhone ‘attempting data recovery’ loop is a common problem faced after attempts to upgrade to the latest iOS 16.
Force restart of the device often resolves the ‘attempting data recovery’ loop issue. If this doesn’t work, further try to get your iPhone on Recovery Mode. Later restore data via iTunes or Stellar Data Recovery for iPhone. The software approach is straightforward and lets you select and restore the informathat you want.
How to Reset iPhone Without Apple Password?
Summary: If you want to erase your iPhone data and reset the device to factory settings, you need to enter your Apple ID password. What if you forgot your registered Apple ID password? This blog explains a step-by-step method of how to reset an iPhone without a password. It also shares a professional erasure tool – Stellar Eraser for iPhone to factory reset your device without entering your Apple credentials.

If you have forgotten your Apple ID password and you wish to reset your iPhone, then it’s going to be a difficult task. However, there are various ways you can use to factory reset your iPhone without an Apple password.
In this blog post, we will explain how to reset your iPhone without password using iTunes or Finder or by using the iPhone Eraser tool .
How to Factory Reset iPhone without a password?
Let’s explore the methods to reset your iPhone without an Apple ID password.
How to Reset iPhone without a password via iTunes or Finder?
To reset your iPhone without using an Apple ID password, you can use iTunes or Finder app. You have to use your computer to access the recovery mode of your iPhone and reset the device to get it without using the password. This method will erase all your iPhone data, so ensure to take a backup of your device before proceeding.
Steps – How to Factory Reset iPhone without Password via iTunes or Finder
- Turn off your iPhone. This process will depend on the kind of iPhone you have.
| iPhone Model | How to Turn iPhone off? |
| All models of iPhone 15, 14, iPhone 13, iPhone 12, iPhone 11, iPhone X, iPhone 8, and iPhone SE (2nd generation). | Press and hold the Lock and Volume down buttons of the iPhone until the power slider appears, then swipe it. |
| All models of iPhone 7, iPhone 6, and iPhone SE (1st generation), | Press and hold the Lock button of the iPhone until the power slider appears and then swipe to turn it off. |
- Connect your iPhone to your computer via a USB cable and ensure iTunes or Finder is running on the system.
- If prompted, enter the device passcode or click Trust in the “Trust This Computer” dialog box.
- Then put your iPhone into recovery mode. To do this:
| iPhone Model | How to put iPhone into recovery mode? |
| All models of iPhone 15, 14, iPhone 13, iPhone 12, iPhone 11, iPhone X, iPhone 8, and iPhone SE (2nd and 3rd generation). | Press and hold the side button until the ‘Connect to computer’ screen appears on your iPhone |
| iPhone 7 and iPhone 7 Plus | Press and hold the Power and Volume Down buttons. Then release the Power button and continue pressing the Volume down button until iPhone has been detected appears. |
| All models iPhone 6, iPhone 5, iPhone 4, iPhone SE (1st generation) | Hold the Home button until a pop-up appears informing the iPhone has been detected in recovery mode. |
- Click on your iPhone when it appears in iTunes and then click Summary.
- Now, select the “Restore iPhone” option on the right pane.

- Click Restore to confirm and then follow the prompts to complete the restore process. This will erase all your iPhone data and install the latest iOS version.

- Once the restore process is complete, set up your iPhone as new or restore it from a backup.
Note– This method of reset will only work when Find My iPhone is disabled.

How to Factory Reset your iPhone without a Password via Stellar iPhone Eraser Tool?
Using the iPhone Eraser software like Stellar Eraser for iPhone is the best tool for resetting the iPhone without knowing the Apple ID login credentials. This tool can permanently erase All Content and Settings including photos, videos, audio, chats, call history, iMessage, texts, contacts, Safari browsing history, and other data on your iPhone.
Stellar Data Eraser Software is supported by all versions of iOS from the latest 16, 15, 14, 12, and below. It even erases content from all variants of iPhone, iPad, and iPod Touch. This tool erases the data permanently from your iOS devices making it unrecoverable by any data recovery software.
![]()
Steps – How to reset iPhone without password using Stellar Eraser for iPhone
- Download and install Stellar Eraser for iPhone on your Mac or Windows system.
- Launch the software and select Erase Data option from the home screen.

- On the Erase iPhone Data screen, click Next.

- Next, connect the iPhone that you want to reset to the computer when prompted. Click Erase.

- Click Yes in the Erase Process dialog box.

- Once the iPhone is completely wiped, click Yes in the Data Erase Complete dialog box.

Conclusion
If you forgot your Apple password and want to reset your iPhone, you can use any of the two methods mentioned above in the blog. You can reset your iPhone with iTunes/ Finder or by using a professional tool, such as Stellar Eraser for iPhone. However, make sure to backup up your iPhone data before proceeding to reset your device.
FAQ
1. How to remotely erase iPhone and iPad data?
If your iPhone is lost or stolen, then you can protect your iPhone data from misuse by remotely erasing its data. For more information, read this blog .
2. How to restore or set up your iPhone from iCloud backup after a factory reset?
If you want to restore your iPhone after a factory reset, you can use iCloud backup to set up your device. For more help, read this guide .
3. How to factory reset iPhone without a computer?
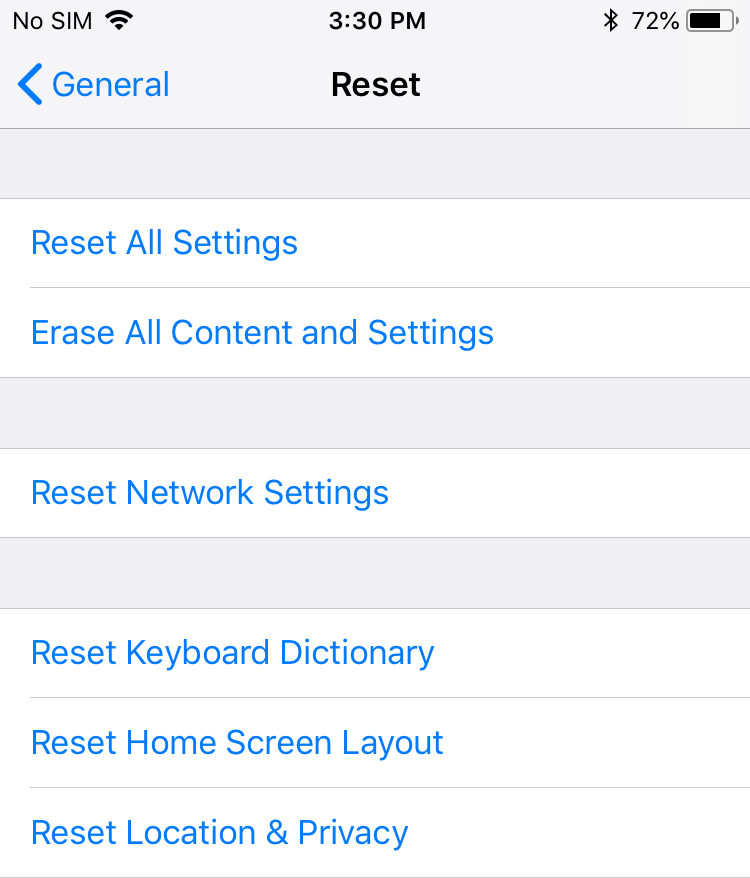
You can reset your iPhone without any computer by using the settings app of your device. To do so:
- Go to the Settings app > General > Reset > Erase all Content and Settings.
iPhone users adore its camera. Capturing priced memories using its compelling features is one of the biggest attraction of the iOS device. However, like any other phone, the digital photos may get lost from iPhone too.
And the situation can be devastating if the lost photos include your precious memories — of a vacation, wedding, your child’s first birthday or a friend’s party, which you wanted to keep with you for a lifetime.
Helping you out in such a situation, here we bring the methods to recoup your memories back into your iPhone.
Why are your photos lost from iPhone?
There could be many possible reasons for the loss of photos from iPhone. Some common reasons are listed below:
- Accidental deletion
- Factory reset
- Camera Roll or Photo Stream crash
- Failed iOS update
- iPhone jailbreak
- Water damaged, stolen iPhone, and others
Methods to recover permanently deleted photos from iPhone
Different situations call for distinct methods to restore lost photos from iPhone.
Since with iCloud and iTunes, Apple ensures a backup for the iPhone photos, if available, get back the lost iPhone photos from there.
Wherein in absence of backup, an iPhone photo recovery software is the best way to get back the deleted or missing photos on your iPhone and iPad. An efficient iPhone recovery software , works regardless of the reason of the photo loss.
Other methods such as photo recovery from ‘Recently Deleted’ folder or turning on iCloud Photos can also work in specific situations.
These methods can be applied on all iPhone models including series of iPhone 15, 14, 13, 12, 11, XS, XS Max, XR, X, 8 Plus, 8, 7 Plus, 7, 6S Plus, 6S, 6 Plus, 6, 5S, 5c, 5, 4S and 4.
1. Recover photos from ‘Recently Deleted’ on iPhone
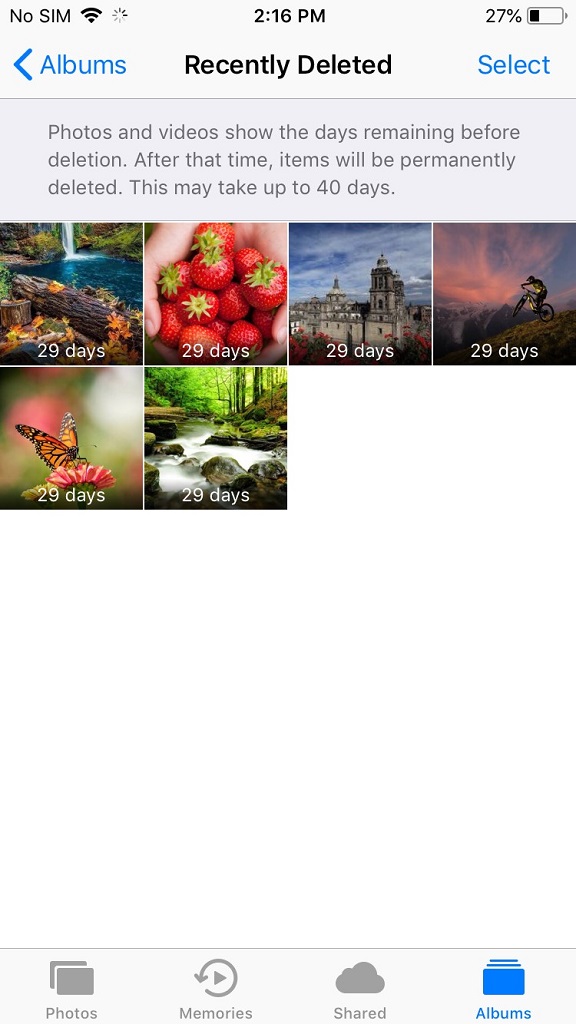
The ‘Recently Deleted’ folder on iPhone keeps all the deleted photos for 30 days. Beyond this duration, the photos are automatically deleted from iPhone and this time permanently.
You can find the deleted photos from Camera Roll, Photo Stream, WhatsApp, SnapChat or Instagram etc., in this folder.
Check the ‘Recently Deleted’ folder on your iPhone. Find the required photos and move them back to your album.
Steps to restore photos from ‘Recently Deleted’ on iPhone:
- Go to the Photos app > Albums > Recently Deleted
- Find the missing photo and tap on it to Recover
2. Use iPhone Photo Recovery tool
In case of absence of photos backup, download and install Stellar Data Recovery for iPhone on your Mac or PC. Stellar Data Recovery for iPhone works with all the iPhone models including series of iPhone 6, 7, 8, X, XS, XR, 11, 12, 13, and 14. It supports latest iOS 16.
Situations when you should use Stellar Data Recovery for iPhone:
- No backup of photos
- Permanently deleted photos from iPhone
- Accidentally deleted photos
- Unable to restore photos from iCloud
- Unable to restore photos from iTunes
- Photos lost after iOS update, Factory reset or jailbreak
- Photos lost after iPhone black screen of death
- Stolen iPhone, water/ liquid damaged iPhone etc.
Note: Apart from photos, Stellar Data Recovery for iPhone can recover your deleted Videos, Contacts, Texts, Calendar, text messages, Notes, and other data.
Try the Free Demo Version of the software to recover your lost and deleted photos in Mac System or in Windows Desktop/Tablet
Step-by-step: Recover deleted photos from iPhone
- Connect your iPhone to the computer
- Launch Stellar Data Recovery for iPhone
- On the first screen select Recover from iPhone
- Select Camera Roll and Photo Stream. To recover Instagram, SnapChat or other App’s photos, select Apps Library

- Click Next
- Preview and choose the photos you want to recover from the list
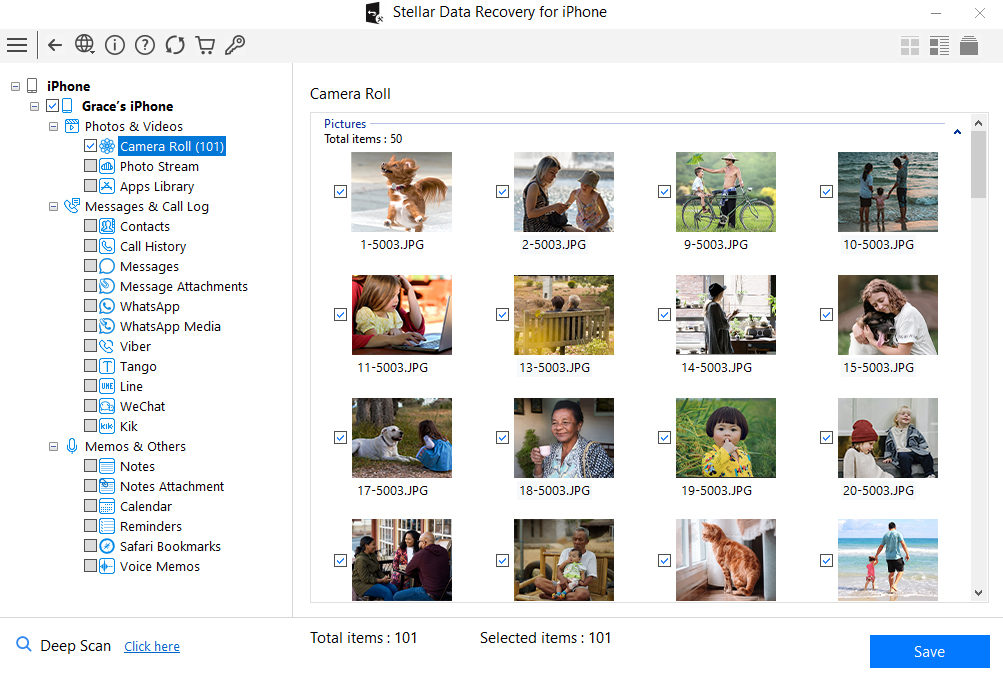
- Click Save
3. Recover from iCloud backup
Do you maintain iCloud backup of your photos? Then bring back the deleted photos on your iPhone via iCloud. iCloud photos recovery is possible in situations of accidentally or permanently deleted photos from iPhone. You can also recover photos lost after your iPhone is set on factory reset, damaged, or stolen.
Steps to restore photos from iCloud on iPhone:
- Click to follow Settings > General > Reset> Erase all Contents and Settings
- A dialog box pops up, choose Erase Now
- Follow the instructions until you get on to the Apps & Data screenTap Restore from iCloud Backup
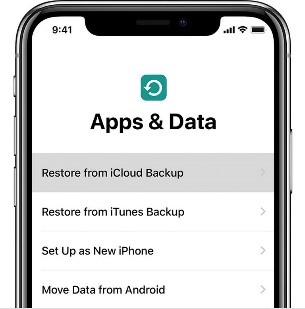
- Sign in to your iCloud account
- Choose the recent backup and click Restore to get back the deleted photos on iPhone
How to recover Photos from iCloud without losing existing iPhone data
This method of iCloud photo recovery protects your existing iPhone data. It also allows you to select and recover only the lost photos from iCloud instead of complete backup data.
Follow the below steps to restore only the lost/deleted photos from iCloud:
- Download and launch Stellar Data Recovery for iPhone on your computer. Note: You don’t need to connect your iPhone for recovering photos from iCloud backup files.
- Select Recover from iCloud Backup on main screen of software.
.png)
- Select Camera Roll and Photo Stream and click Next.
- Enter the Apple ID and password.
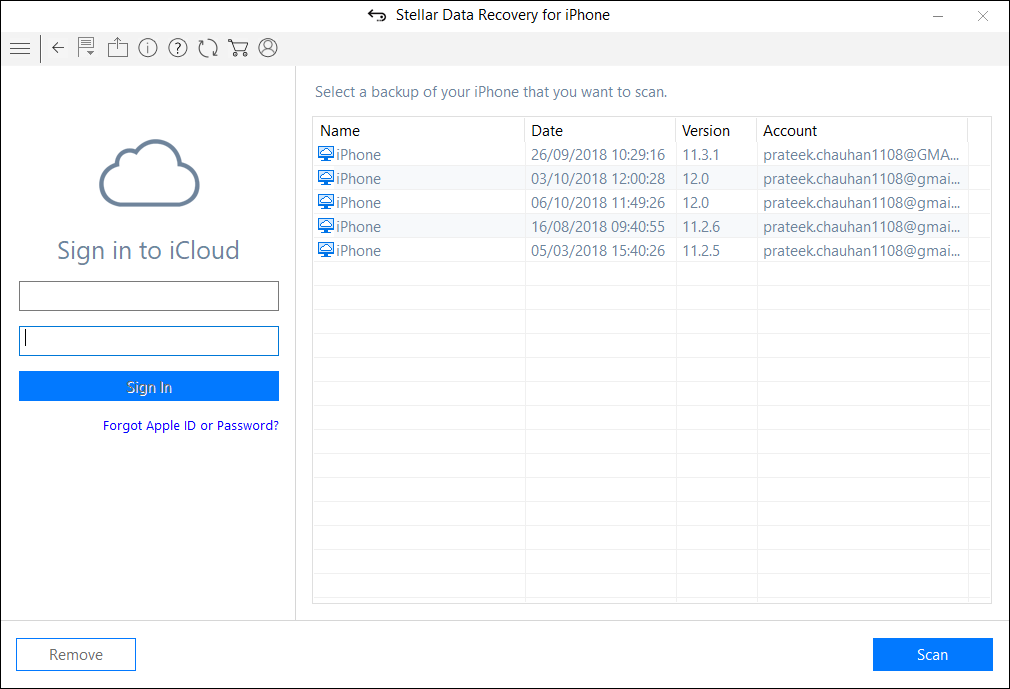
- List of all available iCloud backup files appears. Select the relevant backup of your iPhone and click Scan.
- Click Camera Roll and Photo Stream in the iCloud backup files list on the left window. Preview the existing and deleted photos or search for a specific photo by typing a keyword in the search box. If the desired photo is not in the recovered files list, click Deep Scan.
- Click Save. In the dialog box select either computer or iPhone to save the recovered photos. To save the photos on iPhone, make sure the iOS device is connected to the computer.
4. Recover deleted photos from iTunes
For those of you who maintain iTunes backup, it is the easiest way to retrieve the deleted photos of iPhone. iTunes backup also helps to restore photos lost due to deletion or after factory reset.
Steps to restore photos from iTunes backup:
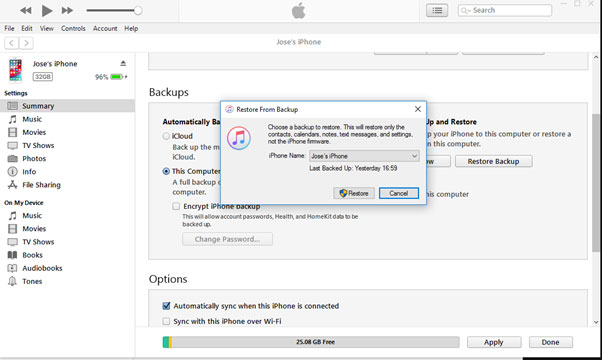
- Connect iPhone to your PC/Mac
- Launch iTunes
- Select your iPhone under the device list
- Select the recent backup date
- Click Restore Backup
All your lost and deleted photos will be restored on your iPhone.
How to recover Photos from iTunes without losing the existing iPhone data
Use Stellar Data Recovery for iPhone to protect your current data on iPhone. The software allows you to select and recover only the lost photos from iTunes. With this method, you can prevent unnecessary data recovery on your iOS device.
Follow the below steps to recover only the lost/deleted photos via iTunes:
- Download and launch Stellar Data Recovery for iPhone software. Note: You can connect your iPhone to computer, if want to save the recovered photos in the iOS device.
- Select Recover from iTunes Backup on the main screen of the application.
- Select Camera Roll and Photo Stream option. Click Next.
.png)
- From the list of the iTunes backup files, select the relevant iTunes backup from which you want to restore photos.
- If your iTunes backup is encrypted, a dialog box will open prompting you to enter the password. Enter the password and click OK.
- From the backup files list in the left pane, click Camera Roll and Photo Stream. Preview the existing and deleted photos or search for a specific photo by typing a keyword in the search box. Click Deep Scan at the bottom left side, if your desired photos are not in the list.
.png)
- Click Save. A dialog box appears asking to select the location to save photos. You can save the recovered photos either onto your iPhone or computer.
5. Enable iCloud Photos
Sometimes you could see the photos on iPhone but not on your synced iPad, iPod Touch, or Mac. To view these missing iPhone pictures on the synced iOS devices turn on iCloud Photos.
iCloud Photos stores the photos in iCloud. It ensures you can view them on your synced devices. If you can’t find a photo on your synced iPad, iPhone, or Mac etc., enable iCloud Photos under Settings of the iOS device.
Steps to turn on iCloud Photos on iPhone/iPad/ iPod Touch
- Click to follow Settings > [your name] > iCloud
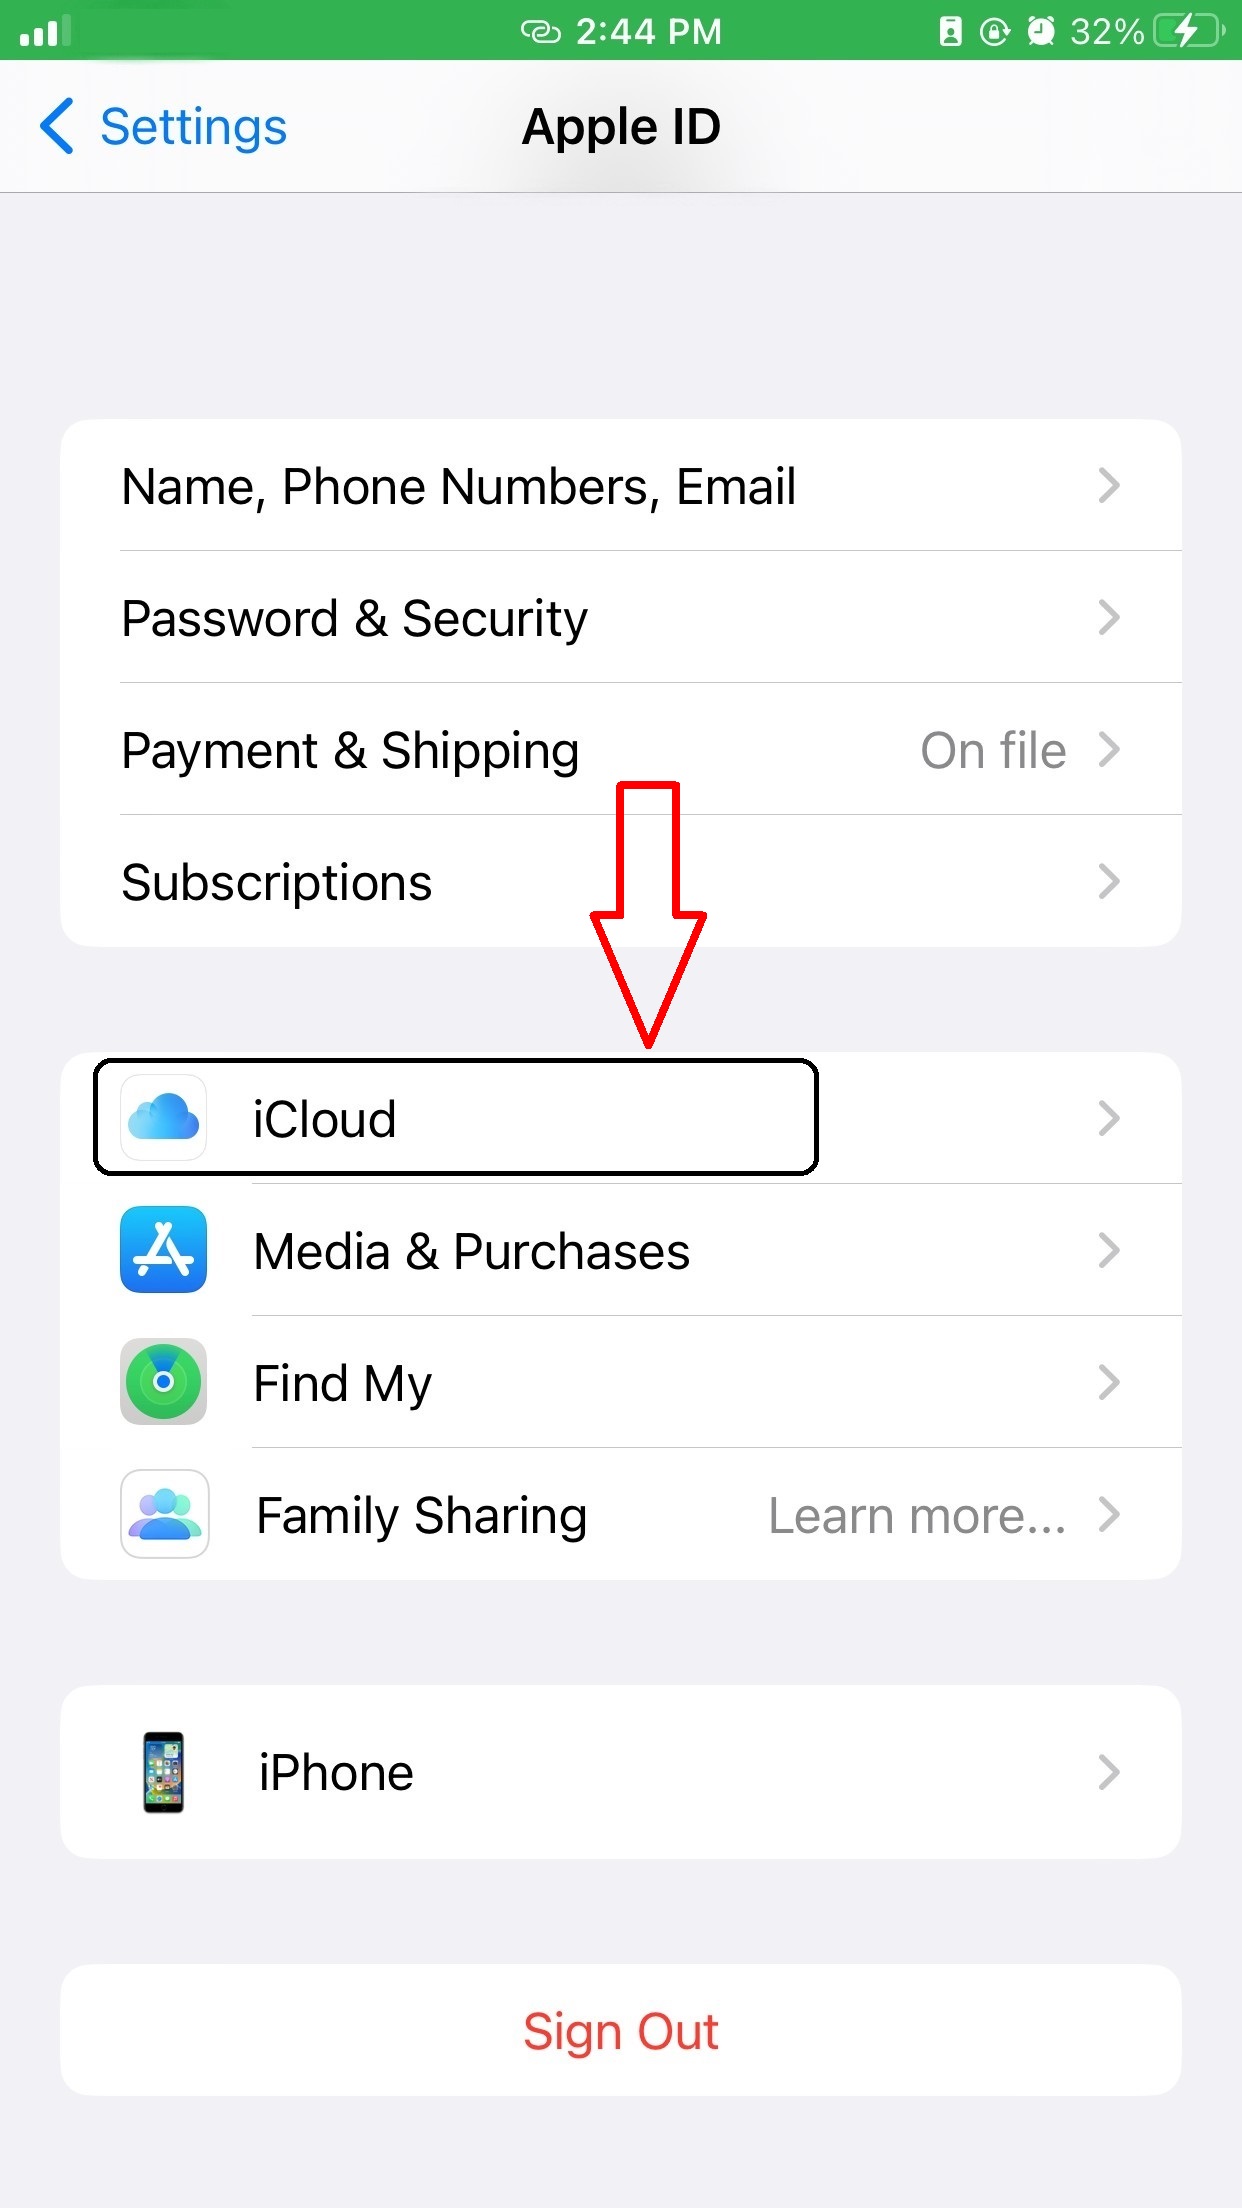
- Tap Photos
- Toggle on iCloud Photos.
To turn on iCloud Photos on Mac
- Go to System Preferences > iCloud.

- Next to Photos, click Options
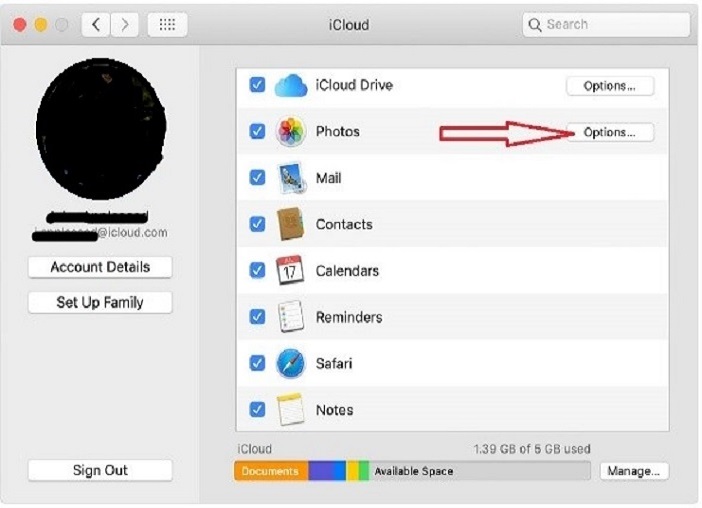
- Select iCloud Photos
Next, connect to Wi-Fi and wait for some time until your photos appear again on the synced devices.
Tip: When you turn on iCloud Photos, photos upload to iCloud but they are not duplicated in your iCloud backup. So make backup of your photo library. You can download your photos from iCloud.com to your PC/Mac and store them as a separate library or store them on a separate drive.
Comparison — iPhone Photo Recovery Methods
|
| Stellar Data Recovery for iPhone | Recover from iCloud | Recover from iTunes | Recently Deleted folder | Enable iCloud Photos |
| — | — | — | — | — | — |
| Success Rate | High | Medium | Medium | Low | Medium |
| Photo Recovery without backup | Yes | No | No | Yes | Yes |
| Effect on iPhone’s existing photos & other data after recovery | Existing data remains in iPhone | Deletes the existing iPhone data | Deletes the existing iPhone data | Existing data remains in iPhone | Existing data remains in iPhone |
| Select Photo and restore | Yes | No | No | Yes | Not applicable |
| Preview photos before recovery | Yes | No | No | Yes | Yes |
| Difficulty level | Nil | Medium | Medium | Nil | Medium |
| Recovery options | Recovers from iPhone, iPad, iCloud & iTunes | Recovers from iCloud only | Recovers from iTunes only | Recover from iPhone & iPad (within 30 days of photo deletion) | Recover on iPhone synced devices |
- Title: How to Recover Data from Broken iPhone 6s Plus Screen | Stellar
- Author: Nova
- Created at : 2024-08-20 20:19:25
- Updated at : 2024-08-21 20:19:25
- Link: https://blog-min.techidaily.com/how-to-recover-data-from-broken-iphone-6s-plus-screen-stellar-by-stellar-data-recovery-ios-iphone-data-recovery/
- License: This work is licensed under CC BY-NC-SA 4.0.