
How To Recover Data From Lost or Stolen iPhone SE (2022) In Easy Steps | Stellar
How To Recover Data From Lost or Stolen iPhone In Easy Steps
Summary: Lost your iPhone and now worried about your precious data on it? This post shares how efficiently Stellar Data Recovery for iPhone can recover lost data from a lost or stolen iPhone using iCloud Backup.
When we lose our phone, then the only thing we worry about is the valuable data stored on it. To recover all our critical data (contacts, messages, photos, videos, voice memo, etc.) all we need to do is restore them either from iTunes or iCloud backup. What if due to some unknown reasons, we are unable to access the backup? Well, in such cases we can still recover our files from the backup via Stellar Data Recovery for iPhone software.
Apple is known for its flagship features and, one of them being able to automatically backup the iPhone data. ICloud and iTunes automatically back up iPhone data and updates it whenever you sync it to your Mac. The advantage of these backup systems is that you can recover your data when your iOS device is lost or stolen.
Speaking of which, a friend of mine lost his iPhone and was looking for ways to restore his critical data. As he had saved the information by backing it up, all he had to do was transfer the information to the new iOS device. However, as luck would have it, he was unable to access the backup files either.
To get rid of the deadlock, he decided to look for a third-party application which can recover iPhone data, and after some analysis, he opted for iPhone Data Recovery Software by Stellar.

Stellar Data Recovery for iPhone (Ultimate Solution to Recover iPhone Data)
If your backup is accessible, you can recover data from the backup files. If you cannot access the backup files, then you need a third-party iPhone Data Recovery Software to recover data from your lost or stolen iPhone.
Stellar Data Recovery for iPhone provides you with 2 options to recover iPhone data i.e. either from iTunes backup files or iCloud backup files. It is easy to use and deploys a robust scanning algorithm so as to recover as much data as possible.
Irrespective of how you lost your iPhone data, you can get back your data in two Recovery modes namely:
- from iTunes Backup
- from iCloud Backup
Let’s look at each —
Recovery Mode 1: iTunes Backup Files
You can recover iPhone data if you have synchronised your iPhone with iTunes earlier. To recover data from iTunes Backup files, follow these steps:
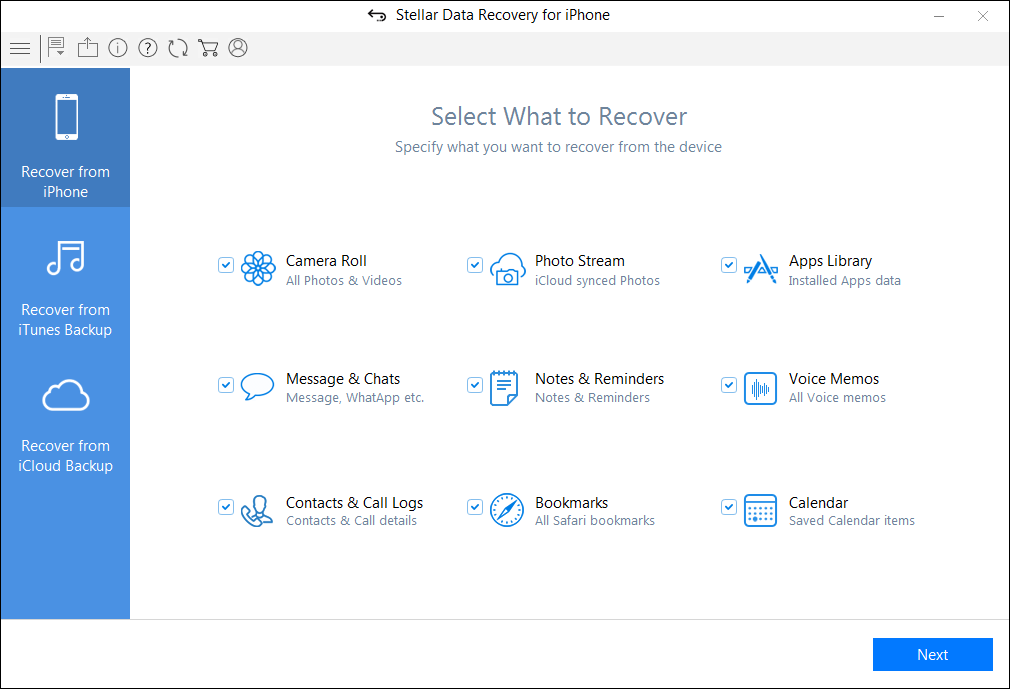
i. Run Stellar Data Recovery for iPhone and select “Recover from iTunes Backup” tab

Figure 1 illustrates the main screen of the software
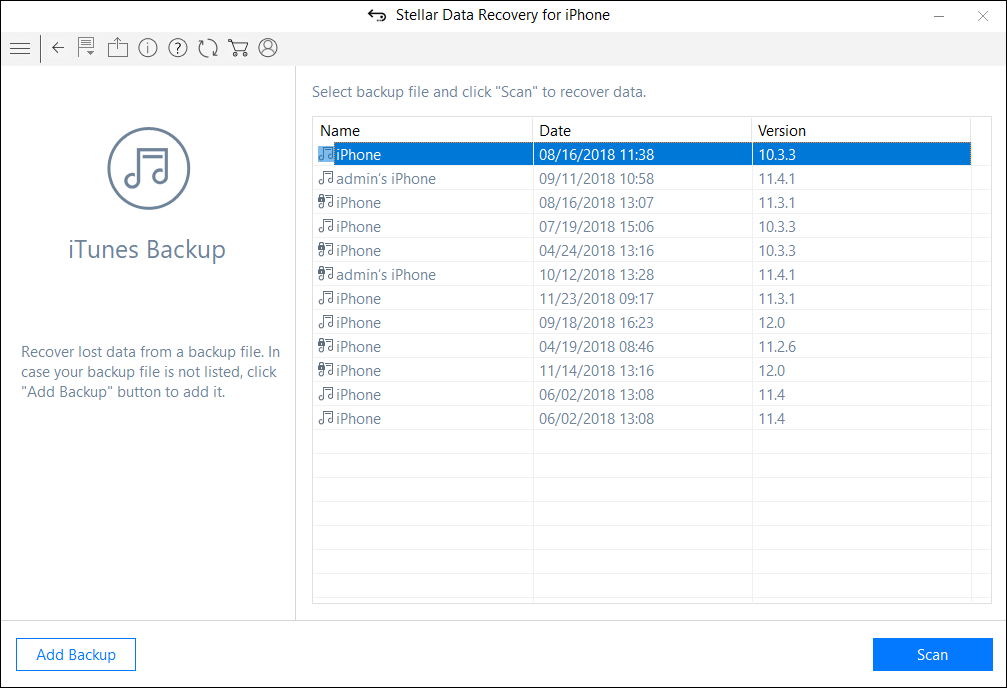
ii. The software displays the list of all iTunes backup files. Select the required backup file to recover

Figure 2 illustrates the entire list of the backup files
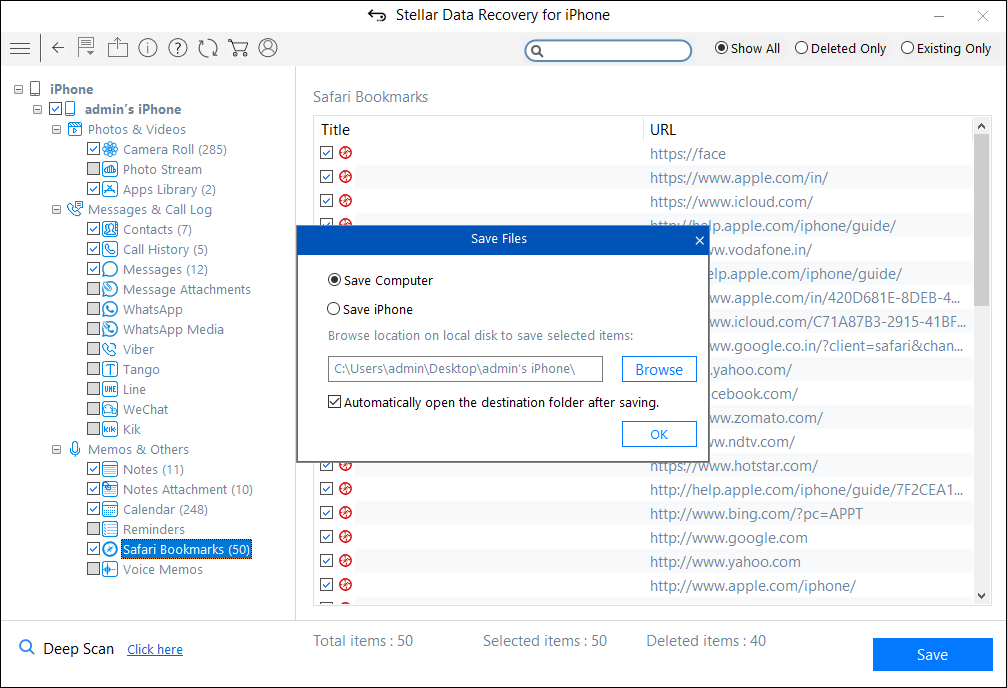
iii. From the Tree view, select the supported file categories which will list all the items under that category head.
iv. Preview the selected backup files and save the files

Figure 3 represents the preview of the files
**Note: You can preview the existing and deleted files. Moreover, type the keyword or filename in the search box to search for a particular file.
v. Click the Save button to recover the file.
Recovery Mode 2: iCloud Backup files
You can restore your iPhone data from iCloud Backup files as well. Follow the steps given below:
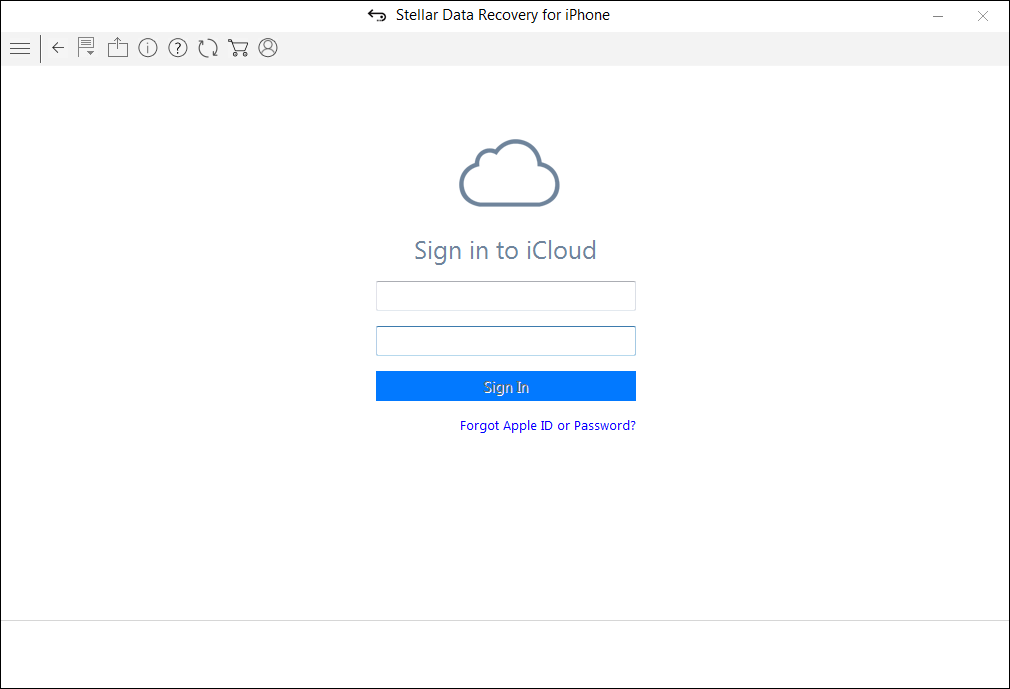
i. Install and Run Stellar Data Recovery for iPhone and select “Recover from iCloud Backup” tab.

Figure 5 represents the home screen of the software
ii. Next, enter the Apple ID and Password and sign in to iCloud.

Figure 6 illustrates the credential page
iii. After entering the necessary credentials, the software displays the list of all the backup files. Select the required files and press the Scan button

Figure 7 Represents the list of all files
iv. Preview the selected files and press the Save button which you can save to the desired location.

Figure 8 illustrates the preview of the files
The Process is over!!
What does Stellar Data Recovery for iPhone offers?
- Supports latest iOS 17, 16 15, 14, 13, 12 and below
- Recovers data from iTunes/iCloud Backup files
- Supports multiple device connections
- Data recovery from encrypted iTunes Backup files
- Provides option to import files to iPhones
Concluding Note
Simplicity is one of the several major aspects that are frequently sought by users. On that note, the interface of Stellar Data Recovery for iPhone software is quite simple and intuitive, and users can quickly and accurately recover iPhone data. With that said, do make it necessary to regularly backup your iPhone data.
Apple will delete your photos in July. Here’s what you should do
Apple has recently announced that it will permanently delete photos from its users’ ‘My Photo Stream’ this month. This news has come as a surprise to the Apple community, as users struggle to understand the implications of this announcement and what necessary precautions can be taken. In this blog post, we will get into the details of this new move by Apple, explore the reasons behind it, and provide tips on how iPhone/iPad/Mac users can safeguard their precious photos.
The Announcement
_”_My Photo Stream is scheduled to be shut down on July 26, 2023. As part of this transition, new photo uploads to My Photo Stream from your devices will stop one month before, on June 26, 2023.
The photos in My Photo Stream are already stored on at least one of your devices, so as long as you have the device with your originals, you won’t lose any photos as part of this process. If a photo you want isn’t already in your Library on a particular iPhone, iPad, or Mac, make sure that you save it to your Library on that device…” Read more
What is Apple’s My Photo Stream?
My Photo Stream, launched in 2011, was designed to sync photos across multiple Apple devices such as iPhone, iPad, or Mac.
This feature automatically stores your most recent pictures (up to 1000) for approx. 30 days so you can view and download them easily from other Apple devices. After this period, photos are removed from My Photo Stream but remain in your device’s Photos app. However, this only shows photos and not your live images or videos.
How to Protect Your ‘My Photo Stream’ Pictures?
Apple, known for its commitment to user privacy and data security, has recommended several preventive measures to mitigate the risk of losing any important photo due to this update.
1. Move My Photo Stream images to your Library
Even if the pictures in My Photo Stream are already there on at least one of your Apple devices, you must save these pictures to your Photo Library to avoid losing them**.** Here’s how to copy My Photo Stream pictures to your Photo Library:
On your iPhone, iPad, or iPod Touch:
- Open the Photos app and tap Albums.
- Tap on My Photo Stream > Select.
- Select all the photos you want to save, then tap the Share button > Save Image.
On your Mac:
- Open the Photos app and then open the My Photo Stream
- Select the photos you want to save which aren’t currently in your photo library.
- Drag and drop them from the My Photo Stream album into your Library.

2. Move to iCloud Photos
To preserve your My Photo Stream images in their original and high-resolution version, you can transfer them to iCloud Photos.
If you already have an iCloud account, just enable iCloud Photos to automatically upload & sync every photo and video you capture on the device, making them accessible from anywhere.
To use the iCloud Photos service, you will require the following:
- iPhone running iOS 8.3 or later version.
- iPad with iPadOS 8.3 or later version.
- Mac running OS X Yosemite or later version.
How to set up iCloud Photos on your iPhone, iPad, or iPod touch?
- On your iPhone, iPad, or iPod touch, go to Settings.
- Next, click on [Your Name] > iCloud.
- Tap on Photos and do the following:
For iOS 16, iPadOS 16, or later versions: Toggle on the ‘Sync this [device]‘ option.
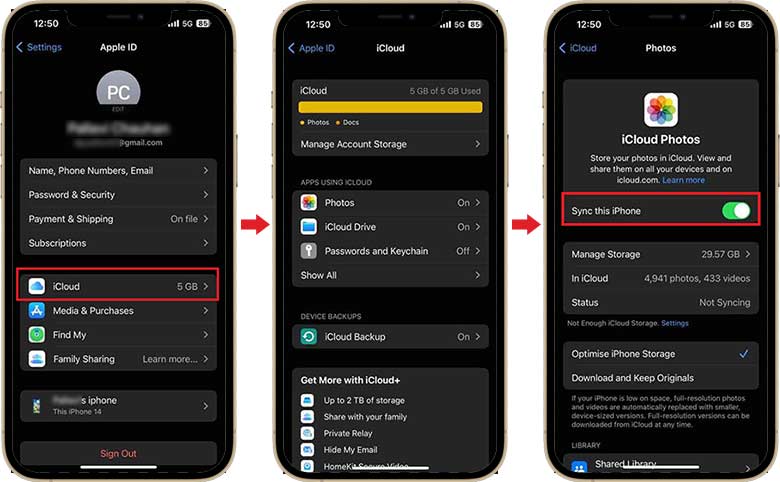
For iOS 15, iPadOS 15, or earlier versions: Turn on the iCloud Photos
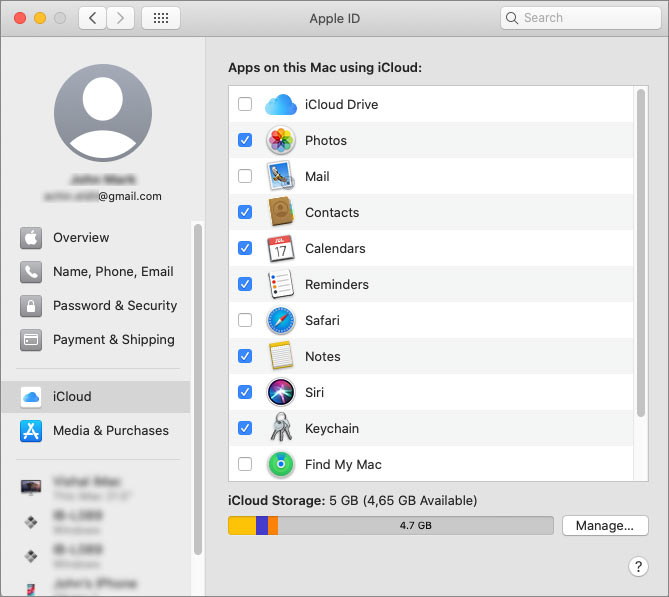
How to set up iCloud Photos on your Mac?
- On your Mac, go to Apple Menu and click on System Preferences.
- Click Apple ID and then select iCloud in the sidebar.
- Now, select Photos and turn on the switch next to Sync this Mac.
**
**
Don’t want to use iCloud Photos?
While iCloud Photos is a convenient option for many Apple users, it’s important to acknowledge that it is not the best fit for everyone. Limited free storage of 5GB or lack of cross-platform compatibility can compel Apple users to look for other alternatives.
Storage options, such as Google Photos, Microsoft OneDrive, Dropbox, external hard drives, etc., are available to ensure your iPhone Photos are safe and easily accessible.
The Bottom Line
Apple’s announcement of the potential discontinuation of My Photo Stream has understandably caused worry among its users. While a specific reason for this action remains undisclosed, they are actively addressing the issue to prevent data loss. In the meantime, iPhone users must take precautionary measures to safeguard their photos. They can simply move the My Photo Stream images to the Photo Library, iCloud Photos, or other backup folders.
How To Recover Whatsapp Chat History From iPhone
Summary: Losing the WhatsApp chat history from iPhone can be annoying. It may contain important details, photos, videos, and audio recordings. This post brings easy and quick methods to recover lost or deleted WhatsApp chat on iPhone using Stellar Data Recovery for iPhone.


With social media engulfing our lives, it becomes all the more important to keep track of people close to us through various social media apps, not only personally but professionally as well.
Messaging apps such as WhatsApp gives you total access to chat and share data with your family, friends, and even with your business or work colleagues 24*7. Each day, billions of people all over the globe, chat and share videos, audio, photos, etc. over this one messaging app. Therefore, it contains information that is of great value.
But it is important to know that this app is not fail-safe. Sometimes due to some technical issues, WhatsApp chats and other valuable information gets erased from the phone and chances of recovery are slim. If you are an iPhone user, it is a common scenario that due to tech issues such as jail breaking or when you upgrade your iPhone, your data as well as your WhatsApp chats may get erased from the iPhone.
Losing the chat history which also contains your priceless photos, videos, and audio can be quite frustrating! Hence, recovery becomes imperative! So in order to help you recover the data lost from your iPhone including your WhatsApp chats, we suggest the following steps that can help restore your chat history.
Recover Deleted Messages from WhatsApp Chat iCloud Backup
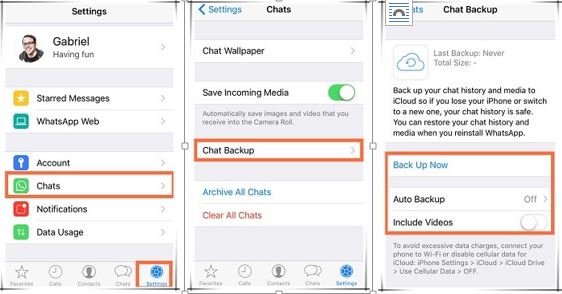
1- First of all, make sure that you have created a backup of all your WhatsApp chats and data on iCloud. In order to check that, go to the WhatsApp settings and check it on the Chat Backup present in the Chats.
2- Next, uninstall the existing WhatsApp and then reinstall it again from the app store and log in with your number. When you log in, a dialogue box will appear asking you to backup the chats: click on the confirm button to proceed.
Recover Deleted WhatsApp Messages Without Backup
1- Download and install iPhone Data Recovery Software by Stellar on your computer and then register the product using the product key.
2- Now after connecting the iPhone, click on Recover from iPhone option. Select the file type you want to recover and click “Next”. The scan will initiate thereafter.
3- Select Only Show Deleted option on the top to focus only on the deleted data. Then select the conversations you want to save. Then click Save.
4- Choose the desired location on your computer where you want to save the files or you can save it directly to your iPhone. Then click OK.
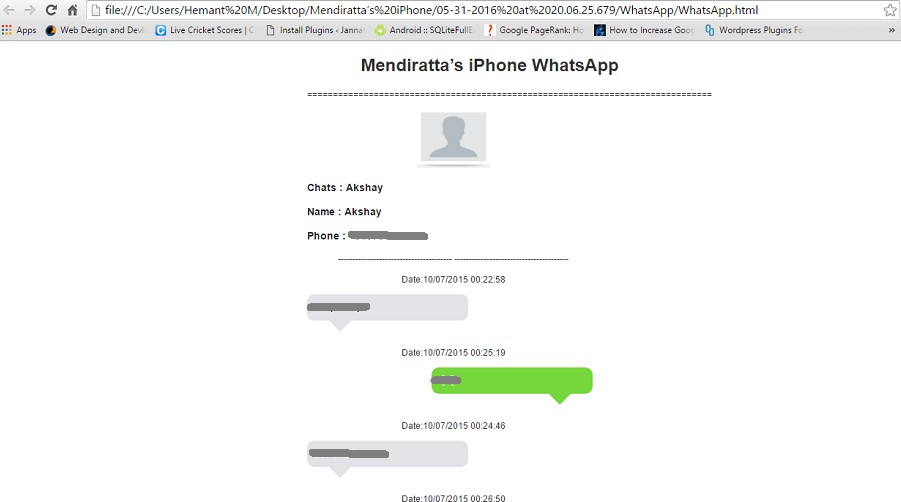
After a wait of 5-10 minutes, the lost data will be saved within form of a HTML page which can be opened using any browser.
Restore Deleted WhatsApp Messages from iTunes Backup
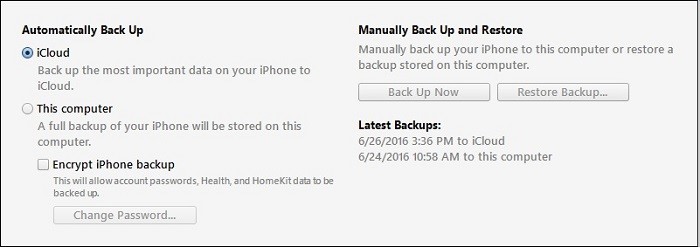
If you have backed up your WhatsApp chats and files in the iTunes app of the iPhone, then you can easily get back all your chats and files easily from it by following the below steps—
1- Open the iTunes app on your computer and then connect your iPhone into it. Next, click on the iPhone icon and then select restore backup. Then select the backup file that contains the WhatsApp messages and then select the recover option.
If you face any difficulty to recover your data from iTunes backup then use Stellar Data Recovery for iPhone to recover lost or deleted Contacts, Call history, Voice Memo, Messages, Notes, Reminders, Calendar, Safari Bookmarks from iOS device iTunes backup file.
Restore Deleted WhatsApp Messages from iCloud Backup
Just like iTunes, you can even back up your files and WhatsApp chats on iCloud present in your iPhone. However, before getting started, make sure that the data and chats are securely backed up in the app from which you have to recover.
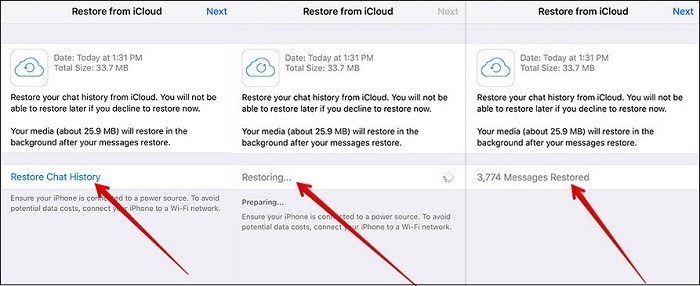
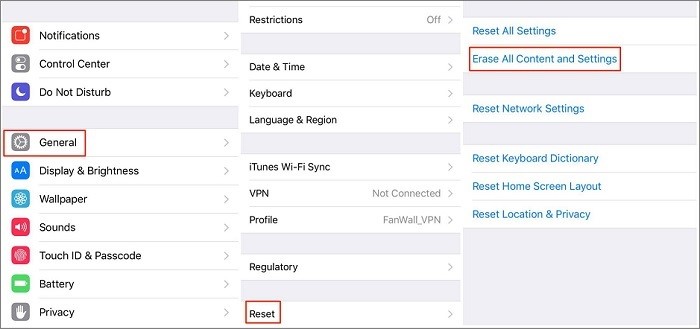
1- The first step contains erasing of all the content and settings present in the iPhone. This can be done by going to the general setting present in the iPhone.
2- A setup screen will be displayed. Follow the steps to get to the apps and data, then select on restore from iCloud backup from it.
3- Select the files and data that you wish to backup and then click on the restore button and let the system restore all the backed up data into your phone.
If you face any difficulty to recover your data from iCloud backup then use Stellar Data Recovery for iPhone to recover lost or deleted Contacts, Call history, Voice Memo, Messages, Notes, Reminders, Calendar, Safari Bookmarks from iOS device iCloud backup file.
Conclusion
Losing chats and other data from WhatsApp may lead to a situation of despair. Therefore, to ease you off your worries, the above simple steps will help restore all your chats as well as your lost photos, audio, and videos from your iPhone.
New iPhone 14 Restore from iCloud Stuck on Time Remaining Estimating
Summary: The joy of using iPhone 14 comes to a halt if your newly purchased iOS device remains stuck at “iCloud backup remaining estimating time” loop. You’ll Google how to restart an iPhone but end up being confused about what to do or what not to do. We understand your angst. So, in this blog, we offer you lucrative options to restore new iPhone 14 from iCloud backup. Also, we have taken the liberty to recommend a reliable iPhone data recovery software to use in case of accidental data loss. Use the given buttons to free download and try it yourself.
Every time you buy a new iPhone, restoring backup becomes a vital necessity to finish the setup. Long wait to restore a new iPhone 14 is killing the joy of using the most awaited Apple product. You can restore iTunes or Finder backup using laptop or MacBook, but as soon as you perform iCloud backup on iPhone 14, the device gets stuck at estimated time remaining. It’s a prominent issue, pointed by many iPhone 14 users recently.
The problem arises at setting up a new iPhone with existing iCloud backup. Possibility of getting stuck on Restore in Progress: An estimated storage (XXGB) required to finish restoring your apps and data.
Why is my new iPhone 14 stuck at restore from iCloud?
Before finding your options to overcome the problem and learn how to restore an iPhone, get familiar with the root cause of the problem:
- Perhaps additional data storage space is required.
- Apple server is preventing iCloud data restoration.
- iCloud system status is not working for iCloud backup and iCloud Account login.

- Slow or unstable WiFi connection.
- Numerous unwanted backup files stored on iCloud.
Generally, restoring in progress doesn’t take more than 20 to 60 minutes for an iPhone to restart. Nonetheless, if restoring is stuck beyond that time, then be wary that it might take hours to finish. Anyhow, iPhone offers you ample options to get around a stuck iCloud backup.
How to restart an iPhone stuck at “Restore from iCloud- Time Remaining: Estimating”
Read the below methods to identify a perfect route to finish restoring iPhone 14 from iCloud backup. You can also stop restoring your iPhone and experiment with other alternatives:
Cancel the iCloud Restore in Progress
Stop the ‘Restore from iCloud’ process and start afresh after giving rest to your iPhone for a while. The move allows iOS device to optimize operations after turning off all the activities. To do so, you need to interrupt the ongoing restore from iCloud backup, which is already stuck at a specified time remaining. Rebooting your iPhone will fix all the minor glitches liable for creating such. Follow these steps:
- Press and hold the side button (on the right hand side of your iPhone) along with volume up/ down button till the power-off slider appears on your iPhone 14 screen.

- Drag the slider to your right and wait for 30-seconds to turn off the device.

- To turn the iPhone back on, press and hold the side button until the Apple logo appears on screen.
![]()
Restart Restoring iCloud Backup
Once your iPhone 14 restarts, follow these steps to restore iCloud backup:
- Go to Settings > General > Transfer or Reset iPhone > Reset > Reset All Settings.

- Set up your iPhone and select Restore from iCloud Backup on the Apps & Data screen.
- You can also choose another restoration option- Transfer Directly from iPhone.
- Follow the instruction available on-screen to restore your iOS device.
If your new iPhone 14 continues getting stuck at iCloud restore progress, then you need to check your internet connection. Also, make sure the iOS device has adequate space to handle large volume of data you are trying to copy in it.
Check the iCloud System Status
At rare occasions, even Apple server prevents the iCloud data restoration. The first thing you can do in such situations is to ascertain whether the restore process was stalled because of an internet issue or iCloud System Status. To do so, go to Apple system status page and check if iCloud Backup, Apple ID, and iCloud Account and Sign In, are working. If not, then you can’t do much but wait for Apple support to fix the issue at their end.
iCloud backup restore stuck while setting up a new iPhone 14 is not stressful until you lose a significant amount of data in the process. It is possible that in the search and trial of different options to restore iCloud backup on new iPhone 14, you might lose a significant amount of data. Use a reliable iPhone data recovery software like Stellar Data Recovery for iPhone to restore all the lost or deleted iPhone data from different variants of iPhone, iPad, and iPod touch.

Note that the software also supports recovery from iCloud backup and iTunes backup. The advanced software allows you to select and restore only a selected few or the desired files lost from iCloud. Moreover, the iOS recovery software executes recovery in the least possible time and could manage every bit of data stored in your iCloud backup. Refer to our KB to learn how to recover deleted iCloud data .
Conclusion:
This blog encapsulates various methods to swiftly get out of the trouble of new iPhone 14 stuck at restore from iCloud. As you try these methods, eventually, you will find the most suitable option to resolve the iPhone 14 stuck at restore from iCloud error. At times, the process of data restore remains slow for reasons beyond your control. Perhaps the files you wish to restore to the newly purchased iOS device are way too large or the process is taking longer because of a weak Wi-Fi network or the Apple Server is undergoing maintenance. Either of the reasons may further enhance the risk of data loss on the iPhone. Therefore, you need an infallible solution like Stellar Data Recovery for iPhone to retrieve lost contacts, photos, videos, apps, games, chats, and more.
- Title: How To Recover Data From Lost or Stolen iPhone SE (2022) In Easy Steps | Stellar
- Author: Nova
- Created at : 2024-08-20 20:15:52
- Updated at : 2024-08-21 20:15:52
- Link: https://blog-min.techidaily.com/how-to-recover-data-from-lost-or-stolen-iphone-se-2022-in-easy-steps-stellar-by-stellar-data-recovery-ios-iphone-data-recovery/
- License: This work is licensed under CC BY-NC-SA 4.0.