
:max_bytes(150000):strip_icc():format(webp)/GettyImages-966273172-fbc5e7e0e68a48f69a1a5ddc0d6df827.jpg)
How to Recover Deleted Excel 2013 Files on Mac Complete Guide | Stellar
How to Repair Multiple Excel Files by Using Stellar
With Stellar Repair for Excel, it is quite easy and simple to repair multiple MS Excel (XLS and XLSX) files that are damaged. This is because the software has a self-explanatory interface and hence is a Do-it-yourself software. Nonetheless, when using this software to repair multiple Excel files, you would have to add all of the files into the software by following a few pre-defined steps. Follow the steps mentioned below:
- Launch Stellar Repair for Excel software.
- Under Home menu, click Select file

- Click Browse and select corrupt Excel files. Select the checkbox to repair multiple files.
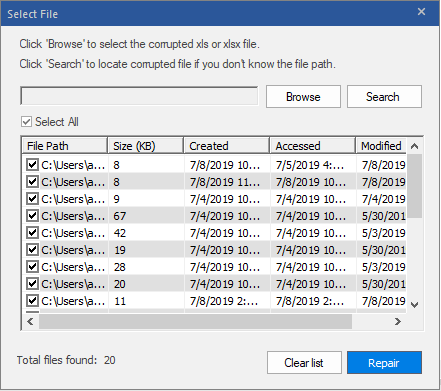
- Click Repair
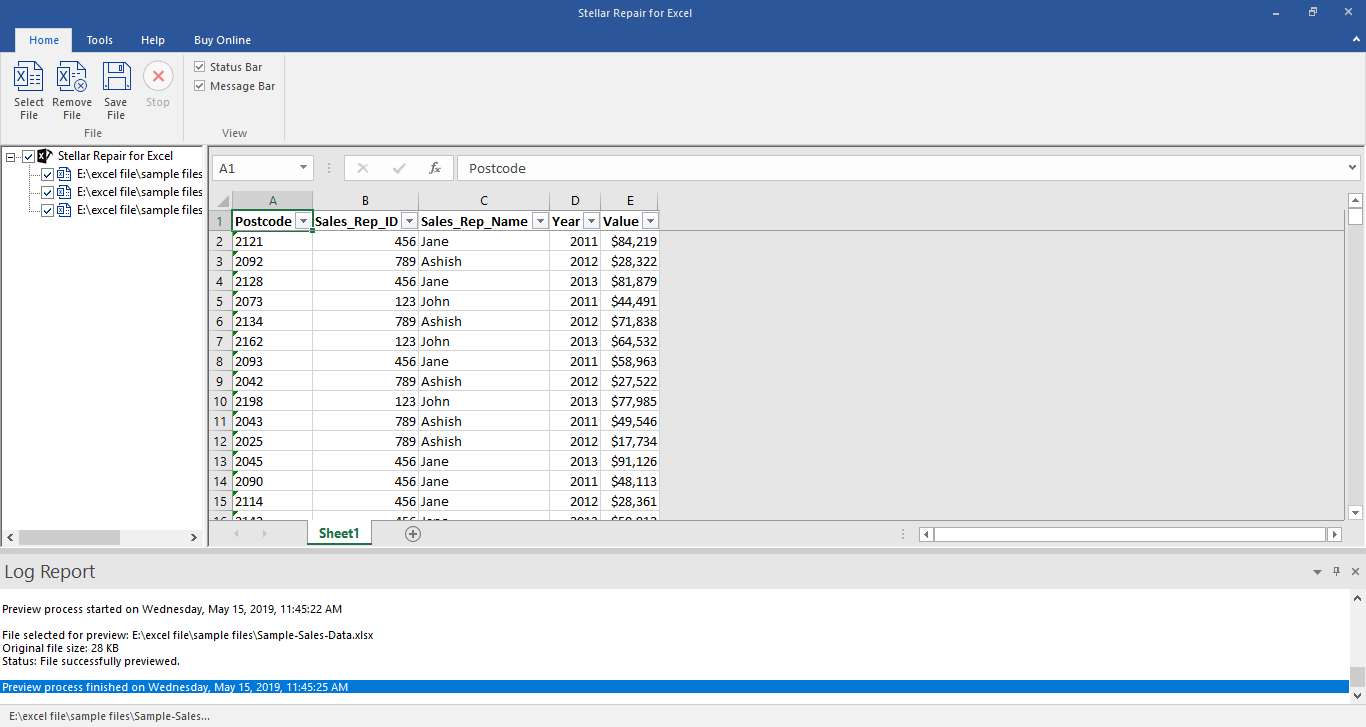
- The software provides the preview facility. You can check the it on left pane.
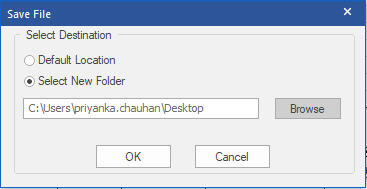
- Save the repired filr ether Default location or Select New Folder radio button.
Stellar Repair for Excel Stellar Repair for Excel is the best choice for repairing corrupt or damaged Excel (.XLS/.XLSX) files. This Excel recovery software restores everything from corrupt file to a new blank Excel file.
‘Open and Repair’ Doesn’t Work in MS Excel
Summary: In this Blog, we will go through Microsoft office most important product i.e Microsoft excel, let’s get into all possible Manual and an alternate method to deal with MS Excel open and Repair doesn’t work issue, read on to know more.

Whether you are a student or an entrepreneur, the features of Microsoft Excel do not delude anyone. Setting goals, creating budgets, analyzing data, calculating salaries, is there anything that Excel can’t do? All of us have used it and trusted it to calculate and provide a solution to our most difficult problems. However, like every other software application, this otherwise reliable application can sometimes fall prey to unexpected errors which can even threaten to make our critical data inaccessible.

A good idea to avoid loss of data when a Microsoft Excel file becomes corrupt is to take some proactive measures, such as saving a backup copy of your files and creating an automatic recovery file at periodic intervals. If you are faced with a corrupted Excel file, you know you can still use the ‘Open and Repair’ function provided by Microsoft to fix and open corrupt Excel file. However, what should a user do when ‘Open and Repair’ is not working? This is a query shared by millions of Excel users worldwide. Sometimes, the ‘Open and Repair’ functionality of Excel stops working due to unknown reasons. In such cases, if users face Excel file corruption, they get stuck with no idea how to fix the Excel file.
In this guide, we’re providing you with the solutions to this very problem. If Excel ‘Open and Repair’ is not working, read on to find out the procedures that you can perform to open corrupted files.
‘Open and Repair’ doesn’t work: Try an alternative solution i.e. Stellar Repair for Excel to recover everything from corrupt Excel files.
How to Fix Excel file that Won’t Open
If your workbook is opening in Excel, there are two options to recover its data. It would be best if you try to perform one, and if you are unsuccessful, move on to the next.
Revert the workbook to the version that was saved before the corruption
- Launch Excel and click File -> Open

- Select the file that is corrupted and open it
- Click ‘Yes’ to save the copy of the workbook that was saved before corruption
Important Note: If you use this method, you will lose all changes made to the file after it was corrupted.
Save the workbook in the SYLK file format
- Launch Excel and click File -> Save As.
- In the Save as Type field, select SYLK (Symbolic Link) from the drop-down menu, and click Save.

- To save only the active sheet in the workbook, click OK. The system will display a message that the sheet has features that are not compatible with the SYLK file format.
- Click Yes.
- In Excel click File -> Open.
- Select the file that you saved in SYLK file format and open it.
- In Excel click File -> Save As.
- In the Save as Type field, select Excel Workbook from the drop-down menu.
- In the File Name field, type a new name for your workbook and click Save.
The SYLK file format will filter out the corrupted elements from your workbook, thereby restoring your data.
Important Note: Using this method you only be able to salvage the active sheet in the workbook.
How to Open/Fix an Excel file that cannot be opened
In this case too, there are two options to recover the data. Try to perform one, and if you are unsuccessful, move on to the next.
Set the calculation option to Manual
- Launch Excel and click File -> New.

- From the Available Templates window, select Blank workbook.

- Click File -> Options.
- Under Formulas, in the Calculation options section, click Manual.

- Click OK.
- In Excel click File -> Open.
- Select the corrupted file and open it.
The system opens the corrupted file. Since the workbook won’t be calculated, it might open.
Link the workbook to external references
- Launch Excel and click File -> Open.
- Copy the name of the corrupted file and click Cancel.
- In Excel click File -> New.
- From the Available Templates window, select Blank workbook.
- In the new workbook, on cell A1, type the following:
=File Name!A1
In the above command, the filename is the name of the corrupted file.
- On the Update Values dialog box, select the corrupted file and click OK.
- On the Select Sheet dialog box, select the sheet and click OK.
- Select cell A1. Select the same range of rows and columns as occupied by the data in the corrupted sheet, including cell A1.
- Under the Home tab, in the Clipboard section, click Paste.
- While the range of rows and columns are still selected, click Copy.
- Click the Paste
- Under Paste Values, click Values.
Note: This method lets you recover only the data but not the values and formulas from the workbook.
Alternative Solution
In addition to the above-mentioned techniques, you can also use macros to extract data from a corrupted workbook. However, macros are generally risky, and executing them needs prior technical knowledge.
Thus, if the above methods do not yield the desired results, a quick and easy way for reconstructing Excel files is to use Excel Recovery Software . Stellar Repair for MS SQL software is the best choice for rebuilding damaged Excel files and restoring everything to a new Excel file. The product lets you recover table, chart, chart-sheet, cell comment, image, formula, sort and filter data from damaged workbooks and also allows you to fix multiple files at one go.

Wrapping it up
Though one of the above-mentioned techniques should recover Excel file if ‘_Open and Repair’ utility doesn’t work_, in case you’ve reached nowhere even after using them, contact Microsoft support for more help.
How to fix “damage to the file was so extensive that repairs were not possible” Excel error?
Summary: Unable to resolve “damage to the file was so extensive that repair was not possible” error in Excel? Read this post to discover more details about the error, possible causes, and how to rectify the error. To save time & efforts, you can also try an Excel file repair software to resolve the “damage to the file…” error in a few clicks.
When opening a workbook in Microsoft Excel 2003 or later, you may encounter an error message,
“Damage to the file was so extensive that repairs were not possible. Excel attempted to recover your formulas and values, but some data may have been lost or corrupted.”

The error message may also occur while exporting an Excel file. Let’s find out what causes this error and what we can do to fix it.
Reasons Behind “Damage to the File Was So Extensive That Repairs Were Not Possible” Error
Your Excel file may be corrupt, oversized, virus-afflicted, etc., which can trigger this error and make the repair impossible. Below are some common reasons.
- Large or oversized excel files hindering export
- Data restore errors
- Field length of a cell is more than 256 characters
- Software conflicts, viruses, network failure
- Unable to open files in upgraded versions
- Errors on output exceeding 64000 rows
- Limited system resources (such as RAM, internal memory)
In a nutshell, the error generally happens if Excel discovers unreadable content, which may also interrupt file saving in Excel.
How to Resolve “Damage to the File Was So Extensive That Repairs Were Not Possible” Error?
Here are a few methods you can follow to fix or resolve the Excel repair error.
Method 1: Perform Basic Troubleshooting
When opening a corrupt workbook, Microsoft Excel automatically initiates the file recovery mode to repair the corrupt file. However, if it fails to perform automatic recovery, then follow these basic troubleshooting steps:
- This error mainly happens when you try to open the Excel file in an upgraded version. Try to open the file in an older version of Excel. You might be able to open it.
- Try saving the file with a different file name.
- Use a different file extension to save the file.
- You can save the Excel file as HTML and then open it. However, an HTML file might not save conditional formatting.
- Close other opened applications on the system which may be causing the error.
- Select less data for export at once.
- Delete worksheets if copied from another document; for instance, delete any file or screenshots you have imported.
- Open the file on another system.
If the error persists, then use the manual method to repair a workbook using the below steps:
- Go to the “File” tab.

- Select Open and select the damaged spreadsheet from the Recent Workbooks section on the right, if listed. However, if you cannot find the file in the Recent Workbooks section, click on “Browse” and choose the corrupted workbook.

- Click the drop-down arrow on the Open tab and select Open and Repair.

Method 2: Check if exporting a Heavy File is Causing Resource Limitations in Excel
Sometimes, when you try to export an Excel sheet carrying a huge database, you may face memory errors in older Excel versions like Excel 2003. Here, you’ll have to decrease the amount of data as Excel 2003 does not permit exporting extensive data beyond a limit. However, modern versions such as Excel 2007, 2010 & 2016 allow exporting a large amount of data and utilize more RAM than the older versions.
Following are some other workarounds:
- Use a lesser number of query presentation fields to re-generate the query. Then, again re-enter those fields.
- Decrease the multi-line string field data text up to 8000 characters.
Method 3: Copy Macros and Data to Another Workbook (Empty) in an Advanced Excel version
If the issue is occurring due to version incompatibility, i.e., if the file opens easily in the older version but shows errors in the new version. You can:
Use the older version to open the file or copy the data or macros in an empty workbook of the new version of Excel.
Copying the Macros in the Workstation
In Microsoft Excel, you can use the Visual Basic Editor to open the workbook with macro on another workbook by copying the macro. Both VBA tools and Macros appear in the Developer section of the excel file. This option is disabled by default. So first, you need to enable it.
Follow the instructions to enable it:
- Open Excel and go to File > Options.

- Click “**Customize Ribbon.**”

- Look at the right side of the pane and ensure the Developer tab is checked.

- Click OK.
Once you have enabled the Developer tab, follow the steps to copy the macro from one workbook to another:
- First, open both the workbooks- the workbook containing the macro and the workbook in which you need to copy the macros.
- Locate the Developer tab.

- Select Visual Basic to display the “Visual Basic Editor.”

- Go to the View menu in the Visual Basic Editor.

- Select Project Explorer.

- In the Project Explorer window, drag the module you need to copy to the destination workbook. For example:

Module 1 has been copied from Book2.xlsm to Book1.xlsm
Method 4- Restore the backup file
The workbook backup helps to open the corrupted or mistakenly deleted file. Sometimes, the issue can be fixed using the Recover Unsaved Workbook option in Excel. Here’s the list of steps to recover the files in Microsoft Excel:
- Go to the File tab on Excel.

- Click Open.

- Search on the top-left of the screen to click Recent Workbooks as below:

- Next, scroll down to the bottom.
- Click the “Recover unsaved workbooks” button.

- Scroll and find the lost file.
- Now double-click on the file to open.
Conclusion
“Damage to the file was so extensive that repairs were not possible” error can be fixed with the above troubleshooting methods or by using a third-party Excel repair tool, like Stellar Repair for Excel . Although There are no standard resolutions to fix the excel error as they may vary with different scenarios. In some cases, the manual methods might be time-consuming or fail to fix the error or recover the excel file. Hence, using an excel file repair tool may be the best option! It extracts data from the corrupted file and saves it to a new Excel workbook, which you can open and edit.
How to Fix Excel File Couldn’t Open in Protected View
Summary: This blog discusses about the Excel error ‘The file couldn’t open in Protected View’ and workarounds to fix the error. If you cannot access the Excel file data, using an Excel file repair tool can help you quickly restore the data to its original state.
Protected View is a feature in Microsoft Excel that opens a file in read-only mode while disabling the editing functions. An Excel file opens in Protected View if the file is from an unsafe location. For example, the file may be opened from an insecure Internet location or downloaded as an Outlook attachment from suspicious senders. In that case, your Excel application won’t let you open the file to protect it against malware or virus attacks.
However, the Protected View feature sometimes prevents an Excel file from opening even if it is from a safe location. Also, opening an Excel file may return an error message ‘file couldn’t open in protected view’.

You may be able to resolve the issue by closing all the open Excel files, closing the Excel application, and then re-opening the problematic file. But this process can take a significant amount of time as you need to close and re-open the Excel application and the file continuously.
How to Fix the Excel File Couldn’t Open in Protected View Error?
Here are some workarounds to fix the error:
Workaround 1 – Disable the Protected View Settings
Note: Before disabling the protected view settings, ensure you have a reliable antivirus software installed on your computer to safeguard files against malware or virus attacks.
- Open the Excel file throwing the error, go to File and click the Options tab.
- From the Options dialog box, go to Trust Center and click on Trust Center Settings.
- From the Trust Center Settings dialog box, select the Protected View tab.
- Uncheck the appropriate option under the Protected View section, and then click OK to apply the changes. For instance, uncheck the “Enable Protected View for Outlook attachments” option if the file is a downloaded Outlook attachment.

- Click OK again.
Now try opening the problematic Excel file. If it still doesn’t open, try the following workaround.
Workaround 2 – Repair the Office Installation
Sometimes, corruption in the Office installation may cause Excel to return the ‘file could not open in protected view’ error. So, try repairing your Office installation and check if it solves the problem.
- Open the Control Panel and click the Uninstall a program option under Programs.
- Click Uninstall a program under the Programs tab.
- Right-click the Microsoft Office program you have installed and click the Change button.
- Select the Repair option and click Continue.

Once the repair operation is complete, check if you can open the Excel file without any issue.
Workaround 3 – Install Latest MS Office Updates
Several Excel users have reported about experiencing issues (such as the Protected View issue) on opening an Office document like Excel, Word, or others – after upgrading Windows to a newer version. This problem may occur due to incompatibility between the Office app and the updated Windows version. You can try to fix the problem by upgrading the Office app, and here’s how:
- Click on the File tab in the Excel file that throws an error.
- Click the Account tab at the left-hand bottom of the screen.
- From Office Updates, expand Update Options, and then click Update Now.

After installing the updates, restart your PC and open the Excel file. If this doesn’t work, use the following workaround.
Workaround 4 – Convert the File and Rename It
Some Excel users resolved the ‘Protected view’ issue by renaming their Excel files. But before that, ensure that the file you are trying to open is saved with .xlsx format. If the file type is .xls, you need to convert it to .xlsx format and then rename it. Before converting the file, save a copy of the original file in the desired location.
If the file type is .xlsx, copy the problematic file. Next, open a blank Excel document and paste the copied file. The file will appear as an icon, double-click on it. If it opens without any error, save it with a different name. Hopefully, reaming the Excel file may help resolve the problem.
Conclusion
There is no fixed solution to resolve the Excel error ‘The file could not open in Protected View’. However, the workarounds discussed in the blog have helped users resolve the ‘Protected View’ issue. Make sure to use the workarounds in the same order as explained in the blog.
If you’re having an issue loading the Excel file data due to the ‘Protected View’ error, consider restoring the data using an Excel file repair tool .
[Fixed] Excel Cannot Open the File Because the File Format or File Extension Is Not Valid
When opening an older version of an Excel file in a newer version, you may encounter the “Excel cannot open the file because the extension is not valid” error. This happens if you have accidentally renamed the file with a different file format or an incorrect file extension. Also, you may get the ‘Excel cannot open the file’ error if the file has become unreadable or corrupted.
This is how the complete Excel error message looks like:
“Excel cannot open the file filename.xlsx because the file format or file extension is not valid. Verify that the file has not been corrupted and that the file extension matches the format of the file.”

Check out this video for a quick demonstration of how to fix “Excel Cannot Open the File Because the File Format or File Extension Is Not Valid”
How to Fix the ‘Excel Cannot Open the File Because the File Format or Extension Is Not Valid’ Error?
Try any of these workarounds to fix the error and regain access to your Excel file data:
Workaround 1 – Change the Default File Format
By default, an Excel file is saved in .xlsx or .xls file format. Trying to open the file with a different or incorrect extension may cause the ‘Excel cannot open the file because the extension is not valid’ error. To fix the error, try changing the Excel default file format by following these steps:
Note: Take a backup of the Excel file that you cannot open and try the steps on the backup copy.
- In Excel 2010 and newer versions, click on the File menu.
Note: For Excel 2007 and earlier versions, click on the Office button.
- On the left panel, click on Options.
- In ‘Excel Options’ window, under Save workbooks section, click on the Save files in this file format: drop-down. Select a file format (i.e., the one supported by your Excel version).
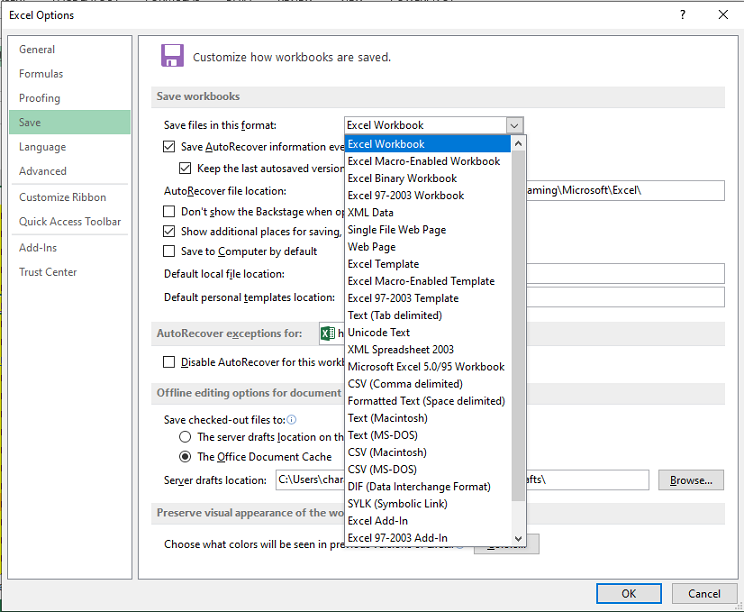
- Click OK.
Check if you can open your Excel file. If not, try the next workaround.
Workaround 2 – Edit the Excel File Permissions
You may receive the ‘Excel file format or file extension is not valid’ error if you lack sufficient permissions to open the file. Usually this happens when you try to open an Excel file received from some other user. Follow these steps to change the file permissions and see if it fixes the problem:
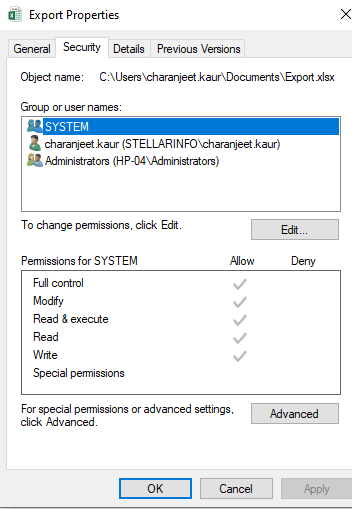
- Right-click on the file that won’t open and click Properties.
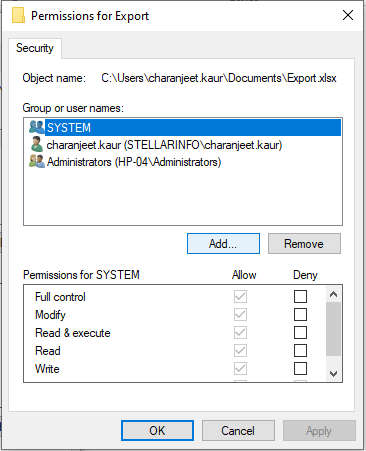
- In the file properties dialog box, click the Security tab and then hit the Edit button.
- When the file’s permissions dialog box appears, click on the Add button.
- Click on the Advanced button from the ‘Select Users or Groups’ window.
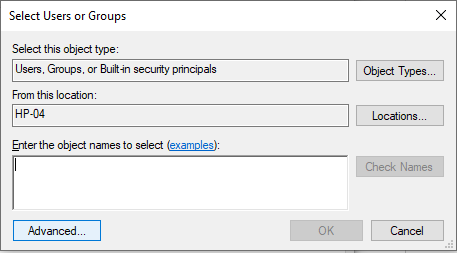
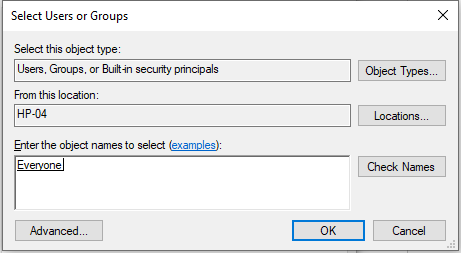
- Select Find Now. A list of all users and groups will get displayed in a search results box. Choose Everyone group from the list and hit OK.

- You can see the ‘Everyone’ group in the ‘Enter the object names to select’ textbox. Click OK once again to return to the file’s permission dialog box.
- Click Everyone from the Group or user names: box and check all the checkboxes under Allow.
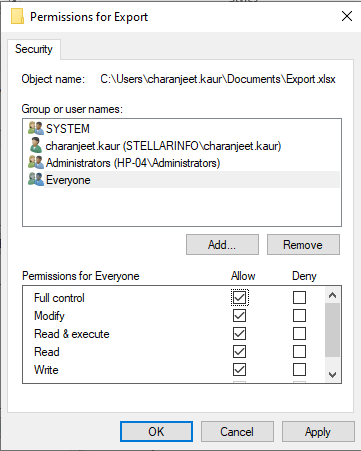
- Click on Apply and then OK.
Now try to open the Excel file. If you’re still getting the Excel file cannot open error, use the following workaround.
Workaround 3 – Recover Unsaved Workbook
If the ‘Excel file extension not valid error’ occurs when attempting to open an unsaved workbook, do the following to recover the unsaved workbook:
- In Excel, click File.
- From the Info screen, under Manage Versions, click Recover Unsaved Workbooks.
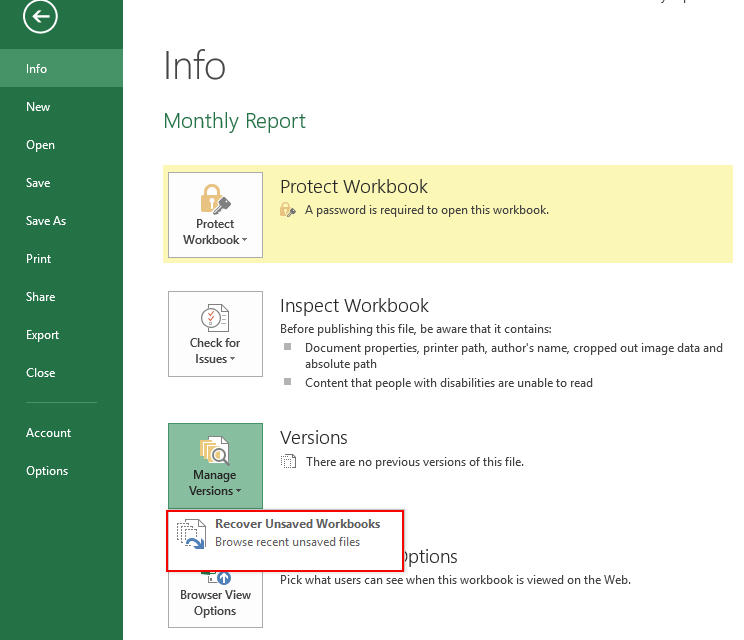
Excel will list any unsaved files. Try opening the file and save it. If this doesn’t work, skip to the next workaround.
Workaround 4 – Repair the Workbook
If none of the above workarounds has worked for you, chances are that the Excel file has become corrupted. Try to repair the file using the Excel inbuilt ‘Open and Repair’ utility by following these steps:
- In your Excel application, click on File > Open.
- In the ‘Open’ dialog box that pops-up, select the Excel file you want to repair and click the arrow next to the Open button.
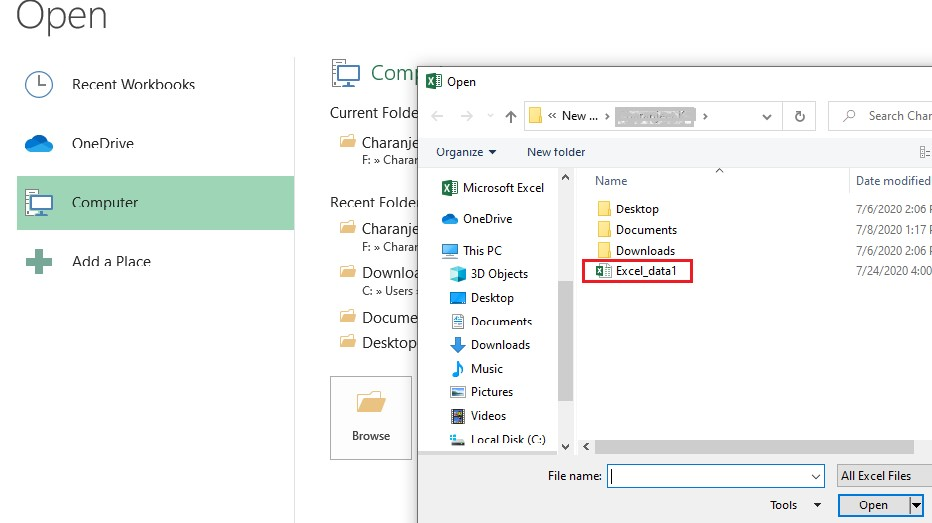
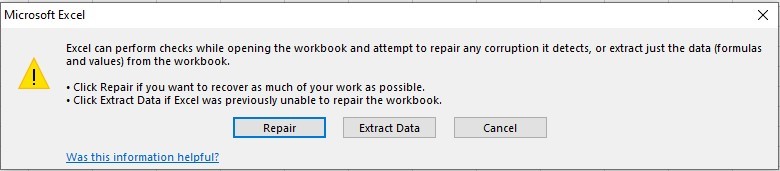
- From the dropdown list, select Open and Repair.
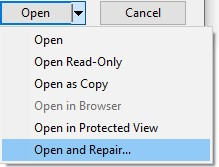
- Excel will ask you to attempt to repair the file or extract data from it. Click Repair to retrieve maximum data. If the Repair option fails, click on Extract Data to recover the data without formulas and values.
If the ‘Open and Repair’ utility doesn’t help fix the corrupted file and/or recover the data, use an Excel repair tool such as Stellar Repair for Excel to regain access to your file and its data.

Stellar Repair for Excel software can help repair severely corrupted XLS and XLSX files. Also, it helps recover all the file components, including tables, pivot tables, cell comments, charts, chart sheets, images, formulas, etc., without impacting the original structure of the Excel file.
To learn how the software works, read this: How to repair corrupt Excel file using Stellar Repair for Excel?
Conclusion
You may encounter the error ‘Excel cannot open the file because the extension is not valid’ when opening a workbook with a different file format or an incorrect file extension. Also, the error may occur if the Excel file has turned corrupt. This article has covered some of the most effective workarounds to resolve the error. But if nothing works, you can try to repair the Excel file and retrieve its data using the Stellar Repair for Excel software.
Summary: Recovering your unsaved Excel file on Windows 10 with some of our tested methods can truly save you a lot of time, money, and effort. Here’s how to do it!
Microsoft provides a wide range of applications to its users that cater to different purposes. Out of all the MS Office applications, Excel is considered the most used native application by several companies and individuals to store and process crucial data. Excel can also be called a go-to data analysis tool that offers great reliability, ease of use, and multiple features. But unfortunately, it’s not immune to human errors and system errors.
What if you accidentally close the Excel file without saving your work or Excel crashes suddenly? Or worse! Your system crashes without any warning and when you reboot your system, you can’t find the unsaved Excel file.
There could be different situations where you may lose access to your unsaved Excel workbook. There is no need to be anxious, though! We’ve covered some easy-to-follow DIY methods in this post to help you recover unsaved Excel files quickly.
4 Ways to Recover Unsaved Excel File
Irrespective of the circumstances, you can recover unsaved Excel files on Windows 10 using the following methods.
Method 1: Use the Search Option
If you remember the name of the Excel file, try to find it using the Search option. Following these steps:
- Go to Windows Search Box and type the name of the file.
- If you find the file there, click Open or Open file location.

- If you click Open file location, it will take you to the exact location of the file, and you’ll be able to regain access to lost/unsaved Excel file easily.
Method 2: Use AutoRecover Feature
Microsoft Excel comes with a built-in AutoRecover feature that saves copies of all open Excel files at a user-definable fixed interval. You can recover the file if you forget to save it and accidentally close it or it closes automatically due to an unexpected system breakdown or power failure. You can follow the given steps to recover unsaved Excel files with the AutoRecover feature:
- Open a new Excel file and go to File > Options.
- Then go to Save > Save workbooks.
- Next, ensure that the ‘Save AutoRecover information every’ and ‘Keep the last autosaved version if I close without saving’ option is already selected.

- Now, copy the file path given against the AutoRecover file location.
- Open the File Explorer, paste the Menu Bar file path there, and hit Enter.
- The unsaved file will appear with the .xlb extension.
- Double-click the file and choose Excel from apps to open the .xlb file.

- Finally, save the file to the desired location.
Method 3: Use the ‘Recover Unsaved Workbooks’ Option
Another way that you can choose is the ‘Recover Unsaved Workbooks’ option. To regain access to your Excel file, follow the given steps:
- Open an Excel sheet and then go to File > Open.
- Now, scroll down and click Recover Unsaved Workbooks.

- The list of unsaved files will show in the Document Recovery pane.
- Locate the file you lost and double-click on it to open.
- Finally, right-click on the version of the file you want to restore and click Save As.

And, save the file to the desired location
Method 4: Restore File with Previous Versions Utility
This feature will help you recover unsaved Excel files when you’ve saved the workbook earlier, but you end up losing access to the file due to an Excel or system crash. It’d help you save the previously saved version of your Excel file. To do so, follow the given steps:
- Open an Excel file and navigate to File > Info > Manage Versions.

- It will show the previously saved versions. You can choose the one you want to restore and click Save/Save As to store the file with a different name.
Hopefully, this blog has helped you learn how to recover unsaved Excel files. You can try any of the above methods.
FAQ
1. How can I repair a corrupted workbook?
Whenever Excel detects a corrupted workbook while opening, it automatically starts running the File Recovery mode and repairing the file. If the File Recovery mode doesn’t start automatically, you can manually repair the corrupted workbook .
How to Repair Excel Document on a Flash Drive
Summary: Microsoft Excel files are stored on flash drives if they need to be transferred between systems or if they need to be backed up. But sometimes unforeseen issues can corrupt the Excel sheets stored on flash drives. When that happens, it can be an arduous task to repair Excel documents on a flash drive. Through this post let us try to understand the reasons why Excel sheets stored on flash drives can get corrupted and how users can resolve them easily.
In this digital age, we all work with computers, files, and documents. Flash drives or USBs are common ways of storing data in an external place. Be it for a meeting or for a party playlist, these devices come handy when one wants to transfer data or access the files stored elsewhere.
You may need to access your data from another location. That’s when a USB flash drive might come in handy. And, that’s exactly why Excel sheets too end up on flash drives; either that or for backup purposes. However, there are many instances where an Excel file stored in a USB gets corrupted when one tries to access the file. The error message you get while trying to open the Excel file would be a great clue for figuring out the exact reason behind corruption.
This blog will provide insights into what are the reasons for the corruption of a USB and how the users can repair Excel on flash drive that has been corrupted.
Reasons for USB inaccessibility
Sometimes flash drives or USBs can become unresponsive due to numerous reasons. There are two types of corruption – logical and physical. Physical corruptions occur due to broken stems and connectors, broken circuits, NAND gate, not recognised, RAW, need to format, not accessible, and dead drives (no power supply).
One of the main reasons behind such an error could be that the USB drive has been infected by some virus. This can affect any file – not only the ones which are there in the USB drive but also the ones which are there in the PC/Laptop where you connect the USB drive. It is recommended that you scan the USB drive with reliable antivirus software to detect viruses.
There can be various other reasons that may make your USB corrupt or unresponsive. But there are very slim chances that you will be able to recover a flash drive that has physical damage. However, you can try to run the check disk on the USB drive to fix the drive. We will be discussing this as you read on.
Recovery Methods for Corrupted Flash Drives
There are 3 tried and tested recovery methods. Try them and see which one works out for you.
- Restoring Excel Files from Windows backup
To bring back your old Excel files, fixing up the corrupt file is your best option. Importantly note that this method would work only if your system’s Windows backup option has been enabled.
Step-by-step process for restoring your older Excel files:
- Connect your USB drive
- Go to “My Computer”->USB Drive->Check if the file exists
- Right click on the excel file and click on the restore previous versions

- You will now see a list of older versions which were created
- Select one the backups and click on “restore”
- Using Command Line to Recover Excel Files
In case you are looking to repair Excel on flash drive, you can also resolve it by using the command line. Just follow the below steps to see if you can recover the excel files.
- Connect your USB Flash drive
- Open “Run” (press Windows+R) and then open “cmd”

- Type “attrib -h -r -s /s /d (USB Drive Letter):\*.*” where the (USB Drive Letter) is the drive letter you can find using “My Computer”
- Once this has been completed, Windows will start repairing your files
- After the process gets over, try accessing the excel file to see if the data has been recovered
- Running a “Check Disk” on flash drives
Follow the below steps while the USB flash drive has been plugged into your computer:
- Open “Run” and then open “cmd”
- Type in “chkdsk /X /f (USB Drive Letter)” where the “(USB Drive Letter)” is the letter of the corrupted USB Drive. You can get this letter easily from the “My Computer”.

It will now check your disk to and correct any corrupted records.
What if none of these methods works?
In case none of the above methods works to repair Excel document on a flash drive, then you would need a professional Excel repair software such as Stellar Repair for Excel to restore your files. Such software not only help repair corrupted Excel files on flash drives but also help in recovering the data stored within them in their original format.
Stellar Repair for Excel resolves corruption problems in Excel files and recovers all formulas, charts, cell formatting, and more from them. It can repair multiple Excel files in one go. Equipped with a fully interactive GUI, working with this product is extremely easy.
To sum it up
Although flash drives are quite popularly used, they are not the most reliable of storage devices. These drives can fail anytime without warning. Thus, always back up your data on other more robust devices instead of flash drives. We hope that with the above tried and tested methods you will easily be able to repair Excel document on flash drive if need be. For any queries that you have, feel free to leave a comment below!
Also read:
- How to Put iPhone 6s or iPad on Recovery mode? (Step by Step Tutorial) | Stellar
- How to identify missing or malfunctioning your hardware drivers with Windows Device Manager on Windows 11/10
- How to identify some outdated drivers with Windows Device Manager in Windows 11 & 10
- How to recover deleted photos on Realme C67 4G
- How to remove Google FRP Lock on Vivo S18 Pro
- How to Restore Deleted Samsung Galaxy XCover 7 Pictures An Easy Method Explained.
- How to Downgrade iPhone 13 Pro Max without iTunes? | Dr.fone
- How to retrieve erased messages from Vivo X100 Pro
- How to Restore iPhone 15 Pro Max from Backup when iTunes Backup is Corrupt or not compatible | Stellar
- How to Rescue Lost Photos from Samsung Galaxy A14 4G?
- How To Repair iOS System of iPhone 13 Pro Max? | Dr.fone
- How to recover deleted photos from Nokia 150 (2023).
- How To Repair iPhone 6s Plus iOS System? | Dr.fone
- How To Restore Missing Messages Files from Itel A05s
- How to Rescue Lost Music from Nokia C210
- How to play AVCHD MTS files on Redmi Note 12R?
- How to Recover lost Calendar on iPhone 14 Pro | Stellar
- How to Downgrade iPhone 6 to the Previous iOS Version? | Dr.fone
- How To Repair System Issues of iPhone 13 Pro? | Dr.fone
- How to Downgrade iPhone XS to an Older Version? | Dr.fone
- How to Fix & Retrieve Pictures/Videos From a Water Damaged iPhone 14 That Wont Turn on | Stellar
- How to Restore Deleted Lava Blaze 2 5G Photos An Easy Method Explained.
- How to recover old videos from your Poco
- How to Repair Broken video files of Note 30 on Mac?
- How to recover deleted contacts from Vivo Y27s.
- How to Downgrade iPhone 15 without Losing Data? | Dr.fone
- How to remove Google FRP Lock on Honor Magic 5 Pro
- How to recover deleted pictures from Tecno Pova 5 Pro.
- How to recover deleted contacts from Xiaomi Redmi Note 12 Pro 5G.
- How To Repair iPhone 6s iOS System? | Dr.fone
- How to Fix Microsoft Excel 2007 Error Code 0x800A03EC? | Stellar
- How to remove Sony Xperia 5 V PIN
- How to Recover Deleted iPhone 14 Camera Roll Photos and Photo Stream Pictures? | Stellar
- How to Restore Deleted S17t Pictures An Easy Method Explained.
- How To Reset iPhone 11 Pro? | Dr.fone
- How to Restore Deleted Realme Narzo N53 Contacts An Easy Method Explained.
- How to Retrieve deleted photos on Motorola G54 5G
- How to Rescue Lost Videos from Honor X50i+
- How to rescue lost call logs from Vivo Y02T
- How to get back lost photos from Oppo Reno 11 5G.
- How to make a digital signature for .docx
- How to retrieve lost files from Magic Vs 2?
- How to fix videos not playing with my Oppo K11 5G?
- How to Rescue Lost Messages from Vivo Y100i Power 5G
- How to Recover Deleted Photos from Android Gallery App on Infinix Smart 8 Pro
- New In 2024, Top 10 Best Free Manga Sites to Read Online
- How can I play .mov files on Xiaomi Redmi Note 12 4G ?
- 2024 Approved Tactics to Make Transparent Image in Minimal Steps
- In 2024, How to Transfer Data After Switching From Honor V Purse to Latest Samsung | Dr.fone
- In 2024, New Multiple Ways How To Remove iCloud Activation Lock On your Apple iPhone 11
- Remove Google FRP lock on Vivo T2 Pro 5G
- AVS Video Editor 2023 A Detailed Review of Its Capabilities and Limitation
- Updated In 2024, How to Send and Add Snapchat GIFs 100 The Easy Way
- In 2024, How To Enable USB Debugging on a Locked ZTE Blade A73 5G Phone
- A Detailed VPNa Fake GPS Location Free Review On Xiaomi Redmi Note 12 Pro 4G | Dr.fone
- In 2024, Effective Ways To Fix Checkra1n Error 31 From Apple iPhone X
- In 2024, How to Change Your Vivo V27e Location on life360 Without Anyone Knowing? | Dr.fone
- How To Transfer WhatsApp From iPhone 15 Pro Max to other iPhone? | Dr.fone
- In 2024, How to get the dragon scale and evolution-enabled pokemon On Vivo V29e? | Dr.fone
- In 2024, How to Fake Snapchat Location without Jailbreak On Sony Xperia 1 V | Dr.fone
- How to Unlock Vivo V29e Phone without Any Data Loss
- In 2024, 4 Ways to Unlock iPhone 7 to Use USB Accessories Without Passcode
- How To Transfer Data From Apple iPhone 6s Plus To Other iPhone 14 Pro devices? | Dr.fone
- How To Bypass iCloud Activation Lock on Mac For Apple iPhone 7?
- Remove the Lock Screen Fingerprint Of Your Vivo Y100t
- How Can We Unlock Our Samsung Galaxy F14 5G Phone Screen?
- In 2024, Simple and Effective Ways to Change Your Country on YouTube App Of your Apple iPhone 11 | Dr.fone
- 4 Most-Known Ways to Find Someone on Tinder For Vivo T2 Pro 5G by Name | Dr.fone
- How to Flash Dead Realme 11 Pro Safely | Dr.fone
- Title: How to Recover Deleted Excel 2013 Files on Mac Complete Guide | Stellar
- Author: Nova
- Created at : 2024-05-19 18:32:14
- Updated at : 2024-05-20 18:32:14
- Link: https://blog-min.techidaily.com/how-to-recover-deleted-excel-2013-files-on-mac-complete-guide-stellar-by-stellar-guide/
- License: This work is licensed under CC BY-NC-SA 4.0.
