
:max_bytes(150000):strip_icc():format(webp)/duet-c82ee94b39e24788bcfd51d1eea24288.jpg)
How to Recover Deleted Excel 2016 Files on Mac Complete Guide | Stellar
How to Repair Multiple Excel Files by Using Stellar
With Stellar Repair for Excel, it is quite easy and simple to repair multiple MS Excel (XLS and XLSX) files that are damaged. This is because the software has a self-explanatory interface and hence is a Do-it-yourself software. Nonetheless, when using this software to repair multiple Excel files, you would have to add all of the files into the software by following a few pre-defined steps. Follow the steps mentioned below:
- Launch Stellar Repair for Excel software.
- Under Home menu, click Select file
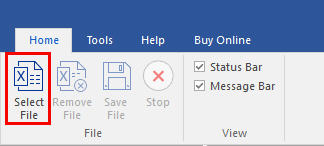
- Click Browse and select corrupt Excel files. Select the checkbox to repair multiple files.
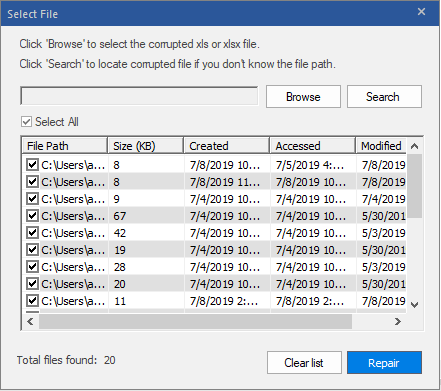
- Click Repair
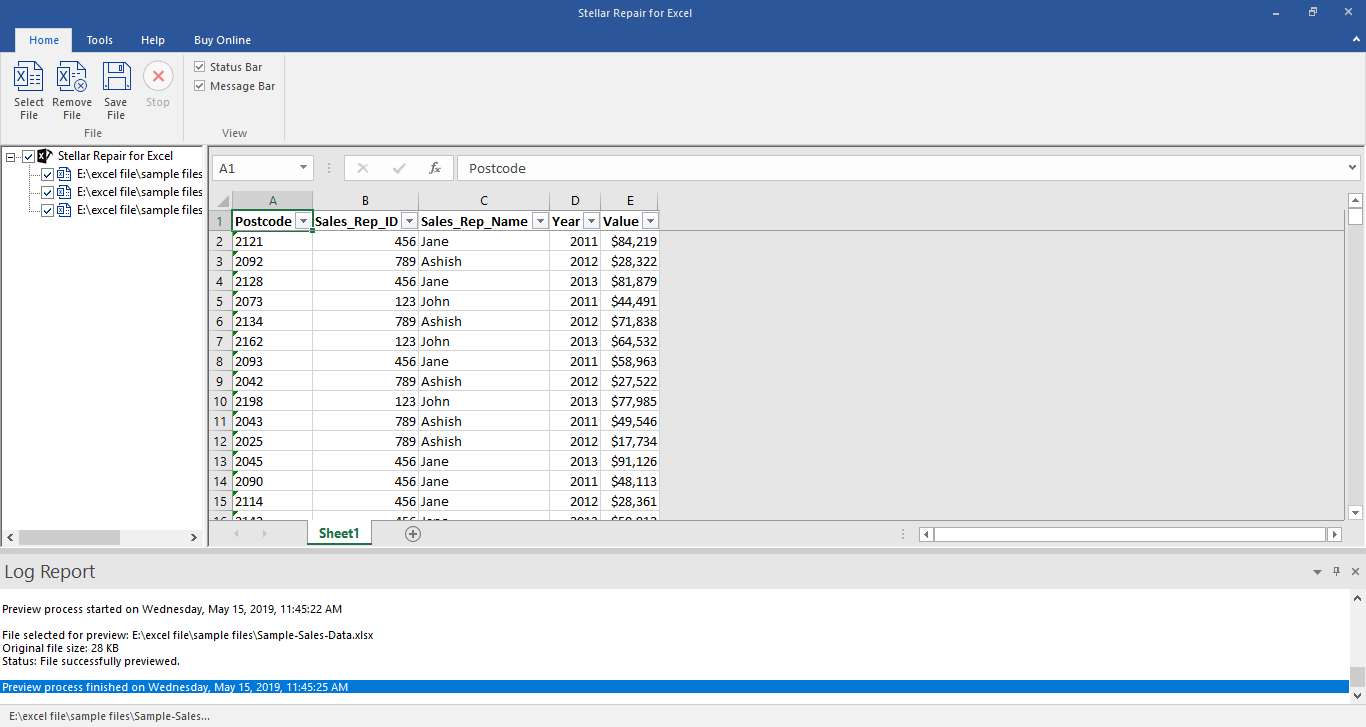
- The software provides the preview facility. You can check the it on left pane.
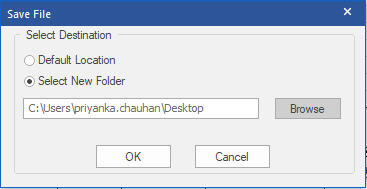
- Save the repired filr ether Default location or Select New Folder radio button.
Stellar Repair for Excel Stellar Repair for Excel is the best choice for repairing corrupt or damaged Excel (.XLS/.XLSX) files. This Excel recovery software restores everything from corrupt file to a new blank Excel file.
How to fix Pivot Table Field Name is not Valid error in Excel?
The Pivot Table field name is not valid error can occur while creating, modifying, or refreshing data fields in the pivot table. It can also appear when using VBA code to modify the pivot table. It usually occurs when there is an issue with the field name in a code or if there is a hidden or empty column in the pivot table. However, there could be many other reasons behind this error.
Why the “Pivot Table Field Name is not Valid” Error Occurs?
You can get the “Pivot Table field name not valid” error in Excel due to several reasons. Some possible causes are:
- Excel file is corrupted
- Damaged fields in the pivot table
- Pivot table is corrupted/damaged
- Hidden columns in the pivot table
- Macro (referring to the pivot table) is corrupted
- Preserve formatting option is enabled
- Missing or incorrect fields in the VBA code
- Issue with workbook.RefreshAll method syntax (if using)
- Pivot Table contains empty columns
- Header values or header column is missing in the Pivot Table
- Pivot table is created without headers
- Columns/rows are deleted from the Pivot Table
Methods to Fix Pivot Table Field Name is not Valid Error in Excel
You can get this error if you have selected the complete data sheet and then trying to create the Pivot Table. Make sure you choose only the data fields that you want to insert in the Pivot Table. If this is not the case, then follow the troubleshooting methods mentioned below.
Method 1: Check the Header Value in the Pivot Table
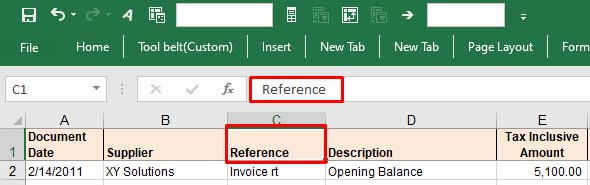
The “Pivot table field name is not valid” error can occur if you have not set up the pivot table correctly. All the columns having data in them should have header and header values. A pivot table without a header value can create issues. You can check the header and its value from the Formula bar. Change the header if the header value is too lengthy or if it contains special characters.
Method 2: Check and Change the Data Range in the Pivot Table
The “Pivot Table field name is not valid” can occur while modifying a field in Pivot Table. It usually occurs if you’re trying to add or modify the field by selecting an incorrect data range in the Create PivotTable dialog box. The “Create PivotTable“ feature helps define how data would be displayed within the pivot table.
Let’s take a scenario to understand this. Open the Excel file with PivotTable. Click on the fields (you want to add), go to the Insert option, and click PivotTable.

If you select an incorrect range, i.e. A1:E18, instead of correct range - “Expenses**!$A$3:Expenses!$A$4**,” you will immediately get the error message.
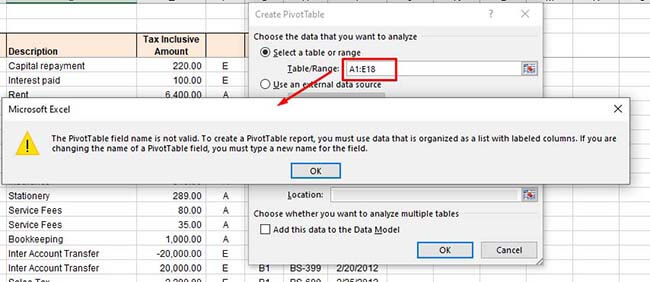
So, type the correct range under the Select a table or range option and click OK.
Method 3: Unhide Excel Columns/Rows
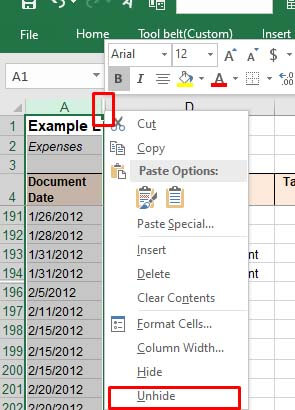
The error can also occur if some columns/rows of the Pivot Table’s data source are hidden. When you try to add a hidden column as a field in the PivotTable, the Excel application will fail to read the data of the hidden column. You can check and unhide the Excel columns by following these steps:
Open the Excel file.
Locate the hidden column number.
Move your cursor on the hidden column number and right-click on the space between the columns. Click Unhide.

Method 4: Check and Delete Empty Excel Columns
Sometimes, you can get the “Pivot Table field name is not valid” error if you are trying to use an empty column as a field in your Pivot Table. Check the columns with no values in all cells. If found, then delete the empty columns. This method is ideal for small-size Excel files. However, for large-sized files, it is a time-consuming process.
Method 5: Unmerge the Column Header (If Merged)
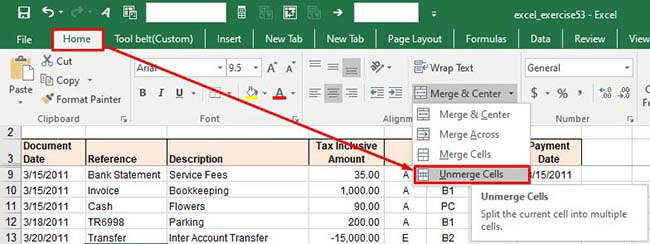
The “Pivot Table field name is not valid” error can also occur due to merged column headers. The pivot table references headers to identify the data inside the rows or columns. The merged headers can sometimes create data inconsistencies. You can try unmerging the column headers to fix the issue. Follow these steps:
In the Excel file, go to the Home
Click the Merge & Center option and select Unmerge Cells from the dropdown.
Method 6: Disable the Background Refresh Option
If the “background refresh” option in the Excel file is enabled, it may also create issues with Pivot Table. The Excel updates all the pivot tables in the background even after a small change if the background refresh option is enabled. This may create issues if the Excel file is large with too many tables. You can try turning off the “background refresh” option in the Excel file to troubleshoot the issue. Here is how to do so:
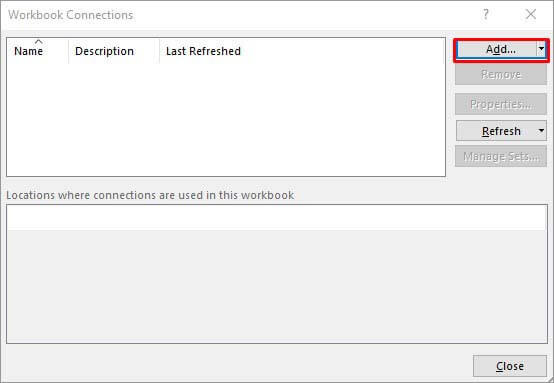
In the Excel file, go to the Data tab and then click Connections.
In the Workbook Connectionsdialog box, click on the ‘Add’ dropdown to add the workbook (in which you need to modify the refresh settings).
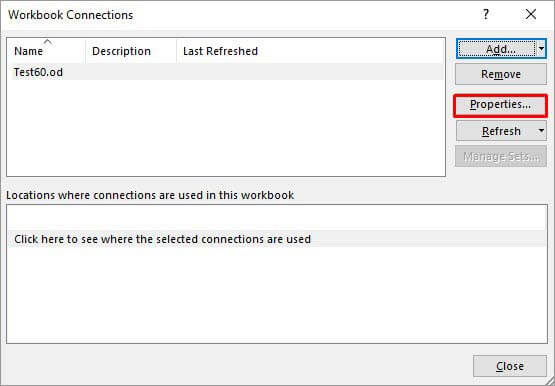
Once you have chosen the Excel file, click Properties.
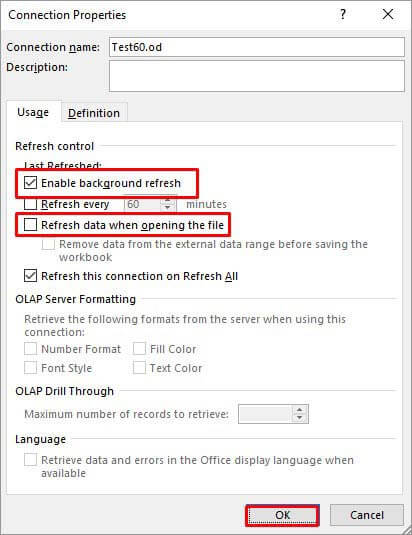
In the Connection Properties window, unselect the **”Enable background refresh”**option, select the “Refresh data when opening the file“, and click **OK.
**

Method 7: Check the VBA Code
The error can also occur when working with PivotTable using VBA code in Excel. Some Excel users reported this error on forums as run-time error 1004: The PivotTable field name is not valid. This error usually occurs when there are issues in the VBA code, affecting the PivotTable data source or field references. You can check field names referring to PivotTable or Workbook.RefreshAll function syntax and other errors in the code.
Method 8: Repair your Excel File
One of the reasons behind the “Pivot Table field name is not valid” error is corruption in the Excel file, containing the Pivot Table. You can repair your Excel file using Microsoft built-in utility - Open and Repair. Here’s how to use this utility:
In Excel, navigate to File > Open.
Click Browse to choose the affected workbook.
The Open dialog box will appear. Click on the corrupted file.
Click the arrow next to the Openbutton and then select Open and Repair.
You will see a dialog box with three buttons - Repair, Extract Data, and Cancel.
Click on the Repair button to recover as much of the data as possible.
After repair, a message is displayed. Click Close.

Method 9: Use a Professional Excel Repair Tool
If the Excel file is heavily damaged or corrupted, then the “Open and Repair” utility may not work or provide the intended results. In such a case, you can opt for a professional Excel repair tool. Stellar Repair for Excel is an advanced Excel file repair tool, which is highly recommended by experts. It can repair severely corrupted Excel files and restore all the data from corrupt file, including pivot tables. This tool comes with a user-friendly interface that even a non-technical user can use. You can try the software’s demo version to check how it works. The software is fully compatible with all Excel versions, including Excel 2019.
Conclusion
The Excel error “Pivot Table field name is not valid” can occur due to hidden or merged column/row headers, empty columns/rows, corrupted pivot table, and various other reasons. You can try the methods mentioned above to fix the error. If this error has occurred due to corruption in the Excel file, then you can use Stellar Repair for Excel - an advanced tool to repair corrupted pivot table, macros, fields, or other elements in an Excel file. It is compatible with all Windows editions, including the latest Windows 11. It can help fix the error if the data source or Pivot table configuration is affected by corruption.
4 Ways to extract data from corrupt Excel file
Summary: Excel files can become corrupt due to numerous reasons. This blog will discuss the reasons behind the corrupted Excel files. Sometimes the file becomes inaccessible. This post includes four ways to extract data from a corrupt Excel file. It also mentioned Stellar Repair for Excel to repair severely corrupted files. The tool helps you recover data from damaged Excel files with complete integrity.

Imagine the frustration of an employee if an Excel workbook he took hours to complete became corrupted for some reason threatening to erase all the data saved in it. Not just that, a corrupted Excel workbook can wreak havoc for the organization too since it poses a risk of permanently deleting critical business information like work records or employee trackers.
Unless a backup of all important Excel files exists, recovering data lost due to damage/corruption to them is next to impossible. However, we’ve conducted some research and found some pretty neat hacks to help you extract data from corrupt excel files without much hassle.
Primary reasons triggering Excel file corruption
As we always point out, to solve a problem for good, getting to its root is imperative. Here are the main reasons that cause Excel file corruption. Knowing these reasons can help you keep Excel corruption at bay for a considerably long time.
- Abrupt system shutdown when you’re editing an Excel sheet
- Bugs / Defects in your Excel application or installation
- Hardware failures like bad sectors on the hard drive where Excel sheets are saved
- Virus Infection / Malware Attack
- Excessive data storage within a single Excel file
- Faulty Excel Macros and CSE Formulas
Depending upon the extent of damage, there can be several ways to perform corrupt Excel file repair.
How to repair corrupt Excel files?
There are a couple of manual methods that can help you repair corrupt Excel files .
- If the damaged Excel sheet can be opened, immediately save its copy; thereafter:
- Open it with a later version of Excel and save it as a new workbook.
- If this doesn’t work, open it in Excel’s latest version and save the workbook in HTML or HTM format.
- Once this is done, reopen the HTML file and save again in XLS format.
- Lastly, open the file and try saving it in SLK format (symbolic link)
Note: It is important to note that saving an Excel workbook in HTML format causes loss of features like custom views, scenarios, unused styles or number formats, natural language formulas, data consolidation settings, custom function categories, etc. In SYLK format only the active worksheet is saved so if using this method, you’ll need to repeat these steps for each worksheet.
- Use Excel’s inbuilt Repair function as follows:
- Launch Microsoft Excel and go to Office button -> Open
- In the Open dialog box, select the damaged Excel file
- On the bottom-right corner of the Open dialog box, you will find a drop-down next to Open Click on it and select Open and Repair
- This will launch the inbuilt Repair module of Excel and you’ll see a dialog box asking you to select an option from Repair or Extract Data
- Click on Repair to initiate the repair process.
- If this doesn’t work, repeat steps 1-4, and when Excel asks you to select an option, select Extract Data from corrupt excel file. Thereafter, follow the instruction Excel shows and you should be able to retrieve your data, but you may end up losing some formulas.
- If you cannot open the Excel, download Spreadsheet viewer from the Microsoft website and open the file using this program. Thereafter copy all data into a new Excel.
Note: This method will cause much of your formatting, formulas, and more to be lost.
- You can download Open Office from its official website OpenOffice.org and try opening the Excel in it. The two programs are very similar so all data should automatically align in the correct place and with the correct formatting.
Note: With this method, VBA code cannot be recovered due to incompatibility between OpenOffice.org and Excel.
Full-proof method for corrupt Excel file repair
If you find the above methods confusing, or you wish to perform Excel file repair without having to face any data and formula loss, or you cannot achieve the desired results with any of these methods, stop wasting any more time with methods that will only frustrate you more. Instead, download the sure-shot solution for dealing with severe Excel corruption –Stellar Repair for Excel and relax!
Stellar Repair for Excel is the best choice for repairing corrupt or damaged Excel (.XLS/.XLSX) files and restoring everything to a new blank Excel file. This competent software can skillfully repair single as well as multiple XLS/XLSX files while preserving worksheet properties and cell formatting. If you have this product by your side, you don’t need to worry about Excel corruption errors ever again.
To Conclude
Instead of giving up on corrupted Excel sheets, try repairing them with the simple tricks we’ve described. And if they don’t work, keep calm and turn to Stellar Repair for Excel.
[Solved] Excel Spreadsheet Disappears after Opening
Several Excel users have reported about experiencing ‘Excel spreadsheet disappears after opening’ issue. The problem occurs when attempting to open an Excel file by double-clicking on the file icon or name. The Excel file opens blank grey screen.

Figure 1 - Excel Blank Screen
User Instances of ‘Excel Open But Can’t See Spreadsheet’ Issue
Instance 1: The user said that “Excel 2016 opens to a blank screen and everything is greyed out. Ribbons at the top of Excel are also not present”.
Instance 2: The user reported that “Attempting to open a spreadsheet, either by double-clicking the file or by opening Excel, it opens but only a blank Excel window is visible. When trying to save that particular file, Excel behaves as though there is no file open at all and all the file saving options, such as save, save as, print, etc. are greyed out.”
Causes Behind ‘Excel Open But Can’t See Spreadsheet’ Issue & the Solutions Thereof
Following are some of the possible reasons behind the ‘Excel open but can’t see spreadsheet’ issue, along with their solutions:
Cause 1: Excel File is Hidden
You may have saved the Excel sheet as a hidden document.
Solution: Unhide Excel File
Verify if your Excel worksheet is hidden by following these steps:
- In Excel, click the View tab, and then click Unhide.
Note: If the ‘Hide’ tab under the View menu is greyed out, the sheet you’re trying to open is not hidden. In that case, proceed to the next workaround.

Figure 2 - Unhide Excel File
- A dialog box will pop-up showing the worksheet name that can be unhidden. For instance, below is an image of Unhide box that lists ‘Daily_Reports’ spreadsheet under Unhide workbook.

Figure 3 – Select and Unhide Excel Workbook
- Click OK to unhide your Excel sheet.
If this fails to work, there’s a possibility that the spreadsheet window pane may have slided to one side of the visible desktop. To bring back the displayed area, click the ‘Arrange All’ option under the View tab. If the issue persists, try the next solution.
Cause 2: Ignore Dynamic Data Exchange (DDE) Option is Enabled
Another reason behind the ‘Excel opens to a blank screen’ issue could be that the “Ignore other applications that use Dynamic Data Exchange (DDE)” checkbox is checked in Excel options.
Usually, when you double-click an Excel file, a DDE message is sent to Excel instructing it to open that particular file. But, if you have the ‘Ignore DDE’ option selected, the DDE message sent to Excel to open a workbook is ignored. As a result, the Excel workbook opens a blank screen.
Solution: Uncheck the Ignore DDE Option
Make sure that the ‘Ignore DDE’ option is unchecked by performing these steps:
Note: Skip these steps for Excel 2019 and Excel Office 365.
- In your Excel window, click File > Options.

Figure 4 - Select Excel Options
- From the left-side of the ‘Options’ window, choose Advanced.
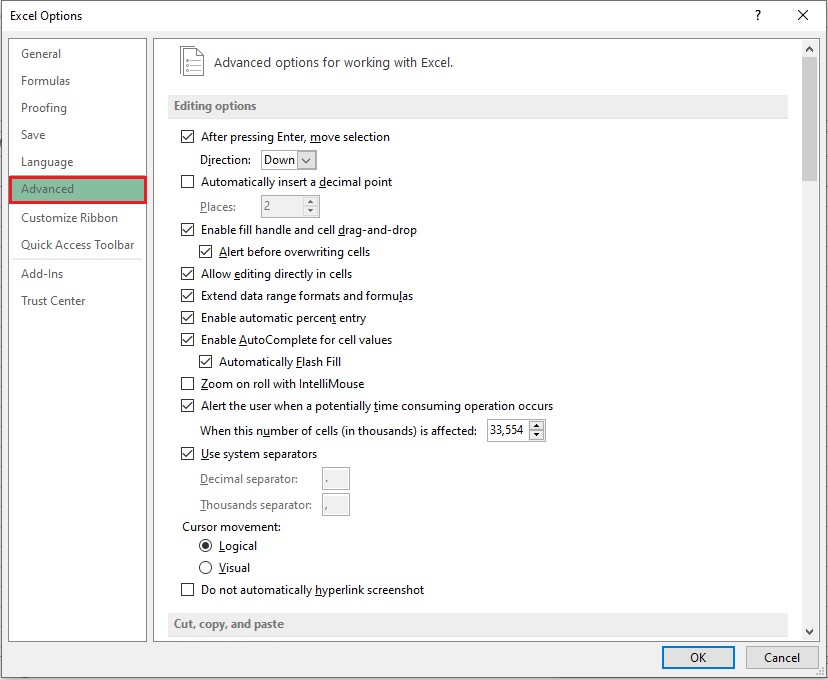
Figure 5 - Excel Options Window
- In ‘Advanced’ window, locate the General section, and then uncheck the “Ignore other applications that use Dynamic Data Exchange (DDE)” checkbox.
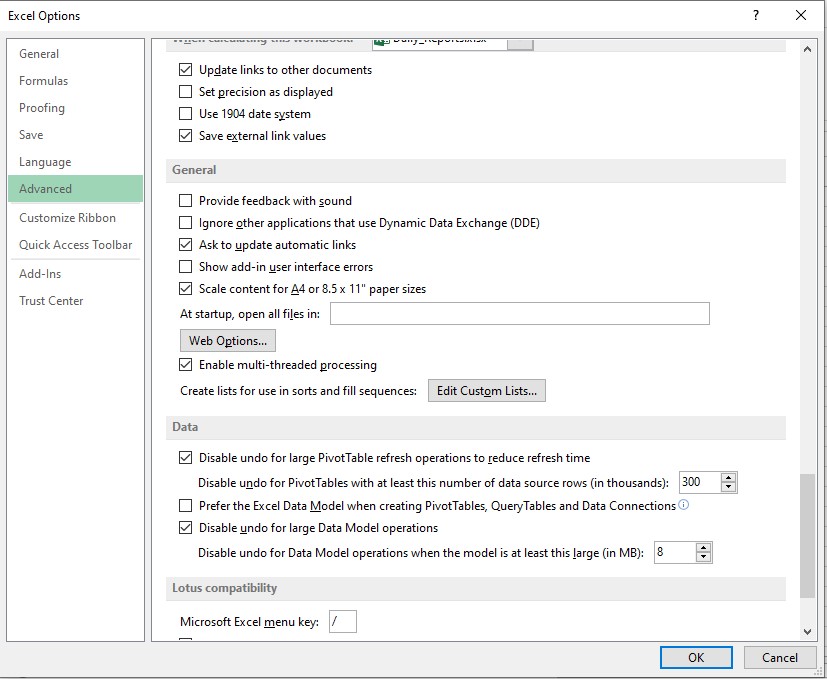
Figure 6 - Uncheck Ignore Other Applications that use DDE
- Click OK to apply the changes.
If these steps don’t work, proceed to the next workaround.
Cause 3: Issue within Office Program
Sometimes, problem within your Microsoft Office program might cause Excel to behave oddly and may result in an Excel spreadsheet disappeared issue.
Solution: Repair Office Program
Try repairing your Office program by executing the steps listed below, based on your Windows OS:
For Windows 10:
- Type Settings in the Windows search box.
- Click Settings.
- In ‘Windows Settings’ screen, select Apps.
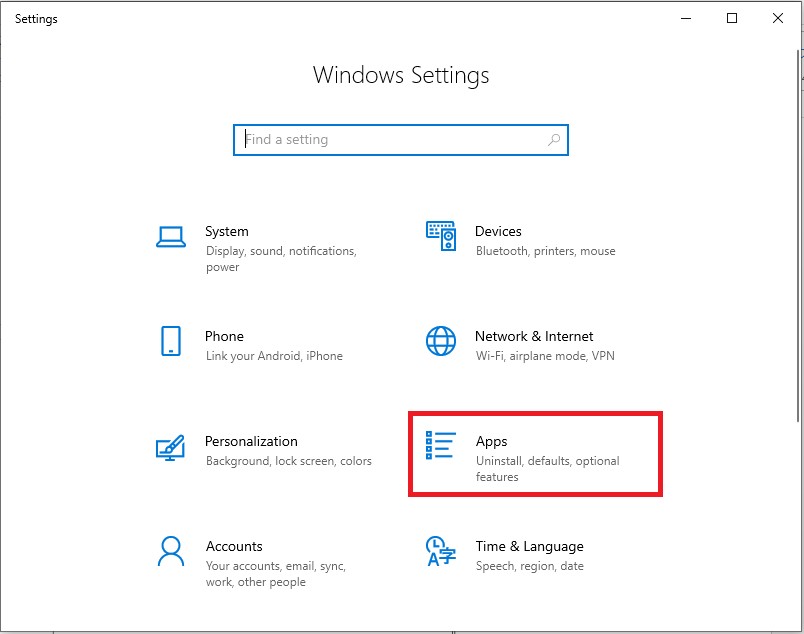
Figure 7 - Windows Settings Screen
- In ‘Apps & features’ screen, scroll down to your Microsoft Office program and tap on it, and then click the Modify

Figure 8 - Modify MS Office Program
- In ‘How would you like to repair your Office programs’ dialog box, select the Online Repairradio button, and then click the Repair
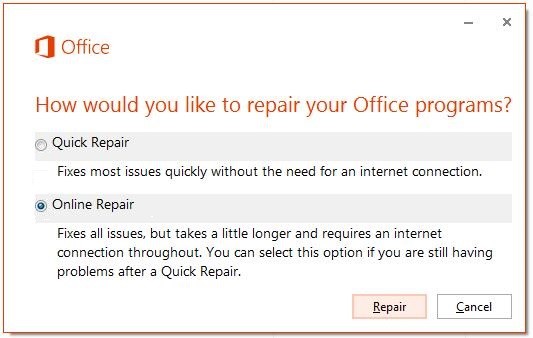
Figure 9 - Repair MS Office Program
For Windows 8:
- Open Control Panel and click the Uninstall a program option under Programs.
- Select Microsoft Office 365 and then click Change.
- In the window that opens, select Online Repair and then hit the Repair
You may be asked to restart your system after completion of the repair process.
For Windows 7:
- In ‘Control Panel’ window, double-click Programs and Features.
- Under Uninstall or change a program section, select the Office program, and then select Change.
- In the dialog box that appears, choose Online Repair and then choose Repair.
If repairing your Office installation fails to resolve the issue, continue to solution 4.
Cause 4: Problematic Excel and COM Add-ins
Sometimes, Excel and COM add-ins may cause Excel file open a blank grey screen problem.
Solution: Disable the Add-ins
Disabling the Excel and COM add-ins one at a time may help resolve the problem. The steps are as follows:
- Click the File menu in your Excel file and select
- From ‘Excel Options’ left-side panel, click Add-Ins, and then choose COM Add-ins from the ‘Manage’ drop-down. Click the Go
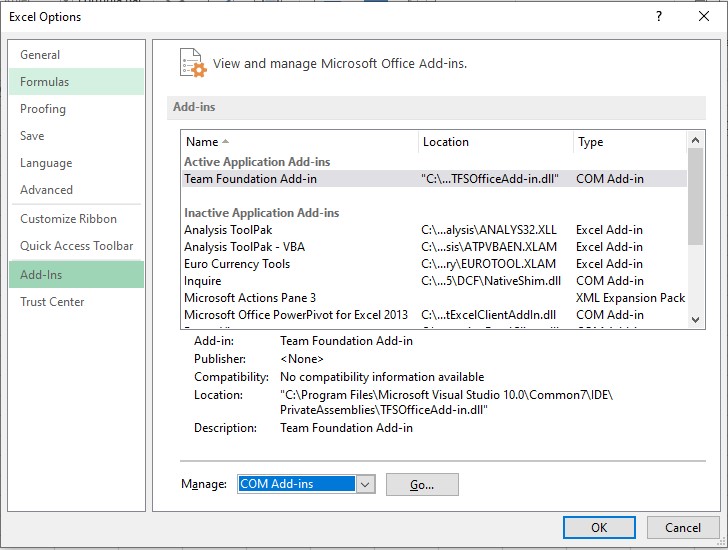
Figure 10 - Select COM Add-ins
- Uncheck one of the add-ins checkbox from the COM Add-ins window, then select OK.
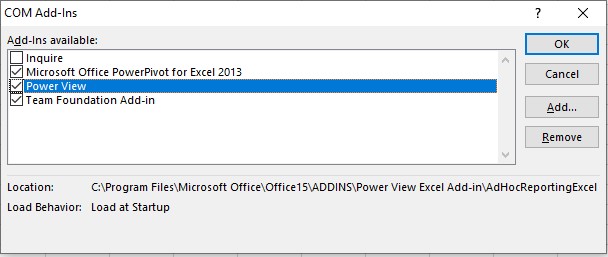
Figure 11 - Uncheck and Disable COM Add-ins
- Restart your Excel program.
If the issue persists, repeat the above steps (1 till 4), except that you need to choose a different add-in in step 3.
If you’re still experiencing the same problem after unchecking all the COM add-ins, repeat all the above steps, except choose ‘Excel Add-ins’ in step 2.
If Excel can load the file, then the add-in that you disabled last leads to the problem. If turning off add-ins does not work, try the next solution.
Cause 5: Problem with Excel File Associations
The Excel file opening a blank screen problem may occur if the file associations are not performing correctly.
Solution: Reset Excel File Associations
Try resetting the file associations in Excel to their default settings. For this, follow the below steps based on your OS.
For Windows 10 and Windows 8.1:
- Select the file that is opening incorrectly and copy it to the desktop.
- Right-click the file and click Properties.
- In the File’s ‘Properties’ window, check your file type next to Type of Filefrom the General tab. For instance, (.docx), (.csv), or (.pdf).
- Next, check to which app your file is associated with from the Opens withoption
If the file type is different than .xlsx, open the file in a different application by following these steps:
- Click the Change button next to the ‘Opens with’ option.
- Click More apps.
- From the list of applications, select the desired app and then check the Always use this app Click OK.
For Windows 8:
- Open Control Panel, click Default Programs, and then select Set your default programs.
- Choose Excel and then tap the Choose default for this program
- In ‘Set Program Associations’ window, choose Select All and then click Save.
For Windows 7:
- In Control Panel, choose Default Programs.
- Click the Associate a file type or protocol with a specific program
- Choose Microsoft Excel Worksheet and click on change program.
- Choose Microsoft Excel under Recommended Programs.
- If you’re unable to find Excel, browse the Excel installation folder.
- Select exe and then choose Excel.
What Next? Use Stellar Repair for Excel to Recover Your File
If the above solutions don’t help recover your Excel file, use an Excel file repair tool, such as Stellar Repair for Excel to recover it. The software can restore the Excel spreadsheet and its components, including tables, pivot tables, charts, formulas, etc. while preserving the spreadsheet properties and formatting.

Check out the video to recover Excel file by using Stellar Repair for Excel software.
Conclusion
This article described the possible causes behind the ‘Excel open but can’t see spreadsheet’ issue, along with their solutions. The manual solutions to resolve the issue require time and efforts. But, if you need to access your Excel file without any delay, use Stellar Repair for Excel software to recover your .xlsx/.xls file in just a few clicks.
Get Rid of corrupt Excel File
Summary: What to do when an Excel file is corrupted? This is a common question that is often asked by Microsoft Excel users. If you too are seeking an answer to this question, read the blog to learn about a few manual workarounds and a specialized Excel file repair tool to resolve the Excel file corruption issue.
An Excel file gets corrupted due to various reasons such as a virus/malware attack, sudden system shutdown when the Excel file is still open, power failure while working with an Excel spreadsheet, etc.
When Microsoft Excel detects corruption in a workbook, it attempts to repair the workbook by starting ‘File Recovery mode’.
Tip! If the file recovery mode doesn’t start, you may use the manual repair process or an Excel repair tool, such as Stellar Repair for Excel to repair a corrupted Excel file. The software can help you quickly retrieve contents from a damaged, corrupt, or inaccessible Excel file and restore the file to its original state.
There even exist a few manual tips that can be used to recover data from damaged MS Office Excel files.
Workarounds to Use When an Excel File is Corrupted
Note: Before carrying out any of the repair and recovery workarounds, it is advised that you must save a backup copy of the damaged file. This is to prevent your files from turning completely inaccessible in case the methods fail to give desired results.
Workaround 1: Use the Open and Repair Method
If MS Excel cannot repair a corrupted workbook automatically, you can try to do it manually. To do so, perform the following:
- Open the corrupt file, like you normally open any file, by clicking File > Open.
- Browse and locate the folder containing the corrupted document.
- When the Open dialog box is displayed:
- Select the Excel document.
- Click on the arrow present to the right side of the Open button and select Open and Repair option.

Figure 1 – Open and Repair Feature
If this doesn’t help repair the broken Excel file or you encounter Open and Repair does not work issue, proceed with the next workaround.
Tip! Try an alternative solution, i.e. Stellar Repair for Excel software to repair and recover corrupt Excel files (.xlsx or .xls) when the ‘Open and Repair’ method won’t work.
Workaround 2: Restore an Excel File with a Shadow Copy
If you’re a Windows 7 or Vista user, you can try restoring the corrupted spreadsheet by using a shadow copy (or a previous version). [Shadow copy](https://en.wikipedia.org/wiki/Shadow_Copy#:~:text=Shadow%20Copy%20(also%20known%20as,the%20Volume%20Shadow%20Copy%20service .) is basically a snapshot (backup copy) of computer files or volumes. The snapshot may contain an older version of your Excel file that has become damaged now. To find out, do the following:
- Launch File Explorer, and right-click the folder in which the file is saved.
- Choose Properties.
- Look for and click the Previous Versions tab. This will display a list of entries under Folder versions or File versions, going back a few days or weeks.
- Double-click one with a date when the file was accessible and could be read. Then, try to open its older version. If it opens, save the older version with a new name and execute the procedure with new file/folder entries.

Figure 2 – Volume Shadow Copy
You would have to repeat the process until you reach the point where the file became damaged. With this, you will get a baseline version of the file, but data may still have been lost.
Workaround 3: Test your Assumptions
If you receive a message saying “Excel file corrupted and cannot be opened”, you would probably believe it. However, there could be other reasons besides corruption that may cause Excel to throw this error message.
Your Office suite, which Excel is a part of, maybe having some primary issues in it causing problems while opening one Excel document. So, try opening another Excel file to check if the problem exists with all the files or just one.
If other Excel documents work correctly, it means that only the particular document is corrupt. On the contrary, if the issue is with your Office suite, repairing the current Office installation may help fix the issue. For this, perform these steps:
- Go to Control Panel and click Uninstall the Program.
- Choose Office.
- Click Change, and hit the Repair button.
You can reinstall the entire Office package. Once reinstalled, try to open the file to check if the issue has been fixed and the Excel file repaired.

Figure 3 – MS Office Repair
Workaround 4: Use Excel File Repair Tool
If the above manual solutions fail, use Excel repair software to successfully repair your damaged Excel workbook and recover all its data. Essentially, the software rebuilds damaged Excel workbook data at a granular level to recover every single object & all the original properties of the workbook.
Suggested Read: How to repair corrupt Excel files using Stellar Repair for Excel?
Why Use Stellar Repair for Excel Software?
- Repairs severely corrupted XLSX and XLS files.
- Can handle corrupt Excel files of any size.
- Demo version allows previewing recoverable Excel file items for free.
- Supports Microsoft Excel 2019 and all lower versions.
- Compatible with Windows 10 and lower versions.
- Tested and recommended by Microsoft Excel MVPs.

Final Word
When an Excel file is corrupted, it won’t open at all or you won’t be able to access all the file data. Such a situation can lead to unnecessary halts, impacting work productivity.
There are manual workarounds that may help fix the corrupt Excel file and recover its data, such as the ones covered in this blog. However, these solutions might not work in severe corruption cases and may require technical assistance. Also, they may result in some data loss.
To overcome the limitations of manual workarounds, it is recommended to go for a professional Excel file repair tool such as Stellar Repair for Excel . It helps repair corrupt Excel (XLS or XLSX) files and restores all worksheet data, such as the table, chart, chart sheet, cell comment, sort and filter, image, formula, etc. in a few simple clicks. Moreover, the software provides a free preview of the recoverable data with its demo version. You can check the preview to evaluate how the software works.
Top 5 Ways to Fix Excel File Not Opening Error
Summary: MS Excel users sometimes face issues while using the MS Excel application. One such issue is the Excel file not opening error. In this post, we’ve mentioned the reasons that may result in this error and the ways to resolve it. Also, you’ll find about an Excel repair software that can help you repair corrupt Excel files.
Several Microsoft Excel users have reported encountering the ‘Excel file not opening’ error when opening their Excel file. There are several reasons that may cause this error. In this post, we’ll be discussing the reasons that may lead to the ‘Excel file not opening’ error and the top 5 ways to fix this error.
Why Does the ‘Excel File Not Opening’ Error Appear?
Following are some possible causes that may result in the ‘Excel file not opening’ error:
- There may be a problem with an add-in that is preventing you from opening the Excel files.
- There’s a chance that your Excel application is faulty.
- Your Excel program is unable to communicate with other programs or the operating system.
- The file association might have been broken. This is a common problem faced by users who have upgraded their Excel application or operating system.
- The file you’re trying to open is corrupted.
5 Ways to Fix Excel File Not Opening Error
Let’s explore the ways to resolve the Excel file not opening error:
1. Uncheck the Ignore DDE Checkbox
Dynamic Data Exchange (DDE)allows Excel to communicate with other programs. The Excel error may occur due to incorrect DDE settings. You need to ensure that the correct DDE configuration is enabled. Follow the steps provided below:
- Launch your MS Excel file.
- Go to File > Options.

- Now click on Advanced.

- Further, find the General option on the screen.

- Uncheck the option **‘Ignore other applications that use Dynamic Data Exchange (DDE)**’.
- Click OK to save the changes.
2. Reset Excel File Associations
When you launch your Excel file, the file association ensures that the Excel application is used to open the file. You can try to reset these associations and see if Excel opens after this. Proceed with the following steps to do so:
- Navigate to Start Menu and launch Control Panel.
- Now, navigate to Programs > Default Programs > Set Your Default Programs.

- A new window will open. Herein, find the Excel program in the list and select it. Now, select the option ‘Choose defaults for this program’. Click OK.

- A new window for ‘Set Program Associations’ will open.
- Check the box against the ‘Select All’ option.
- Further, click Save to reset the Excel File Associations settings.

3. Disable Add-Ins
Many people install third-party add-ins to enhance the application’s functionality. Sometimes, these add-ins can create an issue. Follow the below-mentioned steps to disable the problem creating add-ins:
- Launch MS Excel application.
- Navigate to File > Options > Add-ins.

- In the window that opens, go to the Manage option at the bottom.
- Herein, select the COM Add-ins option from the dropdown list. Click Go.

- In the COM Add-ins window, uncheck all the boxes to disable the add-ins. Click OK.

4. Repair MS Office Program
Sometimes the issue is not with your Excel file. Instead, the reason for the error can be a corrupt MS Office application. You can repair the program to fix the Excel file not opening error. Here are the steps:
- Press the Windows + R keys to launch the ‘Run’ dialog box.

- Enter the text ‘appwiz.cpl’ to launch the program and features window.

- Find the MS Office program in the list of applications.

- Right-click on it and select Change.

- In the new window, select the Quick Repair radio button. Click Repair.

- Follow the on-screen instructions to repair the Office application. Once the repair process is completed, you can try opening the Excel file to see if the problem is resolved.
5. Disable Hardware Graphics Acceleration
The hardware graphics acceleration assists in the system’s better performance, especially when you use MS Office applications, like MS Excel or Word. Sometimes, this causes the Excel file not opening issue. You can disable this option to try to resolve the issue. Here are the steps:
- Launch your MS Excel application.
- Navigate to File > Options > Advanced.
- Herein, go to the Display option.
- Uncheck the Disable hardware graphics acceleration checkbox. Click OK.

What If These Solutions Do Not Work?
If you have applied all the methods mentioned above and still cannot open your Excel file, there are chances that your file is corrupted. You can use a specialized Excel repair tool , such as Stellar Repair for Excel to repair the corrupted Excel file. This software has powerful algorithms that can scan and repair even severely corrupt Excel files, without any file size limitation. After repairing the file, it restores all the data, including tables, charts, rules, etc. to a new Excel, with 100% integrity.
To know how the software works, see the video below:

Conclusion
Before you proceed with resolving the Excel file not opening error, try to find out the root cause of this error. If you know the real reason, you can try the method right away. If the reason for the error is corruption in the Excel file, the best option is to repair the file using a professional Excel repair tool, such as Stellar Repair for Excel .
Data Disappears in Excel - How to get it back
Summary: You may face the issue of ‘Excel spreadsheet data disappeared’ after changing Excel file properties and formatting rows and columns. This blog discusses the possible reasons for data disappearance and the solutions to fix the issue. Also, it mentions an Excel file repair tool to retrieve the data from the file. Sometimes, while editing or formatting a cell in an Excel spreadsheet, the data may go missing or disappear. Let’s discuss in detail the reasons that may cause the ‘Excel data disappeared’ issue along with the solutions.
Probable Reasons for Data Disappearing in MS Excel and Solutions Thereof
Reason 1 – Unsaved Data
While entering data in an Excel spreadsheet, it is important to save the data at frequent intervals. Doing so prevents any unsaved data from disappearing if you lose power or accidentally click ‘No’ when prompted to save the file. Unfortunately, such a situation is quite common as users often close the file without saving the recently made changes to a spreadsheet.
Solution – Use the ‘AutoSave’ Feature
With the AutoSave feature enabled in Excel, data won’t be lost in the event of power failure or abruptly closing the Excel program. By default, Excel automatically saves the information in a spreadsheet after every 10 minutes. You can reduce the limit to a few seconds to reduce the chances of Excel file data lost after being saved.

Reason 2 – Changing Excel Format
You can save an Excel file in various formats, like spreadsheet, text, webpage, and more. However, at times, saving the spreadsheet in a different format may lead to missing data. For example, when you save a workbook to a text file format, all formulas and calculations applied to the data will be lost.
Solution – Adjust a Spreadsheet for the Changed Format
If you’re changing the format of a spreadsheet, make space for the rows and columns. Also, remove all calculations before saving the file.
Note: If the sheet is shared on multiple computers, then save the file in compatibility mode.
Reason 3 – Merging Cells
You can combine two or more cells data to make one large cell. This technique is primarily used to fit the text of a title in a sheet. If there is data in two or more cells, then only the data in the top-left cell is displayed and the data in all other cells is deleted. If the other merged cells have been populated with data after merging, the data is not featured and it does not appear even after remerging the cells.
Solution – Merge Cells inside One Column
To merge cells without data loss, combine all the cells you want to merge within a column and do the following:
- Select the cells to be combined.
- Ensure that column width is wide enough to fit the contents of a cell.
- In the spreadsheet, under the Editing group, click ‘Fill,’ and then click ‘Justify.’

- Under Alignment, click on the ‘Merge & Center’ option to center align the text. Or, click on ‘Merge Cells’.
Note: This solution works for text only. You cannot use it to merge formulas or any numerical values. If you need to combine two or more cells with formula into a single cell, try using the Excel CONCAT function .
Reason 4 – Cell Formatting
Cells and text in the cells can be displayed in different colors to make the spreadsheet simple to create and infer. You may experience data loss when you try to modify the data or change the color or size of the data. Though the information may exist, the data may show an error due to the following reasons:
- White-colored text will not show in a white-colored cell
- Large font-sized data may not appear in small-sized cell
- Calculations may show (#VALUE) error after cell-formatting
Solution – Check and Clear Formatting
Make sure to use dark-colored text on a white-colored cell. Also, resize the cell to fit the text size. Check if numbers in a cell are entered as text. If so, you need to apply a number format to the text-formatted numbers. Read more about it, from here .
What Else You Can Do to Resolve the ‘Excel Data Disappeared’ Issue?
If you can’t recover the missing Excel file data, try to repair or extract the data from the file using the built-in Excel repair tool. Follow the below steps to use the tool:
- Open MS Excel, click File > Open > Computer > Browse.
- On the ‘Open’ window, select the file you want to repair and then click on the Open dropdown.
- Select Open and Repair.

Use the ‘Repair’ option to repair the file and recover as much data as you can from the repaired file. If this doesn’t work, use the ‘Extract’ option to recover the data.
If you fail to retrieve the disappeared data from that file using the above-listed steps, opt for an Excel repair tool , like Stellar Repair for Excel. This software has a proven track record of repairing corrupt or damaged Excel files and recover all the data.
The software helps:
- Fix all corruption errors. It helps in getting back the data which has disappeared.
- Repair a single as well as multiple Excel files.
- Recover all components of XLS/XLSX files – tables, chart sheet, cell comment, image and more.
- Preserve the worksheet properties and cell formatting.
- Support the latest Excel 2019 and earlier versions.
The Excel repair software repairs the Excel file in these simple steps:
- Launch and open the software.
- Select the corrupt Excel file by using the ‘Browse’ option. If the file location is not available, then find the Excel file using the ‘Search’ option.

- Click ‘Repair’ to scan the corrupt file.

- Once the repair process is complete, verify the components of Excel file and check if the available preview shows complete data that disappeared from Excel.

- Save file at default location or preferred location.

The Excel file with all the restored data will be saved at the selected location.
Conclusion
It is better to repair the affected Excel file than suffer the loss when data or text disappears in Excel. A professional software ensures that users get back all the data in the form of a new Excel file. Stellar Repair for Excel software repairs the corrupt file without modifying the original content and file format. The software’s easy-to-use user interface lets you perform the functions without formal software training and technical expertise.
Also read:
- How to Restore iPhone XS from Backup when iTunes Backup is Corrupt or not compatible | Stellar
- How to rescue lost call logs from Infinix Note 30i
- How to Repair Excel File Name is Not Valid Error | Stellar
- How to Repair corrupt MP4 and AVI files of Note 30i with Video Repair Utility on Mac?
- 5 Easy Ways to Copy Contacts from Tecno Pova 5 to iPhone 14 and 15 | Dr.fone
- How To Transfer Data From iPhone 13 Pro To Other iPhone 15 Pro Max devices? | Dr.fone
- How To Restore Missing Messages Files from Gionee F3 Pro
- How to Honor 90 Get Deleted photos Back with Ease and Safety?
- 5 Techniques to Transfer Data from Google Pixel 8 Pro to iPhone 15/14/13/12 | Dr.fone
- How to Restore iPhone without Backup | Stellar
- How to Recover Deleted Notes from iPhone XS Max? | Stellar
- How to Recover Deleted Photos from Android Gallery App on Itel
- How to restore wiped music on C55
- 2 Ways to Transfer Text Messages from Realme Narzo 60 5G to iPhone 15/14/13/12/11/X/8/ | Dr.fone
- How To Install the Latest iOS Beta Version on iPhone XR? | Dr.fone
- How to recover lost data from Tecno Camon 20 Premier 5G?
- How to recover old call logs from your Samsung Galaxy A05?
- 5 Techniques to Transfer Data from Honor X50 GT to iPhone 15/14/13/12 | Dr.fone
- How to Restore Deleted HTC U23 Pictures An Easy Method Explained.
- 5 Easy Ways to Copy Contacts from Honor X50 GT to iPhone 14 and 15 | Dr.fone
- 4 Ways to Transfer Music from Asus ROG Phone 7 Ultimate to iPhone | Dr.fone
- How to Restore Deleted Samsung Photos An Easy Method Explained.
- How to recover old messages from your Oppo
- How To Recover Lost Data on iPhone 6s Plus? | Dr.fone
- How to Fix iPhone 14 Plus Storage Not Loading/Showing | Stellar
- How to Fix Corrupt video files of X6 Pro using Video Repair Utility?
- How to retrieve erased videos from Meizu
- How to Retrieve deleted photos on Vivo S17e
- How to Sign a .wbk file document online
- Can Life360 Track Or See Text Messages? What Can You Do with Life360 On Motorola G24 Power? | Dr.fone
- In 2024, Top Apps and Online Tools To Track Realme GT 3 Phone With/Without IMEI Number
- How to Stop My Spouse from Spying on My OnePlus Ace 2V | Dr.fone
- Updated Top 9 AMV Makers for Computer
- 9 Quick Fixes to Unfortunately TouchWiz has stopped Of OnePlus Nord N30 5G | Dr.fone
- The way to get back lost videos from Infinix Smart 8
- Updated 2024 Approved Live Chat With WooCommerce Your Gateway to Successful Live Selling
- How to Transfer Photos from Vivo T2 Pro 5G to Laptop Without USB | Dr.fone
- In 2024, How to Unlock Itel P55 5G Phone without PIN
- 3 Best Tools to Hard Reset Xiaomi Redmi Note 13 Pro 5G | Dr.fone
- How to Transfer Photos From Realme C51 to Samsung Galaxy S21 Ultra | Dr.fone
- How To Unlock Stolen iPhone 6 In Different Conditionsin
- Apple ID Locked for Security Reasons From Apple iPhone 14 Plus? Find the Best Solution Here
- Updated 2024 Approved 15 Types of Cartoon Drawing Styles Examples
- How to Change/Fake Your Oppo Reno 10 Pro+ 5G Location on Viber | Dr.fone
- How to Factory Reset Xiaomi Redmi Note 12 5G in 5 Easy Ways | Dr.fone
- How to watch AVCHD MTS video on Samsung Galaxy S23 Tactical Edition?
- In 2024, Catch or Beat Sleeping Snorlax on Pokemon Go For Poco X5 Pro | Dr.fone
- Title: How to Recover Deleted Excel 2016 Files on Mac Complete Guide | Stellar
- Author: Nova
- Created at : 2024-05-19 18:32:14
- Updated at : 2024-05-20 18:32:14
- Link: https://blog-min.techidaily.com/how-to-recover-deleted-excel-2016-files-on-mac-complete-guide-stellar-by-stellar-guide/
- License: This work is licensed under CC BY-NC-SA 4.0.
