
How to Recover Deleted iPhone 11 Camera Roll Photos and Photo Stream Pictures? | Stellar
How to Recover Deleted iPhone Camera Roll Photos and Photo Stream Pictures?
Your iPhone is not only a medium to connect but also serves as a personal repository for your priceless photos, videos, and music. However, in case your iPhone crashes or you lose files due to accidental deletion, your data stands at risk and may be lost forever. But with Stellar Data Recovery for iPhone, your data is here to stay. This professional solution helps to retrieve your lost or accidentally deleted photos, audio, as well as video files from Camera Roll, Photo Stream, and App Library. It also offers a complete recovery of your iPhone data such as Contacts, Messages along with attachments, Notes, Call History, Calendars, Safari Bookmarks, iTunes, and iCloud backup files.
An iPhone stands apart for its high image quality, among its other notable features. With several iPhone releases over the years, its camera specifications have improved indescribably, and this has increased the percentage of buyers to a considerable extent. Though it cannot be likened to a professional DSLR, yet it stands superior in its category.
How to recover your deleted iPhone Photos?
If your collection of photos, audios, and video files gets accidentally deleted or lost due to iOS crash, the question that comes to mind is whether they can be recovered. If you have created a backup already, then all you need to do is to restore data from the most recent backup. However, if you have not created a backup either on iTunes or iCloud, then the situation needs attention.
Your photos and other multimedia files are important to you. Therefore, it is important to look for an efficient and reliable recovery tool. Here, Stellar Data Recovery for iPhone serves as a perfect solution with its straight forward and user-centric interface. This tool accommodates all the major specifications of different iPhone versions.
The Process: Let’s look at how Stellar Data Recovery for iPhone recovers your lost or accidentally deleted photos from your iPhone:
Step 1) Download, Install, and Launch Stellar Data Recovery for iPhone on your system
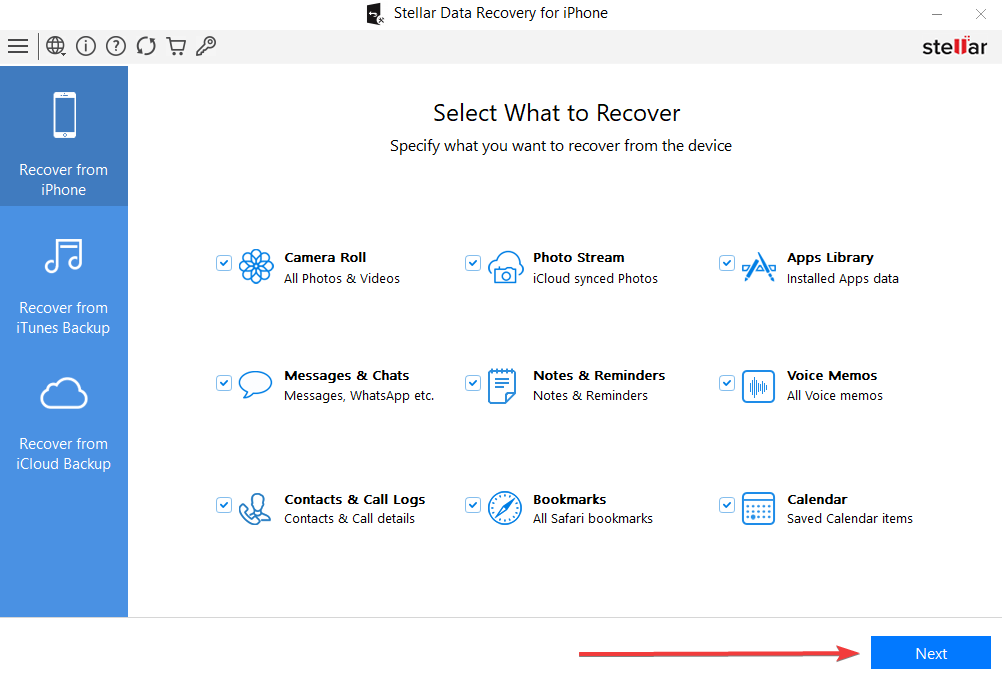
Step 2) Next, select Recover from iPhone option from the three alternates provided on the home screen. Select what you want to recover and click “Next”.

Step 3) Now connect the iPhone device to your system for initiating further recovery process. Alternatively, the device can be connected before you launch the tool
Step 4) The iPhone photo recovery tool will start scanning the connected device. A message will then pop up on the screen which reads: “_Please wait! Scanning your iPhone._” It will appear along with the live progress generator.

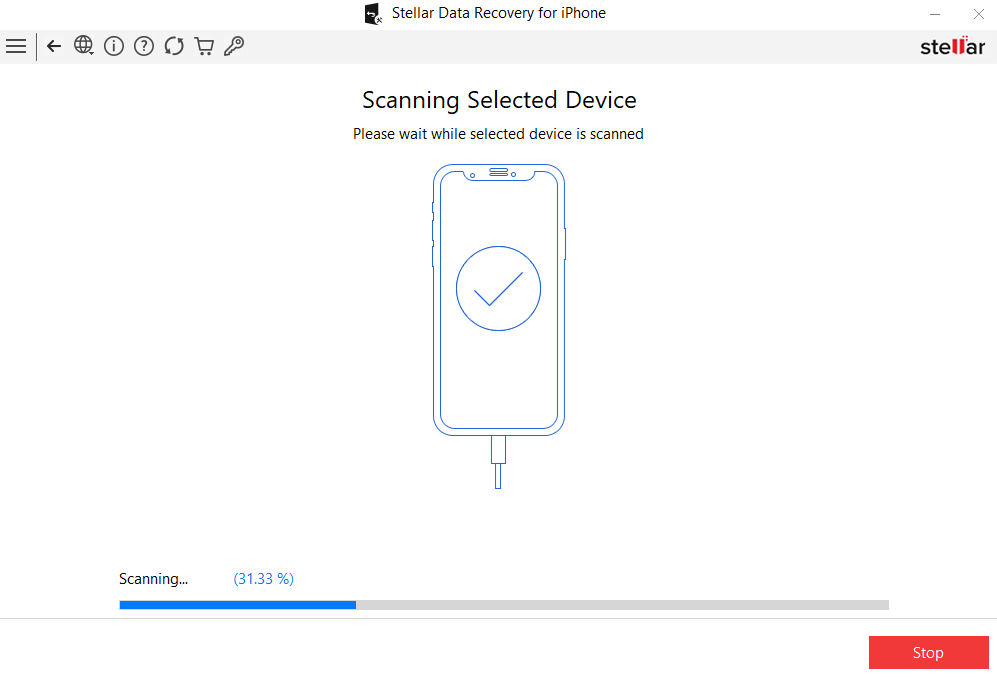
Note: Here, you can select to stop the scan process in between by selecting the Stop button
Step 5) Once the scanning is completed, the tool will enlist all the files and folders existing within the iPhone device.

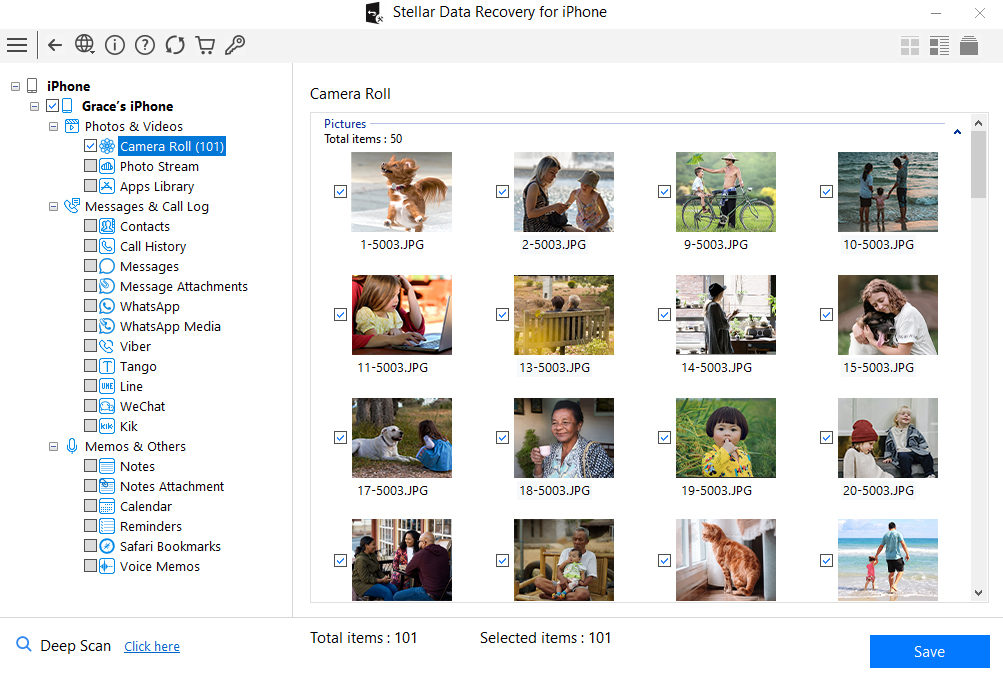
Step 6) From the left panel, you can select Photos & Videos category from the tree structure. It will then expand associated options that include Camera Roll, Photo Stream, and Apps Library.
Step 7) Select Camera Roll and Photo Stream and the tool will display all the items from these two folders in the middle pane
Step 8) Now from the middle pane, you can either select a single file for recovery, or you can select multiple items by checking the associated boxes
Step 9) Once you select all the items that you need to recover from Camera Roll and Photo Stream, click on Save button
Step 10) The Save Files window will appear. Click on Browse and provide the location for storing the recovered data on the hard drive. Else use, the default location provided by the software which is Desktop << iPhone Default Name.
Step 11) Click OK to proceed saving the recovered files.
Step 12) Exit from the tool and go to the selected location to access the Camera Roll and Photo Stream recovered pictures.
Stellar Data Recovery for iPhone also restores data from the following:
- If you are looking to recover data from your iPhone backup such as iTunes backup or iCloud backup, then you need to select Recover from iTunes backup or Recover from iCloud backup options. The tool also allows importing files from Windows and Mac machines to iPhones.
- After the scan is completed, the tool will display all integrated components of deleted iTunes backup or iCloud backup files within its panel from where it can be selected as per priority and preferences. The powerful algorithms are fully advanced to recover every single bit of data.
- The tool also recovers encrypted iOS iTunes backup files and restores it back to the device. You can also recover lost or deleted data from iPad using the iPhone Data Recovery tool. Backup files of small, medium and large scale are handled effectively by the tool.
- The tool also recovers bookmarks deleted accidentally from your iPhone default browser Safari. Since bookmarks hold information about useful links and websites, this feature can be very helpful for technically savvy users.
How to Fix iPhone Storage Not Loading/Showing
The majority of smartphones require a certain amount of storage to operate properly. When you receive a low storage message, you may instinctively check your storage space but encounter the iPhone Storage Not Loading issue.
What could be the cause of such a bothersome problem? The bad news is that the root reason for this problem is unclear, but we’ve offered some fixes you can try to fix this issue.
There is yet another way to check the storage on your iPhone if you face the “iPhone Storage Not Showing” issue, and we’ll go over it in the following section.
How can I use a computer to check my storage?
You can check your iPhone’s storage using a computer with iTunes or Finder app installed.
- On a Mac running macOS Catalina 10.15 or later, launch the Finder or open iTunes on a PC or Mac running macOS Mojave 10.14 or an earlier version.
- You should use a cable to connect your phone and computer.
- Select your device in iTunes or Finder.
- You can see how much storage each type of content takes up by hovering your mouse over the storage bar.

How can I fix iPhone Storage Not Loading/Showing?
1. Wait a bit more
Some computing operations take a while to finish. Your phone’s storage may overflow with tons of app data, images, and other files if you’ve been using it for a while.
And each of them would have to load before reporting their combined size to the OS. Usually, loading takes about three minutes.
2. Update iOS
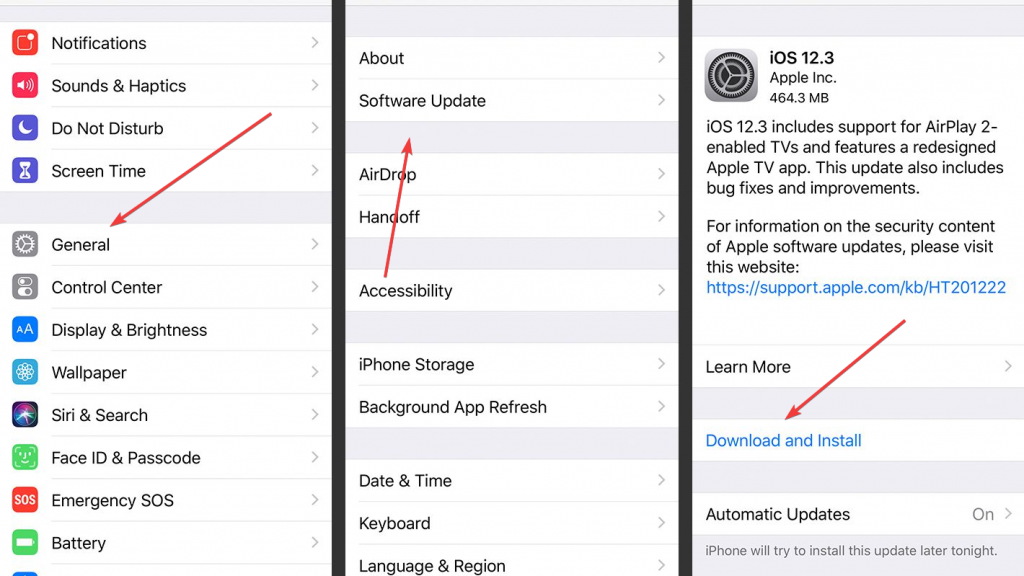
If your iOS version was outdated, your phone’s functionalities, including storage access, would not function properly. Additionally, updating the OS will get rid of any potential issues. Follow the procedures listed below to check and update your iOS version:
- Select General from the Settings menu.
- Click on Software Update. If any updates are available, download and install them.
3. Force Stops the App
The settings app itself can be the problem due to an app bug. Therefore, forcing the app to close is a valid option. This will make the software restart from scratch, wiping off part of the data and information it had in RAM.
- Access the app switcher (swipe up your finger from the bottom of the screen to bring up the menu or double-click the Home button on older iPhone models).
- Swipe up and drag the Settings card off the screen to force the app to close.
- Relaunch the Settings app to see if the problem persists.
4. Reconnect to iCloud
iOS has been designed in a way that it needs to be connected to iCloud to function flawlessly. Therefore, the storage loading error could also be linked to connectivity issues between these two. In this case, signing out of the service and then back in again might resolve the issue.
- Open the Settings application.
- Click your profile at the top. To sign out of the service, tap iCloud.
- Next, sign in once more using your iCloud password.
5. Fix the Issue Using Your PC
When you connect the cable, link your iPhone to your PC, and sync the storage, iTunes looks for any issues and either fixes them on its own or recommends methods to fix them by yourself. For any software-related issues with your phone, this is a great fix, and it may even repair your iPhone storage not updating problem.
- Connect your phone to computers that have iTunes installed on them with a lightning cord.
- The storage data should be able to sync with your smartphone automatically.
- If not, press the Sync button.
6. Factory Reset Your iPhone
You may fix any bugs that cause iPhone storage not to update by performing a factory reset. Furthermore, it would restore your OS version to its factory settings, resolving any problems that updates might have brought on.
The whole contents of your device will be deleted if you follow this method. You can either create a backup of your data or use a tool to restore it once your iPhone has been entirely deleted to prevent this.
- Go Settings app on your smartphone. Next, choose Reset after choosing General.
- Under Reset, among the few options, click Erase all Content and Settings.

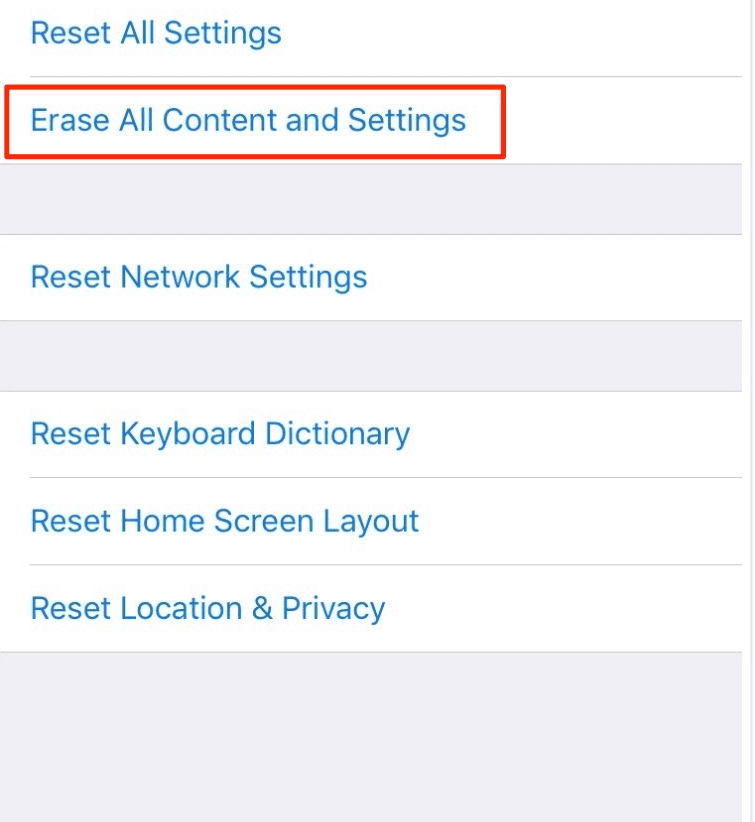
- Next, choose Erase iPhone. After that, your smartphone will return to its factory default settings.
Recover your data using Stellar data recovery for iPhone:
Stellar Data Recovery for iPhone is a powerful program that can retrieve files that have been erased unintentionally or on purpose. To guarantee that Stellar Data Recovery for iPhone will recover your data, it offers a variety of data recovery techniques. Furthermore, you wouldn’t need to check manuals or other documentation to understand how to use the software because of its basic user interface, which makes the recovery process easy.
With Stellar Data Recovery for iPhone, your files, including voice recordings, notes, and Safari bookmarks, will be restored. What you should do is:
- Download and install Stellar Data Recovery for iPhone from the official website.
- Connect your iPhone to the PC through a cable.
- Launch the Stellar Data Recovery for iPhone, choose the type of data you wish to recover from the list, and click Next.
- Preview the recovered data, then Select and Save it to the chosen destination.

When trying to check your iPhone’s storage, you will notice a small spinning wheel going back and forth if your phone is having storage problems since it cannot accurately represent the amount of storage that is accessible.
Furthermore, the loading issue may show an incorrect amount of storage. Some users reported this and other minor issues throughout the iOS 15 beta testing phase. Other factors contributing to this issue include iCloud service problems and application bugs.
Wrap up! Stellar is your ultimate backup
It is hard to download content or install apps on an iPhone with insufficient storage. Therefore, a factory reset would resolve your issue and clear the storage, enabling you to scan your device with Stellar Data Recovery for iPhone and retrieve any desired files.
And if a factory reset doesn’t fix iPhone storage not loading and showing problem, look for professional assistance with your problem. You can never be certain whether a storage issue results from faulty hardware or software.
FAQ:
- How do I create backups before wiping my iPhone clean?
Simply connect your phone to your computer, open iTunes, and choose the backup option, and the program will create a copy of your data that can be used to restore lost or deleted contents.
- Does Stellar Data Recovery for iPhone require a backup for successful file recovery?
Because the software searches iTunes for files, having a backup, there might be useful. However, the software can and will effortlessly restore your content even without any backups.
- Do I install the Stellar Data Recovery Software for iPhone on my smartphone?
The software cannot be installed or used on an iPhone or an Android smartphone. Because the software is compatible with the widely used Windows and Mac operating systems, you must first install it on a device using one of those operating systems before connecting your phone to it.
How to Put iPhone or iPad on Recovery mode? (Step by Step Tutorial)
Summary: DFU or Recovery mode is a way to recover your iPhone or iPad using a computer in case of technical issues. Read this post for a step-by-step process of how to enter and exit Recovery Mode and DFU mode on iPhone.


When you run out of solutions to troubleshoot your iPhone, Recovery Mode or DFU Mode comes as a rescue. Whether iPhone stops booting or fails to restore, you can use the functions in iPhone and fix the issue.
But the method to bring an iPhone in DFU or Recovery Mode varies in each iPhone model and iPad.
This post will guide you on how to enter and exit Recovery and DFU Modes in different iPhone and iPad variants. But first, understand what these iPhone functions are and their uses.


What is Recovery Mode and its use?
Recovery Mode uses iBoot to upgrade or restore your iPhone. iBoot is a bootloader program for iOS devices. Recovery Mode helps install the same or above iOS firmware version already on your iPhone. The iPhone screen in Recovery Mode prompts to connect iPhone to iTunes, showing a computer image.
Recovery Mode helps fix iPhone updates or restore issues, such as iPhone stuck at the Apple logo , unable to open the locked iPhone or want to reset iPhone but forgot iPhone passcode .
What is DFU Mode and its use?
Device Firmware Update or DFU mode lets your iPhone connect with iTunes on the computer without iBoot. As DFU mode doesn’t use iBoot, you can make changes in the operating system of the iOS device. An iPhone in DFU mode has a completely black screen.
Putting iPhone into DFU mode is the solution when Recovery Mode doesn’t resolve the problem. DFU mode can restore or upgrade iPhone. This mode is also commonly used to downgrade or jailbreak iPhone s.
Caution — you may lose all your iPhone data!
If you are entering DFU mode, make sure to back up your iPhone data . DFU mode permanently erases iPhone data . So always back up your videos, photos, messages, chats, Notes, etc., either to iCloud or iTunes.
However, if you have lost iPhone data and don’t have a backup, then immediately download iPhone data recovery software — Stellar Data Recovery for iPhone . The software helps to restore lost or deleted iPhone contacts, call logs, photos, videos, text, FaceTime, audio, chats, Calendar, Notes, Safari bookmarks, etc. It is quick to recover and extremely user-friendly.
What is required to perform Recovery and DFU modes in iPhone?
- Windows or Mac system.
- Lightning to USB cable.
- iTunes updated to the latest version on your computer.
How to put iPhone 6 and earlier versions in Recovery Mode
Follow the below steps to enter Recovery Mode on iPhone 6, iPhone 6s, iPhone 6s Plus, iPhone 5s, iPhone 5, iPhone 4s, and iPhone 4.
- Connect your iPhone to your PC using USB Lightning Cable and launch iTunes.
- Press and hold down the Home and Power button to turn the iPhone.

- Then connect the USB cable to iPhone and turn it on by holding the Home button.
- Continue to hold the Home button until a pop-up appears informing ‘an iPhone has been detected in recovery mode’ on your system.
- In Recovery mode, you can either restore the iPhone, set it up as new, or just recover your backups.

How to put iPhone 7 in Recovery Mode
It’s easy to enter Recovery Mode on iPhone 7 or iPhone 7 Plus. Follow the below steps:
- Turn off your iPhone 7 and connect it to your Mac or Windows computer.
- Ensure iTunes or Finder is running on the system.
- Press and hold the Power and Volume down button for 10 seconds.
- While continuing to hold the Volume down button, release the Power button.

- Release the button if you see the iTunes has detected an iPhone in recovery mode message on your system.
How to put iPhone 8 in Recovery Mode
If you want to enter the Recovery Mode on iPhone 8 and its variants, follow the below steps:
- Connect your iPhone 8 to your Mac or Windows system with a USB cable.
- Next, press and release the following buttons in a sequence Volume Up button, Volume Down, and Side button until your device reboots. Continue holding the Side button, even after seeing the Apple logo appear.
- Release the Side button once the Connect to iTunes logo appears on the iPhone’s display.

- Launch iTunes, and you should see a message stating, “There is a problem with the iPhone that requires it to be updated or restored.” You can choose to Update or Restore your iPhone’s software.
How to put iPhone 11 into Recovery Mode
To enter Recovery Mode on iPhone 11, iPhone 11 Pro, or iPhone 11 Pro Max, follow these steps:
- Connect your iPhone with your Mac or PC and launch iTunes.
- Force restart your iPhone with the following steps:
- Press and release the Volume Up button.
- Press and release the Volume Down button.
- Press and hold the Side button.
- Make sure to release these buttons if you see the recovery mode screen with the “Connect to iTunes” screen.
- Then choose your iPhone in iTunes, and you will see a pop-up saying that your iPhone is in Recovery Mode. Here, you can either update or restore your iPhone.
How to put iPhone 12 into Recovery Mode
Follow the below steps to enter Recovery Mode on iPhone 12, iPhone 12 mini, iPhone 12 Pro, and iPhone 12 Pro Max:
- Update iTunes to the latest version.
- Connect your iPhone to your PC or Mac via Lightning to a USB cable.
- Note: If you are connecting your iPhone to the computer for the first time, click on ‘Trust’ in the Trust This Computer dialog box and follow the prompts.
- Once your iPhone is paired with the computer, press the Volume up button followed by the Volume down button and release.
- Press and continue to hold the Side button until you see the ‘Connect to computer’ screen on your iPhone. While on your computer, you would see the iPhone Recovery Mode message in iTunes, confirming that your iPhone has entered into Recovery Mode. The computer asks you to either Update or Restore your iPhone**.** Click on any based on your requirement.
If you choose Update, iTunes will update your iPhone 12 to the latest iOS release. This won’t lead to any loss of data.
If you select Restore: It will erase iPhone data completely and renew your entire iPhone.
How to put Recovery Mode on iPhone 13
Entering Recovery Mode on iPhone 13 and iPhone 13 Pro has the same steps as iPhone 12. To enter the Recovery Mode, connect your iPhone to your computer and do the following steps in quick succession.
- Press the Volume up button and release.
- Press the Volume down button and release.
- Press and continue to hold the side button until the ‘Connect to iTunes’ screen appears on iPhone.

How to put Recovery Mode on iPhone 14
To use recovery mode on iPhone 14 and iPhone 14 Pro, follows these steps:
- Connect your iPhone to your system with a Lightning cable.
- Now on iPhone, press and quickly release the Volume up, Volume down, and side buttons until you see the recovery mode screen.
- Select your iPhone in the Finder/iTunes window and choose to update or restore your iPhone.

How to exit Recovery Mode on iPhone
It’s easy to exit Recovery Mode on iPhone. Follow the below steps:
- Hold the Home button and Lock button to exit DFU mode on iPhone 6 and earlier versions until your device reboots.
- To exit DFU mode on iPhone 7/7 Plus, hold the Side and Volume Down buttons until the device reboots.
- To exit the Recovery Mode on iPhone 8 or later version, press and hold the Side button until the “Connect to iTunes” screen disappears, and then iPhone should reboot back into iOS.
How to put Recovery Mode on iPad
To enter Recovery Mode on the iPad, follow these steps:
- Connect your iPad to Windows or Mac system using a USB cable.
- For iPad with a Home button: Press and hold the Home button and the Top/Side button until your iPad enters recovery mode.
- For iPad without a Home button: Quickly press and release the Volume Up button, Volume Down button, and the Top button. Keep holding the Top button until the iPad enters recovery mode.

How to put iPhone into DFU mode ?
Follow the below steps to enter DFU Mode on iPhone and its various version:
- Connect iPhone to PC or Mac via USB cable. Note: If the ‘Trust This Computer’ dialog box appears, follow the prompts.
- Once your iPhone is paired with a computer, follow these steps:
How to Enter DFU Mode on an iPhone 8 and later versions
- Press the Volume up button, then Volume down button, and release.
- Quickly press and hold the Side button for about 5 seconds.
- Along with the Side button, press and hold the Volume down button.
- Release the Side button and continue to hold the Volume down button for about 10 seconds.
- Once you see the ‘Recovery Mode’ screen in iTunes on your computer, you have successfully entered the DFU mode. However, the iPhone screen remains black in DFU Mode.
How to Enter DFU Mode on an iPhone 7
- Press and hold the Power and the Volume down buttons for 8–10 seconds.
- Release the Power button and continue to hold the Volume down button.
- Release the Volume down button once your iPhone has entered recovery mode.
How to Enter DFU Mode on an iPhone 6S or Earlier Versions
- Press and hold the Power/Sleep and Home buttons together for 10 seconds.
- Release the Power/Sleep button, but continue holding the Home button.
- Release the Home button once you see iTunes/Finder has detected an iPhone in recovery mode message.
Note: If you see the Apple logo on your iPhone, try again and repeat the above steps carefully.
How to exit DFU Mode on iPhone ?
If you want to exit DFU Mode on iPhone and its variants, follow the below steps:
How to Exit DFU Mode on an iPhone 8 or Later versions
- Press the Volume Up button and quickly release.
- Press the Volume Down button and quickly release.
- Now, press and hold the Side button until the Apple logo appears on iPhone. This indicates your iPhone has exited DFU Mode. Your iPhone would boot to the ‘Lock’ screen in a few seconds. Now, enter your passcode and continue to use your iPhone.
How to Exit DFU Mode on an iPhone 7
Press and hold the Power or Sleep button and the Volume down button until you see the Apple Logo.
How to Exit DFU Mode on iPhone 6 or Earlier versions
Hold the Home button and the Power button of the iPhone simultaneously until Apple’s logo appears on the screen.
Conclusion
Whenever your iPhone and its variants show problems like being stuck at the Apple logo, won’t upgrade, restore, or respond, you can use Recovery Mode and DFU Mode functions to resolve the problem. But don’t forget to back up your iPhone data before using these functions.
However, in any unfortunate incident of data loss while performing the functions, trust Stellar Data Recovery for iPhone – a software that brings back lost data on your iPhone securely.
FAQ
1. Does DFU Mode delete iPhone data?
If you use DFU mode to install something or restore your device, all your iPhone’s data will be erased.
2. Can you enter the recovery mode if your iPhone is disabled?
An iPhone is disabled when a user enters an incorrect password too many times on the lock screen. You should be able to enter the recovery mode using the same steps mentioned above and restore your iPhone to regain access.
3. How to put the iPhone in recovery mode without a computer?
A computer is not necessary to enter the recovery mode on an iPhone. You only need to press the right buttons, depending on your iPhone model, to enter the recovery mode. However, to restore your iPhone – you will need a computer.
The 5 Best Methods to Track a Lost or Stolen iPhone
Summary: Lost your iPhone? Don’t worry, here we tell you how to track lost or stolen iPhone using various techniques. Also, learn how to erase your iPhone data permanently to prevent it from reaching in wrong hands or misuse, using Stellar Data Recovery for iPhone.
|
Q. I cannot live without my iPhone. It was stolen yesterday and can’t recall where I lost it. It has been switched off. Can I track the location of my iPhone? Is there any way to track lost iPhones?
| A. Don’t panic. Log in to ‘Find My iPhone’ via iCloud.com and set it to ‘Lost Mode’. To know what else you can do now to track the iPhone location, read this post. |
|---|
Losing an iPhone (and for that matter any smartphone) is tormenting. Besides the upfront costs, there’s an incredible amount of personal data at stake. Today, smartphones not only store personal photos, videos, and music libraries but might also contain an incredible amount of sensitive information in the form of browsing history, social data, app traces, etc. So the apprehension of exploitation and misuse of the data stored in a stolen or lost iPhone is but real.
So, as soon as you discover that your iPhone has been stolen or lost, first, try to track the location of your missing device and lock it.
How to track a lost or stolen iPhone?
Try out the following methods
- Use Find My iPhone
- Track through Apple’s Family Sharing
- Use Google Timeline
- Try Google Photos
- Use location-tracking apps

Method 1: Use Find My iPhone
If Find My iPhone is enabled on your stolen iPhone, you can do the following:
- Locate your mobile phone
- Protect your iPhone data by choosing Lost Mode or erasing the data remotely
How to use Find My iPhone when the phone is missing
- Sign in to icloud.com on your computer.
- Click on the Find My iPhone link at the bottom.
- On the Find My iPhone’s map interface, select your lost iPhone via the All Devices drop-down menu. The app starts tracking your iPhone location on the map.
As you see the location of your device you can choose to do the following
- Play sound (if your iPhone is nearby, you can trace it with sound)
- Activate ‘Lost Mode’ (this locks your device and still tracks it)
What does Lost Mode do to your device?
- Remotely locks your device
- Displays a message with your phone number on the missing iPhone’s Lock Screen
- Keeps track of your device location.
- Erase iPhone remotely (with this action you won’t be able to track your iPhone but data is prevented from slipping into the wrong hands)
How to erase iPhone data remotely?
Choosing to erase the iPhone remotely deletes the complete data from it.
Note: Always remember to copy important photos, videos, music, and other data on iCloud backup before remotely erasing the iPhone.
Use a trusted and safe data recovery solution such as Stellar Data Recovery for iPhone to restore lost files from iCloud. The software allows the recovery of specific data rather than recovering the entire data.

Method 2: Track iPhone through Family Sharing

If you have set up Family Sharing, use it to track your iPhone. Family Sharing helps the members to know each one’s device location. Ask another member in the Family Sharing group to trace your iPhone via the Find My iPhone app. The member can also sign into iCloud.com to locate the missing iPhone.
|
Is your missing iPhone switched off or offline?
If the missing iPhone is switched off or showing offline in Family Sharing, you can still activate Lost Mode or remotely erase its data via Find My iPhone.
Note: The iPhone’s last known location remains only for one day. In case your device is offline for over 24 hours, you cannot trace its last location.
|
| — |
What to do when ‘Find My iPhone’ is NOT enabled or the missing iPhone is offline for more than one day?
- Change your Apple ID passwords to prevent anyone from accessing your data.
- Change your social media and other Internet account passwords like Gmail, Twitter, Facebook, Instagram, etc.
- Report the device as missing to the authorities.
- Report your network carrier to disable the services like calls, messages, or data use.
Method 3: Use Google Timeline to find lost iPhone
If you have turned on Location Services and Location History on your iPhone, Google’s Timeline will record all the locations of your device.
When an iPhone goes missing, access the location information on a map and find the last location. Remember, Google Timeline records the location only when the iPhone is switched on with an internet connection.
How to see the last location of a lost iPhone in Google Timeline
- Visit <com/maps/timeline> on your computer.
- Sign in to your Google account.
- Click Today or select Date.
- Scroll down to see the last reported location of your iPhone.
Along with the location, note the time when your phone was last connected to Google. Taking clues from the location and time information, you can find your lost iPhone. If needed, take the help of cops.
Method 4: Take location clue from Google Photos
If anyone has captured a photo from your lost iPhone and you have the Google Photos location-sharing option enabled, then luck is on your side.
Visit <photos.google.com/>. Check, if any new photos were uploaded and view their upload location.
Method 5: Location tracking apps
If you have installed any location-tracking app such as GPS Location Tracker, CocoSpy Cell Phone Tracker, or iTrack on your missing device, use it to track the lost or stolen iPhone. These apps share the real-time location of your device on your computer or other connected devices.
Conclusion
Apple’s Find My iPhone feature is the best way to track the location of a stolen or missing device. If Find My iPhone is not enabled you can try Google Timeline or Google Photos. Other than these methods, third-party apps can also help track a lost iPhone, but only if you have installed them before the phone was lost.
Nevertheless, ensure that you copy the iCloud backup of the stolen iPhone before taking any of the above steps.
A smarter way is to filter out the data that you want to keep, with the help of Stellar Data Recovery for iPhone.
Is this post helpful? Share your experience in the comments below, how you managed to track and get back your stolen iPhone.
- Title: How to Recover Deleted iPhone 11 Camera Roll Photos and Photo Stream Pictures? | Stellar
- Author: Nova
- Created at : 2024-08-20 20:12:18
- Updated at : 2024-08-21 20:12:18
- Link: https://blog-min.techidaily.com/how-to-recover-deleted-iphone-11-camera-roll-photos-and-photo-stream-pictures-stellar-by-stellar-data-recovery-ios-iphone-data-recovery/
- License: This work is licensed under CC BY-NC-SA 4.0.