
How to Recover Deleted iPhone 11 Pro Camera Roll Photos and Photo Stream Pictures? | Stellar
How to Recover Deleted iPhone Camera Roll Photos and Photo Stream Pictures?
Your iPhone is not only a medium to connect but also serves as a personal repository for your priceless photos, videos, and music. However, in case your iPhone crashes or you lose files due to accidental deletion, your data stands at risk and may be lost forever. But with Stellar Data Recovery for iPhone, your data is here to stay. This professional solution helps to retrieve your lost or accidentally deleted photos, audio, as well as video files from Camera Roll, Photo Stream, and App Library. It also offers a complete recovery of your iPhone data such as Contacts, Messages along with attachments, Notes, Call History, Calendars, Safari Bookmarks, iTunes, and iCloud backup files.
An iPhone stands apart for its high image quality, among its other notable features. With several iPhone releases over the years, its camera specifications have improved indescribably, and this has increased the percentage of buyers to a considerable extent. Though it cannot be likened to a professional DSLR, yet it stands superior in its category.
How to recover your deleted iPhone Photos?
If your collection of photos, audios, and video files gets accidentally deleted or lost due to iOS crash, the question that comes to mind is whether they can be recovered. If you have created a backup already, then all you need to do is to restore data from the most recent backup. However, if you have not created a backup either on iTunes or iCloud, then the situation needs attention.
Your photos and other multimedia files are important to you. Therefore, it is important to look for an efficient and reliable recovery tool. Here, Stellar Data Recovery for iPhone serves as a perfect solution with its straight forward and user-centric interface. This tool accommodates all the major specifications of different iPhone versions.
The Process: Let’s look at how Stellar Data Recovery for iPhone recovers your lost or accidentally deleted photos from your iPhone:
Step 1) Download, Install, and Launch Stellar Data Recovery for iPhone on your system
Step 2) Next, select Recover from iPhone option from the three alternates provided on the home screen. Select what you want to recover and click “Next”.

Step 3) Now connect the iPhone device to your system for initiating further recovery process. Alternatively, the device can be connected before you launch the tool
Step 4) The iPhone photo recovery tool will start scanning the connected device. A message will then pop up on the screen which reads: “_Please wait! Scanning your iPhone._” It will appear along with the live progress generator.
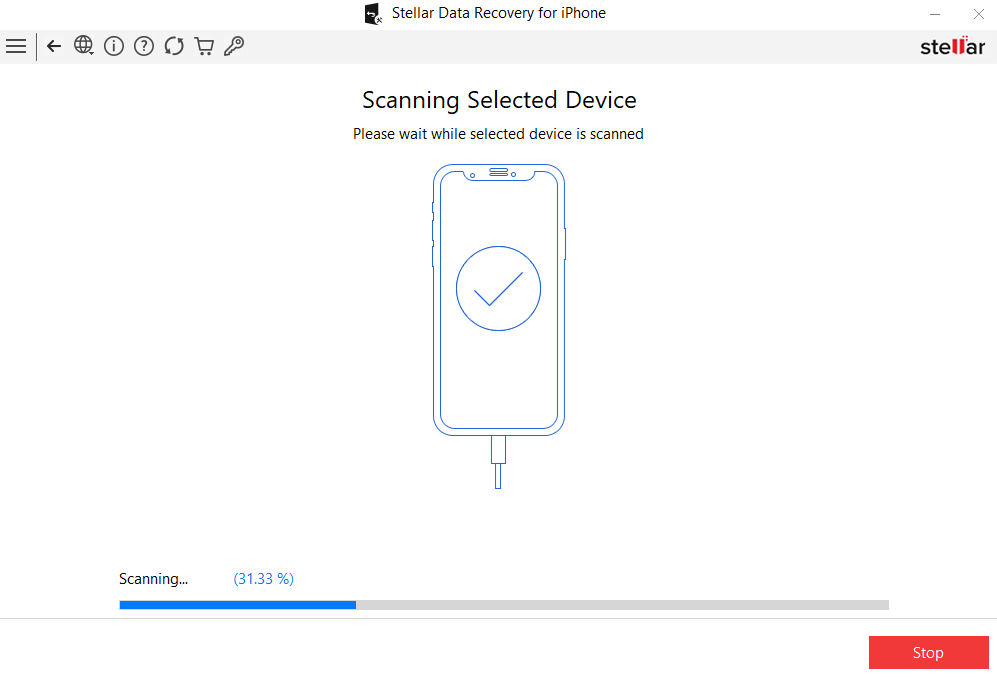Note: Here, you can select to stop the scan process in between by selecting the Stop button
Step 5) Once the scanning is completed, the tool will enlist all the files and folders existing within the iPhone device.
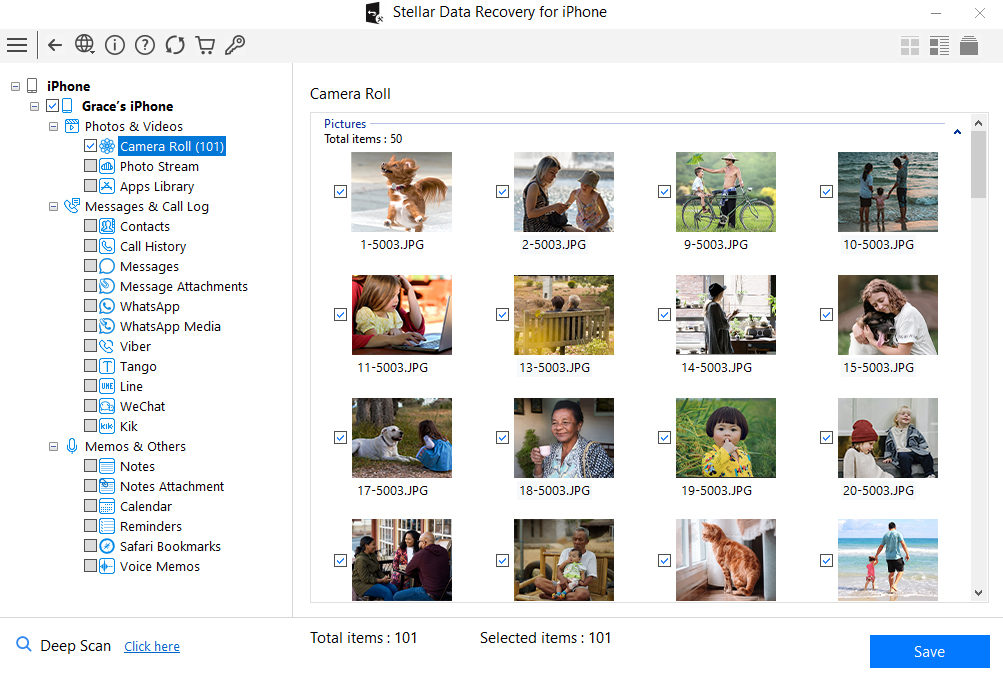
Step 6) From the left panel, you can select Photos & Videos category from the tree structure. It will then expand associated options that include Camera Roll, Photo Stream, and Apps Library.
Step 7) Select Camera Roll and Photo Stream and the tool will display all the items from these two folders in the middle pane
Step 8) Now from the middle pane, you can either select a single file for recovery, or you can select multiple items by checking the associated boxes
Step 9) Once you select all the items that you need to recover from Camera Roll and Photo Stream, click on Save button
Step 10) The Save Files window will appear. Click on Browse and provide the location for storing the recovered data on the hard drive. Else use, the default location provided by the software which is Desktop << iPhone Default Name.
Step 11) Click OK to proceed saving the recovered files.
Step 12) Exit from the tool and go to the selected location to access the Camera Roll and Photo Stream recovered pictures.
Stellar Data Recovery for iPhone also restores data from the following:
- If you are looking to recover data from your iPhone backup such as iTunes backup or iCloud backup, then you need to select Recover from iTunes backup or Recover from iCloud backup options. The tool also allows importing files from Windows and Mac machines to iPhones.
- After the scan is completed, the tool will display all integrated components of deleted iTunes backup or iCloud backup files within its panel from where it can be selected as per priority and preferences. The powerful algorithms are fully advanced to recover every single bit of data.
- The tool also recovers encrypted iOS iTunes backup files and restores it back to the device. You can also recover lost or deleted data from iPad using the iPhone Data Recovery tool. Backup files of small, medium and large scale are handled effectively by the tool.
- The tool also recovers bookmarks deleted accidentally from your iPhone default browser Safari. Since bookmarks hold information about useful links and websites, this feature can be very helpful for technically savvy users.

How to Recover Deleted Photos, Videos & Music Files from iPhone
Summary: Learn how to recover deleted photos, videos and music files from iPhone using the best recovery software —Stellar Data Recovery for iPhone.
There are zillions of tutorials one can find on how to take incredible photos with the A10 fusion chipped smartphone; however, few know how to recover deleted photos from iPhone. As a coin has two sides, through this post, we will explore the other untouched, unexplored side.
iPhone has been the epitome of perfection ever since it entered the smartphone realm. With stellar features and functionality, iPhone has become the highest selling property. There are some hidden iPhone camera features that users can utilize and take amazing photos and videos which leave a lasting impression.
Get Started Here!!!
Recovering deleted photos from iPhone is a straightforward process and do not involve much complexity, provided the right steps are implemented in the right manner.
Without much ado, you can recover deleted iPhone photos or videos with these simple steps. Let’s delve into it in detail.
Solution 1:
Apple has made it easy to recover deleted iPhone photos. Here’s what you need to follow:
- Go to the Albums and access your photos.
- Scroll down and select ‘Recently Deleted’ folder.
- In this folder, you will find all the photos that have been deleted.
- Simply tap the photo you want to recover and press “Recover.”
- To permanently delete a photo, press “Delete”.
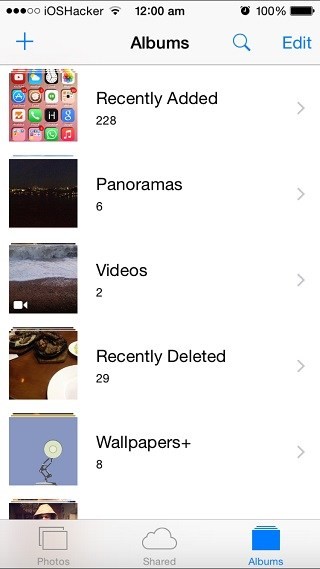
Figure 1 represents how to recover photos from Recently Deleted folder
**Important: _In the ‘Recently Deleted’ folder, you’ll find photos, video & music files that have been deleted within the last 30 days only. To recover them before that period, either you have to restore from iTunes or iCloud backups or use iPhone photo recovery software _.
Solution 2:
iCloud Photo Library to Your Rescue:
You can recover iPhone photos or videos through iCloud Photo Library. iCloud Photo Library securely stores your photos and videos on iCloud. It automatically saves all your photos and videos in iCloud so that you can access the library from any device.
Follow these steps to turn on the iCloud Photo Library:
- Go to settings < [your name] < iCloud < Photos, then turn on iCloud Photo Library (iOS 10.3 or later).
- In iOS 10.2 or earlier, go to Settings < iCloud < Photos.
**Important: Ensure that you’re signed in to iCloud with the same Apple ID as on all of your devices. Things can be complicated as iCloud Photo Library is synced with your different Apple devices which means there could be multiple copies and if a photo, video or music file is deleted from a device, it will not be available on the other devices as well. Deletion sync across all the devices.
Solution 3:
iTunes Backup is there to recover all your photos.
- Click File menu, select Devices < Restore from Backup.
Or
- Open the iOS device’s Summary tab. There are two ways to access this:
- Click the device button in the upper right corner.
- In iTunes tab, click the View menu and select Show Sidebar. Select your iOS device in iTunes under Devices.
- Click the Restore Backup button.
Solution 4:
Use Stellar Data Recovery for iPhone:
iPhone Data Recovery Software by Stellar is an ideal tool to recover lost data from your Apple devices. Utilizing its advanced algorithm, you can scan and recover data (photos, videos, calendar, notes, messages, call history, etc.) from your device. Furthermore, you can recover data from iCloud and iTunes backup as well.


- Connect your iPhone to your system and launch “Stellar Data Recovery for iPhone” software.
- Select “Recover from iPhone” and the software will scan your device for the contents.
- Click on any file to see its preview.
- Finally, click “Save” to save the recovered file to the preferred location.
The Final Word
Apple reflects perfection in its design and innovation; therefore, it constantly thrives to provide its consumers with the best platform. One such feature is that iOS can back up your photos on cloud services automatically so that you have access to them at any given time.
Moreover, there are iTunes backup, iCloud backup options available along with iPhone Data Recovery Software as well; but, it is advisable to backup your iPhone photos or videos timely and manually to avoid unnecessary issues.
Apple will delete your photos in July. Here’s what you should do
Apple has recently announced that it will permanently delete photos from its users’ ‘My Photo Stream’ this month. This news has come as a surprise to the Apple community, as users struggle to understand the implications of this announcement and what necessary precautions can be taken. In this blog post, we will get into the details of this new move by Apple, explore the reasons behind it, and provide tips on how iPhone/iPad/Mac users can safeguard their precious photos.
The Announcement
_”_My Photo Stream is scheduled to be shut down on July 26, 2023. As part of this transition, new photo uploads to My Photo Stream from your devices will stop one month before, on June 26, 2023.
The photos in My Photo Stream are already stored on at least one of your devices, so as long as you have the device with your originals, you won’t lose any photos as part of this process. If a photo you want isn’t already in your Library on a particular iPhone, iPad, or Mac, make sure that you save it to your Library on that device…” Read more
What is Apple’s My Photo Stream?
My Photo Stream, launched in 2011, was designed to sync photos across multiple Apple devices such as iPhone, iPad, or Mac.
This feature automatically stores your most recent pictures (up to 1000) for approx. 30 days so you can view and download them easily from other Apple devices. After this period, photos are removed from My Photo Stream but remain in your device’s Photos app. However, this only shows photos and not your live images or videos.
How to Protect Your ‘My Photo Stream’ Pictures?
Apple, known for its commitment to user privacy and data security, has recommended several preventive measures to mitigate the risk of losing any important photo due to this update.
1. Move My Photo Stream images to your Library
Even if the pictures in My Photo Stream are already there on at least one of your Apple devices, you must save these pictures to your Photo Library to avoid losing them**.** Here’s how to copy My Photo Stream pictures to your Photo Library:
On your iPhone, iPad, or iPod Touch:
- Open the Photos app and tap Albums.
- Tap on My Photo Stream > Select.
- Select all the photos you want to save, then tap the Share button > Save Image.
On your Mac:
- Open the Photos app and then open the My Photo Stream
- Select the photos you want to save which aren’t currently in your photo library.
- Drag and drop them from the My Photo Stream album into your Library.
2. Move to iCloud Photos
To preserve your My Photo Stream images in their original and high-resolution version, you can transfer them to iCloud Photos.
If you already have an iCloud account, just enable iCloud Photos to automatically upload & sync every photo and video you capture on the device, making them accessible from anywhere.
To use the iCloud Photos service, you will require the following:
- iPhone running iOS 8.3 or later version.
- iPad with iPadOS 8.3 or later version.
- Mac running OS X Yosemite or later version.
How to set up iCloud Photos on your iPhone, iPad, or iPod touch?
- On your iPhone, iPad, or iPod touch, go to Settings.
- Next, click on [Your Name] > iCloud.
- Tap on Photos and do the following:
For iOS 16, iPadOS 16, or later versions: Toggle on the ‘Sync this [device]‘ option.
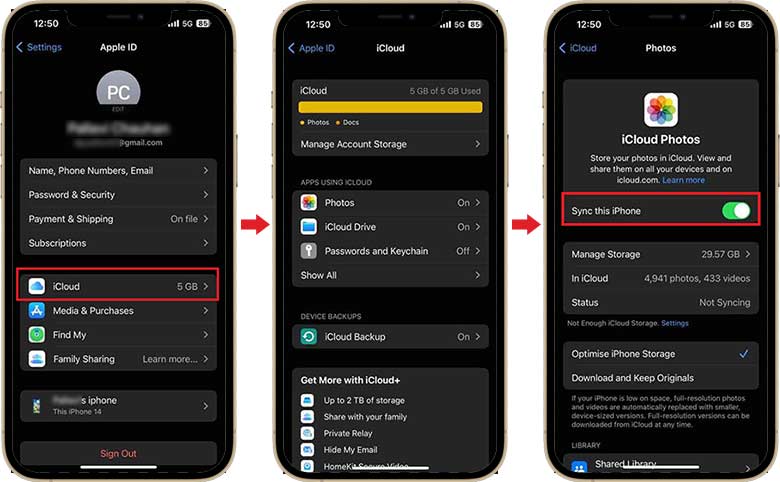
For iOS 15, iPadOS 15, or earlier versions: Turn on the iCloud Photos
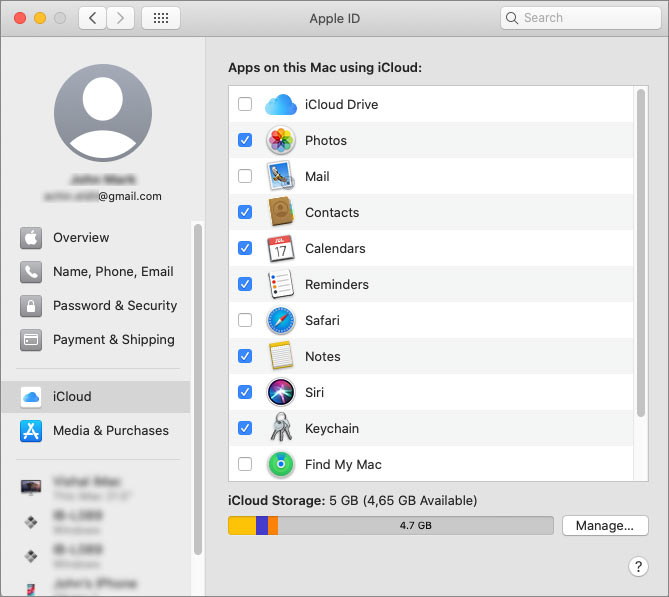
How to set up iCloud Photos on your Mac?
- On your Mac, go to Apple Menu and click on System Preferences.
- Click Apple ID and then select iCloud in the sidebar.
- Now, select Photos and turn on the switch next to Sync this Mac.
**
**
Don’t want to use iCloud Photos?
While iCloud Photos is a convenient option for many Apple users, it’s important to acknowledge that it is not the best fit for everyone. Limited free storage of 5GB or lack of cross-platform compatibility can compel Apple users to look for other alternatives.
Storage options, such as Google Photos, Microsoft OneDrive, Dropbox, external hard drives, etc., are available to ensure your iPhone Photos are safe and easily accessible.
The Bottom Line
Apple’s announcement of the potential discontinuation of My Photo Stream has understandably caused worry among its users. While a specific reason for this action remains undisclosed, they are actively addressing the issue to prevent data loss. In the meantime, iPhone users must take precautionary measures to safeguard their photos. They can simply move the My Photo Stream images to the Photo Library, iCloud Photos, or other backup folders.
6 Things We Can Do To Save A Water Damaged iPhone
“Hey there! I accidentally spilled water on my iPhone 14 Pro yesterday and it won`t turn on anymore. I was pretty sure I retrieved the phone within 10 seconds, yet it’s not working! Is there a way to save and fix water-damaged iPhone?”
If you’ve ever accidentally dropped your phone in water or drenched it in rain, then you’re not alone. From a split cup of coffee or water to dropping it in pools, bathtubs or toilets, your iPhone can be water-damaged due to various reasons.
With new-generation Apple devices, water exposure isn’t an immediate death sentence for your iPhone as it used to be. But it can still create issues in your iPhone, such as:
- Liquid droplets flowing inside the iPhone screen
- Issues in the charging port or the iPhone won’t charge.
- No audio or ruffled audio.
- Blurry images due to moisture in the camera lens.
- The internal part of the device gets corroded.
While the new iPhones have good water resistant capabilities, this doesn’t mean they are totally immune to water. Being electronic devices, water can seriously damage them.
This article shares several best practices that can help you save a water-damaged iPhone. But first, let’s understand how water resistant your iPhone is.

Is my iPhone water resistant?
The water resistance of the smartphones is rated by the “ingress protection” code, also called IP rating.
This rating includes two number: the first number indicates protection against solids, such as dust, whereas the second demonstrate resistance to liquid, mainly water. For example, the iPhone 12 has a rating of IP68, which means it provides six levels of protection from solid and eight levels of protection from liquid.
There are multiple types of IP ratings, but IP67 and IP68 are mainly applied to iPhones.
- IP67 – A device with this rating can withstand being submerged in up to 1 meter of water for a maximum of 30 minutes
- IP68 – iPhone with an IP68 rating can survive submersion in water up to 2 meters for a maximum of 30 minutes
Here’s the list of last few generation iPhone with their IP rating
- iPhone 15/15 Plus/ 15 Pro/ 15 Pro Max – IP68
- iPhone 14/14 Plus/ 14 Pro/ 14 Pro Max – IP68
- iPhone13/ 13 Mini/ 13 Pro / 13 Pro Max – IP68
- iPhone12/ 12 Mini/ 12 Pro / 12 Pro Max – IP68
- iPhone 11/ 11 Pro / 11 Pro Max – IP68
- iPhone XS/ XS Max – IP68
- iPhone X/XR /8/8 Plus /7 /7 Plus/ SE (2nd generation) – IP67
What Not to Do?
Most iPhones offer certain level of water resistance, but it doesn’t mean an iPhone dropped in swimming pool or a bucket full of water is immune to any damage. Moreover, not every repair step will help you fix water-damaged iPhone; and some can complicate things further. Before, we start on potential steps to save your water-damaged iPhone, let’s first look at some absolute things that worsen the cause and should be avoided at all costs.
1. Don’t turn on your iPhone
Your iPhone will turn off automatically after being dropped in water. However, you should manually turn it off if it doesn’t turn off. Turn your phone on only if you are sure water or moisture content from the exterior and interior is completely dry. Turning on the water-damaged iPhone might cause water to reach inside the device, causing it to malfunction.
2. Plug it in or Use the Charging Port in Any Way
Moreover, don’t charge your iPhone battery as it can result in an electrical short circuit or even combustion, resulting in a fire. No matter how water resistant the iPhone is, it’s better to not plug it in when wet or water-damaged.
3. Don’t use hot air to blow dry your iPhone
Blow-drying your iPhone with hot air can damage your device further. Hot air may heat your iPhone to an unbearable degree, making it unsuitable for device hardware. Also, avoid using a space heater or furnace sidewall exhaust to dry your iPhone.
Steps You Can Take to Potentially Save Your Water-Damaged iPhone
If you drop your iPhone in water, the following methods can save your iPhone from potential damage.
1. Take it out and turn it off immediately
Remove your iPhone from the water right away. Once retrieved, turn it off immediately. If there is any iPhone cover and screen guard to protect your phone, remove them as they might hold moisture. Use a paper towel or cotton cloth to wipe the iPhone’s exterior.
2. Evacuate the SIM card
After drying the iPhone’s exterior, remove the SIM card tray, if not using an e-SIM. Although SIM cards have a watertight seal, getting them out helps. Use a paper towel to dry the SIM card and the tray.
3. Dry your iPhone
While Apple recommends simply wiping the iPhone dry or tapping excess water out of the ports, we recommend the below-mentioned ways to ensure your iPhone is as dry as possible.
- Place it in a dry place
You need to place the iPhone in a warm and dry place so the water inside the phone can evaporate. Place it in a nearby window with proper sunlight, but do not expose the device to harsh sunlight.
- Place it in uncooked rice
The uncooked rice trick used to be the go-to method to dry any visible liquid in iPhone, as rice absorbs moisture quickly. Place the iPhone in a bag or bowl of rice for a day or two to ensure the water traces inside the phone are absorbed entirely. However, this method is slightly risky, as uncooked rice can push grains and dust in the charging port of your device.
- Dry it with silica gel packets
If the water has seeped into the internal parts of the iPhone, try burying it in a heap of silica gel bags in an airtight container. This helps in absorbing the moisture from the inside of your iPhone. Using silica gel packets is a safer alternative to the uncooked rice method for drying a wet iPhone, as nothing will get clogged in the ports.
- Use a hairdryer (if it has a cool wind setting)
If your hair dryer has a cool wind setting, you can use it to dry wet iPhone. While drying the iPhone, keep the hair dryer in low mode and keep your iPhone at a distance so that air blowing doesn’t cause any damage.
Or, you can keep your iPhone under a cool air fan to dry it.
4. Disassemble the phone and let it air dry
If drying the iPhone via uncooked rice method or silica gel packet doesn’t work, consider dismantling it as your last resort. You can use DIY repair tips to open the device to dry it out or go to any trusted tech expert.
Caution: We wouldn’t recommend dismantling the iPhone using DIY tips as it may worsen the problem.
Dismantle your iPhone carefully, air dry its interior, and assemble it back after a few hours. Also, if the Liquid Contact Indicators inside the iPhone have already detected water damage, opening the phone invalidates your warranty coverage.
5. Check if your warranty is still valid
If all the above efforts fail to fix the iPhone from water damage, you must check if the device’s warranty is still valid. If it is, call your manufacturer and request a repair or replacement. If it is invalid, visit an Apple Genius bar to repair your cell phone.
6. Take the phone to an approved repair shop
The longer you wait to take your iPhone to an Apple Genius bar, the more damage it incurs. If you cannot dry the wet iPhone by following the manual methods mentioned above, rush to an Apple Genius bar to get it repaired and minimize the chances of further damage.
How To Find Out If Your iPhone Has Water Damage?
Liquid Contact Indicator, or LCI, is the new way to determine whether or not your iPhone is exposed to water damage. An LCI is generally of white or silver color; however, when it comes in contact with water or other liquid, it turns red.
See the table to learn where the indicators are planted in your respective iPhone, depending upon its model.


How To Recover Data From Water-Damaged iPhone?
Once you have powered on your water-damaged iPhone after drying, it is possible to recover data from it. There are two ways to recover lost data from water-damaged iPhones: backup services or professional iPhone data recovery software .
Let’s see various scenarios where you can recover data from a water-damaged iPhone:
iPhone won’t turn on
If your iPhone won’t turn on even after drying the wet iPhone using the tips mentioned above, it has short-circuited or water has eroded some of its internal components. In such a situation, use any backup service to recover your iPhone data.
If you have enabled iCloud backup on your iPhone, you can easily restore your data. You can visit the official iCloud website and log into your account to save the lost data on your computer. Or, set up your new iPhone using the existing iCloud credentials to restore the data of your previous iPhone.
iPhone starts but data is lost
If you turn your iPhone back on again, but its data is lost, try setting up your phone with existing iCloud account to recover the data. However, if you haven’t enabled iCloud backup, it is recommended that you use reliable iPhone data recovery software like Stellar Data Recovery for iPhone. This software recovers deleted/lost photos, videos, audio, messages, voice memos, calendars etc. from iPhone, iPad, iTunes, and iCloud backup files.
The software supports recovery in all data loss scenarios like water-damaged devices, accidental deletion, failed iOS updates, iPhone stuck in recovery mode, etc. This iPhone recovery software is compatible with all variants of iPad and iPhone, including the series of iPhone 15/14/13/12/11 and below.
Conclusion
We hope you fix the water-damaged iPhone after following the above suggestion. However, it would be best if you were extra careful to protect your iPhone from any type of water damage. Here are some best practices you must follow:
- Use a waterproof case to provide an additional layer of protection to your iPhone against water.
- Keep your iPhone away from sinks, bathrooms, toilets, etc.
- Be mindful in rainy conditions, and put your phone in a waterproof bag or safe pocket.
- Refrain from touching your iPhone with wet hands.
- Take regular data backups, as it is handy in data loss situations.
Was this article helpful?
FAQs
What do I do if my iPhone speaker doesn’t work after falling into water?
If there is water in your iPhone speaker, it may not work. In such a situation, try drying your iPhone and turning it on to take a backup of your data before testing the speaker. You can even visit Apple Genius Bar to get the help of a tech expert to fix your iPhone.
- Title: How to Recover Deleted iPhone 11 Pro Camera Roll Photos and Photo Stream Pictures? | Stellar
- Author: Nova
- Created at : 2024-08-20 20:12:20
- Updated at : 2024-08-21 20:12:20
- Link: https://blog-min.techidaily.com/how-to-recover-deleted-iphone-11-pro-camera-roll-photos-and-photo-stream-pictures-stellar-by-stellar-data-recovery-ios-iphone-data-recovery/
- License: This work is licensed under CC BY-NC-SA 4.0.