
How to Recover Deleted Notes from iPhone? | Stellar
How to Recover Deleted Notes from iPhone?
Summary: Lost Notes from iPhone after iOS upgrade, deletion, factory reset, etc.? This post shares 5 best ways to restore lost Notes on iPhone. Also learn how Stellar Data Recovery for iPhone quickly recovers only the missing Notes from your iPhone.


When Matt opened his iPhone 14 Notes after iOS 16.4 upgrade, he found many of his old Notes had disappeared. He was repenting about the upgrade and now looking for ways to get back his Notes on his iPhone.
Notes are important for those who make optimum use of this app. However, if you have also lost them for some reason, this post shares how to restore the lost Notes on your iPhone.
Often underrated, iPhone Notes app lets you do much more than you can think of — scribbling thoughts, ideas, checklists, sketching, adding photos, and videos, attaching location links from Maps, etc.
However, Notes may disappear after an iOS update, jailbreak, factory reset, accidental deletion, etc.

How to Recover Notes on iPhone?
Usually, Notes can be recovered from iCloud, iTunes, or your recently deleted Notes App folder.
But, if in a situation when you have deleted Notes and also don’t have a backup in iCloud, an iPhone recovery software is the way to go.
Top 5 methods that can recover lost Notes from iPhone
- Recover iPhone Notes & Attachments without backup
- Restore Notes from iCloud backup
- Restore from iTunes backup
- Recover Recently Deleted folder
- Restore Notes from e-mail account on iPhone
1. Recover iPhone Notes & Attachments without Backup
There is a plethora of iPhone recovery software. Carefully pick that supports Notes and attachments recovery. Most importantly, the iPhone recovery software should be 100% secure to download and free from viruses.
Advanced tools such as Stellar Data Recovery for iPhone can recover even permanently deleted Notes and their attachments. It is fast, easy to use, and supports the latest iOS and iPhone versions.
Stellar Data Recovery for iPhone restores in situations like,
- In the absence of iCloud backup
- Factory Reset of iPhone
- Unable to retrieve Notes from iCloud/ iTunes
- iPhone is damaged or stolen
- and others
The software lets you recover deleted Notes from iPhone , iPad, iCloud, and iTunes. It thoroughly scans the iOS device and backup to restore every bit of lost data. If you don’t find the required Notes after running the initial quick scan, it offers a second-level Deep Scan for a more comprehensive search.
Unlike Apple backups — iCloud and iTunes, you can select only those Notes and their attachments that you need. Thus, the software protects you from unnecessary data recovery.
You can view the lost and deleted Notes of iPhone in the demo version of the software.
Step-by-step: Recover deleted/ lost Notes and Attachments on iPhone
- Download Stellar Data Recovery for iPhone on your Mac/PC
- Connect your iPhone to your computer and launch the software
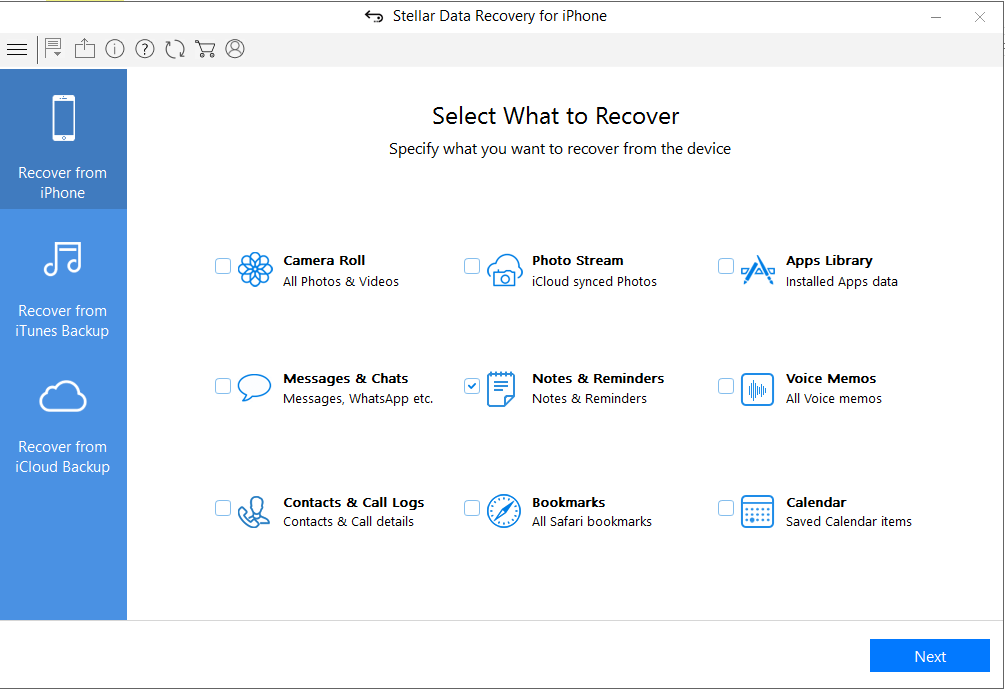
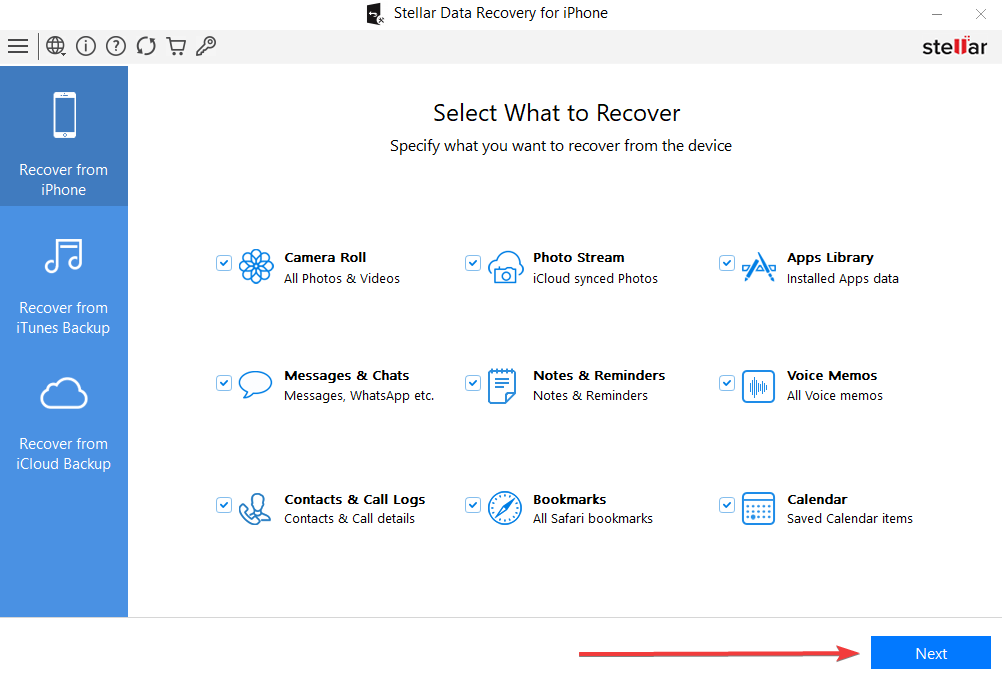
- Choose “Recover from iPhone”, select “Notes & Reminders” and click “Next”
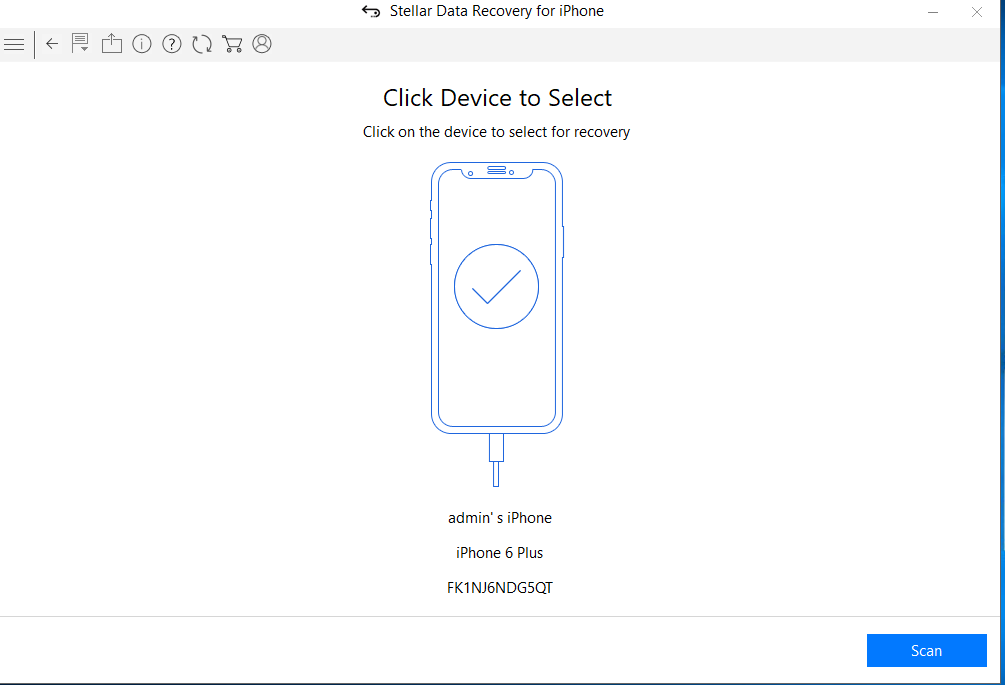
- Select your device and click “Scan.”
- After scanning, select Notes on your left pane to preview in the right pane before saving.

- Click on Save and browse the desired location to save the recovered notes.
Recover Notes from Apple Backups
iCloud and iTunes backup storage protect against data loss. If your Notes are backed up in any of the two, recover the files from there.
Just log in through your Apple ID and restore Notes from backup.
However, one of the major drawbacks of this method is that it will remove and replace all your existing iPhone data, including Camera Roll, apps, messages, music, etc.
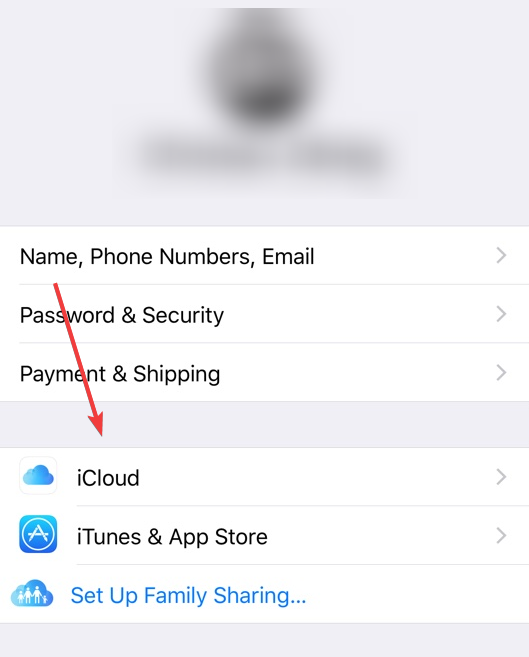
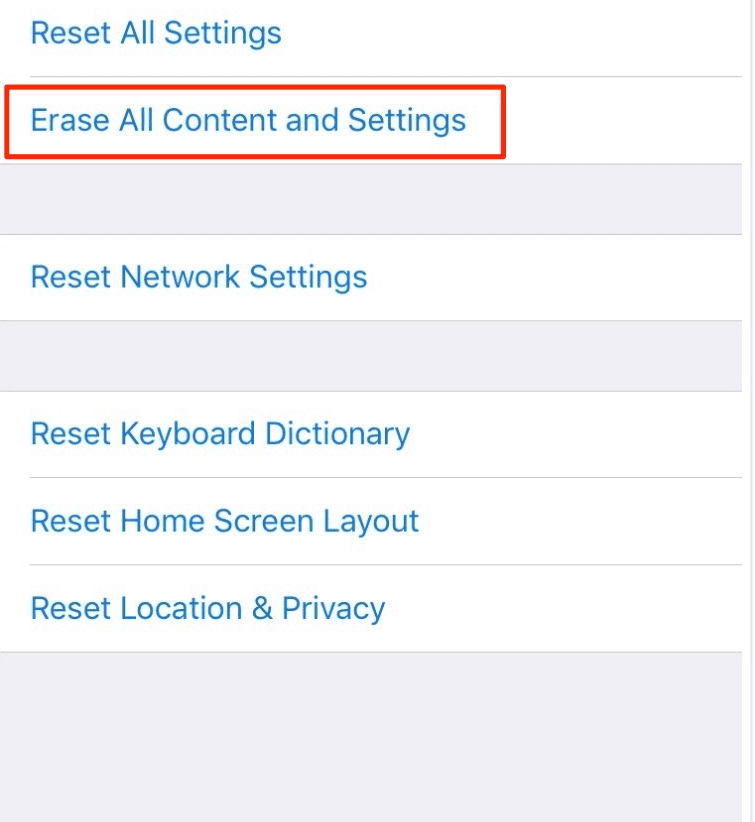
### **2\. How to recover iPhone Notes from iCloud backup**- Go to Settings > General > Reset> Erase all Contents and Settings
- On Apps & Data screen, tap Restore from iCloud Backup
- Sign in to your iCloud account
- Choose the last backup and Restore
3. How to restore Notes from iTunes
- Connect iPhone to PC/Mac
- Launch iTunes
- Select your iPhone under the Device list and choose the recent backup entry date
- Click Restore Backup
4. Recover iPhone Notes from ‘Recently Deleted.’
Once you delete Notes, they remain in the recently deleted folder on your iPhone for 30 days. After that, Notes are permanently deleted from the device.
Steps to restore from ‘Recently Deleted.’
- In the Notes app, tap Recently Deleted.
- Select the notes you want to restore
- Click Recover in the toolbar. The note moves to the Notes folder
5. Restore Notes from an e-mail account on iPhone
When you delete a Note from your iPhone, it remains in your e-mail account of your iPhone. So, for example, suppose you use Gmail on your iPhone, and all your Notes are saved to the e-mail address.
Steps to restore Notes from e-mail on iPhone
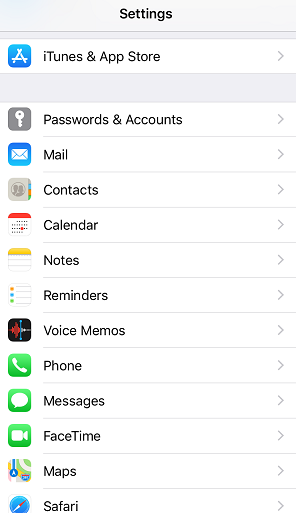
- Go to Setting > Accounts & Passwords
- Click on each email account (Gmail, Yahoo, AOL, etc.) one by one

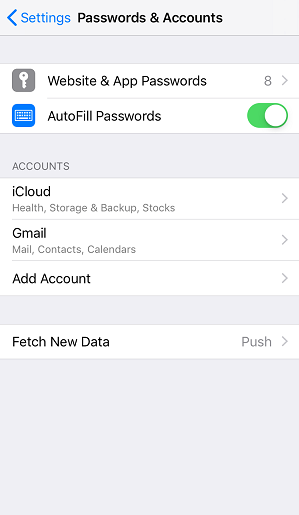
- Turn on Notes for each account

- Open the Notes app to see if they are back
Byte: Do you know the email accounts on your iPhone can store Contacts, Calendars, and Notes, apart from sending e-mails.
Wrapping Up
Notes are your best companion; you don’t want to part with them. Recover all or specific Notes with the help of iPhone notes recovery software.
However, you can also try to restore deleted Notes from an iCloud, e-mail accounts,s or recently deleted folders on your iPhone. However, Stellar iPhone Recovery software is the best solution for permanently deleted Notes in case of the absence of backup.
How to Recover FaceTime Call History on iPhone
Summary: Have you deleted or lost FaceTime calls from your iPhone? Once deleted from the call history, the Facetime calls are removed from the app’s history and vice versa. This post shares quick methods to restore FaceTime call history from any series of iPhone 15, 14, 13, 12, X, XS Max, XR, X, 8, 8 Plus, 7, and below versions and iPads’.
‘Just noticed, that the FaceTime call history suddenly disappeared. Cellular calls history is fine. I am using iOS 16.2, iPhone 14. I don’t have iTunes backup and don’t want to try iCloud backup as it will remove my current data. Is there any other way to get back FaceTime call history?’
‘I deleted the call history on my iPhone and without realizing that FaceTime calls will also be erased. How can I recover deleted FaceTime history?’
You love using FaceTime — Apple’s popular calling app, on your iOS device. It’s a free and easy way to connect with family and friends anywhere in the world through audio and video calls.
But what if ever you accidentally delete or lose FaceTime calls from your iPhone or iPad. They may be important calls you wanted to keep.
Since FaceTime calls are integrated into your recent calls list on iPhone, once deleted from the call history, the calls are removed from the app’s history as well and vice versa.
Here we share various methods to restore FaceTime call history on iPhone 14, 13, 12, 11, XS, XS Max, XR, X, 8, 8 Plus, 7, 7 Plus, 6 and below versions and iPad.
## **How to recover the lost or deleted FaceTime call history?**1. Restore FaceTime call history without iTunes/ iCloud backup
Deleted FaceTime history can be recovered by using Stellar Data Recovery for iPhone software. The software can restore lost FaceTime call history after accidental deletion, factory reset, app crash, jailbreak, and other issues.
The DIY software thoroughly scans your iPhone or iPad to recover the lost FaceTime call history.
In contrast to iTunes and iCloud backup, Stellar iPhone data recovery software lets you select and restore specific iPhone deleted call history along with the details like name, date, call duration, source country. This saves you from restoring other unnecessary data.
Step-by-step: Recover deleted/ lost FaceTime calls from iPhone
- Connect your iPhone to the computer
- Launch Stellar Data Recovery for iPhone
- Select Recover from iPhone on the left
- Select Contacts & Call Logs under What to Recover

- Click Next
- Preview and choose the FaceTime calls you want to restore from the list. Note: All the calls marked in red color are the deleted calls

- Click You can save the call history either on your computer or iPhone.

2. Recover FaceTime call history with iCloud
Stellar Data Recovery for iPhone can also restore FaceTime calls from iCloud backup on your iPhone or iPad. This method allows you to select and recover only the lost FaceTime call history from iCloud instead of restoring complete backup data.
Two methods to restore FaceTime log from iCloud:
- Restore lost/deleted FaceTime calls from iCloud without losing existing iPhone data
- Restore FaceTime call history from iCloud backup for free, deleting the current iPhone data
Method 1: Restore lost/deleted FaceTime calls from iCloud without losing existing iPhone data:
- Download Stellar Data Recovery for iPhone on your PC/ Mac
- Select Recover from iCloud Backup on main screen of software

- Select Contacts & Call Logs and click Next
- Enter the Apple ID and password. List of all available iCloud backup files appears. Select the relevant backup of your iPhone
- Click Scan

- Click Call History on the left window. Preview the existing and deleted FaceTime calls. Click Deep Scan, if you don’t find your required calls.

- Click Save to save the recovered call history either on iPhone or computer
Method 2: Restore FaceTime from iCloud backup for free (this deletes the current iPhone data)
- Go to Settings > General > Reset> Erase all Contents and Settings

- On Apps & Data screen, tap Restore from iCloud Backup

- Sign in to your iCloud account

- Choose the last backup and Restore
Note – The drawback of this method is that it deletes all your existing data from the iPhone.
Recover FaceTime calls from iTunes Backup
3. Recover FaceTime calls from iTunes Backup
FaceTime recovery from iTunes backup is also possible if you have enabled the backup in iTunes.
Restore FaceTime call log from iTunes either with the help of Stellar Data Recovery for iPhone or directly from your system without the help of software.
However, if you don’t want to part ways with your iPhone’s existing data and lose all the current photos, videos, etc. with the old backup file, take the help of Stellar Data Recovery for iPhone.
The software protects your current data on iPhone and recovers only the call history as required.
Two methods to restore FaceTime call history from iTunes
- Restore FaceTime call history from iTunes without losing existing iPhone data
- Restore FaceTime call history from iTunes backup, deleting the current iPhone data
Method 1: Restore FaceTime call history from iTunes without losing existing iPhone data
- Download Stellar Data Recovery for iPhone software on your PC/ Mac. Note: Connect your iPhone to a computer, if want to save the recovered FaceTime call history on iPhone.
- Select Recover from iTunes Backup on the main screen of the application.


- Select Contacts & Call Logs
- Click Next. From the list of the iTunes backup files, select the relevant iTunes backup

- Click Scan
- Click Call History. Preview the existing and deleted FaceTime calls. Click Deep Scan, if you don’t find your required calls.
- Click Save. You can save on your computer or iPhone
Method 2: Restore FaceTime call history from iTunes for free (this method deletes the current iPhone data)
- Connect iPhone to PC/ Mac
- Launch iTunes on your computer
- Select your iPhone under the Device list and choose the recent backup entry date

- Click Restore Backup
4. Contact Apple
Apple uses end-to-end encryption in FaceTime calls. It will not decrypt the content of your conversations. Apple may record and store information, such as to whom you had called and your iPhone/ iPad network configurations. It stores this information for up to 30 days. You don’t get the details like the content of the conversation or whether your call was answered or not.
Nevertheless, you can contact Apple requesting for FaceTime call logs by clicking on this link and submitting the request – Read More
Apple will get back to you.
Conclusion
iCloud and iTunes backup are the natural way for Apple users to recover FaceTime deleted call history. However, Apple’s solution though workable is not efficient when it comes to the recovery of specific types of data. The iTunes or iCloud backup recovery methods replace every existing data on your iPhone with an old/recent backup. You lose your current photos, videos, call history, messages, chats, etc.
Whereas Stellar Data Recovery for iPhone tackles this recovery issue more effectively. It recovers lost FaceTime calls and also keeps your current data intact on the iPhone.
The software works in all data loss situations due to deletion, jailbreak, water damage, factory reset, etc. You can restore FaceTime call history from any iPhone including series of iPhone 15, 14, 13, 12, 11, X, XS, XR, iPhone 8, iPhone 7, iPhone 6 and older versions. It is available for both Windows and macOS computers.
Apple will delete your photos in July. Here’s what you should do
Apple has recently announced that it will permanently delete photos from its users’ ‘My Photo Stream’ this month. This news has come as a surprise to the Apple community, as users struggle to understand the implications of this announcement and what necessary precautions can be taken. In this blog post, we will get into the details of this new move by Apple, explore the reasons behind it, and provide tips on how iPhone/iPad/Mac users can safeguard their precious photos.
Parental Control Software
## **The Announcement**_”_My Photo Stream is scheduled to be shut down on July 26, 2023. As part of this transition, new photo uploads to My Photo Stream from your devices will stop one month before, on June 26, 2023.
The photos in My Photo Stream are already stored on at least one of your devices, so as long as you have the device with your originals, you won’t lose any photos as part of this process. If a photo you want isn’t already in your Library on a particular iPhone, iPad, or Mac, make sure that you save it to your Library on that device…” Read more
What is Apple’s My Photo Stream?
My Photo Stream, launched in 2011, was designed to sync photos across multiple Apple devices such as iPhone, iPad, or Mac.
This feature automatically stores your most recent pictures (up to 1000) for approx. 30 days so you can view and download them easily from other Apple devices. After this period, photos are removed from My Photo Stream but remain in your device’s Photos app. However, this only shows photos and not your live images or videos.
How to Protect Your ‘My Photo Stream’ Pictures?
Apple, known for its commitment to user privacy and data security, has recommended several preventive measures to mitigate the risk of losing any important photo due to this update.
1. Move My Photo Stream images to your Library
Even if the pictures in My Photo Stream are already there on at least one of your Apple devices, you must save these pictures to your Photo Library to avoid losing them**.** Here’s how to copy My Photo Stream pictures to your Photo Library:
On your iPhone, iPad, or iPod Touch:
- Open the Photos app and tap Albums.
- Tap on My Photo Stream > Select.
- Select all the photos you want to save, then tap the Share button > Save Image.
On your Mac:
- Open the Photos app and then open the My Photo Stream
- Select the photos you want to save which aren’t currently in your photo library.
- Drag and drop them from the My Photo Stream album into your Library.
2. Move to iCloud Photos
To preserve your My Photo Stream images in their original and high-resolution version, you can transfer them to iCloud Photos.
If you already have an iCloud account, just enable iCloud Photos to automatically upload & sync every photo and video you capture on the device, making them accessible from anywhere.
To use the iCloud Photos service, you will require the following:
- iPhone running iOS 8.3 or later version.
- iPad with iPadOS 8.3 or later version.
- Mac running OS X Yosemite or later version.
How to set up iCloud Photos on your iPhone, iPad, or iPod touch?
- On your iPhone, iPad, or iPod touch, go to Settings.
- Next, click on [Your Name] > iCloud.
- Tap on Photos and do the following:
For iOS 16, iPadOS 16, or later versions: Toggle on the ‘Sync this [device]‘ option.
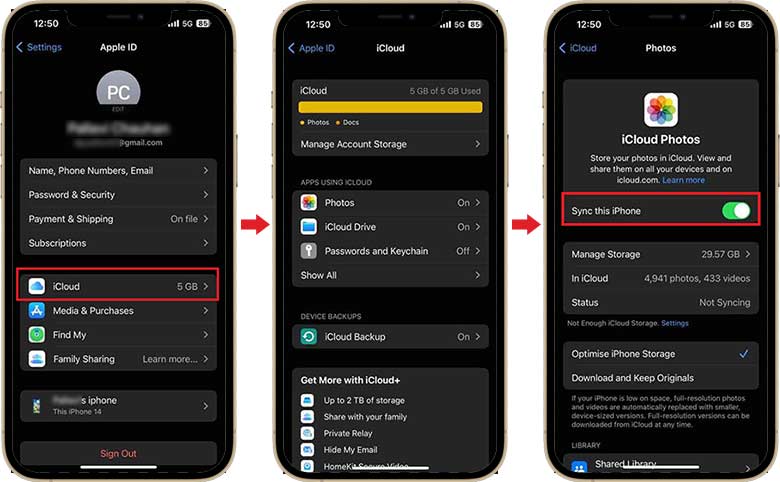
For iOS 15, iPadOS 15, or earlier versions: Turn on the iCloud Photos
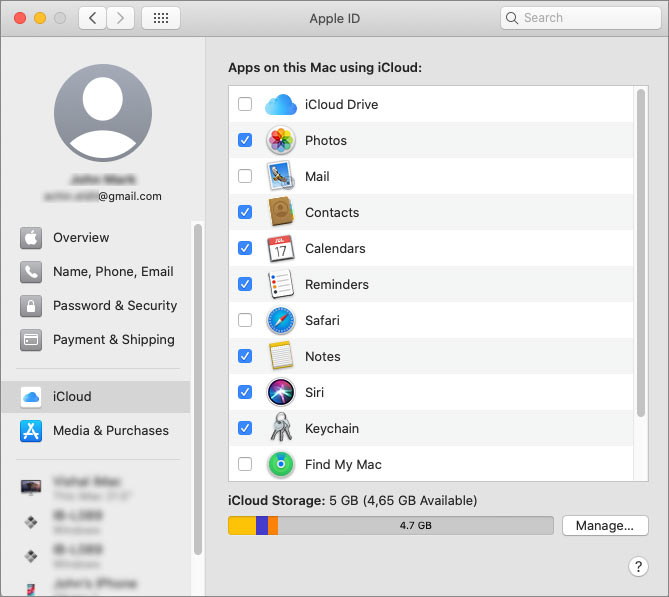
How to set up iCloud Photos on your Mac?
- On your Mac, go to Apple Menu and click on System Preferences.
- Click Apple ID and then select iCloud in the sidebar.
- Now, select Photos and turn on the switch next to Sync this Mac.
**
**
Don’t want to use iCloud Photos?
While iCloud Photos is a convenient option for many Apple users, it’s important to acknowledge that it is not the best fit for everyone. Limited free storage of 5GB or lack of cross-platform compatibility can compel Apple users to look for other alternatives.
Storage options, such as Google Photos, Microsoft OneDrive, Dropbox, external hard drives, etc., are available to ensure your iPhone Photos are safe and easily accessible.
The Bottom Line
Apple’s announcement of the potential discontinuation of My Photo Stream has understandably caused worry among its users. While a specific reason for this action remains undisclosed, they are actively addressing the issue to prevent data loss. In the meantime, iPhone users must take precautionary measures to safeguard their photos. They can simply move the My Photo Stream images to the Photo Library, iCloud Photos, or other backup folders.
How to Fix iPhone Storage Not Loading/Showing
The majority of smartphones require a certain amount of storage to operate properly. When you receive a low storage message, you may instinctively check your storage space but encounter the iPhone Storage Not Loading issue.
What could be the cause of such a bothersome problem? The bad news is that the root reason for this problem is unclear, but we’ve offered some fixes you can try to fix this issue.
There is yet another way to check the storage on your iPhone if you face the “iPhone Storage Not Showing” issue, and we’ll go over it in the following section.
How can I use a computer to check my storage?
You can check your iPhone’s storage using a computer with iTunes or Finder app installed.
- On a Mac running macOS Catalina 10.15 or later, launch the Finder or open iTunes on a PC or Mac running macOS Mojave 10.14 or an earlier version.
- You should use a cable to connect your phone and computer.
- Select your device in iTunes or Finder.
- You can see how much storage each type of content takes up by hovering your mouse over the storage bar.


How can I fix iPhone Storage Not Loading/Showing?
1. Wait a bit more
Some computing operations take a while to finish. Your phone’s storage may overflow with tons of app data, images, and other files if you’ve been using it for a while.
And each of them would have to load before reporting their combined size to the OS. Usually, loading takes about three minutes.
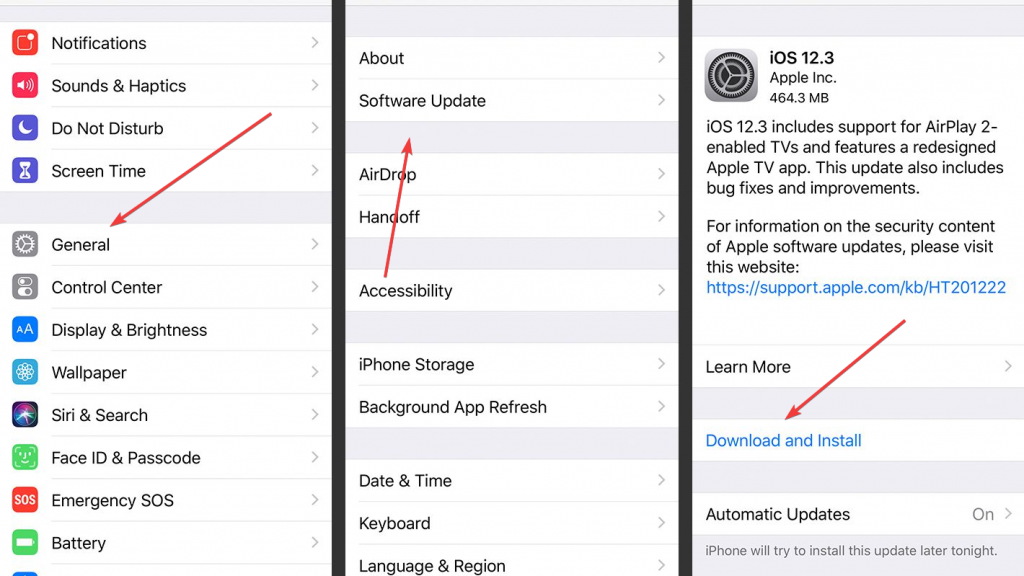
2. Update iOS
If your iOS version was outdated, your phone’s functionalities, including storage access, would not function properly. Additionally, updating the OS will get rid of any potential issues. Follow the procedures listed below to check and update your iOS version:
- Select General from the Settings menu.
- Click on Software Update. If any updates are available, download and install them.
3. Force Stops the App
The settings app itself can be the problem due to an app bug. Therefore, forcing the app to close is a valid option. This will make the software restart from scratch, wiping off part of the data and information it had in RAM.
- Access the app switcher (swipe up your finger from the bottom of the screen to bring up the menu or double-click the Home button on older iPhone models).
- Swipe up and drag the Settings card off the screen to force the app to close.
- Relaunch the Settings app to see if the problem persists.
4. Reconnect to iCloud
iOS has been designed in a way that it needs to be connected to iCloud to function flawlessly. Therefore, the storage loading error could also be linked to connectivity issues between these two. In this case, signing out of the service and then back in again might resolve the issue.
- Open the Settings application.
- Click your profile at the top. To sign out of the service, tap iCloud.
- Next, sign in once more using your iCloud password.
5. Fix the Issue Using Your PC
When you connect the cable, link your iPhone to your PC, and sync the storage, iTunes looks for any issues and either fixes them on its own or recommends methods to fix them by yourself. For any software-related issues with your phone, this is a great fix, and it may even repair your iPhone storage not updating problem.
- Connect your phone to computers that have iTunes installed on them with a lightning cord.
- The storage data should be able to sync with your smartphone automatically.
- If not, press the Sync button.
6. Factory Reset Your iPhone
You may fix any bugs that cause iPhone storage not to update by performing a factory reset. Furthermore, it would restore your OS version to its factory settings, resolving any problems that updates might have brought on.
The whole contents of your device will be deleted if you follow this method. You can either create a backup of your data or use a tool to restore it once your iPhone has been entirely deleted to prevent this.
- Go Settings app on your smartphone. Next, choose Reset after choosing General.
- Under Reset, among the few options, click Erase all Content and Settings.
- Next, choose Erase iPhone. After that, your smartphone will return to its factory default settings.
Recover your data using Stellar data recovery for iPhone:
Stellar Data Recovery for iPhone is a powerful program that can retrieve files that have been erased unintentionally or on purpose. To guarantee that Stellar Data Recovery for iPhone will recover your data, it offers a variety of data recovery techniques. Furthermore, you wouldn’t need to check manuals or other documentation to understand how to use the software because of its basic user interface, which makes the recovery process easy.
With Stellar Data Recovery for iPhone, your files, including voice recordings, notes, and Safari bookmarks, will be restored. What you should do is:
- Download and install Stellar Data Recovery for iPhone from the official website.
- Connect your iPhone to the PC through a cable.
- Launch the Stellar Data Recovery for iPhone, choose the type of data you wish to recover from the list, and click Next.
- Preview the recovered data, then Select and Save it to the chosen destination.

Why isn’t my iPhone storage loading?
When trying to check your iPhone’s storage, you will notice a small spinning wheel going back and forth if your phone is having storage problems since it cannot accurately represent the amount of storage that is accessible.
Furthermore, the loading issue may show an incorrect amount of storage. Some users reported this and other minor issues throughout the iOS 15 beta testing phase. Other factors contributing to this issue include iCloud service problems and application bugs.
Wrap up! Stellar is your ultimate backup
It is hard to download content or install apps on an iPhone with insufficient storage. Therefore, a factory reset would resolve your issue and clear the storage, enabling you to scan your device with Stellar Data Recovery for iPhone and retrieve any desired files.
And if a factory reset doesn’t fix iPhone storage not loading and showing problem, look for professional assistance with your problem. You can never be certain whether a storage issue results from faulty hardware or software.
FAQ:
- How do I create backups before wiping my iPhone clean?
Simply connect your phone to your computer, open iTunes, and choose the backup option, and the program will create a copy of your data that can be used to restore lost or deleted contents.
- Does Stellar Data Recovery for iPhone require a backup for successful file recovery?
Because the software searches iTunes for files, having a backup, there might be useful. However, the software can and will effortlessly restore your content even without any backups.
- Do I install the Stellar Data Recovery Software for iPhone on my smartphone?
The software cannot be installed or used on an iPhone or an Android smartphone. Because the software is compatible with the widely used Windows and Mac operating systems, you must first install it on a device using one of those operating systems before connecting your phone to it.
- Title: How to Recover Deleted Notes from iPhone? | Stellar
- Author: Nova
- Created at : 2024-08-20 20:11:10
- Updated at : 2024-08-21 20:11:10
- Link: https://blog-min.techidaily.com/how-to-recover-deleted-notes-from-iphone-stellar-by-stellar-data-recovery-ios-iphone-data-recovery/
- License: This work is licensed under CC BY-NC-SA 4.0.