
How to Recover Deleted Notes from iPhone XS? | Stellar
How to Recover Deleted Notes from iPhone?
Summary: Lost Notes from iPhone after iOS upgrade, deletion, factory reset, etc.? This post shares 5 best ways to restore lost Notes on iPhone. Also learn how Stellar Data Recovery for iPhone quickly recovers only the missing Notes from your iPhone.


When Matt opened his iPhone 14 Notes after iOS 16.4 upgrade, he found many of his old Notes had disappeared. He was repenting about the upgrade and now looking for ways to get back his Notes on his iPhone.
Notes are important for those who make optimum use of this app. However, if you have also lost them for some reason, this post shares how to restore the lost Notes on your iPhone.
Often underrated, iPhone Notes app lets you do much more than you can think of — scribbling thoughts, ideas, checklists, sketching, adding photos, and videos, attaching location links from Maps, etc.
However, Notes may disappear after an iOS update, jailbreak, factory reset, accidental deletion, etc.
How to Recover Notes on iPhone?
Usually, Notes can be recovered from iCloud, iTunes, or your recently deleted Notes App folder.
But, if in a situation when you have deleted Notes and also don’t have a backup in iCloud, an iPhone recovery software is the way to go.
Top 5 methods that can recover lost Notes from iPhone
- Recover iPhone Notes & Attachments without backup
- Restore Notes from iCloud backup
- Restore from iTunes backup
- Recover Recently Deleted folder
- Restore Notes from e-mail account on iPhone
1. Recover iPhone Notes & Attachments without Backup
There is a plethora of iPhone recovery software. Carefully pick that supports Notes and attachments recovery. Most importantly, the iPhone recovery software should be 100% secure to download and free from viruses.
Advanced tools such as Stellar Data Recovery for iPhone can recover even permanently deleted Notes and their attachments. It is fast, easy to use, and supports the latest iOS and iPhone versions.
Stellar Data Recovery for iPhone restores in situations like,
- In the absence of iCloud backup
- Factory Reset of iPhone
- Unable to retrieve Notes from iCloud/ iTunes
- iPhone is damaged or stolen
- and others
The software lets you recover deleted Notes from iPhone , iPad, iCloud, and iTunes. It thoroughly scans the iOS device and backup to restore every bit of lost data. If you don’t find the required Notes after running the initial quick scan, it offers a second-level Deep Scan for a more comprehensive search.
Unlike Apple backups — iCloud and iTunes, you can select only those Notes and their attachments that you need. Thus, the software protects you from unnecessary data recovery.
You can view the lost and deleted Notes of iPhone in the demo version of the software.
Step-by-step: Recover deleted/ lost Notes and Attachments on iPhone
- Download Stellar Data Recovery for iPhone on your Mac/PC
- Connect your iPhone to your computer and launch the software
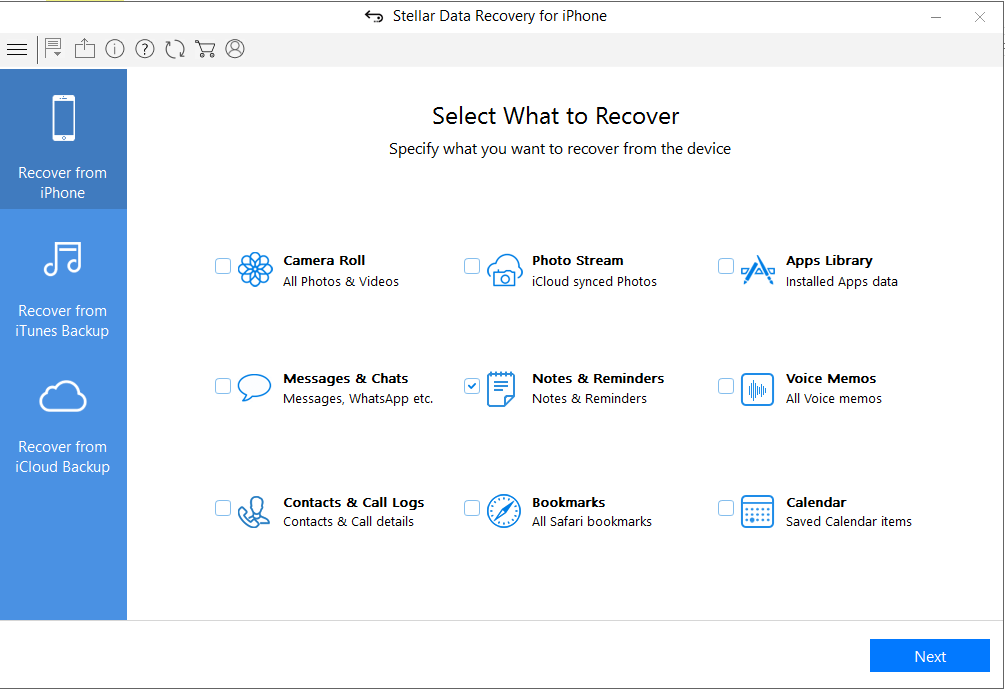
- Choose “Recover from iPhone”, select “Notes & Reminders” and click “Next”
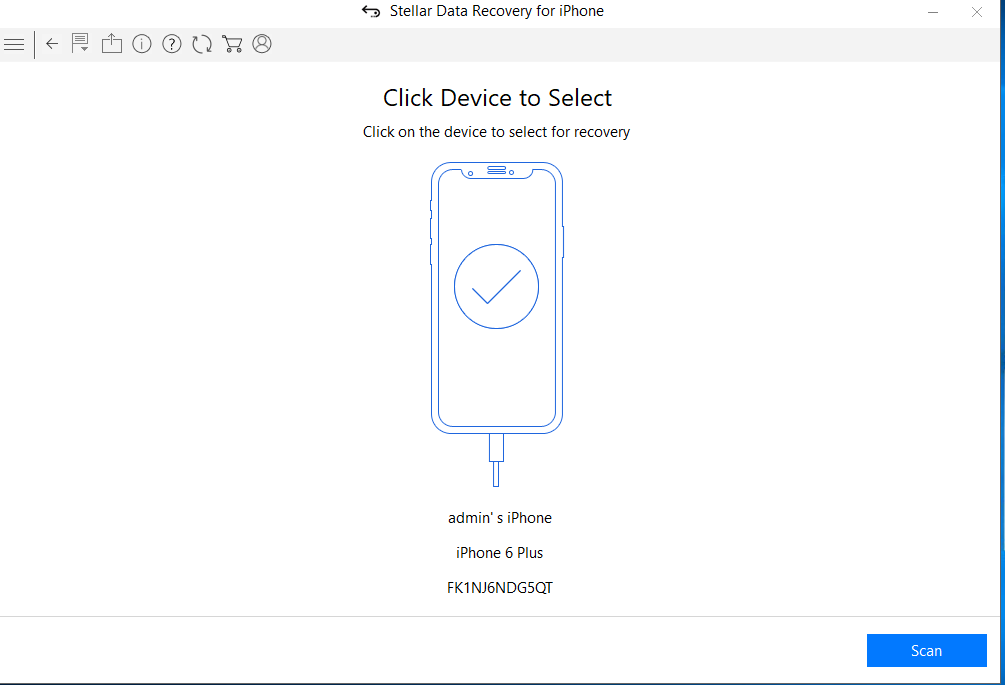
- Select your device and click “Scan.”
- After scanning, select Notes on your left pane to preview in the right pane before saving.

- Click on Save and browse the desired location to save the recovered notes.
Recover Notes from Apple Backups
iCloud and iTunes backup storage protect against data loss. If your Notes are backed up in any of the two, recover the files from there.
Just log in through your Apple ID and restore Notes from backup.
However, one of the major drawbacks of this method is that it will remove and replace all your existing iPhone data, including Camera Roll, apps, messages, music, etc.

2. How to recover iPhone Notes from iCloud backup
- Go to Settings > General > Reset> Erase all Contents and Settings
- On Apps & Data screen, tap Restore from iCloud Backup
- Sign in to your iCloud account
- Choose the last backup and Restore
3. How to restore Notes from iTunes
- Connect iPhone to PC/Mac
- Launch iTunes
- Select your iPhone under the Device list and choose the recent backup entry date
- Click Restore Backup
4. Recover iPhone Notes from ‘Recently Deleted.’
Once you delete Notes, they remain in the recently deleted folder on your iPhone for 30 days. After that, Notes are permanently deleted from the device.
Steps to restore from ‘Recently Deleted.’
- In the Notes app, tap Recently Deleted.
- Select the notes you want to restore
- Click Recover in the toolbar. The note moves to the Notes folder
5. Restore Notes from an e-mail account on iPhone
When you delete a Note from your iPhone, it remains in your e-mail account of your iPhone. So, for example, suppose you use Gmail on your iPhone, and all your Notes are saved to the e-mail address.
Steps to restore Notes from e-mail on iPhone
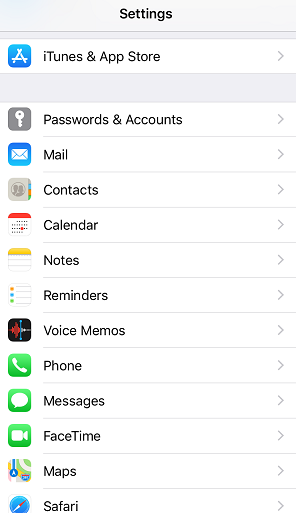
- Go to Setting > Accounts & Passwords
- Click on each email account (Gmail, Yahoo, AOL, etc.) one by one
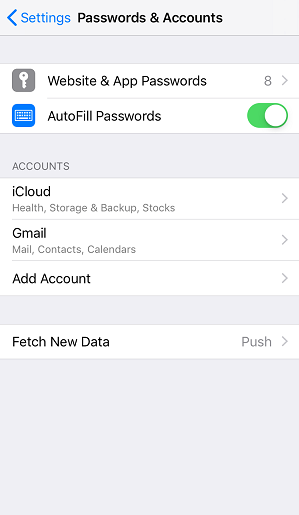
- Turn on Notes for each account

- Open the Notes app to see if they are back
Byte: Do you know the email accounts on your iPhone can store Contacts, Calendars, and Notes, apart from sending e-mails.
Wrapping Up
Notes are your best companion; you don’t want to part with them. Recover all or specific Notes with the help of iPhone notes recovery software.
However, you can also try to restore deleted Notes from an iCloud, e-mail accounts,s or recently deleted folders on your iPhone. However, Stellar iPhone Recovery software is the best solution for permanently deleted Notes in case of the absence of backup.
Forgot iPhone Password? – Here are the Best Solutions
Summary: Can’t remember your iPhone password? This post brings the best solutions to fix forgotten password issue and restore your data from the locked iPhone.
Setting up a password on your iPhone is a great way to keep unauthorized access at bay but what if you forget the password? On a positive note, you can still access or restore your iPhone Data and this blog highlights some best solutions for forgotten iPhone password.
Password enabled iPhone ensures that no one can access it without your permission and is a great way to stop prying eyes from accessing your personal data. But what if you itself forget the password? Isn’t that a problematic situation? Obviously, as you cannot unlock your iPhone and access the data. Further, if you enter the wrong password six times, then a message is displayed stating that the iPhone has been disabled.
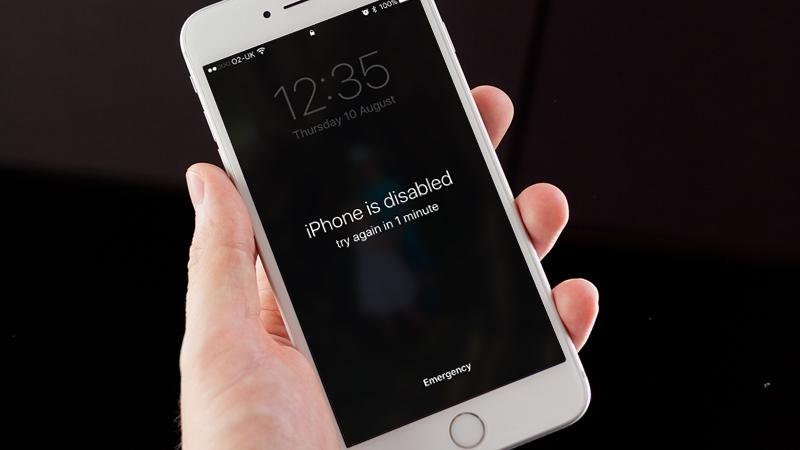 Figure 1. If you enter the wrong password six times in a row, then a message will be displayed stating that your iPhone has been disabled.
If you’re lucky then you might be able to unlock your iPhone and access the data stored on it else there is a probability that you may end up losing your data in the process of unlocking it.
Forgot iPhone passcode? What to do next?
Alright, I know it’s next to impossible that you will ever forget your passcode but we cannot overlook the fact that, yes there is a chance that you may forget it. The majority of us will say that we use fingerprint identity sensor (Touch ID) and hardly use a numeric passcode. Well, suppose your Touch ID stops working properly and to fix it you need to go to Settings < Touch ID & Passcode < Enter the Passcode.
Wait! What! You need to enter the passcode to get the Touch ID working again and you thought that you’d never need to remember the passcode. If you have a backup of your data, then all you have to do is simply reset your iPhone and restore your data from the backup. Unfortunately, you’ll only restore data that has been backed up and any new data added after that won’t be there. That said, let’s delve into some of the best solutions for forgotten iPhone password.
If you’ve forgotten the password, these options will help you out:
- Erase your iOS device with iTunes to remove the password
- Erase the passcode with iCloud
- Use Recovery mode if you’re unable to connect to either iCloud or iTunes
- Leverage an iPhone data recovery to recover deleted/lost data
Erase your iPhone with iTunes, restore files from it and remove the passcode
If you’ve synced your iPhone with iTunes, you can restore your files from it. Further, this will erase all the data and the passcode. To restore your data and remove the passcode, follow these steps:
i. Connect your iPhone to your computer and launch iTunes
ii. If you’re asked for the passcode, try another computer with which you’ve synced your iPhone, else proceed with either iCloud or Recovery mode
iii. Sync your iPhone with iTunes and make a backup of it
iv. On your iPhone set up the screen, choose Restore from iTunes backup
v. In iTunes select your iPhone and select the relevant backup
This process will restore all your data on iPhone. Now, configure a new passcode and never forget it.
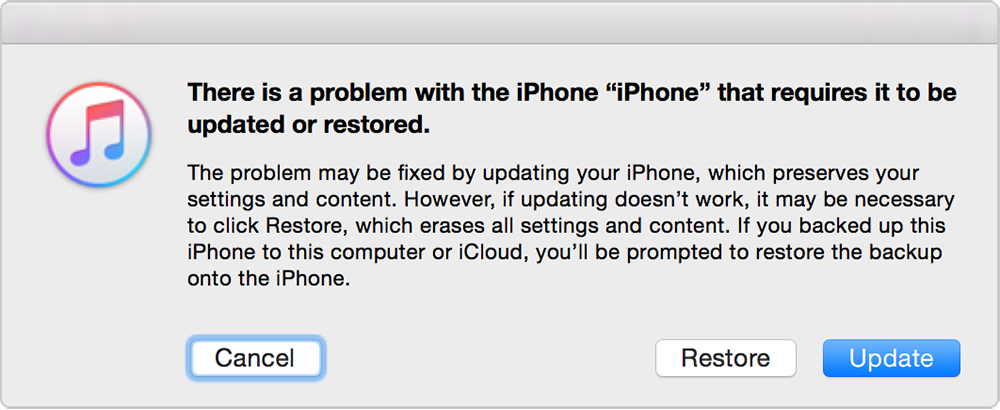
Figure 2 illustrates to erase the data & passcode and to restore your iPhone
Erase the passcode with iCloud
Follow these steps to erase the passcode of your iPhone with iCloud:
i. Go to iCloud.com and sign in with your valid Apple credentials to view the iCloud dashboard.
ii. At the top of the dashboard, select ‘All Devices’ and select your iPhone from the given list
iii. Click on ‘Erase’ to erase the passcode
iv. On the setup screen on your iPhone, choose the restore from a backup option to restore files from the iCloud backup
Important: You can erase your iPhone with Find My iPhone as long as it is connected to a Wi-Fi or cellular network.
Use Recovery mode to erase the passcode
If you’ve never synced your iPhone with iTunes or iCloud, then you need to erase the passcode in the Recovery mode. Follow these steps to erase the passcode:
i. Connect your iPhone to your system and force restart it. Different versions of iPhone have different settings; therefore, follow these settings depending on your iPhone
- iPhone 8/8 Plus: Press and release the Volume up button and then quickly press and release the Volume down button. Press and hold the Side button until the recovery mode screen appears
- iPhone 7/7 Plus: Press and keep holding both the Side and Volume down buttons until you see the recovery mode screen
- iPhone 6S and earlier: Press and keep holding the Home and the Side buttons until the recovery mode screen appears
ii. Finally, after restarting the iPhone, select Restore from the given options
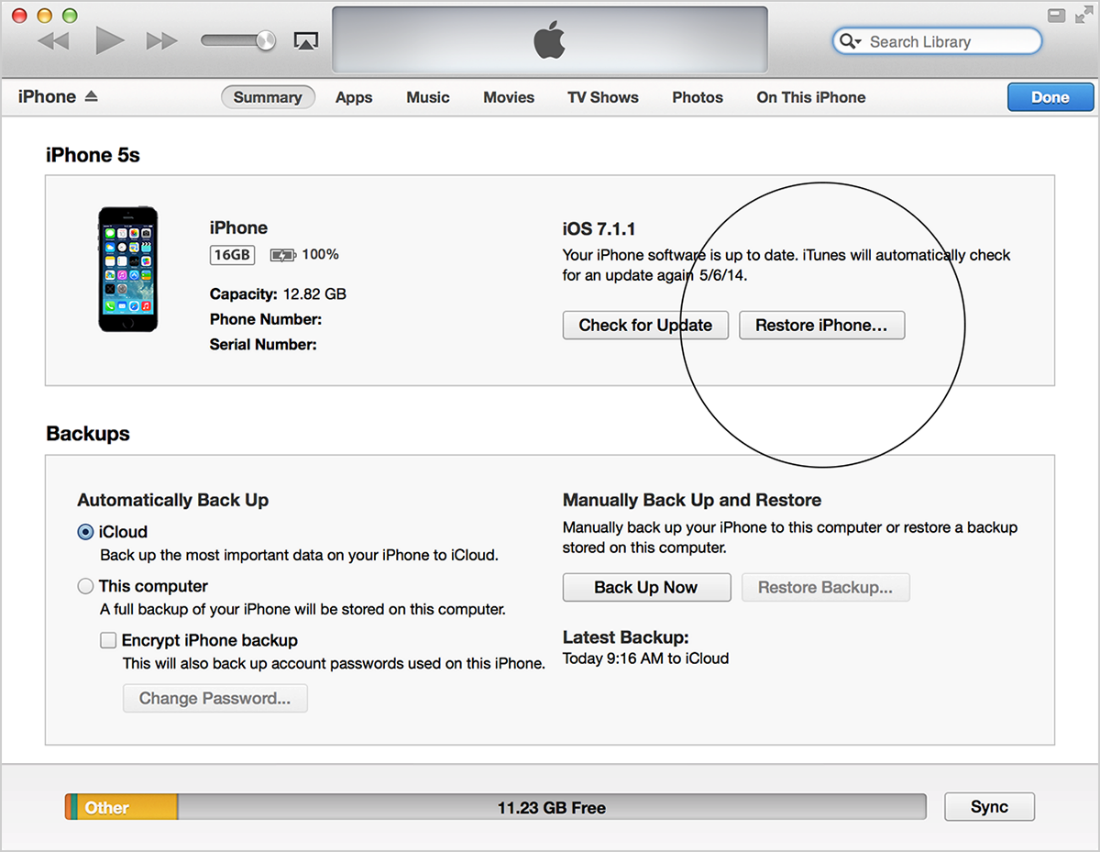
Figure 3 illustrates to restore iPhone via recovery mode
iii. Wait for the process to finish and then restore your files to your iPhone and set up a new passcode
Get more help
If due to any reason you lose your data stored on iPhone during the whole process, then you can utilize an iPhone data recovery software and recover all your lost data. Stellar Data Recovery for iPhone is a robust iPhone data recovery software which efficiently brings back all your lost data. Moreover, the software facilitates three recovery option namely:
- Recover from iPhone
- Recover from iTunes Backup
- Recover from iCloud backup
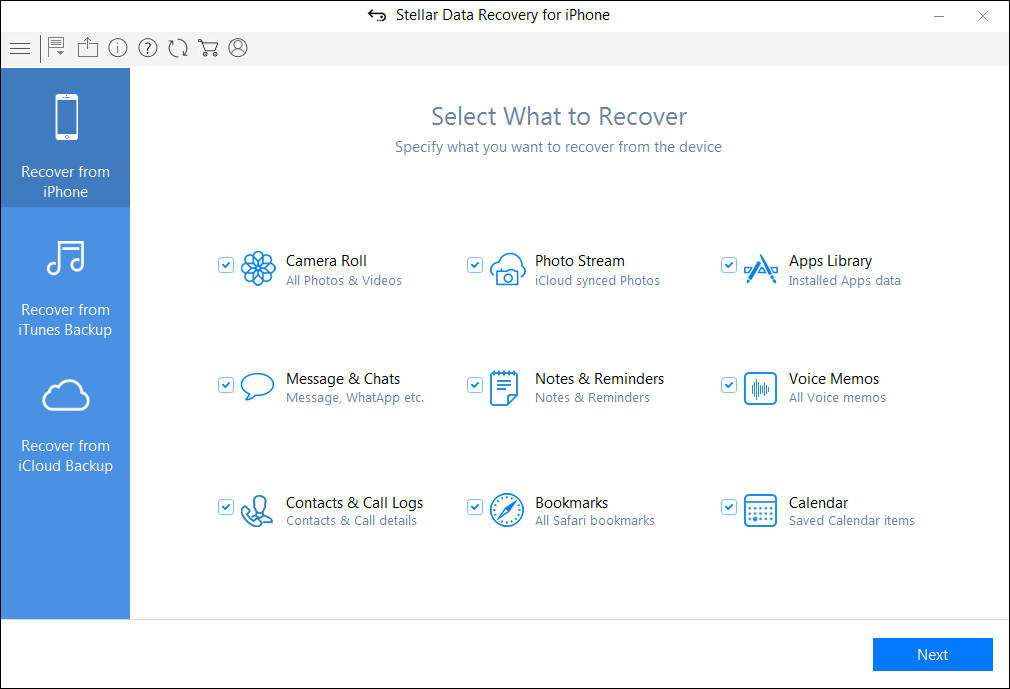
Figure 3 illustrates the home screen of Stellar Data Recovery for iPhone software
At Last
After restoring your iPhone , make sure that you never ever forget the passcode. The key is to create a strong passcode which is easy to remember. Further, if your iPhone gets stuck in recovery mode or due to any reason you’re unable to unlock your device, contact Apple support or visit the nearest service centre.
How to Delete All Photos from iPhone Beyond Scope of Recovery?
Summary: Learn how to delete all photos from your iPhone beyond the scope of recovery with this comprehensive guide. We’ve also mentioned an iPhone eraser software that securely erases your photos for good and safeguards your privacy.

Are you planning to sell or discard your iPhone? If yes, it’s important to ensure that your personal data, such as photos and videos, etc. is deleted and cannot be recovered even by a professional data recovery tool. To protect your privacy and prevent unauthorized access to your deleted iPhone photos, make sure your iPhone is wiped clean of all your previous photos before you sell, donate, or discard it.
In this blog, we will talk about different ways to delete photos from iPhones beyond the scope of recovery.
How to Delete All Photos from iPhone?
Before deleting all photos from the iPhone, it’s important to take a backup of all photos to avoid any accidental data loss situation. There are various ways to back up your iPhone photos:

1. iCloud
Use iCloud to back up all your photos automatically. To sync iCloud with Photos –
- Go to Settings > [your name] > iCloud > Photos, and turn on iCloud Photos.

Your photos will be backed up to iCloud automatically if your device has enough storage space and is connected to Wi-Fi.
2. iTunes:
You can even use iTunes to back up your iPhone photos. To do this,
- Connect your iPhone to your system.
- Launch iTunes and then select your device.
- Click Summary > “Back Up Now” to create a backup of all your data, including photos.

Once you have backed up all your photos, proceed forward with deleting them from your iPhone.
Method 1: Delete Images From Photos and Recently Deleted Folder
Photos app saves images shot from iPhone as well as those received on chats. You can delete all the photos from your iPhone via the Photos app. Here’s how to do it.
- Open the Photos app on your iPhone.
- Go to the Library tab, tap All Photos, and then tap Select.
- Select one or multiple photos you want to delete.
- Tap on the Trash icon and then confirm to delete the photos.

When you delete a photo from the iPhone, it’s not deleted permanently. Instead, it is moved to the Recently Deleted folder, where the deleted photos stay for 30 days before being permanently deleted.
To permanently delete photos from the Recently Deleted folder, follow these steps:
- Open the Photos app > Albums.
- Scroll down, then tap on Recently Deleted.
- Next, tap Select and choose the photos that you want to delete permanently.
- Tap Delete and then confirm to delete the photos.

Remember, if iCloud sync is enabled, photos deleted from iPhone will be deleted on iCloud. That is why if you want to delete photos from your iPhone but not on iCloud, make sure iCloud sync is disabled for Photos.
Method 2: Factory Reset Your iPhone
Apple’s brilliant feature of the ‘Erase All Content and Settings’ option brings your device to default settings by erasing all your iPhone data, etc.
The factory reset will delete all the settings, photos, audio, videos, messages, notes, call history, search history, app history, passcodes, and any other data on your iPhone.
However, remember erasing your iPhone data with the ‘Erase All Content and Settings’ doesn’t delete your data permanently. It means that all your iPhone data including photos are still recoverable with the help of robust iPhone data recovery software .
Steps to Factory Reset iPhone
- Open Settings on your iPhone.
- Go to General and tap on Transfer or Reset iPhone.
- Click on the Erase All Content and Settings options.
- Click Continue and enter your iPhone passcode.
- Next, click Erase iPhone. This will fully wipe your device clean.

Note: Don’t forget to back up your iPhone data on iCloud or iTunes before initiating the factory reset. Because this backed-up data can be accessed on your computer or new iPhone.
Stellar Eraser for iPhone is the best way to delete permanently erase all photos as well as other data of the iPhone. The software erases all your photos, contacts, videos, chats, iMessage, browser search history, third-party apps data, and more from your iPhone.
The Stellar iPhone Eraser tool is the best way to clean or delete iPhone data. This tool deletes iPhone data permanently making it impossible to recover it from any software. It is the best data erasure tool for iOS devices before you exchange, sell, recycle, or give them away.
The software works with all iPhones and iPad versions, such as iPhone 14 to lower versions till iPhone 4 and supports iOS versions from iOS 6.0 to iOS 16.
![]()
Steps- How to Delete All Photos From iPhone via Stellar Eraser for iPhone
- Download and install Stellar Eraser for iPhone on your Windows and Mac systems.
- Launch the software and click on the Erase Data option.

- In the next Erase iPhone Data screen, click Next.

- Connect your iPhone to the system when prompted and click Erase.

- Click Yes to start the process of erasure.


- Click OK, once all the data is successfully erased.

All the data including photos and videos get permanently erased from iPhone beyond the scope of recovery.

Conclusion
Deleting all photos from your iPhone beyond the scope of recovery is crucial to protect your privacy and prevent unauthorized access to your personal data. By following the methods above, you can ensure that all your photos are deleted permanently from your iPhone. However, the best way to delete all photos from iPhone is by using Stellar Eraser for iPhone. The software will help you erase photos and other data from your iPhone so that it is impossible to recover it using any data recovery software.
![]()
FAQ
1. How to Delete Photos from iCloud?
To delete Photos from iCloud, follow these steps:
- Open Settings > tap on your Apple ID > iCloud.
- Then tap Manage Storage and select Photos.
- Next tap Disable and Delete. It will disable your photos from being saved on your iCloud account.
2. How to delete apps on iPhone permanently?
If you want to delete apps on your iPhone for managing the storage space then you directly remove it from Home Screen or delete it from App Library.
3. How to delete documents and data on iPhone?
Documents and Data folder may contain browsing history, cookies, cache, temporary files, database files and other information specific to the app. You can delete them easily by following this detailed guide .
How to Reset iPhone without Losing Data?
Summary: Sometimes, resetting an iPhone is essential to fix minor issues like iPhone crashing, freezing, or getting stuck at the Apple logo. But the iPhone reset process can delete important data and settings on your device. Read this post to learn smart ways to reset your iPhone without data loss. Moreover, you can also download this quick tool to reset your iPhone without losing data.
“Yesterday, my iPhone stopped working suddenly. I have been trying multiple ways to fix it since then; even tried the force reboot method. Should I simply reset my iPhone? How do I do it without losing my device data?”
Resetting an iPhone can sometimes become a necessity, whether due to sudden freezing up of your device, software glitches, or slow performance. Often, when your iPhone gets stuck on the Apple logo or suddenly crashes, you can reset your iPhone to fix this minor issue.
A factory reset is also necessary if you want to sell your iPhone and want to start fresh. When resetting your iPhone, it will become an empty slate with no pictures, contacts, videos, downloaded applications, playlists, or anything else. An iPhone reset restores your iPhone to its initial configuration and original factory settings.
However, be careful with this method as resetting your iPhone deletes all files & settings on the device. For those looking to reset iPhone without losing their precious data, this blog is the answer. Let’s read on to find some simple ways to do so while keeping our data intact.
How to reset your iPhone without Losing Data?
Before starting, it’s crucial to back up your iPhone data to avoid losing important files and folders. You can back up your iPhone using iCloud, iTunes, or Finder on Mac or PC.
Next, follow the step-by-step instructions on resetting an iPhone using iPhone Settings, iPhone erasure software, and iTunes.
Method 1: Reset iPhone Without Losing Data via Settings
To reset iPhone without losing data, you need to use the ‘Reset’ feature in your iPhone. This feature has different options on how you would like to reset- whether through the ‘Reset All Settings’ or the ‘Reset Network Settings’ option.
The Reset All Settings option will remove or reset privacy settings, keyword dictionary, location settings, etc., to default. At the same time, Reset Network Settings will remove previously used networks and VPN settings. Resetting the Network Settings will turn off the cellular data roaming and remove previously used Wi-Fi settings of your iPhone.
Moreover, no data or media is deleted from iPhone when choosing the Reset All Settings or Reset Network Settings option.
Steps to Reset iPhone Using the ‘Reset All Settings’ option
- On the iPhone, navigate to Settings > General.
- Tap on Transfer or Reset iPhone.
- Click Reset options.

- Next, click the Reset All Settings option.
- Then enter the iPhone passcode.
- Now, click Reset All Settings. This process will take a couple of minutes to reset the privacy settings, keyword dictionary, location settings to default, but will keep the rest of your data fully secure.

Method 2: Reset iPhone via Stellar Toolkit for iPhone Tool
Sometimes, the ‘Reset All Settings’ option doesn’t solve your iPhone issue. In such a case, try resetting the iPhone with the help of trusted software. Stellar Toolkit for iPhone is a secure and professional tool that can help you reset your iPhone to fix various iOS issues without losing data.
Also, you can also use Stellar Toolkit for iPhone to fix iOS related issues like- iPhone crashing, stuck at the Apple logo, etc.
This tool’s ‘Repair iPhone’ feature will first download the fresh copy of the iOS version present in your device from the official website. Then it will install the freshly downloaded iOS version on your iPhone after removing the existing one from your device. The software will reset your iPhone, making it seem new without removing or deleting your data.
Stellar Toolkit for iPhone is compatible with the latest iPhone 14, 13, 12, and below series and even all iPad versions, such as iPad Air, iPad Mini, and others.


Step-by-Step: How to reset iPhone with Stellar Toolkit for iPhone:
Step 1: Download Stellar Toolkit for iPhone on your Mac or Windows PC and connect your iPhone to the system using a USB cable.
Step 2: Select Repair iPhone module from the launch screen of the software.

Step 3: On the Repair iPhone screen, click the Next button.

Step 4: Click on the iPhone icon.
Step 5: Click the Download button to download the latest iOS or iPadOS version of the firmware file. If you have already downloaded the firmware before, select Import.

Step 6: After downloading the firmware file, click the Repair button to start repairing.

Step 7: Once you receive the message —The repairing process of the selected iOS device is completed, click OK.

Restart your iPhone to see if the iOS issues are resolved.
Method 3: Reset iPhone Without Losing Data via Recovery Mode
To reset your iPhone, you can use iTunes or Finder app. You need to use Mac or Windows PC to access the recovery mode of your iPhone and reset the device. This method will erase all your device data, so take a backup of your iPhone before proceeding.
Steps to reset iPhone via Recovery
- Open iTunes on your Mac or Windows system.
- Connect your iPhone to the computer and then put your iPhone into Recovery Mode .
- Once your device has entered the Recovery Mode, a message ‘you’re in Recovery Mode’ will pop up. Click OK.

- Click on your iPhone when it appears in iTunes, then click Summary.
- Now, select the “Restore iPhone” option on the right pane.

- Click Restore to confirm. It might take a while for your iPhone to reset; don’t disconnect your device from the computer until the reset process is completed.

- Once the restore process is complete, set up your iPhone as new or restore it from a backup.
Conclusion
You can factory reset your iPhone without fearing data loss by trying different methods mentioned in this blog. Reset All Settings/ Reset Network Settings feature of iPhone can reset your device; however, it may not always work. You can even use iTunes to reset your iPhone, but you will lose all your device data.
Or use the ‘Repair iPhone’ feature of Stellar Toolkit for iPhone software to permanently reset your iPhone without losing data. This tool can repair iOS issues like iPhone crashing, Black Screen of Death, and iPhone stuck at the Apple logo.
Download the free trial version to evaluate the features of the software.

FAQs
How to remotely erase iPhone data?
If your iPhone is lost or stolen, you can protect your iPhone data from misuse by remotely erasing its data using the iCloud website.
How to restore or set up your iPhone after reset?
Use an iCloud backup to restore your iPhone after a factory reset.
- Title: How to Recover Deleted Notes from iPhone XS? | Stellar
- Author: Nova
- Created at : 2024-08-20 20:11:15
- Updated at : 2024-08-21 20:11:15
- Link: https://blog-min.techidaily.com/how-to-recover-deleted-notes-from-iphone-xs-stellar-by-stellar-data-recovery-ios-iphone-data-recovery/
- License: This work is licensed under CC BY-NC-SA 4.0.