
How to recover deleted photos after deleting from Recently Deleted on iPhone 11 | Stellar
How to recover deleted photos after deleting from ‘Recently Deleted’ on iPhone
The Recently Deleted folder in the Photos App on iPhone is there to recover accidentally deleted photos. However, even if your important photos are deleted from ‘Recently Deleted’ you are not yet out of luck. This post shares how to recover deleted photos after deleting them from ‘Recently Deleted’ on iPhone.


‘I deleted some important pictures on my iPhone and also deleted them from the ‘Recently Deleted’ folder. Is there any possible way to recover photos after permanently deleting them from the iPhone?’
When you delete photos from your iPhone, they first go to the ‘Recently Deleted’ folder of the Photos App. Here the photos remain for 30 days. Hence, any picture deleted 30 days ago automatically gets removed after this period, and this time permanently.
However, sometimes you may accidentally delete valuable pictures too. To make the situation worse, even remove image files from ‘Recently Deleted’ or realize the mistake 30 days after deleting!
In any case, can you get photos back after deleting from ‘Recently Deleted’ on your iPhone?
This post addresses the problem situation of permanently deleted photos from iPhones and finds the appropriate solution.
Let’s read on…
Understanding permanently deleted photo recovery from iPhone
You can recover deleted photos from your iPhone after deleting them from the Recently Deleted folder or 30 days of automatic deletion.
Of course, backups — iCloud and iTunes are the immediate go-through solution in such a case. However, Apple backups have their own disadvantage. Photo recovery with iCloud and iTunes results in the loss of your current data on your iPhone!
That’s the reason, iCloud and iTunes are frustrating when you want to get back only a few photos.
So, if you are using another backup service such as Google Drive or OneDrive for iPhone photo backup, they are more convenient.
In addition, apart from backup, iPhone recovery software is just the right solution. It works even when you don’t have a backup or don’t want to eliminate your existing data on your iPhone or iPad.
1. Recover ‘Recently Deleted’ photos from iCloud backup
Use an iCloud backup to recover deleted photos from your iPhone after 30 days of deleting them from the ‘Recently Deleted’ folder. iCloud backup is the best solution to retrieve permanently deleted photos from iPhone free.
Just get on to the below steps to recover deleted photos from iCloud:
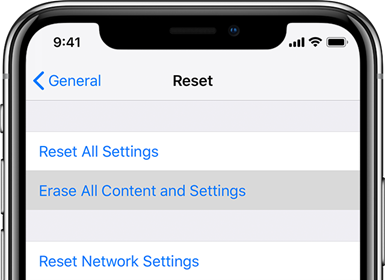
- On your iPhone, navigate to Settings > General > Reset> Erase all Contents and Settings.
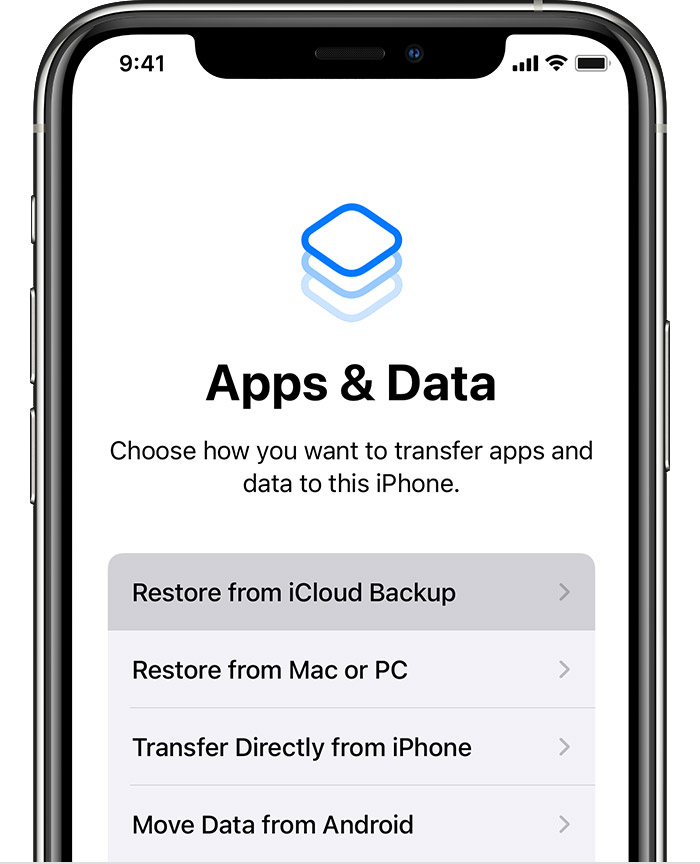
- Select Erase Now in the dialog box and follow the prompts until you reach the Apps & Data screen.
- Click on Restore from iCloud Backup.
- Sign in to your iCloud account.
- Select the recent backup from the list that has the deleted pictures. Click Restore to get back the deleted photos on your iPhone.
2. Recover permanently deleted photos from iTunes
If you have an iTunes backup, look for the deleted photos after deleting from ‘Recently Deleted’ in your iTunes backup.
Below are the quick steps:
- Connect your iPhone to your PC or Mac and launch iTunes.
- Click on your iPhone under the device list and select the recent backup date that may contain the permanently deleted pictures.
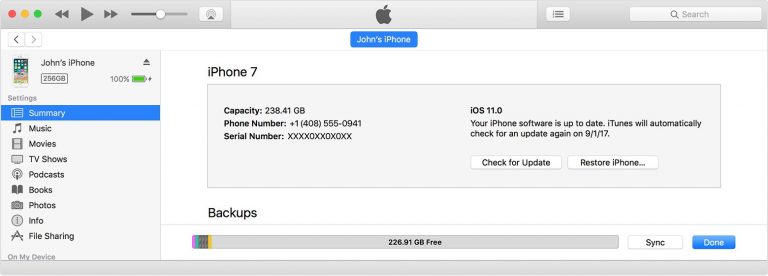
- Click Restore Backup.
That’s it. You get back the deleted photos on your iPhone. However, this will replace the current data on the iPhone with the old backup data.
3. Recover recently deleted photos from cloud storage
iPhone users, who don’t completely rely on iCloud and iTunes for backup, use third-party cloud backup solutions. If you are one of those, check your cloud storage for permanently deleted photos on your iPhone. Cloud backups such as Google Drive, iCloud, Dropbox, OneDrive, etc., are efficient ways to save and protect your photos on your iPhone from permanent loss. You can restore photos on a PC , Mac, or iPhone by using cloud storage.
4. Recover Recently Deleted Photos with iPhone recovery software [Recommended]
Some of you may not have photos backed up in iCloud or iTunes. It’s also possible you couldn’t find the desired picture in the backup. In any case, use the best iPhone recovery software to get pictures back after deleting from Recently Deleted on iPhone.
Try one of the popularly used Stellar Data Recovery for iPhone . It is compatible with not just old iPhones like iPhone 6, 7, 8, X, etc., but also the latest series of iPhone 15. You also get the latest iOS 17 support.
Stellar Data Recovery for iPhone can help to recover photos from the iPhone without backup. Additionally, you can retrieve lost or deleted contacts, messages, chat messages, Notes, Reminders, etc.
Besides, when you recover photos by using iTunes or iCloud, it gets back all data from the backup file whereas with the software you can select and recover only what you require. Unlike photo recovery from backup, the software doesn’t replace the existing data with old backup data on your iPhone.
Here are the steps to recover deleted photos after deleting them from the Recently Deleted folder on your iPhone:
- Connect your iPhone to your PC or Mac computer.
- Download and launch Stellar Data Recovery for iPhone on a computer.


- On the first screen, select Recover from iPhone on the left pane. If required, you can choose the ‘Recover from iCloud’ or ‘Recover from iTunes’ option.
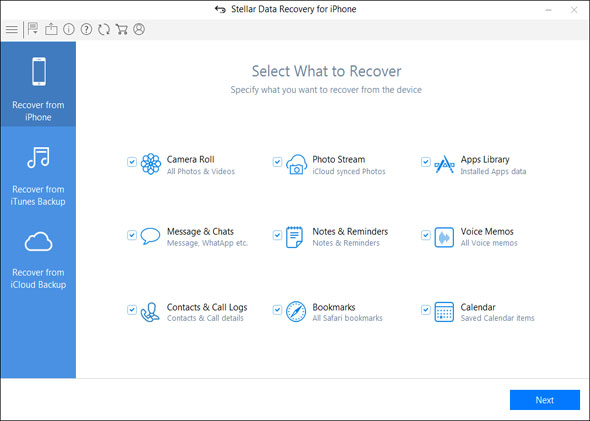
- Check-in Camera Roll and Photo Stream and click Next.
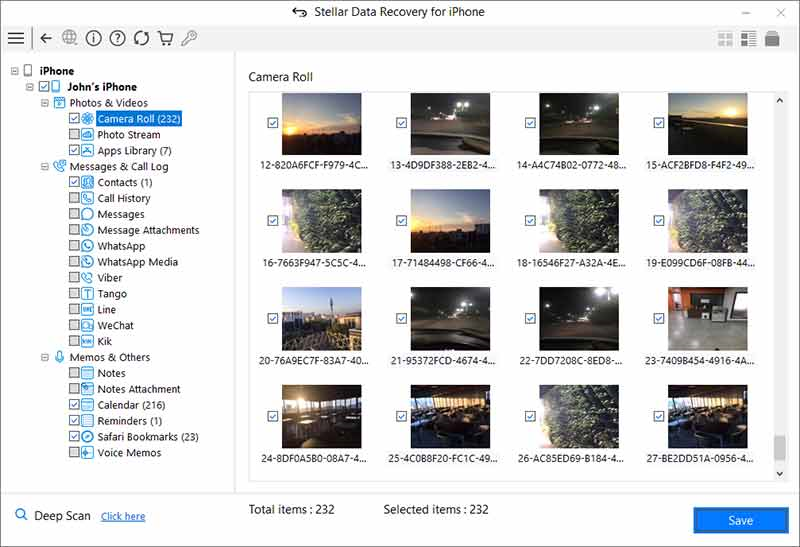
- The software scans and displays the recovered pictures. See preview, select, and save the desired photos.
Conclusion
An iPhone recovery software is the perfect approach to recover deleted photos from an iPhone after 30 days of deleting them from the ‘Recently Deleted’ folder. We recommend Stellar Data Recovery for iPhone. It is fast and can retrieve permanently deleted photos without affecting the current data of your iPhone. Unlike iCloud and iTunes backup, which annoyingly replace existing data with the old backup data, the software can restore only those photos, which you have deleted.
Take the free trial and ensure that Stellar Data Recovery for iPhone can retrieve permanently deleted photos from your iPhone.
How to fix error 1015 while restoring iPhone
Summary: Error 1015 appears during iPhone restore through iTunes. If you are getting this error, its probably due to attempts of jailbreak or iPhone downgrade. This post shares 7 ways to fix iPhone restore error 1015 on iPhone 7, 8, XS, XR, SE, 11, 12, and above models.
Are you receiving iPhone error 1015 during restore with iTunes as below?
Case 1: _I have an old iPhone 3G stuck in Recovery Mode. I am trying to restore it through iTunes. But at the end of the restore, I get unknown error 1015. How can I fix error 1015 on my own?
_
Case 2: I tried to restore my iPhone in iTunes. It won’t finish because of this error 1015 code. I have the latest software. I’ve restarted and updated my iPhone too. Still the same error message appears.
Have you used tools like TinyUmbrella to restore firmware that Apple no longer supports?
Did you try to jailbreak your iPhone by using applications like Redsn0w or Pwnage?
If yes, that’s the reason behind the problem. The error 1015 is typically caused by attempts of jailbreak or downgrade on the iOS device. Such activities are a violation of the iOS end-user software license agreement. They can make your iPhone vulnerable to malware and prone to errors like 1015.
Naturally, Apple wouldn’t encourage jailbreak or downgrading to an older iOS version. Thus, you are bound to face problems when trying the unauthorized iOS modifications on your iPhone or iPad.
Thus, the probable reasons for the iPhone restore error 1015 are:
- Downgrade of iOS
- Jailbreak
- Outdated software
- Third-party tools on your computer
This post shares all the possible solutions to fix iPhone restore error 1015.
You can apply these solutions on all iPhones including 3G, 4, 5, 6, 6s, 7, 8, X and above models using any iOS version.
1. I****nstall the latest version of iTunes
Make sure your computer has the latest iTunes before restoring iPhone using iTunes.
On Windows PC, update iTunes by following Help > Check for Updates in the top menu bar of iTunes.
On Mac, go to App Store > Updates > click Install, if you see any iTunes updates.
2. Update iOS
iOS updates usually fix error 1015 which appears while restoring iPhone with iTunes.
On your iPhone, go to Settings > General > Software Update and tap Download and Install.
3. Update Windows or macOS
System update ensures smooth and error-free performance of your computer.
If you are using Windows PC, follow Start > Settings > Update & Security > Windows Update.
On Mac, click on Apple icon and select S****oftware Update and click on updates available.
4. Uninstall third-party software on PC/ Mac
Third-party software often create conflict among programs while performing iPhone restore or update with iTunes. You may not receive the error 1015, after uninstalling such programs.
On Windows computer go to Start > All apps. Find the third-party software and right-click on it. Choose Uninstall.
On Mac, in the Finder window, go to Applications. Find and select the third-party software. In the top menu bar, go to File and select Move to Trash. Next, click on Empty Trash.
5. Put your iPhone in Recovery Mode and restore
Before you put your iPhone on Recovery Mode, ensure you are using the latest version of iTunes. Next, follow the below steps to restore iPhone using the Recovery Mode.
- Connect your iPhone to computer
- Open iTunes
- Force restart your iPhone while it is still connected to the computer, until you see the iTunes logo (To force restart use home and/or volume button depending on your iPhone version)

- On your computer, you will receive a dialog box asking to either Update or Restore.

- Click Update
After the Update process completes, you can restore your iPhone from iTunes or iCloud backup without facing the error 1015.
Note: If you are unable to enter Recovery Mode on your iPhone due to jailbreak, you may use programs like RecBoot, which are used to enter and exit the Recovery Mode on iPhone, iPad or iPod touch.
6. Delete the IPSW file on your computer
Files with .ipsw extensions on your computer are backups and temporary files of your iOS updates. Many iPhone users who were receiving error 1015 while restoring iPhone were able to fix the problem by deleting these files on their PC or Mac.
Deleting these backup files doesn’t impact your iTunes or iPhone function.
Note: You can get rid of the old IPSW files and keep the most recent ones.
Location of .IPSW files on your computer:
On Windows XP: C:\Documents and Settings\[username]\Application Data\Apple Computer\iTunes\iPhone Software Update
On Windows Vista/7: C:\Users\[username]\AppData\Roaming\Apple Computer\iTunes\iPhone Software Updates
On Mac OS X: ~/Library/iTunes/iPhone Software Updates
7. Restore your iPhone into DFU Mode
When no other method is helpful, choose to put your iPhone in DFU (Device Firmware Update) mode. Whether you are receiving the iPhone error 1015 due to jailbreaking your iOS device or not, the DFU mode solution is your last resort to fix error 1015.
As in Recovery Mode, bringing your iOS device to DFU mode will lead to loss of iPhone data. Thus, before you attempt this, make sure you have iCloud or iTunes backup.
Steps to DFU mode for iPhone 7, 6s and below users:
- Connect your iPhone to computer (even if your iPhone is off)
- For 8 seconds, press and hold the Sleep button and Home button (iPhone 6s and below users) or the volume down button (iPhone 7). Next, release the Sleep button but continue to hold the Home button or the volume down button until iTunes shows message _‘iTunes has detected an iPhone in recovery mode._’

- Leave the Home button or volume down button. The iPhone screen turns black indicating the device has entered DFU mode
- Next, you can restore your iPhone using iTunes
Steps to DFU mode for iPhone X, 8, or 8 Plus users
- Connect your iPhone to computer (even if your iPhone is off)
- Quickly press and release the volume up button, quickly press and release the volume down button, and press and hold the side button until your iPhone screen turns black
- Press and hold the volume down button while continue holding the side button for 5 seconds
- Release the side button and continue holding the volume down button until your iPhone shows up in iTunes.
- Next, release the volume button. Your iPhone is in DFU mode
Now restore iPhone with iTunes. You can exit DFU Mode by force restarting your iPhone.
| Unable to restore iPhone from iTunes after Recovery Mode or DFU Mode?
If after putting your iOS device to Recovery or DFU mode you are unable to restore iPhone, download Stellar Data Recovery for iPhone The DIY software for Mac and PC can easily restore the data from iPhone, iCloud, and iTunes.


|
| — |
To Sum Up
Naturally, the error code 1015 is annoying when you quickly want to restore your iPhone using iTunes.
The error usually appears when your software is not updated, you have attempted jailbreak or downgraded your iPhone’s iOS.
The post shares 7 different ways you can try to fix the problem. Begin with the simpler troubleshooting such as updating your iOS, Windows/ macOS and iTunes. Uninstalling third-party security software or deleting the IPSW files on your computer has also worked for many in resolving the error 1015.
In case these methods don’t work, then go for the tougher solutions like bringing iPhone to Recovery Mode or DFU Mode which lead to iPhone data loss. They are the harsher solutions to the problem, but assure you don’t receive error 1015 while restoring from iTunes. But make sure you have iCloud and iTunes backup before attempting these two methods. Else you would need an iPhone data recovery software such as Stellar Data Recovery for iPhone to restore your lost iPhone data. The software is quick and efficient way to get back lost data in cases of jailbreak, downgrade of iOS and restore errors.
Apple will delete your photos in July. Here’s what you should do
Apple has recently announced that it will permanently delete photos from its users’ ‘My Photo Stream’ this month. This news has come as a surprise to the Apple community, as users struggle to understand the implications of this announcement and what necessary precautions can be taken. In this blog post, we will get into the details of this new move by Apple, explore the reasons behind it, and provide tips on how iPhone/iPad/Mac users can safeguard their precious photos.
The Announcement
_”_My Photo Stream is scheduled to be shut down on July 26, 2023. As part of this transition, new photo uploads to My Photo Stream from your devices will stop one month before, on June 26, 2023.
The photos in My Photo Stream are already stored on at least one of your devices, so as long as you have the device with your originals, you won’t lose any photos as part of this process. If a photo you want isn’t already in your Library on a particular iPhone, iPad, or Mac, make sure that you save it to your Library on that device…” Read more

What is Apple’s My Photo Stream?
My Photo Stream, launched in 2011, was designed to sync photos across multiple Apple devices such as iPhone, iPad, or Mac.
This feature automatically stores your most recent pictures (up to 1000) for approx. 30 days so you can view and download them easily from other Apple devices. After this period, photos are removed from My Photo Stream but remain in your device’s Photos app. However, this only shows photos and not your live images or videos.
How to Protect Your ‘My Photo Stream’ Pictures?
Apple, known for its commitment to user privacy and data security, has recommended several preventive measures to mitigate the risk of losing any important photo due to this update.

1. Move My Photo Stream images to your Library
Even if the pictures in My Photo Stream are already there on at least one of your Apple devices, you must save these pictures to your Photo Library to avoid losing them**.** Here’s how to copy My Photo Stream pictures to your Photo Library:
On your iPhone, iPad, or iPod Touch:
- Open the Photos app and tap Albums.
- Tap on My Photo Stream > Select.
- Select all the photos you want to save, then tap the Share button > Save Image.
On your Mac:
- Open the Photos app and then open the My Photo Stream
- Select the photos you want to save which aren’t currently in your photo library.
- Drag and drop them from the My Photo Stream album into your Library.
2. Move to iCloud Photos
To preserve your My Photo Stream images in their original and high-resolution version, you can transfer them to iCloud Photos.
If you already have an iCloud account, just enable iCloud Photos to automatically upload & sync every photo and video you capture on the device, making them accessible from anywhere.
To use the iCloud Photos service, you will require the following:
- iPhone running iOS 8.3 or later version.
- iPad with iPadOS 8.3 or later version.
- Mac running OS X Yosemite or later version.
How to set up iCloud Photos on your iPhone, iPad, or iPod touch?
- On your iPhone, iPad, or iPod touch, go to Settings.
- Next, click on [Your Name] > iCloud.
- Tap on Photos and do the following:
For iOS 16, iPadOS 16, or later versions: Toggle on the ‘Sync this [device]‘ option.
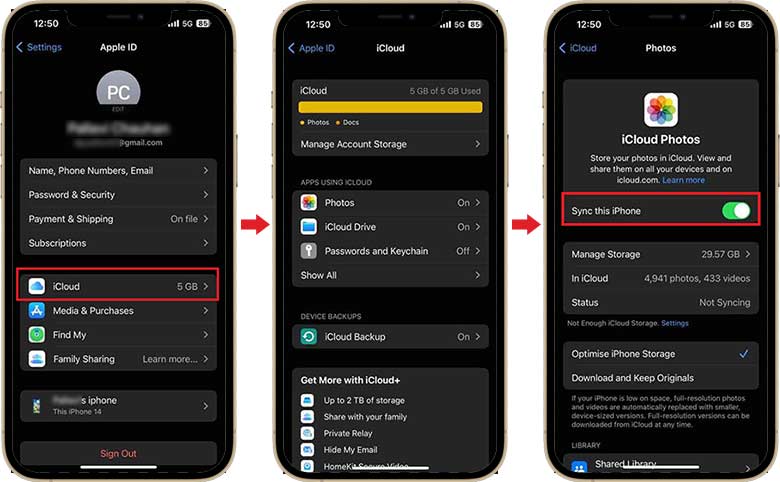
For iOS 15, iPadOS 15, or earlier versions: Turn on the iCloud Photos
How to set up iCloud Photos on your Mac?
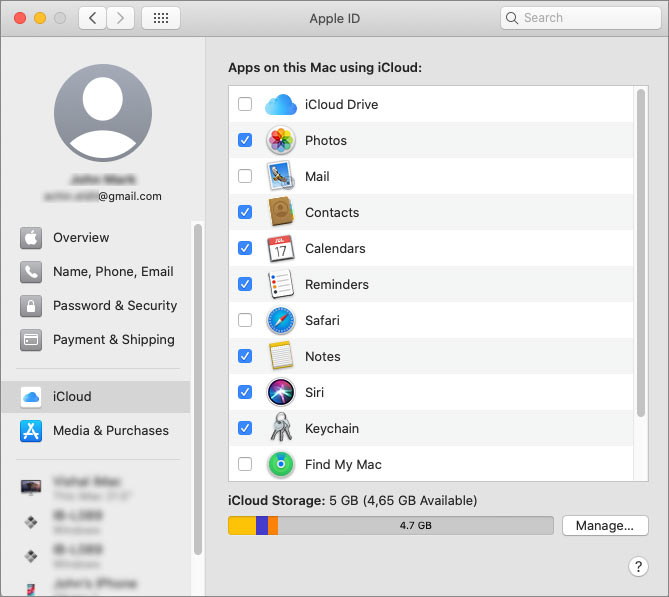
- On your Mac, go to Apple Menu and click on System Preferences.
- Click Apple ID and then select iCloud in the sidebar.
- Now, select Photos and turn on the switch next to Sync this Mac.
**
**
Don’t want to use iCloud Photos?
While iCloud Photos is a convenient option for many Apple users, it’s important to acknowledge that it is not the best fit for everyone. Limited free storage of 5GB or lack of cross-platform compatibility can compel Apple users to look for other alternatives.
Storage options, such as Google Photos, Microsoft OneDrive, Dropbox, external hard drives, etc., are available to ensure your iPhone Photos are safe and easily accessible.
The Bottom Line
Apple’s announcement of the potential discontinuation of My Photo Stream has understandably caused worry among its users. While a specific reason for this action remains undisclosed, they are actively addressing the issue to prevent data loss. In the meantime, iPhone users must take precautionary measures to safeguard their photos. They can simply move the My Photo Stream images to the Photo Library, iCloud Photos, or other backup folders.
How to Recover Lost Data from iTunes Backup File?
If you have lost iPhone data and are unable to restore it from the iTunes backup file, use Stellar Data Recovery for iPhone. The software quickly recovers lost or deleted iPhone data from iTunes.
Stellar Data Recovery for iPhone is the best iPhone data recovery tool to recover data from iTunes backup files. The tool uses a sophisticated algorithm, which scans through the entire backup file to recover data. You can easily restore saved iOS data like Messages, Call History, Calendar, Notes, etc., from the backup file.
Note: Make sure your Mac or PC is updated and you are using the latest version of iTunes.
Follow the below steps to recover lost data from iTunes backup file:
1. Launch ‘Stellar Data Recovery for iPhone’ tool on your computer.

Figure: Home screen of Stellar Data Recovery for iPhone
2. Click ‘Recover iTunes Backup’ option on the left. The software scans the system for iTunes backup files and lists them along with the date of creation.
3. Select an iTunes backup from which you want to restore data.
4. On the left pane, click on the type of data that you want to recover. You can restore Camera Roll, Photo Stream, Contacts, Messages, Message Attachments, Call history, Calendar, Reminder, Voice Memo, Notes, Notes Attachments, Safari Bookmarks, WhatsApp, WhatsApp Attachments, Line, Kik Viber, Tango, WeChat, and Apps Library.
The software lets you preview, select, recover, and also search for specific photos, videos, messages, and other data.
5. Select what you want to recover and click on Save. Select a destination to save the iPhone data.

- Title: How to recover deleted photos after deleting from Recently Deleted on iPhone 11 | Stellar
- Author: Nova
- Created at : 2024-08-20 20:11:19
- Updated at : 2024-08-21 20:11:19
- Link: https://blog-min.techidaily.com/how-to-recover-deleted-photos-after-deleting-from-recently-deleted-on-iphone-11-stellar-by-stellar-data-recovery-ios-iphone-data-recovery/
- License: This work is licensed under CC BY-NC-SA 4.0.