
How to Recover deleted pictures on iPhone 14? 5 Best Solutions | Stellar
How to Recover deleted pictures on iPhone? 5 Best Solutions
For many iPhone users, photos are the most important data stored on their device – so losing those photos can be a disaster.
However, even if you accidentally deleted some or all of your pictures on iPhone, you can get them back.
We’ll discuss how to recover deleted photos on your iPhone with or without backup.
How to Recover Deleted Pictures on iPhone?
There are five best solutions to recover deleted pictures on iPhone. Use the solution that fits your needs and helps you recover your lost pictures.
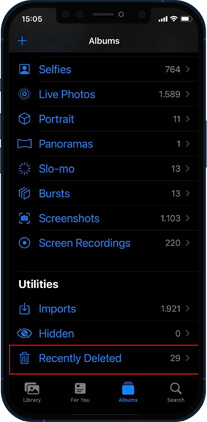
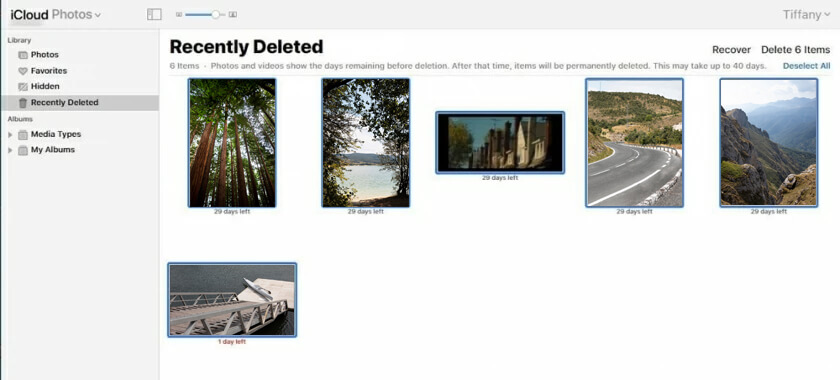
1. Recover Deleted Pictures on iPhone from Recently Deleted Albums
Pictures taken with the iPhone Camera application are saved by default in the Photos application. If a photo or video is deleted, it’s moved to the Recently Deleted folder in the Photos app. This folder is the same as your computer’s Recycle Bin and retains the deleted photos for 30 days. Once this period expires, your photos are permanently deleted from this folder. Perform these steps if you want to recover recently deleted photos on your iPhone:
- Open the Photos app.
- Tap on Albums at the bottom.


- Scroll down to find the Recently Deleted folder.
- Tap on the Select option at the top-right corner of the screen.


- Select the deleted photos you want to recover on your iPhone.
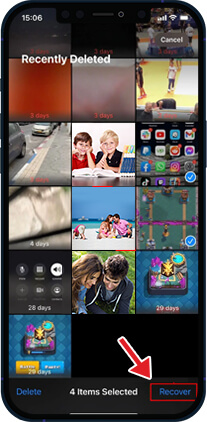
- Now, tap Recover, and the pictures will be returned to their original iPhone albums.
Note – If you want to restore all the deleted photos from your Recently Deleted folder, tap on the Recover All button.
How to Recover Deleted Pictures on iPhone From a Backup?
If your photos are not in the Recently Deleted folder, you might get them back by restoring your iPhone from a previous backup. There are three ways to restore deleted photos on iPhone – iCloud website, iTunes backup, or Finder.
When recovering photos from your iPhone from backup, pay attention to the date of creation of your backups. Use the most recent backup but don’t delete all older backups. It’s always good to have multiple backups if something goes wrong.
2. Recover Photos on iPhone using iCloud via the iCloud website
Apple’s iCloud Backup helps you recover deleted photos from your iPhone to your system. For iCloud to automatically back up all your pictures and videos, you must first set up and enable iCloud Photos on your device. Here’s how to enable iCloud Photos to Backup all your photos:
- Open the Settings app on your iPhone.
- Tap iCloud and then go to Photos.
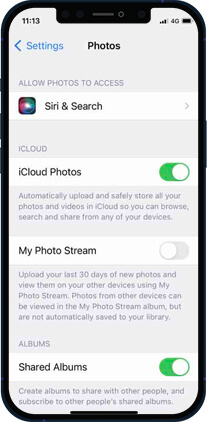
- Toggle on iCloud Photos to enable it.
To restore photos from iCloud, follow these steps:
- Go to the iCloud Website and log in with your Apple credentials.

- Once logged in, select ‘Photos’ from the app list.
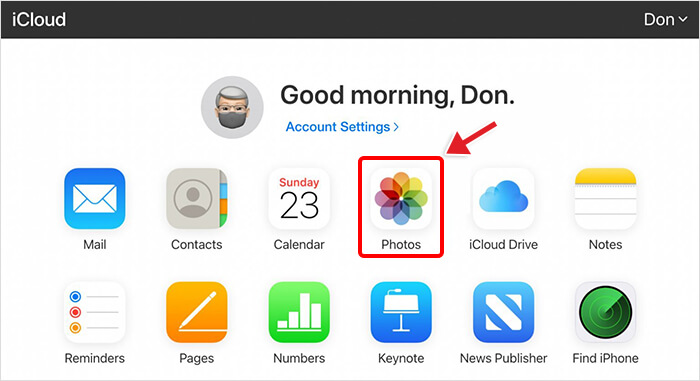
- Go to Recently Deleted Album, select the photos you wish to restore, and click Recover.
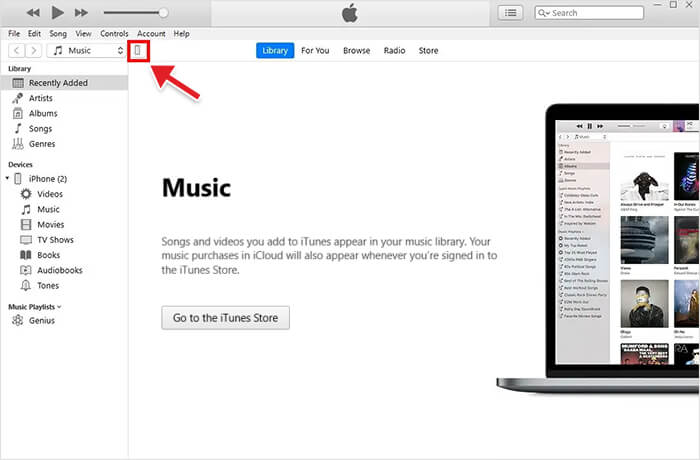
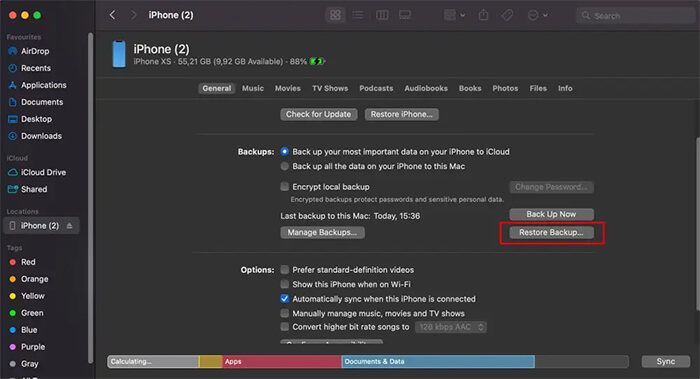
3. Recover Photos on iPhone using iTunes
Many iPhone users use iTunes backup to recover their deleted photos and videos. This Apple’s proprietary tool syncs your iPhone files to your PC or Mac. Follow the steps to recover deleted photos from iTunes backup:
- Connect your iPhone to your Mac system with macOS Mojave or an earlier version.
- Click on the iPhone icon at the upper-left corner of your iTunes window.
- Click the Summary tab in the left pane.
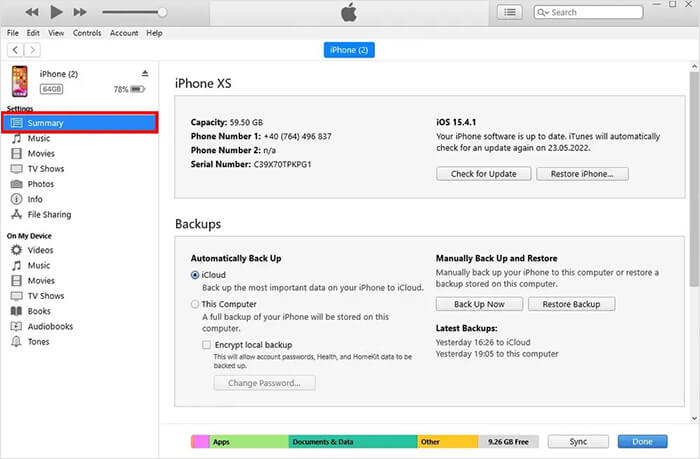
- Now in the Backups section, click on Restore Backup.
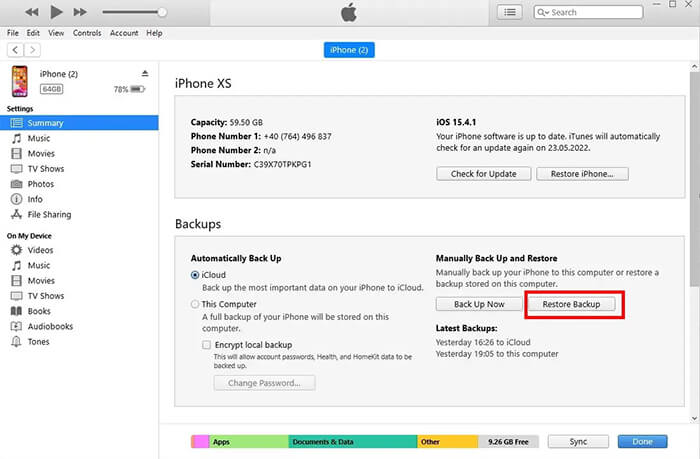
- Select the backup you want your phone to use.
Note - macOS Mojave is the last version of Apple’s OS to ship with iTunes. In macOS Catalina and newer version, iTunes is split into different apps: Podcasts, Books, TV, and Music. Moreover, Finder is used to manage and sync content on your iPhone, iPad, and iPod touch.
- Once the restoration process is complete, check the Photos app to see if the deleted photos were recovered. If not, try repeating the process and return to the most recent backup or choose an older backup.
4. Recover Deleted Pictures on iPhone using Finder
To restore the pictures on iPhone using Finder in macOS Catalina 10.15 or above, follow these steps:
- Open Finder on your Mac with macOS Catalina 10.15 or above.
- Connect your iPhone to your Mac system.
- Select your iPhone from the location lists on the left.
- Navigate to the General tab and click Restore Backup.
- Select the backup date you like to use for restoring.
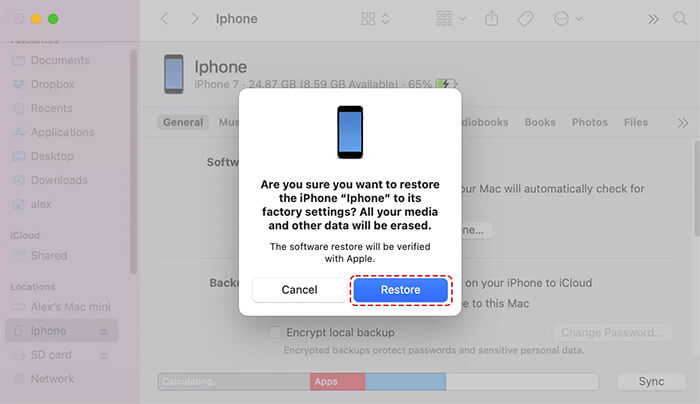
- Click the Restore button to confirm.
How to Recover Pictures on iPhone without Backup?
What to do if there is no iPhone backup or you cannot restore pictures using iCloud or iTunes? Use iPhone data recovery software to restore lost iPhone pictures.
Stellar Data Recovery for iPhone can find and restore deleted/lost pictures, videos, chat messages, audio, contacts, etc., from your iPhone/iPad/iPod touch. This software is easy to use when restoring deleted photos, and you can operate it even if you don’t have technical knowledge. Follow the steps to discover how to use software to recover deleted photos:
- Connect your iPhone to your computer.
- Download Stellar Data Recovery for iPhone on your PC or Mac.


- Select Recover from iPhone on the main screen of the software.
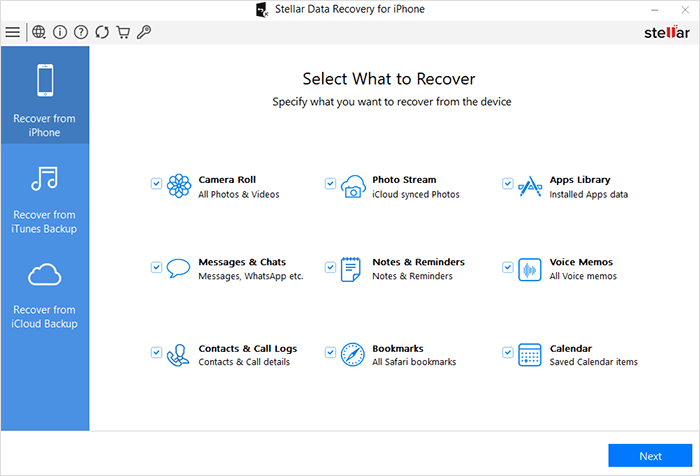
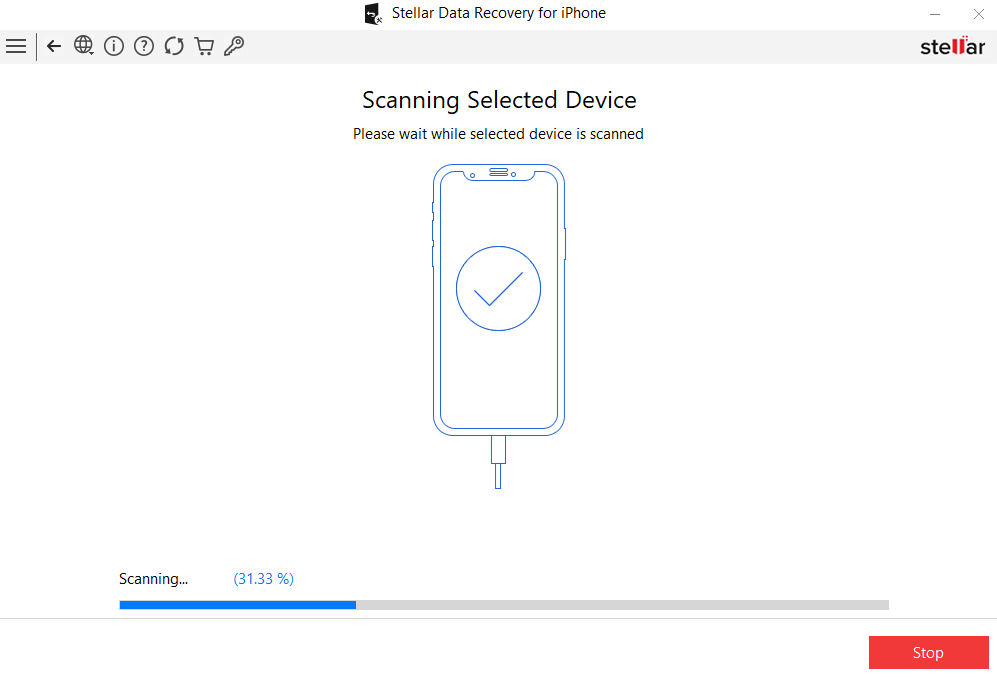
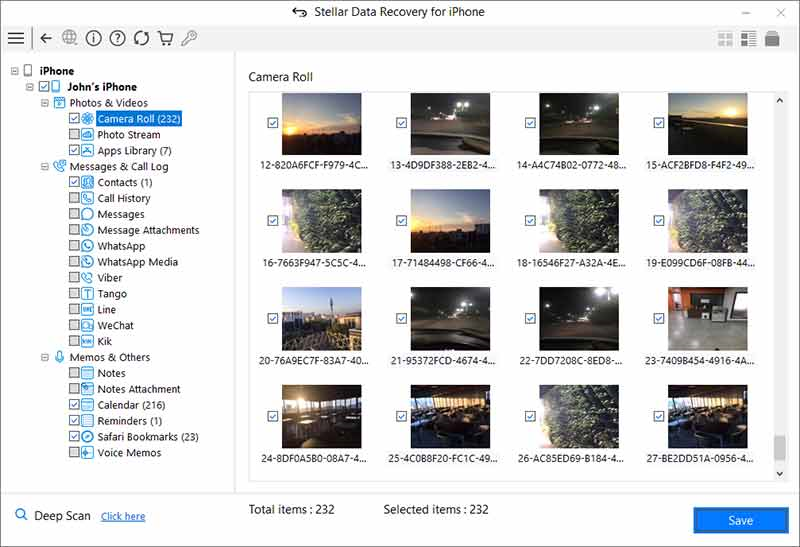
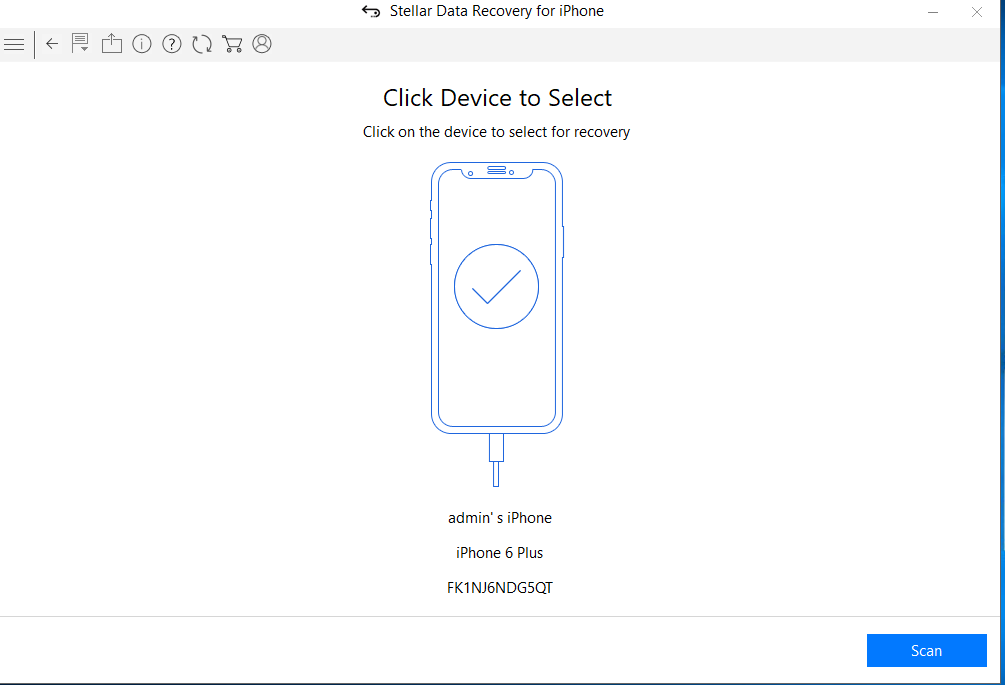
- Select the data type and click Next. The scanning process will start.

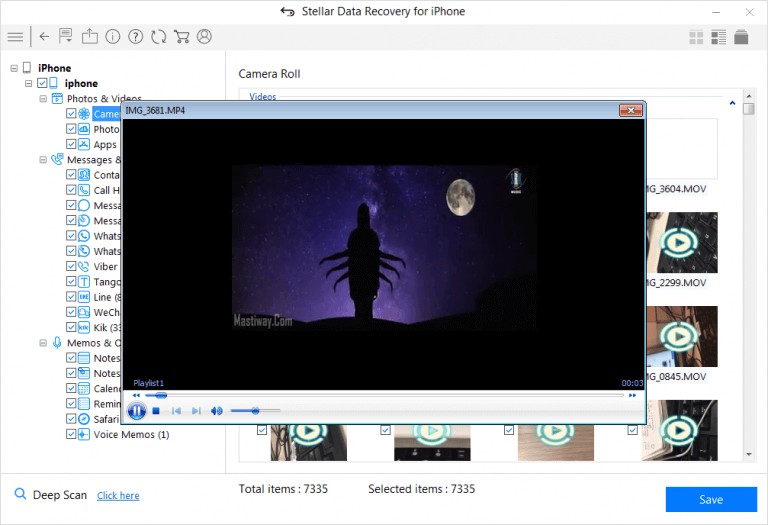
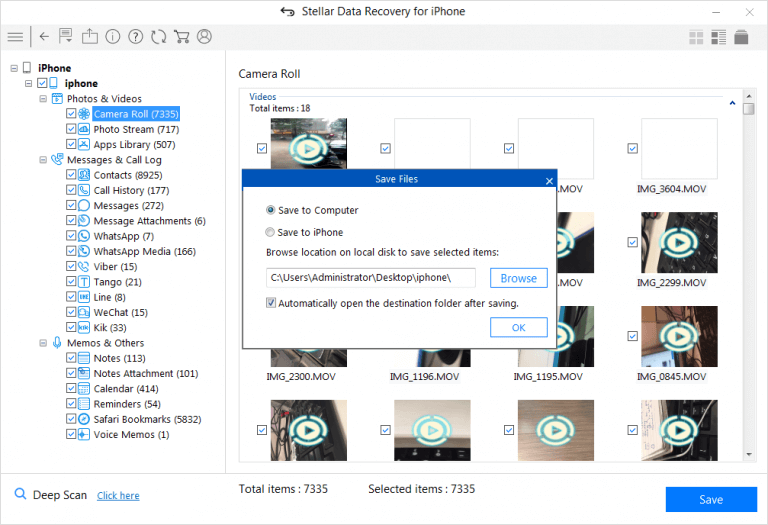
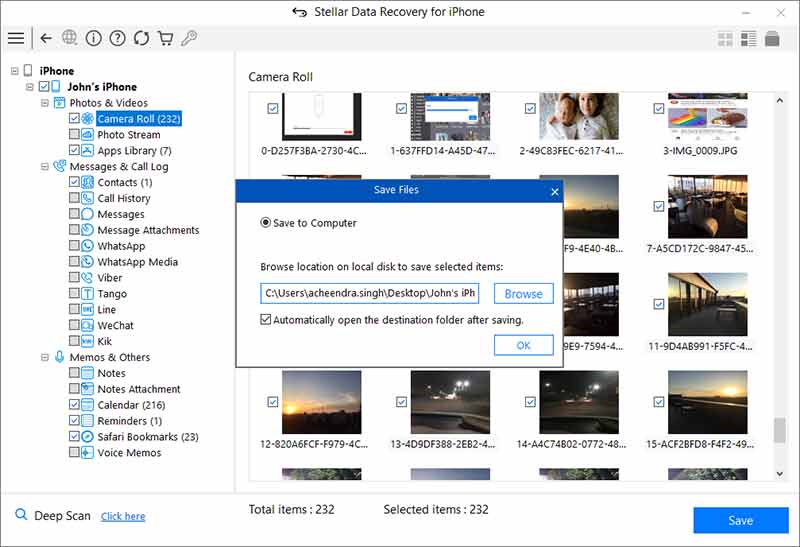
- Once the scanning is completed, preview the data. Select the recovered data you want to restore and click Save.
- Choose the destination to save the recovered data.
Parental Control Software
Conclusion
The data loss issues in Apple can be resolved easily through multiple backup solutions — iTunes, iCloud, and iCloud.com. However, these native backup recovery solutions fall short when you need to recover specific data, though you can easily recover deleted photos in your iPhone from these backup options. However, you will also end up replacing every existing data on your device!
Stellar Data Recovery for iPhone fills this gap quite efficiently. It recovers your deleted photos in water damage, jailbreak, factory reset, Black Screen of Death, etc. In addition, this software has an exceptionally high data recovery success rate, making it an essential utility for iPhone users.
Stellar Data Recovery for iPhone failed to recognize my iPhone. How to fix it?
In case Stellar Data Recovery for iPhone software doesn’t recognize your iPhone, do the following to fix the issue:
- Install/ update to the latest iTunes on your PC or Mac computer.
- Ensure your iPhone is turned on and on the Home screen.
- Check if the USB port and cable are working fine or use a different Apple USB cable.
- Ensure the iOS device ‘Trust’ your computer. If you receive the ‘Trust this Computer’ message, click on ‘Trust’.
- Restart your iPhone.
- Restart your computer.
- Update your Windows or macOS.
Stellar Data Recovery for iPhone supports all the iPhone models and their individual variants, including iPhone 13, iPhone 12, iPhone 11, iPhone XS, and below variants. It is compatible with the latest iOS 15, 14, 13, 12 and below.
How to Recover Deleted Data from iPhone using Stellar Data Recovery for iPhone?
Stellar Data Recovery for iPhone is an ideal tool for efficiently recovering deleted data from iPhone devices. This software can recover photos, videos, messages, call history, calendar, notes, etc. The tool uses an advanced algorithm, which scans through the memory and recovers data from any cases of data loss. In addition, this iPhone data recovery software also uses a very simple and easy-to-use graphical user interface, making the entire process very easy to perform. Therefore, you can follow the below-mentioned steps to recover deleted photos and contacts from an iPhone device using Stellar Data Recovery for iPhone.


Note: Run the latest version of iTunes services before launching the software.
1. Connect your iPhone to a computer via USB cable for recovery from iPhone. Once you launch the software, you have three options to choose from. Recover from iPhone, Recover from iTunes backup and Recover from iCloud backup.

2. Once Computer detects your iPhone, select ‘Recover from iPhone’, choose what you want to recover, and click “next”. It will show you the iOS devices connected to your system. Next, select your device and click “scan.”
3. After scanning the device, you will see details of all the recoverable items listed in the left-hand side panel.
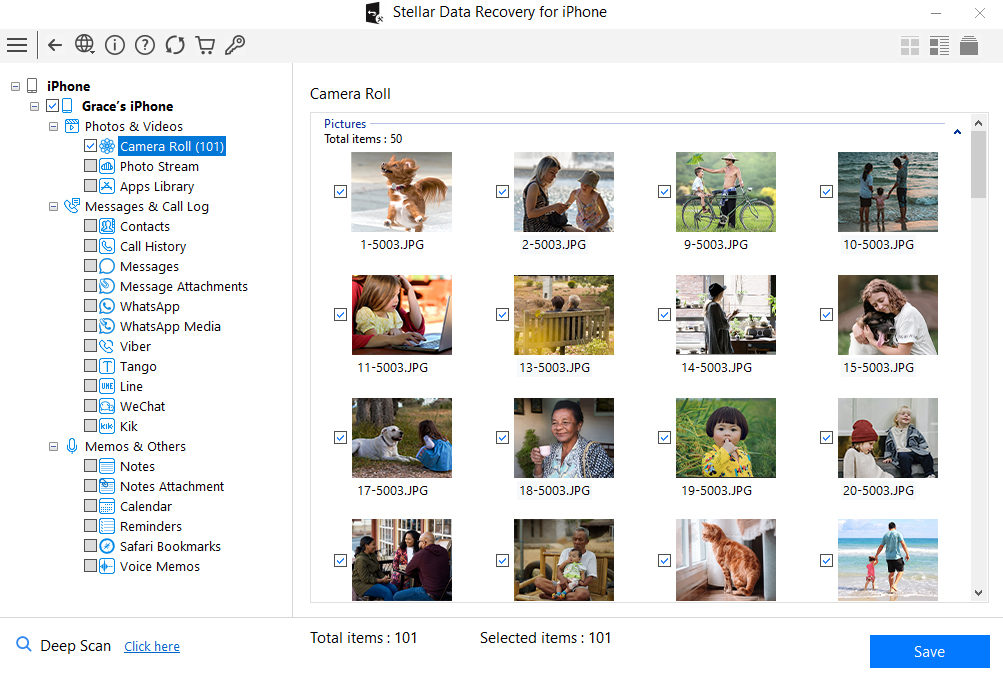
4. Now select and preview the required items by clicking the corresponding checkbox in front of each item.
5. Click on ‘Save’ option to save the recovered items either on the Computer or iPhone depending on chosen location
Stellar Data Recovery for iPhone® Stellar Data Recovery for iPhone® is the best DIY software to recover missing or accidentally deleted Contacts, Messages, Calendar, Photos, Videos, Call History etc directly from iPhone or iPad.
How to Recover Deleted Notes from iPhone?
Summary: Lost Notes from iPhone after iOS upgrade, deletion, factory reset, etc.? This post shares 5 best ways to restore lost Notes on iPhone. Also learn how Stellar Data Recovery for iPhone quickly recovers only the missing Notes from your iPhone.


When Matt opened his iPhone 14 Notes after iOS 16.4 upgrade, he found many of his old Notes had disappeared. He was repenting about the upgrade and now looking for ways to get back his Notes on his iPhone.
Notes are important for those who make optimum use of this app. However, if you have also lost them for some reason, this post shares how to restore the lost Notes on your iPhone.
Often underrated, iPhone Notes app lets you do much more than you can think of — scribbling thoughts, ideas, checklists, sketching, adding photos, and videos, attaching location links from Maps, etc.
However, Notes may disappear after an iOS update, jailbreak, factory reset, accidental deletion, etc.
How to Recover Notes on iPhone?
Usually, Notes can be recovered from iCloud, iTunes, or your recently deleted Notes App folder.
But, if in a situation when you have deleted Notes and also don’t have a backup in iCloud, an iPhone recovery software is the way to go.
Top 5 methods that can recover lost Notes from iPhone
- Recover iPhone Notes & Attachments without backup
- Restore Notes from iCloud backup
- Restore from iTunes backup
- Recover Recently Deleted folder
- Restore Notes from e-mail account on iPhone
1. Recover iPhone Notes & Attachments without Backup
There is a plethora of iPhone recovery software. Carefully pick that supports Notes and attachments recovery. Most importantly, the iPhone recovery software should be 100% secure to download and free from viruses.
Advanced tools such as Stellar Data Recovery for iPhone can recover even permanently deleted Notes and their attachments. It is fast, easy to use, and supports the latest iOS and iPhone versions.
Stellar Data Recovery for iPhone restores in situations like,
- In the absence of iCloud backup
- Factory Reset of iPhone
- Unable to retrieve Notes from iCloud/ iTunes
- iPhone is damaged or stolen
- and others
The software lets you recover deleted Notes from iPhone , iPad, iCloud, and iTunes. It thoroughly scans the iOS device and backup to restore every bit of lost data. If you don’t find the required Notes after running the initial quick scan, it offers a second-level Deep Scan for a more comprehensive search.
Unlike Apple backups — iCloud and iTunes, you can select only those Notes and their attachments that you need. Thus, the software protects you from unnecessary data recovery.
You can view the lost and deleted Notes of iPhone in the demo version of the software.
Step-by-step: Recover deleted/ lost Notes and Attachments on iPhone
- Download Stellar Data Recovery for iPhone on your Mac/PC
- Connect your iPhone to your computer and launch the software
- Choose “Recover from iPhone”, select “Notes & Reminders” and click “Next”
- Select your device and click “Scan.”
- After scanning, select Notes on your left pane to preview in the right pane before saving.

- Click on Save and browse the desired location to save the recovered notes.
Recover Notes from Apple Backups
iCloud and iTunes backup storage protect against data loss. If your Notes are backed up in any of the two, recover the files from there.
Just log in through your Apple ID and restore Notes from backup.
However, one of the major drawbacks of this method is that it will remove and replace all your existing iPhone data, including Camera Roll, apps, messages, music, etc.
2. How to recover iPhone Notes from iCloud backup
- Go to Settings > General > Reset> Erase all Contents and Settings
- On Apps & Data screen, tap Restore from iCloud Backup
- Sign in to your iCloud account
- Choose the last backup and Restore
3. How to restore Notes from iTunes
- Connect iPhone to PC/Mac
- Launch iTunes
- Select your iPhone under the Device list and choose the recent backup entry date
- Click Restore Backup
4. Recover iPhone Notes from ‘Recently Deleted.’
Once you delete Notes, they remain in the recently deleted folder on your iPhone for 30 days. After that, Notes are permanently deleted from the device.
Steps to restore from ‘Recently Deleted.’
- In the Notes app, tap Recently Deleted.
- Select the notes you want to restore
- Click Recover in the toolbar. The note moves to the Notes folder
5. Restore Notes from an e-mail account on iPhone
When you delete a Note from your iPhone, it remains in your e-mail account of your iPhone. So, for example, suppose you use Gmail on your iPhone, and all your Notes are saved to the e-mail address.
Steps to restore Notes from e-mail on iPhone
- Go to Setting > Accounts & Passwords
- Click on each email account (Gmail, Yahoo, AOL, etc.) one by one
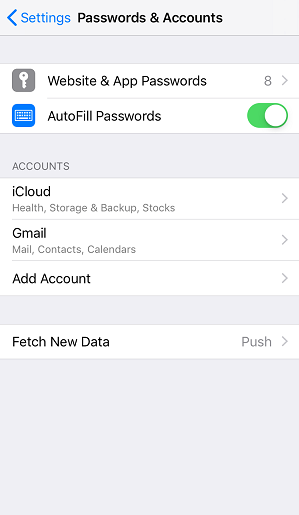
- Turn on Notes for each account

- Open the Notes app to see if they are back
Byte: Do you know the email accounts on your iPhone can store Contacts, Calendars, and Notes, apart from sending e-mails.
Wrapping Up
Notes are your best companion; you don’t want to part with them. Recover all or specific Notes with the help of iPhone notes recovery software.
However, you can also try to restore deleted Notes from an iCloud, e-mail accounts,s or recently deleted folders on your iPhone. However, Stellar iPhone Recovery software is the best solution for permanently deleted Notes in case of the absence of backup.
- Title: How to Recover deleted pictures on iPhone 14? 5 Best Solutions | Stellar
- Author: Nova
- Created at : 2024-08-20 20:03:10
- Updated at : 2024-08-21 20:03:10
- Link: https://blog-min.techidaily.com/how-to-recover-deleted-pictures-on-iphone-14-5-best-solutions-stellar-by-stellar-data-recovery-ios-iphone-data-recovery/
- License: This work is licensed under CC BY-NC-SA 4.0.