
How to Recover Deleted Videos from iPhone 14 Plus Without Backup? | Stellar
How to Recover Deleted Videos from iPhone Without Backup?
Your iPhone 14 Plus is supported by a strong and powerful operating system that makes your daily activities such as calling, emailing, messaging, web browsing, notes making, etc. easily possible. Also, capturing happy moments spent with family, friends, and your loved ones is another thing that you do with it. It is natural that the good times that you record becomes your favorite videos, which you love watching anytime you feel like.
However, at times in the event of making space in your iPhone 14 Plus, or due to any other reason, you accidentally delete the videos, and end up losing one, more, or all of them. The situation becomes grim when you realize that you haven’t taken a backup of your favorite videos. You really do not know what to do to recover your deleted videos from iPhone 13 without backup. It is then that you understand the importance of having a backup and regret not creating the same for your favorite videos.
You can come out from such a situation with the help of Stellar Data Recovery for iPhone. It is a comprehensive iPhone data recovery software tool through which you can recover deleted videos from iPhone 14 Plus without a backup.
The videos you capture with your iPhone 14 Plus gets stored in either the memory of the phone. However, once the videos are lost or accidentally deleted from there, you lose access to them. To recover deleted videos of iPhone 14 Plus with Stellar Data Recovery for iPhone, you need to execute the following steps:
Step 1) Download and install the software on your system, the one on which you want to recover the deleted videos of your iPhone 14 Plus.
Step 2) Connect your iPhone 14 Plus to your system.
Note – You can connect your iPhone 14 Plus with multiple devices and the software will enlist all the connected devices. You can connect the iPhone 14 Plus after or before the launch of the software.
Step 3) Next, launch the software that you installed.


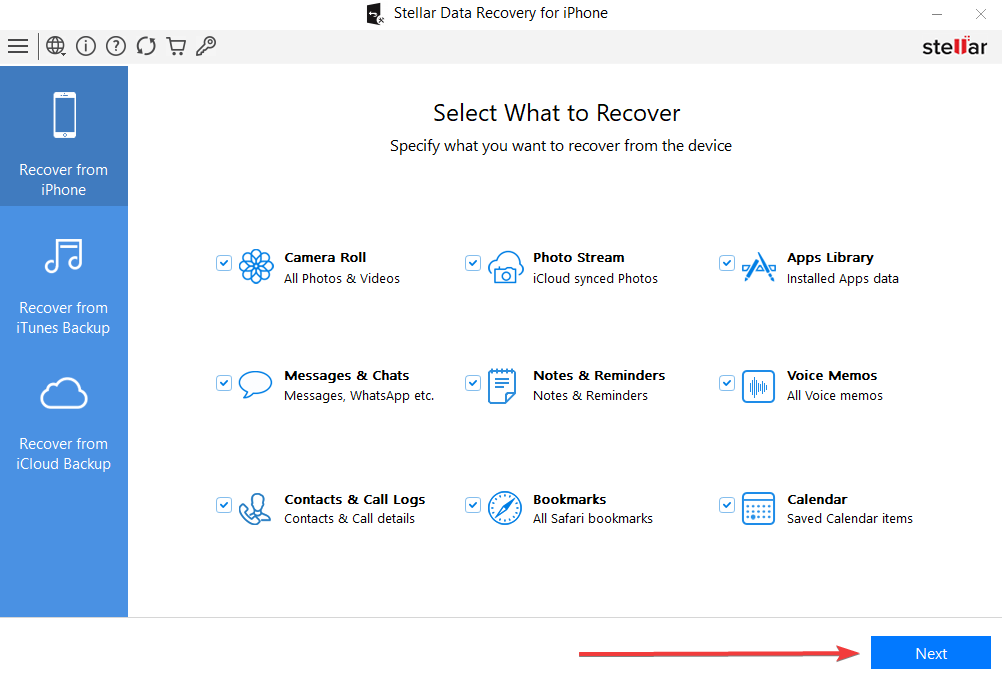
Step 4) To recover deleted videos from your iPhone 14 Plus, click on the ‘Recover from iPhone’ option that comes up on the screen.
Step 5) The Stellar Data Recovery for iPhone software will scan the iPhone 14 Plus to list all the recently deleted data including videos.
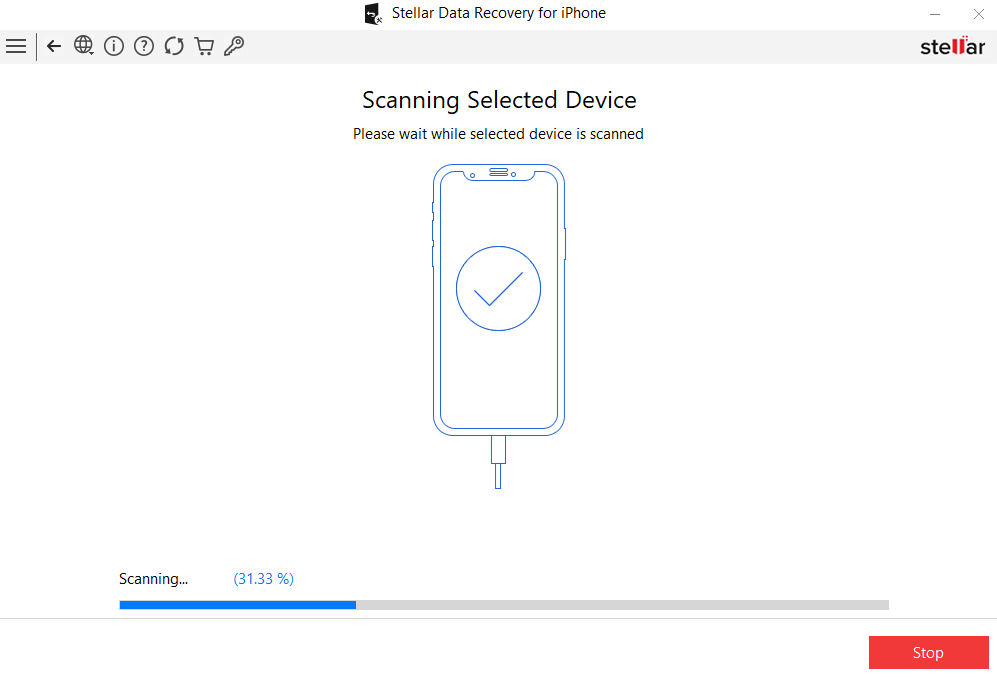
Step 6) All deleted videos will be listed in red, while the rest will be listed in black color as shown in the image placed below.
Step 7) After that, select the videos you want to recover by putting check marks in the boxes in front of them.
Step 8) Provide the address of the location where you would want the recovered videos to be saved.
Step 9) Click Save button to finally save the videos. With this, the ‘Save Files’ dialog appears as shown below:
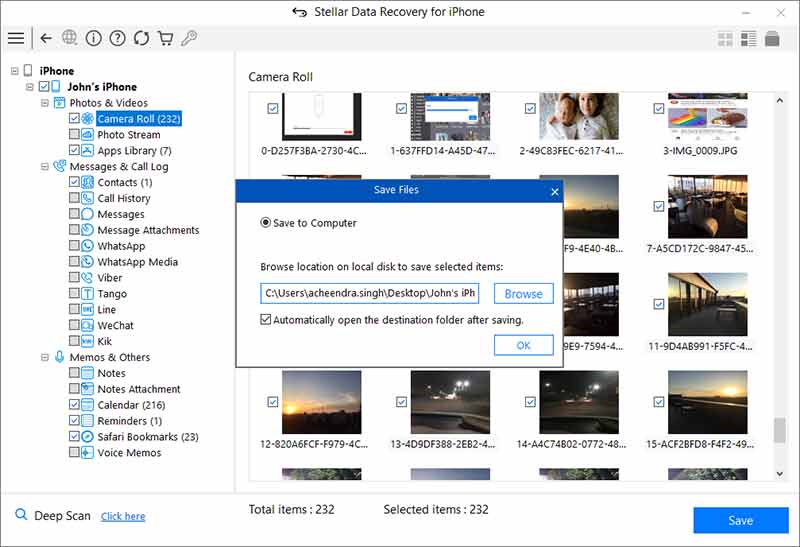
(i) Chose the option ‘Save to Computer’ if you want to save the recovered videos to your computer. Click Browse and select a destination for saving the recovered files and click OK.
(ii) Choose the option ‘Save to iPhone’ if you want to save the recovered files to your iPhone 14 Plus. From the drop-down menu, select the iPhone 14 Plus to which you want to save the recovered videos.
Step 10) Finally, click on the OK tab to complete the recovery process of deleted videos from your iPhone 14 Plus.
How to Retrieve Deleted Calendar Events iPhone?
Summary: Want to recover deleted calendar events on your iPhone? This article discusses methods to recover and restore deleted calendar events via iTunes or iCloud backup. You can also try a professional iPhone data recovery software to recover deleted or lost calendar events on iPhone.


A lot of things have become easier on iPhone, from day-to-day activities like sending messages, making calls, etc. to complex tasks like photo editing or making movies.
One feature that many people use on iPhone is its Calendar app to keep their life more organized. Whether you want to keep track of family events like birthdays or professional events like meetings, deadlines, etc., Apple Calendar has all the tools you need.
Moreover, setting up and syncing your Calendar on iPhone with Mac or vice versa ensures that you can access your calendar on both devices. Likewise, you can sync your Google or Outlook Calendar with the Apple Calendar app for streamlining your schedule.
However, like other iPhone apps, the Calendar app is also prone to data loss that mostly occurs due to accidental deletion. In addition, malware attacks, iPhone crashing, syncing errors, etc. may lead to missing or lost Calendar events.
In this post, you will learn various methods to recover lost or deleted calendar events on your iPhone.
How to Recover Lost Calendar Events on iPhone?
The methods to recover deleted Calendar events on iPhone depend on whether you have the backup of your data or not.
For instance, if you have the backup, the lost Calendar events can be restored from iCloud and iTunes backup.
However, if you don’t have a backup, use robust iPhone data recovery software to retrieve deleted Calendar events on your iPhone.
Method 1: Recover Deleted Calendar Events from iCloud Backup
You can retrieve iPhone Calendar events using the backup file saved on the iCloud. This remote backup system will get back your lost Calendar events. However, all your existing iPhone data will be erased and replaced with backed-up data.
Steps to recover deleted Calendar events on iPhone via iCloud Backup
- Open Settings on your iPhone.
- Go to General > Reset > Erase all Contents and Settings.

- Select Erase Now in the confirmation pop-up and follow the on-screen instructions until you reach Apps & Data screen. Then tap Restore from iCloud Backup.


- Sign in to your iCloud account and choose the backup file from the list to restore. Wait for some time for the restore process to complete.

Method 2: Recover Lost Calendar Events from iCloud.com
If your iPhone is inaccessible, lost, or stolen, use iCloud.com on your Mac or Windows PC to retrieve deleted iPhone Calendar events.
Steps to recover iPhone Calendar events from iCloud.com
- Open icloud.com in the web browser of your computer.
- Log into your account. Click Trust when ‘Trust/Untrust’ pop-up appears.
- On the home screen, click on nine-dots and select Data Recovery.

- Click Restore Calendars.

- A Calendar archive list will appear, click Restore option next to the archive that you wish to restore.

- Now, confirm your choice and click Restore.

- Wait until the Restore process completes.

- Once the required Calendar archive is successfully recovered, click OK.

Method 3: Retrieve Deleted Calendar Events from iTunes Backup
iTunes backup can also be used to retrieve deleted calendar events on iPhone. However, restoring iPhone through iTunes will delete the existing data on your device and replace it with the data in the backup.
Steps to retrieve deleted calendar events in iPhone from iTunes backup
- Connect your iPhone to PC/Mac with a USB cable. Follow the prompts, till the pop-up for your device passcode or to Trust This Computer appears.
- Launch iTunes and select your iPhone from the device list.
- Click Summary.
- Click Restore Backup and then select the relevant backup date from the Restore from Backup dialog box.


- Click Restore. Wait until the restore process finishes.

Method 4: Recover Calendar Events with iPhone Data Recovery Software
In the absence of backup be it iCloud or iTunes, use iPhone data recovery software, such as Stellar Data Recovery for iPhone to retrieve deleted calendar events. The iPhone data recovery software helps recover lost or deleted Photos, Videos, Call Logs, Calendar, Text Messages, Call Logs, Photo Streams, Safari Bookmarks, and other data from iPad, iPod Touch, and iPhone.
It even supports recovery from iTunes and iCloud backup and is compatible with all versions of iOS and iPhone variants. The iPhone data recovery tool supports recovery from all data loss scenarios like accidental deletion, failed iOS update, factory reset, etc.


Here’s how to use the Stellar iPhone data recovery tool to retrieve deleted calendar events:
- Download and install Stellar Data Recovery for iPhone on your Windows or Mac.
- Launch the software and select Recover from iPhone on the main screen.
- Next, select the Calendar option and click Next.

- Connect your iPhone to the computer via cable and select your device to proceed forward.

- If your iPhone is encrypted, enter your iPhone password in the dialog box. Click OK.

- Once the scanning is completed, see the list of recoverable data. You can preview the recoverable calendar events.

- Select the files and click Save to restore the recovered Calendar events at your desired location.

Conclusion
Often, in a rush, you may end up accidentally deleting an iPhone calendar event. You can recover deleted Calendar events from the iCloud or iTunes backup. However, if you don’t have a backup, use a specialized iPhone Calendar recovery software. To avoid such a situation in future, always take backup of your iPhone data .
FAQ
1. How to recover disappeared iPhone calendar events?
Force reboot your device, turn off and on the iCloud Calendar, and check the date and time settings of your iPhone to recover your disappeared iPhone Calendar events.
2. What are the different ways to view the iPhone Calendar app?
You can use list view, daily view, weekly, monthly, and yearly view for viewing iPhone Calendar app.
3. How to add an event on the iPhone Calendar app?
To add an event, you need to do the following:
- Go to Calendar, select event data, and tap on Add icon.
- Enter the details of the appointment and tap Add.
4. How to delete the iPhone Calendar event?
To delete an iPhone Calendar event,
- Tap on Calendar from the home screen.
- Next, tap on the event you want to delete, then tap Delete Event.
- Confirm your choice by tapping Delete Event.
Apple will delete your photos in July. Here’s what you should do
Apple has recently announced that it will permanently delete photos from its users’ ‘My Photo Stream’ this month. This news has come as a surprise to the Apple community, as users struggle to understand the implications of this announcement and what necessary precautions can be taken. In this blog post, we will get into the details of this new move by Apple, explore the reasons behind it, and provide tips on how iPhone/iPad/Mac users can safeguard their precious photos.
The Announcement
_”_My Photo Stream is scheduled to be shut down on July 26, 2023. As part of this transition, new photo uploads to My Photo Stream from your devices will stop one month before, on June 26, 2023.
The photos in My Photo Stream are already stored on at least one of your devices, so as long as you have the device with your originals, you won’t lose any photos as part of this process. If a photo you want isn’t already in your Library on a particular iPhone, iPad, or Mac, make sure that you save it to your Library on that device…” Read more
What is Apple’s My Photo Stream?
My Photo Stream, launched in 2011, was designed to sync photos across multiple Apple devices such as iPhone, iPad, or Mac.
This feature automatically stores your most recent pictures (up to 1000) for approx. 30 days so you can view and download them easily from other Apple devices. After this period, photos are removed from My Photo Stream but remain in your device’s Photos app. However, this only shows photos and not your live images or videos.
How to Protect Your ‘My Photo Stream’ Pictures?
Apple, known for its commitment to user privacy and data security, has recommended several preventive measures to mitigate the risk of losing any important photo due to this update.
1. Move My Photo Stream images to your Library
Even if the pictures in My Photo Stream are already there on at least one of your Apple devices, you must save these pictures to your Photo Library to avoid losing them**.** Here’s how to copy My Photo Stream pictures to your Photo Library:
On your iPhone, iPad, or iPod Touch:
- Open the Photos app and tap Albums.
- Tap on My Photo Stream > Select.
- Select all the photos you want to save, then tap the Share button > Save Image.
On your Mac:
- Open the Photos app and then open the My Photo Stream
- Select the photos you want to save which aren’t currently in your photo library.
- Drag and drop them from the My Photo Stream album into your Library.
2. Move to iCloud Photos
To preserve your My Photo Stream images in their original and high-resolution version, you can transfer them to iCloud Photos.
If you already have an iCloud account, just enable iCloud Photos to automatically upload & sync every photo and video you capture on the device, making them accessible from anywhere.
To use the iCloud Photos service, you will require the following:
- iPhone running iOS 8.3 or later version.
- iPad with iPadOS 8.3 or later version.
- Mac running OS X Yosemite or later version.
How to set up iCloud Photos on your iPhone, iPad, or iPod touch?
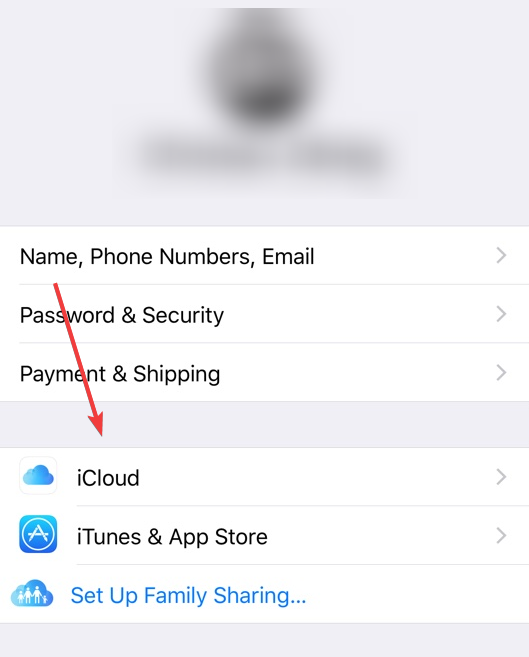
- On your iPhone, iPad, or iPod touch, go to Settings.
- Next, click on [Your Name] > iCloud.
- Tap on Photos and do the following:
For iOS 16, iPadOS 16, or later versions: Toggle on the ‘Sync this [device]‘ option.
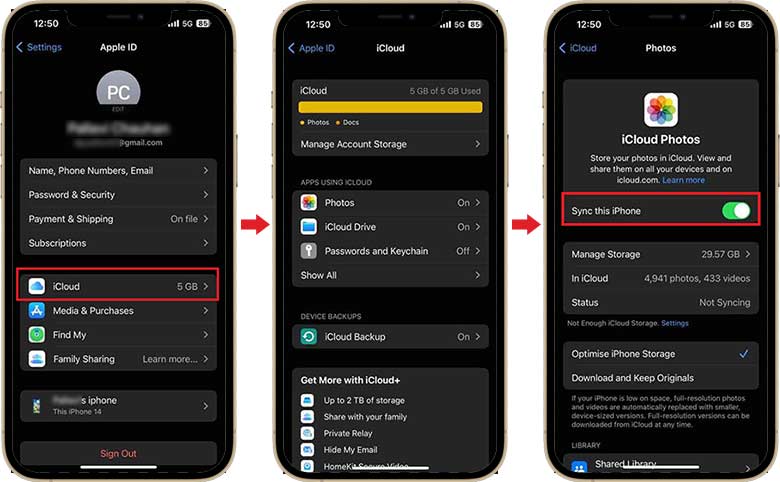
For iOS 15, iPadOS 15, or earlier versions: Turn on the iCloud Photos
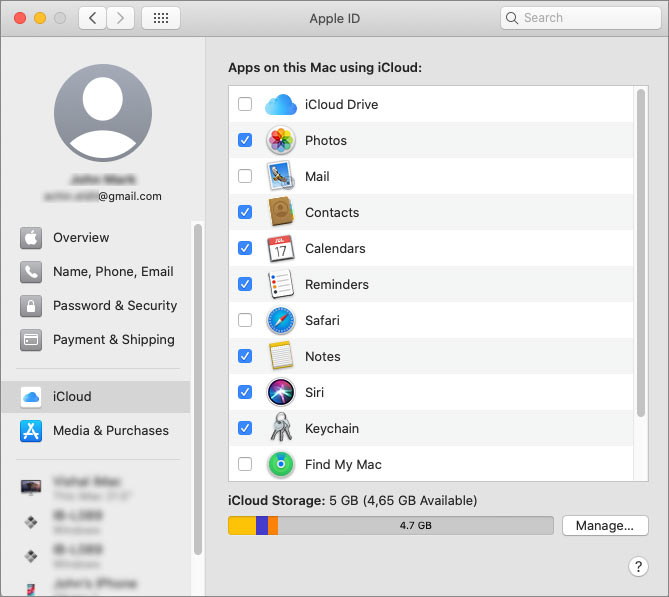
How to set up iCloud Photos on your Mac?
- On your Mac, go to Apple Menu and click on System Preferences.
- Click Apple ID and then select iCloud in the sidebar.
- Now, select Photos and turn on the switch next to Sync this Mac.

**
**
Don’t want to use iCloud Photos?
While iCloud Photos is a convenient option for many Apple users, it’s important to acknowledge that it is not the best fit for everyone. Limited free storage of 5GB or lack of cross-platform compatibility can compel Apple users to look for other alternatives.
Storage options, such as Google Photos, Microsoft OneDrive, Dropbox, external hard drives, etc., are available to ensure your iPhone Photos are safe and easily accessible.
The Bottom Line
Apple’s announcement of the potential discontinuation of My Photo Stream has understandably caused worry among its users. While a specific reason for this action remains undisclosed, they are actively addressing the issue to prevent data loss. In the meantime, iPhone users must take precautionary measures to safeguard their photos. They can simply move the My Photo Stream images to the Photo Library, iCloud Photos, or other backup folders.
How to Fix iPhone Storage Not Loading/Showing
The majority of smartphones require a certain amount of storage to operate properly. When you receive a low storage message, you may instinctively check your storage space but encounter the iPhone Storage Not Loading issue.
What could be the cause of such a bothersome problem? The bad news is that the root reason for this problem is unclear, but we’ve offered some fixes you can try to fix this issue.
There is yet another way to check the storage on your iPhone if you face the “iPhone Storage Not Showing” issue, and we’ll go over it in the following section.
How can I use a computer to check my storage?
You can check your iPhone’s storage using a computer with iTunes or Finder app installed.
- On a Mac running macOS Catalina 10.15 or later, launch the Finder or open iTunes on a PC or Mac running macOS Mojave 10.14 or an earlier version.
- You should use a cable to connect your phone and computer.
- Select your device in iTunes or Finder.
- You can see how much storage each type of content takes up by hovering your mouse over the storage bar.

How can I fix iPhone Storage Not Loading/Showing?
1. Wait a bit more
Some computing operations take a while to finish. Your phone’s storage may overflow with tons of app data, images, and other files if you’ve been using it for a while.
And each of them would have to load before reporting their combined size to the OS. Usually, loading takes about three minutes.
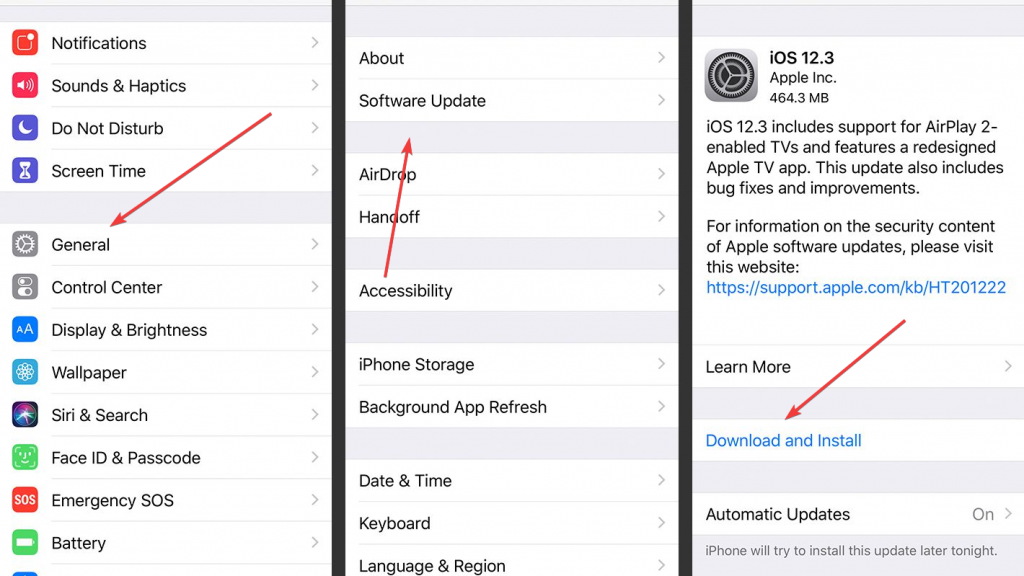
### 2\. Update iOSIf your iOS version was outdated, your phone’s functionalities, including storage access, would not function properly. Additionally, updating the OS will get rid of any potential issues. Follow the procedures listed below to check and update your iOS version:
- Select General from the Settings menu.
- Click on Software Update. If any updates are available, download and install them.
3. Force Stops the App
The settings app itself can be the problem due to an app bug. Therefore, forcing the app to close is a valid option. This will make the software restart from scratch, wiping off part of the data and information it had in RAM.
- Access the app switcher (swipe up your finger from the bottom of the screen to bring up the menu or double-click the Home button on older iPhone models).
- Swipe up and drag the Settings card off the screen to force the app to close.
- Relaunch the Settings app to see if the problem persists.
4. Reconnect to iCloud
iOS has been designed in a way that it needs to be connected to iCloud to function flawlessly. Therefore, the storage loading error could also be linked to connectivity issues between these two. In this case, signing out of the service and then back in again might resolve the issue.
- Open the Settings application.
- Click your profile at the top. To sign out of the service, tap iCloud.

- Next, sign in once more using your iCloud password.

5. Fix the Issue Using Your PC
When you connect the cable, link your iPhone to your PC, and sync the storage, iTunes looks for any issues and either fixes them on its own or recommends methods to fix them by yourself. For any software-related issues with your phone, this is a great fix, and it may even repair your iPhone storage not updating problem.
- Connect your phone to computers that have iTunes installed on them with a lightning cord.
- The storage data should be able to sync with your smartphone automatically.
- If not, press the Sync button.
6. Factory Reset Your iPhone
You may fix any bugs that cause iPhone storage not to update by performing a factory reset. Furthermore, it would restore your OS version to its factory settings, resolving any problems that updates might have brought on.
The whole contents of your device will be deleted if you follow this method. You can either create a backup of your data or use a tool to restore it once your iPhone has been entirely deleted to prevent this.
- Go Settings app on your smartphone. Next, choose Reset after choosing General.
- Under Reset, among the few options, click Erase all Content and Settings.
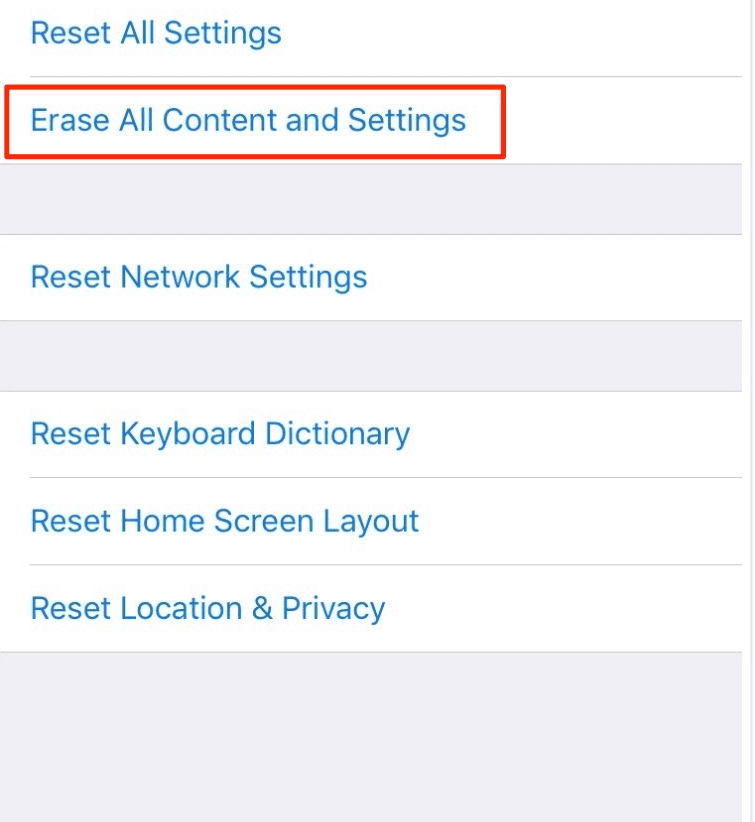
- Next, choose Erase iPhone. After that, your smartphone will return to its factory default settings.
Recover your data using Stellar data recovery for iPhone:
Stellar Data Recovery for iPhone is a powerful program that can retrieve files that have been erased unintentionally or on purpose. To guarantee that Stellar Data Recovery for iPhone will recover your data, it offers a variety of data recovery techniques. Furthermore, you wouldn’t need to check manuals or other documentation to understand how to use the software because of its basic user interface, which makes the recovery process easy.
With Stellar Data Recovery for iPhone, your files, including voice recordings, notes, and Safari bookmarks, will be restored. What you should do is:
- Download and install Stellar Data Recovery for iPhone from the official website.
- Connect your iPhone to the PC through a cable.
- Launch the Stellar Data Recovery for iPhone, choose the type of data you wish to recover from the list, and click Next.

- Preview the recovered data, then Select and Save it to the chosen destination.

Why isn’t my iPhone storage loading?
When trying to check your iPhone’s storage, you will notice a small spinning wheel going back and forth if your phone is having storage problems since it cannot accurately represent the amount of storage that is accessible.
Furthermore, the loading issue may show an incorrect amount of storage. Some users reported this and other minor issues throughout the iOS 15 beta testing phase. Other factors contributing to this issue include iCloud service problems and application bugs.
Wrap up! Stellar is your ultimate backup
It is hard to download content or install apps on an iPhone with insufficient storage. Therefore, a factory reset would resolve your issue and clear the storage, enabling you to scan your device with Stellar Data Recovery for iPhone and retrieve any desired files.
And if a factory reset doesn’t fix iPhone storage not loading and showing problem, look for professional assistance with your problem. You can never be certain whether a storage issue results from faulty hardware or software.
FAQ:
- How do I create backups before wiping my iPhone clean?
Simply connect your phone to your computer, open iTunes, and choose the backup option, and the program will create a copy of your data that can be used to restore lost or deleted contents.
- Does Stellar Data Recovery for iPhone require a backup for successful file recovery?
Because the software searches iTunes for files, having a backup, there might be useful. However, the software can and will effortlessly restore your content even without any backups.
- Do I install the Stellar Data Recovery Software for iPhone on my smartphone?
The software cannot be installed or used on an iPhone or an Android smartphone. Because the software is compatible with the widely used Windows and Mac operating systems, you must first install it on a device using one of those operating systems before connecting your phone to it.
- Title: How to Recover Deleted Videos from iPhone 14 Plus Without Backup? | Stellar
- Author: Nova
- Created at : 2024-08-20 20:01:31
- Updated at : 2024-08-21 20:01:31
- Link: https://blog-min.techidaily.com/how-to-recover-deleted-videos-from-iphone-14-plus-without-backup-stellar-by-stellar-data-recovery-ios-iphone-data-recovery/
- License: This work is licensed under CC BY-NC-SA 4.0.