
How to Recover FaceTime Call History on iPhone 8 Plus | Stellar
How to Recover FaceTime Call History on iPhone
Summary: Have you deleted or lost FaceTime calls from your iPhone? Once deleted from the call history, the Facetime calls are removed from the app’s history and vice versa. This post shares quick methods to restore FaceTime call history from any series of iPhone 15, 14, 13, 12, X, XS Max, XR, X, 8, 8 Plus, 7, and below versions and iPads’.


‘Just noticed, that the FaceTime call history suddenly disappeared. Cellular calls history is fine. I am using iOS 16.2, iPhone 14. I don’t have iTunes backup and don’t want to try iCloud backup as it will remove my current data. Is there any other way to get back FaceTime call history?’
‘I deleted the call history on my iPhone and without realizing that FaceTime calls will also be erased. How can I recover deleted FaceTime history?’
You love using FaceTime — Apple’s popular calling app, on your iOS device. It’s a free and easy way to connect with family and friends anywhere in the world through audio and video calls.
But what if ever you accidentally delete or lose FaceTime calls from your iPhone or iPad. They may be important calls you wanted to keep.
Since FaceTime calls are integrated into your recent calls list on iPhone, once deleted from the call history, the calls are removed from the app’s history as well and vice versa.
Here we share various methods to restore FaceTime call history on iPhone 14, 13, 12, 11, XS, XS Max, XR, X, 8, 8 Plus, 7, 7 Plus, 6 and below versions and iPad.

How to recover the lost or deleted FaceTime call history?
1. Restore FaceTime call history without iTunes/ iCloud backup
Deleted FaceTime history can be recovered by using Stellar Data Recovery for iPhone software. The software can restore lost FaceTime call history after accidental deletion, factory reset, app crash, jailbreak, and other issues.
The DIY software thoroughly scans your iPhone or iPad to recover the lost FaceTime call history.
In contrast to iTunes and iCloud backup, Stellar iPhone data recovery software lets you select and restore specific iPhone deleted call history along with the details like name, date, call duration, source country. This saves you from restoring other unnecessary data.
Step-by-step: Recover deleted/ lost FaceTime calls from iPhone
- Connect your iPhone to the computer
- Launch Stellar Data Recovery for iPhone
- Select Recover from iPhone on the left
- Select Contacts & Call Logs under What to Recover

- Click Next
- Preview and choose the FaceTime calls you want to restore from the list. Note: All the calls marked in red color are the deleted calls


- Click You can save the call history either on your computer or iPhone.
2. Recover FaceTime call history with iCloud
Stellar Data Recovery for iPhone can also restore FaceTime calls from iCloud backup on your iPhone or iPad. This method allows you to select and recover only the lost FaceTime call history from iCloud instead of restoring complete backup data.
Two methods to restore FaceTime log from iCloud:
- Restore lost/deleted FaceTime calls from iCloud without losing existing iPhone data
- Restore FaceTime call history from iCloud backup for free, deleting the current iPhone data
Method 1: Restore lost/deleted FaceTime calls from iCloud without losing existing iPhone data:
- Download Stellar Data Recovery for iPhone on your PC/ Mac
- Select Recover from iCloud Backup on main screen of software

- Select Contacts & Call Logs and click Next
- Enter the Apple ID and password. List of all available iCloud backup files appears. Select the relevant backup of your iPhone
- Click Scan

- Click Call History on the left window. Preview the existing and deleted FaceTime calls. Click Deep Scan, if you don’t find your required calls.

- Click Save to save the recovered call history either on iPhone or computer
Method 2: Restore FaceTime from iCloud backup for free (this deletes the current iPhone data)
- Go to Settings > General > Reset> Erase all Contents and Settings

- On Apps & Data screen, tap Restore from iCloud Backup

- Sign in to your iCloud account

- Choose the last backup and Restore
Note – The drawback of this method is that it deletes all your existing data from the iPhone.
Recover FaceTime calls from iTunes Backup
3. Recover FaceTime calls from iTunes Backup
FaceTime recovery from iTunes backup is also possible if you have enabled the backup in iTunes.
Restore FaceTime call log from iTunes either with the help of Stellar Data Recovery for iPhone or directly from your system without the help of software.
However, if you don’t want to part ways with your iPhone’s existing data and lose all the current photos, videos, etc. with the old backup file, take the help of Stellar Data Recovery for iPhone.
The software protects your current data on iPhone and recovers only the call history as required.
Two methods to restore FaceTime call history from iTunes
- Restore FaceTime call history from iTunes without losing existing iPhone data
- Restore FaceTime call history from iTunes backup, deleting the current iPhone data
Method 1: Restore FaceTime call history from iTunes without losing existing iPhone data
- Download Stellar Data Recovery for iPhone software on your PC/ Mac. Note: Connect your iPhone to a computer, if want to save the recovered FaceTime call history on iPhone.
- Select Recover from iTunes Backup on the main screen of the application.

- Select Contacts & Call Logs
- Click Next. From the list of the iTunes backup files, select the relevant iTunes backup

- Click Scan
- Click Call History. Preview the existing and deleted FaceTime calls. Click Deep Scan, if you don’t find your required calls.
- Click Save. You can save on your computer or iPhone
Method 2: Restore FaceTime call history from iTunes for free (this method deletes the current iPhone data)
- Connect iPhone to PC/ Mac
- Launch iTunes on your computer
- Select your iPhone under the Device list and choose the recent backup entry date

- Click Restore Backup
4. Contact Apple
Apple uses end-to-end encryption in FaceTime calls. It will not decrypt the content of your conversations. Apple may record and store information, such as to whom you had called and your iPhone/ iPad network configurations. It stores this information for up to 30 days. You don’t get the details like the content of the conversation or whether your call was answered or not.
Nevertheless, you can contact Apple requesting for FaceTime call logs by clicking on this link and submitting the request – Read More
Apple will get back to you.
Conclusion
iCloud and iTunes backup are the natural way for Apple users to recover FaceTime deleted call history. However, Apple’s solution though workable is not efficient when it comes to the recovery of specific types of data. The iTunes or iCloud backup recovery methods replace every existing data on your iPhone with an old/recent backup. You lose your current photos, videos, call history, messages, chats, etc.
Whereas Stellar Data Recovery for iPhone tackles this recovery issue more effectively. It recovers lost FaceTime calls and also keeps your current data intact on the iPhone.
The software works in all data loss situations due to deletion, jailbreak, water damage, factory reset, etc. You can restore FaceTime call history from any iPhone including series of iPhone 15, 14, 13, 12, 11, X, XS, XR, iPhone 8, iPhone 7, iPhone 6 and older versions. It is available for both Windows and macOS computers.
Why Stellar Data Recovery for iPhone takes time in scanning my iPhone?
Stellar Data Recovery for iPhone thoroughly scans your iOS device, computer, and iCloud to retrieve every bit of data. However, the scanning time of the software depends upon the following:
- The amount of data in your iOS device: Greater the amount of data on your iPhone more time it will take to scan.
- The size of RAM on your iPhone: Greater the RAM more will be the scanning time. For instance, the software will take more time to thoroughly scan an iPhone 12 with 6GB RAM compared to iPhone 11 that has 4GB RAM.
- RAM of your computer: The recommended system requirement of Stellar Data Recovery for iPhone is 8GB. Although it can scan and recover from 4GB RAM computer, but you may experience slow speed.
How to Delete All Photos from iPhone Beyond Scope of Recovery?
Summary: Learn how to delete all photos from your iPhone beyond the scope of recovery with this comprehensive guide. We’ve also mentioned an iPhone eraser software that securely erases your photos for good and safeguards your privacy.

Are you planning to sell or discard your iPhone? If yes, it’s important to ensure that your personal data, such as photos and videos, etc. is deleted and cannot be recovered even by a professional data recovery tool. To protect your privacy and prevent unauthorized access to your deleted iPhone photos, make sure your iPhone is wiped clean of all your previous photos before you sell, donate, or discard it.
In this blog, we will talk about different ways to delete photos from iPhones beyond the scope of recovery.
How to Delete All Photos from iPhone?
Before deleting all photos from the iPhone, it’s important to take a backup of all photos to avoid any accidental data loss situation. There are various ways to back up your iPhone photos:
### **1\. iCloud**Use iCloud to back up all your photos automatically. To sync iCloud with Photos –
- Go to Settings > [your name] > iCloud > Photos, and turn on iCloud Photos.

Your photos will be backed up to iCloud automatically if your device has enough storage space and is connected to Wi-Fi.
2. iTunes:
You can even use iTunes to back up your iPhone photos. To do this,
- Connect your iPhone to your system.
- Launch iTunes and then select your device.
- Click Summary > “Back Up Now” to create a backup of all your data, including photos.


Once you have backed up all your photos, proceed forward with deleting them from your iPhone.
Method 1: Delete Images From Photos and Recently Deleted Folder
Photos app saves images shot from iPhone as well as those received on chats. You can delete all the photos from your iPhone via the Photos app. Here’s how to do it.
- Open the Photos app on your iPhone.
- Go to the Library tab, tap All Photos, and then tap Select.
- Select one or multiple photos you want to delete.
- Tap on the Trash icon and then confirm to delete the photos.

When you delete a photo from the iPhone, it’s not deleted permanently. Instead, it is moved to the Recently Deleted folder, where the deleted photos stay for 30 days before being permanently deleted.
To permanently delete photos from the Recently Deleted folder, follow these steps:
- Open the Photos app > Albums.
- Scroll down, then tap on Recently Deleted.
- Next, tap Select and choose the photos that you want to delete permanently.
- Tap Delete and then confirm to delete the photos.

Remember, if iCloud sync is enabled, photos deleted from iPhone will be deleted on iCloud. That is why if you want to delete photos from your iPhone but not on iCloud, make sure iCloud sync is disabled for Photos.
Method 2: Factory Reset Your iPhone
Apple’s brilliant feature of the ‘Erase All Content and Settings’ option brings your device to default settings by erasing all your iPhone data, etc.
The factory reset will delete all the settings, photos, audio, videos, messages, notes, call history, search history, app history, passcodes, and any other data on your iPhone.
However, remember erasing your iPhone data with the ‘Erase All Content and Settings’ doesn’t delete your data permanently. It means that all your iPhone data including photos are still recoverable with the help of robust iPhone data recovery software .
Steps to Factory Reset iPhone
- Open Settings on your iPhone.
- Go to General and tap on Transfer or Reset iPhone.
- Click on the Erase All Content and Settings options.
- Click Continue and enter your iPhone passcode.
- Next, click Erase iPhone. This will fully wipe your device clean.

Note: Don’t forget to back up your iPhone data on iCloud or iTunes before initiating the factory reset. Because this backed-up data can be accessed on your computer or new iPhone.
Stellar Eraser for iPhone is the best way to delete permanently erase all photos as well as other data of the iPhone. The software erases all your photos, contacts, videos, chats, iMessage, browser search history, third-party apps data, and more from your iPhone.
The Stellar iPhone Eraser tool is the best way to clean or delete iPhone data. This tool deletes iPhone data permanently making it impossible to recover it from any software. It is the best data erasure tool for iOS devices before you exchange, sell, recycle, or give them away.
The software works with all iPhones and iPad versions, such as iPhone 14 to lower versions till iPhone 4 and supports iOS versions from iOS 6.0 to iOS 16.
![]()
Steps- How to Delete All Photos From iPhone via Stellar Eraser for iPhone
- Download and install Stellar Eraser for iPhone on your Windows and Mac systems.
- Launch the software and click on the Erase Data option.

- In the next Erase iPhone Data screen, click Next.

- Connect your iPhone to the system when prompted and click Erase.

- Click Yes to start the process of erasure.

- Click OK, once all the data is successfully erased.

All the data including photos and videos get permanently erased from iPhone beyond the scope of recovery.
Conclusion
Deleting all photos from your iPhone beyond the scope of recovery is crucial to protect your privacy and prevent unauthorized access to your personal data. By following the methods above, you can ensure that all your photos are deleted permanently from your iPhone. However, the best way to delete all photos from iPhone is by using Stellar Eraser for iPhone. The software will help you erase photos and other data from your iPhone so that it is impossible to recover it using any data recovery software.
![]()
FAQ
1. How to Delete Photos from iCloud?
To delete Photos from iCloud, follow these steps:
- Open Settings > tap on your Apple ID > iCloud.
- Then tap Manage Storage and select Photos.
- Next tap Disable and Delete. It will disable your photos from being saved on your iCloud account.
2. How to delete apps on iPhone permanently?
If you want to delete apps on your iPhone for managing the storage space then you directly remove it from Home Screen or delete it from App Library.
3. How to delete documents and data on iPhone?
Documents and Data folder may contain browsing history, cookies, cache, temporary files, database files and other information specific to the app. You can delete them easily by following this detailed guide .
How to Recover Deleted Photos, Videos & Music Files from iPhone
Summary: Learn how to recover deleted photos, videos and music files from iPhone using the best recovery software —Stellar Data Recovery for iPhone.
There are zillions of tutorials one can find on how to take incredible photos with the A10 fusion chipped smartphone; however, few know how to recover deleted photos from iPhone. As a coin has two sides, through this post, we will explore the other untouched, unexplored side.
iPhone has been the epitome of perfection ever since it entered the smartphone realm. With stellar features and functionality, iPhone has become the highest selling property. There are some hidden iPhone camera features that users can utilize and take amazing photos and videos which leave a lasting impression.
Get Started Here!!!
Recovering deleted photos from iPhone is a straightforward process and do not involve much complexity, provided the right steps are implemented in the right manner.
Without much ado, you can recover deleted iPhone photos or videos with these simple steps. Let’s delve into it in detail.
Solution 1:
Apple has made it easy to recover deleted iPhone photos. Here’s what you need to follow:
- Go to the Albums and access your photos.
- Scroll down and select ‘Recently Deleted’ folder.
- In this folder, you will find all the photos that have been deleted.
- Simply tap the photo you want to recover and press “Recover.”
- To permanently delete a photo, press “Delete”.
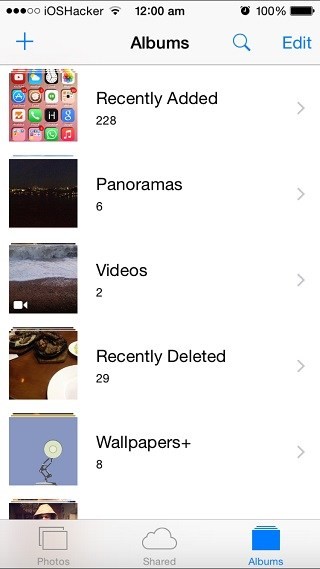
Figure 1 represents how to recover photos from Recently Deleted folder
**Important: _In the ‘Recently Deleted’ folder, you’ll find photos, video & music files that have been deleted within the last 30 days only. To recover them before that period, either you have to restore from iTunes or iCloud backups or use iPhone photo recovery software _.
Solution 2:
iCloud Photo Library to Your Rescue:
You can recover iPhone photos or videos through iCloud Photo Library. iCloud Photo Library securely stores your photos and videos on iCloud. It automatically saves all your photos and videos in iCloud so that you can access the library from any device.
Follow these steps to turn on the iCloud Photo Library:
- Go to settings < [your name] < iCloud < Photos, then turn on iCloud Photo Library (iOS 10.3 or later).
- In iOS 10.2 or earlier, go to Settings < iCloud < Photos.
**Important: Ensure that you’re signed in to iCloud with the same Apple ID as on all of your devices. Things can be complicated as iCloud Photo Library is synced with your different Apple devices which means there could be multiple copies and if a photo, video or music file is deleted from a device, it will not be available on the other devices as well. Deletion sync across all the devices.
Solution 3:
iTunes Backup is there to recover all your photos.
- Click File menu, select Devices < Restore from Backup.
Or
- Open the iOS device’s Summary tab. There are two ways to access this:
- Click the device button in the upper right corner.
- In iTunes tab, click the View menu and select Show Sidebar. Select your iOS device in iTunes under Devices.
- Click the Restore Backup button.
Solution 4:
Use Stellar Data Recovery for iPhone:
iPhone Data Recovery Software by Stellar is an ideal tool to recover lost data from your Apple devices. Utilizing its advanced algorithm, you can scan and recover data (photos, videos, calendar, notes, messages, call history, etc.) from your device. Furthermore, you can recover data from iCloud and iTunes backup as well.

- Connect your iPhone to your system and launch “Stellar Data Recovery for iPhone” software.
- Select “Recover from iPhone” and the software will scan your device for the contents.
- Click on any file to see its preview.
- Finally, click “Save” to save the recovered file to the preferred location.
The Final Word
Apple reflects perfection in its design and innovation; therefore, it constantly thrives to provide its consumers with the best platform. One such feature is that iOS can back up your photos on cloud services automatically so that you have access to them at any given time.
Moreover, there are iTunes backup, iCloud backup options available along with iPhone Data Recovery Software as well; but, it is advisable to backup your iPhone photos or videos timely and manually to avoid unnecessary issues.
- Title: How to Recover FaceTime Call History on iPhone 8 Plus | Stellar
- Author: Nova
- Created at : 2024-08-20 20:00:19
- Updated at : 2024-08-21 20:00:19
- Link: https://blog-min.techidaily.com/how-to-recover-facetime-call-history-on-iphone-8-plus-stellar-by-stellar-data-recovery-ios-iphone-data-recovery/
- License: This work is licensed under CC BY-NC-SA 4.0.