
How to Recover FaceTime Call History on iPhone 8 | Stellar
How to Recover FaceTime Call History on iPhone
Summary: Have you deleted or lost FaceTime calls from your iPhone? Once deleted from the call history, the Facetime calls are removed from the app’s history and vice versa. This post shares quick methods to restore FaceTime call history from any series of iPhone 15, 14, 13, 12, X, XS Max, XR, X, 8, 8 Plus, 7, and below versions and iPads’.


‘Just noticed, that the FaceTime call history suddenly disappeared. Cellular calls history is fine. I am using iOS 16.2, iPhone 14. I don’t have iTunes backup and don’t want to try iCloud backup as it will remove my current data. Is there any other way to get back FaceTime call history?’
‘I deleted the call history on my iPhone and without realizing that FaceTime calls will also be erased. How can I recover deleted FaceTime history?’
You love using FaceTime — Apple’s popular calling app, on your iOS device. It’s a free and easy way to connect with family and friends anywhere in the world through audio and video calls.
But what if ever you accidentally delete or lose FaceTime calls from your iPhone or iPad. They may be important calls you wanted to keep.
Since FaceTime calls are integrated into your recent calls list on iPhone, once deleted from the call history, the calls are removed from the app’s history as well and vice versa.
Here we share various methods to restore FaceTime call history on iPhone 14, 13, 12, 11, XS, XS Max, XR, X, 8, 8 Plus, 7, 7 Plus, 6 and below versions and iPad.
How to recover the lost or deleted FaceTime call history?
1. Restore FaceTime call history without iTunes/ iCloud backup
Deleted FaceTime history can be recovered by using Stellar Data Recovery for iPhone software. The software can restore lost FaceTime call history after accidental deletion, factory reset, app crash, jailbreak, and other issues.
The DIY software thoroughly scans your iPhone or iPad to recover the lost FaceTime call history.
In contrast to iTunes and iCloud backup, Stellar iPhone data recovery software lets you select and restore specific iPhone deleted call history along with the details like name, date, call duration, source country. This saves you from restoring other unnecessary data.
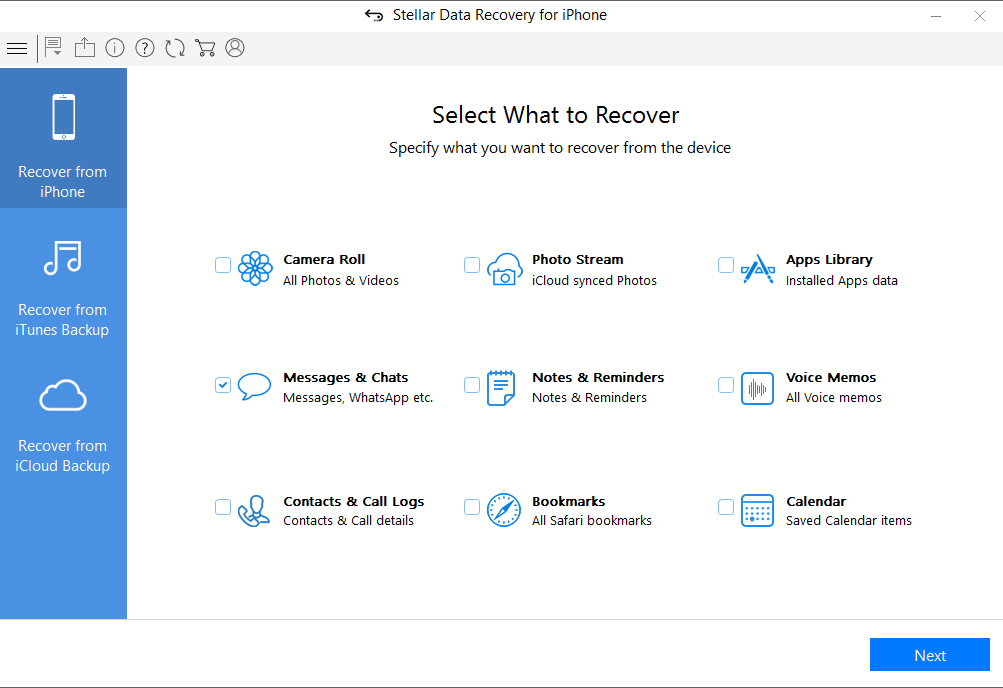
Step-by-step: Recover deleted/ lost FaceTime calls from iPhone
- Connect your iPhone to the computer
- Launch Stellar Data Recovery for iPhone
- Select Recover from iPhone on the left
- Select Contacts & Call Logs under What to Recover

- Click Next
- Preview and choose the FaceTime calls you want to restore from the list. Note: All the calls marked in red color are the deleted calls

- Click You can save the call history either on your computer or iPhone.
Stellar Data Recovery for iPhone can also restore FaceTime calls from iCloud backup on your iPhone or iPad. This method allows you to select and recover only the lost FaceTime call history from iCloud instead of restoring complete backup data.
Two methods to restore FaceTime log from iCloud:
- Restore lost/deleted FaceTime calls from iCloud without losing existing iPhone data
- Restore FaceTime call history from iCloud backup for free, deleting the current iPhone data
Method 1: Restore lost/deleted FaceTime calls from iCloud without losing existing iPhone data:
- Download Stellar Data Recovery for iPhone on your PC/ Mac
- Select Recover from iCloud Backup on main screen of software

- Select Contacts & Call Logs and click Next
- Enter the Apple ID and password. List of all available iCloud backup files appears. Select the relevant backup of your iPhone
- Click Scan

- Click Call History on the left window. Preview the existing and deleted FaceTime calls. Click Deep Scan, if you don’t find your required calls.

- Click Save to save the recovered call history either on iPhone or computer
Method 2: Restore FaceTime from iCloud backup for free (this deletes the current iPhone data)
- Go to Settings > General > Reset> Erase all Contents and Settings

- On Apps & Data screen, tap Restore from iCloud Backup

- Sign in to your iCloud account

- Choose the last backup and Restore
Note – The drawback of this method is that it deletes all your existing data from the iPhone.
Recover FaceTime calls from iTunes Backup
3. Recover FaceTime calls from iTunes Backup
FaceTime recovery from iTunes backup is also possible if you have enabled the backup in iTunes.
Restore FaceTime call log from iTunes either with the help of Stellar Data Recovery for iPhone or directly from your system without the help of software.
However, if you don’t want to part ways with your iPhone’s existing data and lose all the current photos, videos, etc. with the old backup file, take the help of Stellar Data Recovery for iPhone.
The software protects your current data on iPhone and recovers only the call history as required.
Two methods to restore FaceTime call history from iTunes
- Restore FaceTime call history from iTunes without losing existing iPhone data
- Restore FaceTime call history from iTunes backup, deleting the current iPhone data
Method 1: Restore FaceTime call history from iTunes without losing existing iPhone data
- Download Stellar Data Recovery for iPhone software on your PC/ Mac. Note: Connect your iPhone to a computer, if want to save the recovered FaceTime call history on iPhone.
- Select Recover from iTunes Backup on the main screen of the application.

- Select Contacts & Call Logs
- Click Next. From the list of the iTunes backup files, select the relevant iTunes backup

- Click Scan
- Click Call History. Preview the existing and deleted FaceTime calls. Click Deep Scan, if you don’t find your required calls.
- Click Save. You can save on your computer or iPhone
Method 2: Restore FaceTime call history from iTunes for free (this method deletes the current iPhone data)
- Connect iPhone to PC/ Mac
- Launch iTunes on your computer
- Select your iPhone under the Device list and choose the recent backup entry date

- Click Restore Backup
4. Contact Apple
Apple uses end-to-end encryption in FaceTime calls. It will not decrypt the content of your conversations. Apple may record and store information, such as to whom you had called and your iPhone/ iPad network configurations. It stores this information for up to 30 days. You don’t get the details like the content of the conversation or whether your call was answered or not.
Nevertheless, you can contact Apple requesting for FaceTime call logs by clicking on this link and submitting the request – Read More
Apple will get back to you.

Conclusion
iCloud and iTunes backup are the natural way for Apple users to recover FaceTime deleted call history. However, Apple’s solution though workable is not efficient when it comes to the recovery of specific types of data. The iTunes or iCloud backup recovery methods replace every existing data on your iPhone with an old/recent backup. You lose your current photos, videos, call history, messages, chats, etc.
Whereas Stellar Data Recovery for iPhone tackles this recovery issue more effectively. It recovers lost FaceTime calls and also keeps your current data intact on the iPhone.
The software works in all data loss situations due to deletion, jailbreak, water damage, factory reset, etc. You can restore FaceTime call history from any iPhone including series of iPhone 15, 14, 13, 12, 11, X, XS, XR, iPhone 8, iPhone 7, iPhone 6 and older versions. It is available for both Windows and macOS computers.
Best 10 iMessage Recovery Software
Summary: Digital data may sometimes seem a nuisance, and due to essential data may be deleted with unwanted trash. However, if you have also deleted your important messages with all the trash various companies spam you with, you have the option to recover your messages. We are covering the best 10 iMessage Recovery Software to let you make your choice and stay stress-free.
Messages have been an integral part of our personal and professional lives. Losing important messages can be a nightmare. Since most Apple systems work seamlessly with cloud backups, there’s not much to worry about if the backup exists. The heavens fall flat, though, when there’s no backup.
Fret not, as we have a list of top iMessage recovery software to help you get the messages back. We’ve walked the hard yard to make a list and take notes of all the available software. Then, we tested each and listed only the best 10 iMessage Recovery Software for your perusal.
What are iMessages?
iMessage is Apple’s proprietary messaging service. iMessages are a secure form of text, photo, and video messaging across Apple devices. They can only be sent from and received by an Apple device, like an iPhone, iPad, or a Mac.
Top iMessage Recovery Software
1. Stellar Data Recovery for iPhone
Stellar is a known name across the data recovery world, with top-of-the-line products and services. Stellar has been the industry leader for the past 25 years, with awards and accolades to go along with it. When they launched their iPhone Data Recovery Software, they packed years of expertise, experience, and technological advancement in that software. The software is dedicated to simplifying the lives of iPhone users by offering data recovery in every possible way. Among the many options for recovery, Stellar Data Recovery for iPhone software also recovers iMessages easily.
The top Features of Stellar Data Recovery for iPhone:
- Apart from the iMessages, it also recovers photos, videos, contacts, call logs, text messages, photo streams, voice memos, camera roll, app data, and so on. It is a single solution for all iPhone users.
- It also recovers your messages, including attachments, from messaging apps like WhatsApp, WeChat, and Tango.
- The preview feature lets you pick the data you want to recover and discard the unwanted data.
- It also allows for recovering desired data from iCloud and iTunes while not affecting the current iPhone data.
The best iPhone Message Recovery software, and more, are available for both Windows and Mac. It supports iOS 15 and all the versions below. In addition, it is compatible with all the iPhone series, including the iPhone 14 series.
Steps to Recover iMessages using Stellar Data Recovery for iPhone

- Download and install Stellar Data Recovery for iPhone to your computer. It is available for both Windows and Mac users.
- Use your data cable to connect your Apple device to your computer.
- Run Stellar Data Recovery for iPhone.
- Select the ‘Recover from iPhone’ option on the main screen.
.png)
- Select the data type you want to recover.
- Click ‘Next’ to begin the scanning process.
- Preview the data available to recover.
- Select the required data and click ‘Save’ to start recovering the data.
- You can also recover from iTunes or iCloud backup and follow the same steps.

2. Dr. Fone for iOS
Dr. Fone for iOS comes from the house of Wondershare, which supports a wide array of data recovery on iOS. In addition, it has a preview feature to sneak a peek at any deleted messages before recovering them. Dr. Fone has an excellent scanning procedure that is also uncomplicated.
The top Features of Dr. Fone for iOS:
- Fast Data Recovery
- Compatible with all the iPhones
- Recover from iTunes, iCloud, as well as iPhone
3. Primo iPhone Data Recovery
It is also a wonderful iPhone messages recovery application that provides assured results. It enables one to recover any deleted message regardless of the circumstance. For example, it can result from water damage, forgotten passwords, update failures, etc. Primo iPhone Data Recovery uses three settings of recuperation to guarantee a greater success rate as an iMessage recovery software. The problem with Primo is that it works only with iPhone 7 and earlier versions.
The top features of Primo iPhone Data Recovery:
- Recover any of the top 25 file types from any iPhone.
- Three recovery settings, from simple to deep recovery.
4. PhoneRescue for iOS
PhoneRescue is also among the best iMessage recovery software that has helped many users recover their lost data on iPhone devices. In addition, it features easier operating steps that don’t require the user to be tech-savvy, as even casual users can follow the steps, making it a choice application for the users.
The top features of PhoneRescue for iOS:
- Recovers iMessages safely, and no other person can access your data.
- It can help you restore deleted messages/iMessage to your iPhone’s messaging application directly.
- You can preview and then choose the message before restoring them.
- No backup is needed to recover 31 file types with ease.
5. ApowerRescue
ApowerRescue is a high-grade iMessages recovery software for iPhone users. It allows one to recover missing messages easily. ApowerRescue provides extensive device scanning for iPhones, iCloud backup, and iTunes backup to help one recover any erased data. It can recover lost information even if your gadget isn’t easily accessible, is stuck on the Apple Logo, or has a white or black screen. ApowerRescue supports up to iPhone XS Max and iPad Pro models.
The top features of ApowerRescue are:
- Recovers iMessages safely, and no other person can access your data.
- It can help you restore deleted messages/iMessage to your iPhone’s messaging application directly.
- You can preview and then choose the message before restoring them.
- No backup is needed to recover 31 file types with ease.
6. 7thShare iPhone Data Recovery
The 7thShare iPhone Data Recovery has been one of the best iMessage recovery software in terms of its ease of use, speed, usage, and efficiency. It recovers lost data in two ways: from iphone as well as from iTunes backup.
The top features of 7thShare iPhone Data Recovery are:
- It recovers deleted messages more quickly.
- The recovery of files is selective.
- No skills are required.
- Clean and user-friendly interface.
7. iMyFone D-Back
iMyFone D-Back is the best software for fast recovery of data from iPhones with only access to the iCloud account. It is good for recovering mistakenly erased files and messages, even in case of a factory reset. iMyFone D-Back is an iPhone Data Recovery software application specially produced for iOS 9 to iOS 15 gadgets. Thus, it came in handy for different use cases like sync issues. It can recover all data files and information supported with various other programs.
The top features of iMyFone D-Back are:
- Powerful recovery through an intelligent integrated algorithm of iMyFone D-Back.
- You can sneak a peek at the content before recovering it.
- It enables selective recovery of data that stays clear of overwriting existing data.
- It has 3 data healing modes.
- It can be used to recover complete information.
8. MobiKin Doctor for iOS
MobiKin Doctor for iOS works great when looking for easy and quick recovery from iOS devices and iTunes backup. The application supports most iPods, iPhones, as well as iPads. Recovering data from the internal storage of your devices, like contacts and iMessages, works like a breeze. This great iMessage recovery software can also recover many other file types, like videos, music, books, attachments, calendar, etc.
The top Features of MobiKin Doctor for iOS are:
- Preview and recover data from iPhone’s internal memory without any backup.
- Pick only the files you want to recover through previews.
- Recover from iPhone easily.
9. Aiseesoft Fonelab
Aiseesoft Fonelab focuses on the ease of recovery, ensuring that technology helps even the ones who don’t understand. A simple, step-by-step process allows you to recover data from one iOS device to another. Among the best iPhone message recovery software, it can recover from iOS, iTunes Backup, or iCloud backup.
The top features of Aiseesoft Fonelab are:
- Data recovery is independent of the method of data loss.
- Export recovered data to other iOS devices.
- Supports both old and new iPhones.
10. Coolmuster iPhone Data Recovery
Coolmuster iPhone Data Recovery is designed to improve the efficiency of data recovery. It recovers accidentally deleted iMessages, while also recovering other file types, like photos, videos, messages, notes, etc.
The top features of Coolmuster iPhone Data Recovery are:
- It allows you to recover deleted messages and contacts without backup.
- In addition, you can preview your iMessages before recovery.
- You can also transfer data to your computer using the software.
Recovering lost data with the best iMessage Recovery Software
Technological advancements have meant that there are several options available for the recovery of data. iMessages can be recovered using any software with or without iTunes/iCloud backup. However, we recommend Stellar due to its stellar record in data recovery. The software needs no introduction, and reviews have consistently pitched Stellar’s Data Recovery solutions to consumers for their ease of use and efficiency.
FAQs
How do I recover all my iMessages?
You can recover all your iMessages by connecting your iPhone to your computer, opening iTunes, and finding your backup. If the backup doesn’t recover all iMessages, you can try one of the best iMessage recovery software, Stellar Data Recovery for iPhone.
Are deleted iMessages gone forever?
Deleted iMessages may seem scary, but they aren’t gone forever. You can always find them in iTunes or iCloud backups. In addition, you can try the top iPhone message recovery software listed above if they’re not there.
How to Reset iPhone Without Apple Password?
Summary: If you want to erase your iPhone data and reset the device to factory settings, you need to enter your Apple ID password. What if you forgot your registered Apple ID password? This blog explains a step-by-step method of how to reset an iPhone without a password. It also shares a professional erasure tool – Stellar Eraser for iPhone to factory reset your device without entering your Apple credentials.

If you have forgotten your Apple ID password and you wish to reset your iPhone, then it’s going to be a difficult task. However, there are various ways you can use to factory reset your iPhone without an Apple password.
In this blog post, we will explain how to reset your iPhone without password using iTunes or Finder or by using the iPhone Eraser tool .
How to Factory Reset iPhone without a password?
Let’s explore the methods to reset your iPhone without an Apple ID password.
How to Reset iPhone without a password via iTunes or Finder?
To reset your iPhone without using an Apple ID password, you can use iTunes or Finder app. You have to use your computer to access the recovery mode of your iPhone and reset the device to get it without using the password. This method will erase all your iPhone data, so ensure to take a backup of your device before proceeding.
Steps – How to Factory Reset iPhone without Password via iTunes or Finder
- Turn off your iPhone. This process will depend on the kind of iPhone you have.
| iPhone Model | How to Turn iPhone off? |
| All models of iPhone 15, 14, iPhone 13, iPhone 12, iPhone 11, iPhone X, iPhone 8, and iPhone SE (2nd generation). | Press and hold the Lock and Volume down buttons of the iPhone until the power slider appears, then swipe it. |
| All models of iPhone 7, iPhone 6, and iPhone SE (1st generation), | Press and hold the Lock button of the iPhone until the power slider appears and then swipe to turn it off. |
- Connect your iPhone to your computer via a USB cable and ensure iTunes or Finder is running on the system.
- If prompted, enter the device passcode or click Trust in the “Trust This Computer” dialog box.
- Then put your iPhone into recovery mode. To do this:
| iPhone Model | How to put iPhone into recovery mode? |
| All models of iPhone 15, 14, iPhone 13, iPhone 12, iPhone 11, iPhone X, iPhone 8, and iPhone SE (2nd and 3rd generation). | Press and hold the side button until the ‘Connect to computer’ screen appears on your iPhone |
| iPhone 7 and iPhone 7 Plus | Press and hold the Power and Volume Down buttons. Then release the Power button and continue pressing the Volume down button until iPhone has been detected appears. |
| All models iPhone 6, iPhone 5, iPhone 4, iPhone SE (1st generation) | Hold the Home button until a pop-up appears informing the iPhone has been detected in recovery mode. |
- Click on your iPhone when it appears in iTunes and then click Summary.
- Now, select the “Restore iPhone” option on the right pane.


- Click Restore to confirm and then follow the prompts to complete the restore process. This will erase all your iPhone data and install the latest iOS version.

- Once the restore process is complete, set up your iPhone as new or restore it from a backup.
Note– This method of reset will only work when Find My iPhone is disabled.

How to Factory Reset your iPhone without a Password via Stellar iPhone Eraser Tool?
Using the iPhone Eraser software like Stellar Eraser for iPhone is the best tool for resetting the iPhone without knowing the Apple ID login credentials. This tool can permanently erase All Content and Settings including photos, videos, audio, chats, call history, iMessage, texts, contacts, Safari browsing history, and other data on your iPhone.
Stellar Data Eraser Software is supported by all versions of iOS from the latest 16, 15, 14, 12, and below. It even erases content from all variants of iPhone, iPad, and iPod Touch. This tool erases the data permanently from your iOS devices making it unrecoverable by any data recovery software.
![]()
Steps – How to reset iPhone without password using Stellar Eraser for iPhone
- Download and install Stellar Eraser for iPhone on your Mac or Windows system.
- Launch the software and select Erase Data option from the home screen.

- On the Erase iPhone Data screen, click Next.

- Next, connect the iPhone that you want to reset to the computer when prompted. Click Erase.

- Click Yes in the Erase Process dialog box.

- Once the iPhone is completely wiped, click Yes in the Data Erase Complete dialog box.
Conclusion
If you forgot your Apple password and want to reset your iPhone, you can use any of the two methods mentioned above in the blog. You can reset your iPhone with iTunes/ Finder or by using a professional tool, such as Stellar Eraser for iPhone. However, make sure to backup up your iPhone data before proceeding to reset your device.
FAQ
1. How to remotely erase iPhone and iPad data?
If your iPhone is lost or stolen, then you can protect your iPhone data from misuse by remotely erasing its data. For more information, read this blog .
2. How to restore or set up your iPhone from iCloud backup after a factory reset?
If you want to restore your iPhone after a factory reset, you can use iCloud backup to set up your device. For more help, read this guide .
3. How to factory reset iPhone without a computer?
You can reset your iPhone without any computer by using the settings app of your device. To do so:
- Go to the Settings app > General > Reset > Erase all Content and Settings.
Solved: Mac Doesn’t Recognize my iPhone
Summary: Is your Mac not recognizing the iPhone? Learn the 9 ways to fix iPhone not showing up on Mac. You can apply these methods for all iPhone models not recognized by macOS Ventura, Monterey, Catalina, Big Sur, High Sierra and below versions.
You may want to backup iPhone data or transfer favorite photos, music, or videos to Mac. But sometimes your Mac computer doesn’t detect the iPhone when you try to connect it. There are so many complaints such as iPhone not showing up in Finder in Ventura, Monterey, Catalina or Macbook not recognizing iPhone 14. Some also reported an unknown error or a 0xE error when trying to connect iPhone to Mac computer. The situation is frustrating as it prevents you to sync iPhone to macOS and access iPhone data on Mac.
No worries. There are methods, which can fix the issue and let you again access your iPhone on Mac. But, first you should be aware why Mac fails to recognize your iPhone as this helps in troubleshooting the problem.
Why your iPhone not detected by Mac computer?
Mac does not detect your iPhone due to many reasons, such as
- iPhone is not ‘on’ when connected to Mac.
- iPhone is damaged.
- The USB cable or USB port is not working.
- Software updates are pending including iOS, iTunes, and macOS.
- Third-party software conflict wherein 2 programs arecompeting for the same memory, peripheral device etc., on your Mac.
- Firewall or Antivirus software is preventing Mac to recognize iPhone.
- Mac settings don’t allow to view iPhone in Finder.

1. Check your iPhone
Before you connect your iPhone to Mac, make sure the iOS device is unlocked and on the Home screen.
2. Fix USB connection
When Mac computer doesn’t recognize iPhone, first check your USB connection. The USB cable or the port can be faulty. Try to connect iPhone to Mac using another Apple USB 2.0 cable. If that doesn’t work try with the different port. Plus, disconnect other USB devices from Mac except your iPhone.
3. Restart your iPhone
Restarting the iOS device would resolve any issue between your iPhone programs and iTunes. To restart hold volume/side/ top button depending on your iPhone model. Slide the red power off slider on your iPhone. Wait for your iPhone to turn off. After a few seconds, again restart iPhone. Now Mac should recognize your iPhone.
4. Restart your Mac
Restarting Mac clears the cache and memory of your system giving it a fresh start. It also installs pending updates.
5. Update your macOS
When iPhone is not showing up on Mac Finder but you can see it under USB Device Tree, update the macOS to the latest version. Make sure there are no pending software installs.
To check the USB Device Tree on Mac follow the below steps:
- Click on Apple icon followed by About This Mac.
- Click the System Report button.
- Under Hardware, select USB.

Figure: USB Device Tree
- On the right pane, you will see USB Device Tree. If you see your iPhone in the list, then update to the latest macOS.
6. Update iTunes
Older versions of iTunes can create conflict with normal Mac functions. Hence, Apple recommends installing the latest iTunes updates.
To install the latest iTunes, open iTunes. From the menu bar choose Help > Check for Updates and follow the prompts to install the latest version.
Now, check if your Mac recognizes the iPhone or not.
7. Disable antivirus on Mac
One of the reason cited for iPhone not detected by Mac is anti-virus or firewall protection on your system. So disable the antivirus or firewall and then try to connect your iPhone to Mac.
8. Enable iOS device in Mac Preferences
When iPhone is not showing on Mac Finder, check if your Mac Preferences allows to view iOS devices in Finder. To enable iOS device in Finder follow the below steps:
- Go to Finder > Preferences.
- Click on the Sidebar button in Finder Preferences box.
- Check in CDs, DVDs and iOS Devices.


Figure: Finder Preferences
This should fix iPhone not showing up in Finder on Mac.
9. Connect iPhone to a different Mac machine
Try by connecting your iPhone to another Mac. If you receive a message asking to ‘Trust this computer’, click on ‘Trust’ to access your iPhone data on the new computer. Make sure to backup iPhone to avoid data loss situation.
Tip: Have you lost or accidentally deleted Camera Roll, Contacts, Photos Stream, Voice Memos, or more while transferring iPhone data to Mac? No need to worry. Restore the deleted photos, videos, messages, contacts, etc., with the help of an efficient Stellar Data Recovery for iPhone for Mac.

FAQ
1. Can I connect iPhone with Mac wirelessly?
You can sync your Mac and iPhone over the same Wi-Fi network.
- Connect your iPhone to Mac using a USB cable.
- Open Finder on Mac and select your iPhone in the sidebar.
- Click on the General tab.
- Check in Show this iPhone when on Wi-Fi.
- Click Apply.
2. How to fix my iPhone cannot connect to iTunes?
If iPhone is not showing up in iTunes, restart your devices and ensure macOS, iTunes, and iOS are updated. To know more methods, read How fix iPhone unable to connect to iTunes problem.
3. How to connect iPhone to the latest MacBook Pro 2021 that doesn’t have USB A port?
The new MacBook has USB Type-C port. You can use USB-C to Lightning cable to connect iPhone XR, SE, 11, and above to the new MacBook. If you have iPhone X or below use USB-A to Lightning cable.
4. Can I use the methods to fix iPhone 14 not recognized by macOS Ventura?
Yes, you can apply the above methods to fix any iPhone not detected by macOS Ventura, Monterey, Big Sur, Catalina, or below.
5. Will I lose any data when syncing iPhone and Mac?
No, you won’t lose data by syncing iPhone to Mac. Syncing helps to access your iPhone data on Mac anytime from anywhere. However, if you accidentally delete iPhone data, use an iPhone Data Recovery software to restore it.
Wrapping Up
Syncing iOS device to macOS has so many advantages but if Mac is not recognizing your iPhone, you cannot transfer, back up, or access iPhone data on Mac. This post has shared 9 methods to fix the syncing issue of Mac and iPhone. One of them should resolve Mac not detecting your iPhone.
- Title: How to Recover FaceTime Call History on iPhone 8 | Stellar
- Author: Nova
- Created at : 2024-08-20 20:00:20
- Updated at : 2024-08-21 20:00:20
- Link: https://blog-min.techidaily.com/how-to-recover-facetime-call-history-on-iphone-8-stellar-by-stellar-data-recovery-ios-iphone-data-recovery/
- License: This work is licensed under CC BY-NC-SA 4.0.