
How to Recover FaceTime Call History on iPhone XS Max | Stellar
How to Recover FaceTime Call History on iPhone
Summary: Have you deleted or lost FaceTime calls from your iPhone? Once deleted from the call history, the Facetime calls are removed from the app’s history and vice versa. This post shares quick methods to restore FaceTime call history from any series of iPhone 15, 14, 13, 12, X, XS Max, XR, X, 8, 8 Plus, 7, and below versions and iPads’.


‘Just noticed, that the FaceTime call history suddenly disappeared. Cellular calls history is fine. I am using iOS 16.2, iPhone 14. I don’t have iTunes backup and don’t want to try iCloud backup as it will remove my current data. Is there any other way to get back FaceTime call history?’
‘I deleted the call history on my iPhone and without realizing that FaceTime calls will also be erased. How can I recover deleted FaceTime history?’
You love using FaceTime — Apple’s popular calling app, on your iOS device. It’s a free and easy way to connect with family and friends anywhere in the world through audio and video calls.
But what if ever you accidentally delete or lose FaceTime calls from your iPhone or iPad. They may be important calls you wanted to keep.
Since FaceTime calls are integrated into your recent calls list on iPhone, once deleted from the call history, the calls are removed from the app’s history as well and vice versa.
Here we share various methods to restore FaceTime call history on iPhone 14, 13, 12, 11, XS, XS Max, XR, X, 8, 8 Plus, 7, 7 Plus, 6 and below versions and iPad.
How to recover the lost or deleted FaceTime call history?

1. Restore FaceTime call history without iTunes/ iCloud backup
Deleted FaceTime history can be recovered by using Stellar Data Recovery for iPhone software. The software can restore lost FaceTime call history after accidental deletion, factory reset, app crash, jailbreak, and other issues.
The DIY software thoroughly scans your iPhone or iPad to recover the lost FaceTime call history.
In contrast to iTunes and iCloud backup, Stellar iPhone data recovery software lets you select and restore specific iPhone deleted call history along with the details like name, date, call duration, source country. This saves you from restoring other unnecessary data.
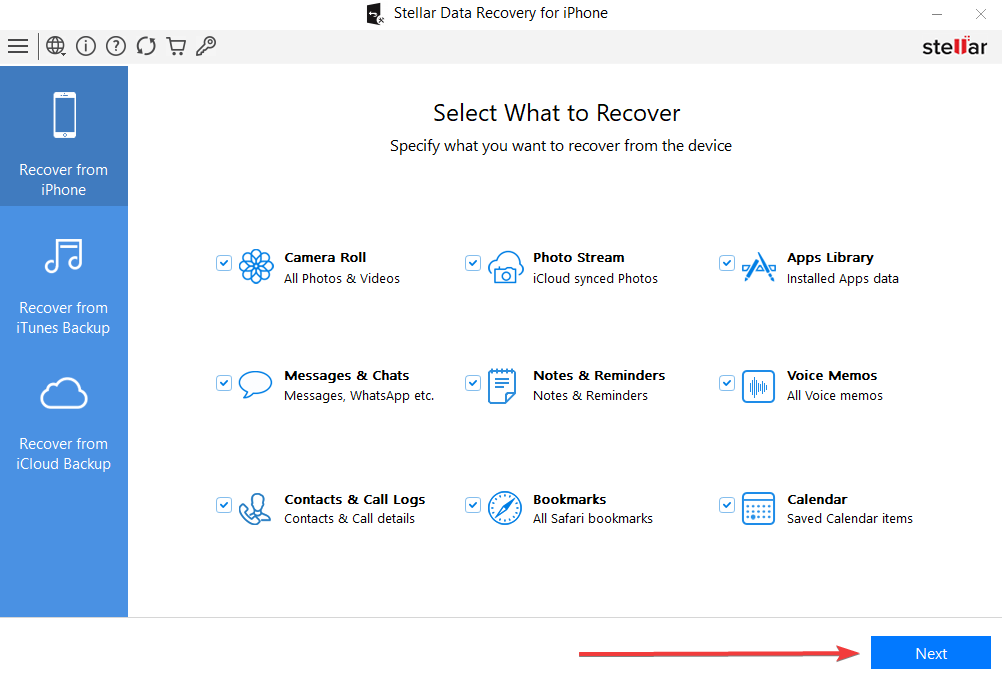
Step-by-step: Recover deleted/ lost FaceTime calls from iPhone
- Connect your iPhone to the computer
- Launch Stellar Data Recovery for iPhone
- Select Recover from iPhone on the left
- Select Contacts & Call Logs under What to Recover

- Click Next
- Preview and choose the FaceTime calls you want to restore from the list. Note: All the calls marked in red color are the deleted calls

- Click You can save the call history either on your computer or iPhone.
2. Recover FaceTime call history with iCloud
Stellar Data Recovery for iPhone can also restore FaceTime calls from iCloud backup on your iPhone or iPad. This method allows you to select and recover only the lost FaceTime call history from iCloud instead of restoring complete backup data.
Two methods to restore FaceTime log from iCloud:
- Restore lost/deleted FaceTime calls from iCloud without losing existing iPhone data
- Restore FaceTime call history from iCloud backup for free, deleting the current iPhone data
Method 1: Restore lost/deleted FaceTime calls from iCloud without losing existing iPhone data:
- Download Stellar Data Recovery for iPhone on your PC/ Mac
- Select Recover from iCloud Backup on main screen of software

- Select Contacts & Call Logs and click Next
- Enter the Apple ID and password. List of all available iCloud backup files appears. Select the relevant backup of your iPhone
- Click Scan

- Click Call History on the left window. Preview the existing and deleted FaceTime calls. Click Deep Scan, if you don’t find your required calls.


- Click Save to save the recovered call history either on iPhone or computer
Method 2: Restore FaceTime from iCloud backup for free (this deletes the current iPhone data)
- Go to Settings > General > Reset> Erase all Contents and Settings

- On Apps & Data screen, tap Restore from iCloud Backup

- Sign in to your iCloud account

- Choose the last backup and Restore
Note – The drawback of this method is that it deletes all your existing data from the iPhone.
Recover FaceTime calls from iTunes Backup
3. Recover FaceTime calls from iTunes Backup
FaceTime recovery from iTunes backup is also possible if you have enabled the backup in iTunes.
Restore FaceTime call log from iTunes either with the help of Stellar Data Recovery for iPhone or directly from your system without the help of software.
However, if you don’t want to part ways with your iPhone’s existing data and lose all the current photos, videos, etc. with the old backup file, take the help of Stellar Data Recovery for iPhone.
The software protects your current data on iPhone and recovers only the call history as required.
Two methods to restore FaceTime call history from iTunes
- Restore FaceTime call history from iTunes without losing existing iPhone data
- Restore FaceTime call history from iTunes backup, deleting the current iPhone data
Method 1: Restore FaceTime call history from iTunes without losing existing iPhone data
- Download Stellar Data Recovery for iPhone software on your PC/ Mac. Note: Connect your iPhone to a computer, if want to save the recovered FaceTime call history on iPhone.
- Select Recover from iTunes Backup on the main screen of the application.

- Select Contacts & Call Logs
- Click Next. From the list of the iTunes backup files, select the relevant iTunes backup

- Click Scan
- Click Call History. Preview the existing and deleted FaceTime calls. Click Deep Scan, if you don’t find your required calls.
- Click Save. You can save on your computer or iPhone
Method 2: Restore FaceTime call history from iTunes for free (this method deletes the current iPhone data)
- Connect iPhone to PC/ Mac
- Launch iTunes on your computer
- Select your iPhone under the Device list and choose the recent backup entry date

- Click Restore Backup
4. Contact Apple
Apple uses end-to-end encryption in FaceTime calls. It will not decrypt the content of your conversations. Apple may record and store information, such as to whom you had called and your iPhone/ iPad network configurations. It stores this information for up to 30 days. You don’t get the details like the content of the conversation or whether your call was answered or not.
Nevertheless, you can contact Apple requesting for FaceTime call logs by clicking on this link and submitting the request – Read More
Apple will get back to you.
Conclusion
iCloud and iTunes backup are the natural way for Apple users to recover FaceTime deleted call history. However, Apple’s solution though workable is not efficient when it comes to the recovery of specific types of data. The iTunes or iCloud backup recovery methods replace every existing data on your iPhone with an old/recent backup. You lose your current photos, videos, call history, messages, chats, etc.
Whereas Stellar Data Recovery for iPhone tackles this recovery issue more effectively. It recovers lost FaceTime calls and also keeps your current data intact on the iPhone.
The software works in all data loss situations due to deletion, jailbreak, water damage, factory reset, etc. You can restore FaceTime call history from any iPhone including series of iPhone 15, 14, 13, 12, 11, X, XS, XR, iPhone 8, iPhone 7, iPhone 6 and older versions. It is available for both Windows and macOS computers.
How to Fix iPhone Storage Not Loading/Showing
The majority of smartphones require a certain amount of storage to operate properly. When you receive a low storage message, you may instinctively check your storage space but encounter the iPhone Storage Not Loading issue.
What could be the cause of such a bothersome problem? The bad news is that the root reason for this problem is unclear, but we’ve offered some fixes you can try to fix this issue.
There is yet another way to check the storage on your iPhone if you face the “iPhone Storage Not Showing” issue, and we’ll go over it in the following section.
How can I use a computer to check my storage?
You can check your iPhone’s storage using a computer with iTunes or Finder app installed.
- On a Mac running macOS Catalina 10.15 or later, launch the Finder or open iTunes on a PC or Mac running macOS Mojave 10.14 or an earlier version.
- You should use a cable to connect your phone and computer.
- Select your device in iTunes or Finder.
- You can see how much storage each type of content takes up by hovering your mouse over the storage bar.

How can I fix iPhone Storage Not Loading/Showing?
1. Wait a bit more
Some computing operations take a while to finish. Your phone’s storage may overflow with tons of app data, images, and other files if you’ve been using it for a while.
And each of them would have to load before reporting their combined size to the OS. Usually, loading takes about three minutes.
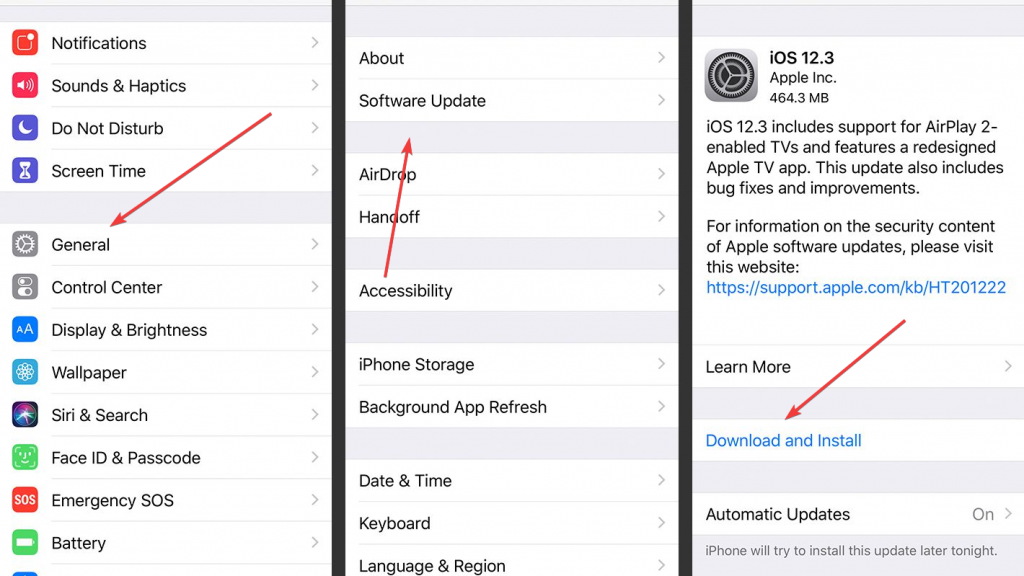
2. Update iOS
If your iOS version was outdated, your phone’s functionalities, including storage access, would not function properly. Additionally, updating the OS will get rid of any potential issues. Follow the procedures listed below to check and update your iOS version:
- Select General from the Settings menu.
- Click on Software Update. If any updates are available, download and install them.
3. Force Stops the App
The settings app itself can be the problem due to an app bug. Therefore, forcing the app to close is a valid option. This will make the software restart from scratch, wiping off part of the data and information it had in RAM.
- Access the app switcher (swipe up your finger from the bottom of the screen to bring up the menu or double-click the Home button on older iPhone models).
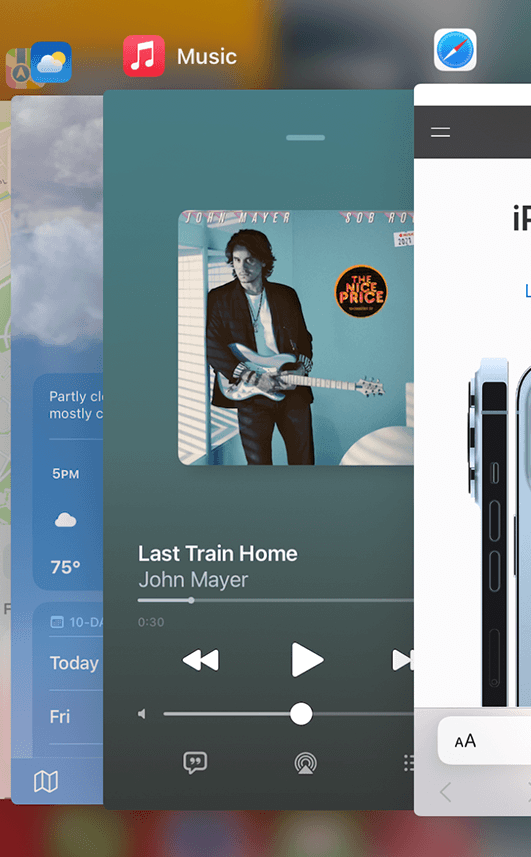
- Swipe up and drag the Settings card off the screen to force the app to close.
- Relaunch the Settings app to see if the problem persists.
4. Reconnect to iCloud
iOS has been designed in a way that it needs to be connected to iCloud to function flawlessly. Therefore, the storage loading error could also be linked to connectivity issues between these two. In this case, signing out of the service and then back in again might resolve the issue.
- Open the Settings application.
- Click your profile at the top. To sign out of the service, tap iCloud.

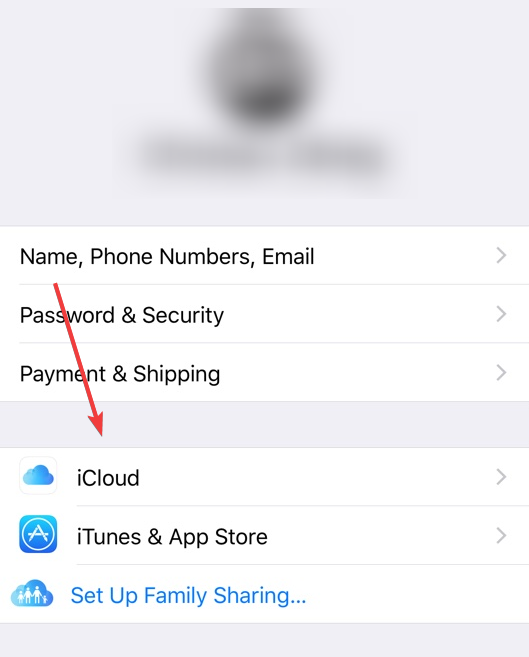
- Next, sign in once more using your iCloud password.
5. Fix the Issue Using Your PC
When you connect the cable, link your iPhone to your PC, and sync the storage, iTunes looks for any issues and either fixes them on its own or recommends methods to fix them by yourself. For any software-related issues with your phone, this is a great fix, and it may even repair your iPhone storage not updating problem.
- Connect your phone to computers that have iTunes installed on them with a lightning cord.
- The storage data should be able to sync with your smartphone automatically.
- If not, press the Sync button.
6. Factory Reset Your iPhone
You may fix any bugs that cause iPhone storage not to update by performing a factory reset. Furthermore, it would restore your OS version to its factory settings, resolving any problems that updates might have brought on.
The whole contents of your device will be deleted if you follow this method. You can either create a backup of your data or use a tool to restore it once your iPhone has been entirely deleted to prevent this.
- Go Settings app on your smartphone. Next, choose Reset after choosing General.
- Under Reset, among the few options, click Erase all Content and Settings.
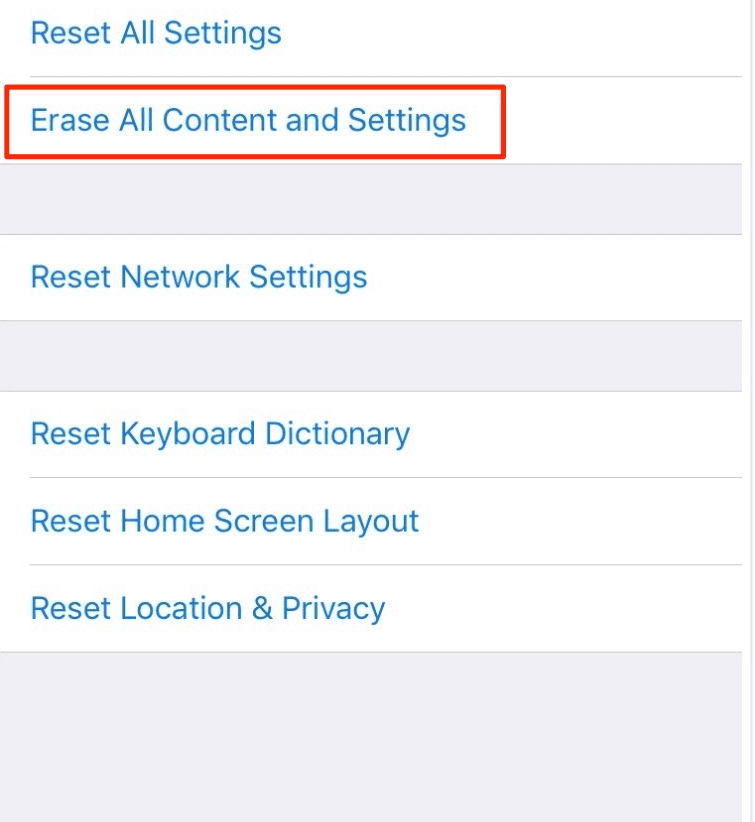
- Next, choose Erase iPhone. After that, your smartphone will return to its factory default settings.
Recover your data using Stellar data recovery for iPhone:
Stellar Data Recovery for iPhone is a powerful program that can retrieve files that have been erased unintentionally or on purpose. To guarantee that Stellar Data Recovery for iPhone will recover your data, it offers a variety of data recovery techniques. Furthermore, you wouldn’t need to check manuals or other documentation to understand how to use the software because of its basic user interface, which makes the recovery process easy.
With Stellar Data Recovery for iPhone, your files, including voice recordings, notes, and Safari bookmarks, will be restored. What you should do is:
- Download and install Stellar Data Recovery for iPhone from the official website.
- Connect your iPhone to the PC through a cable.
- Launch the Stellar Data Recovery for iPhone, choose the type of data you wish to recover from the list, and click Next.
- Preview the recovered data, then Select and Save it to the chosen destination.

Why isn’t my iPhone storage loading?
When trying to check your iPhone’s storage, you will notice a small spinning wheel going back and forth if your phone is having storage problems since it cannot accurately represent the amount of storage that is accessible.
Furthermore, the loading issue may show an incorrect amount of storage. Some users reported this and other minor issues throughout the iOS 15 beta testing phase. Other factors contributing to this issue include iCloud service problems and application bugs.
Wrap up! Stellar is your ultimate backup
It is hard to download content or install apps on an iPhone with insufficient storage. Therefore, a factory reset would resolve your issue and clear the storage, enabling you to scan your device with Stellar Data Recovery for iPhone and retrieve any desired files.
And if a factory reset doesn’t fix iPhone storage not loading and showing problem, look for professional assistance with your problem. You can never be certain whether a storage issue results from faulty hardware or software.
FAQ:
- How do I create backups before wiping my iPhone clean?
Simply connect your phone to your computer, open iTunes, and choose the backup option, and the program will create a copy of your data that can be used to restore lost or deleted contents.
- Does Stellar Data Recovery for iPhone require a backup for successful file recovery?
Because the software searches iTunes for files, having a backup, there might be useful. However, the software can and will effortlessly restore your content even without any backups.
- Do I install the Stellar Data Recovery Software for iPhone on my smartphone?
The software cannot be installed or used on an iPhone or an Android smartphone. Because the software is compatible with the widely used Windows and Mac operating systems, you must first install it on a device using one of those operating systems before connecting your phone to it.
How to Fix iPhone Stuck at ‘attempting data recovery’ Loop
Summary: If your iPhone gets stuck at ‘attempting data recovery’ loop screen while updating iOS, learn how to fix iPhone failed iOS update error and efficiently recover lost data using Stellar Data Recovery for iPhone.

Since the release of iOS 16, there are frequent complaints about flood updates leading to the ‘attempting data recovery’ loop. Moreover, users are concerned about data loss in such situations.
Users globally reported that their iPhone gets stuck in the ‘attempting data recovery’ loop while trying to install iOS updates. The issue occurs when they update to iOS 16 versions by using iTunes. It leaves the update in the lurch and erases some or all data from their iPhone.
iOS updates breathe new life into your device. However, the truth is that Apple’s every update brings some bug or new problem, like this one.
Read this post further if your iPhone screen gets stuck at the ‘attempting data recovery’ loop during an iOS update.
It shares how to fix iPhone ‘attempting data recovery’ failed problem and recover lost iPhone data in any case.
You can apply the methods on iPhone 14, 13, 12, SE, 11, XS, XR, X, 8, 7, 6, 5, and 4 series. They are relevant to iOS 16 and below versions.
Common causes of ‘attempting data recovery’ loop on iPhone
The attempting to data recovery failed problem usually occurs when iOS is updated with iTunes. The ‘attempting data recovery’ screen takes a long time and is often followed by a prompt ‘press home button to restore.’
Some of these occurrences were reported in the following scenarios:
- Users unplugged the iPhone from a PC or Mac during the update
- Downgrading from iOS 16 to 15 or below
- Updating iOS after jailbreak
How to fix iPhone stuck at the ‘Attempting Data Recovery’ loop
- Force Restart iPhone
- Put iPhone into Recovery Mode
Method 1: Force Restart iPhone
It’s essential to know that a force restart differs from a normal Restart. A force restart is advised when iPhone is not in its normal working condition. It is either hanged or stuck at the Apple logo or another screen in Recovery Mode or Restore Mode. It cuts the power and turns on the iPhone again. Force restart usually fixes many iPhone issues.
Steps to Force Restart iPhone 8 and earlier:
- Press and fast release the Volume Up button
- Press and fast release the Volume Down button
- Press and hold the Side button (power) until the Apple logo appears
Steps to Force Restart iPhone X and later:
- Press and quickly release the Volume Up button
- Press and quickly release the Volume Down button
- Press and hold the Side button until you see the recovery-mode screen.
Method 2: Put iPhone into Recovery Mode
If Force Restart doesn’t help, try this method. Recovery Mode helps in cases of failed iOS updates. Thus, whenever the iOS updates, the iPhone gets stuck at the ‘attempting data recovery,’ op put the device on Recovery Mode.
[Caution]: Recovery Mode erases the iPhone data, which can be restored with the help of iTunes backup. So, make sure that the iTunes version is the latest.
Steps to put iPhone on Recovery Mode:
- Connect iPhone to computer
- Open iTunes
- Force restart iPhone (with steps mentioned above)
- A dialog box appears. Select Update

5. After the Update process completes, set up your iPhone.
Fixed ‘attempting data recovery’ failed problem. Further, how to restore data on iPhone
Recovery Mode, though fixes iPhone’s ‘attempting data recovery’ issue but at the same time erases all information from the device. You can restore iPhone data from iTunes backup or iCloud backup.
In case, iTunes/iCloud backups are not able to restore iPhone or you discover that some of the data is still missing after restoring the device, choose Stellar Data Recovery for iPhone .
The software is also helpful when you don’t want to recover all the data from iTunes or iCloud unnecessarily. Instead, it. It lets you recover precisely what you want, by allowing you to choose specific files like photos, videos, WhatsApp chats, or memos, Calendar, etc., and restoring them on the device.
Additionally, Stellar Data Recovery for iPhone also restores the data lost and deleted after jailbreak, water damage, a Black screen of death, iPhone stuck at Apple logo , screen damage iPhone, factory reset, etc. It supports recovery from iPhone 15, 14, 13, 12, SE, 11, XS, XR, X, 8, 7, 6, 5, and 4 series.
Steps to Restore Data on iPhone with Stellar Data Recovery of iPhone
- Download Stellar Data Recovery for iPhone on PC/ Mac
- Connect iPhone to the computer
- Select iTunes from the software screen
- Follow the simple on-screen instructions
Wrapping Up
Users look forward to iOS updates. However, the experience can get irritating, when iPhone software updates fail. For example, iPhone ‘attempting data recovery’ loop is a common problem faced after attempts to upgrade to the latest iOS 16.
Force restart of the device often resolves the ‘attempting data recovery’ loop issue. If this doesn’t work, further try to get your iPhone on Recovery Mode. Later restore data via iTunes or Stellar Data Recovery for iPhone. The software approach is straightforward and lets you select and restore the informathat you want.
How to Recover Lost Data from iTunes Backup File?
If you have lost iPhone data and are unable to restore it from the iTunes backup file, use Stellar Data Recovery for iPhone. The software quickly recovers lost or deleted iPhone data from iTunes.
Stellar Data Recovery for iPhone is the best iPhone data recovery tool to recover data from iTunes backup files. The tool uses a sophisticated algorithm, which scans through the entire backup file to recover data. You can easily restore saved iOS data like Messages, Call History, Calendar, Notes, etc., from the backup file.
Note: Make sure your Mac or PC is updated and you are using the latest version of iTunes.
Follow the below steps to recover lost data from iTunes backup file:
1. Launch ‘Stellar Data Recovery for iPhone’ tool on your computer.

Figure: Home screen of Stellar Data Recovery for iPhone
2. Click ‘Recover iTunes Backup’ option on the left. The software scans the system for iTunes backup files and lists them along with the date of creation.
3. Select an iTunes backup from which you want to restore data.
4. On the left pane, click on the type of data that you want to recover. You can restore Camera Roll, Photo Stream, Contacts, Messages, Message Attachments, Call history, Calendar, Reminder, Voice Memo, Notes, Notes Attachments, Safari Bookmarks, WhatsApp, WhatsApp Attachments, Line, Kik Viber, Tango, WeChat, and Apps Library.
The software lets you preview, select, recover, and also search for specific photos, videos, messages, and other data.
5. Select what you want to recover and click on Save. Select a destination to save the iPhone data.


- Title: How to Recover FaceTime Call History on iPhone XS Max | Stellar
- Author: Nova
- Created at : 2024-08-20 20:00:29
- Updated at : 2024-08-21 20:00:29
- Link: https://blog-min.techidaily.com/how-to-recover-facetime-call-history-on-iphone-xs-max-stellar-by-stellar-data-recovery-ios-iphone-data-recovery/
- License: This work is licensed under CC BY-NC-SA 4.0.