
How to Repair Corrupt Excel 2003 Files | Stellar
How to repair corrupt Excel file
Stellar Repair for Excel is an excellent tool to repair corrupt or damaged MS Excel files. Mentioned below are the steps to perform Excel repair with this tool:
- Download & Run the Stellar Repair for Excel.


- A dialog box appears on your screen, click ‘OK’ to proceed.
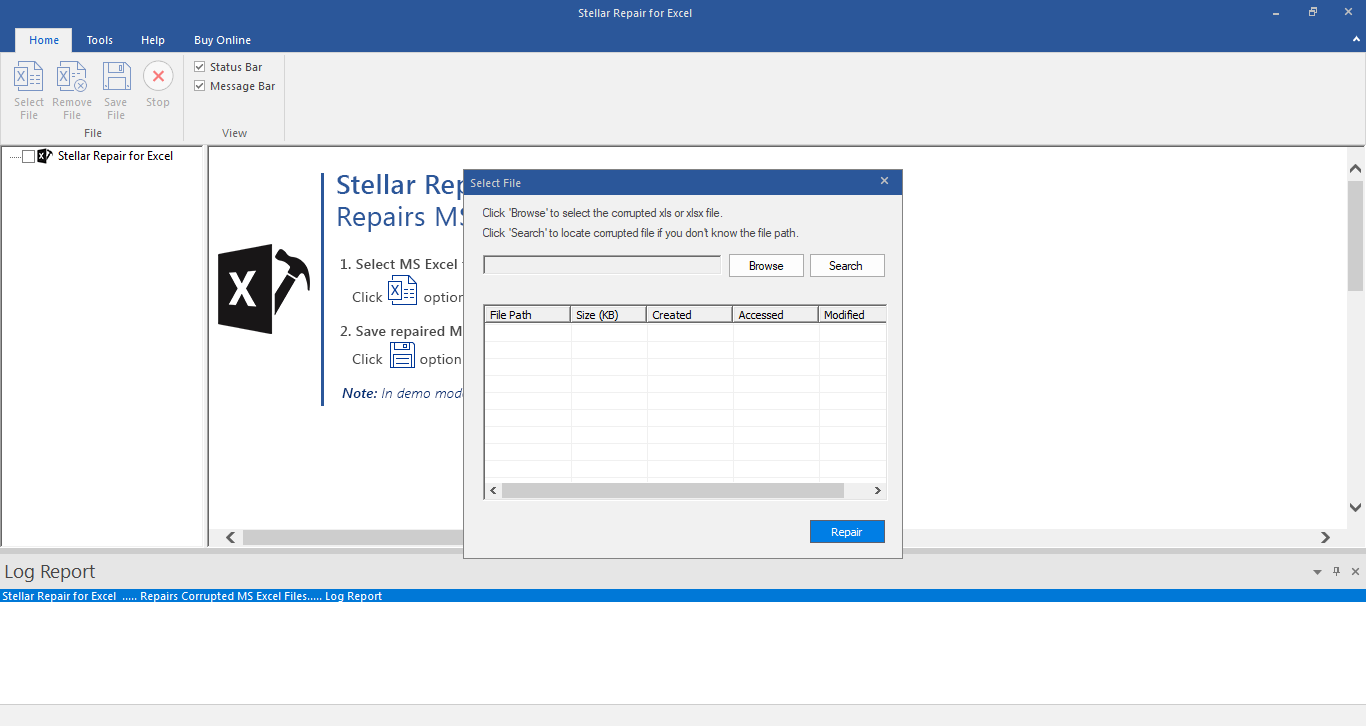
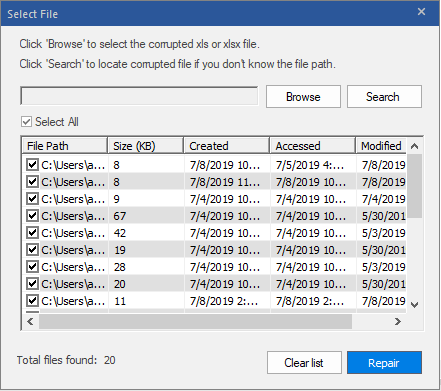
- To select your corrupt .XLS or .XLSX file, click ‘Browse’ button. However, if you do not know the location of your .XLS or .XLSX file, the software provides you the option ‘Search’ to search for your corrupt Excel files.

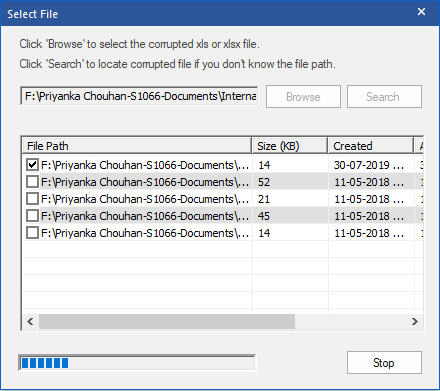
- Select the checkboxes against the files that you want to repair and click ‘Repair’. This starts the scanning process.
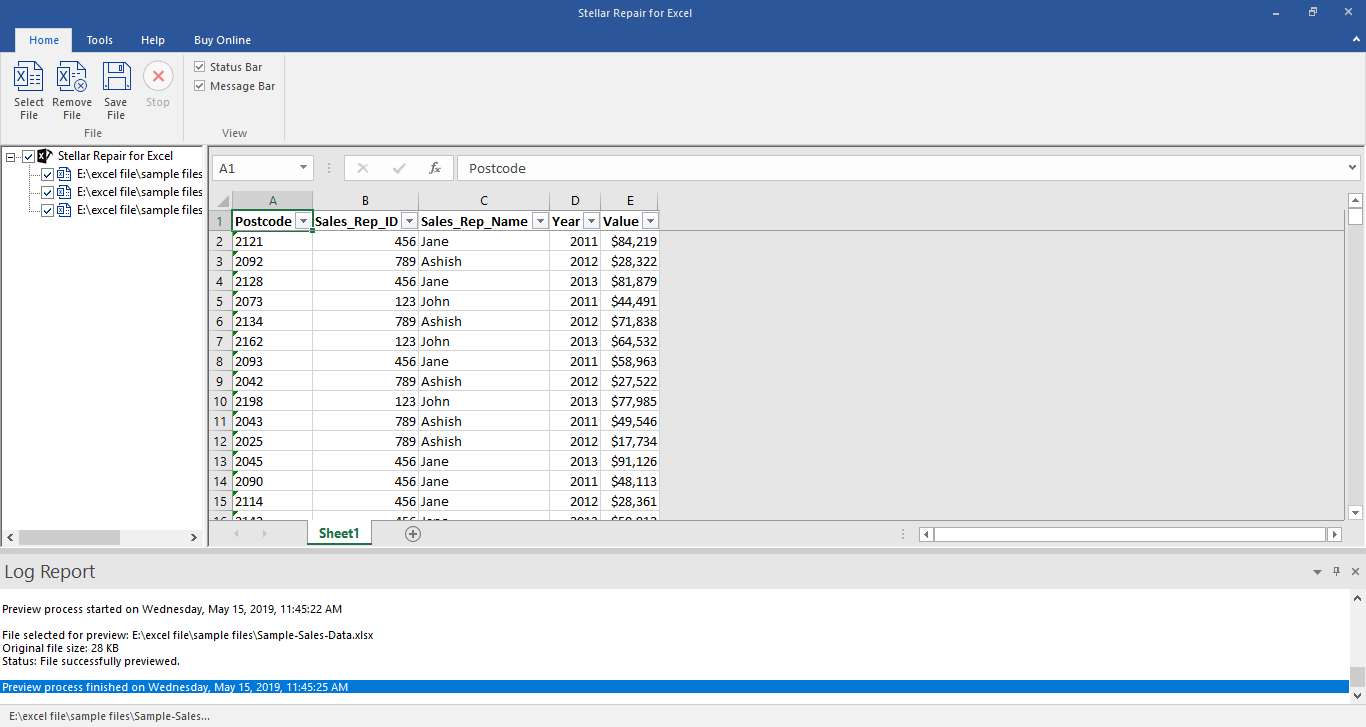
- The list of all the files that the software has scanned is displayed in the tree-view in the left pane. Click on a file from this tree-view to see its preview in the middle pane. From this list, you can select the file that you want to recover.
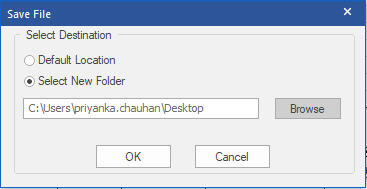
- You can either select the ‘Default location of file’ or ‘Select New Folder’ in the ‘Save Document’ dialog box to save the repaired files.

Stellar Repair for Excel Stellar Repair for Excel is the best choice for repairing corrupt or damaged Excel (.XLS/.XLSX) files. This Excel recovery software restores everything from corrupt file to a new blank Excel file.
[Learn More ](https://tools.techidaily.com/stellardata-recovery/repaire-for-excel/)How to Repair Multiple Excel Files by Using Stellar
With Stellar Repair for Excel, it is quite easy and simple to repair multiple MS Excel (XLS and XLSX) files that are damaged. This is because the software has a self-explanatory interface and hence is a Do-it-yourself software. Nonetheless, when using this software to repair multiple Excel files, you would have to add all of the files into the software by following a few pre-defined steps. Follow the steps mentioned below:
- Launch Stellar Repair for Excel software.
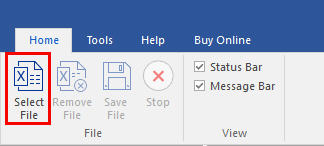
- Under Home menu, click Select file
- Click Browse and select corrupt Excel files. Select the checkbox to repair multiple files.
- Click Repair
- The software provides the preview facility. You can check the it on left pane.
- Save the repired filr ether Default location or Select New Folder radio button.
Stellar Repair for Excel Stellar Repair for Excel is the best choice for repairing corrupt or damaged Excel (.XLS/.XLSX) files. This Excel recovery software restores everything from corrupt file to a new blank Excel file.
Recover Excel Files from Virus-Infected Pen Drives for Free
Summary: Imagine you lost your important Excel file on which you had been working since the morning and in the next moment you realized that the file was not saved and you just lost hours of work. Wondering how to deal with this situation? Read this blog to know how Stellar free data recovery software can help you.

From making annual reports to business growth representation figures, excel is a commonly used program for organizing data, creating pivot tables, charts etc. People from all walks of life, know the importance of Excel and the part it plays. Although it is a common file, there is a probability that you may accidentally delete excel files while working or are unable to access it due to unexpected errors. In addition, one of the major issues users face is to recover excel files from a virus infected pen drive.
Pen drives have made it possible to store and carry our important files such as excel, word document, photos, videos, etc. with us day in and day out. They just fit perfectly in our pockets and are compatible with almost every device; hence, they are widely used for transferring data from one system to another. But what if your pen drive is infected by a virus and due to it you end up losing your excel files, how will you recover your excel files for free?
A user reported that his pen drive got virus-infected and to remove the virus from it, he ran an antivirus program which removed the virus but also deleted excel files stored on it.
When your pen drive is infected by a virus, the first thing you ought to do is stop using it, even not for removing virus as an antivirus utility may remove your files as well. Further, if you have a backup, then you can recover your excel files from it, else you can use these free data recovery methods to recover your excel files.
1. Free File Recovery Software Approach
Stellar Windows Data Recovery – Free Edition is an easy to use tool to recover files from a virus-infected pen drive. The software is equipped with powerful utilities to recover lost and deleted files for free. Further, it supports a wide range of file systems and is efficient in recovering files such as Excel, emails, word files, photos, audio and video files.
Using Stellar Windows Data Recovery – Free Edition, you can recover your files from all storage devices for free. Here’s how the software works:
- From the website, download Stellar Windows Data Recovery – Free Edition. Connect your pen drive to your system and launch the software
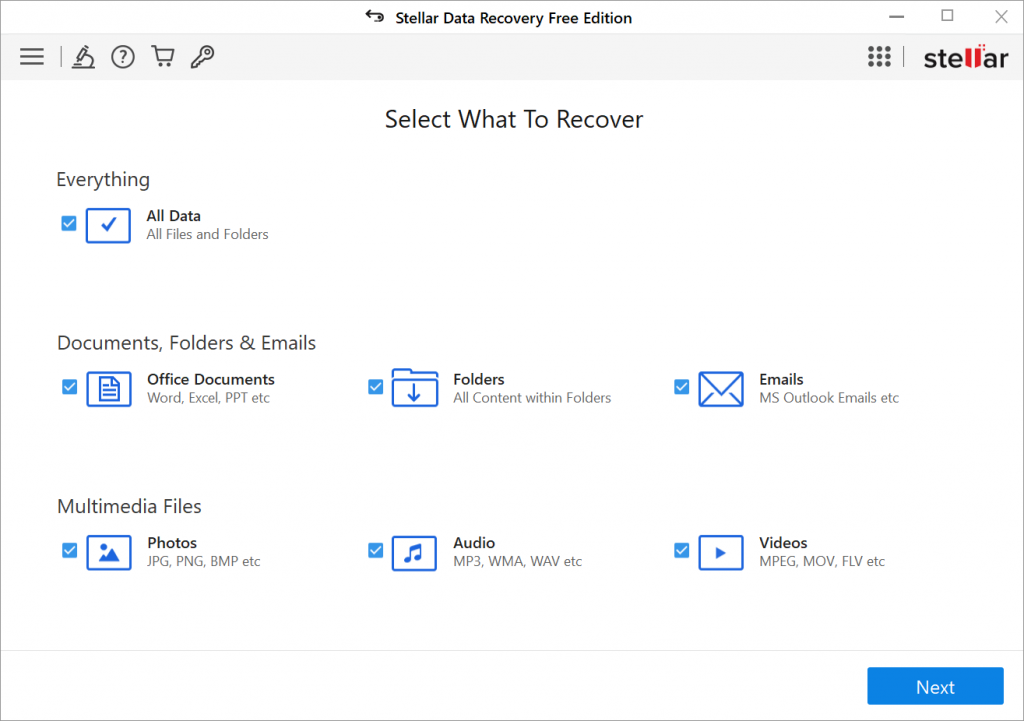
- On ‘Select What to Recover’ screen, select file types from the given option that you wish to recover. For instance, if you want to recover photos, then under Multimedia Files, select ‘Photos’ and click on ‘Next’
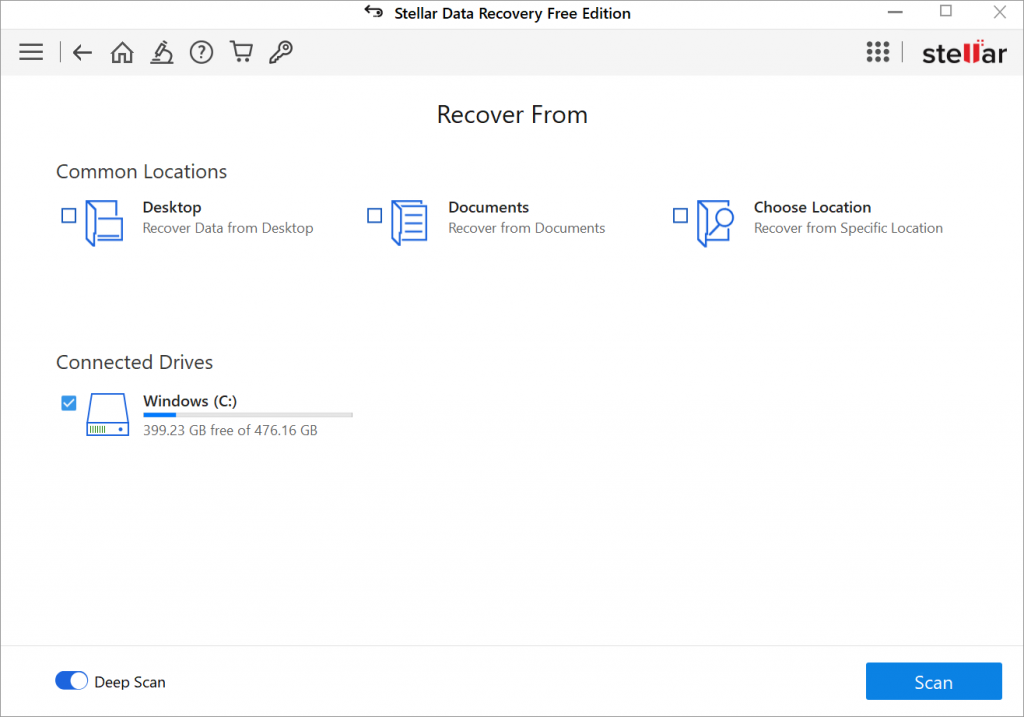
- From ‘Select Location’ screen, select the connected pen drive and click ‘Scan’
- The scanning process starts and once the process is complete, software lists all the recoverable files
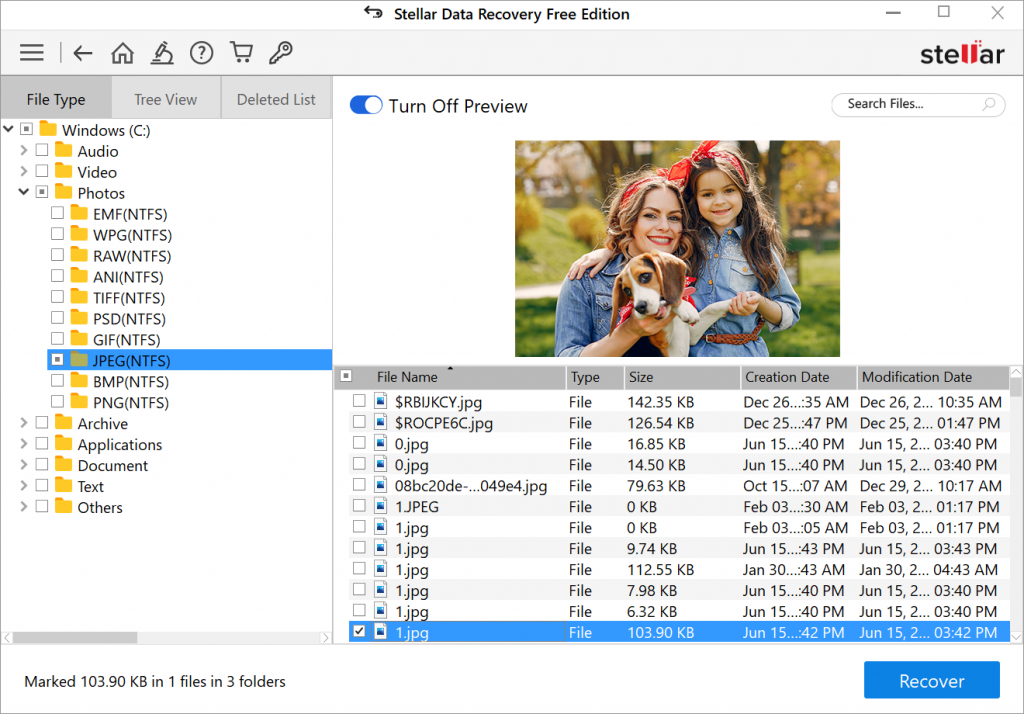
- Select the files from the list and click on ‘Recover’ to save the files
2. Restore Excel File from the Previous Version
If excel files are deleted from your pen drive or from your system; then you can recover them from the previous version. This feature works when Windows Backup option is enabled, else, it will not work.
Follow these steps to recover excel files:
- Connect your pen drive to your system, go to This PC and navigate to the folder of excel files
- Select the folder, right-click on it and select ‘Restore previous versions’
- From the available version of excel files, select the required one and click on ‘Restore’
3. Use Command Line to Recover Excel Files
The Command prompt should be your first choice to recover excel files from the virus-infected pen drive. Here’s how command prompt recovers your files:
- Connect your virus-infected pen drive to your system and then in the search box type ‘CMD’ and hit ‘Enter’
- In the command window, type in attrib –h-r-s /s/ drive letter:\*.*”, for example, “attrib -h -r -s /s /d G:\*.*” and hit ‘Enter’
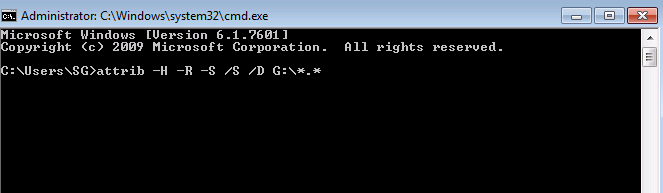
- Windows starts repairing the virus-infected pen drive and once the process is complete, you can access your pen drive and recover excel files.
Even after following the above-mentioned steps you’re unable to recover your excel files, then try a Home approach i.e. a data recovery tool.
To Sum Up
It is always a good idea to create a backup of important files since no one can anticipate what might go wrong. The scenario presented in the blog paints a clear picture of how you can recover your Microsoft excel files for free from a virus-infected pen drive. For quick and better results, you can always go with Stellar Windows Data Recovery – Free Edition.
Repair Files using Stellar Toolkit for File Repair
Stellar Toolkit for File Repair Technician
The main interface of Stellar Toolkit for File Repair comprises four modules to repair MS Office and PDF files. These modules are:
- Repair Document
- Repair Spreadsheet
- Repair PowerPoint
- Repair PDF
Click on the desired tab to repair that file format.
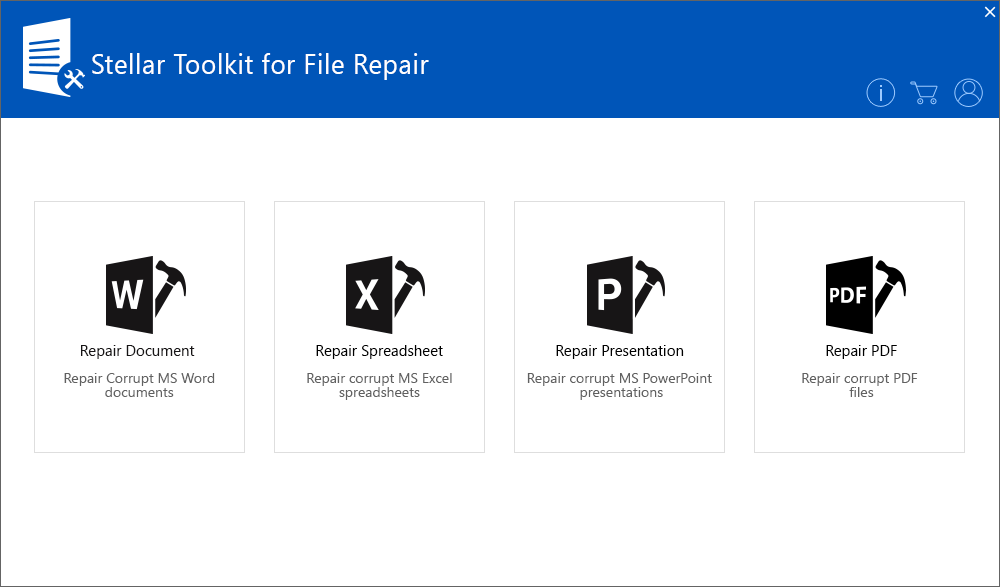
Figure 1 - Illustrates Homepage of the Stellar Toolkit for File Repair
Steps to Repair MS Word – .doc/.docx file
- Click Select File to select a single corrupt Word (.doc/.docx) file that you want to repair. Alternately, click Select Folder for selecting all Word files in a single folder.
Note: Click Find file(s) to search for the Word file, if the location is not known.
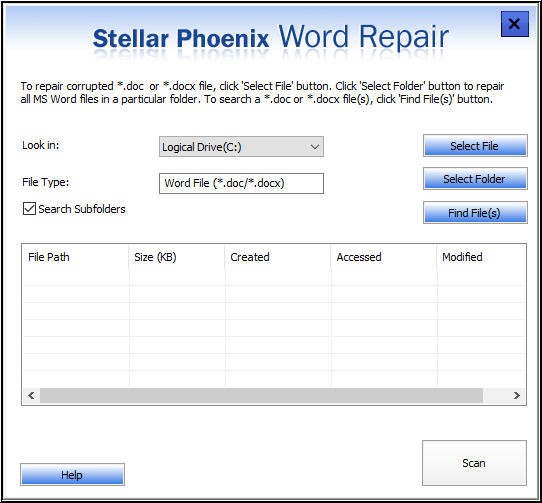
Figure 2 - Illustrates Selection of single doc/.docx file or multiple files
- Once the file is selected, click the Scan button to scan and repair the file.
- A preview of the repaired Word file is displayed on the screen. Verify the file contents from the right pane of the preview window.
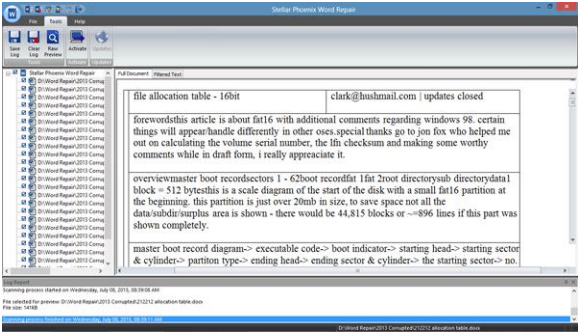
Figure 3 - Preview of Repaired Word Document
Note: If you’re unable to repair a corrupt .doc file, select ‘Advance Repair’ option from the File menu for repairing the .doc files.
- Click the Save icon on the File menu to save the repaired file.

Figure 4 - File Menu
In Save Document dialog box that appears, do the following:
Select default location or a new folder to save the repaired file.
Save the file in any of these formats: ‘Full Document’, ‘Filtered Text’ or ‘Raw Text’.
Click OK.
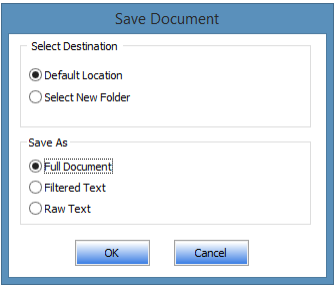
Figure 5 - Word Document Saving Options
The repaired file will be saved at your preferred location.
Steps to Repair Excel – .xls/.xlsx files
- In Select File window, click Browse to select the corrupt Excel file from the desired location. If you do not know the file location, click Search to find and select the corrupted spreadsheet.
- Once the Excel file is selected, start repairing the file by clicking the Repair button.
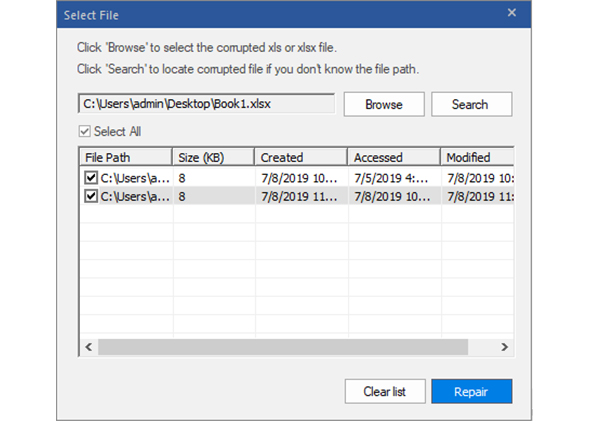
Figure 6 - Illustrates selection of one xls/xlsx file or multiple files in a folder
- After completion of the repair process, the software displays the repaired Excel file and its recoverable data in a preview window.
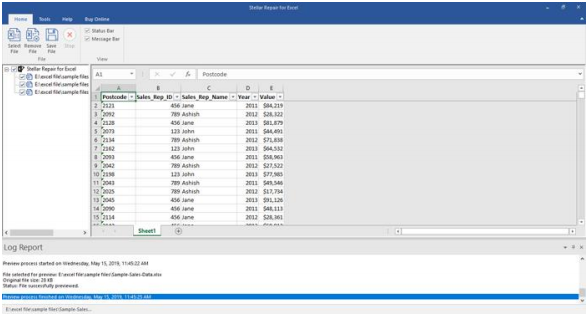
Figure 7 - Preview of Excel File
- Click on Save File icon on Home menu to save the repaired file.
- In Save File dialog box, choose Default location or Select New Folder for saving the file.
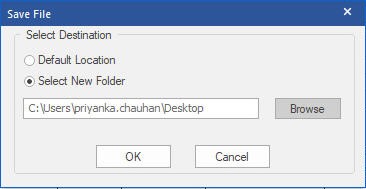
Figure 8 - Select Destination to Save Repaired Excel File
- Click OK to proceed with the saving process.
The repaired file gets saved at the preferred location.
Note: To recover the Engineering formulae, include ‘Analysis ToolPak’ Add-in.
Steps to Repair PowerPoint – ppt/pptx/pptm file
- Click Browse to select the corrupt PowerPoint file. Alternately, click on Search to search for the file, if the location is not known.
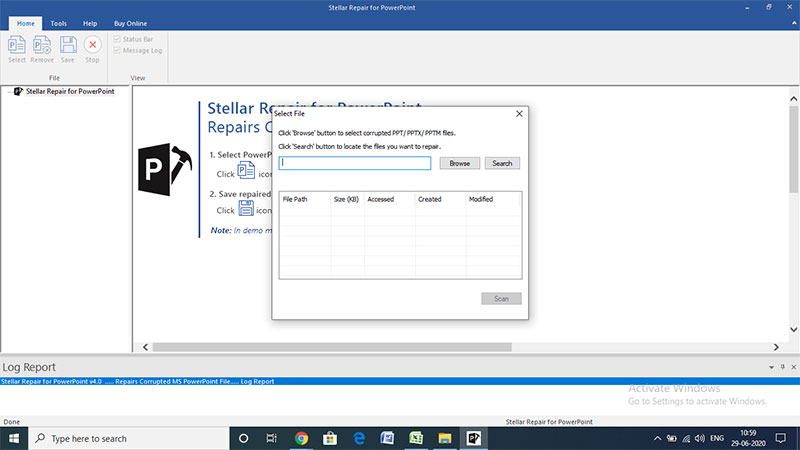
Figure 9 - Illustrates Selection of Single PowerPoint Presentation
- Once the corrupt PowerPoint file is selected, click Scan for scanning and repairing the file.
- A preview of scanned file gets displayed. Verify the file contents from the preview window.
- Click Save on Home menu to save the repaired PPT file.
- From the Save File dialog box, click Default location or Other location under Save As for saving the file.
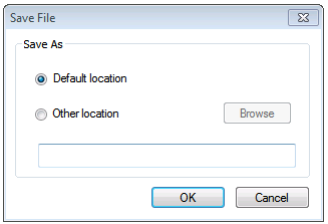
Figure 10 - Select Location to Save PPT File
- Click on the OK button and the repaired file is saved at preferred location.
Steps to Repair PDF file
- From the Stellar Repair for PDF main interface window, click Add File to select a single or multiple PDF files you want to repair.

Figure 11 - Illustrates adding of corrupt PDF Files
- A screen with recently added PDF file is displayed. Select the file and click Repair to start repairing it.
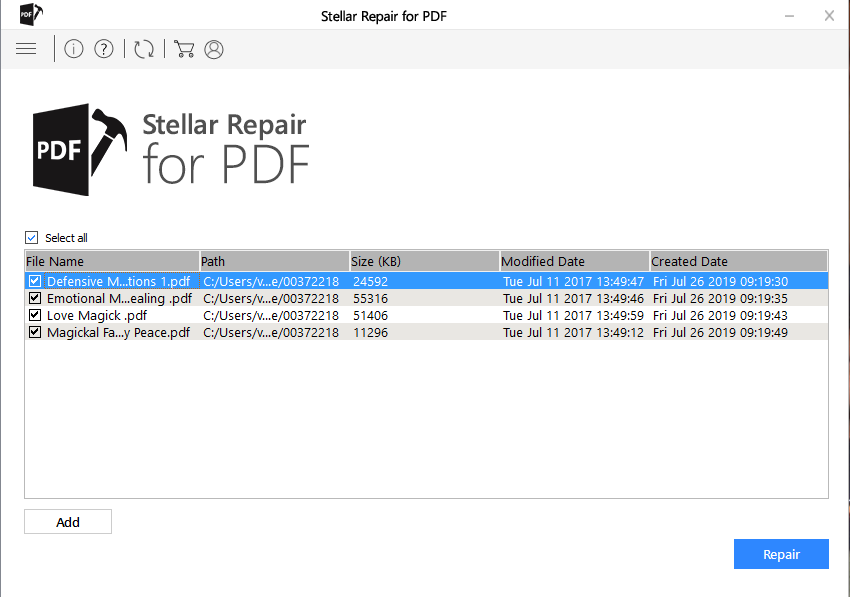
Figure 12 - Repair the Selected PDF File
- A screen showing the progress of the repair process appears.
- When the ‘Repair Complete’ window pops-up, click OK.
- Preview the repaired PDF file.
- Click the Save Repaired Files button to save the repaired file.
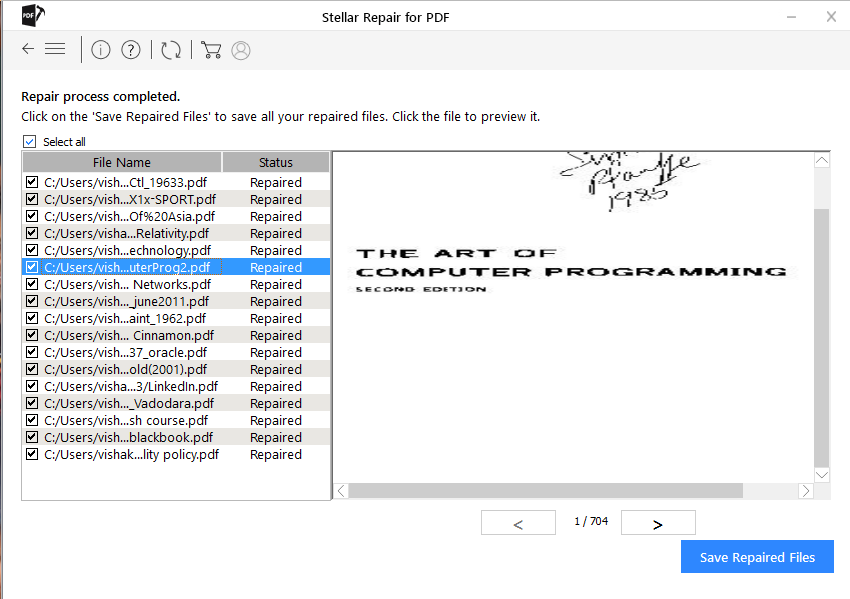
Figure 13 - Save Repaired File
- In Browse for Folder dialog box, select a folder for saving the file.
- From the Saving Complete dialog box, click the hyperlink to the folder containing the repaired PDF file.
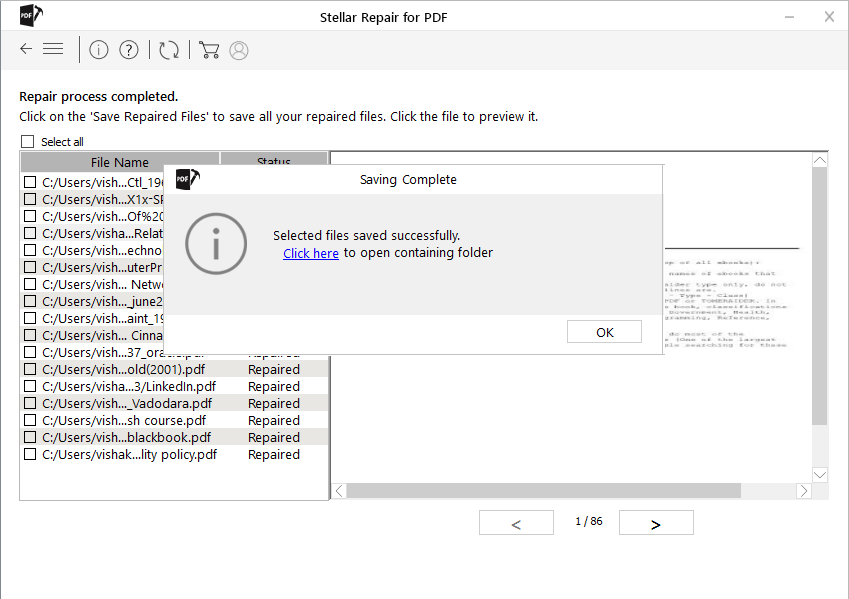
Figure 14 - Saving Complete Window
- Click OK.
‘Unable to Save Excel Workbook’ Issue [Fix 2024]
Summary: You may unable to save your Excel Workbooks due to several reasons. Many users have reported this issue on the Tech Forums. This blog will discuss a few instances when users cannot save their Excel files. It lists the causes behind the issue and their possible solutions. It also mentions the Stellar Repair for Excel to fix the saving error if it is due to corruption in the Excel file.
It is easy to work with Microsoft Excel but sometimes, the application may create issues thereby hampering the smooth functioning of the workbook. One such issue is “unable to Save Excel Workbook”.
Let’s take a look at the issue of Unable to Save Excel Workbook
Instance 1:
In an organization, users connected to one of the servers (Windows 2008 R2) using Citrix – a Terminal Server configured with Windows 2008 R2 –and accessed their data through a File Server, also configured with Windows 2008R2. Since the connectivity to Shared Drive was established through a Terminal server, any conflict amongst the server configuration may create conflict in shared file.
This issue was discussed at length at one of the Tech Forums , where the users were unable to access their workbooks stored on the shared drive. The File menu did not work. As a result, the users were forced to save the workbook by creating quick access shortcuts or locally on the desktop. In many cases, the saving option was ruled out completely.
Instance 2:
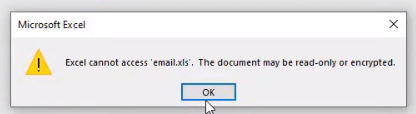
A similar problem was reported, wherein the users received an error when saving an Excel workbook after inserting a chart in an existing workbook (previously saved) or copying values from an existing workbook. A system is configured with Windows 7 and Microsoft Office 10 configuration. The issue arises when the user is unable to save the changes after editing in a saved spreadsheet. The following message displays on the screen:

Figure: Unable to Save Excel WorkBook Issue
Further, if the user clicks ‘Continue’, the following error message is received:
“Excel encountered errors during save. However, Excel was able to minimally save your file to <**filename.xlsx**>”.
Note: This issue impacts build Version 1707 (Build 8326.2086) and later, and also only occurs with files that are stored locally, such as on the desktop. This problem does not occur if you manually enter values or insert a chart in a newly created workbook.
Plausible reasons for the ‘Unable to save Excel workbook’ Issue
- The issue was detected in Microsoft Office Professional Plus 2010 32-bit, Service Pack 14.0.6029.1000.
- Excel version on the user system may or may not match with Excel version on File server.
- The issue of ‘Unable to Save Excel Workbook’ impacts only the Build Version 1707 (Build 8326.2086) and later.
- In case of Issue 2, the problem surfaces when the user adds files, tables or charts in the locally saved excel files, such as on the desktop.
Methods to fix the ‘Unable to Save Excel Workbook’ Issue
There may be an issue with the Build version or the Registry Values settings may not be appropriate, which does not allow the Excel workbooks to save.
But, before starting to resolve the issue, verify the following:
- The location where the file is to be saved may not have enough space to save the Excel file: Check the available space and save again. You may also use the option of ‘Save As’ to save the file at a new location.
- Excel file may be a shared one where edits are not allowed by a specific user: There are restrictions attached to documents and other files shared over the network. Check for these restrictions.
- Antivirus may interrupt in during file saving: Antivirus in the system may not allow saving of the files. Request the system administrator to uninstall the antivirus and reinstall after saving.
- The file is not saved within 218 characters: If the file is not saved due to the naming issue, then check the character length and try again.
- Differences in Windows versions of the local system and those on network drive may cause excel not saved issues. Check that all the systems have the same configuration and are updated to the recently available versions.
- Excel spreadsheet is corrupt: If none of the above factors have not caused hindrance in saving the file, then there may be a probability of corruption in the Excel spreadsheet .
Once verified, look for a healthy and restorable backup. If backup is missing, resolve the issue of “Unable to open Excel File” with manual settings on local system or through a reliable Excel repair software.

Method 1: Modify Registry Entries
If multiple users are unable to access their workbooks stored on the shared drive and facing unable to save Excel file problem (see Instance 1 above), then follow the below steps:
- Go to ‘Registry Entry’. To do this, type ‘regedit’ in the Start Search box, and press ENTER

Figure: Edit Registry
- You are prompted for the administrator password or for a confirmation, type the password, or click Continue
- Locate the following registry subkey, and right-click it: HKEY_LOCAL_MACHINE\System\CurrentControlSet\Services\CSC

Figure: CSC Location
- Point the cursor to New, and click Key


Figure: Create new key
- Type ‘File Parameters’ in the available box

Figure: File parameters
- Right-click Parameters, point the cursor to New, and click DWORD (32-bit) Value

Figure: File parameter (DWORD – 32 bit) value
- Type ‘FormatDatabase’, and press ‘ENTER’. Right-click ‘FormatDatabase’, and click ‘Modify’

Figure: Modify format database
- In the Value data box, type ‘1’, and click ‘OK’

Figure: Value data
- Exit ‘Registry Editor’
- Restart the system and verify if the files can be saved now
Method 2: Try Google Uploads
If the user is unable to save the changes after editing in a locally saved spreadsheet (see Instance 2 above), then follow these steps:
- Upload the unsaved Excel file to Google Docs. Ensure that the file gets converted to Google Sheets format.
- Check if all the formulae are active and working.
- Make changes to the Google Sheet and verify that all the changes are working fine.
- Use the Google Sheets export feature to download the file in Excel format.
Method 3: Resolve manually with Open and Repair
If the Excel file is found to have corruption, try out the Excel Open and Repair utility:
- Open a blank Excel File. Go to File and Click Open.
- Go to Computers and click Browse.
- Access the Location and Folder and click the arrow icon beside Open followed by Open and Repair.

Figure: Illustrates Steps to use ‘Open and Repair’ method
The Open and Repair utility is not competitive enough and may not fix corruption in severely corrupted files. Hence, if you are unable to save Excel workbook after applying the manual methods, then you can search for a useful software-based repair utility.
Method 4: Excel File Repair Software
Specifically meant to resolve Excel file corruption. Stellar Repair for Excel helps you to repair every single object including charts, tables, their formatting, shared formulae and rules and more.
- Install and Open the software and select the corrupt Excel File. You can also click the Find option if the file location is not known.
- Click Scan and allow the software to scan and repair the corrupt Excel file.
- Once repaired, the software displays the fixed file components to verify its content.
- Click Save to save the file data in a blank new file as ‘Recovered_abc.xls’, where abc.xls is the name of the original file.
See the working of the software which has been declared as a tool that provides 100% integrity and precision.
The Excel repair software takes care to save the repaired data in a new file to minimize the chances of further corruption.
Conclusion
‘Unable to save Excel file’ is a generic problem that may appear due to various reasons. In this blog post, we presented some of the actual instances reported by users on community forums.
Windows updates, the Build versions, the Service Packs of the local systems and those on the network drive must be either similar or in sync with each other. Any deviation may cause issues in accessing or saving the Microsoft files, as reported in Instance 1 is caused where user is unable to save Microsoft Excel file on the Network Drive. In case, the user is unable to save the file on network drive then the problem lies with the Registry value.
Another case is when the users receive an error while saving an Excel workbook after they insert a chart in an existing workbook or copying values from an existing workbook. This issue is known to affect build Version 1707 (Build 8326.2086) and later, and only occurs with locally stored files.
When a user is unable to save a specific Excel file, then the problem can be resolved using the manual methods or the software based utility. The mode of repair depends upon the level of corruption in Excel file.
Hence, it is suggested to analyze the nature of the problem and decide an appropriate resolution method.
[Fixed]: Freeze Panes not Working in Excel
Summary: This blog discusses the “freeze panes not working” issue in Excel. It mentions the possible reasons behind the issue and offers workarounds and methods to fix it. If the issue is associated with corruption in the Excel file, you can use the specialized Excel repair tool mentioned in the blog to repair the affected file.

The freeze panes feature in Excel is used to freeze the row/column headings to keep them visible while scrolling the worksheet. It is a useful feature when you’re working on a large worksheet containing data that exceeds the rows and columns on the screen. Sometimes, you notice that the ‘Excel freeze panes feature is not working’. There could be numerous factors that can trigger this issue. Let’s know the reasons for the freeze pane not working issue in Excel and how to resolve this issue.
Why can’t I freeze panes in excel?
Several factors may contribute to the Excel freeze panes not working issue in Excel. A few of them are:
- The cell editing mode is enabled in the workbook in which you are trying to use the Freeze Panes feature.
- The Excel file is corrupted.
- The worksheet is protected.
- Advanced Options are disabled in Excel Settings.
- The Excel application is not up-to-date.
- You might be trying to lock rows in the middle of the worksheet.
- Your Excel workbook is not in normal file preview mode.
- Wrong/incorrect positioning of the frozen panes.
How to fix ‘Freeze Panes not Working’ in Excel?
The freeze panes option is available in the View bar. Sometimes, you’re unable to see the View option. It usually occurs if you are using the Excel Started version. Check and try to open the file in the advanced Excel version, which supports all the features. If you are using the advanced Excel version, then try the below workarounds to fix the freeze panes not working issue in Excel.
Workaround 1: Exit the Cell Editing Mode
If your Excel file is switched from normal file view mode to cell editing mode, you can encounter the freeze panes not working issue. In cell editing mode, certain features in Excel, such as the freeze panes, are temporarily disabled to prevent any conflicts. You can disable cell editing mode by pressing the ESC or Enter key. Now locate the View tab and check whether the freeze pane feature is working. If not, then try the next workaround.
Workaround 2: Change the Page Layout View
The Excel freeze panes not working issue can also occur if your workbook is opened in Page Layout view. The Page Layout view doesn’t support freeze panes. If you select page layout, the freeze panes option gets disabled.


To enable the freeze pane option, go to View and click the Page Break Preview tab.

Workaround 3: Check and Remove Options under the Data Tab
Sometimes, you can experience the “freeze panes not working” issue if Sorting, Data Filter, Group, and Subtotal options are enabled in Excel workbook. Such options, when enabled, can lead to unexpected problems with the freeze panes’ functionality. You can check and remove these features from your workbook. To do so, follow these steps:
- Open the Excel file in which you are getting the issue.
- Navigate to the Data tab.
- Check and remove the below features (if enabled):
- Sort
- Filter
- Group
- Subtotal

Workaround 4: Check and Unprotect Worksheet
The freeze panes feature may stop working if your worksheet is protected. You can try to disable the worksheet protection option. Here are the steps:
- In the Excel file, go to the Review tab.
- Click Unprotect Sheet.

After unprotecting the sheet, check whether the “freeze panes not working” issue is resolved. If not, follow the next workaround.
Workaround 5: Use Correct Cell Positioning
The freeze pane is not working issue in Excel can also occur when you use incorrect cell positioning to apply the freeze panes feature. Several users have reported facing this issue when trying to lock multiple rows with the wrong cell selection. So, use correct cell positioning to freeze the rows. For example, if you are trying to lock two rows in an Excel worksheet, then you need to click on 3rd row’s column.


What if the above Workarounds Fail to Fix the Freeze Panes not Working Issue?
If none of the above workarounds works, then there are chances that the workbook is damaged or corrupt. In such a case, you can try the below methods to repair the corrupt Excel workbook.
Run Open and Repair Utility
In case of corruption in the Excel file, you can use the Open and Repair tool in Excel to repair the file. To use this utility, follow these steps:
- In the Excel application, navigate to File and then click Open.
- Click Browse to select the workbook in which you are facing the issue.
- The Open dialog box is displayed. Click on the affected file.
- Click the arrow next to the Open option and then click Open and Repair.

- Click on the Repair option to recover as much data as possible.
- You can see a completion message once the repair process is complete. Click Close.
Use a Professional Excel Repair Tool
If the Open and Repair tool doesn’t work to resolve complex file-related issues and your Excel file is severely corrupted, you can opt for a reliable third-party Excel repair tool, such as Stellar Repair for Excel. This tool can help you repair the Excel file and recover all the data with complete integrity. You can try the software’s demo version to scan the affected file and preview the recoverable data. The software is compatible with all MS Excel versions and Windows operating systems, including Windows 11.
Closure
The “freeze panes not working” issue in Excel can occur due to several reasons, like protected worksheet, incompatible Excel version, and incorrect cell position. Try the workarounds shared in the blog to fix the issue. If the Excel file is corrupt, you can use Stellar Repair for Excel to fix the corruption issues in the file. This tool can quickly repair the Excel file and recover all the data from the file with 100% integrity.
Solutions to open Excel Read Only Documents
‘Excel cannot open read-only documents’ is an error message that usually appears when you try to open an Excel (XLS or XLSX) file downloaded from the Internet, email, or the network server. It may also appear when you try to open an encrypted or password-protected Excel document. In such a case, MS Excel prevents the user from making any changes to the document.
Reasons behind the “Excel cannot access ‘xxx.xls.’ The Document may be read-only or encrypted” Error
There could be several reasons that may cause the error. Some of them are as follows:
- Corrupt or damaged Excel workbook
- Incompatible or unsupported add-in
- Antivirus or malware software conflict
- Read-Only Excel file
- The file is encrypted
- File or drive read/write permissions issues
- Protected Excel workbook
- Damaged or missing MS Office (MS Excel) program files
Solutions to Open and Edit Read-Only Excel Documents
Below are a few solutions that can help you fix the ‘Excel cannot access ‘xxx.xls.’ The Document may be read-only or encrypted’ error and allow you to open and edit Excel documents.
- Remove Read-only Attribute from Excel File Properties
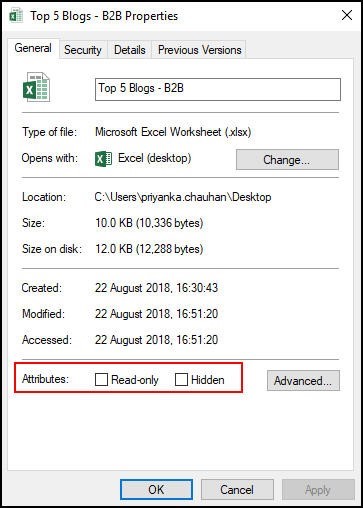
The ‘Excel cannot open read-only documents’ error message may appear when the Excel file property is set to read-only. To check if this is the case, follow these steps:
- Right-click on the particular Excel (xls/xlsx) document and select ‘Properties’.
- Uncheck the ‘Read-only’ attribute and then click the ‘OK’ button.
Now try to open the Excel document and check if the problem is fixed.
- Adjust Antivirus Settings
A few antivirus programs block Excel files and other Office documents by opening those in ‘read-only’ mode. In such cases, try adjusting the antivirus settings to open the Excel files normally. This will allow you to edit, modify, and save the Excel workbook without encountering the “Excel cannot access ‘xxx.xls.’ The Document may be a read-only or encrypted” error message.
- Disable Protected-View
The error may appear when you try to open an Excel file received as email attachments or downloaded from unsafe source. The file may potentially contain viruses, worms, or other types of malware that could damage the system or the server.
To safeguard the system, MS Excel opens such files in Protected View. It may also open an Excel workbook in Protected Mode when it detects a problem with the file. This security feature allows you to read or view Excel files and reduces the risks to the computer system or PC.
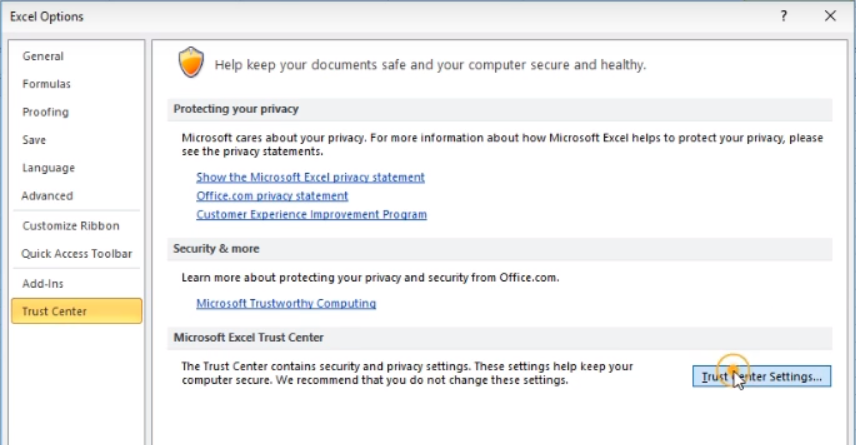
However, you can click File > Info and then click ‘Edit Anyway‘ to access and edit file content. You may also disable the Protected View setting via File > Options > Trust Center > Trust Center Settings…> Protected View. However, we do not recommend this.
- Renew/Activate Microsoft Office
If MS Office is in a deactivated state or its subscription has expired, the Office documents, including the Excel, could be in ‘read-only reduced functionality mode.’
In such a scenario, activate Microsoft Office or renew the Office subscription. Then open the Excel workbook and check if the problem of ‘Excel cannot open read-only documents’ is resolved.
- Check if OneDrive Storage is Full
If Excel files are saved on OneDrive with low or no storage space, you may encounter such issues with your files.
To know the amount of free space on OneDrive, follow these steps:
- On your PC, open Settings and navigate to OneDrive.
- Click ‘Sync Settings > File Storage‘ to see available space.
You may also visit onedrive.live.com, sign in to the account, and then check the available space. If there’s no space available or the drive is full, empty the storage space and see if the problem is resolved.
- Check and Update MS Office and Windows
Microsoft releases updates to fix known errors. Thus, it is critical to update both Windows and MS Office to the latest release and avoid issues, such as ‘Excel cannot access ‘xxx.xls.’ The Document may be read-only or encrypted.’
- Repair MS Office (MS Excel)
The error ‘Excel cannot open read-only documents’ may appear due to a problem with your MS Office (MS Excel) program. You can repair the MS Office program to resolve such errors. The steps are as follows:
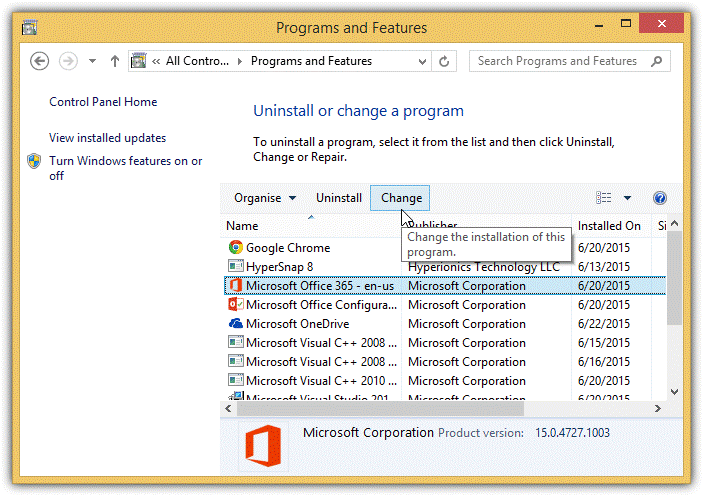
- Open Control Panel and click Uninstall a Program link under Programs.
- Choose Microsoft Office from the list and click the Change button.
- Select Quick Repair and then click Repair to fix problems with MS Office and MS Excel. It will also restore any missing or damaged program files.
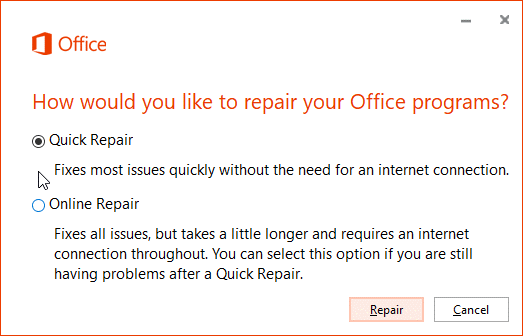
After the Repair, open the Excel workbook and check if the error is resolved.
- Check Permissions
The error message may also appear if you access an Excel workbook from a network or shared drive due to lack of write permission. Make sure you have read and write permissions assigned for the particular network drive. Alternatively, you can copy the file from the network drive and save it in your local folder to access and edit it without encountering this error message.
- Repair MS Excel File
If none of the solutions worked, the Excel workbook could be damaged or corrupt. To repair such damaged Excel workbook or spreadsheet, you can use the inbuilt ‘Open and Repair…’ option in MS Excel or install an Excel repair software , such as Stellar Repair for Excel. The software comes in handy when the Open and Repair option fails to fix the Excel workbook problems. It repairs the corrupt or damaged Excel workbook, extracts all components and content from the file with 100% integrity, and saves them in a new Excel workbook.
Conclusion
Sometimes, the ‘Excel cannot open read-only documents’ error can be resolved by a simple restart. But if it doesn’t work, you can follow the solutions discussed in this article to resolve the ‘Excel cannot open read-only documents’ issue. However, if the issue is caused due to a damaged or corrupt Excel workbook, these methods may not work. In such a case, you can use Excel’s inbuilt repair utility, i.e., Open and Repair, or install Stellar Repair for Excel software recommended by MVPs and industry experts to fix all kinds of problems with MS Excel workbooks.
- Title: How to Repair Corrupt Excel 2003 Files | Stellar
- Author: Nova
- Created at : 2024-08-20 19:28:48
- Updated at : 2024-08-21 19:28:48
- Link: https://blog-min.techidaily.com/how-to-repair-corrupt-excel-2003-files-stellar-by-stellar-guide/
- License: This work is licensed under CC BY-NC-SA 4.0.