
:max_bytes(150000):strip_icc():format(webp)/best-free-movies-on-youtube-5114491-12-811d37329347405eab1a368e3018dc54.jpg)
How to Repair Corrupt Excel 2013 Workbook? | Stellar
How to Repair Corrupt Excel Workbook?
Summary: Corruption in an Excel workbook could lead to data loss. This blog outlines the possible reasons behind corrupted workbook and describes how to repair the workbook manually and using an Excel repair tool.

Is your Excel behaving differently, for instance, stops responding or freezes? Or have you encountered a warning or an error message indicating corruption in the Excel workbook?
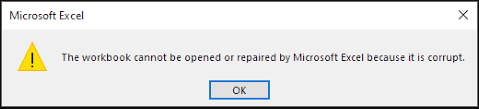
Figure 1 - Corruption Warning in Excel: The corrupt workbook cannot be opened or repaired
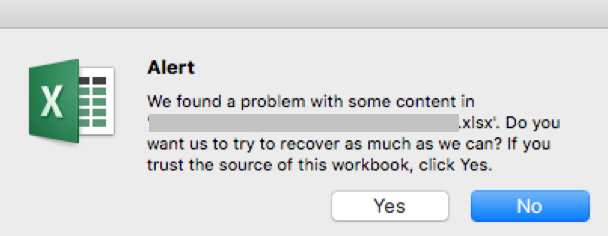
Figure 2 - Excel File Corruption Message
In any of these situations, you won?t be able to open your Excel workbook.
TIP! If you?re unable to open an Excel workbook, it does not necessarily mean that the workbook is corrupt. Try a few workarounds to resolve the issue, like disabling the ?Protected View Settings?, disabling add-ins, or moving the workbook to another drive.
You will need to repair the corrupted Excel workbook to make it usable. Before discussing the repair methods, let?s first look at the possible reasons behind file corruption.
To jump to methods to repair the workbook, click here .
Possible Reasons behind Corrupted Excel Workbook
- Large size of a workbook: A workbook containing lots of information or objects like images, shaded cells, or other visual representations is prone to corruption.
- Unexpected system shutdown or power loss: If you haven?t saved your Excel file, abrupt system shutdown or power failure can corrupt the data and render the file inaccessible.
- Bad sectors on storage media: Accumulation of bad sectors on storage media on which Excel files are saved is another reason that may lead to Excel file corruption.
Other common reasons causing Excel file corruption are virus attack, network errors, etc.
Methods to Repair Corrupted Excel Workbook
Note: Repairing the corrupt workbook may result in data loss. And so, it?s recommended to back up the workbook before attempting to repair the file.
Method 1 ? Repair the Excel Workbook Manually
Use the Excel ?Open and Repair? feature to repair your corrupt workbook manually. Here?s how:
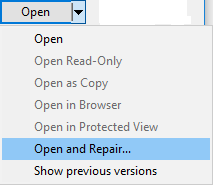
Step 1: In Excel, click the File tab and then click Open.
Step 2: Select the corrupt Excel file, click the arrow button next to the Open button and then select Open and Repair.
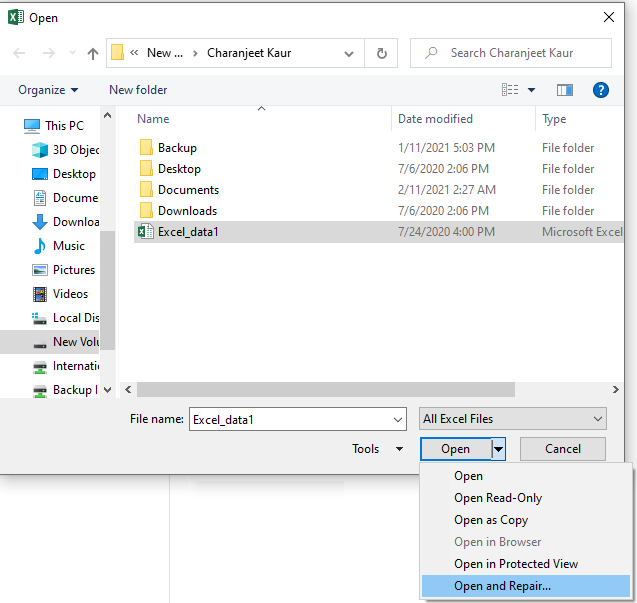
Figure 3 - Excel Open and Repair Feature
Step 3: In Microsoft Excel dialog box that opens, click Repair to begin repairing your corrupt workbook.

Figure 4 - Repair the Microsoft Excel File
Note: If the Excel repair process fails, repeat Steps 1 till 3 and click the ?Extract Data? button. This will help you extract values and formulas from the corrupted workbook.
Performing these steps will repair your Excel file. If the issue persists, skip to the next method.
Method 2 ? Use Excel File Repair Software
If the above method failed to fix corruption in the workbook, use Excel file repair software to repair your workbook quickly. This Excel repair tool is purpose-built to help users repair large-sized Excel files (.xlsx and .xls) in just a few clicks. Also, it helps recover all the data from the corrupted workbook while preserving the cell formatting and worksheet properties.
Steps to Repair Corrupt Excel File Using the Software
Step 1: Download, install, and open Stellar Repair for Excel software.
Free Download for windows ](https://tools.techidaily.com/stellardata-recovery/repaire-for-excel/ )
Step 2: Click Browse to select your corrupted .xlsx or .xls file. If you are not aware of the file location, click Search to locate and select the file.

Figure 5 - Select Corrupt Excel Workbook
Step 3: Once the file is selected, click Repair.
Step 4: A preview of recoverable workbook data gets displayed.
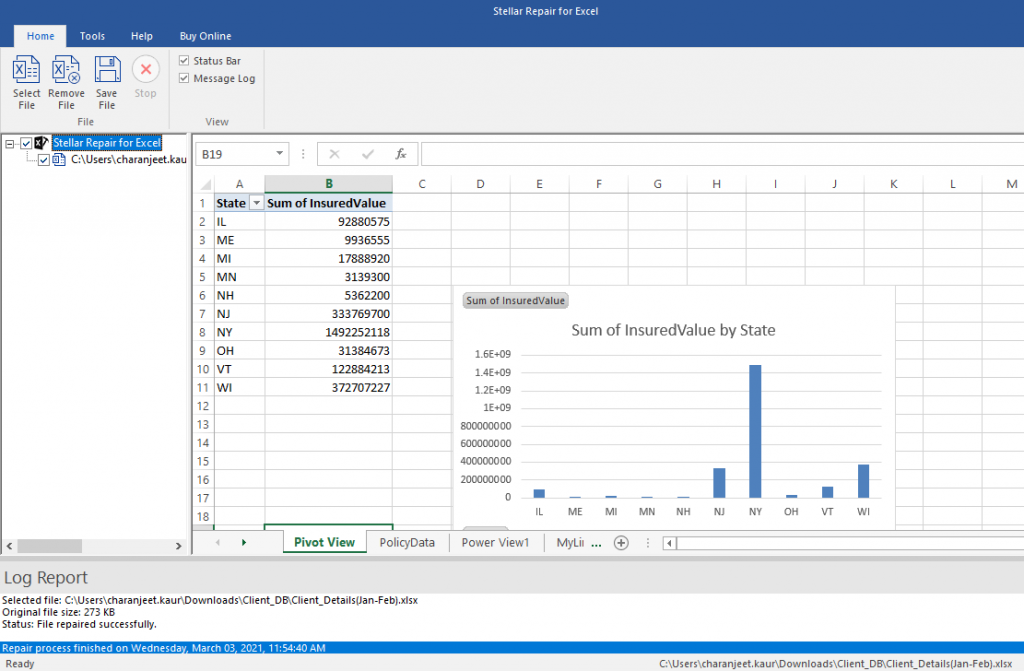
Figure 6 - Preview of Recoverable Excel Workbook Data
Note: You will need to activate the licensed version of Stellar Repair for Excel software for saving the repaired file. Once activated, proceed with the steps below to save the repaired file.
Step 5: Click Save File on the File menu. This will open a Save File dialog box with options to save the repaired .xlsx/.xls file at default or new location. After choosing the appropriate option, click OK.
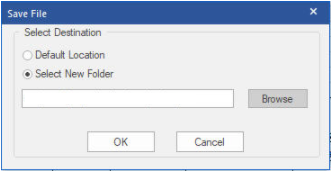
Figure 7 - Save Repaired Excel File
The repaired file will get saved at the selected location.
Key Features of Stellar Repair for Excel Software
- Repairs severely corrupt Excel file and recovers pivots, pivot tables, conditional formatting rules, chart, chart sheets, etc.
- Can repair multiple Excel files in a batch simultaneously
- Can handle all types of Excel file corruption errors, like ?Excel found unreadable content in filename.xls?, ?Excel cannot open the file filename.xlsx?, etc.
- Supports repairing corrupt workbooks of Excel 2019, 2016, 2013, 2007, 2003, and lower versions.
End Note
If your Excel workbook has turned corrupt, try using the methods discussed in this blog to repair the workbook. Once it is repaired, you must follow preventive measures to avoid your Excel file from getting corrupt. Some of these measures are as follows:
Reduce the size of your workbook by:
- Removing unused data
- Saving images at lower resolutions
- Avoid saving pivot table cache
Turn on the ?AutoRecover? and ?AutoSave? features in Excel
[Fixed] “Microsoft Excel Cannot Access the File” Error
Summary: The “Microsoft Excel cannot access the file” error usually occurs when there is an issue with the Excel file you are trying to save. This post summarizes the causes behind the error and mentions some effective solutions to fix it. If you suspect the problem is encountered due to corruption in the Excel file, you can use the professional Excel repair tool mentioned in the post to repair the file.
You may experience the “Microsoft Excel cannot access the file” error when saving the Excel file. This happens when the Excel application fails to read the file you are attempting to save. The error message indicates that there is an issue with the file name or its path. Sometimes, the error occurs if the file you are trying to access is already in use by another application. Some other reasons for the “Excel cannot access the file” error are:
- Faulty or incompatible Excel add-ins.
- The file is in Protected View.
- The Excel file is damaged or corrupted.
- You do not have the required permissions to access the file.
- The Excel file is not in a compatible format.
Methods to Fix “Microsoft Excel Cannot Access the File” Error
Sometimes, changing the file location can fix the “Microsoft Excel cannot access the file” error. You can try changing the file location, if the location is incorrect. If moving the file to a different location didn’t work, then try the below troubleshooting methods.
Method 1: Check the File Name and Path
You can get the “Microsoft Excel cannot access file” error if there is an issue with the file path – either the path does not exist or it is too lengthy, thus creating conflicts. Make sure the file path is correct. If the file name is too long, you can rename the file with a short name and also move the file to the parent folder instead of a subfolder. After that, remove the file from the Recent list that is created by Excel based on your recent activity. Follow the below steps:
- Open the Excel application.
- In the Recent list, right-click on the affected Excel file.
- Now, select Remove from list.

- Close the Excel application.
Now, reopen the problematic file and check if the error exists. If yes, then follow the next solution.
Method 2: Try Clearing the Microsoft Office Cache
Sometimes, clearing the Microsoft Office cache can help eliminate the “Excel cannot access the file” error. To clear the Microsoft Office cache, follow the given steps:
- First, close all the Office applications.
- Press Windows+R to open the Run window.
- Type %localappdata%\Microsoft\Office\16.0\OfficeFileCache and press the Enter key. You can change ‘16.0’ with your Office version.

- In the OfficeFileCache window, clear all the temporary files.
Method 3: Check and Update Microsoft Excel
You can try updating your Microsoft Excel application. The latest updates include bug fixes, security patches, and other improvements. Updating the application can help fix several issues that might be causing the error. Here are the steps to update Microsoft Excel:
- Open your Excel application.
- Go to File and then select Account.
- Under Product information, click Update Options and then click Update Now.
Method 4: Disable Protected View
You may get the “Microsoft Excel cannot access the file” error if the Protected View option is enabled. You can try disabling the Protected View settings in Excel. This allows you to open the file without any restrictions. However, disabling the protected view can put your system at high risk. To disable the Protected View in Microsoft Excel, follow the below steps:
- In Excel, go to File and then click Options.
- In the Excel Options window, click Trust Center and then click Trust Center Settings.

- Click Protected View from the left pane in the Trust Center Settings window.
- Unselect the options under Protected View. Click OK.
Method 5: Check and Disable Add-ins
The “Excel cannot access the file” error can also occur due to faulty add-ins in Excel. To check if the error has occurred due to some faulty add-ins, open the application in safe mode (press Windows + R and typeexcel /safe in the Run window**)**. If you can save the file without any hiccups in safe mode, this indicates some problematic add-ins are behind the error. You can remove the Excel add-ins by following these steps:
Open your Excel application and go to File > Options.
In Excel Options, select Trust Center and then click Trust Center Settings.
In Trust Center Settings, click Add-ins and thenselect “Disable all applications Add-ins”. Click OK.

Method 6: Check File Permission
You can get the “Excel cannot access the file” error if you don’t have sufficient permissions to modify the Excel file. You can check and provide the write permissions to fix the issue. Here’s how to do so:
- Open Windows Explorer.
- Find the affected Excel file, right-click on it, and click Properties.

- In the Properties window, click the Securities option and click Edit.

- In the Security window, select the user names under ‘Group or users name’.
- Check the file permissions and make sure the write option is enabled. If not, then grant the permission. Click Apply and then OK.
Method 7: Check External Links
The “Excel cannot access the file” error can also occur due to broken external links in the Excel file. External links are references to the data or content in other files. The link usually breaks if the file has been moved to another location or the file name is changed. You can check and change the source of link.
Method 8: Repair your Excel File
Excel may fail to read the file if it is corrupted or damaged. If the error “Excel cannot access the file” has occurred due to file corruption, then try the Excel’s Open and Repair utility to repair the Excel file. Here are the steps:
- In the Excel application, click the File tab and then select Open.
- Click Browse to select the problematic workbook.
- The Open dialog box will appear. Click on the corrupted file.
- Click the arrow next to the Open button and then select Open and Repair.
- You will see a dialog box with three buttons – Repair, Extract Data, and Cancel.

- Click on the Repair button to recover as much of the data as possible.
- After repair, a message is displayed. Click Close.
If the Open and Repair utility fails to work , it indicates the Excel file is severely corrupted. Use Stellar Repair for Excel to repair severely corrupt Excel file. It helps recover all the components of the corrupted Excel file, such as charts, formulas, etc. without making any changes to the original file. It can also fix all types of corruption-related errors. You can use Stellar Repair for Excel to repair Excel files created in all Excel versions – from 2007 to 2023.
Closure
The “Microsoft Excel cannot access the file” error can occur due to numerous reasons. Follow the troubleshooting methods, such as checking file location, path, permissions, etc., as discussed above to fix this error. Sometimes, Excel throws this error if the file you are trying to save is corrupted. You can try repairing the file using the built-in utility – Open and Repair. If the file is severely corrupted, then you can use Stellar Repair for Excel . It can repair damaged Excel files (.xls, .xlsx, .xltm, .xltx, and .xlsm) with complete integrity.
Solutions to open Excel Read Only Documents
‘Excel cannot open read-only documents’ is an error message that usually appears when you try to open an Excel (XLS or XLSX) file downloaded from the Internet, email, or the network server. It may also appear when you try to open an encrypted or password-protected Excel document. In such a case, MS Excel prevents the user from making any changes to the document.
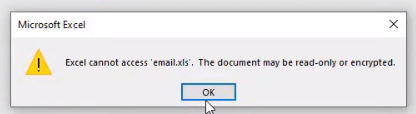
Reasons behind the “Excel cannot access ‘xxx.xls.’ The Document may be read-only or encrypted” Error
There could be several reasons that may cause the error. Some of them are as follows:
- Corrupt or damaged Excel workbook
- Incompatible or unsupported add-in
- Antivirus or malware software conflict
- Read-Only Excel file
- The file is encrypted
- File or drive read/write permissions issues
- Protected Excel workbook
- Damaged or missing MS Office (MS Excel) program files
Solutions to Open and Edit Read-Only Excel Documents
Below are a few solutions that can help you fix the ‘Excel cannot access ‘xxx.xls.’ The Document may be read-only or encrypted’ error and allow you to open and edit Excel documents.
- Remove Read-only Attribute from Excel File Properties
The ‘Excel cannot open read-only documents’ error message may appear when the Excel file property is set to read-only. To check if this is the case, follow these steps:
- Right-click on the particular Excel (xls/xlsx) document and select ‘Properties’.
- Uncheck the ‘Read-only’ attribute and then click the ‘OK’ button.
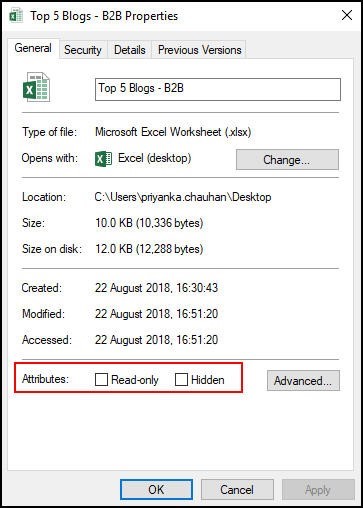
Now try to open the Excel document and check if the problem is fixed.
- Adjust Antivirus Settings
A few antivirus programs block Excel files and other Office documents by opening those in ‘read-only’ mode. In such cases, try adjusting the antivirus settings to open the Excel files normally. This will allow you to edit, modify, and save the Excel workbook without encountering the “Excel cannot access ‘xxx.xls.’ The Document may be a read-only or encrypted” error message.
- Disable Protected-View
The error may appear when you try to open an Excel file received as email attachments or downloaded from unsafe source. The file may potentially contain viruses, worms, or other types of malware that could damage the system or the server.
To safeguard the system, MS Excel opens such files in Protected View. It may also open an Excel workbook in Protected Mode when it detects a problem with the file. This security feature allows you to read or view Excel files and reduces the risks to the computer system or PC.
However, you can click File > Info and then click ‘Edit Anyway‘ to access and edit file content. You may also disable the Protected View setting via File > Options > Trust Center > Trust Center Settings…> Protected View. However, we do not recommend this.
- Renew/Activate Microsoft Office
If MS Office is in a deactivated state or its subscription has expired, the Office documents, including the Excel, could be in ‘read-only reduced functionality mode.’
In such a scenario, activate Microsoft Office or renew the Office subscription. Then open the Excel workbook and check if the problem of ‘Excel cannot open read-only documents’ is resolved.
- Check if OneDrive Storage is Full
If Excel files are saved on OneDrive with low or no storage space, you may encounter such issues with your files.
To know the amount of free space on OneDrive, follow these steps:
- On your PC, open Settings and navigate to OneDrive.
- Click ‘Sync Settings > File Storage‘ to see available space.
You may also visit onedrive.live.com, sign in to the account, and then check the available space. If there’s no space available or the drive is full, empty the storage space and see if the problem is resolved.
- Check and Update MS Office and Windows
Microsoft releases updates to fix known errors. Thus, it is critical to update both Windows and MS Office to the latest release and avoid issues, such as ‘Excel cannot access ‘xxx.xls.’ The Document may be read-only or encrypted.’
- Repair MS Office (MS Excel)
The error ‘Excel cannot open read-only documents’ may appear due to a problem with your MS Office (MS Excel) program. You can repair the MS Office program to resolve such errors. The steps are as follows:
- Open Control Panel and click Uninstall a Program link under Programs.
- Choose Microsoft Office from the list and click the Change button.
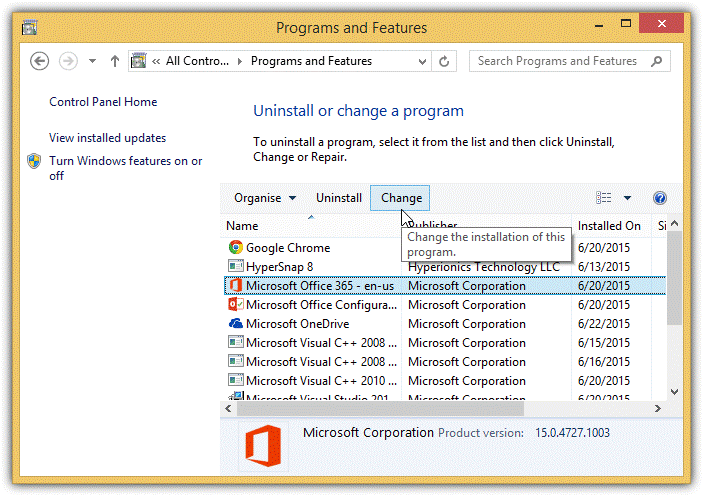
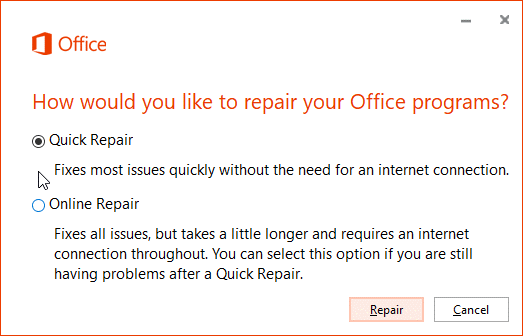
- Select Quick Repair and then click Repair to fix problems with MS Office and MS Excel. It will also restore any missing or damaged program files.
After the Repair, open the Excel workbook and check if the error is resolved.
- Check Permissions
The error message may also appear if you access an Excel workbook from a network or shared drive due to lack of write permission. Make sure you have read and write permissions assigned for the particular network drive. Alternatively, you can copy the file from the network drive and save it in your local folder to access and edit it without encountering this error message.
- Repair MS Excel File
If none of the solutions worked, the Excel workbook could be damaged or corrupt. To repair such damaged Excel workbook or spreadsheet, you can use the inbuilt ‘Open and Repair…’ option in MS Excel or install an Excel repair software , such as Stellar Repair for Excel. The software comes in handy when the Open and Repair option fails to fix the Excel workbook problems. It repairs the corrupt or damaged Excel workbook, extracts all components and content from the file with 100% integrity, and saves them in a new Excel workbook.
Conclusion
Sometimes, the ‘Excel cannot open read-only documents’ error can be resolved by a simple restart. But if it doesn’t work, you can follow the solutions discussed in this article to resolve the ‘Excel cannot open read-only documents’ issue. However, if the issue is caused due to a damaged or corrupt Excel workbook, these methods may not work. In such a case, you can use Excel’s inbuilt repair utility, i.e., Open and Repair, or install Stellar Repair for Excel software recommended by MVPs and industry experts to fix all kinds of problems with MS Excel workbooks.
How to Fix the #Value! Error in Excel?
Summary: #Value! is a common error that occurs when using formulas in Excel. It can be due to an issue with the cells you are referencing or use of formulas in the wrong type or format. This blog will discuss some cases when this error may occur and the solutions to fix the issue. You’ll also find about an Excel repair software that can help fix the error if it has occurred due to corruption in Excel file.
You may experience the #Value! error in Excel when trying to enter invalid data type into the formulas. Sometimes, it appears when a value is not the expected type or when dates are given a text value. This Excel error may occur due to several reasons. However, the exact cause of this error is difficult to find. Below, we will be discussing some cases where you may get this error and the solutions to resolve the issues.
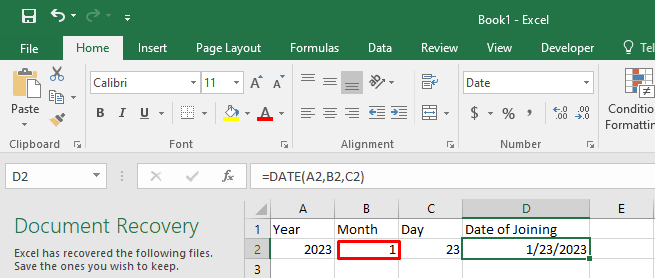
Case 1: Wrong Argument Data Type in Formulas
Sometimes, Excel throws the “#Value!” error if it recognizes incompatible arguments in the formulas.
For example: The Date function in the sheet expects only numerical values as arguments. In the below image you can see that when the formula’s string value is used in the month (January), it resulted in the #VALUE! error.

Solution
To fix the issue,
- Double-click the formula to verify the type of arguments.

- Correct the argument in the cell (B2).
The formula will work as expected.
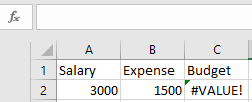
Case 2: Using the Basic Subtraction Formula
Users often experience the #Value! error, when using the basic subtraction formula in Excel.
Solution
Check the formula and the type of values in the cell. If these are correct and the error persists, then follow these steps:

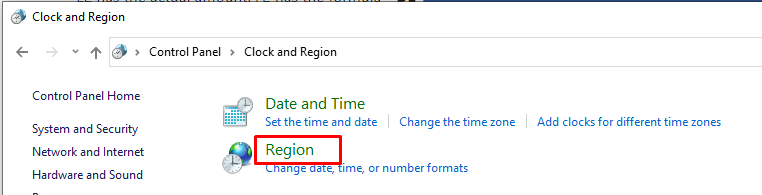
- Go to the Start button on Windows, type Control Panel, and double-click on it.
- Click Clock and Region > Region.
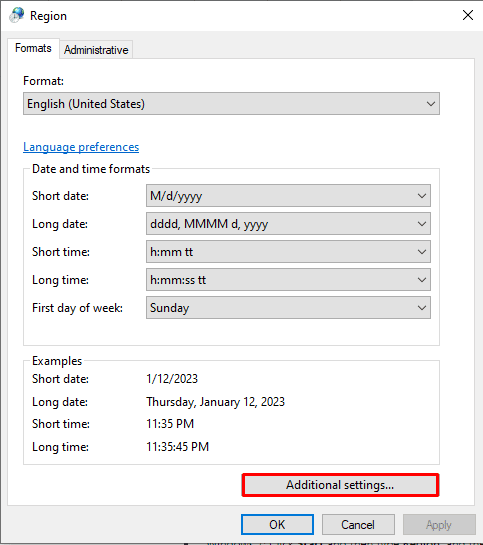
- On the Format tab, click Additional Settings.
- In the Customized Format window, search for List Separator.
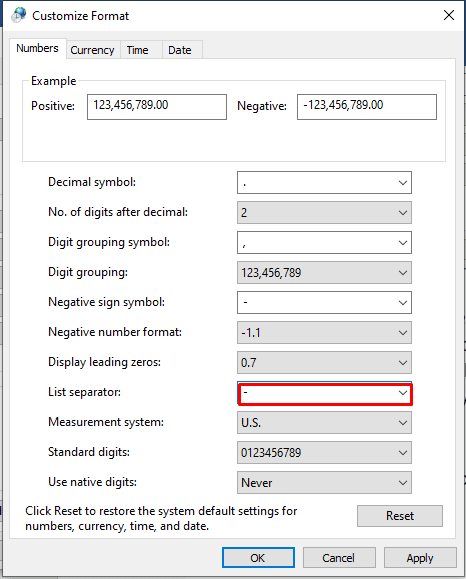
- Check if the List Separator is set to minus (-). Change it to comma (,).
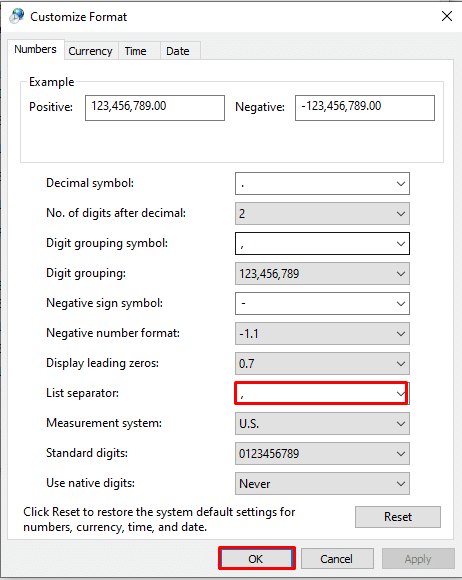
- Click OK.
- Now, open the Excel file and again try to use the formula.
Case 3: Wrong Text Value
The #Value! error can also occur due to the formula’s wrong value.
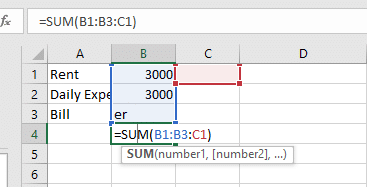
For example: If you are using the formula to add values in cells and Excel recognizes the unexpected text value, you may get a #Value error.

Solution
To fix the issue, you can correct the value or use the SUM function. It is recommended to use functions instead of operations to reduce the errors. In Excel, the formulas with math operators may not able to calculate the text in the cells. The SUM function automatically ignores the text value(er), calculates everything as numbers, and displays the result without the #Value! error.
Case 4: Blank Space in Cells
You may get the #Value! error if your formula refers to other cells with space or hidden space. Sometimes, spaces that make a cell display blank but actually they are not blank.

Solution
You can either delete the space or replace the blank space. Here’s how:
1. Delete the Blank Space
First, check if a cell is blank or not. To do this,
- Select the cell that looks blank.
- Press F2.

The blank cell won’t show space.
Then, press the Backspace key to delete the space. It will fix the error.

2. Replace Blank Space
You can also use the “Find and Select” option to replace the blank space in Excel. Here are the steps:
- Open the Excel file that shows #Value! error.
- On the Home tab, click Find & Select > Replace.

- In the Find what field, type a single space and delete everything in the “Replace with” field.
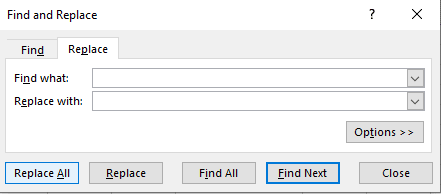
- Click Replace All > OK.

Case 4: Problem with Network Connection
Many users have reported experiencing errors when using Excel online due to problems with the network connection.
Solution
Check your Internet connection and see if it is working properly.
Case 5: Wrong Formula Format
If you enter the wrong formula with a missing parenthesis or comma, then Excel can throw the #Value! error. The error can also occur if the application finds a special character within a cell.
Solution
Correct the formula and use the ISTEXT function to find the cells with issues.
Case 6: Corruption in the Excel File
If none of the above works, then it indicates the Excel file is corrupt. The formulas in the Excel file do not work due to corruption.
Solution
You can use the Open and Repair utility in Excel if you are getting the error due to corruption in Excel file. In case the utility fails or the Excel file is severely corrupt, you can use a third-party Excel repair software, such as Stellar Repair for Excel. It is a powerful tool to repair corrupted or damaged Excel files and recover all its data, with 100% integrity. The tool supports Excel 2019, 2016, and older versions.
Closure
There are several reasons that can trigger Excel to throw the #Value! error. It can occur if there is an incorrect argument data type in formulas or blank space, text, or special characters within a cell. This blog discussed the possible scenarios when this error occurs. You can apply the solutions mentioned above to fix the error. If the #Value! error occurs due to corruption in the Excel file, then you can use Stellar Repair for Excel . It is a reliable tool that helps in fixing corruption-related errors in Excel.
How to Fix Excel File Couldn’t Open in Protected View
Summary: This blog discusses about the Excel error ‘The file couldn’t open in Protected View’ and workarounds to fix the error. If you cannot access the Excel file data, using an Excel file repair tool can help you quickly restore the data to its original state.
Protected View is a feature in Microsoft Excel that opens a file in read-only mode while disabling the editing functions. An Excel file opens in Protected View if the file is from an unsafe location. For example, the file may be opened from an insecure Internet location or downloaded as an Outlook attachment from suspicious senders. In that case, your Excel application won’t let you open the file to protect it against malware or virus attacks.
However, the Protected View feature sometimes prevents an Excel file from opening even if it is from a safe location. Also, opening an Excel file may return an error message ‘file couldn’t open in protected view’.

You may be able to resolve the issue by closing all the open Excel files, closing the Excel application, and then re-opening the problematic file. But this process can take a significant amount of time as you need to close and re-open the Excel application and the file continuously.
How to Fix the Excel File Couldn’t Open in Protected View Error?
Here are some workarounds to fix the error:
Workaround 1 – Disable the Protected View Settings
Note: Before disabling the protected view settings, ensure you have a reliable antivirus software installed on your computer to safeguard files against malware or virus attacks.
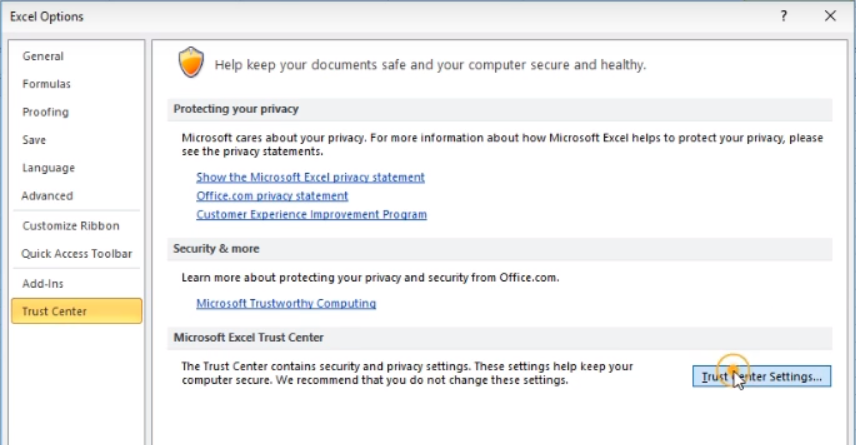
- Open the Excel file throwing the error, go to File and click the Options tab.
- From the Options dialog box, go to Trust Center and click on Trust Center Settings.
- From the Trust Center Settings dialog box, select the Protected View tab.
- Uncheck the appropriate option under the Protected View section, and then click OK to apply the changes. For instance, uncheck the “Enable Protected View for Outlook attachments” option if the file is a downloaded Outlook attachment.

- Click OK again.
Now try opening the problematic Excel file. If it still doesn’t open, try the following workaround.
Workaround 2 – Repair the Office Installation
Sometimes, corruption in the Office installation may cause Excel to return the ‘file could not open in protected view’ error. So, try repairing your Office installation and check if it solves the problem.
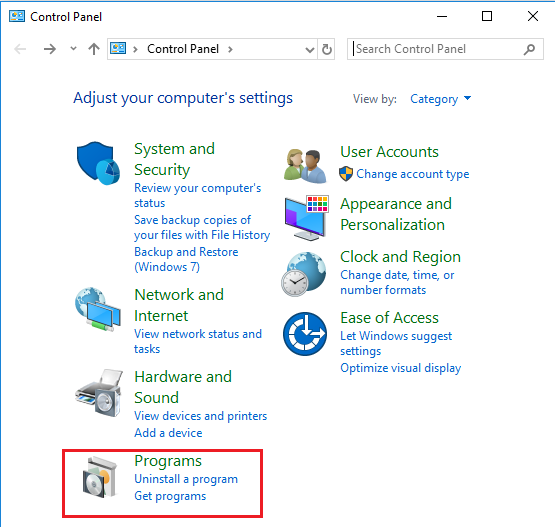
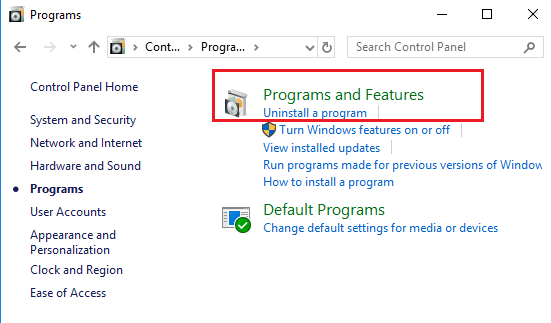
- Open the Control Panel and click the Uninstall a program option under Programs.
- Click Uninstall a program under the Programs tab.
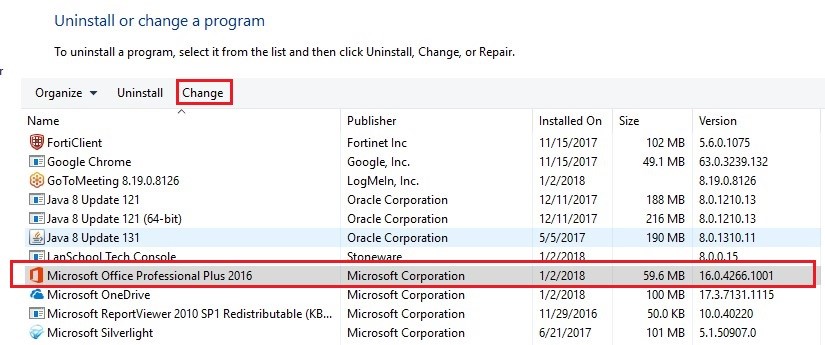
- Right-click the Microsoft Office program you have installed and click the Change button.
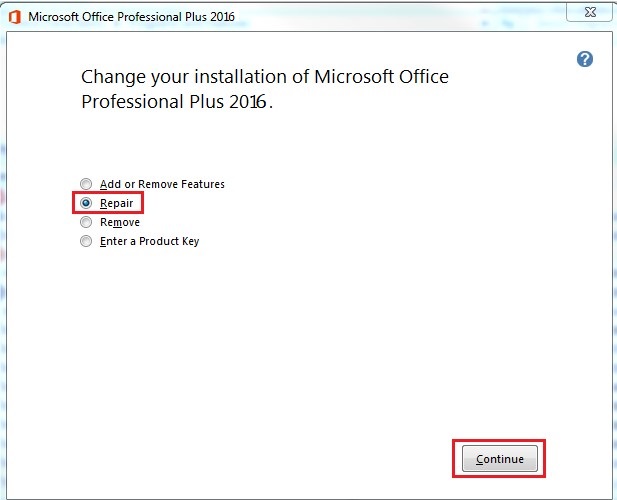
- Select the Repair option and click Continue.

Once the repair operation is complete, check if you can open the Excel file without any issue.
Workaround 3 – Install Latest MS Office Updates
Several Excel users have reported about experiencing issues (such as the Protected View issue) on opening an Office document like Excel, Word, or others – after upgrading Windows to a newer version. This problem may occur due to incompatibility between the Office app and the updated Windows version. You can try to fix the problem by upgrading the Office app, and here’s how:
- Click on the File tab in the Excel file that throws an error.
- Click the Account tab at the left-hand bottom of the screen.
- From Office Updates, expand Update Options, and then click Update Now.

After installing the updates, restart your PC and open the Excel file. If this doesn’t work, use the following workaround.
Workaround 4 – Convert the File and Rename It
Some Excel users resolved the ‘Protected view’ issue by renaming their Excel files. But before that, ensure that the file you are trying to open is saved with .xlsx format. If the file type is .xls, you need to convert it to .xlsx format and then rename it. Before converting the file, save a copy of the original file in the desired location.
If the file type is .xlsx, copy the problematic file. Next, open a blank Excel document and paste the copied file. The file will appear as an icon, double-click on it. If it opens without any error, save it with a different name. Hopefully, reaming the Excel file may help resolve the problem.
Conclusion
There is no fixed solution to resolve the Excel error ‘The file could not open in Protected View’. However, the workarounds discussed in the blog have helped users resolve the ‘Protected View’ issue. Make sure to use the workarounds in the same order as explained in the blog.
If you’re having an issue loading the Excel file data due to the ‘Protected View’ error, consider restoring the data using an Excel file repair tool .

Repair Office 2016 Files (Word, Excel and PowerPoint)on Windows
If you frequently work with Microsoft Word (.docx), Excel (.xlsx), and PowerPoint (.pptx) files, then issues like file inaccessibility or corruption won’t be new to you.
Let’s discuss some common scenarios which may lead to corrupt MS Office 2016 files:
Scenarios behind Microsoft Office Files Corruption
Scenario 1 – Disruption during Data Migration
You decide to move Office files from your hard drive to other removable media. However, when you try to access the data within the files post-migration, you may find Word, Excel, and PowerPoint files showing gibberish characters. Due to a power surge, sudden system shutdown, and internal mechanical failure, the files may have turned corrupt.
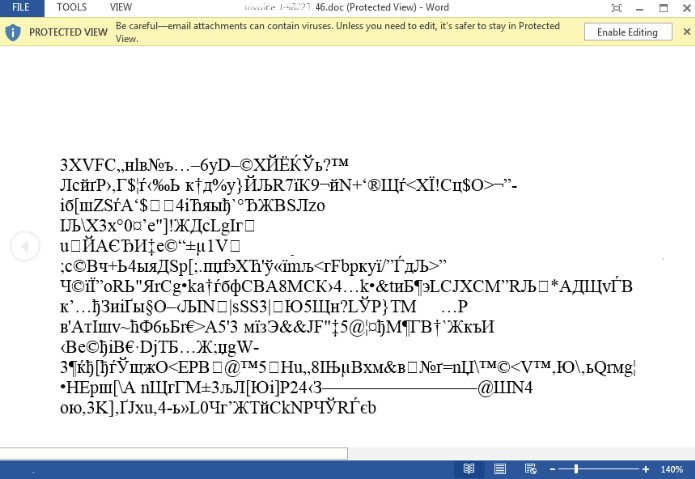
Figure 1- Microsoft Word file showing garbage characters
Scenario 2 – Office Files and Registry Entries Become Infected
When you open or use the Microsoft Office application, it crashes as soon as it opens. You assume that an add-in was causing the problem and restart the Office application without add-ins loaded, but the application still crashes. This may happen because of a virus infecting the Office files and registry values, thus leading to corrupt or damaged Office files.
Scenario 3 – Inaccessible or Lost Data
Suppose all your Office files are stored on a USB device, and you unplugged the device while it was still open in Windows. Now, when you attempt to open a Word or an Excel file, all the data is gone. Unsafe removal of USB or any other external storage device may corrupt the data inside your Office files or turn the file inaccessible.
How Can You Deal with Microsoft Office Files Corruption?
Here are a few solutions that can help you fix or repair Office 2016 Files Corruption:
Solution 1 – Use Microsoft in-built Repair Utility
Microsoft recommends using its in-built repair utility, ‘Open and Repair’, to fix corrupt Office files. Follow these steps to understand how you can use the utility to repair the corrupt Word, Excel, and PowerPoint files:
- Launch the MS Office application whose file you want to repair:
- To repair corrupt Word (.doc, .docx) files, launch MS Word
- To repair corrupt Excel files (.xls, .xlsx) files, launch MS Excel
- To repair corrupt PowerPoint (.ppt, .pptx) files, launch MS PowerPoint
- Click File, and then click the Open tab.
- Click Navigate to the location or folder where the Word, Excel, or PowerPoint file is stored.
- Select the corrupt file you want to repair by single-clicking on it, and then find the Open button and click on the drop-down menu next to it.
- From the drop-down menu, click the Open and Repair option and follow the subsequent instructions to repair Office 2016 files.
Solution 2 – Repair Office 2016 Installation
Try repairing the Office installation to fix the MS Office files. The steps to repair your Office installation may vary depending on the operating system you are using.
For Windows 7
- Open your PC’s control panel
- Click Programs
- Click Programs and Features, and then click Uninstall a program option
- Right-click on the Office application you want to repair, and then click Change
- Under Change your installation of Microsoft Office Professional Plus 2016, choose Repair and then click Continue.
For Windows 10
- Right-click the Start button, and type in Apps & Features (For Windows 10)

NOTE: This step will work for Windows 10/8/8.1/7 and Vista
- Click Programs from the window that opens, click on the MS Office product you want to repair, and then click on Modify
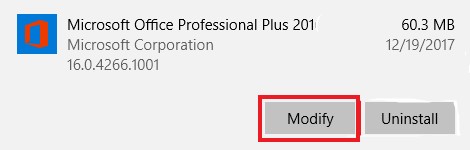
Note: Following the step will repair the entire Microsoft Office suite even if it contains only one application you want to repair such as an Excel or PowerPoint file. But, in case you have a standalone app installed, try to locate that application by name.
- Under Change your installation of Microsoft Office Professional Plus 2016, choose Repair, and then click Continue to initiate the repair process.
- Once the repair process completes, you’ll be prompted to restart your PC. Click Yes
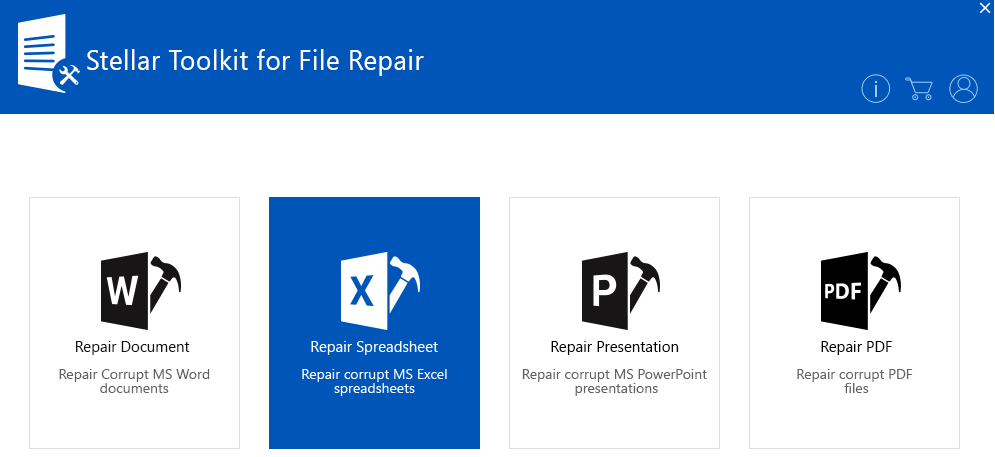
Solution 3 – Use Stellar Toolkit for File Repair
Repair MS Office 2016 files by using Stellar Toolkit for File Repair . This software comprises four essential utilities that can help you repair corrupt MS Word, MS Excel, MS PowerPoint, and PDF files.
The toolkit helps repair corrupt Office 2016 and other version documents and files while maintaining the original file format, which is less likely achievable with inbuilt methods. Follow these steps to repair MS Office 2016 documents by using the Office file repair tool:
- Download and install Stellar Toolkit for File Repair.

- Launch the software.
- From the software’s main interface, select the MS Office file you want to repair.
- From the window that pops up, select the corrupted file to be repaired.
Note: If you don’t know the exact location of corrupt office files or if they are large in number, you can locate the files by using the Find/Search option included in the software.
- After selecting the file, click the Scan button to initiate the repairing process.
- Once the scanning process is complete, all the recoverable information is displayed in the software’s left-hand panel. Click on any item to preview it before recovery.
- To save the repaired data, click the Save button, and enter a destination of your choice.
- Click OK.
Conclusion
This post outlined possible scenarios and their causes that may lead to corruption in MS Office 2016 files. It also emphasized how the inbuilt methods such as Open and Repair, and Repair Office Installation help to resolve the corruption issues. But these are not competent enough to resolve all the errors. With Stellar Toolkit for File Repair, you can resolve all sorts of corruption issues and recover data of Office 2016 files – Excel, Word, PPT, and PDF – in their original state.
How to fix “damage to the file was so extensive that repairs were not possible” Excel error?
Summary: Unable to resolve “damage to the file was so extensive that repair was not possible” error in Excel? Read this post to discover more details about the error, possible causes, and how to rectify the error. To save time & efforts, you can also try an Excel file repair software to resolve the “damage to the file…” error in a few clicks.
When opening a workbook in Microsoft Excel 2003 or later, you may encounter an error message,
“Damage to the file was so extensive that repairs were not possible. Excel attempted to recover your formulas and values, but some data may have been lost or corrupted.”

The error message may also occur while exporting an Excel file. Let’s find out what causes this error and what we can do to fix it.
Reasons Behind “Damage to the File Was So Extensive That Repairs Were Not Possible” Error
Your Excel file may be corrupt, oversized, virus-afflicted, etc., which can trigger this error and make the repair impossible. Below are some common reasons.
- Large or oversized excel files hindering export
- Data restore errors
- Field length of a cell is more than 256 characters
- Software conflicts, viruses, network failure
- Unable to open files in upgraded versions
- Errors on output exceeding 64000 rows
- Limited system resources (such as RAM, internal memory)
In a nutshell, the error generally happens if Excel discovers unreadable content, which may also interrupt file saving in Excel.
How to Resolve “Damage to the File Was So Extensive That Repairs Were Not Possible” Error?
Here are a few methods you can follow to fix or resolve the Excel repair error.
Method 1: Perform Basic Troubleshooting
When opening a corrupt workbook, Microsoft Excel automatically initiates the file recovery mode to repair the corrupt file. However, if it fails to perform automatic recovery, then follow these basic troubleshooting steps:
- This error mainly happens when you try to open the Excel file in an upgraded version. Try to open the file in an older version of Excel. You might be able to open it.
- Try saving the file with a different file name.
- Use a different file extension to save the file.
- You can save the Excel file as HTML and then open it. However, an HTML file might not save conditional formatting.
- Close other opened applications on the system which may be causing the error.
- Select less data for export at once.
- Delete worksheets if copied from another document; for instance, delete any file or screenshots you have imported.
- Open the file on another system.
If the error persists, then use the manual method to repair a workbook using the below steps:
- Go to the “File” tab.

- Select Open and select the damaged spreadsheet from the Recent Workbooks section on the right, if listed. However, if you cannot find the file in the Recent Workbooks section, click on “Browse” and choose the corrupted workbook.

- Click the drop-down arrow on the Open tab and select Open and Repair.

Method 2: Check if exporting a Heavy File is Causing Resource Limitations in Excel
Sometimes, when you try to export an Excel sheet carrying a huge database, you may face memory errors in older Excel versions like Excel 2003. Here, you’ll have to decrease the amount of data as Excel 2003 does not permit exporting extensive data beyond a limit. However, modern versions such as Excel 2007, 2010 & 2016 allow exporting a large amount of data and utilize more RAM than the older versions.
Following are some other workarounds:
- Use a lesser number of query presentation fields to re-generate the query. Then, again re-enter those fields.
- Decrease the multi-line string field data text up to 8000 characters.
Method 3: Copy Macros and Data to Another Workbook (Empty) in an Advanced Excel version
If the issue is occurring due to version incompatibility, i.e., if the file opens easily in the older version but shows errors in the new version. You can:
Use the older version to open the file or copy the data or macros in an empty workbook of the new version of Excel.
Copying the Macros in the Workstation
In Microsoft Excel, you can use the Visual Basic Editor to open the workbook with macro on another workbook by copying the macro. Both VBA tools and Macros appear in the Developer section of the excel file. This option is disabled by default. So first, you need to enable it.
Follow the instructions to enable it:
- Open Excel and go to File > Options.

- Click “**Customize Ribbon.**”

- Look at the right side of the pane and ensure the Developer tab is checked.

- Click OK.
Once you have enabled the Developer tab, follow the steps to copy the macro from one workbook to another:
- First, open both the workbooks- the workbook containing the macro and the workbook in which you need to copy the macros.
- Locate the Developer tab.

- Select Visual Basic to display the “Visual Basic Editor.”

- Go to the View menu in the Visual Basic Editor.

- Select Project Explorer.

- In the Project Explorer window, drag the module you need to copy to the destination workbook. For example:

Module 1 has been copied from Book2.xlsm to Book1.xlsm
Method 4- Restore the backup file
The workbook backup helps to open the corrupted or mistakenly deleted file. Sometimes, the issue can be fixed using the Recover Unsaved Workbook option in Excel. Here’s the list of steps to recover the files in Microsoft Excel:
- Go to the File tab on Excel.

- Click Open.

- Search on the top-left of the screen to click Recent Workbooks as below:

- Next, scroll down to the bottom.
- Click the “Recover unsaved workbooks” button.

- Scroll and find the lost file.
- Now double-click on the file to open.
Conclusion
“Damage to the file was so extensive that repairs were not possible” error can be fixed with the above troubleshooting methods or by using a third-party Excel repair tool, like Stellar Repair for Excel . Although There are no standard resolutions to fix the excel error as they may vary with different scenarios. In some cases, the manual methods might be time-consuming or fail to fix the error or recover the excel file. Hence, using an excel file repair tool may be the best option! It extracts data from the corrupted file and saves it to a new Excel workbook, which you can open and edit.
- Title: How to Repair Corrupt Excel 2013 Workbook? | Stellar
- Author: Nova
- Created at : 2024-03-12 16:35:59
- Updated at : 2024-03-14 15:22:21
- Link: https://blog-min.techidaily.com/how-to-repair-corrupt-excel-2013-workbook-stellar-by-stellar-guide/
- License: This work is licensed under CC BY-NC-SA 4.0.
