
:max_bytes(150000):strip_icc():format(webp)/iPad-Air-5-e11857a8d117450e9e09d770e300a872.jpg)
How to Repair Corrupt Excel 2016 Files | Stellar
How to repair corrupt Excel file
Stellar Repair for Excel is an excellent tool to repair corrupt or damaged MS Excel files. Mentioned below are the steps to perform Excel repair with this tool:
- Download & Run the Stellar Repair for Excel.

- A dialog box appears on your screen, click ‘OK’ to proceed.
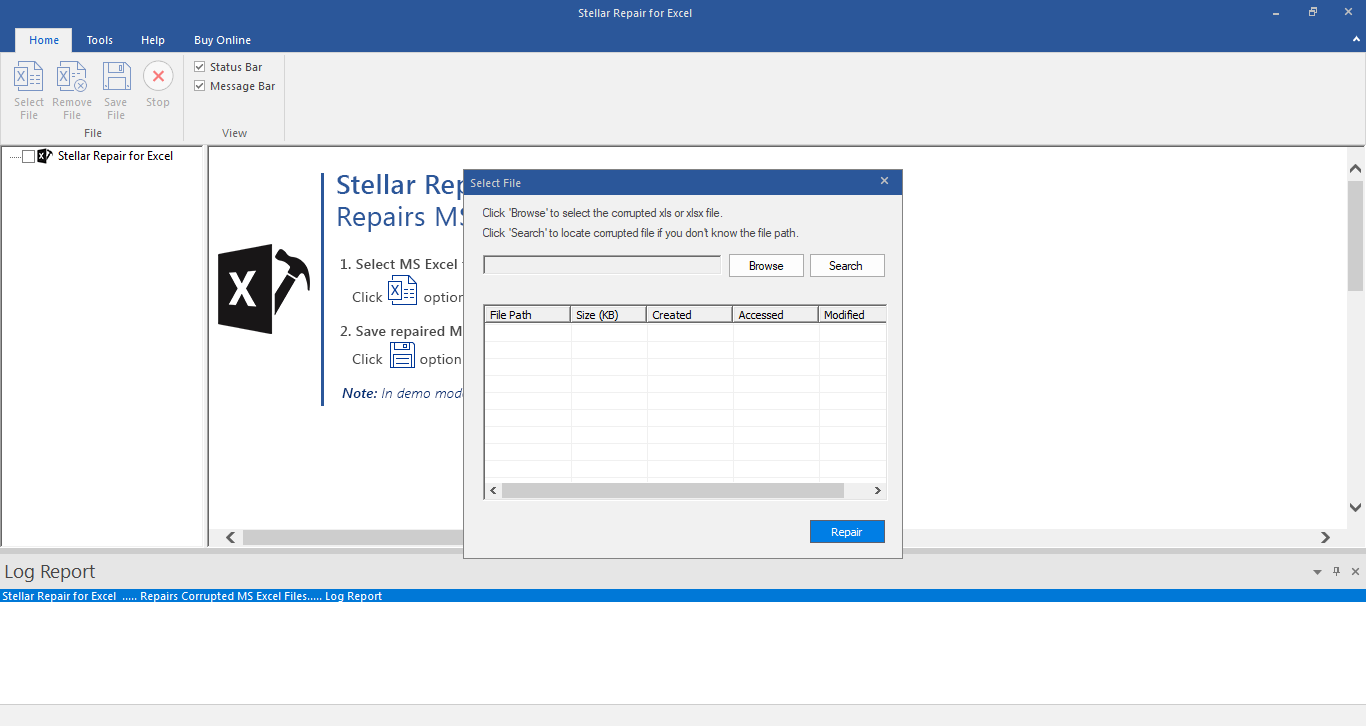
- To select your corrupt .XLS or .XLSX file, click ‘Browse’ button. However, if you do not know the location of your .XLS or .XLSX file, the software provides you the option ‘Search’ to search for your corrupt Excel files.

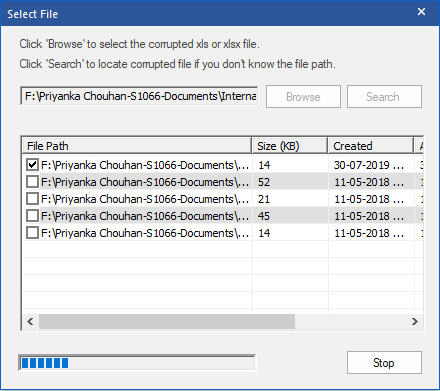
- Select the checkboxes against the files that you want to repair and click ‘Repair’. This starts the scanning process.
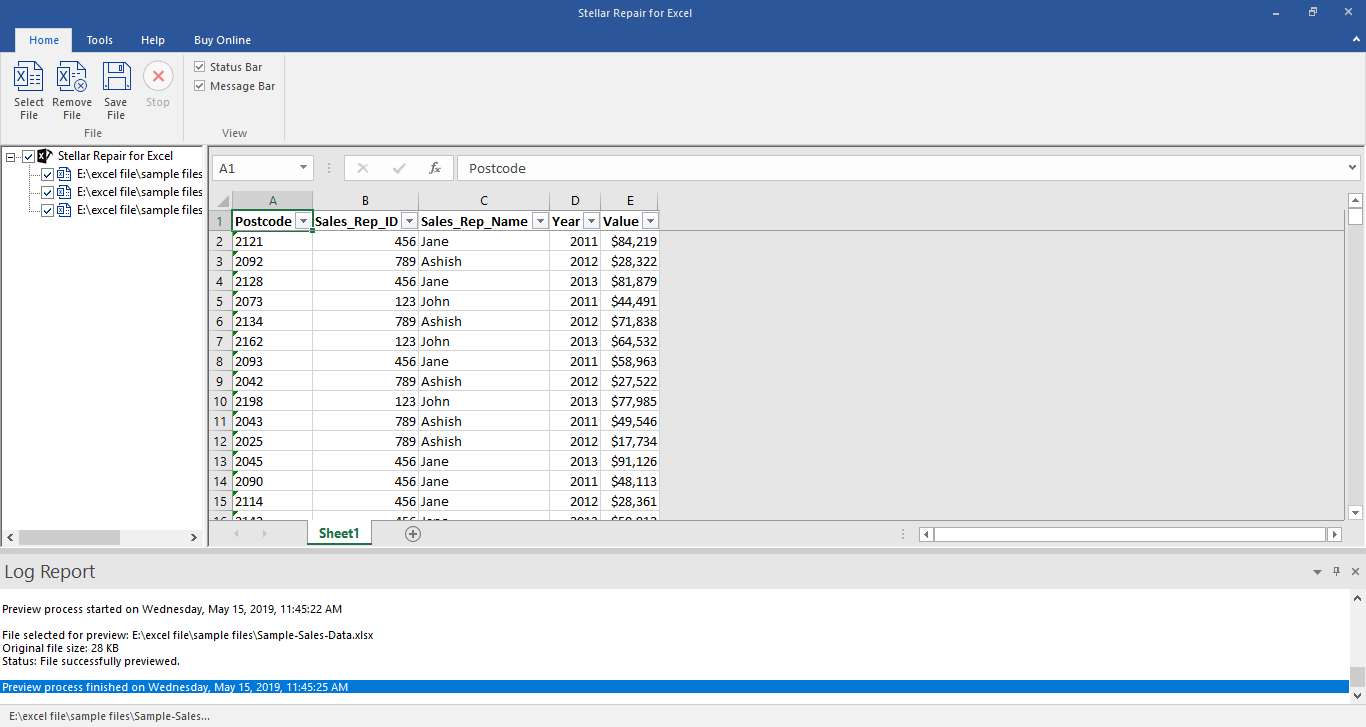
- The list of all the files that the software has scanned is displayed in the tree-view in the left pane. Click on a file from this tree-view to see its preview in the middle pane. From this list, you can select the file that you want to recover.
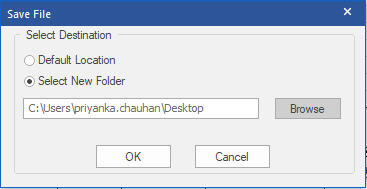
- You can either select the ‘Default location of file’ or ‘Select New Folder’ in the ‘Save Document’ dialog box to save the repaired files.
Stellar Repair for Excel Stellar Repair for Excel is the best choice for repairing corrupt or damaged Excel (.XLS/.XLSX) files. This Excel recovery software restores everything from corrupt file to a new blank Excel file.
Data Disappears in Excel - How to get it back
Summary: You may face the issue of ‘Excel spreadsheet data disappeared’ after changing Excel file properties and formatting rows and columns. This blog discusses the possible reasons for data disappearance and the solutions to fix the issue. Also, it mentions an Excel file repair tool to retrieve the data from the file. Sometimes, while editing or formatting a cell in an Excel spreadsheet, the data may go missing or disappear. Let’s discuss in detail the reasons that may cause the ‘Excel data disappeared’ issue along with the solutions.

Probable Reasons for Data Disappearing in MS Excel and Solutions Thereof
Reason 1 – Unsaved Data
While entering data in an Excel spreadsheet, it is important to save the data at frequent intervals. Doing so prevents any unsaved data from disappearing if you lose power or accidentally click ‘No’ when prompted to save the file. Unfortunately, such a situation is quite common as users often close the file without saving the recently made changes to a spreadsheet.
Solution – Use the ‘AutoSave’ Feature
With the AutoSave feature enabled in Excel, data won’t be lost in the event of power failure or abruptly closing the Excel program. By default, Excel automatically saves the information in a spreadsheet after every 10 minutes. You can reduce the limit to a few seconds to reduce the chances of Excel file data lost after being saved.

Reason 2 – Changing Excel Format
You can save an Excel file in various formats, like spreadsheet, text, webpage, and more. However, at times, saving the spreadsheet in a different format may lead to missing data. For example, when you save a workbook to a text file format, all formulas and calculations applied to the data will be lost.
Solution – Adjust a Spreadsheet for the Changed Format
If you’re changing the format of a spreadsheet, make space for the rows and columns. Also, remove all calculations before saving the file.
Note: If the sheet is shared on multiple computers, then save the file in compatibility mode.
Reason 3 – Merging Cells
You can combine two or more cells data to make one large cell. This technique is primarily used to fit the text of a title in a sheet. If there is data in two or more cells, then only the data in the top-left cell is displayed and the data in all other cells is deleted. If the other merged cells have been populated with data after merging, the data is not featured and it does not appear even after remerging the cells.
Solution – Merge Cells inside One Column
To merge cells without data loss, combine all the cells you want to merge within a column and do the following:
- Select the cells to be combined.
- Ensure that column width is wide enough to fit the contents of a cell.
- In the spreadsheet, under the Editing group, click ‘Fill,’ and then click ‘Justify.’

- Under Alignment, click on the ‘Merge & Center’ option to center align the text. Or, click on ‘Merge Cells’.
Note: This solution works for text only. You cannot use it to merge formulas or any numerical values. If you need to combine two or more cells with formula into a single cell, try using the Excel CONCAT function .
Reason 4 – Cell Formatting
Cells and text in the cells can be displayed in different colors to make the spreadsheet simple to create and infer. You may experience data loss when you try to modify the data or change the color or size of the data. Though the information may exist, the data may show an error due to the following reasons:
- White-colored text will not show in a white-colored cell
- Large font-sized data may not appear in small-sized cell
- Calculations may show (#VALUE) error after cell-formatting
Solution – Check and Clear Formatting
Make sure to use dark-colored text on a white-colored cell. Also, resize the cell to fit the text size. Check if numbers in a cell are entered as text. If so, you need to apply a number format to the text-formatted numbers. Read more about it, from here .
What Else You Can Do to Resolve the ‘Excel Data Disappeared’ Issue?
If you can’t recover the missing Excel file data, try to repair or extract the data from the file using the built-in Excel repair tool. Follow the below steps to use the tool:
- Open MS Excel, click File > Open > Computer > Browse.
- On the ‘Open’ window, select the file you want to repair and then click on the Open dropdown.
- Select Open and Repair.

Use the ‘Repair’ option to repair the file and recover as much data as you can from the repaired file. If this doesn’t work, use the ‘Extract’ option to recover the data.
If you fail to retrieve the disappeared data from that file using the above-listed steps, opt for an Excel repair tool , like Stellar Repair for Excel. This software has a proven track record of repairing corrupt or damaged Excel files and recover all the data.

The software helps:
- Fix all corruption errors. It helps in getting back the data which has disappeared.
- Repair a single as well as multiple Excel files.
- Recover all components of XLS/XLSX files – tables, chart sheet, cell comment, image and more.
- Preserve the worksheet properties and cell formatting.
- Support the latest Excel 2019 and earlier versions.
The Excel repair software repairs the Excel file in these simple steps:
- Launch and open the software.
- Select the corrupt Excel file by using the ‘Browse’ option. If the file location is not available, then find the Excel file using the ‘Search’ option.

- Click ‘Repair’ to scan the corrupt file.

- Once the repair process is complete, verify the components of Excel file and check if the available preview shows complete data that disappeared from Excel.

- Save file at default location or preferred location.

The Excel file with all the restored data will be saved at the selected location.
Conclusion
It is better to repair the affected Excel file than suffer the loss when data or text disappears in Excel. A professional software ensures that users get back all the data in the form of a new Excel file. Stellar Repair for Excel software repairs the corrupt file without modifying the original content and file format. The software’s easy-to-use user interface lets you perform the functions without formal software training and technical expertise.
‘Open and Repair’ Doesn’t Work in MS Excel
Summary: In this Blog, we will go through Microsoft office most important product i.e Microsoft excel, let’s get into all possible Manual and an alternate method to deal with MS Excel open and Repair doesn’t work issue, read on to know more.
Whether you are a student or an entrepreneur, the features of Microsoft Excel do not delude anyone. Setting goals, creating budgets, analyzing data, calculating salaries, is there anything that Excel can’t do? All of us have used it and trusted it to calculate and provide a solution to our most difficult problems. However, like every other software application, this otherwise reliable application can sometimes fall prey to unexpected errors which can even threaten to make our critical data inaccessible.

A good idea to avoid loss of data when a Microsoft Excel file becomes corrupt is to take some proactive measures, such as saving a backup copy of your files and creating an automatic recovery file at periodic intervals. If you are faced with a corrupted Excel file, you know you can still use the ‘Open and Repair’ function provided by Microsoft to fix and open corrupt Excel file. However, what should a user do when ‘Open and Repair’ is not working? This is a query shared by millions of Excel users worldwide. Sometimes, the ‘Open and Repair’ functionality of Excel stops working due to unknown reasons. In such cases, if users face Excel file corruption, they get stuck with no idea how to fix the Excel file.
In this guide, we’re providing you with the solutions to this very problem. If Excel ‘Open and Repair’ is not working, read on to find out the procedures that you can perform to open corrupted files.
‘Open and Repair’ doesn’t work: Try an alternative solution i.e. Stellar Repair for Excel to recover everything from corrupt Excel files.
How to Fix Excel file that Won’t Open
If your workbook is opening in Excel, there are two options to recover its data. It would be best if you try to perform one, and if you are unsuccessful, move on to the next.
Revert the workbook to the version that was saved before the corruption
- Launch Excel and click File -> Open

- Select the file that is corrupted and open it
- Click ‘Yes’ to save the copy of the workbook that was saved before corruption
Important Note: If you use this method, you will lose all changes made to the file after it was corrupted.
Save the workbook in the SYLK file format
- Launch Excel and click File -> Save As.
- In the Save as Type field, select SYLK (Symbolic Link) from the drop-down menu, and click Save.

- To save only the active sheet in the workbook, click OK. The system will display a message that the sheet has features that are not compatible with the SYLK file format.
- Click Yes.
- In Excel click File -> Open.
- Select the file that you saved in SYLK file format and open it.
- In Excel click File -> Save As.
- In the Save as Type field, select Excel Workbook from the drop-down menu.
- In the File Name field, type a new name for your workbook and click Save.
The SYLK file format will filter out the corrupted elements from your workbook, thereby restoring your data.
Important Note: Using this method you only be able to salvage the active sheet in the workbook.
How to Open/Fix an Excel file that cannot be opened
In this case too, there are two options to recover the data. Try to perform one, and if you are unsuccessful, move on to the next.
Set the calculation option to Manual
- Launch Excel and click File -> New.

- From the Available Templates window, select Blank workbook.

- Click File -> Options.
- Under Formulas, in the Calculation options section, click Manual.

- Click OK.
- In Excel click File -> Open.
- Select the corrupted file and open it.
The system opens the corrupted file. Since the workbook won’t be calculated, it might open.
Link the workbook to external references
- Launch Excel and click File -> Open.
- Copy the name of the corrupted file and click Cancel.
- In Excel click File -> New.
- From the Available Templates window, select Blank workbook.
- In the new workbook, on cell A1, type the following:
=File Name!A1
In the above command, the filename is the name of the corrupted file.
- On the Update Values dialog box, select the corrupted file and click OK.
- On the Select Sheet dialog box, select the sheet and click OK.
- Select cell A1. Select the same range of rows and columns as occupied by the data in the corrupted sheet, including cell A1.
- Under the Home tab, in the Clipboard section, click Paste.
- While the range of rows and columns are still selected, click Copy.
- Click the Paste
- Under Paste Values, click Values.
Note: This method lets you recover only the data but not the values and formulas from the workbook.
Alternative Solution
In addition to the above-mentioned techniques, you can also use macros to extract data from a corrupted workbook. However, macros are generally risky, and executing them needs prior technical knowledge.
Thus, if the above methods do not yield the desired results, a quick and easy way for reconstructing Excel files is to use Excel Recovery Software . Stellar Repair for MS SQL software is the best choice for rebuilding damaged Excel files and restoring everything to a new Excel file. The product lets you recover table, chart, chart-sheet, cell comment, image, formula, sort and filter data from damaged workbooks and also allows you to fix multiple files at one go.

Wrapping it up
Though one of the above-mentioned techniques should recover Excel file if ‘_Open and Repair’ utility doesn’t work_, in case you’ve reached nowhere even after using them, contact Microsoft support for more help.
How to Fix ‘Sharing Violation Error’ when Saving Excel?
Summary: You may encounter the sharing violation error in Excel when you repeatedly save changes in a workbook. The error can occur due to different reasons. In this blog, we will discuss the possible reasons behind this sharing violation error and some effective solutions to fix it. If the issue has occurred due to corruption in Excel file, you can try the advanced Excel repair tool mentioned in the post to repair the corrupted file.
It is not uncommon to encounter errors while working with Excel application. One common error that Excel users face is the sharing violation error that occurs while saving an Excel spreadsheet. The complete error message says, “Your changes could not be saved to file because of a sharing violation.” When this error occurs, users won’t be able to save the changes in the file. So, it is important to fix this issue as soon as possible. But before fixing the error, let’s find out the causes behind this error.
Causes of Excel Sharing Violation Error
This error may pop up due to the below reasons:
- The file you are trying to save is corrupted.
- The Excel file is not in the trusted location.
- Sharing Wizard is disabled.
- You do not have permission to modify the Excel file.
- The Excel file is not permitted to get indexed.
Methods to Fix the Sharing Violation Error in Excel
You can move the affected Excel file to a new folder and save it with a different name. Then, see if it fixes the error. If it doesn’t help, you can try the below methods.
Method 1: Check and Change the Excel File Properties
You can get the sharing violation error in Excel if the file attribute options, such as “File is ready for archiving” and “Allow this file to have contents indexed in addition to file properties” are disabled. You can check the File Properties and enable these options to fix the issue. Here are the steps:
- Right-click on any Excel file and select Properties.

- In the Properties window, click on the Advanced option.

- In the Advanced Attributes window, select the below options under File attributes:
- File is ready for archiving.
- Allow this file to have contents indexed in addition to file properties.

- Click OK.
Note: If these options are already selected, then unselect and re-select them.
Method 2: Enable Sharing Wizard Option
The error “Your changes could not be saved to file because of a sharing violation” can also occur if the sharing wizard option is disabled on your system. You can check and enable the sharing wizard option using these steps:
- Go to your system’s Documents folder.
- Click View > Options > Change folders and search options.

- In the Folder Options window, click View.

- Under the View section, search for the “Use Sharing Wizard” option in the Advanced Settings.

- If the Use Sharing Wizard option is unselected, select it and then click OK.
Method 3: Move the Excel File to a Trusted Location
You can encounter the sharing violation error if the file you are trying to save is not in the trusted location. You can try moving the file to a trusted location by following these steps:
- In Excel, go to File and then click Options.
- Click Trust Center and then click Trust Center Settings.

- In the Trust Center window, click Trusted Locations and then click Add new location.

- In the Add new location window, select Browse to locate and choose the folder, and then click OK.
Method 4: Open Excel in Safe Mode
Incompatible add-ins can create issues in the Excel file. To check if the sharing violation issue has occurred due to add-ins, open Excel in safe mode. To do so, follow these steps:
- Open the Run window using Windows + R.

- Type excel /safe and click on OK.
- Open the affected file and then try to save the changes.
- If you are able to save the changes without any error, then it indicates add-ins are causing the issue. To fix this, you can remove the recently downloaded add-ins (if any).
Method 5: Repair the Excel File
Corruption in Excel file can also create issue while saving the changes. In such a case, you can repair the corrupted Excel file using the inbuilt utility in Excel, named Open and Repair. Follow these steps to use this utility:
- In Excel, navigate to File > Open > Browse.
- In the Open dialog box, click on the affected Excel file.
- Click the arrow next to the Open button and select Open and Repair from the dropdown.
- Click on the Repair option to recover as much data from the file as possible.
If the above utility fails to fix the corrupt Excel file, then you can use a more powerful Excel repair tool , such as Stellar Repair for Excel. This Excel repair tool can repair even severely corrupted or damaged Excel files (xls, .xlsx, .xltm, .xltx, and .xlsm). This tool can recover all the data from the corrupted Excel file, including images, chart sheets, formulas, etc., without changing the original format. It can help in fixing common corruption-related errors in Excel. You can download the software’s demo version to scan the corrupt file.
To Conclude
Above, we have discussed some effective methods to fix the sharing violation error in Excel. This error may also occur if you try to save the Excel file in an incompatible format. So, check the format and try saving the file in a compatible format. If the error occurs due to Excel file corruption, you can repair corrupt Excel file using the Open and Repair tool. If nothing works, then download a third-party Excel repair tool, such as Stellar Repair for Excel. It is an advanced tool that can fix severely corrupted Excel files. You can install this repair tool on any Windows system.
Solutions to Repair Corrupt Excel File
Summary: MS Excel can throw various errors due to corrupted Excel files. This blog discusses the error messages that indicate Excel file corruption and the methods to prevent data loss due to a corrupt file. It also discusses the reasons behind the corruption in Excel file and their solutions. It also mentions a “Stellar repair for Excel” tool that can help to repair the corrupt or damaged Excel file.
Is your Excel file corrupted? And you don’t have backup of your data? There is no need to worry. There are some simple solutions to repair Excel file 2019. But before heading towards the solutions, let’s discuss the possible reasons for Excel file corruption and how you can prevent losing your data.
Error Messages that Indicate Excel File Corruption
When an Excel file gets corrupted, different error messages appear. For example:
- “Excel found unreadable content in
. Do you want to recover the content of this workbook, click Yes.” - “Can’t find project and library.”
- “The workbook cannot be opened or repaired by Microsoft Excel because it is corrupted.”
- “Microsoft Excel has stopped working.”
Reasons Behind Excel File Corruption
The reasons for corruption in Excel file could be any of the following:
- Improper system shutdown
- Computer virus/malware attack/Hacker attack
- Outdated anti-virus definition
- Hardware failure
- Unintentional deletion of files
- Large Excel files
- Bad sectors on storage media
How to Avoid Data Loss Due to Excel File Corruption?
Excel users should follow the below precautionary measures to prevent data loss due to Excel file corruption:
1. Create an Automatic Backup Copy
When you create an Excel spreadsheet, it is advised to Save As your document, as follows:
- In Save As window, click Tools next to Save option.
- Select General Options from the drop-down menu.
- Then check the dialogue box Always create back up and click OK.

This will always create a backup of your Excel. If it’s deleted or corrupted at any time, it can be recovered.
2. Create Recovery File at Different Time Periods
Steps are as follows:
- Go to File and then click Excel Options.
- Click Save and then select the Save Auto Recover information every checkbox
- Add the required minutes and location. Ensure that Disable AutoRecover for this workbook only box is unchecked.

Methods to Repair Corrupted Excel 2019 File
Try using these 5 methods to restore your Excel file and recover data:
Method 1: ‘Open and Repair’ Excel Files
Excel automatically opens the corrupted file in Recovery Mode. If not, you can repair Excel file manually through the following steps:
- Click on the File and select Open.

- Go to the location where the corrupt workbook is stored. In the Open window, select the corrupt file.
- Click Open and then select Open and Repair.
- In the window that opens, click Repair.
If the Repair option doesn’t work, you can select Extract Data and try to extract the values and formulae safely from the corrupt file.
Method 2: Recover Data from Open Workbook
If you face issues while working in an Excel file, you can choose to return to the last saved version of the Excel file. For this:
- Click File. Then select Open.
- Double click on the name of the workbook (the one that is open in your Excel).
- Click Yes to reopen it.

- The workbook will now appear.
Please note that it will show the last saved version and changes made after that won’t be recovered.
Method 3: Set Calculation Option as Manual
You can also recover data from Excel workbooks that you’re unable to open. For this, you need to configure the calculation option as manual in Excel. You can do this through the following steps:
- Click on File. Select New and open a Blank workbook.
- From File, select Excel Options.

- From the Formulas category, under the section Calculation options, select Manual. Now click OK.

- Then click File, and select Open to open the corrupted or damaged Excel file.
Method 4: Recover Content by Using External Links
You can also recover specifically the content (leaving formulas/calculated values) from the workbook by using external references (to link Excel workbook). For this:
- Click on File, Select Open.
- Navigate to the folder that contains the corrupted workbook.
- Now, right-click on the file name of the corrupted workbook and click Copy.
- Click File button. Then, select New and create another blank workbook.
- In the first cell (A1), type =!A1 and press Enter.
- Select the corrupted workbook in the Update Values dialogue (if it appears). Then click OK.
- Select the relevant sheet in the Select Sheet dialogue (if it appears). Then click OK.

- Again, select the cell A1, go to Home and select Copy.
- Now select (start from the cell A1) an area equal to that of the data in the original workbook.
- Go to Home now and select Paste.
- Again, go to Home, and Copy the data (the same selection of cells).
- Go to Home, and then click on the arrow below Paste. Then click on Values.
By pasting values, you removed the links to the corrupted workbook and only the data is left behind.
Method 5: Excel Repair Software
If the above-mentioned methods do not help in repairing the corrupt Excel file, try an Excel repair software.
One of the most commonly used Excel repair tools is Stellar Repair for Excel. Its trial version is available for free download, which lets you scan and preview the repaired Excel files. Once you’ve ascertained the effectiveness of the software, you can save the file after activating the software.
Here’s the complete repairing process of the corrupt Excel file
Conclusion
This post shared the reasons behind Excel file corruption and precautionary measures to prevent data loss. It also outlined different methods to repair corrupt Excel file 2019. There are several in-built utilities in Microsoft Excel to repair corrupt workbooks and recover data from it. In case these methods didn’t work, you can use Stellar Repair for Excel – an easy-to-use DIY tool that can fix all Excel corruption errors and restore data with all original properties.
How to Fix the #Value! Error in Excel?
Summary: #Value! is a common error that occurs when using formulas in Excel. It can be due to an issue with the cells you are referencing or use of formulas in the wrong type or format. This blog will discuss some cases when this error may occur and the solutions to fix the issue. You’ll also find about an Excel repair software that can help fix the error if it has occurred due to corruption in Excel file.
You may experience the #Value! error in Excel when trying to enter invalid data type into the formulas. Sometimes, it appears when a value is not the expected type or when dates are given a text value. This Excel error may occur due to several reasons. However, the exact cause of this error is difficult to find. Below, we will be discussing some cases where you may get this error and the solutions to resolve the issues.
Case 1: Wrong Argument Data Type in Formulas
Sometimes, Excel throws the “#Value!” error if it recognizes incompatible arguments in the formulas.
For example: The Date function in the sheet expects only numerical values as arguments. In the below image you can see that when the formula’s string value is used in the month (January), it resulted in the #VALUE! error.

Solution
To fix the issue,
- Double-click the formula to verify the type of arguments.

- Correct the argument in the cell (B2).
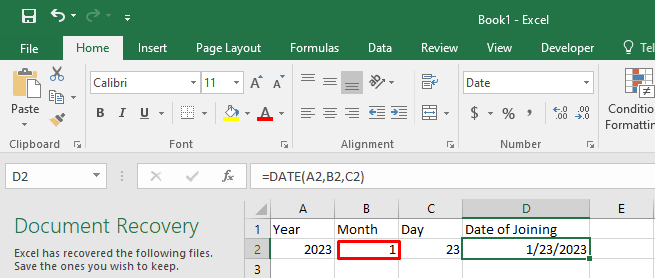
The formula will work as expected.
Case 2: Using the Basic Subtraction Formula
Users often experience the #Value! error, when using the basic subtraction formula in Excel.
Solution
Check the formula and the type of values in the cell. If these are correct and the error persists, then follow these steps:

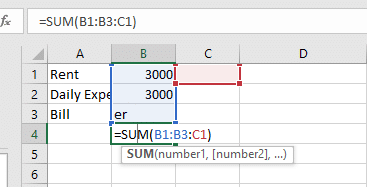
- Go to the Start button on Windows, type Control Panel, and double-click on it.
- Click Clock and Region > Region.

- On the Format tab, click Additional Settings.
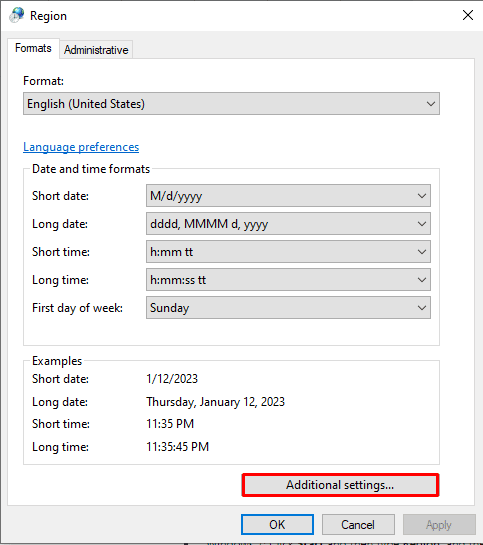
- In the Customized Format window, search for List Separator.
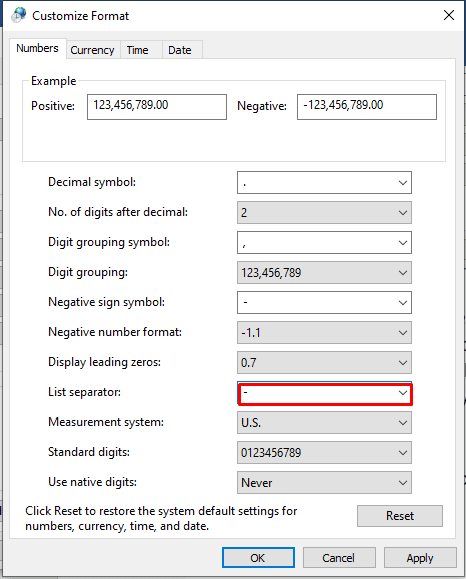
- Check if the List Separator is set to minus (-). Change it to comma (,).
- Click OK.
- Now, open the Excel file and again try to use the formula.
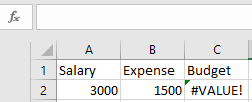
Case 3: Wrong Text Value
The #Value! error can also occur due to the formula’s wrong value.
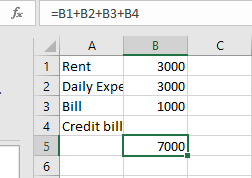
For example: If you are using the formula to add values in cells and Excel recognizes the unexpected text value, you may get a #Value error.

Solution
To fix the issue, you can correct the value or use the SUM function. It is recommended to use functions instead of operations to reduce the errors. In Excel, the formulas with math operators may not able to calculate the text in the cells. The SUM function automatically ignores the text value(er), calculates everything as numbers, and displays the result without the #Value! error.
Case 4: Blank Space in Cells
You may get the #Value! error if your formula refers to other cells with space or hidden space. Sometimes, spaces that make a cell display blank but actually they are not blank.

Solution
You can either delete the space or replace the blank space. Here’s how:
1. Delete the Blank Space
First, check if a cell is blank or not. To do this,
- Select the cell that looks blank.
- Press F2.

The blank cell won’t show space.
Then, press the Backspace key to delete the space. It will fix the error.
2. Replace Blank Space
You can also use the “Find and Select” option to replace the blank space in Excel. Here are the steps:
- Open the Excel file that shows #Value! error.
- On the Home tab, click Find & Select > Replace.

- In the Find what field, type a single space and delete everything in the “Replace with” field.
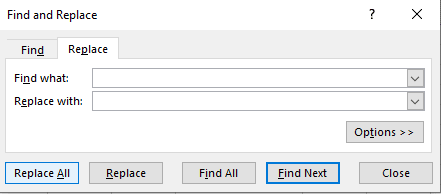
- Click Replace All > OK.

Case 4: Problem with Network Connection
Many users have reported experiencing errors when using Excel online due to problems with the network connection.
Solution
Check your Internet connection and see if it is working properly.
Case 5: Wrong Formula Format
If you enter the wrong formula with a missing parenthesis or comma, then Excel can throw the #Value! error. The error can also occur if the application finds a special character within a cell.
Solution
Correct the formula and use the ISTEXT function to find the cells with issues.
Case 6: Corruption in the Excel File
If none of the above works, then it indicates the Excel file is corrupt. The formulas in the Excel file do not work due to corruption.
Solution
You can use the Open and Repair utility in Excel if you are getting the error due to corruption in Excel file. In case the utility fails or the Excel file is severely corrupt, you can use a third-party Excel repair software, such as Stellar Repair for Excel. It is a powerful tool to repair corrupted or damaged Excel files and recover all its data, with 100% integrity. The tool supports Excel 2019, 2016, and older versions.
Closure
There are several reasons that can trigger Excel to throw the #Value! error. It can occur if there is an incorrect argument data type in formulas or blank space, text, or special characters within a cell. This blog discussed the possible scenarios when this error occurs. You can apply the solutions mentioned above to fix the error. If the #Value! error occurs due to corruption in the Excel file, then you can use Stellar Repair for Excel . It is a reliable tool that helps in fixing corruption-related errors in Excel.
How to fix runtime error 424 object required error in Excel
The Runtime error 424: Object required occurs when Excel is not able to recognize an object that you are referring to in a VBA code. The object can be a workbook, worksheet, range, variable, class, macro, etc. Some users have also reported that this error occurred when they tried to copy the values of the cells from one workbook to another.
Let’s understand the error through a small scenario. Suppose, I want to check the last field row in a table in a spreadsheet named “First” using the VBA code. To do this, I have added a command button and double-clicked on it and entered the below code in the backend:
Private Sub CommandButton2_Click()
Dim LRow As Integer
LRow = Worksheets(“First”).Cells(Rows.Count, 2).End(xlUp).Row
MsgBox (“Last Row “ & LRow)
End Sub
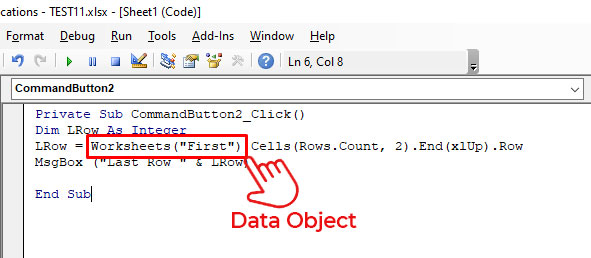
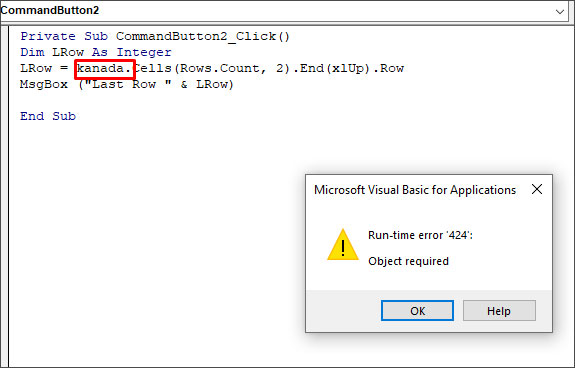
In this code, Worksheets(“First”) is a data object. If I mistakenly delete this data object and insert any random name (for example - kanada), then it will not be recognized by Excel. When I run this code, I will get the “Run-time error 424”.
Causes of Runtime Error 424 in Excel
The Runtime error 424: Object required can occur due to the following reasons:
- Incorrect name of the object you are trying to refer to in a code.
- You have provided an invalid qualifier to an object.
- You have not used the Set statement while assigning an object reference.
- The object is corrupted.
- Missing objects in a workbook.
- Objects you are trying to call in a code are mistakenly deleted or unavailable.
- You have used an incorrect syntax for object declaration.
- You are trying to perform an invalid action on an object in a code.
- Workbook is corrupted.
Solutions to Fix Runtime Error 424: Object Required in Excel
The VBA error ‘object required’ may occur due to different reasons. Based on the reason, you can follow the solutions mentioned below to fix the error.
1. Check the Name of the Object
The Runtime error 424 can occur when you run the VBA code using an incorrect name of the object. For example, the object name is ‘MyObject’ but you’re using “Backcolor”.
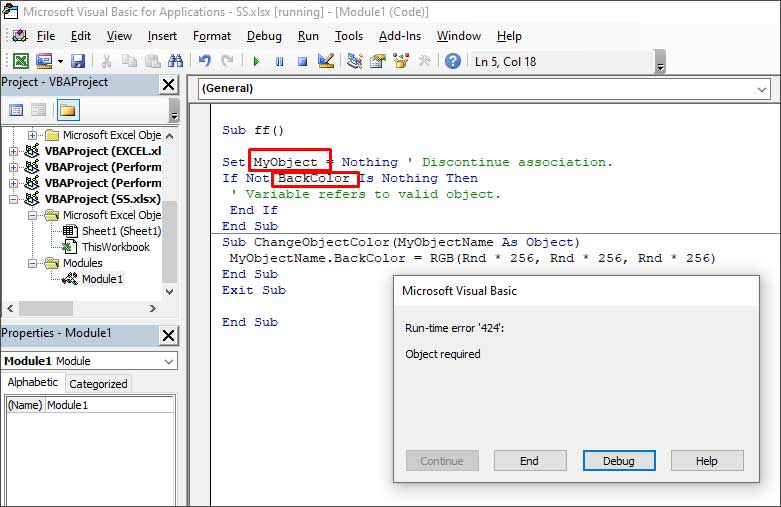
When you click the Debug button, the line with the error will highlight.

To fix the issue, you need to provide the correct name of the object.
2. Check if the Object is Missing
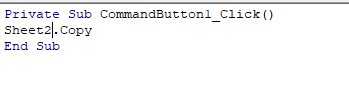
The Runtime error 424 can occur if the object you are referring to as a method is not available or you are using the wrong object in a code. In the below example, you can see that the error occurs when an object named “Employee” is not available in the Project list.
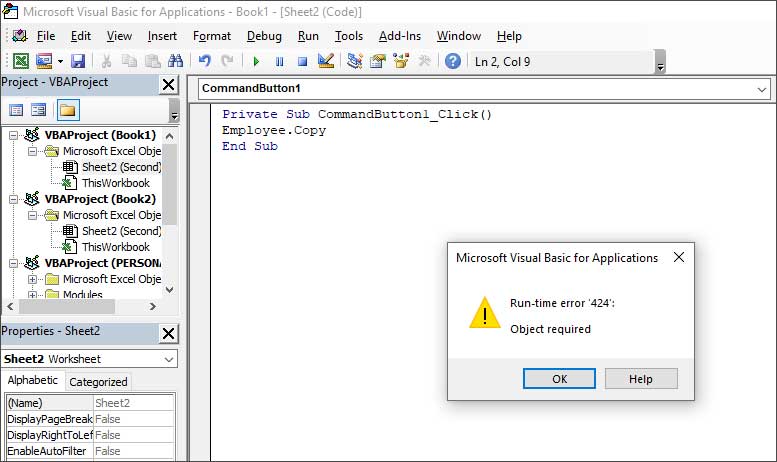
You can check and mention the object which is available. For instance, Sheet2 in the below code.
3. Check All References are Declared in the Code
You can get the Runtime error 424 if all the references are not declared. So, make sure you have declared all the references in the code. To verify this, you can use the debug mode by pressing F5 or clicking on the Debug option.

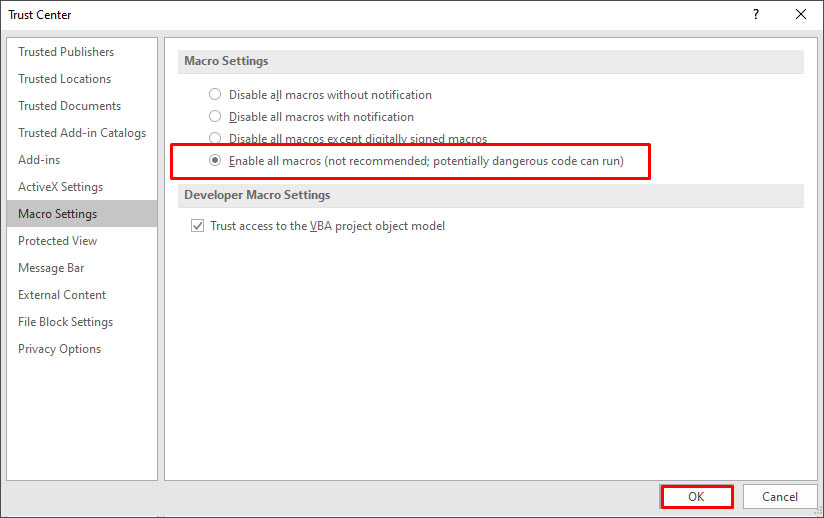
4. Check the Macro Security Settings
Sometimes, the error can occur if macros are disabled in the Macro Security settings. You can check and change the settings by following these steps:
- On the Developer tab, in the Code section, click Macro Security.
- In the Trust Center window, select Enable all macros.

- Click OK.
5. Repair your Workbook
Sometimes, the ‘Object required’ error can occur if your Excel file is damaged or corrupted. In such a case, you can try repairing the file using Microsoft’s in-built utility - Open and Repair. To use this utility, follow these steps:
- In Excel, go to File > Open > Browse.
- In the Open dialog box, click on the corrupted Excel file.
- Click the arrow next to the Open button and select Open and Repair from the dropdown.
- Select Repair to recover as much data from the file as possible.
If the Open and Repair utility fails or stops working, then you can try a professional Excel repair tool, such as Stellar Repair for Excel . It is an advanced tool that can repair severely corrupted Excel files (.xls, .xlsx, .xltm, .xltx, and .xlsm). It helps recover all the file components, including images, charts, tables, pivot tables, cell comments, chart sheets, formulas, etc., without impacting the original structure.
Conclusion
The Runtime error 424 usually occurs when there is an issue with the objects in your VBA code. In this article, we have covered some effective methods to resolve the “object required” error in Excel. If the error occurs due to corruption in Excel file, then you can repair the corrupt file using Stellar Repair for Excel. It is a reliable tool that can repair severely corrupted Excel file without changing its actual formatting. You can download the free trial version of the software to evaluate its functionality.
- Title: How to Repair Corrupt Excel 2016 Files | Stellar
- Author: Nova
- Created at : 2024-03-12 12:32:29
- Updated at : 2024-03-14 12:12:31
- Link: https://blog-min.techidaily.com/how-to-repair-corrupt-excel-2016-files-stellar-by-stellar-guide/
- License: This work is licensed under CC BY-NC-SA 4.0.
