
:max_bytes(150000):strip_icc():format(webp)/GettyImages-534572567-56facec43df78c784197b92d.jpg)
How to Repair Corrupt Excel 2023 Workbook? | Stellar
How to Repair Corrupt Excel Workbook?
Summary: Corruption in an Excel workbook could lead to data loss. This blog outlines the possible reasons behind corrupted workbook and describes how to repair the workbook manually and using an Excel repair tool.

Is your Excel behaving differently, for instance, stops responding or freezes? Or have you encountered a warning or an error message indicating corruption in the Excel workbook?
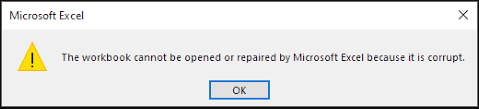
Figure 1 - Corruption Warning in Excel: The corrupt workbook cannot be opened or repaired
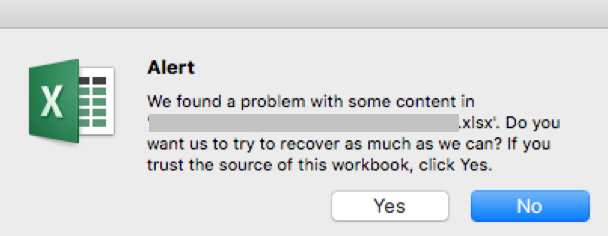
Figure 2 - Excel File Corruption Message
In any of these situations, you won?t be able to open your Excel workbook.
TIP! If you?re unable to open an Excel workbook, it does not necessarily mean that the workbook is corrupt. Try a few workarounds to resolve the issue, like disabling the ?Protected View Settings?, disabling add-ins, or moving the workbook to another drive.
You will need to repair the corrupted Excel workbook to make it usable. Before discussing the repair methods, let?s first look at the possible reasons behind file corruption.
To jump to methods to repair the workbook, click here .
Possible Reasons behind Corrupted Excel Workbook
- Large size of a workbook: A workbook containing lots of information or objects like images, shaded cells, or other visual representations is prone to corruption.
- Unexpected system shutdown or power loss: If you haven?t saved your Excel file, abrupt system shutdown or power failure can corrupt the data and render the file inaccessible.
- Bad sectors on storage media: Accumulation of bad sectors on storage media on which Excel files are saved is another reason that may lead to Excel file corruption.
Other common reasons causing Excel file corruption are virus attack, network errors, etc.
Methods to Repair Corrupted Excel Workbook
Note: Repairing the corrupt workbook may result in data loss. And so, it?s recommended to back up the workbook before attempting to repair the file.
Method 1 ? Repair the Excel Workbook Manually
Use the Excel ?Open and Repair? feature to repair your corrupt workbook manually. Here?s how:
Step 1: In Excel, click the File tab and then click Open.
Step 2: Select the corrupt Excel file, click the arrow button next to the Open button and then select Open and Repair.

Figure 3 - Excel Open and Repair Feature
Step 3: In Microsoft Excel dialog box that opens, click Repair to begin repairing your corrupt workbook.

Figure 4 - Repair the Microsoft Excel File
Note: If the Excel repair process fails, repeat Steps 1 till 3 and click the ?Extract Data? button. This will help you extract values and formulas from the corrupted workbook.
Performing these steps will repair your Excel file. If the issue persists, skip to the next method.
Method 2 ? Use Excel File Repair Software
If the above method failed to fix corruption in the workbook, use Excel file repair software to repair your workbook quickly. This Excel repair tool is purpose-built to help users repair large-sized Excel files (.xlsx and .xls) in just a few clicks. Also, it helps recover all the data from the corrupted workbook while preserving the cell formatting and worksheet properties.
Steps to Repair Corrupt Excel File Using the Software
Step 1: Download, install, and open Stellar Repair for Excel software.
Free Download for windows ](https://tools.techidaily.com/stellardata-recovery/repaire-for-excel/ )
Step 2: Click Browse to select your corrupted .xlsx or .xls file. If you are not aware of the file location, click Search to locate and select the file.

Figure 5 - Select Corrupt Excel Workbook
Step 3: Once the file is selected, click Repair.
Step 4: A preview of recoverable workbook data gets displayed.
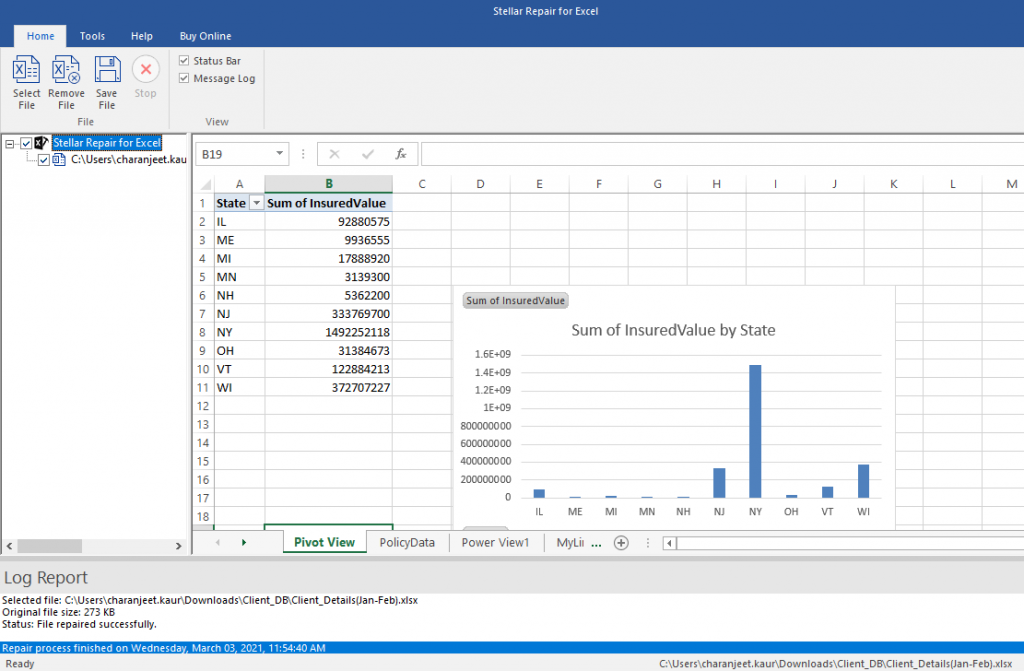
Figure 6 - Preview of Recoverable Excel Workbook Data
Note: You will need to activate the licensed version of Stellar Repair for Excel software for saving the repaired file. Once activated, proceed with the steps below to save the repaired file.
Step 5: Click Save File on the File menu. This will open a Save File dialog box with options to save the repaired .xlsx/.xls file at default or new location. After choosing the appropriate option, click OK.
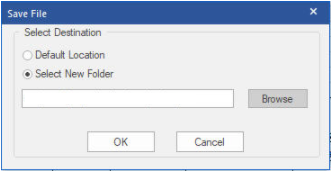
Figure 7 - Save Repaired Excel File
The repaired file will get saved at the selected location.
Key Features of Stellar Repair for Excel Software
- Repairs severely corrupt Excel file and recovers pivots, pivot tables, conditional formatting rules, chart, chart sheets, etc.
- Can repair multiple Excel files in a batch simultaneously
- Can handle all types of Excel file corruption errors, like ?Excel found unreadable content in filename.xls?, ?Excel cannot open the file filename.xlsx?, etc.
- Supports repairing corrupt workbooks of Excel 2019, 2016, 2013, 2007, 2003, and lower versions.
End Note
If your Excel workbook has turned corrupt, try using the methods discussed in this blog to repair the workbook. Once it is repaired, you must follow preventive measures to avoid your Excel file from getting corrupt. Some of these measures are as follows:
Reduce the size of your workbook by:
- Removing unused data
- Saving images at lower resolutions
- Avoid saving pivot table cache
Turn on the ?AutoRecover? and ?AutoSave? features in Excel
Data Disappears in Excel - How to get it back
Summary: You may face the issue of ‘Excel spreadsheet data disappeared’ after changing Excel file properties and formatting rows and columns. This blog discusses the possible reasons for data disappearance and the solutions to fix the issue. Also, it mentions an Excel file repair tool to retrieve the data from the file. Sometimes, while editing or formatting a cell in an Excel spreadsheet, the data may go missing or disappear. Let’s discuss in detail the reasons that may cause the ‘Excel data disappeared’ issue along with the solutions.
Probable Reasons for Data Disappearing in MS Excel and Solutions Thereof
Reason 1 – Unsaved Data
While entering data in an Excel spreadsheet, it is important to save the data at frequent intervals. Doing so prevents any unsaved data from disappearing if you lose power or accidentally click ‘No’ when prompted to save the file. Unfortunately, such a situation is quite common as users often close the file without saving the recently made changes to a spreadsheet.
Solution – Use the ‘AutoSave’ Feature
With the AutoSave feature enabled in Excel, data won’t be lost in the event of power failure or abruptly closing the Excel program. By default, Excel automatically saves the information in a spreadsheet after every 10 minutes. You can reduce the limit to a few seconds to reduce the chances of Excel file data lost after being saved.

Reason 2 – Changing Excel Format
You can save an Excel file in various formats, like spreadsheet, text, webpage, and more. However, at times, saving the spreadsheet in a different format may lead to missing data. For example, when you save a workbook to a text file format, all formulas and calculations applied to the data will be lost.
Solution – Adjust a Spreadsheet for the Changed Format
If you’re changing the format of a spreadsheet, make space for the rows and columns. Also, remove all calculations before saving the file.
Note: If the sheet is shared on multiple computers, then save the file in compatibility mode.
Reason 3 – Merging Cells
You can combine two or more cells data to make one large cell. This technique is primarily used to fit the text of a title in a sheet. If there is data in two or more cells, then only the data in the top-left cell is displayed and the data in all other cells is deleted. If the other merged cells have been populated with data after merging, the data is not featured and it does not appear even after remerging the cells.
Solution – Merge Cells inside One Column
To merge cells without data loss, combine all the cells you want to merge within a column and do the following:
- Select the cells to be combined.
- Ensure that column width is wide enough to fit the contents of a cell.
- In the spreadsheet, under the Editing group, click ‘Fill,’ and then click ‘Justify.’

- Under Alignment, click on the ‘Merge & Center’ option to center align the text. Or, click on ‘Merge Cells’.
Note: This solution works for text only. You cannot use it to merge formulas or any numerical values. If you need to combine two or more cells with formula into a single cell, try using the Excel CONCAT function .
Reason 4 – Cell Formatting
Cells and text in the cells can be displayed in different colors to make the spreadsheet simple to create and infer. You may experience data loss when you try to modify the data or change the color or size of the data. Though the information may exist, the data may show an error due to the following reasons:
- White-colored text will not show in a white-colored cell
- Large font-sized data may not appear in small-sized cell
- Calculations may show (#VALUE) error after cell-formatting
Solution – Check and Clear Formatting
Make sure to use dark-colored text on a white-colored cell. Also, resize the cell to fit the text size. Check if numbers in a cell are entered as text. If so, you need to apply a number format to the text-formatted numbers. Read more about it, from here .
What Else You Can Do to Resolve the ‘Excel Data Disappeared’ Issue?
If you can’t recover the missing Excel file data, try to repair or extract the data from the file using the built-in Excel repair tool. Follow the below steps to use the tool:
- Open MS Excel, click File > Open > Computer > Browse.
- On the ‘Open’ window, select the file you want to repair and then click on the Open dropdown.
- Select Open and Repair.

Use the ‘Repair’ option to repair the file and recover as much data as you can from the repaired file. If this doesn’t work, use the ‘Extract’ option to recover the data.
If you fail to retrieve the disappeared data from that file using the above-listed steps, opt for an Excel repair tool , like Stellar Repair for Excel. This software has a proven track record of repairing corrupt or damaged Excel files and recover all the data.

The software helps:
- Fix all corruption errors. It helps in getting back the data which has disappeared.
- Repair a single as well as multiple Excel files.
- Recover all components of XLS/XLSX files – tables, chart sheet, cell comment, image and more.
- Preserve the worksheet properties and cell formatting.
- Support the latest Excel 2019 and earlier versions.
The Excel repair software repairs the Excel file in these simple steps:
- Launch and open the software.
- Select the corrupt Excel file by using the ‘Browse’ option. If the file location is not available, then find the Excel file using the ‘Search’ option.

- Click ‘Repair’ to scan the corrupt file.

- Once the repair process is complete, verify the components of Excel file and check if the available preview shows complete data that disappeared from Excel.

- Save file at default location or preferred location.

The Excel file with all the restored data will be saved at the selected location.
Conclusion
It is better to repair the affected Excel file than suffer the loss when data or text disappears in Excel. A professional software ensures that users get back all the data in the form of a new Excel file. Stellar Repair for Excel software repairs the corrupt file without modifying the original content and file format. The software’s easy-to-use user interface lets you perform the functions without formal software training and technical expertise.
How to Repair Corrupt Excel Workbook?
Summary: Corruption in an Excel workbook could lead to data loss. This blog outlines the possible reasons behind corrupted workbook and describes how to repair the workbook manually and using an Excel repair tool.
Is your Excel behaving differently, for instance, stops responding or freezes? Or have you encountered a warning or an error message indicating corruption in the Excel workbook?
Figure 1 - Corruption Warning in Excel: The corrupt workbook cannot be opened or repaired
Figure 2 - Excel File Corruption Message
In any of these situations, you won?t be able to open your Excel workbook.
TIP! If you?re unable to open an Excel workbook, it does not necessarily mean that the workbook is corrupt. Try a few workarounds to resolve the issue, like disabling the ?Protected View Settings?, disabling add-ins, or moving the workbook to another drive.
You will need to repair the corrupted Excel workbook to make it usable. Before discussing the repair methods, let?s first look at the possible reasons behind file corruption.
To jump to methods to repair the workbook, click here .
Possible Reasons behind Corrupted Excel Workbook
- Large size of a workbook: A workbook containing lots of information or objects like images, shaded cells, or other visual representations is prone to corruption.
- Unexpected system shutdown or power loss: If you haven?t saved your Excel file, abrupt system shutdown or power failure can corrupt the data and render the file inaccessible.
- Bad sectors on storage media: Accumulation of bad sectors on storage media on which Excel files are saved is another reason that may lead to Excel file corruption.
Other common reasons causing Excel file corruption are virus attack, network errors, etc.
Methods to Repair Corrupted Excel Workbook
Note: Repairing the corrupt workbook may result in data loss. And so, it?s recommended to back up the workbook before attempting to repair the file.
Method 1 ? Repair the Excel Workbook Manually
Use the Excel ?Open and Repair? feature to repair your corrupt workbook manually. Here?s how:
Step 1: In Excel, click the File tab and then click Open.
Step 2: Select the corrupt Excel file, click the arrow button next to the Open button and then select Open and Repair.
Figure 3 - Excel Open and Repair Feature
Step 3: In Microsoft Excel dialog box that opens, click Repair to begin repairing your corrupt workbook.
Figure 4 - Repair the Microsoft Excel File
Note: If the Excel repair process fails, repeat Steps 1 till 3 and click the ?Extract Data? button. This will help you extract values and formulas from the corrupted workbook.
Performing these steps will repair your Excel file. If the issue persists, skip to the next method.
Method 2 ? Use Excel File Repair Software
If the above method failed to fix corruption in the workbook, use Excel file repair software to repair your workbook quickly. This Excel repair tool is purpose-built to help users repair large-sized Excel files (.xlsx and .xls) in just a few clicks. Also, it helps recover all the data from the corrupted workbook while preserving the cell formatting and worksheet properties.
Steps to Repair Corrupt Excel File Using the Software
Step 1: Download, install, and open Stellar Repair for Excel software.
Free Download for windows ](https://tools.techidaily.com/stellardata-recovery/repaire-for-excel/ )
Step 2: Click Browse to select your corrupted .xlsx or .xls file. If you are not aware of the file location, click Search to locate and select the file.
Figure 5 - Select Corrupt Excel Workbook
Step 3: Once the file is selected, click Repair.
Step 4: A preview of recoverable workbook data gets displayed.
Figure 6 - Preview of Recoverable Excel Workbook Data
Note: You will need to activate the licensed version of Stellar Repair for Excel software for saving the repaired file. Once activated, proceed with the steps below to save the repaired file.
Step 5: Click Save File on the File menu. This will open a Save File dialog box with options to save the repaired .xlsx/.xls file at default or new location. After choosing the appropriate option, click OK.
Figure 7 - Save Repaired Excel File
The repaired file will get saved at the selected location.
Key Features of Stellar Repair for Excel Software
- Repairs severely corrupt Excel file and recovers pivots, pivot tables, conditional formatting rules, chart, chart sheets, etc.
- Can repair multiple Excel files in a batch simultaneously
- Can handle all types of Excel file corruption errors, like ?Excel found unreadable content in filename.xls?, ?Excel cannot open the file filename.xlsx?, etc.
- Supports repairing corrupt workbooks of Excel 2019, 2016, 2013, 2007, 2003, and lower versions.
End Note
If your Excel workbook has turned corrupt, try using the methods discussed in this blog to repair the workbook. Once it is repaired, you must follow preventive measures to avoid your Excel file from getting corrupt. Some of these measures are as follows:
Reduce the size of your workbook by:
- Removing unused data
- Saving images at lower resolutions
- Avoid saving pivot table cache
Turn on the ?AutoRecover? and ?AutoSave? features in Excel
[Fixed] Excel VBA Runtime Error 9: Subscript Out of Range
Summary: The runtime error 9 in Excel usually occurs when you use different objects in a code or the object you are trying to use is not defined. This post will discuss the reasons behind the Excel VBA error “Subscript out of Range” and the solutions to resolve the issue. It will also mention an Excel repair tool that can help fix the error if it occurs due to corruption in worksheet.
Many users have reported encountering the error “Subscript out of range” (runtime error 9) when using VBA code in Excel. The error often occurs when the object you are referring to in a code is not available, deleted, or not defined earlier. Sometimes, it occurs if you have declared an array in code but forgot to specify the DIM or ReDIM statement to define the length of array.
Causes of VBA Runtime Error 9: Subscript Out Of Range
The error ‘Subscript out of range’ in Excel can occur due to several reasons, such as:
- Object you are trying to use in the VBA code is not defined earlier or is deleted.
- Entered a wrong declaration syntax of the array.
- Wrong spelling of the variable name.
- Referenced a wrong array element.
- Entered incorrect name of the worksheet you are trying to refer.
- Worksheet you trying to call in the code is not available.
- Specified an invalid element.
- Not specified the number of elements in an array.
- Workbook in which you trying to use VBA is corrupted.
Methods to Fix Excel VBA Error ‘Subscript out of Range’
Following are some workarounds you can try to fix the runtime error 9 in Excel.
Method 1: Check the Name of Worksheet in the Code
Sometimes, Excel throws the runtime error 9: Subscript out of range if the name of the worksheet is not defined correctly in the code. For example – When trying to copy content from one Excel sheet (emp) to another sheet (emp2) via VBA code, you have mistakenly mentioned wrong name of the worksheet (see the below code).
1 | Private Sub CommandButton1_Click() |

When you run the above code, the Excel will throw the Subscript out of range error.
So, check the name of the worksheet and correct it. Here are the steps:
- Go to the Design tab in the Developer section.
- Double-click on the Command button.
- Check and modify the worksheet name (e.g. from “emp” to “emp2”).

- Now run the code.
- The content in ‘emp’ worksheet will be copied to ‘emp2’ (see below).

Method 2: Check the Range of the Array
The VBA error “Subscript out of range” also occurs if you have declared an array in a code but didn’t specify the number of elements. For example – If you have declared an array and forgot to declare the array variable with elements, you will get the error (see below):

To fix this, specify the array variable:
1 | Sub FillArray() |
Method 3: Change Macro Security Settings
The Runtime error 9: Subscript out of range can also occur if there is an issue with the macros or macros are disabled in the Macro Security Settings. In such a case, you can check and change the macro settings. Follow these steps:
- Open your Microsoft Excel.
- Navigate to File > Options > Trust Center.
- Under Trust Center, select Trust Center Settings.
- Click Macro Settings, select Enable all macros, and then click OK.

Method 4: Repair your Excel File
The name or format of the Excel file or name of the objects may get changed due to corruption in the file. When the objects are not identified in a VBA code, you may encounter the Subscript out of range error. You can use the Open and Repair utility in Excel to repair the corrupted file. To use this utility, follow these steps:
- In your MS Excel, click File > Open.
- Browse to the location where the affected file is stored.
- In the Open dialog box, select the corrupted workbook.
- In the Open dropdown, click on Open and Repair.
- You will see a prompt asking you to repair the file or extract data from it.
- Click on the Repair option to extract the data as much as possible. If Repair button fails, then click Extract button to recover data without formulas and values.
If the “Open and Repair” utility fails to repair the corrupted/damaged macro-enabled Excel file, then try an advanced Excel repair tool, such as Stellar Repair for Excel. It can easily repair severely corrupted Excel workbook and recover all the items, including macros, cell comments, table, charts, etc. with 100% integrity. The tool is compatible with all versions of Microsoft Excel.
Conclusion
You may experience the “Subscript out of range” error while using VBA in Excel. You can follow the workarounds discussed in this blog to fix the error. If the Excel file is corrupt, then you can use Stellar Repair for Excel to repair the file. It’s a powerful software that can help fix all the issues that occur due to corruption in the Excel file. It helps to recover all the data from the corrupt Excel files (.xls, .xlsx, .xltm, .xltx, and .xlsm) without changing the original formatting. The tool supports Excel 2021, 2019, 2016, and older versions.
Repair Files using Stellar Toolkit for File Repair
Stellar Toolkit for File Repair Technician
The main interface of Stellar Toolkit for File Repair comprises four modules to repair MS Office and PDF files. These modules are:
- Repair Document
- Repair Spreadsheet
- Repair PowerPoint
- Repair PDF
Click on the desired tab to repair that file format.
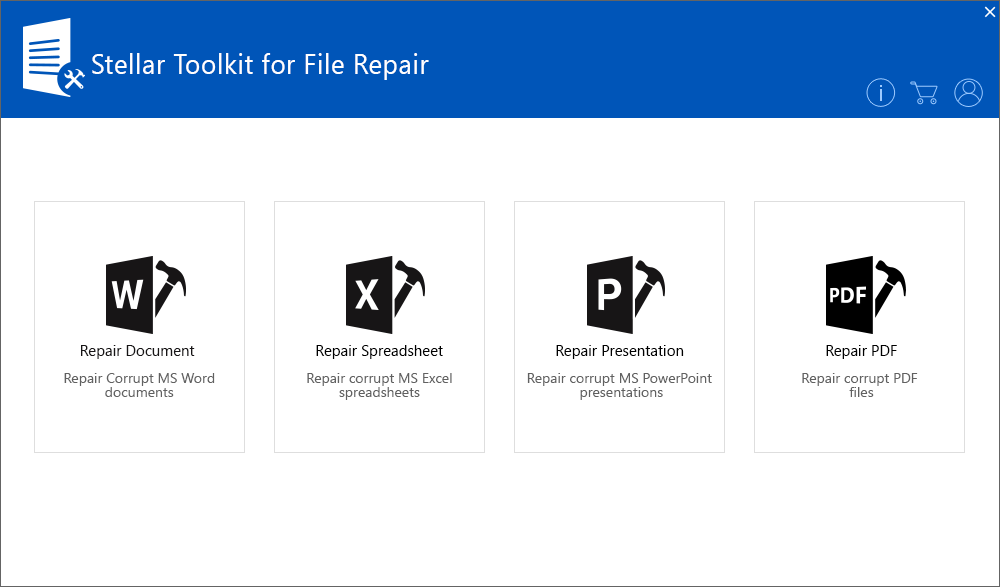
Figure 1 - Illustrates Homepage of the Stellar Toolkit for File Repair
Steps to Repair MS Word – .doc/.docx file
- Click Select File to select a single corrupt Word (.doc/.docx) file that you want to repair. Alternately, click Select Folder for selecting all Word files in a single folder.
Note: Click Find file(s) to search for the Word file, if the location is not known.
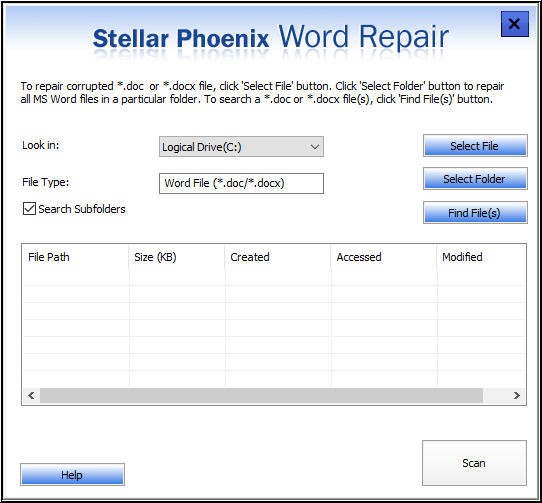
Figure 2 - Illustrates Selection of single doc/.docx file or multiple files
- Once the file is selected, click the Scan button to scan and repair the file.
- A preview of the repaired Word file is displayed on the screen. Verify the file contents from the right pane of the preview window.
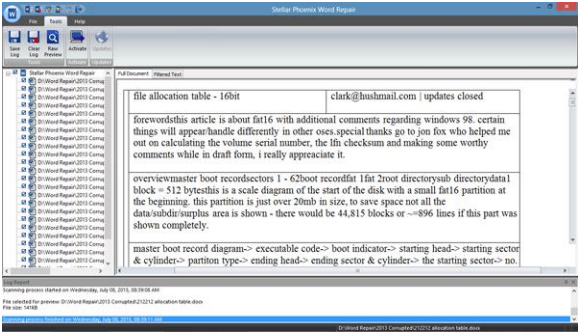
Figure 3 - Preview of Repaired Word Document
Note: If you’re unable to repair a corrupt .doc file, select ‘Advance Repair’ option from the File menu for repairing the .doc files.
- Click the Save icon on the File menu to save the repaired file.

Figure 4 - File Menu
In Save Document dialog box that appears, do the following:
Select default location or a new folder to save the repaired file.
Save the file in any of these formats: ‘Full Document’, ‘Filtered Text’ or ‘Raw Text’.
Click OK.
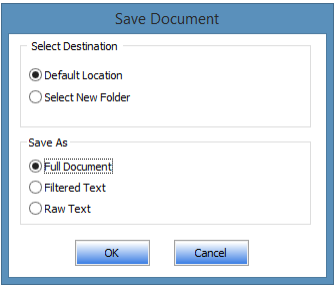
Figure 5 - Word Document Saving Options
The repaired file will be saved at your preferred location.
Steps to Repair Excel – .xls/.xlsx files
- In Select File window, click Browse to select the corrupt Excel file from the desired location. If you do not know the file location, click Search to find and select the corrupted spreadsheet.
- Once the Excel file is selected, start repairing the file by clicking the Repair button.
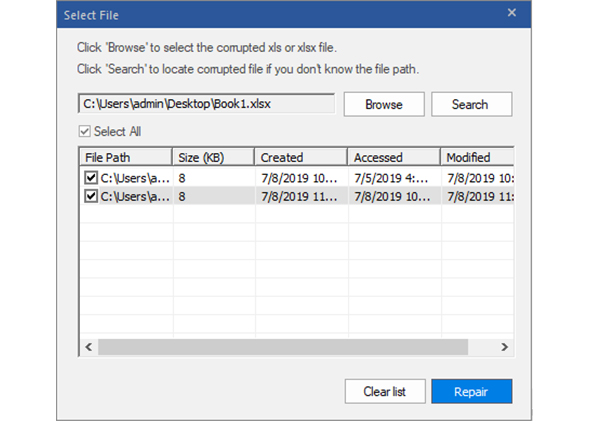
Figure 6 - Illustrates selection of one xls/xlsx file or multiple files in a folder
- After completion of the repair process, the software displays the repaired Excel file and its recoverable data in a preview window.
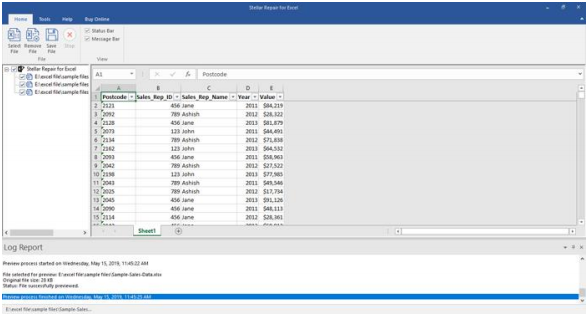
Figure 7 - Preview of Excel File
- Click on Save File icon on Home menu to save the repaired file.
- In Save File dialog box, choose Default location or Select New Folder for saving the file.
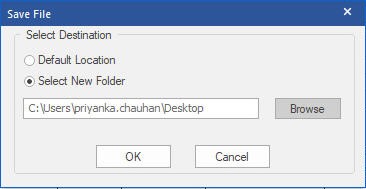
Figure 8 - Select Destination to Save Repaired Excel File
- Click OK to proceed with the saving process.
The repaired file gets saved at the preferred location.
Note: To recover the Engineering formulae, include ‘Analysis ToolPak’ Add-in.
Steps to Repair PowerPoint – ppt/pptx/pptm file
- Click Browse to select the corrupt PowerPoint file. Alternately, click on Search to search for the file, if the location is not known.
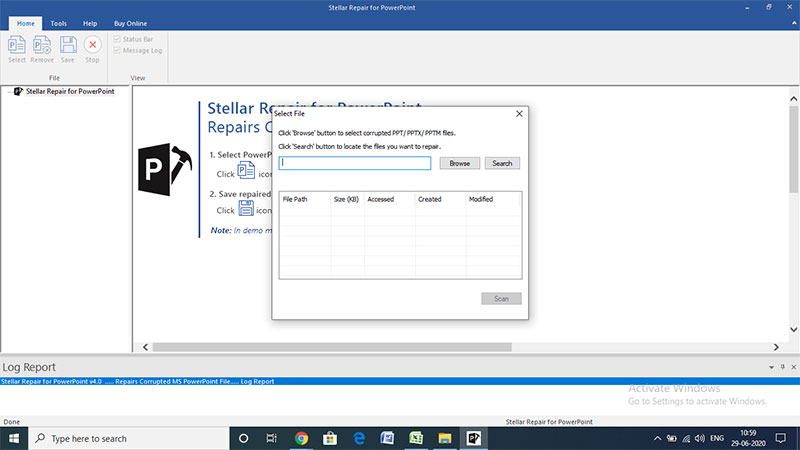
Figure 9 - Illustrates Selection of Single PowerPoint Presentation
- Once the corrupt PowerPoint file is selected, click Scan for scanning and repairing the file.
- A preview of scanned file gets displayed. Verify the file contents from the preview window.
- Click Save on Home menu to save the repaired PPT file.
- From the Save File dialog box, click Default location or Other location under Save As for saving the file.
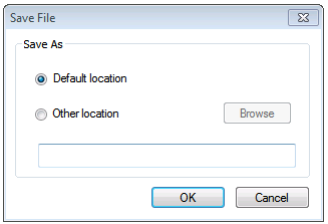
Figure 10 - Select Location to Save PPT File
- Click on the OK button and the repaired file is saved at preferred location.
Steps to Repair PDF file
- From the Stellar Repair for PDF main interface window, click Add File to select a single or multiple PDF files you want to repair.

Figure 11 - Illustrates adding of corrupt PDF Files
- A screen with recently added PDF file is displayed. Select the file and click Repair to start repairing it.
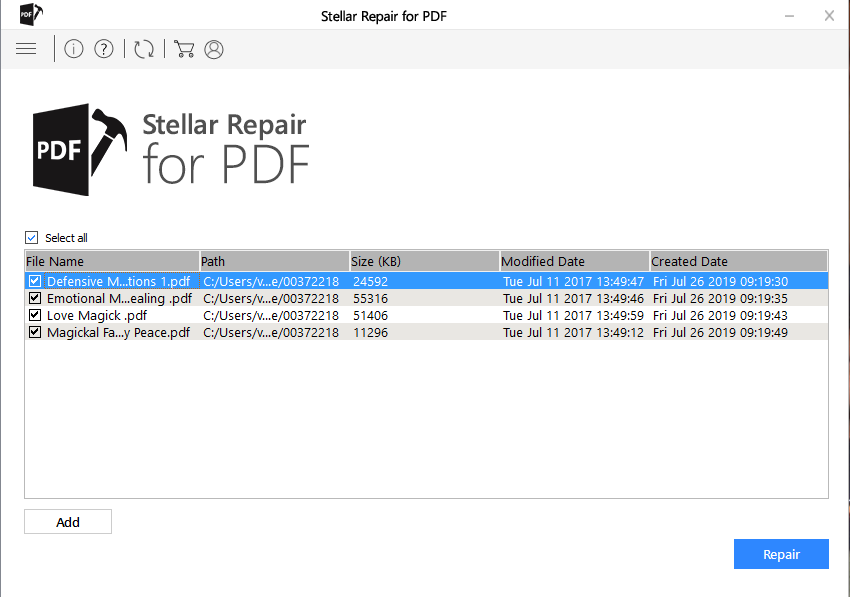
Figure 12 - Repair the Selected PDF File
- A screen showing the progress of the repair process appears.
- When the ‘Repair Complete’ window pops-up, click OK.
- Preview the repaired PDF file.
- Click the Save Repaired Files button to save the repaired file.
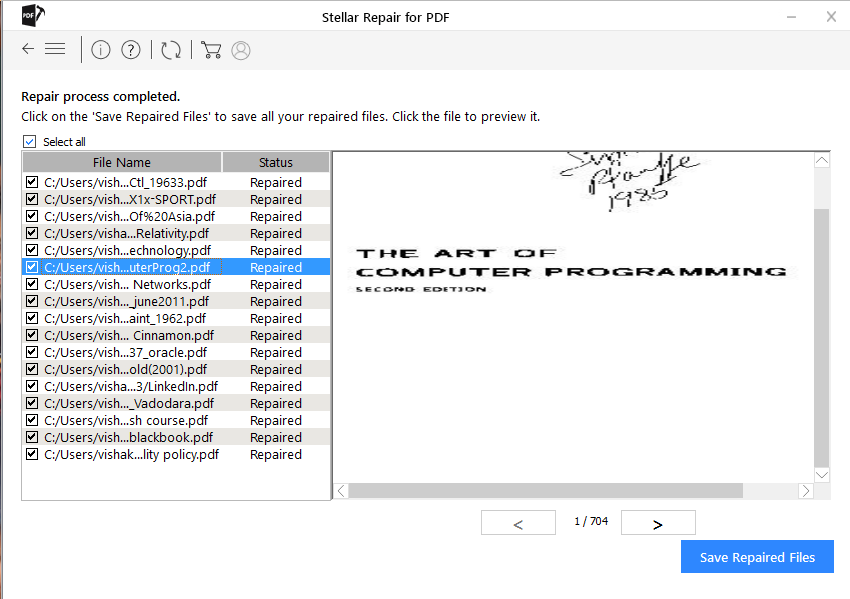
Figure 13 - Save Repaired File
- In Browse for Folder dialog box, select a folder for saving the file.
- From the Saving Complete dialog box, click the hyperlink to the folder containing the repaired PDF file.
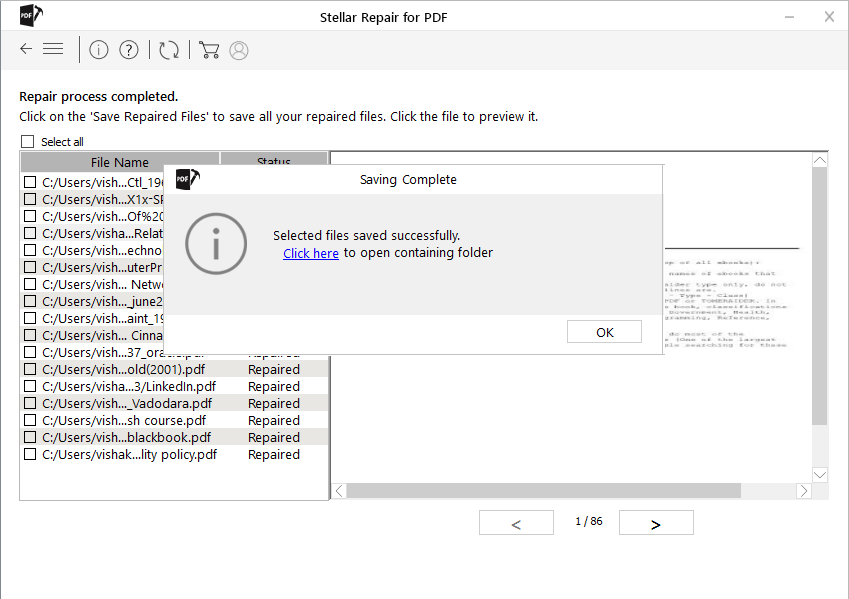
Figure 14 - Saving Complete Window
- Click OK.
How to Fix the #Value! Error in Excel?
Summary: #Value! is a common error that occurs when using formulas in Excel. It can be due to an issue with the cells you are referencing or use of formulas in the wrong type or format. This blog will discuss some cases when this error may occur and the solutions to fix the issue. You’ll also find about an Excel repair software that can help fix the error if it has occurred due to corruption in Excel file.
You may experience the #Value! error in Excel when trying to enter invalid data type into the formulas. Sometimes, it appears when a value is not the expected type or when dates are given a text value. This Excel error may occur due to several reasons. However, the exact cause of this error is difficult to find. Below, we will be discussing some cases where you may get this error and the solutions to resolve the issues.
Case 1: Wrong Argument Data Type in Formulas
Sometimes, Excel throws the “#Value!” error if it recognizes incompatible arguments in the formulas.
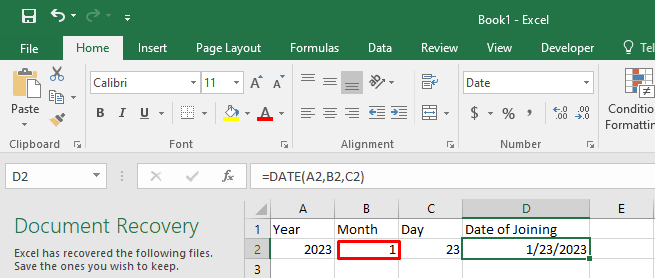
For example: The Date function in the sheet expects only numerical values as arguments. In the below image you can see that when the formula’s string value is used in the month (January), it resulted in the #VALUE! error.

Solution
To fix the issue,
- Double-click the formula to verify the type of arguments.

- Correct the argument in the cell (B2).
The formula will work as expected.
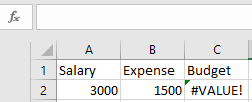
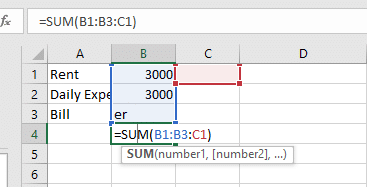
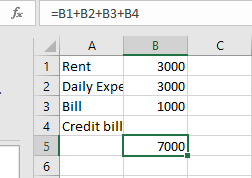
Case 2: Using the Basic Subtraction Formula
Users often experience the #Value! error, when using the basic subtraction formula in Excel.
Solution
Check the formula and the type of values in the cell. If these are correct and the error persists, then follow these steps:

- Go to the Start button on Windows, type Control Panel, and double-click on it.
- Click Clock and Region > Region.

- On the Format tab, click Additional Settings.
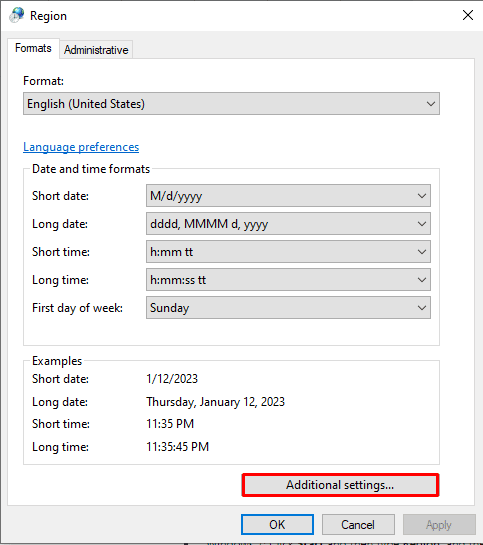
- In the Customized Format window, search for List Separator.
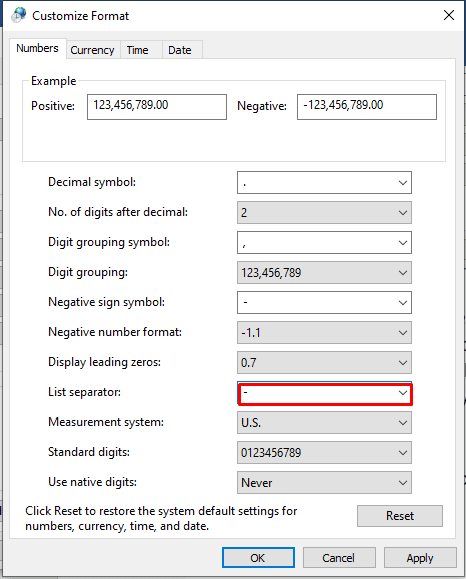
- Check if the List Separator is set to minus (-). Change it to comma (,).
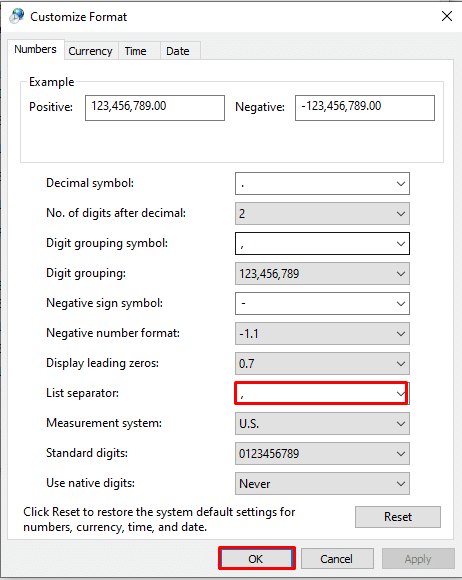
- Click OK.
- Now, open the Excel file and again try to use the formula.
Case 3: Wrong Text Value
The #Value! error can also occur due to the formula’s wrong value.
For example: If you are using the formula to add values in cells and Excel recognizes the unexpected text value, you may get a #Value error.

Solution
To fix the issue, you can correct the value or use the SUM function. It is recommended to use functions instead of operations to reduce the errors. In Excel, the formulas with math operators may not able to calculate the text in the cells. The SUM function automatically ignores the text value(er), calculates everything as numbers, and displays the result without the #Value! error.
Case 4: Blank Space in Cells
You may get the #Value! error if your formula refers to other cells with space or hidden space. Sometimes, spaces that make a cell display blank but actually they are not blank.

Solution
You can either delete the space or replace the blank space. Here’s how:
1. Delete the Blank Space
First, check if a cell is blank or not. To do this,
- Select the cell that looks blank.
- Press F2.

The blank cell won’t show space.
Then, press the Backspace key to delete the space. It will fix the error.
2. Replace Blank Space
You can also use the “Find and Select” option to replace the blank space in Excel. Here are the steps:
- Open the Excel file that shows #Value! error.
- On the Home tab, click Find & Select > Replace.

- In the Find what field, type a single space and delete everything in the “Replace with” field.
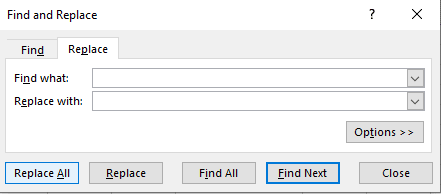
- Click Replace All > OK.

Case 4: Problem with Network Connection
Many users have reported experiencing errors when using Excel online due to problems with the network connection.
Solution
Check your Internet connection and see if it is working properly.
Case 5: Wrong Formula Format
If you enter the wrong formula with a missing parenthesis or comma, then Excel can throw the #Value! error. The error can also occur if the application finds a special character within a cell.
Solution
Correct the formula and use the ISTEXT function to find the cells with issues.
Case 6: Corruption in the Excel File
If none of the above works, then it indicates the Excel file is corrupt. The formulas in the Excel file do not work due to corruption.
Solution
You can use the Open and Repair utility in Excel if you are getting the error due to corruption in Excel file. In case the utility fails or the Excel file is severely corrupt, you can use a third-party Excel repair software, such as Stellar Repair for Excel. It is a powerful tool to repair corrupted or damaged Excel files and recover all its data, with 100% integrity. The tool supports Excel 2019, 2016, and older versions.
Closure
There are several reasons that can trigger Excel to throw the #Value! error. It can occur if there is an incorrect argument data type in formulas or blank space, text, or special characters within a cell. This blog discussed the possible scenarios when this error occurs. You can apply the solutions mentioned above to fix the error. If the #Value! error occurs due to corruption in the Excel file, then you can use Stellar Repair for Excel . It is a reliable tool that helps in fixing corruption-related errors in Excel.
Resolve Compile Error in Hidden Module in Excel: Causes & Solutions
The hidden module in Excel refers to a container with VBA codes, custom queries, and complex macros. The compile error in a hidden (protected) module in the Excel worksheet usually occurs when doing different activities on a macro-enabled sheet, such as merging .xls files. The error can result in macros execution failure. You need to quickly resolve this compile error to restore full functionality of the VBA code. Below, we’ll be discussing the solutions to fix this Excel error. But before that, let’s see why this error occurs.
You may encounter the Compile error in hidden module due to one of the following reasons:
- The code in the workbook is not compatible with the Excel application.
- Manual queries created in a previous version are no longer compatible with your current version of Excel.
- Missing references.
- Invalid .exe files (control information cache files) are automatically created with ActiveX control insertion in Excel file.
- Protected module is corrupted.
- The workbook with hidden module is damaged or corrupted.
- Incompatible add-ins.
- Incompatible Excel file version.
- The module is protected or password-protected.
- Missing or corrupted mscomctl.ocx file.
Excel can throw the compile error while compiling the code that exists in the protected module. So, first check the error and identify the hidden module that is creating the issue. You can unprotect the module. Also, ensure that you have permission to access the VBA code in the module. If the error still exists, follow the below troubleshooting methods.
Method 1: Re-register ActiveX Control Files or mscomctl.ocx Files
You can get the compile error in the Excel file, containing the VBA code related to ActiveX controls or OCX files. The ActiveX control files and OCX files (mscomctl.ocx files) are the components of Microsoft’s standard controls library. The compile error in the hidden module can occur if these files are missing. In this case, you can use the Regsvr32 tool to re-register the OCX files. The Regsvr32 is a command-line utility to register and unregister OLE controls in the Windows registry.
Method 2: Delete .exd Files
The .exd files are temporary files created by Excel when inserting ActiveX controls objects. These temporary files can lead to a compile error if they are corrupted. So, if this issue has occurred, particularly in the Excel file containing ActiveX controls, then deleting .exd files might fix the issue. To delete the .exd file, follow the below steps:
- First, open the Run window by pressing the Windows+R keys.
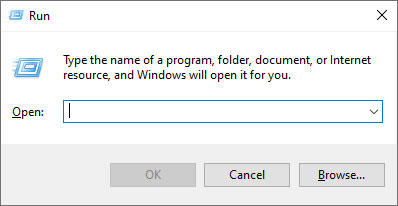
- In the Run window, type %appdata%.
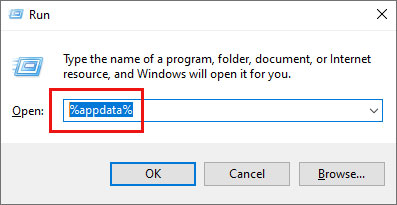
- In the Roaming window, click on the Microsoft option.
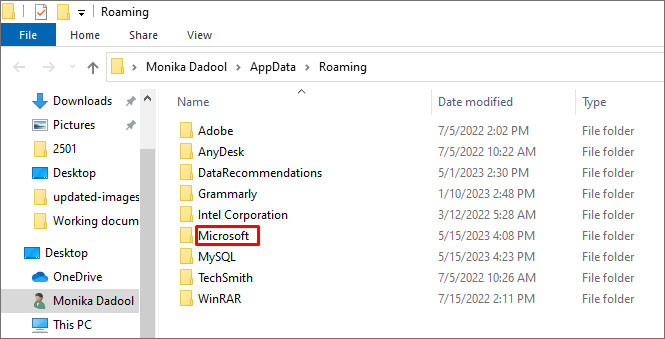
- Under Microsoft, you will see a list of folders. Search and click on Forms.
- Right-click on a file with .exd extension and select Delete.
- Once you delete the .exd files, restart your Excel application.
Method 3: Rollback the Office Updates
MS Office updates or upgrades may also cause the compile error in hidden module in Excel. If the error has occurred after downloading the recent Microsoft Office updates, try reverting to the previous version or uninstalling the recent updates to fix the issue.
Method 4: Unselect Missing References
The compile error in hidden module determine path in Excel can also occur if your file contains a reference to object library/type library, which is labelled as Missing. You can locate, check, and uncheck the references marked as ‘Missing’ to fix the issue. Here are the steps:
- Open your Excel and press Alt + F11 keys.
- The Visual Basic Editor is displayed.

- Go to the Tools option and then click References.
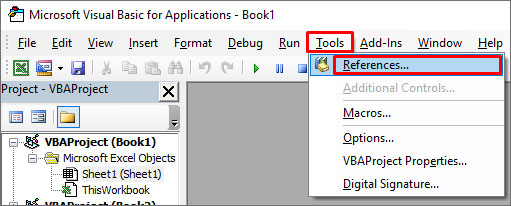
- In the References-VBAProject window, under Available References, search and unselect the references starting as “Missing”.
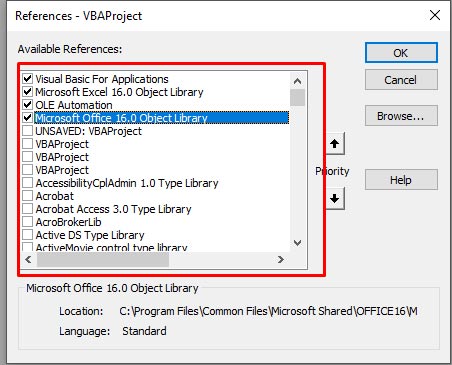
- Click OK.
Method 5: Check the Code in Module
The compile error in hidden module can occur if there are issues in the code within the module. The problems include incorrect or missing syntaxes, missing parameters/references, or the code contains incompatible functions or a wrong name of the object. You can check and fix these issues in the code by opening the VBA editor.
Method 6: Check and Remove Add-ins
In Excel, the compile error in macro-enabled files can also occur due to incompatible add-ins. You can check and disable the add-ins in Excel using the below steps:
- First, open the Run window and type excel /safe and then click OK. The Excel application will open in safe mode.
- Now try to open the affected Excel file. If it opens without the error, then check and remove the latest installed Excel add-ins.
- Navigate to the File option and then select Options.
- In the Excel Options window, click Add-ins.
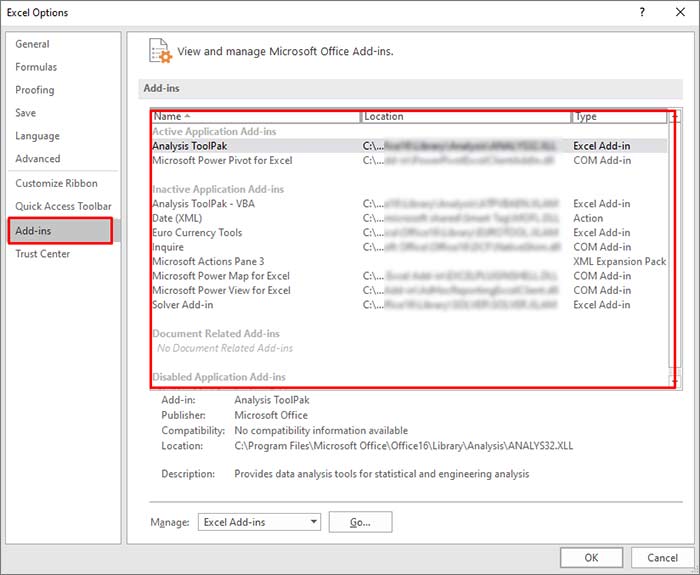
- Under Add-ins, search and select the latest add-ins, and then click on Go.
- In the Add-ins window, uncheck the add-ins and then click OK.

- Restart Excel and then check if the error is fixed or not.
Method 7: Repair the Corrupt Excel File
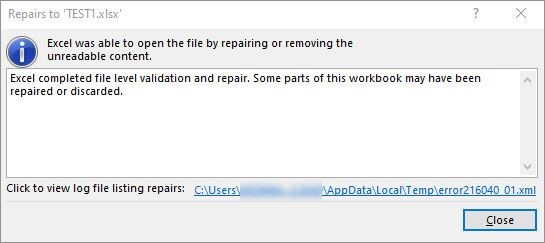
Corruption in the Excel file can affect the macros in the hidden module, which may result in the compile error. In such a case, you can try repairing the Excel file using Microsoft’s inbuilt utility -Open and Repair. To use this tool, follow these steps:
- Open your Excel application.
- Click the File tab and then click Open.
- Click Browse to select the affected workbook.
- The Open dialog box will appear. Click on the corrupted file.
- Click the arrow next to the Open button and then Open and Repair.
- You will see a dialog box with three buttons - Repair, Extract Data, and Cancel.

- Click on the Repair button to recover as much of the data as possible.
- After repair, a message is displayed. Click Close.
What if None of the Above Solutions Works?
If the above methods fail to get rid of the “compile error in hidden module” in Excel, then use an Excel repair tool such as Stellar Repair for Excel. This tool is specifically designed to repair the corrupted Excel file. It can recover all the components from corrupted Excel file (macros, queries, formulas, etc.) without changing their original formatting. The tool is compatible with all Excel versions and can be downloaded on a Windows system. You can download the free trial version of Stellar Repair for Excel to scan the corrupted Excel file and preview the data.
Closure
You can get the “compile error in hidden module” when Excel detects any issue while compiling the code in a protected module. It can occur when there is an issue with the macro-enabled Excel workbook or Excel add-ins. You can follow the above-mentioned methods to fix the issue. If the error occurs due to corruption in the database file, then you can try Stellar Repair for Excel . It can repair severely corrupted Excel files. It also helps recover all the Excel workbook’s components, including macros and queries. The tool has a simple and user-friendly interface.
- Title: How to Repair Corrupt Excel 2023 Workbook? | Stellar
- Author: Nova
- Created at : 2024-03-13 11:17:33
- Updated at : 2024-03-14 12:35:47
- Link: https://blog-min.techidaily.com/how-to-repair-corrupt-excel-2023-workbook-stellar-by-stellar-guide/
- License: This work is licensed under CC BY-NC-SA 4.0.
