
:max_bytes(150000):strip_icc():format(webp)/apple-tvos_a-star-is-born_060319-b01aea7d8a1949609359d8d96b1a22e0.jpg)
How to Repair Excel File Name is Not Valid Error | Stellar
How to fix Pivot Table Field Name is not Valid error in Excel?
The Pivot Table field name is not valid error can occur while creating, modifying, or refreshing data fields in the pivot table. It can also appear when using VBA code to modify the pivot table. It usually occurs when there is an issue with the field name in a code or if there is a hidden or empty column in the pivot table. However, there could be many other reasons behind this error.
Why the “Pivot Table Field Name is not Valid” Error Occurs?
You can get the “Pivot Table field name not valid” error in Excel due to several reasons. Some possible causes are:
- Excel file is corrupted
- Damaged fields in the pivot table
- Pivot table is corrupted/damaged
- Hidden columns in the pivot table
- Macro (referring to the pivot table) is corrupted
- Preserve formatting option is enabled
- Missing or incorrect fields in the VBA code
- Issue with workbook.RefreshAll method syntax (if using)
- Pivot Table contains empty columns
- Header values or header column is missing in the Pivot Table
- Pivot table is created without headers
- Columns/rows are deleted from the Pivot Table
Methods to Fix Pivot Table Field Name is not Valid Error in Excel
You can get this error if you have selected the complete data sheet and then trying to create the Pivot Table. Make sure you choose only the data fields that you want to insert in the Pivot Table. If this is not the case, then follow the troubleshooting methods mentioned below.
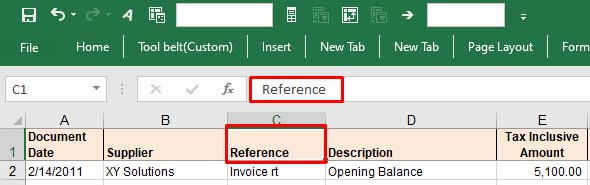
Method 1: Check the Header Value in the Pivot Table
The “Pivot table field name is not valid” error can occur if you have not set up the pivot table correctly. All the columns having data in them should have header and header values. A pivot table without a header value can create issues. You can check the header and its value from the Formula bar. Change the header if the header value is too lengthy or if it contains special characters.
Method 2: Check and Change the Data Range in the Pivot Table
The “Pivot Table field name is not valid” can occur while modifying a field in Pivot Table. It usually occurs if you’re trying to add or modify the field by selecting an incorrect data range in the Create PivotTable dialog box. The “Create PivotTable“ feature helps define how data would be displayed within the pivot table.
Let’s take a scenario to understand this. Open the Excel file with PivotTable. Click on the fields (you want to add), go to the Insert option, and click PivotTable.

If you select an incorrect range, i.e. A1:E18, instead of correct range - “Expenses**!$A$3:Expenses!$A$4**,” you will immediately get the error message.
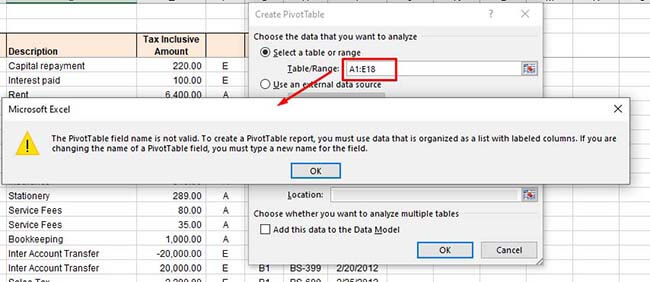
So, type the correct range under the Select a table or range option and click OK.
Method 3: Unhide Excel Columns/Rows
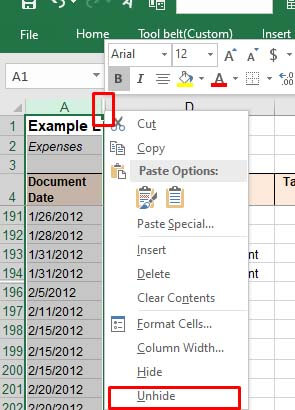
The error can also occur if some columns/rows of the Pivot Table’s data source are hidden. When you try to add a hidden column as a field in the PivotTable, the Excel application will fail to read the data of the hidden column. You can check and unhide the Excel columns by following these steps:
Open the Excel file.
Locate the hidden column number.
Move your cursor on the hidden column number and right-click on the space between the columns. Click Unhide.

Method 4: Check and Delete Empty Excel Columns
Sometimes, you can get the “Pivot Table field name is not valid” error if you are trying to use an empty column as a field in your Pivot Table. Check the columns with no values in all cells. If found, then delete the empty columns. This method is ideal for small-size Excel files. However, for large-sized files, it is a time-consuming process.
Method 5: Unmerge the Column Header (If Merged)
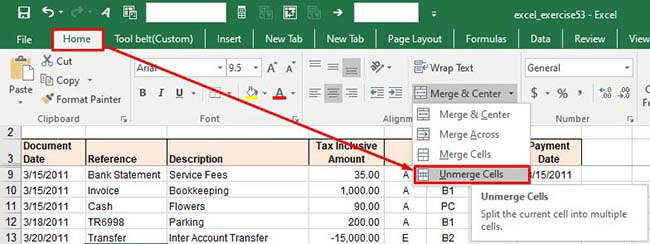
The “Pivot Table field name is not valid” error can also occur due to merged column headers. The pivot table references headers to identify the data inside the rows or columns. The merged headers can sometimes create data inconsistencies. You can try unmerging the column headers to fix the issue. Follow these steps:
In the Excel file, go to the Home
Click the Merge & Center option and select Unmerge Cells from the dropdown.
Method 6: Disable the Background Refresh Option
If the “background refresh” option in the Excel file is enabled, it may also create issues with Pivot Table. The Excel updates all the pivot tables in the background even after a small change if the background refresh option is enabled. This may create issues if the Excel file is large with too many tables. You can try turning off the “background refresh” option in the Excel file to troubleshoot the issue. Here is how to do so:
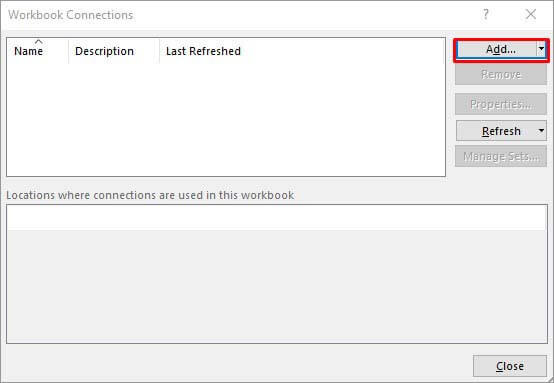
In the Excel file, go to the Data tab and then click Connections.
In the Workbook Connectionsdialog box, click on the ‘Add’ dropdown to add the workbook (in which you need to modify the refresh settings).
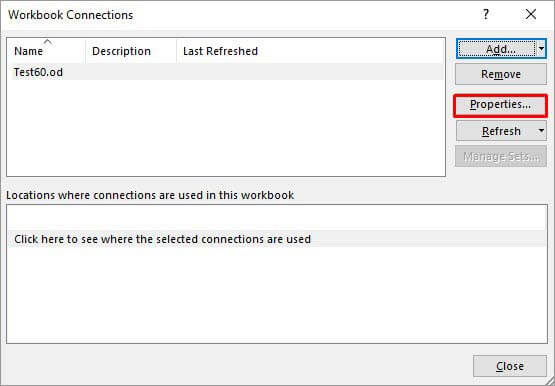
Once you have chosen the Excel file, click Properties.
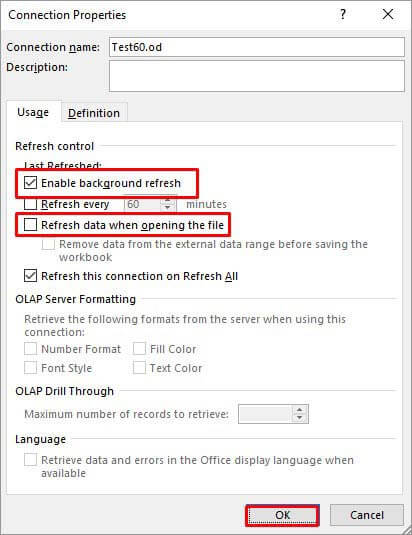
In the Connection Properties window, unselect the **”Enable background refresh”**option, select the “Refresh data when opening the file“, and click **OK.
**

Method 7: Check the VBA Code
The error can also occur when working with PivotTable using VBA code in Excel. Some Excel users reported this error on forums as run-time error 1004: The PivotTable field name is not valid. This error usually occurs when there are issues in the VBA code, affecting the PivotTable data source or field references. You can check field names referring to PivotTable or Workbook.RefreshAll function syntax and other errors in the code.
Method 8: Repair your Excel File
One of the reasons behind the “Pivot Table field name is not valid” error is corruption in the Excel file, containing the Pivot Table. You can repair your Excel file using Microsoft built-in utility - Open and Repair. Here’s how to use this utility:
In Excel, navigate to File > Open.
Click Browse to choose the affected workbook.
The Open dialog box will appear. Click on the corrupted file.
Click the arrow next to the Openbutton and then select Open and Repair.
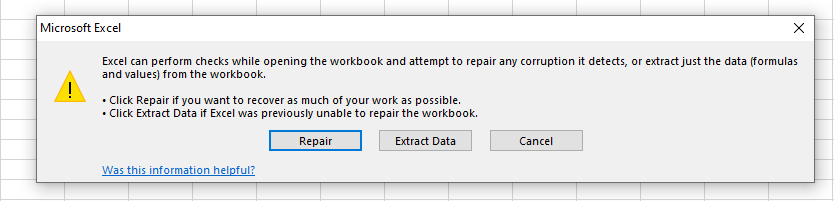
You will see a dialog box with three buttons - Repair, Extract Data, and Cancel.
Click on the Repair button to recover as much of the data as possible.
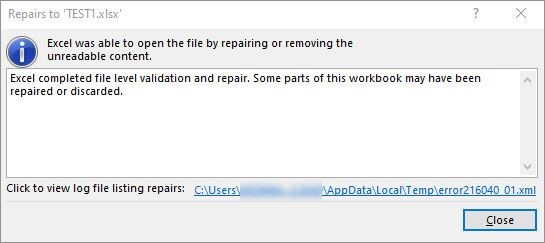
After repair, a message is displayed. Click Close.

Method 9: Use a Professional Excel Repair Tool
If the Excel file is heavily damaged or corrupted, then the “Open and Repair” utility may not work or provide the intended results. In such a case, you can opt for a professional Excel repair tool. Stellar Repair for Excel is an advanced Excel file repair tool, which is highly recommended by experts. It can repair severely corrupted Excel files and restore all the data from corrupt file, including pivot tables. This tool comes with a user-friendly interface that even a non-technical user can use. You can try the software’s demo version to check how it works. The software is fully compatible with all Excel versions, including Excel 2019.
Conclusion
The Excel error “Pivot Table field name is not valid” can occur due to hidden or merged column/row headers, empty columns/rows, corrupted pivot table, and various other reasons. You can try the methods mentioned above to fix the error. If this error has occurred due to corruption in the Excel file, then you can use Stellar Repair for Excel - an advanced tool to repair corrupted pivot table, macros, fields, or other elements in an Excel file. It is compatible with all Windows editions, including the latest Windows 11. It can help fix the error if the data source or Pivot table configuration is affected by corruption.
How to fix runtime error 424 object required error in Excel
The Runtime error 424: Object required occurs when Excel is not able to recognize an object that you are referring to in a VBA code. The object can be a workbook, worksheet, range, variable, class, macro, etc. Some users have also reported that this error occurred when they tried to copy the values of the cells from one workbook to another.
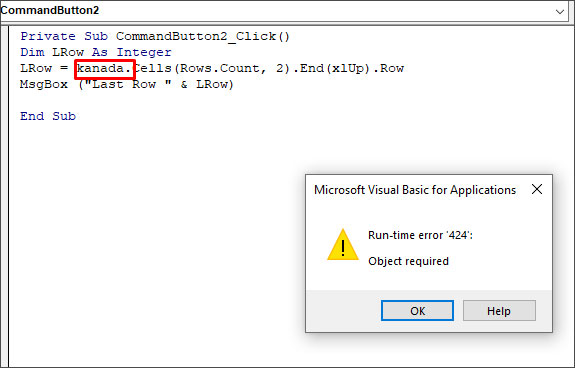
Let’s understand the error through a small scenario. Suppose, I want to check the last field row in a table in a spreadsheet named “First” using the VBA code. To do this, I have added a command button and double-clicked on it and entered the below code in the backend:
Private Sub CommandButton2_Click()
Dim LRow As Integer
LRow = Worksheets(“First”).Cells(Rows.Count, 2).End(xlUp).Row
MsgBox (“Last Row “ & LRow)
End Sub
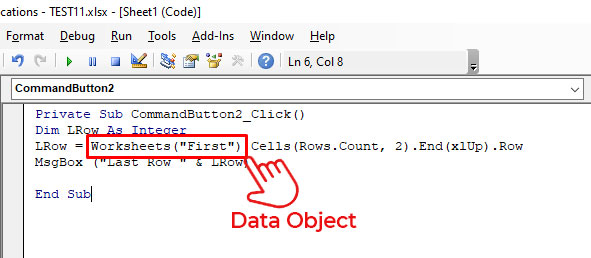
In this code, Worksheets(“First”) is a data object. If I mistakenly delete this data object and insert any random name (for example - kanada), then it will not be recognized by Excel. When I run this code, I will get the “Run-time error 424”.
Causes of Runtime Error 424 in Excel
The Runtime error 424: Object required can occur due to the following reasons:
- Incorrect name of the object you are trying to refer to in a code.
- You have provided an invalid qualifier to an object.
- You have not used the Set statement while assigning an object reference.
- The object is corrupted.
- Missing objects in a workbook.
- Objects you are trying to call in a code are mistakenly deleted or unavailable.
- You have used an incorrect syntax for object declaration.
- You are trying to perform an invalid action on an object in a code.
- Workbook is corrupted.
Solutions to Fix Runtime Error 424: Object Required in Excel
The VBA error ‘object required’ may occur due to different reasons. Based on the reason, you can follow the solutions mentioned below to fix the error.
1. Check the Name of the Object
The Runtime error 424 can occur when you run the VBA code using an incorrect name of the object. For example, the object name is ‘MyObject’ but you’re using “Backcolor”.
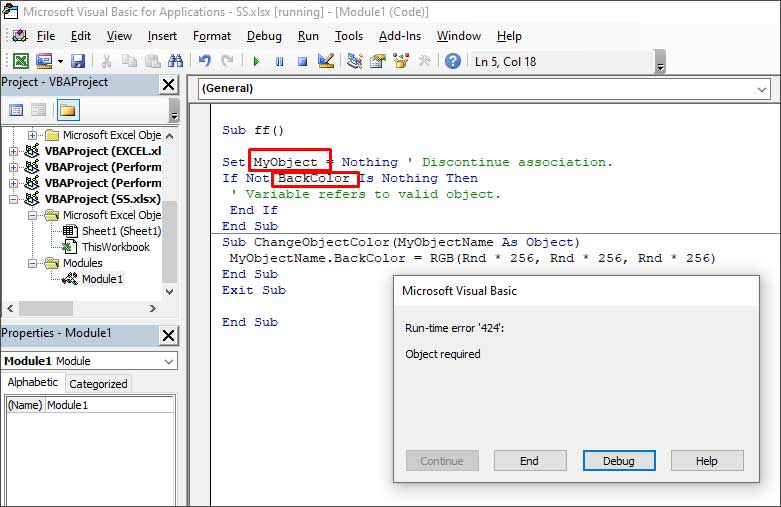
When you click the Debug button, the line with the error will highlight.

To fix the issue, you need to provide the correct name of the object.
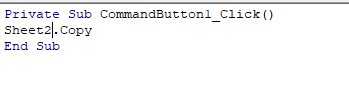
2. Check if the Object is Missing
The Runtime error 424 can occur if the object you are referring to as a method is not available or you are using the wrong object in a code. In the below example, you can see that the error occurs when an object named “Employee” is not available in the Project list.
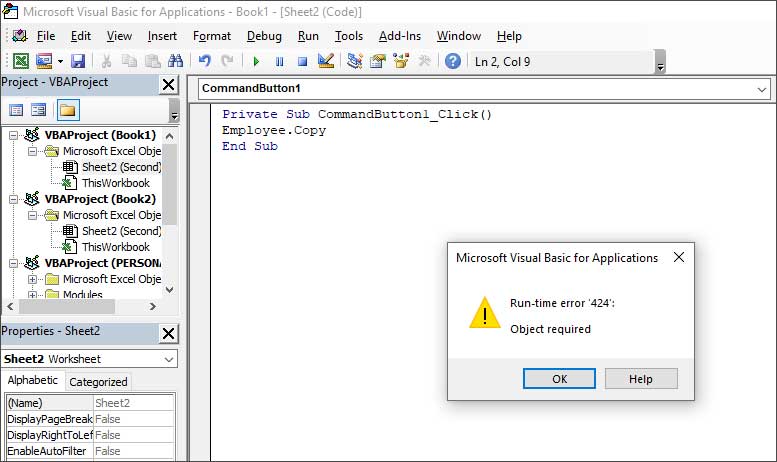
You can check and mention the object which is available. For instance, Sheet2 in the below code.
3. Check All References are Declared in the Code
You can get the Runtime error 424 if all the references are not declared. So, make sure you have declared all the references in the code. To verify this, you can use the debug mode by pressing F5 or clicking on the Debug option.

4. Check the Macro Security Settings
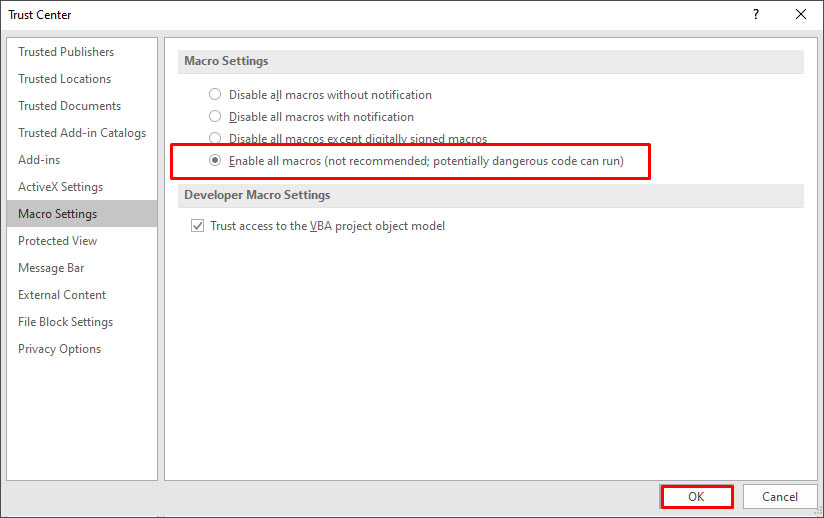
Sometimes, the error can occur if macros are disabled in the Macro Security settings. You can check and change the settings by following these steps:
- On the Developer tab, in the Code section, click Macro Security.
- In the Trust Center window, select Enable all macros.

- Click OK.
5. Repair your Workbook
Sometimes, the ‘Object required’ error can occur if your Excel file is damaged or corrupted. In such a case, you can try repairing the file using Microsoft’s in-built utility - Open and Repair. To use this utility, follow these steps:
- In Excel, go to File > Open > Browse.
- In the Open dialog box, click on the corrupted Excel file.
- Click the arrow next to the Open button and select Open and Repair from the dropdown.
- Select Repair to recover as much data from the file as possible.
If the Open and Repair utility fails or stops working, then you can try a professional Excel repair tool, such as Stellar Repair for Excel . It is an advanced tool that can repair severely corrupted Excel files (.xls, .xlsx, .xltm, .xltx, and .xlsm). It helps recover all the file components, including images, charts, tables, pivot tables, cell comments, chart sheets, formulas, etc., without impacting the original structure.
Conclusion
The Runtime error 424 usually occurs when there is an issue with the objects in your VBA code. In this article, we have covered some effective methods to resolve the “object required” error in Excel. If the error occurs due to corruption in Excel file, then you can repair the corrupt file using Stellar Repair for Excel. It is a reliable tool that can repair severely corrupted Excel file without changing its actual formatting. You can download the free trial version of the software to evaluate its functionality.
How Do I Repair and Restore Excel File?
When an Excel file turns corrupt, the file might become inaccessible or you might receive errors. You may encounter errors, such as ‘the file is corrupt and cannot be opened,’ ‘Excel found unreadable content in “filename>”,’ ‘Excel cannot open “filename” because the file format or extension is not valid,’ etc.
Common Reasons for Excel File Corruption
There are several reasons that can turn the file corrupt. The most common reason is a damaged hard drive. Other factors that can cause corruption in an Excel file are as follows:
- System crash or abrupt shutdown of the system while the file is still open
- Viruses infecting the file with malicious code
- Bug in the operating system
- Bad sectors on the drive where the file is stored
- Large spreadsheets with formulas and other components
Whatever be the reason, if your business is dependent on an Excel file, corruption in the file could hamper your business continuity. Also, you may lose crucial data. In such a situation, you could try to repair the file.
Before We Begin
It is important to identify the root cause behind Excel file corruption. If the problem has occurred due to a faulty hard disk drive, contact your hardware vendor to get it fixed. Also, move the file to another local drive and check if it opens. If nothing works, proceed with the methods discussed below to repair and restore the file.
Methods to Repair and Restore Excel File
Try the following methods to fix corruption in an Excel file and restore it.
Method 1 – Use the Built-in ‘Open and Repair’ Tool
You can use the Excel built-in Open and Repair utility to repair the corrupt file. Follow these steps:
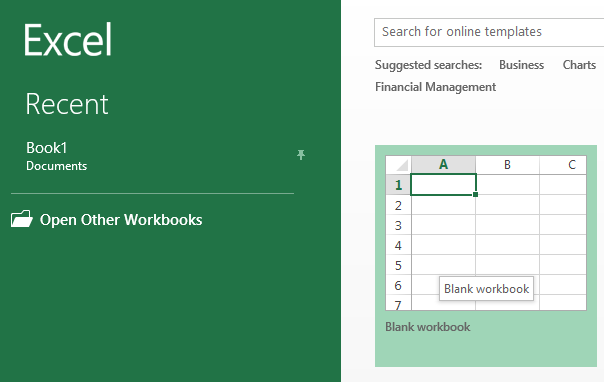
- Open your Excel application and click on Blank workbook.
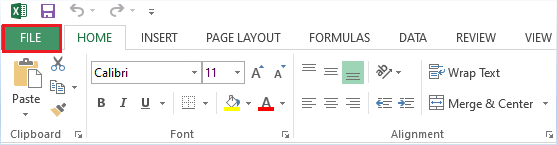
- On the blank workbook screen, click on the File tab.
- Click Open > Computer > Browse.
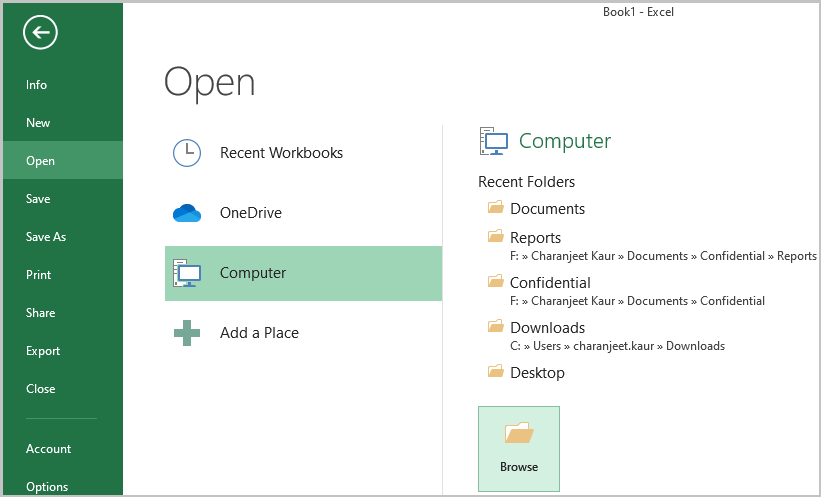
- Select the file you want to repair and then click on Open and Repair from the Open dropdown box.
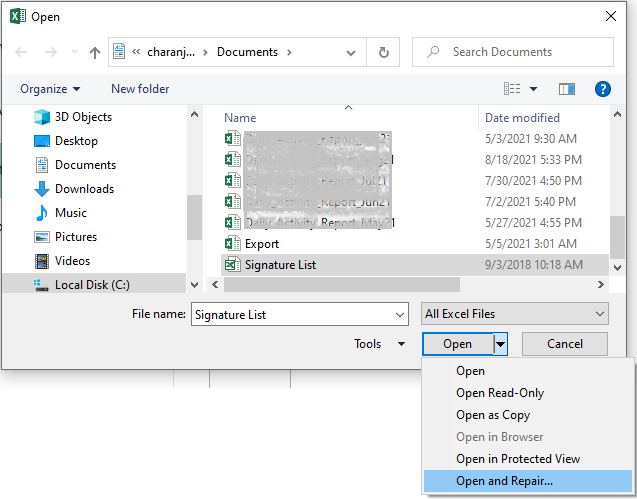
- Click Repair to fix corruption in the Excel file and recover maximum data.
- If you get the following error message, click Yes to open the file.

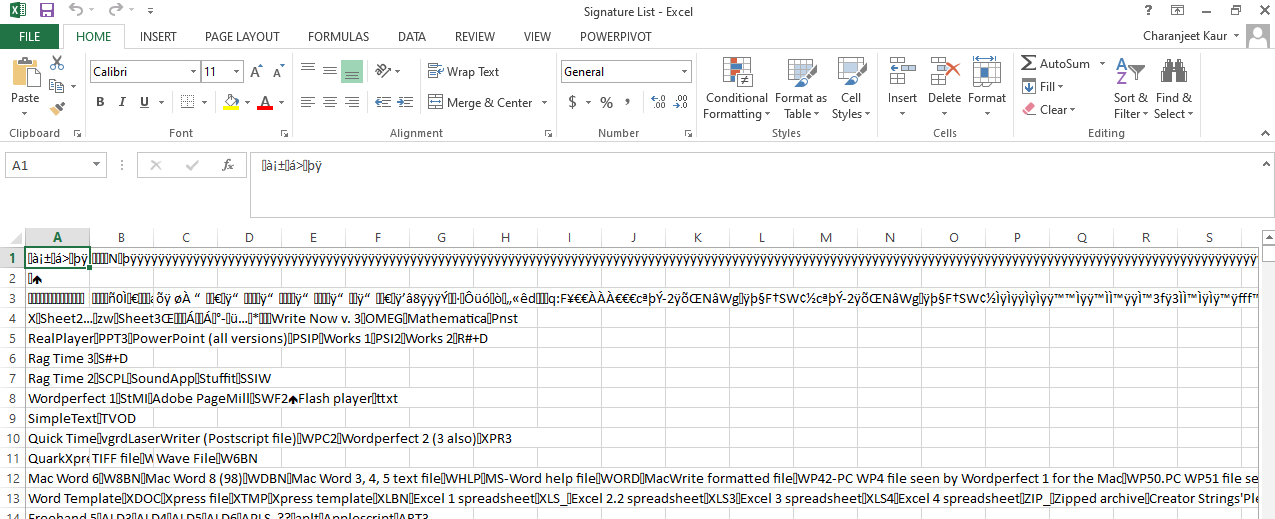
- If clicking Yes opens the file with garbage entries (see the image below), perform Step 1 – 5 and click Extract Data. This will only help you recover data without formulas and values.
Note: You may also try to recover the data from a corrupted workbook by using the methods suggested by Microsoft .
A better way to repair and restore an Excel file with complete data is to use a specialized Excel file repair tool .
Method 2 – Use Excel File Repair Tool
Stellar Repair for Excel is a powerful tool designed to help users fix corrupted .xls or .xlsx files without any technical assistance. Also, the tool recovers all the components from a corrupted workbook, including tables, pivot tables, cell values, formulas, charts, images, etc. You can preview the repaired file and its contents by downloading the free demo version from the link below. It is a useful feature that allows the user to validate the data before saving it.
[

](https://tools.techidaily.com/stellardata-recovery/repaire-for-excel/ “Free Download For Windows”)
Here’s the step-by-step instructions to repair a corrupt Excel file using the software:
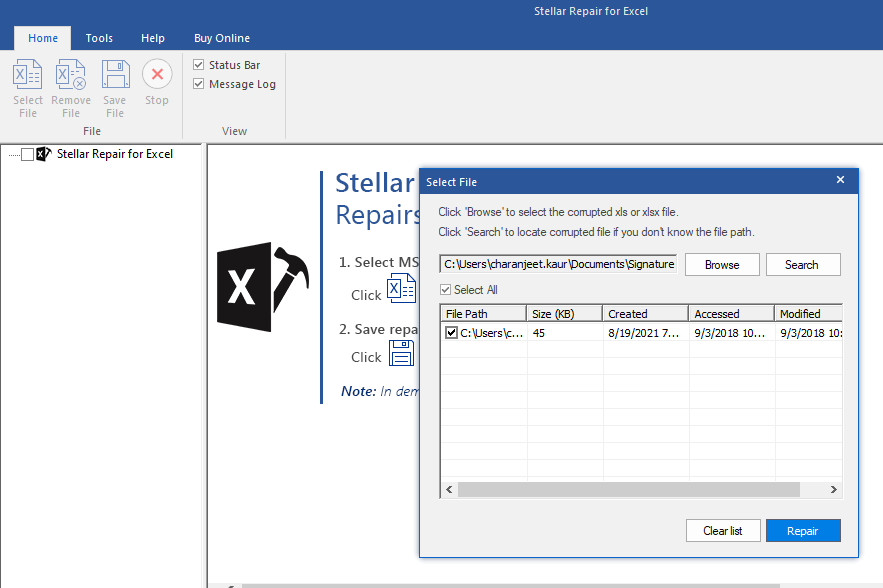
- Run the software. The software main interface opens with an instruction to add some add-ins if you’ve engineering formulas in the file you want to repair.
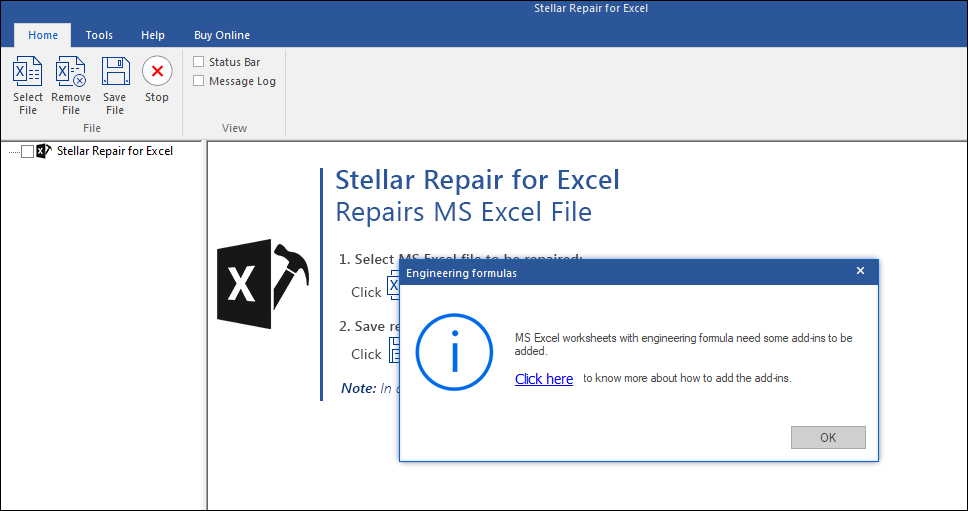
Click OK to proceed.
Select the file you wish to repair by using the Browse option.
Note: If you’re not aware of the file location, choose the ‘Search’ option to locate the file.
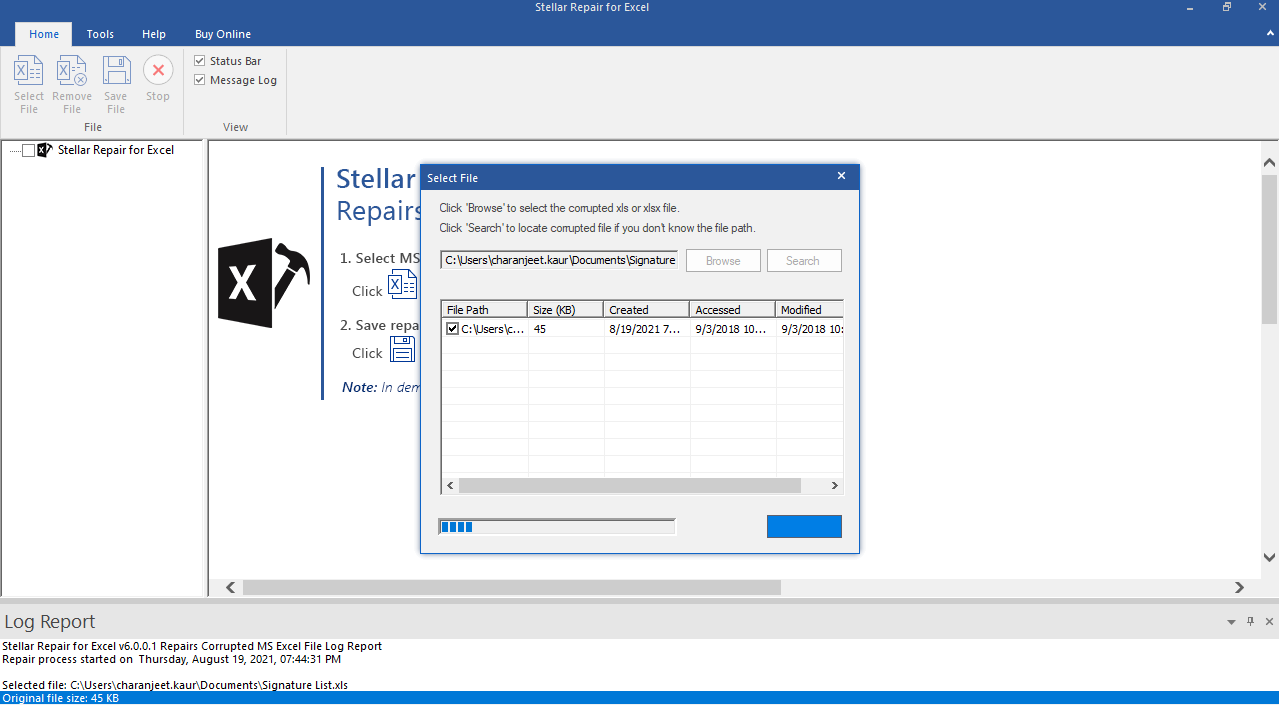
- A screen showing progress of the Excel file repair process is displayed.
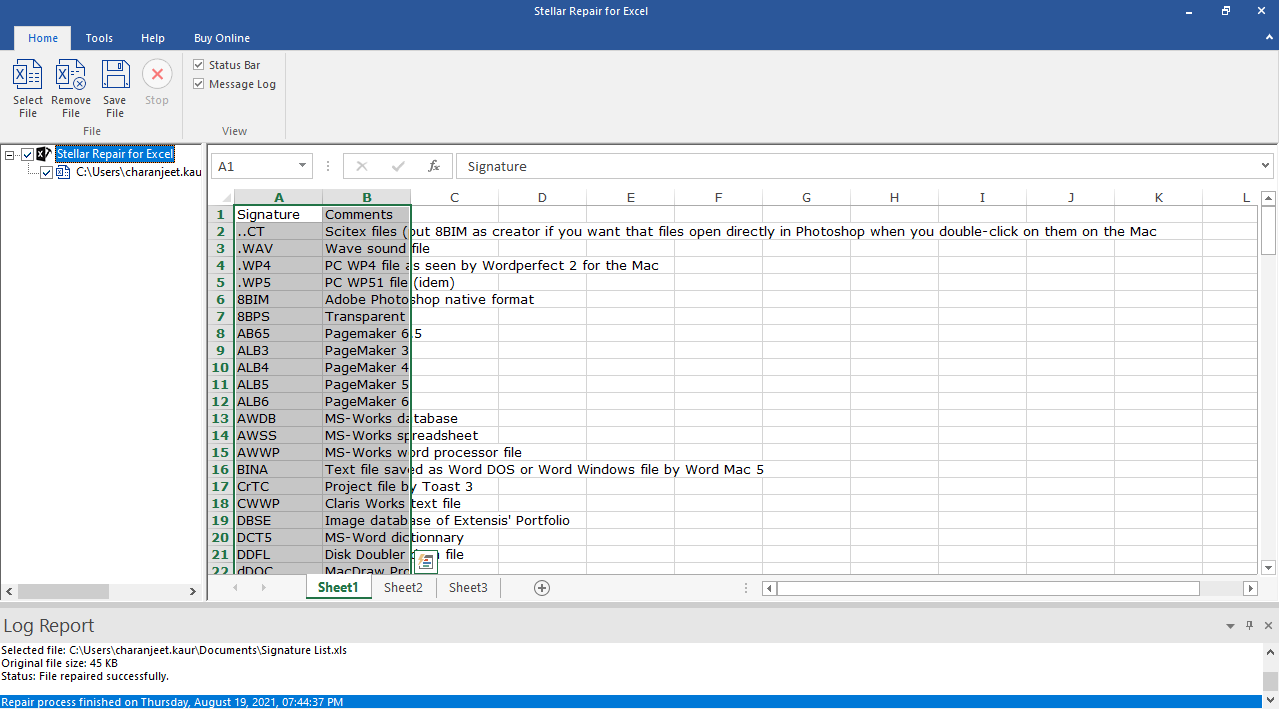
- Preview of the repaired Excel file and its recoverable data is displayed.
- After verifying the data, click on the Save File button on the File menu to save the repaired file.
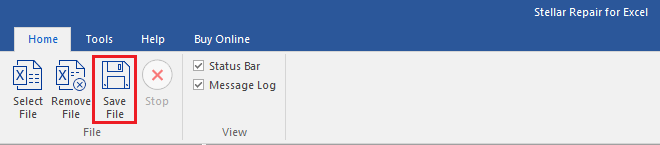
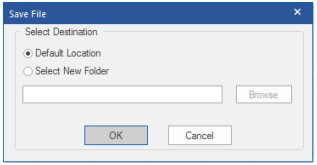
- Select the location where you wish to save the repaired file on the Save File window and then click OK.
A confirmation message will pop-up after completion of the repair process. You can now try to open the file in your Excel program.
End Note
Even if you’re taking preventive measures, you might still experience corruption in an Excel file. So, it’s crucial to take regular backups of your workbooks. For this, ensure that the ‘Always create backup’ option is enabled in Excel. You can find it in General Options by clicking on the Tools button in the Save As dialog box. Enabling it will ensure that the Excel backup file is updated with the changes made in a spreadsheet.
Additionally, ensure that the Excel ‘AutoRecover’ feature is set to save a version of your Excel file after every 10 minutes. You can increase or shorten the interval as per your requirement.
Resolve Compile Error in Hidden Module in Excel: Causes & Solutions
The hidden module in Excel refers to a container with VBA codes, custom queries, and complex macros. The compile error in a hidden (protected) module in the Excel worksheet usually occurs when doing different activities on a macro-enabled sheet, such as merging .xls files. The error can result in macros execution failure. You need to quickly resolve this compile error to restore full functionality of the VBA code. Below, we’ll be discussing the solutions to fix this Excel error. But before that, let’s see why this error occurs.
You may encounter the Compile error in hidden module due to one of the following reasons:
- The code in the workbook is not compatible with the Excel application.
- Manual queries created in a previous version are no longer compatible with your current version of Excel.
- Missing references.
- Invalid .exe files (control information cache files) are automatically created with ActiveX control insertion in Excel file.
- Protected module is corrupted.
- The workbook with hidden module is damaged or corrupted.
- Incompatible add-ins.
- Incompatible Excel file version.
- The module is protected or password-protected.
- Missing or corrupted mscomctl.ocx file.
Excel can throw the compile error while compiling the code that exists in the protected module. So, first check the error and identify the hidden module that is creating the issue. You can unprotect the module. Also, ensure that you have permission to access the VBA code in the module. If the error still exists, follow the below troubleshooting methods.
Method 1: Re-register ActiveX Control Files or mscomctl.ocx Files
You can get the compile error in the Excel file, containing the VBA code related to ActiveX controls or OCX files. The ActiveX control files and OCX files (mscomctl.ocx files) are the components of Microsoft’s standard controls library. The compile error in the hidden module can occur if these files are missing. In this case, you can use the Regsvr32 tool to re-register the OCX files. The Regsvr32 is a command-line utility to register and unregister OLE controls in the Windows registry.
Method 2: Delete .exd Files
The .exd files are temporary files created by Excel when inserting ActiveX controls objects. These temporary files can lead to a compile error if they are corrupted. So, if this issue has occurred, particularly in the Excel file containing ActiveX controls, then deleting .exd files might fix the issue. To delete the .exd file, follow the below steps:
- First, open the Run window by pressing the Windows+R keys.
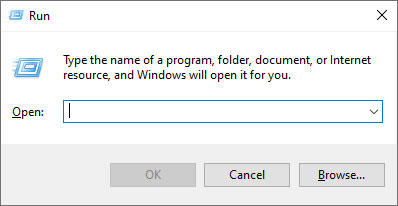
- In the Run window, type %appdata%.
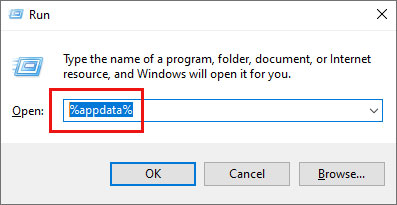
- In the Roaming window, click on the Microsoft option.
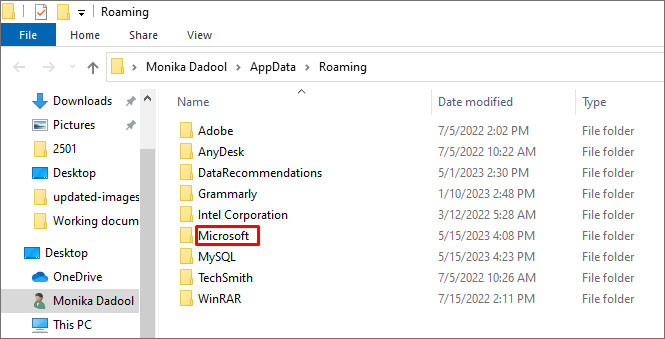
- Under Microsoft, you will see a list of folders. Search and click on Forms.
- Right-click on a file with .exd extension and select Delete.
- Once you delete the .exd files, restart your Excel application.
Method 3: Rollback the Office Updates
MS Office updates or upgrades may also cause the compile error in hidden module in Excel. If the error has occurred after downloading the recent Microsoft Office updates, try reverting to the previous version or uninstalling the recent updates to fix the issue.
Method 4: Unselect Missing References
The compile error in hidden module determine path in Excel can also occur if your file contains a reference to object library/type library, which is labelled as Missing. You can locate, check, and uncheck the references marked as ‘Missing’ to fix the issue. Here are the steps:
- Open your Excel and press Alt + F11 keys.
- The Visual Basic Editor is displayed.

- Go to the Tools option and then click References.
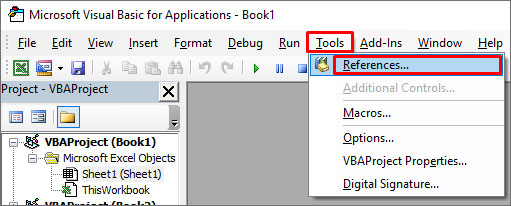
- In the References-VBAProject window, under Available References, search and unselect the references starting as “Missing”.
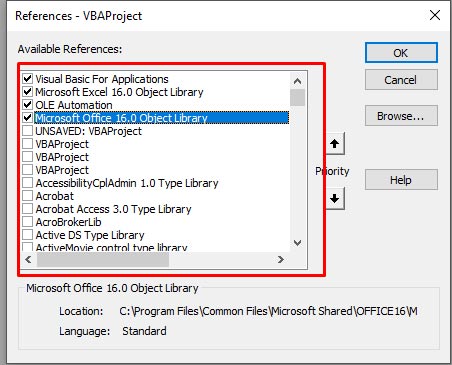
- Click OK.
Method 5: Check the Code in Module
The compile error in hidden module can occur if there are issues in the code within the module. The problems include incorrect or missing syntaxes, missing parameters/references, or the code contains incompatible functions or a wrong name of the object. You can check and fix these issues in the code by opening the VBA editor.
Method 6: Check and Remove Add-ins
In Excel, the compile error in macro-enabled files can also occur due to incompatible add-ins. You can check and disable the add-ins in Excel using the below steps:
- First, open the Run window and type excel /safe and then click OK. The Excel application will open in safe mode.
- Now try to open the affected Excel file. If it opens without the error, then check and remove the latest installed Excel add-ins.
- Navigate to the File option and then select Options.
- In the Excel Options window, click Add-ins.
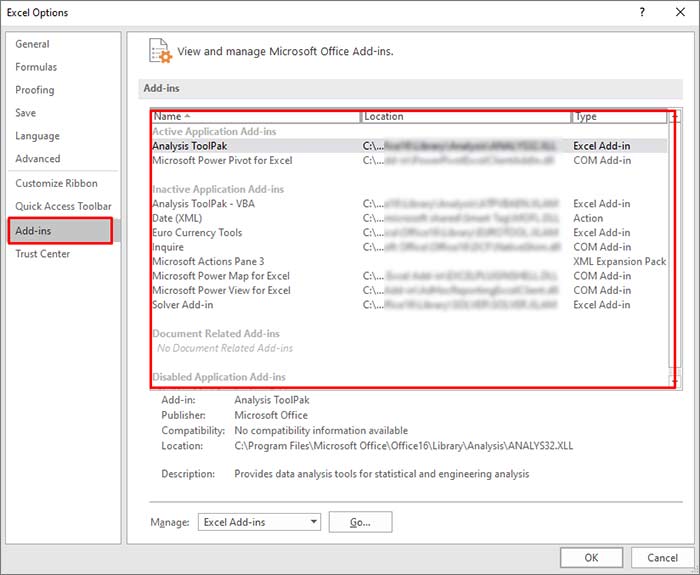
- Under Add-ins, search and select the latest add-ins, and then click on Go.
- In the Add-ins window, uncheck the add-ins and then click OK.

- Restart Excel and then check if the error is fixed or not.
Method 7: Repair the Corrupt Excel File
Corruption in the Excel file can affect the macros in the hidden module, which may result in the compile error. In such a case, you can try repairing the Excel file using Microsoft’s inbuilt utility -Open and Repair. To use this tool, follow these steps:
- Open your Excel application.
- Click the File tab and then click Open.
- Click Browse to select the affected workbook.
- The Open dialog box will appear. Click on the corrupted file.
- Click the arrow next to the Open button and then Open and Repair.
- You will see a dialog box with three buttons - Repair, Extract Data, and Cancel.

- Click on the Repair button to recover as much of the data as possible.
- After repair, a message is displayed. Click Close.
What if None of the Above Solutions Works?
If the above methods fail to get rid of the “compile error in hidden module” in Excel, then use an Excel repair tool such as Stellar Repair for Excel. This tool is specifically designed to repair the corrupted Excel file. It can recover all the components from corrupted Excel file (macros, queries, formulas, etc.) without changing their original formatting. The tool is compatible with all Excel versions and can be downloaded on a Windows system. You can download the free trial version of Stellar Repair for Excel to scan the corrupted Excel file and preview the data.
Closure
You can get the “compile error in hidden module” when Excel detects any issue while compiling the code in a protected module. It can occur when there is an issue with the macro-enabled Excel workbook or Excel add-ins. You can follow the above-mentioned methods to fix the issue. If the error occurs due to corruption in the database file, then you can try Stellar Repair for Excel . It can repair severely corrupted Excel files. It also helps recover all the Excel workbook’s components, including macros and queries. The tool has a simple and user-friendly interface.
Easy Steps to Make Excel Hyperlinks Working
Summary: This blog discusses why hyperlinks won’t work in Excel and solutions to fix it. If nothing works, try using Stellar Repair for Excel software to recover your workbook with hyperlinks and all the data intact.

Hyperlinks in your Excel file could be references to a file’s location on the computer or a location within the same worksheet. Or, hyperlinks might be pointing to a URL. Sometimes, the hyperlinks won’t work and any of the following errors may pop up on your screen on clicking a hyperlink:
‘Cannot open the specified file.’

‘This operation has been canceled due to restrictions in effect on this computer. Please contact your system administrator.’

Causes of ‘hyperlinks not working in Excel’ problem, and solutions thereof
Here are some of the possible causes behind the ‘hyperlinks not working’ issue and solutions to fix it:
Cause 1 – Change in the name of the hyperlinked file
If the file name that appears in the hyperlink text is different than the actual file name, it will prevent the hyperlink from working.
Solution – Link to the renamed file
Ensure that the links in the Excel file are updated and points to the renamed file. For this, right-click the hyperlink and select ‘Edit the hyperlink’. Next, in the hyperlink address, replace the current filename with the renamed one in the hyperlink address.
Cause 2 – File name has a pound (#) sign
When you create a hyperlink for a file in Excel, you cannot use a pound character (#) in the file name that appears in the hyperlink. That is because the pound sign is not accepted in hyperlinks and may lead to the ‘Cannot open the specified file’ error.
Note: While you can use a pound character in a file name, it cannot be used in hyperlinks in an MS Office document.
Solution – Rename the file name and remove the pound sign
Open the file that contains the ‘#’ sign and rename it by following these steps.
- Right-click the cell containing the hyperlink that is not working, and click Edit Hyperlink.
- From the Address box, copy the address of the file you are linking to.
- Go to the location where the file is stored, right-click on the file, and click Rename.
- Remove the ‘#’ character from the name of the file.
- Go back to the Excel file, right-click on the problematic hyperlink, and choose Edit Hyperlink. Next, browse and select the renamed file.
- The renamed file without the pound sign will be added in the Address box.
- Click OK.
Now try opening the hyperlink.
Cause 3 – Sudden system shutdown causes abrupt closing of Excel
There may be a discrepancy in the data in hyperlinks when a system shut down suddenly, without properly closing the Excel file. And so, when trying to open a link, it won’t open.
Solution – Enable the option to save hyperlinks
There is an inbuilt option in Excel to update hyperlinks every time the workbook is saved. Follow these steps to enable that option:
Note: The steps may vary based on the Excel version you are using.
For Excel 2013, 2016, or 2019:
- Open Excel Workbook -> Go to File->Options->Advanced
- Scroll down to find the General tab and click on Web Options
- Web Options Window pops-up
- In the Web Options Window, go to Files Tab and select the ‘Update Links on save‘ checkbox
- Click on OK button and your option is saved
The steps are also explained in the image below:

For Excel 2007:
- Click the Office button
- Select Excel Options, then follow Step 1) to Step 5), as mentioned above and get the Excel Hyperlinks to work again.
Still unable to open hyperlinks in Excel?
If you fail to make Excel hyperlinks work using the above-discussed solutions, use an Excel repair tool to fix the hyperlinks issue. Download the Stellar Repair for Excel to repair an XLS/XLSX file and restore the hyperlinks.

See the working of the tool here:
The tool recovers all components of the Excel file including tables, charts, chart sheets, cell comments, images, formulas, and more. You can repair multiple worksheets and fix all dysfunctional Excel hyperlinks across multiple worksheets in a single workbook. Click on the workbook, select all worksheets and start repairing
Conclusion
Carefully read the possible causes behind the ‘Excel Hyperlinks not working’ issue to understand what resulted in the issue in the first place. If nothing helps, use Stellar Repair for Excel to restore the hyperlinks and save the result in a new Excel file, without interfering with worksheet properties and cell formatting.
Top 5 Ways to Fix Excel File Not Opening Error
Summary: MS Excel users sometimes face issues while using the MS Excel application. One such issue is the Excel file not opening error. In this post, we’ve mentioned the reasons that may result in this error and the ways to resolve it. Also, you’ll find about an Excel repair software that can help you repair corrupt Excel files.
Several Microsoft Excel users have reported encountering the ‘Excel file not opening’ error when opening their Excel file. There are several reasons that may cause this error. In this post, we’ll be discussing the reasons that may lead to the ‘Excel file not opening’ error and the top 5 ways to fix this error.
Why Does the ‘Excel File Not Opening’ Error Appear?
Following are some possible causes that may result in the ‘Excel file not opening’ error:
- There may be a problem with an add-in that is preventing you from opening the Excel files.
- There’s a chance that your Excel application is faulty.
- Your Excel program is unable to communicate with other programs or the operating system.
- The file association might have been broken. This is a common problem faced by users who have upgraded their Excel application or operating system.
- The file you’re trying to open is corrupted.
5 Ways to Fix Excel File Not Opening Error
Let’s explore the ways to resolve the Excel file not opening error:
1. Uncheck the Ignore DDE Checkbox
Dynamic Data Exchange (DDE)allows Excel to communicate with other programs. The Excel error may occur due to incorrect DDE settings. You need to ensure that the correct DDE configuration is enabled. Follow the steps provided below:
- Launch your MS Excel file.
- Go to File > Options.

- Now click on Advanced.

- Further, find the General option on the screen.

- Uncheck the option **‘Ignore other applications that use Dynamic Data Exchange (DDE)**’.
- Click OK to save the changes.
2. Reset Excel File Associations
When you launch your Excel file, the file association ensures that the Excel application is used to open the file. You can try to reset these associations and see if Excel opens after this. Proceed with the following steps to do so:
- Navigate to Start Menu and launch Control Panel.
- Now, navigate to Programs > Default Programs > Set Your Default Programs.

- A new window will open. Herein, find the Excel program in the list and select it. Now, select the option ‘Choose defaults for this program’. Click OK.

- A new window for ‘Set Program Associations’ will open.
- Check the box against the ‘Select All’ option.
- Further, click Save to reset the Excel File Associations settings.

3. Disable Add-Ins
Many people install third-party add-ins to enhance the application’s functionality. Sometimes, these add-ins can create an issue. Follow the below-mentioned steps to disable the problem creating add-ins:
- Launch MS Excel application.
- Navigate to File > Options > Add-ins.

- In the window that opens, go to the Manage option at the bottom.
- Herein, select the COM Add-ins option from the dropdown list. Click Go.

- In the COM Add-ins window, uncheck all the boxes to disable the add-ins. Click OK.

4. Repair MS Office Program
Sometimes the issue is not with your Excel file. Instead, the reason for the error can be a corrupt MS Office application. You can repair the program to fix the Excel file not opening error. Here are the steps:
- Press the Windows + R keys to launch the ‘Run’ dialog box.

- Enter the text ‘appwiz.cpl’ to launch the program and features window.

- Find the MS Office program in the list of applications.

- Right-click on it and select Change.

- In the new window, select the Quick Repair radio button. Click Repair.

- Follow the on-screen instructions to repair the Office application. Once the repair process is completed, you can try opening the Excel file to see if the problem is resolved.
5. Disable Hardware Graphics Acceleration
The hardware graphics acceleration assists in the system’s better performance, especially when you use MS Office applications, like MS Excel or Word. Sometimes, this causes the Excel file not opening issue. You can disable this option to try to resolve the issue. Here are the steps:
- Launch your MS Excel application.
- Navigate to File > Options > Advanced.
- Herein, go to the Display option.
- Uncheck the Disable hardware graphics acceleration checkbox. Click OK.

What If These Solutions Do Not Work?
If you have applied all the methods mentioned above and still cannot open your Excel file, there are chances that your file is corrupted. You can use a specialized Excel repair tool , such as Stellar Repair for Excel to repair the corrupted Excel file. This software has powerful algorithms that can scan and repair even severely corrupt Excel files, without any file size limitation. After repairing the file, it restores all the data, including tables, charts, rules, etc. to a new Excel, with 100% integrity.
To know how the software works, see the video below:

Conclusion
Before you proceed with resolving the Excel file not opening error, try to find out the root cause of this error. If you know the real reason, you can try the method right away. If the reason for the error is corruption in the Excel file, the best option is to repair the file using a professional Excel repair tool, such as Stellar Repair for Excel .
Repair Office 2016 Files (Word, Excel and PowerPoint)on Windows
If you frequently work with Microsoft Word (.docx), Excel (.xlsx), and PowerPoint (.pptx) files, then issues like file inaccessibility or corruption won’t be new to you.
Let’s discuss some common scenarios which may lead to corrupt MS Office 2016 files:
Scenarios behind Microsoft Office Files Corruption
Scenario 1 – Disruption during Data Migration
You decide to move Office files from your hard drive to other removable media. However, when you try to access the data within the files post-migration, you may find Word, Excel, and PowerPoint files showing gibberish characters. Due to a power surge, sudden system shutdown, and internal mechanical failure, the files may have turned corrupt.
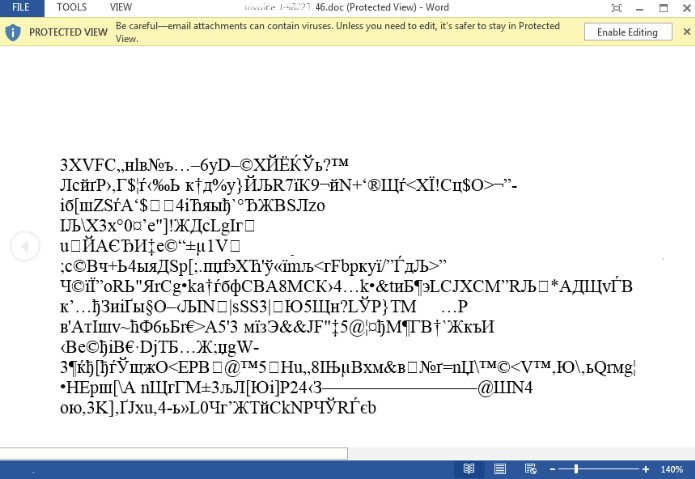
Figure 1- Microsoft Word file showing garbage characters
Scenario 2 – Office Files and Registry Entries Become Infected
When you open or use the Microsoft Office application, it crashes as soon as it opens. You assume that an add-in was causing the problem and restart the Office application without add-ins loaded, but the application still crashes. This may happen because of a virus infecting the Office files and registry values, thus leading to corrupt or damaged Office files.
Scenario 3 – Inaccessible or Lost Data
Suppose all your Office files are stored on a USB device, and you unplugged the device while it was still open in Windows. Now, when you attempt to open a Word or an Excel file, all the data is gone. Unsafe removal of USB or any other external storage device may corrupt the data inside your Office files or turn the file inaccessible.
How Can You Deal with Microsoft Office Files Corruption?
Here are a few solutions that can help you fix or repair Office 2016 Files Corruption:
Solution 1 – Use Microsoft in-built Repair Utility
Microsoft recommends using its in-built repair utility, ‘Open and Repair’, to fix corrupt Office files. Follow these steps to understand how you can use the utility to repair the corrupt Word, Excel, and PowerPoint files:
- Launch the MS Office application whose file you want to repair:
- To repair corrupt Word (.doc, .docx) files, launch MS Word
- To repair corrupt Excel files (.xls, .xlsx) files, launch MS Excel
- To repair corrupt PowerPoint (.ppt, .pptx) files, launch MS PowerPoint
- Click File, and then click the Open tab.
- Click Navigate to the location or folder where the Word, Excel, or PowerPoint file is stored.
- Select the corrupt file you want to repair by single-clicking on it, and then find the Open button and click on the drop-down menu next to it.
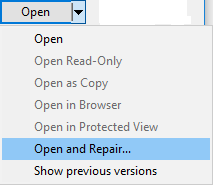
- From the drop-down menu, click the Open and Repair option and follow the subsequent instructions to repair Office 2016 files.
Solution 2 – Repair Office 2016 Installation
Try repairing the Office installation to fix the MS Office files. The steps to repair your Office installation may vary depending on the operating system you are using.
For Windows 7
- Open your PC’s control panel
- Click Programs
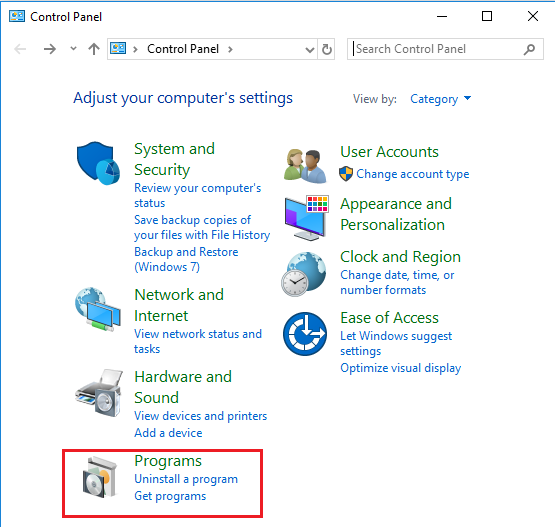
- Click Programs and Features, and then click Uninstall a program option
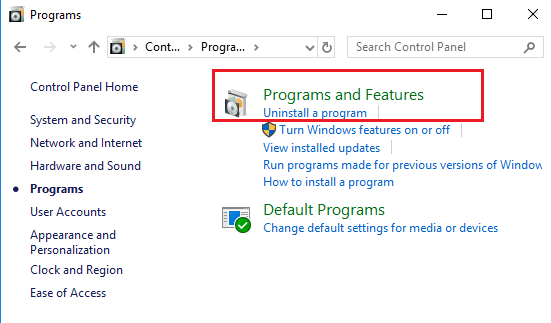
- Right-click on the Office application you want to repair, and then click Change
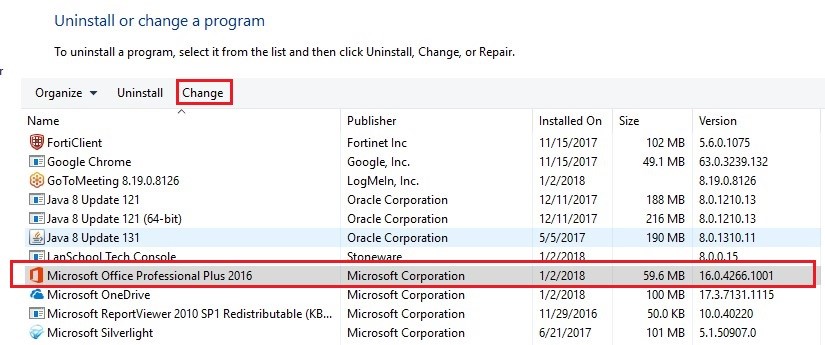
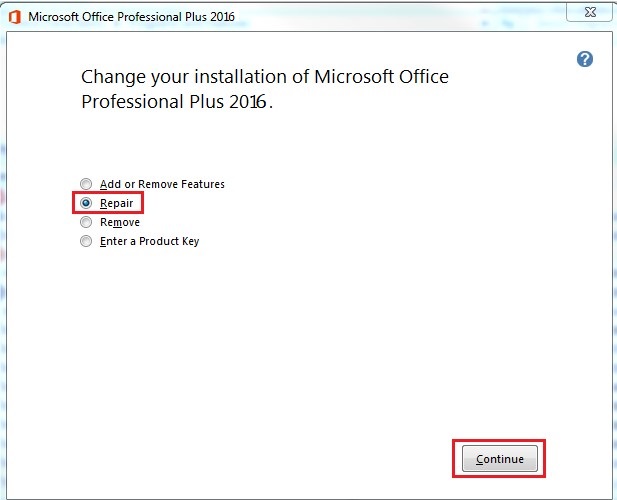
- Under Change your installation of Microsoft Office Professional Plus 2016, choose Repair and then click Continue.
For Windows 10
- Right-click the Start button, and type in Apps & Features (For Windows 10)

NOTE: This step will work for Windows 10/8/8.1/7 and Vista
- Click Programs from the window that opens, click on the MS Office product you want to repair, and then click on Modify

Note: Following the step will repair the entire Microsoft Office suite even if it contains only one application you want to repair such as an Excel or PowerPoint file. But, in case you have a standalone app installed, try to locate that application by name.
- Under Change your installation of Microsoft Office Professional Plus 2016, choose Repair, and then click Continue to initiate the repair process.
- Once the repair process completes, you’ll be prompted to restart your PC. Click Yes
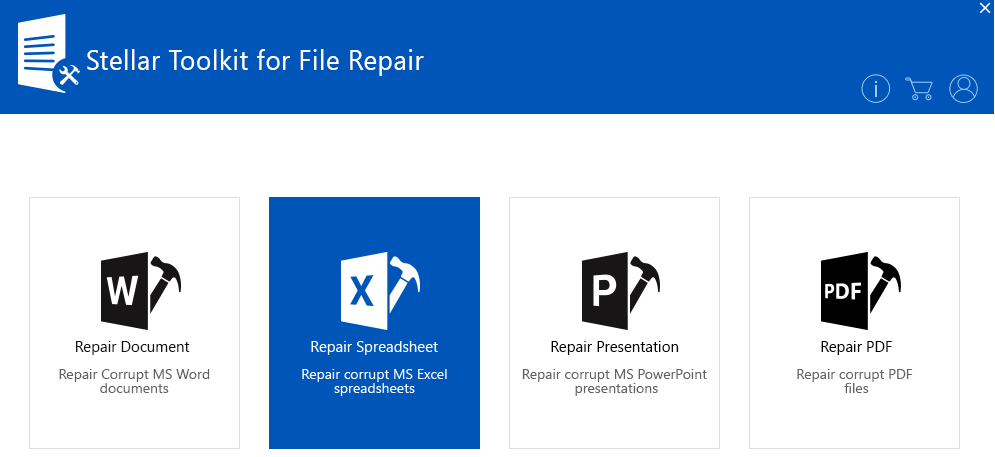
Solution 3 – Use Stellar Toolkit for File Repair
Repair MS Office 2016 files by using Stellar Toolkit for File Repair . This software comprises four essential utilities that can help you repair corrupt MS Word, MS Excel, MS PowerPoint, and PDF files.
The toolkit helps repair corrupt Office 2016 and other version documents and files while maintaining the original file format, which is less likely achievable with inbuilt methods. Follow these steps to repair MS Office 2016 documents by using the Office file repair tool:
- Download and install Stellar Toolkit for File Repair.

- Launch the software.
- From the software’s main interface, select the MS Office file you want to repair.
- From the window that pops up, select the corrupted file to be repaired.
Note: If you don’t know the exact location of corrupt office files or if they are large in number, you can locate the files by using the Find/Search option included in the software.
- After selecting the file, click the Scan button to initiate the repairing process.
- Once the scanning process is complete, all the recoverable information is displayed in the software’s left-hand panel. Click on any item to preview it before recovery.
- To save the repaired data, click the Save button, and enter a destination of your choice.
- Click OK.
Conclusion
This post outlined possible scenarios and their causes that may lead to corruption in MS Office 2016 files. It also emphasized how the inbuilt methods such as Open and Repair, and Repair Office Installation help to resolve the corruption issues. But these are not competent enough to resolve all the errors. With Stellar Toolkit for File Repair, you can resolve all sorts of corruption issues and recover data of Office 2016 files – Excel, Word, PPT, and PDF – in their original state.
- Title: How to Repair Excel File Name is Not Valid Error | Stellar
- Author: Nova
- Created at : 2024-03-13 11:52:28
- Updated at : 2024-03-14 11:57:10
- Link: https://blog-min.techidaily.com/how-to-repair-excel-file-name-is-not-valid-error-stellar-by-stellar-guide/
- License: This work is licensed under CC BY-NC-SA 4.0.
