
How to Reset iPhone 12 mini Without Apple Password? | Stellar
How to Reset iPhone Without Apple Password?
Summary: If you want to erase your iPhone data and reset the device to factory settings, you need to enter your Apple ID password. What if you forgot your registered Apple ID password? This blog explains a step-by-step method of how to reset an iPhone without a password. It also shares a professional erasure tool – Stellar Eraser for iPhone to factory reset your device without entering your Apple credentials.
Parental Control Software
[](https://tools.techidaily.com/stellardata-recovery/data-recovery-ios/ "Buy Now")If you have forgotten your Apple ID password and you wish to reset your iPhone, then it’s going to be a difficult task. However, there are various ways you can use to factory reset your iPhone without an Apple password.
In this blog post, we will explain how to reset your iPhone without password using iTunes or Finder or by using the iPhone Eraser tool .

How to Factory Reset iPhone without a password?
Let’s explore the methods to reset your iPhone without an Apple ID password.
How to Reset iPhone without a password via iTunes or Finder?
To reset your iPhone without using an Apple ID password, you can use iTunes or Finder app. You have to use your computer to access the recovery mode of your iPhone and reset the device to get it without using the password. This method will erase all your iPhone data, so ensure to take a backup of your device before proceeding.
Steps – How to Factory Reset iPhone without Password via iTunes or Finder
- Turn off your iPhone. This process will depend on the kind of iPhone you have.
| iPhone Model | How to Turn iPhone off? |
| All models of iPhone 15, 14, iPhone 13, iPhone 12, iPhone 11, iPhone X, iPhone 8, and iPhone SE (2nd generation). | Press and hold the Lock and Volume down buttons of the iPhone until the power slider appears, then swipe it. |
| All models of iPhone 7, iPhone 6, and iPhone SE (1st generation), | Press and hold the Lock button of the iPhone until the power slider appears and then swipe to turn it off. |
- Connect your iPhone to your computer via a USB cable and ensure iTunes or Finder is running on the system.
- If prompted, enter the device passcode or click Trust in the “Trust This Computer” dialog box.
- Then put your iPhone into recovery mode. To do this:
| iPhone Model | How to put iPhone into recovery mode? |
| All models of iPhone 15, 14, iPhone 13, iPhone 12, iPhone 11, iPhone X, iPhone 8, and iPhone SE (2nd and 3rd generation). | Press and hold the side button until the ‘Connect to computer’ screen appears on your iPhone |
| iPhone 7 and iPhone 7 Plus | Press and hold the Power and Volume Down buttons. Then release the Power button and continue pressing the Volume down button until iPhone has been detected appears. |
| All models iPhone 6, iPhone 5, iPhone 4, iPhone SE (1st generation) | Hold the Home button until a pop-up appears informing the iPhone has been detected in recovery mode. |
- Click on your iPhone when it appears in iTunes and then click Summary.
- Now, select the “Restore iPhone” option on the right pane.

- Click Restore to confirm and then follow the prompts to complete the restore process. This will erase all your iPhone data and install the latest iOS version.

- Once the restore process is complete, set up your iPhone as new or restore it from a backup.
Note– This method of reset will only work when Find My iPhone is disabled.
How to Factory Reset your iPhone without a Password via Stellar iPhone Eraser Tool?
Using the iPhone Eraser software like Stellar Eraser for iPhone is the best tool for resetting the iPhone without knowing the Apple ID login credentials. This tool can permanently erase All Content and Settings including photos, videos, audio, chats, call history, iMessage, texts, contacts, Safari browsing history, and other data on your iPhone.
Stellar Data Eraser Software is supported by all versions of iOS from the latest 16, 15, 14, 12, and below. It even erases content from all variants of iPhone, iPad, and iPod Touch. This tool erases the data permanently from your iOS devices making it unrecoverable by any data recovery software.
![]()
Steps – How to reset iPhone without password using Stellar Eraser for iPhone
- Download and install Stellar Eraser for iPhone on your Mac or Windows system.
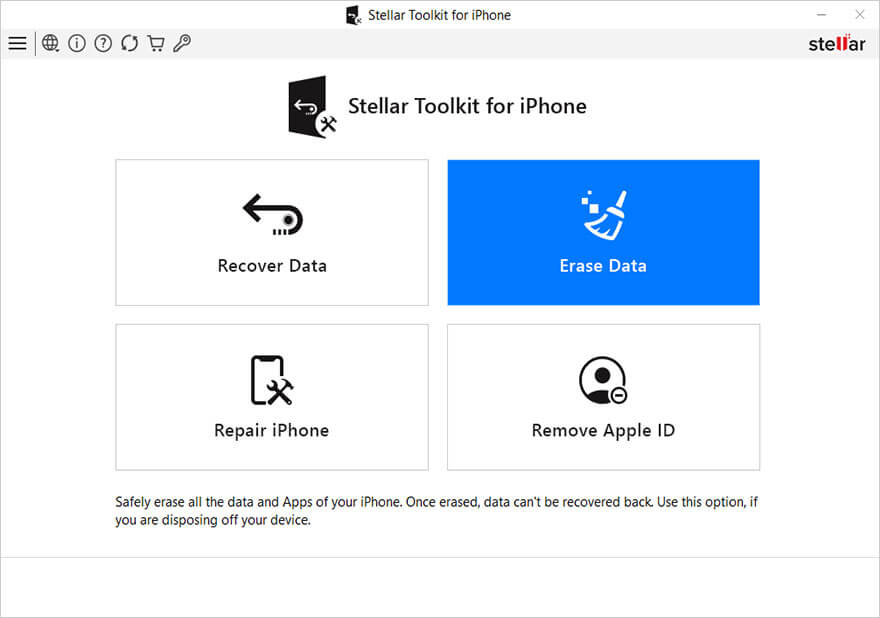
- Launch the software and select Erase Data option from the home screen.

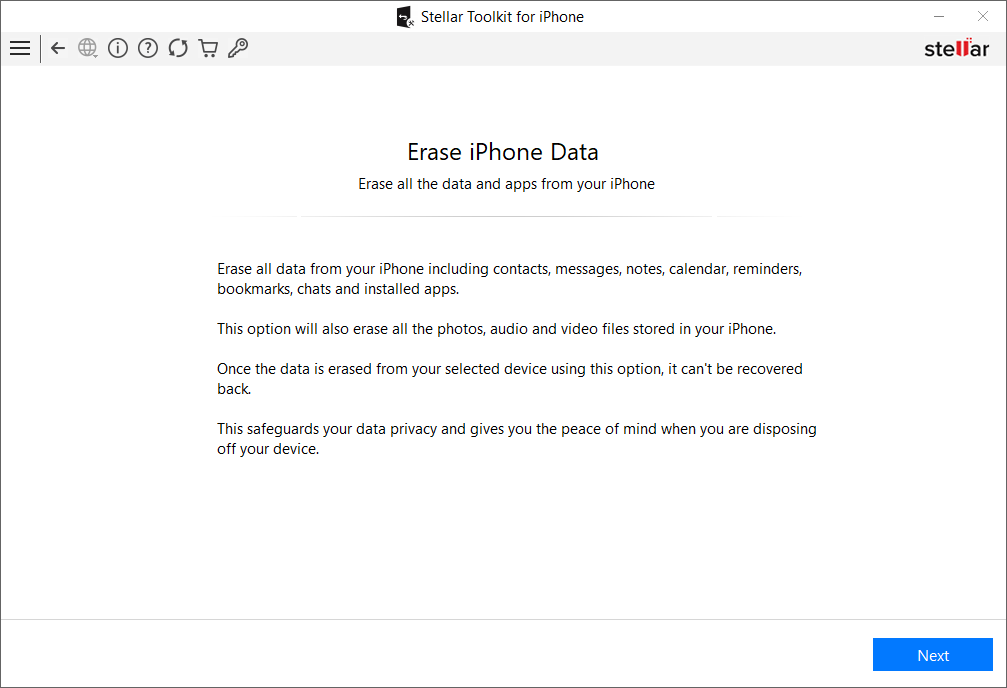
- On the Erase iPhone Data screen, click Next.

- Next, connect the iPhone that you want to reset to the computer when prompted. Click Erase.

- Click Yes in the Erase Process dialog box.

- Once the iPhone is completely wiped, click Yes in the Data Erase Complete dialog box.

Conclusion
If you forgot your Apple password and want to reset your iPhone, you can use any of the two methods mentioned above in the blog. You can reset your iPhone with iTunes/ Finder or by using a professional tool, such as Stellar Eraser for iPhone. However, make sure to backup up your iPhone data before proceeding to reset your device.
FAQ
1. How to remotely erase iPhone and iPad data?
If your iPhone is lost or stolen, then you can protect your iPhone data from misuse by remotely erasing its data. For more information, read this blog .
2. How to restore or set up your iPhone from iCloud backup after a factory reset?
If you want to restore your iPhone after a factory reset, you can use iCloud backup to set up your device. For more help, read this guide .
3. How to factory reset iPhone without a computer?
You can reset your iPhone without any computer by using the settings app of your device. To do so:
- Go to the Settings app > General > Reset > Erase all Content and Settings.
How to fix ‘Unable to load Video: An Error Occurred’
Summary: Are you facing ‘unable to load video’ error message while trying to play videos on iPhone or iPad? No worries. This post guides you how to fix the error and watch your videos on the iOS device without any issue.
‘I am frequently facing ‘unable to load video’ error message ever since iOS 16 update. Its annoying as I cannot watch videos on iPhone. How to fix the issue?’
‘Since I upgraded to iPhone14 Pro from iPhone 11, I have problem playing a few videos. It states ‘error loading video’. I even bought more iCloud storage but no luck. Please help.’
Videos not loading on iPhone or show ‘Unable to load video, an error occurred’ message is a persistent issue faced by iPhone users, even after successive iOS upgrades, irrespective of the iPhone model.
As the annoying error stops you from watching your favorite videos on iPhone, you want to fix it soon. But before that its’ important to understand what could be the cause of this ‘unable to load video’ error, to troubleshoot the problem accordingly.
Why iPhone shows unable to load videos error?
There is no single reason for video loading error. Usually, videos saved in iCloud would display unable to load error on iPhone, if the Internet is off or you have slow connection.
Another common reason behind videos not loading on iPhone is that the ‘optimize storage’ option is enabled on your iOS device. Apple offers this feature to save space on your iOS device and stores the full resolution videos to iCloud. However, this often results in the video loading problem on the device.
Its’ also possible that your iPhone has insufficient space, which prevents videos from loading. There could also be a bug that can be fixed with iPhone update.
Right 9 ways to Fix ‘Unable to load Video, an error occurred’ on iPhone, iPad

Method 1: Restart iPhone
Restart, also called soft reset can fix error in loading video on iPhone or iPad. Close all the applications and restart your iPhone or iPad.
Method 2: Turn on Internet of the iOS device
If you are watching YouTube, Netflix, or other online videos, ensure cellular data of your device is turned on. In case you are facing the error ‘unable to load video: an error occurred’ while loading a higher quality version of the video on iPhone, try by switching to uninterrupted Wi-Fi connection. Note that high speed Internet is necessary for streaming videos on iOS device.
Method 3: Update your iOS device
You can update the device to fix ‘unable to load video’ error on iPhone or iPad. To update your iPhone or iPad follow the given steps. Before that make sure Wi-Fi is turned on.
- Go to Settings > General > Software Update.
- Click Download and Install followed by Install Now.
Method 4: Turn off the Optimize Storage option
When ‘optimize storage’ option is enabled on your iOS device, all the full-resolution high quality videos and photos get saved in iCloud while only the compressed space-saving versions are on your iPhone.
Thus, when you try to open a video on the iOS device, it takes time eventually to load it from iCloud. While sometimes, the video may not load at all. Try to fix unable to load video on iPhone by turning off this feature. Here are steps to disable optimize storage’ option:
- Open Settings. Click on your name.
- Tap on iCloud > Photos.
- Below Optimize iPhone Storage, tap on Download and Keep Originals option.

Figure: Disable Optimise iPhone Storage Option
Wait until the iPhone downloads all the videos from iCloud. You should now be able to open videos without loading error.
Method 5: Update the app that shows video load error on iPhone
If the video loading issue error pops up in a particular app like YouTube, Instagram, then update the application. If the update doesn’t help, you can reinstall the app also. This should fix videos not loading error or buffering issues. App update are available in App Store. To update any iPhone app follow the given steps:
- Open the App Store.
- Now click on your profile icon on top.

Figure: Update app in App Store
- Scroll to find your app and click on the Update button next to it. You can also click on Update All on top.
Method 6: Create free space on your iPhone
High quality videos may not load and show error if there is no space on your iPhone. Check your iOS device, if it has enough free space. Its’ essential to have 2GB free space available in the device to play high quality and large size videos.
You can check the available space on your iPhone or iPad by navigating to: Settings > General > iPhone Storage.

Figure: iPhone storage screen
On the top right, you will see the amount of space used on your iOS device. If the space is less, remove the useless videos, photos, apps and other data on your iPhone or iPad.
Method 7: Access video from iCloud.com
If the videos don’t load on iPhone and show error, try to access them via iCloud.com on your computer by following the below steps:
- Open iCloud.com and enter Apple ID credentials to sign in.
- Click on the Photos or iCloud Drive app where the video is saved.
- Find your video and click on it to open.
There’s also the options in icloud.com to share the video via email or download to save it on your computer.
Method 8: Repair video not loading on iPhone
If you face ‘unable to load video’ an error occurred in Camera Roll videos of iPhone, the file may have corrupted.
Copy or transfer the problem video to your PC or Mac. Download and install a video repair software—Stellar Repair for Video . It can fix file corruption in the error throwing iPhone video. The software is compatible with MP4, MOV, HEVC, video files formats used in iPhone and iPad.
The software also offers a free trail wherein you can repair the corrupt video and watch its preview.
Method 9: Restore iPhone to factory settings
If ‘unable to load video’ error is perpetual on your iPhone or iPad, in spite of trying the above methods, then factory reset can be your last bet.
As all know, factory reset will delete everything on your iOS device , make sure you create the latest backup of the iPhone in iCloud or iTunes.
Follow the below steps to factory reset iPhone and fix unable to load video error:
- Open Settings > General > Reset.
- Click on Erase All Content and Settings.
- Enter Apple passcode. Click on Erase iPhone and follow the prompts.
Now check if the video error problem is resolved or not.
Wrapping Up & FAQ
Usually one of the methods shared in this post fixes the error – ‘unable to load video‘, an error occurred’ on iPhone. However, unfortunately if none works and you cannot play videos on iPhone, contact Apple support .
FAQ
- Why does my iPhone say ‘an error occurred while loading a higher quality version of this photo’?
High quality photos/videos require more storage space to open. Less free storage is one of the for the media file loading error.
Hence, delete some useless photos, videos, or apps to free up space. Now you can open the high quality photo/video smoothly without any error.
2. Why my iPhone videos not playing on PC?
Your iPhone videos may not play on Windows PC due to many reasons— the media player doesn’t support videos file format; virus in your PC; or the video has turned corrupt during transfer. However, you can fix the problem and play iPhone videos on Windows .
3. Why I cannot view my video in icloud.com?
In iCloud.com, select the Photos app and click Photos. In the side bar, you will see the thumbnails of all your photos and videos. Find your video and click on it to view.
New iPhone 14 Restore from iCloud Stuck on Time Remaining Estimating
Summary: The joy of using iPhone 14 comes to a halt if your newly purchased iOS device remains stuck at “iCloud backup remaining estimating time” loop. You’ll Google how to restart an iPhone but end up being confused about what to do or what not to do. We understand your angst. So, in this blog, we offer you lucrative options to restore new iPhone 14 from iCloud backup. Also, we have taken the liberty to recommend a reliable iPhone data recovery software to use in case of accidental data loss. Use the given buttons to free download and try it yourself.


Every time you buy a new iPhone, restoring backup becomes a vital necessity to finish the setup. Long wait to restore a new iPhone 14 is killing the joy of using the most awaited Apple product. You can restore iTunes or Finder backup using laptop or MacBook, but as soon as you perform iCloud backup on iPhone 14, the device gets stuck at estimated time remaining. It’s a prominent issue, pointed by many iPhone 14 users recently.
The problem arises at setting up a new iPhone with existing iCloud backup. Possibility of getting stuck on Restore in Progress: An estimated storage (XXGB) required to finish restoring your apps and data.
## **Why is my new iPhone 14 stuck at restore from iCloud?**Before finding your options to overcome the problem and learn how to restore an iPhone, get familiar with the root cause of the problem:
- Perhaps additional data storage space is required.
- Apple server is preventing iCloud data restoration.
- iCloud system status is not working for iCloud backup and iCloud Account login.

- Slow or unstable WiFi connection.
- Numerous unwanted backup files stored on iCloud.
Generally, restoring in progress doesn’t take more than 20 to 60 minutes for an iPhone to restart. Nonetheless, if restoring is stuck beyond that time, then be wary that it might take hours to finish. Anyhow, iPhone offers you ample options to get around a stuck iCloud backup.
How to restart an iPhone stuck at “Restore from iCloud- Time Remaining: Estimating”
Read the below methods to identify a perfect route to finish restoring iPhone 14 from iCloud backup. You can also stop restoring your iPhone and experiment with other alternatives:
Cancel the iCloud Restore in Progress
Stop the ‘Restore from iCloud’ process and start afresh after giving rest to your iPhone for a while. The move allows iOS device to optimize operations after turning off all the activities. To do so, you need to interrupt the ongoing restore from iCloud backup, which is already stuck at a specified time remaining. Rebooting your iPhone will fix all the minor glitches liable for creating such. Follow these steps:
- Press and hold the side button (on the right hand side of your iPhone) along with volume up/ down button till the power-off slider appears on your iPhone 14 screen.

- Drag the slider to your right and wait for 30-seconds to turn off the device.

- To turn the iPhone back on, press and hold the side button until the Apple logo appears on screen.
![]()
Restart Restoring iCloud Backup
Once your iPhone 14 restarts, follow these steps to restore iCloud backup:
- Go to Settings > General > Transfer or Reset iPhone > Reset > Reset All Settings.

- Set up your iPhone and select Restore from iCloud Backup on the Apps & Data screen.
- You can also choose another restoration option- Transfer Directly from iPhone.
- Follow the instruction available on-screen to restore your iOS device.
If your new iPhone 14 continues getting stuck at iCloud restore progress, then you need to check your internet connection. Also, make sure the iOS device has adequate space to handle large volume of data you are trying to copy in it.
Check the iCloud System Status
At rare occasions, even Apple server prevents the iCloud data restoration. The first thing you can do in such situations is to ascertain whether the restore process was stalled because of an internet issue or iCloud System Status. To do so, go to Apple system status page and check if iCloud Backup, Apple ID, and iCloud Account and Sign In, are working. If not, then you can’t do much but wait for Apple support to fix the issue at their end.
iCloud backup restore stuck while setting up a new iPhone 14 is not stressful until you lose a significant amount of data in the process. It is possible that in the search and trial of different options to restore iCloud backup on new iPhone 14, you might lose a significant amount of data. Use a reliable iPhone data recovery software like Stellar Data Recovery for iPhone to restore all the lost or deleted iPhone data from different variants of iPhone, iPad, and iPod touch.

Note that the software also supports recovery from iCloud backup and iTunes backup. The advanced software allows you to select and restore only a selected few or the desired files lost from iCloud. Moreover, the iOS recovery software executes recovery in the least possible time and could manage every bit of data stored in your iCloud backup. Refer to our KB to learn how to recover deleted iCloud data .
Conclusion:
This blog encapsulates various methods to swiftly get out of the trouble of new iPhone 14 stuck at restore from iCloud. As you try these methods, eventually, you will find the most suitable option to resolve the iPhone 14 stuck at restore from iCloud error. At times, the process of data restore remains slow for reasons beyond your control. Perhaps the files you wish to restore to the newly purchased iOS device are way too large or the process is taking longer because of a weak Wi-Fi network or the Apple Server is undergoing maintenance. Either of the reasons may further enhance the risk of data loss on the iPhone. Therefore, you need an infallible solution like Stellar Data Recovery for iPhone to retrieve lost contacts, photos, videos, apps, games, chats, and more.
Guide to Completely Erase Data on iPhone to Avoid Privacy Leak
With growing instances of data leak and misuse, there’s a fear of digital data on iPhone landing in wrong hands. Personal photos, messages, videos, contacts, or sensitive information such as bank details, shopping apps ID etc., are at risk when selling, trading off, recycling or donating your iOS device.
So what can you do to keep your old iPhone data away from strangers’ eyes and make it 100% unrecoverable?
One solution is the commonly used Apple’s recommendation — erase iPhone data by choosing ‘erase all content and settings’ on your device. However, with professional hackers and sophisticated software available, erasing data by this method doesn’t guarantee data privacy.
Experts suggest using trusted iPhone erasure software that is 100 % safe. The software can make iPhone data unrecoverable beyond the reach of any tool.
Let’s understand in detail how to permanently erase data on iPhone by these techniques.
Clean iPhone by using ‘Erase All Content and Settings’
To clear all data from iPhone use the’Erase All Content and Settings’ option in the settings of your iOS device. It is like factory resetting your iPhone.
All the app data, settings, passwords, photos, videos, contacts, documents, messages, Calendar, chats, music, audio files etc., gets deleted after factory reset from iPhone.
However, don’t forget to first take the backup of your iPhone data in iCloud or iTunes.
Steps to erase iPhone via Settings:
- Go to Settings.
- Navigate to General > Reset> Erase All Content and Settings.
- Click Erase Now in the dialog box. Enter Passcode and Apple ID password, when prompted.
This will erase iPhone data turning the device off. When you power on the iPhone, you will see all its data is deleted including, photos videos, apps, contacts etc.
Permanently wipe iPhone to 0% recovery – Secure & tested method
Although deleting data via ‘Erase All Content and Settings’ on iPhone will make your device as clean as new, but it is not enough. Your iPhone data after factory reset is still recoverable by hackers. Thus, to protect privacy and prevent data leak by any means, it is essential to erase iPhone with the help of a professional iOS eraser software .
You can find several iOS cleaner software online but here we recommend Stellar Toolkit for iPhone. The efficient software is the best way to wipe iOS device before you sell , recycle, or donate.
It removes your personal videos, pictures, contacts, notes, calendar, browsing history, call log, chats, messages, Instagram, WhatsApp, and other sensitive information saved on your iPhone. The secure DIY software supports the latest iOS 16 and below versions. You can erase all variants including iPhone 6, iPhone 7, iPhone 8, iPhone X, iPhone SE, iPhone 11, and above.
You can take the free trail and gage the software features and user-friendliness.
Step-by-step guide to erase iPhone data permanently:
Step 1: Download and launch Stellar Toolkit for iPhone on computer.
Step 2: Click on Erase Data module.
Step 3: On Erase iPhone Data screen, click **Next.
**
Step 4: As you see the Click Device to Select screen appears, connect your iPhone to computer.
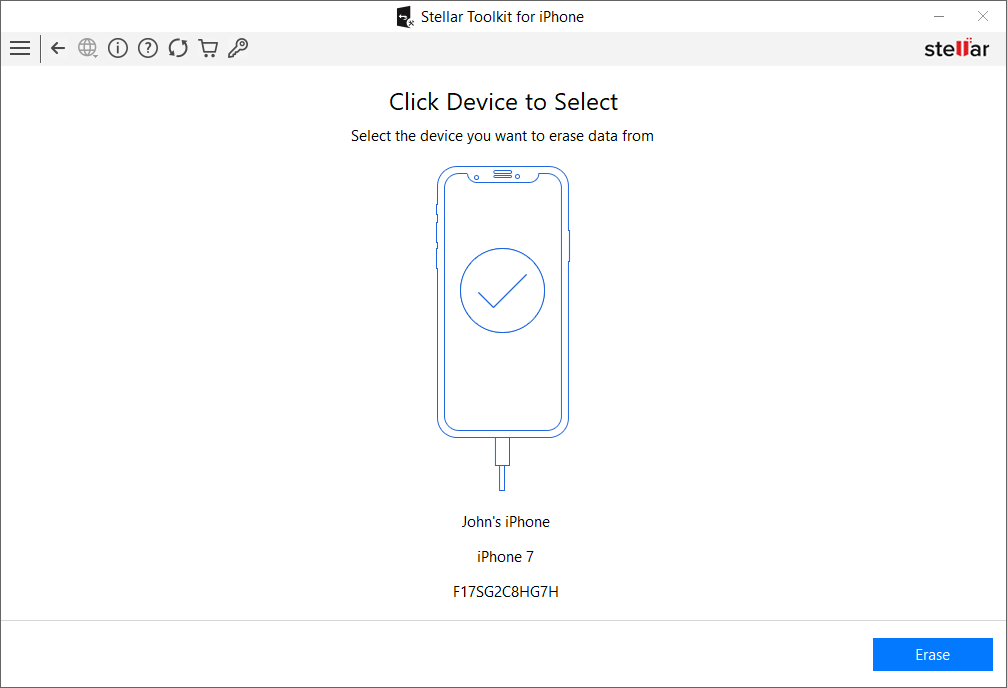
Step 5: Select Erase.
Step 6: In the Erase Process box, select Yes.
Step 7: Data Erase Complete message box appears that asks for confirmation before erasing the data. Click OK.
Wrapping Up
After erasing complete iPhone data by using the secure iPhone eraser software by Stellar, there’s no need to worry about personal data leak. The software algorithms ensure that even the most advanced iOS data recovery tool cannot retrieve your information.
![]()
Was this article helpful?
FAQs
How do you permanently erase data so that it cannot be recovered from iPhone?
Use the best iPhone data eraser tool to permanently wipe iPhone data. This is a assure way to prevent data leak and protect privacy.
- Title: How to Reset iPhone 12 mini Without Apple Password? | Stellar
- Author: Nova
- Created at : 2024-08-20 18:58:36
- Updated at : 2024-08-21 18:58:36
- Link: https://blog-min.techidaily.com/how-to-reset-iphone-12-mini-without-apple-password-stellar-by-stellar-data-recovery-ios-iphone-data-recovery/
- License: This work is licensed under CC BY-NC-SA 4.0.