
How to Reset iPhone SE without Losing Data? | Stellar
How to Reset iPhone without Losing Data?
Summary: Sometimes, resetting an iPhone is essential to fix minor issues like iPhone crashing, freezing, or getting stuck at the Apple logo. But the iPhone reset process can delete important data and settings on your device. Read this post to learn smart ways to reset your iPhone without data loss. Moreover, you can also download this quick tool to reset your iPhone without losing data.


“Yesterday, my iPhone stopped working suddenly. I have been trying multiple ways to fix it since then; even tried the force reboot method. Should I simply reset my iPhone? How do I do it without losing my device data?”
Resetting an iPhone can sometimes become a necessity, whether due to sudden freezing up of your device, software glitches, or slow performance. Often, when your iPhone gets stuck on the Apple logo or suddenly crashes, you can reset your iPhone to fix this minor issue.
A factory reset is also necessary if you want to sell your iPhone and want to start fresh. When resetting your iPhone, it will become an empty slate with no pictures, contacts, videos, downloaded applications, playlists, or anything else. An iPhone reset restores your iPhone to its initial configuration and original factory settings.
However, be careful with this method as resetting your iPhone deletes all files & settings on the device. For those looking to reset iPhone without losing their precious data, this blog is the answer. Let’s read on to find some simple ways to do so while keeping our data intact.

How to reset your iPhone without Losing Data?
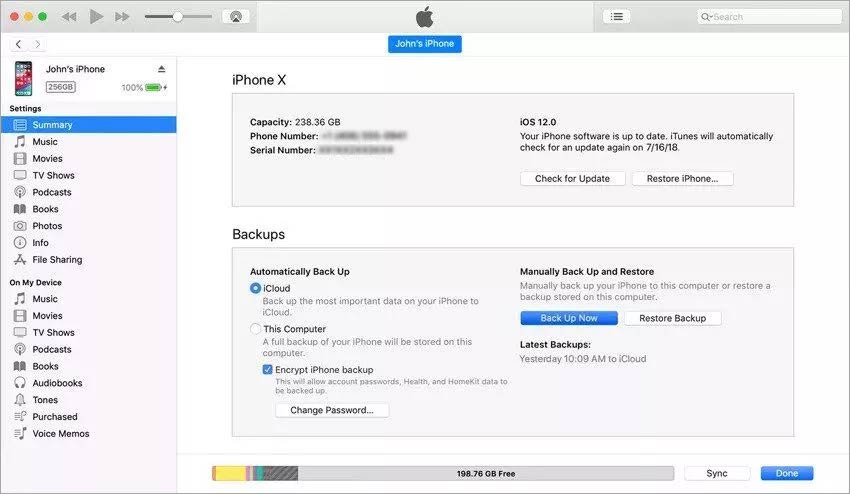
Before starting, it’s crucial to back up your iPhone data to avoid losing important files and folders. You can back up your iPhone using iCloud, iTunes, or Finder on Mac or PC.
Next, follow the step-by-step instructions on resetting an iPhone using iPhone Settings, iPhone erasure software, and iTunes.
Method 1: Reset iPhone Without Losing Data via Settings
To reset iPhone without losing data, you need to use the ‘Reset’ feature in your iPhone. This feature has different options on how you would like to reset- whether through the ‘Reset All Settings’ or the ‘Reset Network Settings’ option.
The Reset All Settings option will remove or reset privacy settings, keyword dictionary, location settings, etc., to default. At the same time, Reset Network Settings will remove previously used networks and VPN settings. Resetting the Network Settings will turn off the cellular data roaming and remove previously used Wi-Fi settings of your iPhone.
Moreover, no data or media is deleted from iPhone when choosing the Reset All Settings or Reset Network Settings option.
Steps to Reset iPhone Using the ‘Reset All Settings’ option
- On the iPhone, navigate to Settings > General.
- Tap on Transfer or Reset iPhone.
- Click Reset options.


- Next, click the Reset All Settings option.
- Then enter the iPhone passcode.
- Now, click Reset All Settings. This process will take a couple of minutes to reset the privacy settings, keyword dictionary, location settings to default, but will keep the rest of your data fully secure.

Method 2: Reset iPhone via Stellar Toolkit for iPhone Tool
Sometimes, the ‘Reset All Settings’ option doesn’t solve your iPhone issue. In such a case, try resetting the iPhone with the help of trusted software. Stellar Toolkit for iPhone is a secure and professional tool that can help you reset your iPhone to fix various iOS issues without losing data.
Also, you can also use Stellar Toolkit for iPhone to fix iOS related issues like- iPhone crashing, stuck at the Apple logo, etc.
This tool’s ‘Repair iPhone’ feature will first download the fresh copy of the iOS version present in your device from the official website. Then it will install the freshly downloaded iOS version on your iPhone after removing the existing one from your device. The software will reset your iPhone, making it seem new without removing or deleting your data.
Stellar Toolkit for iPhone is compatible with the latest iPhone 14, 13, 12, and below series and even all iPad versions, such as iPad Air, iPad Mini, and others.


Step-by-Step: How to reset iPhone with Stellar Toolkit for iPhone:
Step 1: Download Stellar Toolkit for iPhone on your Mac or Windows PC and connect your iPhone to the system using a USB cable.
Step 2: Select Repair iPhone module from the launch screen of the software.

Step 3: On the Repair iPhone screen, click the Next button.

Step 4: Click on the iPhone icon.
Step 5: Click the Download button to download the latest iOS or iPadOS version of the firmware file. If you have already downloaded the firmware before, select Import.


Step 6: After downloading the firmware file, click the Repair button to start repairing.

Step 7: Once you receive the message —The repairing process of the selected iOS device is completed, click OK.

Restart your iPhone to see if the iOS issues are resolved.

Method 3: Reset iPhone Without Losing Data via Recovery Mode
To reset your iPhone, you can use iTunes or Finder app. You need to use Mac or Windows PC to access the recovery mode of your iPhone and reset the device. This method will erase all your device data, so take a backup of your iPhone before proceeding.
Steps to reset iPhone via Recovery
- Open iTunes on your Mac or Windows system.
- Connect your iPhone to the computer and then put your iPhone into Recovery Mode .
- Once your device has entered the Recovery Mode, a message ‘you’re in Recovery Mode’ will pop up. Click OK.

- Click on your iPhone when it appears in iTunes, then click Summary.
- Now, select the “Restore iPhone” option on the right pane.

- Click Restore to confirm. It might take a while for your iPhone to reset; don’t disconnect your device from the computer until the reset process is completed.


- Once the restore process is complete, set up your iPhone as new or restore it from a backup.
Conclusion
You can factory reset your iPhone without fearing data loss by trying different methods mentioned in this blog. Reset All Settings/ Reset Network Settings feature of iPhone can reset your device; however, it may not always work. You can even use iTunes to reset your iPhone, but you will lose all your device data.
Or use the ‘Repair iPhone’ feature of Stellar Toolkit for iPhone software to permanently reset your iPhone without losing data. This tool can repair iOS issues like iPhone crashing, Black Screen of Death, and iPhone stuck at the Apple logo.
Download the free trial version to evaluate the features of the software.
FAQs
How to remotely erase iPhone data?
If your iPhone is lost or stolen, you can protect your iPhone data from misuse by remotely erasing its data using the iCloud website.
How to restore or set up your iPhone after reset?
Use an iCloud backup to restore your iPhone after a factory reset.
7 Ways to Fix iTunes Error 9
Summary: The iTunes error 9 appears when iPhone update through iTunes gets failed. It’s annoying as the error doesn’t let you use your device further. Learn 7 quick methods to fix iTunes error 9 and update the device without any issue.
Trying to get the new iOS on your iPhone but facing iTunes Error 9?

The iTunes error 9 usually occurs while updating your iPhone via iTunes. The error annoyingly neither lets you update the iPhone nor do any activity on your device. Thus, it urgently requires a fix so that you can work on your iPhone and also update the device.
In this post, we will share with you 7 best possible ways to fix iTunes Error 9. But before that let’s know what is causing the iTunes error on trying to update your iPhone.
Why does iTunes Error 9 occur?
It is difficult to determine the exact reason of your iTunes Error 9. But it may be due to any of the reasons given below :
- USB port or cable is damaged
- You have jailbroken your iPhone
- Corrupt network settings
- Security software prevents access to Apple server
Since it is usually, regarded as a hardware issue, you should begin with hardware-related workarounds and later move to other software troubleshooting methods.
Going by the order, try below methods to fix iTunes Error 9
- Check USB cable & port
- Restore iPhone with iTunes on another computer
- Force your device to restart
- Check Anti-Virus & Firewall on your computer
- Update iTunes to the latest version
- Use Recovery Mode to Fix iTunes Error 9
- Choose to update iPhone wirelessly
Solution 1: Check USB cable and port
Make sure your iPhone USB cable and port are properly connected and working fine. Do the below checks and fix:
- USB cable is not loosely connected to the computer
- You are using the USB cable that you got with your iPhone or another certified cable
- The USB port is not damaged. Try by shifting to another USB port
Solution 2: Restore iPhone with iTunes on another computer
iTunes error 9 is generally regarded as a hardware-related problem. Sometimes it is difficult to detect the issue. The easier way out is to restore iPhone using iTunes on another computer or laptop. If still the error persists, move on to the other workarounds.
Solution 3: Force restart your device
Apple suggests trying once force a restart of iPhone to fix iTunes error 9.
iPhone X, iPhone 8, & iPhone 8 Plus users: Press and quickly release the Volume Up button. Press and quickly release the Volume Down button. Then, press and hold the Side button until you see the Apple logo.
iPhone 7 & iPhone 7 Plus users: Press and hold both the Side and Volume Down buttons for at least 10 seconds, until you see the Apple logo.
Solution 4: Check Anti-Virus & Firewall on your computer
Antivirus or Firewalls in your computer may prevent iTunes to connect with Apple server. Check the security software settings, and tweak them if required to allow iTunes to access the network servers.
Solution 5: Update iTunes to the latest version
Updates usually bring in new features, fix existing bugs and make the application smarter. If the iTunes error 9 is due to outdated iTunes, installing the latest version may help to fix the error.
How to update iTunes to the latest version?
For Windows users: Launch iTunes on PC. On the menu bar, click Help > Check for Updates and follow the given instructions
For Mac users: Launch iTunes on Mac. On Menu bar go to iTunes > Check for Updates and follow the on-screen instructions.
After updating iTunes, reboot your computer and check if the iTunes error 9 is fixed.
Solution 6: Use Recovery Mode to fix iTunes Error 9

iPhone in Recovery Mode
All the above methods fail to fix iTunes error 9? As last resort choose Recovery Mode to restore iPhone in iTunes. Choosing this option means you will lose all your iPhone data. Thus, first take backup in iCloud or iTunes before applying this fix.
How to put your iPhone into Recovery Mode? (For iPhone 8, 8 Plus, & X users)
- Update your iTunes
- Press and release the Volume Up button and then the Volume Down button
- Press and hold the Side button till connect to iTunes screen appears
- Once the iPhone is in Recovery Mode, connect your computer with iPhone via USB cable. You will see the white Apple logo screen.
- When iTunes asks you to update or restore, click Update to reinstall iOS
Lost iPhone data after restoring iPhone in iTunes via Recovery Mode?
Losing iPhone data after update through Recovery mode is a panicky situation. It gets even more serious if you are unable to restore from iCloud or iTunes backup. In such situation, Stellar Data Recovery for iPhone comes as big relief**.** The software restores complete iPhone information from iPhone, iCloud and iTunes.
Stellar iPhone data recovery software quickly and safely restores all iPhone data including photos, videos, music, contacts, messages, Safari bookmarks, etc. It also recovers the lost WhatsApp, WeChat, Line, Viber, Tango, and Kik messages. The software is extremely easy to use. Simply launch it on your Mac or PC, connect your iPhone to the computer and follow the on-screen instructions.
Solution 7: Choose to update iPhone wirelessly


Select Software Update in Settings on iPhone
Alternatively update iPhone wirelessly, without using iTunes. Make sure you have a continuous Internet connection. Go to Settings > General > Software Update. If an update is available, tap on Download and Install.
Conclusion
Although iTunes Error 9 rarely occurs but is a frustrating situation as you are unable to do any other activity on your device.
You can sometimes easily fix the Error 9 by doing a simple check if your USB cable, port connection, and firewall settings are appropriate. Restarting the device and updating iTunes to the latest version can also resolve Error 9. As a last resort, update iOS in iTunes through Recovery Mode. Nevertheless, you can also choose to bypass iTunes and update your device wirelessly.
One of the above methods is surely going to help you out. Also do not forget to share with us in the comment box below, which of these methods helped you to fix iTunes Error 9.
How to recover data from dead iPhone
Summary: Recovering data from a dead iPhone is precarious if you don’t acquire knowledge about your iOS device. Be wary of how your device works and its data backup options to avert data loss problems in the future. If your iPhone has turned dead because of a major technical glitch, you can recover the data stored in it using a reliable data recovery software. This blog encapsulates all such concrete details with a step-by-step guide to recover data from dead iPhone.
iPhone is one of the most affluent smartphones loaded with advanced features. Most people invest in it because its upbeat features and advanced technology intrigue them. Every time Apple announces a new upgrade or introduces new features to its iOS software upgrade, iPhone fans dig deep to learn more about it.
If your iPhone is dead and not working at all, and you want to learn how to recover data from dead iPhone, this blog is exclusively for you.
Why would an iPhone suddenly go dead?
These are the possible reasons why iPhone turns dead or blank for hours:
- A defective charging cable or adapter that doesn’t perfectly pair with your iOS device.
- A recent iOS update that triggered some unforeseen software error in your iPhone.
- Faulty or failed hardware, like a battery or a logic board that needs to be replaced.
In either of the above-mentioned conditions, your iPhone will stop responding to any command. Turning the device off and restarting works in rare circumstances, but not always. In such bleak situations, you can try to fix your dead iPhone using these tips:
- Keep a close watch over the charging cable or power adapter and fix the loose ends.
- Put your dead iPhone on charge for at least an hour.
- Connect your iPhone to iTunes or put it on Device Firmware Update (DFU) mode.
- Seek immediate assistance from Apple Support Services.
If these attempts won’t bring your iPhone back to life, certainly it has some major technical glitch that only Apple experts can address. Before submitting your device for the same, recover all the data stored in it. Follow these DIY solutions to recover data from dead iPhone:
Use iTunes to Recover Data from Dead iPhone
iTunes is one of the most coveted options to recover data recovery from dead iPhone. However, to use this method, your iPhone should be in sync with iTunes, and you have to periodically take data backup on it. Observe the steps to keep data backup on iTunes:
- Connect your iPhone to your computer and open iTunes to login.
- From the menu bar at the top of the iTunes window, select File > Library > Organize Library.
- Next, select Consolidate files to organize the Library screen and press OK.
- Once you do that, copies of any files that were not in the iTunes Media folder will be added to your iTunes Media folder.
- At the same time, take the opportunity to eliminate all the duplicate files taking unnecessary space on your hard drive. However, before making this move, save a copy of the original files in your iTunes Media Folder.
If you have been practicing the above steps for long, then simply connect your device with your computer using a USB cable and follow steps to recover data from iTunes backup:
- Connect your iPhone to your computer and open iTunes.
- Select your iPhone in the main iTunes window or select it from Finder.
- The move will prompt a new set of instructions on iTunes with options to backup data. You need to click on Restore Backup to retrieve your dead iPhone’s data.
- Several backup options will prompt on your computer. You can choose a selected set of files to restore a specific file or all of them.
- Once selected, the desired number of files/data to restore, press Restore, and wait. The move may restart your iPhone. If not, your device will suffer a more serious hardware failure that only technical experts can fix.
Pro Tip: If found dead, let your iPhone remain off for as long as possible to avoid data overwriting.
Use iCloud to Recover Data from Dead iPhone
If you are proactively using iCloud to maintain data backup, there is a fair chance to recover your dead phone’s data from it. You can directly recover data from iCloud on another iPhone that doesn’t necessarily require connection to a laptop or computer. All you need is an iPhone that can be turned on at least and let you through the initial steps to login to your iCloud. Don’t forget to erase your dead iPhone before continuing on the new one; otherwise, you won’t get to perform the initial set-up. Follow the steps below to restore dead iPhone’s data from iCloud Backup:
- Turn on the working iPhone and perform the initial setup procedures till you get through Apps & Data. Tap on Restore from iCloud Backup option and sign in with your Apple ID.
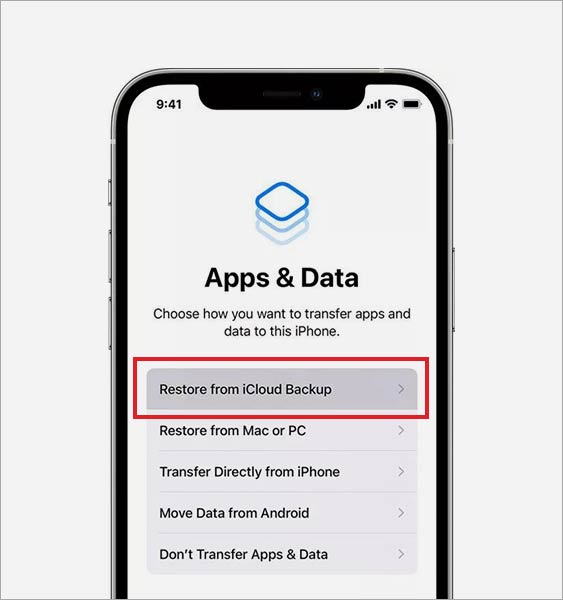
- A window will prompt you with all backups available for restoring. Select the most recent one that contains all the data you wish to retrieve from your dead iPhone.
- Patiently wait for the data transfer procedure to finish.
- In the data transfer procedure, at some point, you might be asked to enter your Apple ID once again. Enter details to keep the action going.
- Once done, you’ll get a notification of successful data transfer.
You can also transfer all your dead iPhone data to a new one by inserting its SIM card in the new iPhone. Learn here how to Transfer Data from Old iPhone to New iPhone .
Use a Reliable Data Recovery Software
Your last respite is a professional data recovery software in case a vast amount of data from dead iPhone, like photos, videos, messages, contacts, etc., remain missing after iCloud recovery. We recommend Stellar Data Recovery for iPhone because it guarantees absolute recovery of lost or deleted data from iPhone, iTunes, and iCloud. Listing some common situations where the software can help:
- If iTunes fails to restore data after unlocking the disabled iPhone.
- If some data is found missing after restoring data from iTunes or iCloud.
- Instead of restoring all files from the iPhone, you wish to recover only some selected files.
You can download the demo version of the software for assessment and buy the software to activate its key functionalities. It will activate via activation key that will be sent on your email once you purchase the software. Read this KB to learn How to Activate Stellar Data Recovery for iPhone . Additionally, using the Toolkit version of the software, identified as Stellar Eraser for iPhone , you can permanently remove all the sensitive data stored in your dead iPhone so it won’t fall into the wrong hands.
Conclusion:
Avid iPhone users know when to stop playing with their iOS device to let it reset in case of a technical glitch. Nevertheless, not all iPhone users are aware of this practice. Consequently, we panic and keep on switching off and on our smartphones when it hangs.
If your phone turns blank or dead, don’t panic and stop using your device for some time. Let it rest and resume its function. Otherwise, you’ll end up losing all the memories stored in it. This blog aimed to help you understand the grim consequences and smart ways to recover data from iPhone if your device turns dead. In case you are unable to recover data on your own using Stellar Data Recovery for iPhone, you can avail Data Recovery Lab-Services where our experts can recover all the data from your dead iPhone.
FAQs:
What to do if iPhone is not working?
If your iPhone has stopped responding to any command and you can’t even turn it off, then force shutdown and restart it. Swiftly press and release the volume up button first and repeat the same with volume down button. Now, press and hold the side button and once the Apple logo appears on the screen, release the side button too.
Why is my phone unresponsive?
Your iPhone’s touchscreen can be unresponsive for reasons like a brief hiccup or glitch that your smartphone’s inner system can’t detect or render it unresponsive. Sometimes, touch screen becomes unresponsive due to water damage or app glitch, or virus attack.
Why did my iPhone screen go black?
In iPhone, black screen appears due to software or hardware issues. Firmware modifications, dropping the iPhone, iOS upgrade/downgrade, and jailbreaking, are some other common reasons behind the black screen error. Learn some great solutions to overcome the black screen of death error .
Solved: Mac Doesn’t Recognize my iPhone
Summary: Is your Mac not recognizing the iPhone? Learn the 9 ways to fix iPhone not showing up on Mac. You can apply these methods for all iPhone models not recognized by macOS Ventura, Monterey, Catalina, Big Sur, High Sierra and below versions.
You may want to backup iPhone data or transfer favorite photos, music, or videos to Mac. But sometimes your Mac computer doesn’t detect the iPhone when you try to connect it. There are so many complaints such as iPhone not showing up in Finder in Ventura, Monterey, Catalina or Macbook not recognizing iPhone 14. Some also reported an unknown error or a 0xE error when trying to connect iPhone to Mac computer. The situation is frustrating as it prevents you to sync iPhone to macOS and access iPhone data on Mac.
No worries. There are methods, which can fix the issue and let you again access your iPhone on Mac. But, first you should be aware why Mac fails to recognize your iPhone as this helps in troubleshooting the problem.
Why your iPhone not detected by Mac computer?
Mac does not detect your iPhone due to many reasons, such as
- iPhone is not ‘on’ when connected to Mac.
- iPhone is damaged.
- The USB cable or USB port is not working.
- Software updates are pending including iOS, iTunes, and macOS.
- Third-party software conflict wherein 2 programs arecompeting for the same memory, peripheral device etc., on your Mac.
- Firewall or Antivirus software is preventing Mac to recognize iPhone.
- Mac settings don’t allow to view iPhone in Finder.

1. Check your iPhone
Before you connect your iPhone to Mac, make sure the iOS device is unlocked and on the Home screen.
2. Fix USB connection
When Mac computer doesn’t recognize iPhone, first check your USB connection. The USB cable or the port can be faulty. Try to connect iPhone to Mac using another Apple USB 2.0 cable. If that doesn’t work try with the different port. Plus, disconnect other USB devices from Mac except your iPhone.
3. Restart your iPhone
Restarting the iOS device would resolve any issue between your iPhone programs and iTunes. To restart hold volume/side/ top button depending on your iPhone model. Slide the red power off slider on your iPhone. Wait for your iPhone to turn off. After a few seconds, again restart iPhone. Now Mac should recognize your iPhone.
4. Restart your Mac
Restarting Mac clears the cache and memory of your system giving it a fresh start. It also installs pending updates.

5. Update your macOS
When iPhone is not showing up on Mac Finder but you can see it under USB Device Tree, update the macOS to the latest version. Make sure there are no pending software installs.
To check the USB Device Tree on Mac follow the below steps:
- Click on Apple icon followed by About This Mac.
- Click the System Report button.
- Under Hardware, select USB.

Figure: USB Device Tree
- On the right pane, you will see USB Device Tree. If you see your iPhone in the list, then update to the latest macOS.
6. Update iTunes
Older versions of iTunes can create conflict with normal Mac functions. Hence, Apple recommends installing the latest iTunes updates.
To install the latest iTunes, open iTunes. From the menu bar choose Help > Check for Updates and follow the prompts to install the latest version.
Now, check if your Mac recognizes the iPhone or not.
7. Disable antivirus on Mac
One of the reason cited for iPhone not detected by Mac is anti-virus or firewall protection on your system. So disable the antivirus or firewall and then try to connect your iPhone to Mac.
8. Enable iOS device in Mac Preferences
When iPhone is not showing on Mac Finder, check if your Mac Preferences allows to view iOS devices in Finder. To enable iOS device in Finder follow the below steps:
- Go to Finder > Preferences.
- Click on the Sidebar button in Finder Preferences box.
- Check in CDs, DVDs and iOS Devices.

Figure: Finder Preferences
This should fix iPhone not showing up in Finder on Mac.
9. Connect iPhone to a different Mac machine
Try by connecting your iPhone to another Mac. If you receive a message asking to ‘Trust this computer’, click on ‘Trust’ to access your iPhone data on the new computer. Make sure to backup iPhone to avoid data loss situation.
Tip: Have you lost or accidentally deleted Camera Roll, Contacts, Photos Stream, Voice Memos, or more while transferring iPhone data to Mac? No need to worry. Restore the deleted photos, videos, messages, contacts, etc., with the help of an efficient Stellar Data Recovery for iPhone for Mac.

FAQ
1. Can I connect iPhone with Mac wirelessly?
You can sync your Mac and iPhone over the same Wi-Fi network.
- Connect your iPhone to Mac using a USB cable.
- Open Finder on Mac and select your iPhone in the sidebar.
- Click on the General tab.
- Check in Show this iPhone when on Wi-Fi.
- Click Apply.
2. How to fix my iPhone cannot connect to iTunes?
If iPhone is not showing up in iTunes, restart your devices and ensure macOS, iTunes, and iOS are updated. To know more methods, read How fix iPhone unable to connect to iTunes problem.
3. How to connect iPhone to the latest MacBook Pro 2021 that doesn’t have USB A port?
The new MacBook has USB Type-C port. You can use USB-C to Lightning cable to connect iPhone XR, SE, 11, and above to the new MacBook. If you have iPhone X or below use USB-A to Lightning cable.
4. Can I use the methods to fix iPhone 14 not recognized by macOS Ventura?
Yes, you can apply the above methods to fix any iPhone not detected by macOS Ventura, Monterey, Big Sur, Catalina, or below.
5. Will I lose any data when syncing iPhone and Mac?
No, you won’t lose data by syncing iPhone to Mac. Syncing helps to access your iPhone data on Mac anytime from anywhere. However, if you accidentally delete iPhone data, use an iPhone Data Recovery software to restore it.
Wrapping Up
Syncing iOS device to macOS has so many advantages but if Mac is not recognizing your iPhone, you cannot transfer, back up, or access iPhone data on Mac. This post has shared 9 methods to fix the syncing issue of Mac and iPhone. One of them should resolve Mac not detecting your iPhone.
- Title: How to Reset iPhone SE without Losing Data? | Stellar
- Author: Nova
- Created at : 2024-08-20 18:56:56
- Updated at : 2024-08-21 18:56:56
- Link: https://blog-min.techidaily.com/how-to-reset-iphone-se-without-losing-data-stellar-by-stellar-data-recovery-ios-iphone-data-recovery/
- License: This work is licensed under CC BY-NC-SA 4.0.