
How to Transfer Contacts from Nokia C12 to iPhone XS/11 | Dr.fone
How to Transfer Contacts from Nokia C12 to iPhone XS/11
When it comes to transferring contacts from Nokia C12 to iPhone XS/11, we play enough care to not mess with the process.
Though, there are numerous ways to switch to a new iPhone from an Android device, some of them are really outdated. Consider, transferring contacts from Nokia C12 to iPhone XS/11 via Bluetooth for that matter. If you have a huge phone book, then it will take ages to finish moving the contacts. You don’t need to worry at all. We have amazing alternative solutions for you.
In this article, we are going to introduce 4 vital solutions to make your transition from Nokia C12 to iPhone a smooth sail.
How to transfer contacts from Nokia C12 to iPhone XS/11 in one click
If you want to import contacts to iPhone XS/11 from Android in a single click, there is no better solution than Dr.Fone - Phone Transfer . Not only contacts but a wide range of device data can be transferred from your Android to an iPhone with this tool. Photos, music, text messages, videos, etc. are a few of them.
Dr.Fone - Phone Transfer
Easily transfer contacts from Nokia C12 to iPhone XS/11
- Enables you to transfer data between Android, iOS, and WinPhone with a single click.
- Secure and there is no data loss while you transfer data between devices.
- Supports more than 6000 mobile device models from various brands like Apple, Sony, Samsung, HUAWEI, Google, etc.
- Supports all Android and iOS versions.
4,683,556 people have downloaded it
Well! After going through the amazing features of with Dr.Fone - Phone Transfer. How about learning the step-by-step procedure to transfer contacts from Nokia C12 to iPhone XS/11 with Dr.Fone - Phone Transfer?
Here is how to transfer contacts from Nokia C12 to iPhone XS/11 in 1 click:
Step 1: Download Dr.Fone - Phone Transfer on your computer and then install it. Launch it after installation and hit on the ‘Phone Transfer’ tab on the Dr.Fone software interface.

Step 2: Now, connect both your Nokia C12 and iPhone XS/11 to the computer using genuine USB cables.
Step 3: Once the Nokia C12 devices get detected, you need to select Android as the source device on the next screen. As you wish to import contacts to iPhone XS/11 from Android, the iPhone XS/11 needs to be selected in place of the target device.

Note: In case of a wrong selection, you can tap the ‘Flip’ button and change the selection.
Step 4: In this step, you have to select the data type you want to move from your Nokia C12 to the iPhone XS/11, i.e. ‘Contacts’. Now, push the ‘Start Transfer’ button consecutively to initiate the transfer.

Note: If it’s a used iPhone XS/11, then you can select the ‘Clear Data before Copy’ checkbox for erasing any existing data on it prior to transferring the data.
Step 5: Allow some time to get the process completed. Your contacts are successfully transferred from the Android device to iPhone XS/11.
How to transfer contacts from Nokia C12 to iPhone XS/11 using Move to iOS
Move to the iOS app from Apple allows you to make a smooth transition from an Android device to an iOS device. Be it an iPhone, iPad, or iPod Touch, this tool makes transferring content a cakewalk.
It involves quick steps to automatically moving data. Apart from contacts, it supports message history, web bookmarks, camera photos and videos, free apps, etc. It will transfer data to a factory reset or brand new iPhone only.
Step by step guide of Move to iOS app for importing contacts to iPhone XS/11 from Android
- Download the ‘Move to iOS’ app on your Nokia C12. Install and launch it soon after.
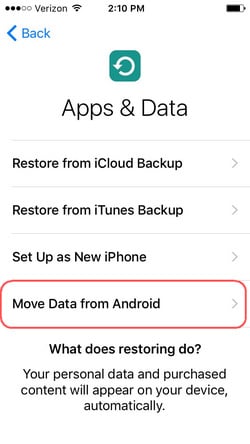
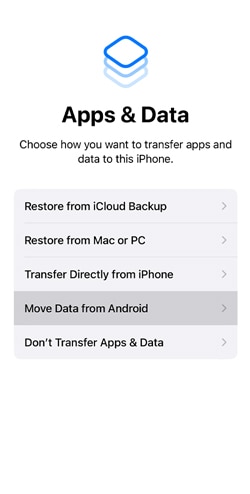
- Get your iPhone XS/11 and then set up the language, passcode, touchID. After that connect it to a Wi-Fi network. Browse for the ‘Apps & Data’ and select ‘Move Data from Android’.
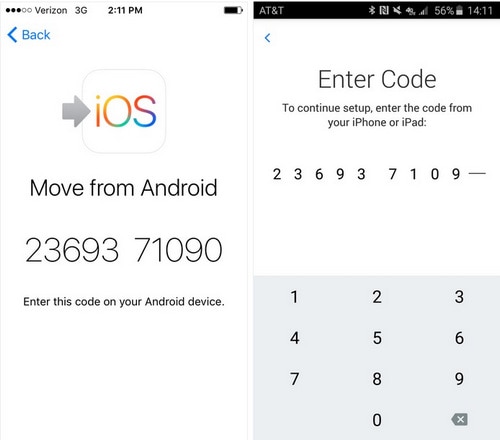
- On your Nokia C12, click ‘Continue’ and then ‘Agree’. A prompt asking for a code will appear on your Android mobile.
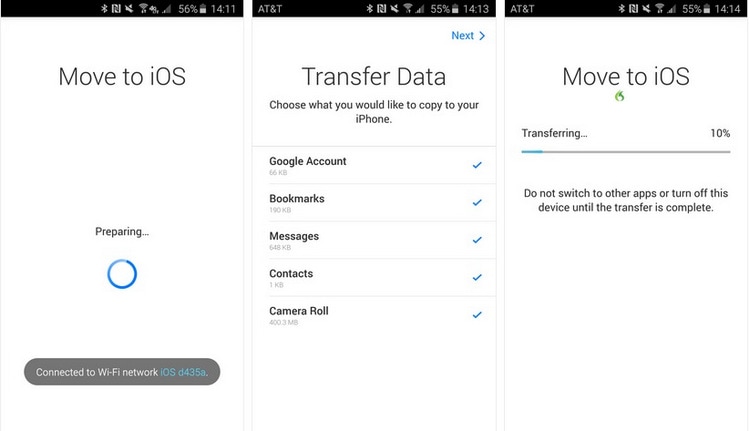
- Get the iPhone and hit ‘Continue’ and note the displayed code. Enter this on your Nokia C12. When both the Android and iPhone are connected to the Wi-Fi, select ‘Contacts’ from the data types and tap ‘Next’.
- On your Nokia C12, click ‘Done’ as soon as the data transfer is complete. Let the iPhone XS/11 sync the contacts. You need to set up your iCloud account now. Once it is done, you can view the transferred contacts on the iOS device.

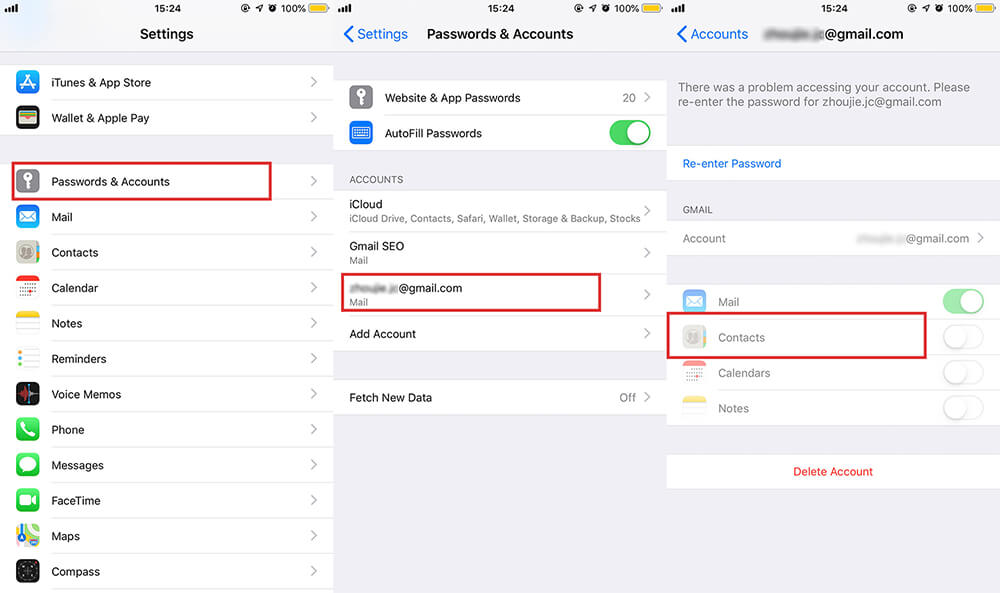
How to transfer contacts from Nokia C12 to iPhone XS/11 using Google account
Alternatively, you can import contacts to iPhone XS/11 from Gmail from your Android mobile, as well. to do that, you need to get your Gmail and Android device contacts to get synced first.
Here is the detailed guide to transferring contacts from an Android to an iOS device.
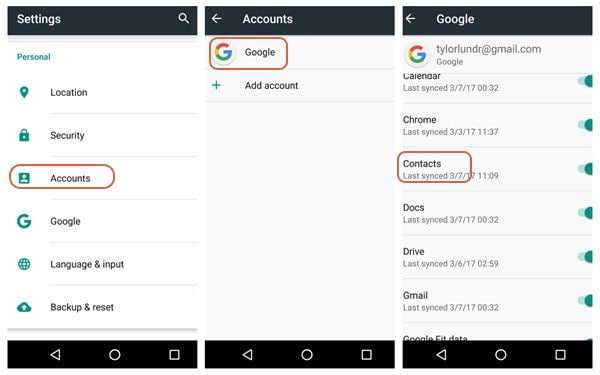
- Go to your Nokia C12 and go to the ‘Accounts’ tab and enable syncing of contacts. ‘Settings’ > ‘Accounts’ > ‘Google’ > Turn on ‘Contacts’ switch > tap on ‘3 vertical dots’ > ‘Sync Now’.
- Now, you need to add the same Gmail account to your iPhone X, in order to sync back contacts from it. For this, head to ‘Settings’ > ‘Passwords & Accounts’ > ‘Add Account’ > ‘Google’. Then, you’re required to punch in the details of the same Gmail account used over Android to sync contacts.
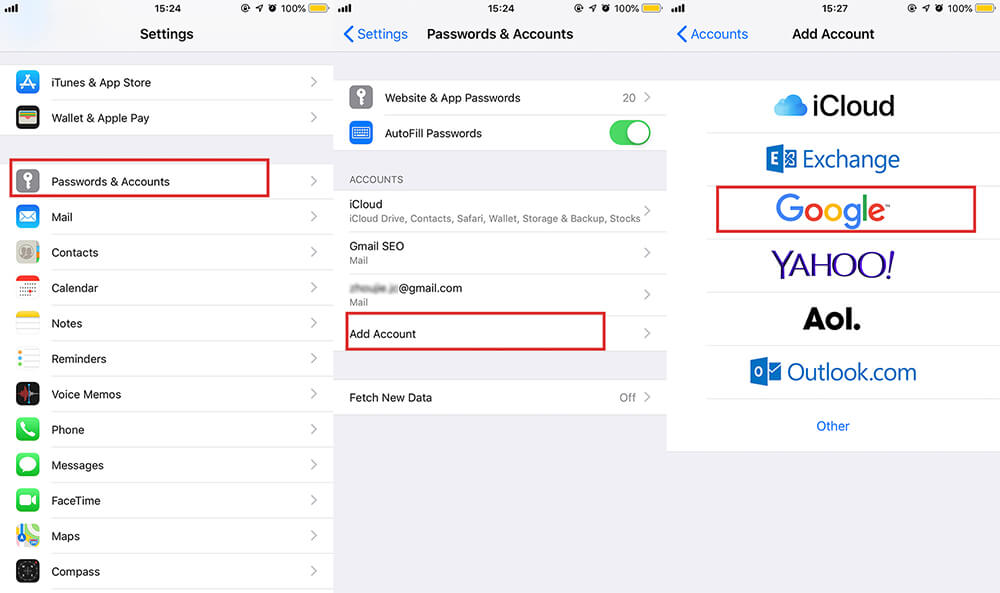
- Lastly, get into ‘Settings’, then ‘Passwords & Accounts’, tap on your Gmail account and ensure that the ‘Contacts’ switch is turned on. Turn it on if it is not already. Within a short span of time, you can find the Android contacts appearing on your iPhone XS/11 after that.
How to transfer contacts from Nokia C12 to iPhone XS/11 using SIM card
As you know the SIM card itself can hold a certain number of contacts, depending on the carrier and phone make and model.
- Open the ‘Contacts’ app and click on ‘More’. Go to the ‘Import/Export’ or simply ‘Export Contacts’ option there.
- Click on ‘Export to SIM’ or ‘SIM card’ and then select the source of contacts i.e. ‘Phone’/’WhatsApp’/’Google’/’Messenger’.
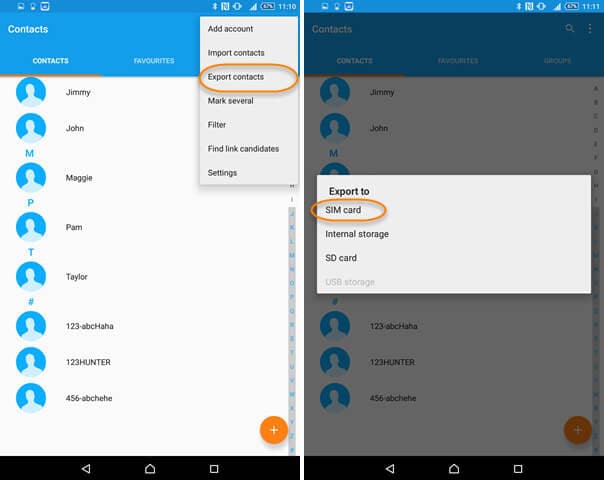
- Then hit ‘Export’ and ‘Continue’ afterward.
- Now, open the SIM card slot of your Nokia C12 and unmount the SIM. Insert it on your iPhone XS/11 and turn it on. You can find the contacts on your iPhone.
Note: Though, it’s rare nowadays. In case you happen to own a very old SIM card and your Nokia C12 supported the size. You might need to cut it to fit the iPhone XS/11’s micro-SIM slot.
How to Transfer Content from android to iPhone Directly
Since Nokia C12 is embracing Android as its operating system, transitioning from an iPhone to a Nokia C12, or vice versa, can pose challenges due to the differing operating systems. But it doesn’t mean impossible!
If you’re switching to an iPhone and need to transfer all your data, this article has you covered. We will look at ways to facilitate smooth Nokia C12 to iPhone transfer while ensuring your valuable information transfers across these devices with no problem.
Part 1. How to Transfer Content from Nokia C12 to iPhone Directly
You must be familiar with Nokia C12 Migrate if you are a Nokia C12 user. It is a solution for seamless data transfer used in Nokia C12 devices. With this app, you can transfer data from your Nokia C12 device to others, such as iPhones.
However, most of the latest Nokia C12 models are now unable to run Nokia C12 Migrate since it’s a pretty outdated app. It has been retired by the company since 2015. Users are seeking alternative methods for data transfer as a result. In this section, we explore more effective solutions to transfer content directly from Nokia C12 to iPhone besides Nokia C12 Migrate.
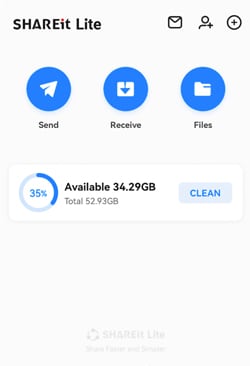
Solution 1. Using ShareIt App
When Nokia C12 Migrate is not an option, ShareIt can be a versatile alternative for Nokia C12 to iPhone transfer. ShareIt is a popular cross-platform file-sharing application known for its simplicity and efficiency. To use it, you’ll need to download the ShareIt app on both your Nokia C12 and iPhone.
If you have downloaded and installed it, you can continue with the steps below:
- Step 1: Connect your Nokia C12 and iPhone devices
Since ShareIt operates by creating a hotspot network among devices, it’s necessary to have both devices connected to the same Wi-Fi network. Make sure to keep both devices close to each other, too.
- Step 2: Select the files to transfer
On your Nokia C12 device, click the “Send” button. After a new window appears displaying all the categorized files on your device, choose the specific files you want to transfer.
- Step 3: Look for the Nokia C12 device to transfer
After selecting the files, press “Send” and provide the necessary permissions for GPS and Bluetooth. Once permissions are granted, the Nokia C12 device will initiate a search for nearby devices.
- Step 4: Transfer the files to the iPhone.
On your iPhone, open the ShareIt app and click “Receive.” This action opens all the necessary ports to receive shared files. When your Nokia C12 phone detects your iPhone, tap on the iPhone’s avatar to proceed with the transfer.

WPS Office Premium ( File Recovery, Photo Scanning, Convert PDF)–Yearly
Solution 2. Move Contents from Nokia C12 to iPhone via Apps & Data
Another good alternative of Nokia C12 to iPhone transfer app is Move to iOS. This Move to iOS app is designed by Apple specifically for users moving from Android devices to iPhones. You can download it from the Google Play Store. Then, you can transfer the data by accessing Apps & Data on the iPhone.
However, if you have been using your iPhone for a while, you must reset your iPhone first to proceed with this method. It can be done by going to Settings > General > Reset > Erase all content and settings. After resetting, your iPhone will be going back to the initial setup.
For more details, follow the instructions below:
Step 1: Setup your iPhone
Power up your new iPhone and progress through the initial setup until you get into the “Apps & Data” screen. Select the option that reads “Move Data from Android.”
Step 2: Agree to Terms and Conditions
Open Move to iOS on your Nokia C12 phone. Review the terms and conditions and press “Agree” to proceed.
Step 3: Enter the Code
On your Nokia C12, a screen will appear to request a 6-10-digit code. This code will be generated on your iPhone. Enter the displayed code on your Nokia C12 device to make a secure connection between the two devices.
Step 4: Select Content to Transfer
Next, choose the types of content you wish to transfer. Tap “Continue” to initiate the transfer process. Remember to keep your devices close to each other and connected to power until the transfer process is completed for quicker transfer.
Step 5: Transfer complete.
Once the transfer is complete, you will be prompted to finish setting up your iPhone. Follow the instructions to complete the setup process.
One significant reason why data transfer from iPhone to Nokia C12 is tricky is due to privacy concerns. Apple really prioritizes their user privacy. It implements strict security measures to prevent any breaches. While this is beneficial for users, it can also complicate data transfer.
Another contributing factor is the structure of the files. Android boasts a file system that is more straightforward, unlike iOS. As a solution, third-party software like Wondershare Dr.Fone offers tools like Phone Transfer to simplify the process. With Dr. Fone’s Phone Transfer, you can transfer any data from Nokia C12 to iPhone or iPhone to Nokia C12.
How to make iPhone to Nokia C12 data transfer with Dr.Fone:
- Step 1: Open Dr.Fone’s Phone Transfer tool
Make a connection between your iPhone and your Nokia C12 phone through USB cable on your computer. Launch Wondershare Dr.Fone on your computer and navigate to Toolbox > Phone Transfer.
- Step 2: Specify the source and destination devices
After connecting them, the platform will identify the connected devices and load their data onto the platform. Choose the Source and Destination devices to set the transfer path. Use the Flip button if necessary to alter the transfer direction.
 CollageIt Pro
- Step 3: Choose the data type for the transfer
Proceed to select the types of data you wish to transfer. Checkmark the category and click the Start Transfer button. If you want to remove existing data from the destination device, you can select “Clear data before copy.”

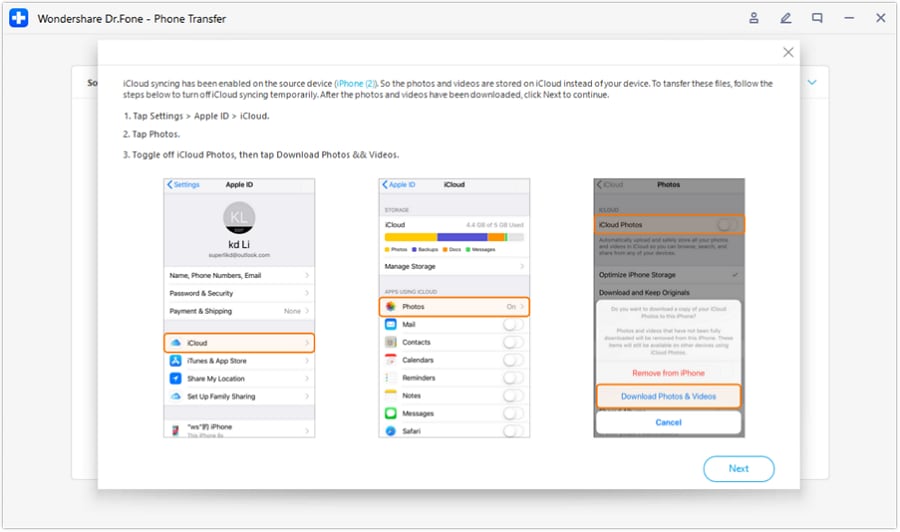
- Step 4: Disable iCloud syncing
Now, Dr. Fone’s Phone Transfer tool should prompt a specific operation on the window. Follow the instructions to turn off iCloud syncing. Open your iPhone Settings and tap on your device’s name. Go to iCloud > Photos to disable the toggle for iCloud Photos.
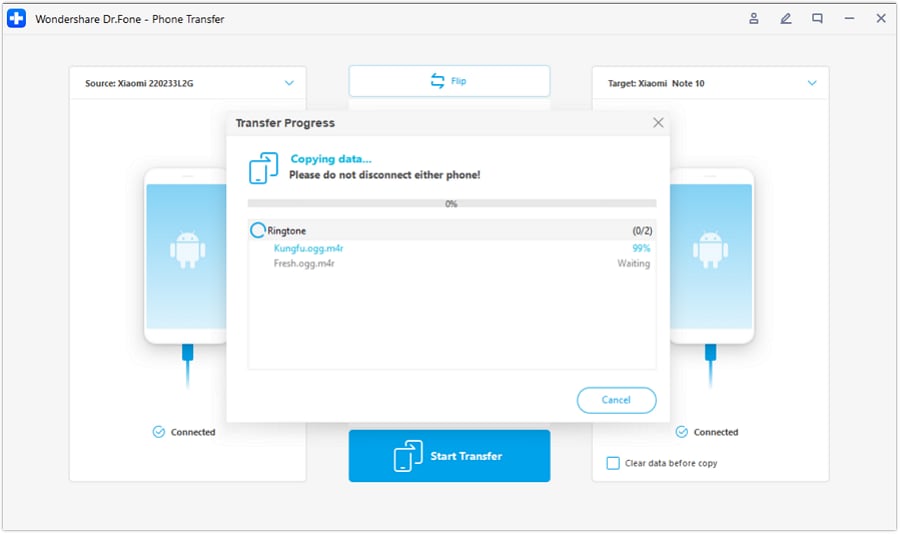
- Step 5: Monitor data transfer progress
The progress of the data transfer will be displayed in a pop-up window. Once completed, click OK to conclude the process.
 Any DRM Removal for Win:Remove DRM from Adobe, Kindle, Sony eReader, Kobo, etc, read your ebooks anywhere.
Part 3. How to Do Nokia C12 to iPhone Data Transfer Using Dropbox/Google Drive
Another method for Nokia C12 to iPhone transfer is using Cloud services like Dropbox or Google Drive. Both Dropbox and Google Drive serve as virtual storage spaces accessible from any device with an internet connection. Users can upload and store their files to the cloud, making them available for download on other devices.
Either Google Drive or Dropbox follows similar steps for data transfer. The difference between them is in the amount of free storage each service provides. Notably, Google Drive provides 15GB of free storage, while Dropbox offers 2GB.
Follow these steps on how to do a Nokia C12 to iPhone transfer via cloud storage services.
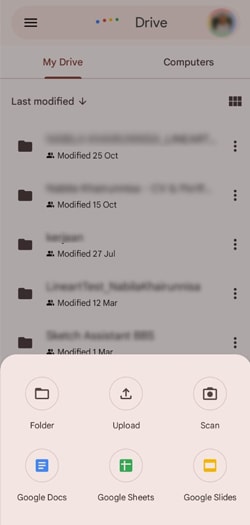
- Step 1: Install and set up Dropbox/Google Drive:
Begin by installing the Dropbox or Google Drive app on both your Nokia C12 and iPhone. Create accounts if you don’t have them already.
- Step 2: Upload the files from Nokia C12
Open the cloud storage app on your Nokia C12 device and upload the data you want to transfer. This can include photos, videos, documents, and more. Then, wait for the upload to complete. Make sure that all files are successfully uploaded before proceeding.
- Step 3: Sign in to the cloud storage on your iPhone
On your iPhone, open Dropbox or Google Drive and sign in with the same account. Find the transferred files in the cloud storage.
- Step 4: Download to iPhone:
Select the files you want to transfer and download them to your iPhone. Once the download is complete, organize the transferred files on your iPhone as needed.

Conclusion
Transitioning from a Nokia C12 device to an iPhone, or vice versa, may present challenges due to the difference in operating systems. However, with the right tools and methods, the iPhone to Nokia C12 data transfer can be done seamlessly and efficiently.
Even though Nokia C12 Migrate is no longer in the game, apps like ShareIt and Move to iOS can be alternatives for a direct transfer. If things get a bit trickier when transferring from iPhone to Nokia C12 due to Apple’s privacy measures, third-party software like Wondershare Dr.Fone’s Phone Transfer is there to simplify it all.
And for those who prefer the cloud, Dropbox and Google Drive also offer a solution. So, no matter your preference, there’s a solution to ensure your data transfer moves smoothly.
How to Transfer Apps from Nokia C12 to Another
Nowadays, the transfer of apps between devices has become an essential task. Switching from one phone to another requires a smooth transfer of applications. It is particularly important when transitioning to an Android device. This comprehensive guide explores how to transfer apps to new Android phones.
Moreover, understanding the app migration process is crucial whether you are moving from an iOS device or another Android phone. This article aims to simplify the journey, offering step-by-step instructions and expert tips.
 Epubor Audible Converter for Mac: Download and convert Audible AAXC/AA/AAX to MP3 with 100% original quality preserved.
Part 1: Is It Possible To Transfer Apps from Nokia C12 to Other Android Devices and iPhone to Android?
It is possible to transfer applications from an Android phone to another Android. There are multiple ways that Android offers to move apps between two smartphones. These include using the Google Play Store and signing in with the same Google account. Also, multiple tools and apps can assist you in this context.
By contrast, it is not feasible to transfer apps to a new Android phone from an iPhone. That’s mainly because of the different operating software in the two devices. The applications downloaded in iOS are not compatible with Android. Additionally, Google Play Store does not support these iOS applications. That’s why directly transferring apps from iPhone to Android is impossible. You must download it again from the Google Play Store on your Nokia C12.
Part 2: How To Transfer Apps From One Android Device to Another in 3 Simplified Steps?
You can try Wondershare Dr.Fone - Phone Transfer tool if you are trying to transfer apps from one Android to another. This tool offers an efficient and convenient solution for transferring data between devices. With a one-click method, it simplifies moving various data types, including contacts, apps, photos, videos, and more.
Also, the software supports a wide range of devices, including the latest products of Apple, Samsung, and other famous brands. Notably, it is compatible with the latest iOS 17 and Android 14 versions, ensuring smooth data transfer. This makes it a versatile tool for users seeking a hassle-free and convenient data transfer experience across various devices.
Key Features
- Wondershare Dr.Fone – Phone Transfer tool allows you to select the desired type of files and transfer them with just one click.
- The tool enables the users to transfer within devices in a few minutes. This saves a lot of time and increases the productivity of the users.
- This software is operatable and provides easy navigation for each kind of user. That means you don’t have to be a tech expert to run the tool.
Steps Involved To Transfer Apps From One Android Device to Another Using the Phone Transfer Tool
Wondershare Dr.Fone – Phone Transfer provides a complete solution through a phone transfer process. You can discover the following essential steps in this how to transfer apps to a new Android phone procedure:
- Step 1: Download Dr.Fone and Choose Phone Transfer Tool
Download the Wondershare Dr.Fone toolkit by pressing the “Free Download” provided and install it on your Windows PC or MacBook. Next, choose the “Phone Transfer” tool from the “Toolbox” tab present on the left side.
- Step 2: Device Selection for Android-to-Android Transfer
Start the process by connecting both Android devices to load their data onto the platform. After that, designate the “Source” and “Destination” devices for the transfer. You can also use the “Flip” button to flip the Nokia C12 devices.

- Step 3: Select the Data Categories for Transfer
Now, you have to select the “Apps” category to be transferred in this process. Proceed by clicking the “Start Transfer” button after selecting it to start the transfer. A window will display the progress of the transfer, where you can view the progress bar. Upon successfully completing the data transfer, a confirmation message will appear on the window. Hit the “OK” button to conclude the transfer process.

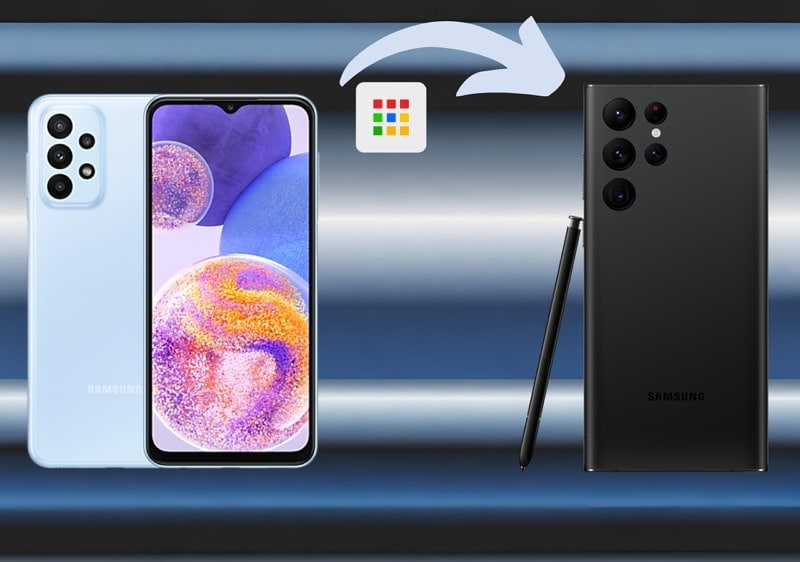
Part 3: How To Transfer Apps From Non-Samsung to Galaxy Devices Using Samsung Smart Switch?
Samsung Smart Switch allows you to quickly transfer various contents from your one Android phone to a Galaxy device. Also, it provides you the option to transfer contents selectively. The contents include apps, contacts, messages, media, and more. Here, we’ll transfer apps from a non-Samsung Android phone to a Galaxy device.
- Step 1: First of all, you have to open the Smart Switch application on your Galaxy device. Then, tap “Continue” to agree with the terms and conditions. After that, allow the app’s specific permissions to continue the operation.
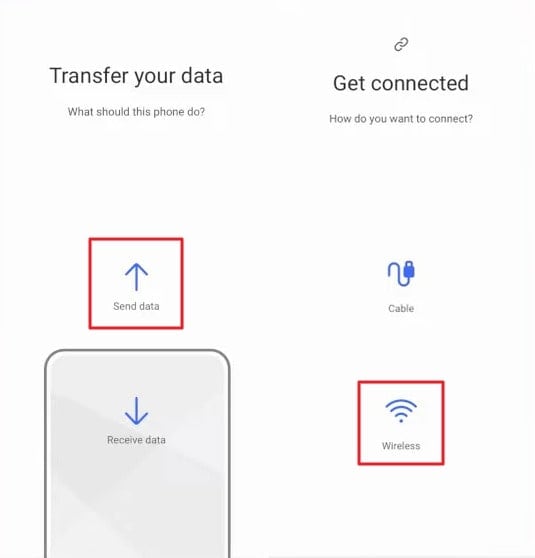
- Step 2: Next, open the Smart Switch app on the old device and tap the “Send Data” option. Then, select the “Wireless” option to start the procedure.
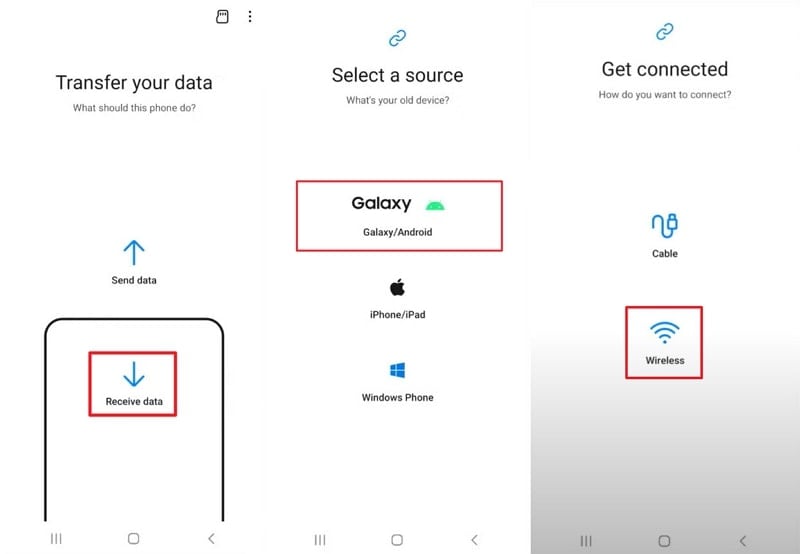
- Step 3: Now, you have to tap the “Receive Data” option on your Galaxy device. Next, select the “Galaxy/Android” option as a data source, followed by the “Wireless” option. Then, you need to “Allow” the connection on the old device that this new device wants to have.
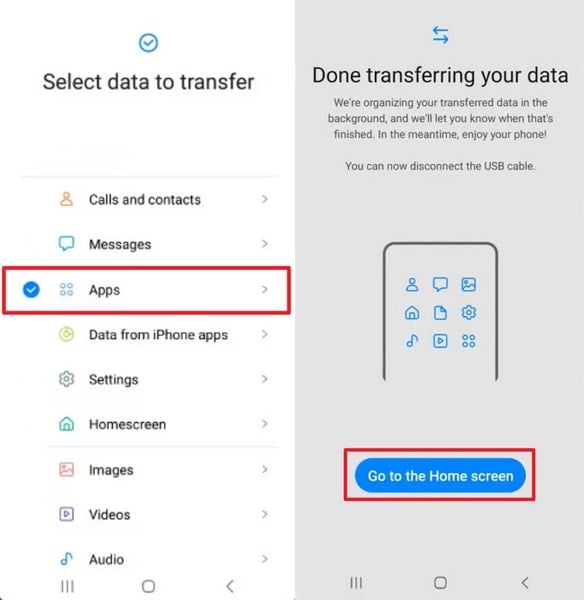
- Step 4: The Galaxy phone will subsequently ask for the data selection. There, you can go into the “Custom” option and select the “Apps” option. Next, choose the applications you want to transfer and hit the “Transfer” option. The transfer process will be complete within a few minutes. You can tap on the “Go to the Home Screen” prompt and find the apps you have just transferred.
Part 4: How To Transfer Apps Between Android Devices With the Help of Google Backup
There is another method that you can try to transfer apps to a new Android phone. This includes restoring a Google backup on a new device. You can back up all of your data, including the applications, to the Google account you have signed in. Later, you can restore the same data on a new device quite easily:
- Step 1: First,access the “Settings” menu on your old Android device and tap on the “Additional Settings.” Then, you need to navigate to and tap on the “Back up and Restore” option.
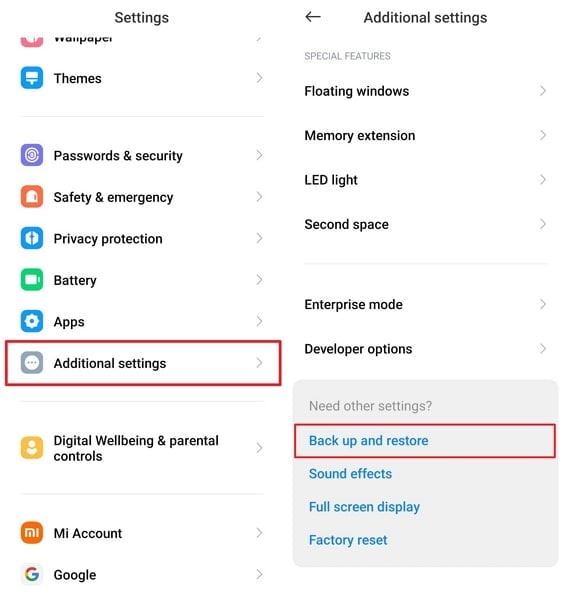
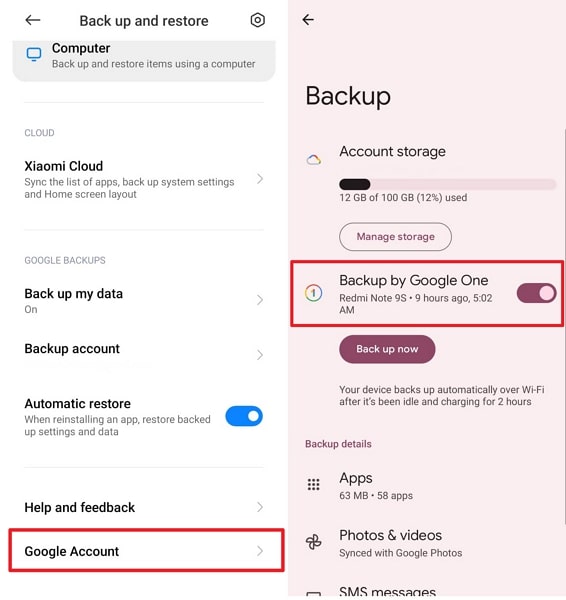
- Step 2: Next, choose the “Google Account” option and enable the “Backup by Google One” toggle. If the toggle is off, slide it to activate and select “Back up Now.” After that, your data is securely stored when the backup process finishes.

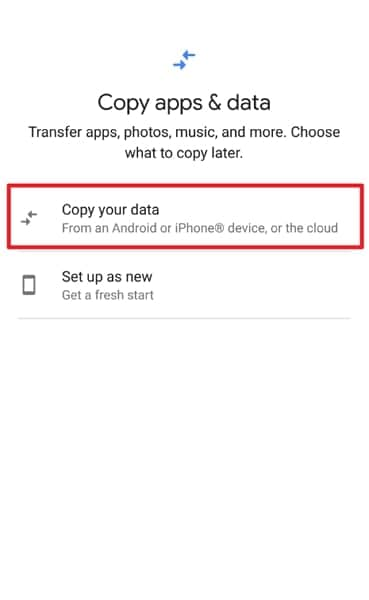
- Step 3: To restore your data, you have to charge and power up your new Android device. Then, follow the on-screen instructions until prompted to restore data from another device. Following this, you will have to choose the Nokia C12 device from which you want to restore data and tap the “Copy Your Data” option.
 Jet Profiler for MySQL, Enterprise Version: Jet Profiler for MySQL is real-time query performance and diagnostics tool for the MySQL database server. Its detailed query information, graphical interface and ease of use makes this a great tool for finding performance bottlenecks in your MySQL databases.
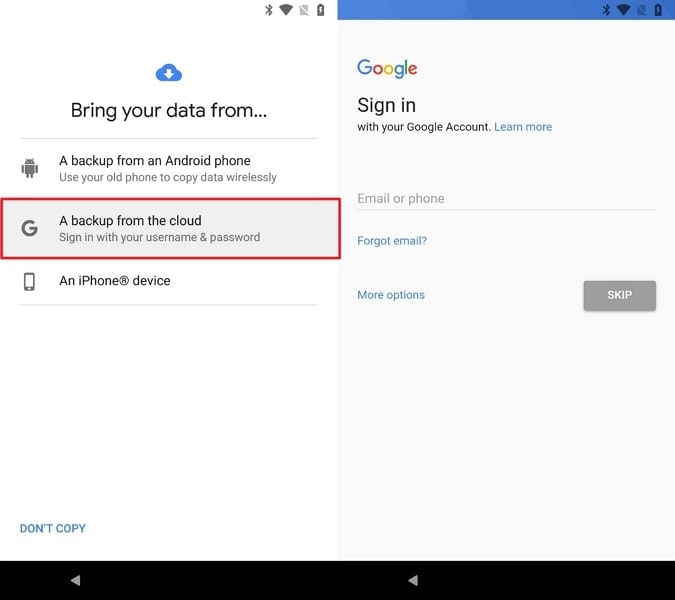
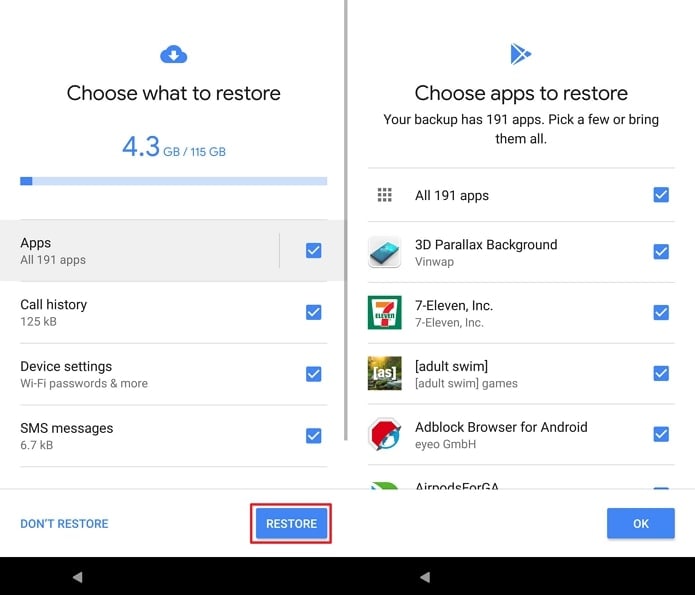
 - Step 4: Next,connect your Nokia C12 to the same Wi-Fi network as your old phone is connected. Then, select “A backup from the cloud” from the restoration options. In the next step, sign in to your Google account on your new device using the same account as your old phone. Now, you need to choose the recent backup from your old device.

- Step 5: Lastly, you can choose the “Apps” option to pick the apps you want on the new device. Afterward, you have to tap on the “Restore” option to restore your Google backup.

 Lyric Video Creator Professional Version
Part 5: How To Transfer and Download Apps From One Phone to Another Using Play Store
You can also transfer apps from one phone to another using the Play Store. It’s more like downloading apps and a time-consuming procedure. This manual method uses the Play Store to detect applications not installed on your new Galaxy device. Then, after the detection process, you can download those applications. The “how to transfer apps to new Android phone” method includes some steps that are described below.
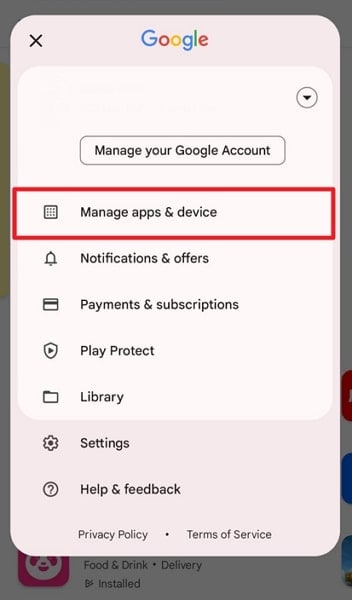
- Step 1: First, access the “Google Play Store” on your new Android device and tap the “Profile” icon situated at the upper right corner of the search bar. Among the displayed options, proceed with choosing “Manage Apps & Device” to proceed.
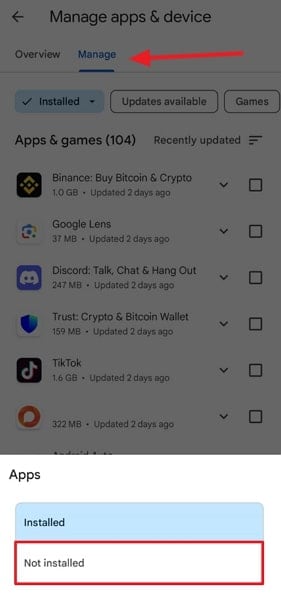
- Step 2: Then, move to the “Manage” section and select the “Installed” drop-down menu. From there, opt for the “Not Installed” category to see all the previously installed apps of your old Android smartphone.
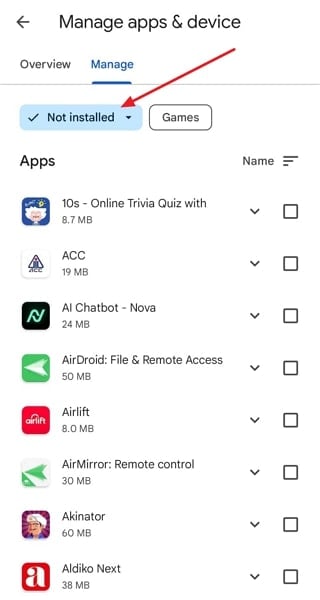
- Step 3: You’ll encounter a list of previously installed apps linked to your Google account but not currently on your new Galaxy device. Choose the desired apps and tap the “Install” button located at the top right to reinstall them.

Conclusion
In a nutshell, you can transfer the applications from your old Android device to a new Galaxy phone using various methods. We have described these effective methods through which you can easily transfer your old apps. However, the Wondershare Dr.Fone – Phone Transfer method stands out as the best technique to transfer apps to new Android phones. The software allows the transfer process to be implemented in simple steps that require a few clicks.
- Title: How to Transfer Contacts from Nokia C12 to iPhone XS/11 | Dr.fone
- Author: Nova
- Created at : 2024-08-30 01:23:04
- Updated at : 2024-08-31 01:23:04
- Link: https://blog-min.techidaily.com/how-to-transfer-contacts-from-nokia-c12-to-iphone-xs11-drfone-by-drfone-transfer-from-android-transfer-from-android/
- License: This work is licensed under CC BY-NC-SA 4.0.