
How to Transfer Contacts from Oppo A2 to Outlook | Dr.fone
How to Transfer Contacts from Oppo A2 to Outlook
I would like to export/edit my contacts that are on My Oppo A2 and get them onto my computer for a back, to edit them, to input/import them into Outlook. Can this be done and how? Is there something I can download or a backup assistant?
With lots of contacts on your Oppo A2, you may want to transfer these contacts from Oppo A2 to Outlook for backup. This way, when you get a new Android phone or when you lose contacts by accident, you can quickly get them back.
To sync Android to Outlook, I highly recommend an Android manager: Dr.Fone - Phone Manager (Android) . This program empowers you to transfer contacts on your Oppo A2 to Outlook 2003/2007/2010/2013 easily and effortlessly.
Dr.Fone - Phone Manager (Android)
One Stop Solution to Transfer Contacts from Oppo A2 to Outlook
- Transfer files between Android and computer, including contacts, photos, music, SMS, and more.
- Manage, export/import your music, photos, videos, contacts, SMS, Apps etc.
- Transfer iTunes to Android (vice versa).
- Manage your Oppo A2 on computer.
- Fully compatible with Android 8.0.
4,858,377 people have downloaded it

How to sync Android with Outlook?
Now, I’d like to introduce you how to transfer Android contacts to Outlook. Download this free trial version on your computer. Then check out the easy steps below.
 PaperScan Professional: PaperScan Scanner Software is a powerful TWAIN & WIA scanning application centered on one idea: making document acquisition an unparalleled easy task for anyone.
Step 1. Connect Android phone with a computer and run Dr.Fone
To start with, connect your Oppo A2 with a computer either via a USB cable. Run Dr.Fone on your computer and choose Transfer fron the main window Then, your Oppo A2 will be detected instantly. After that, the primary window will appears like the screenshot shows below.

Step 2. Android to Outlook sync
Then, click “Contacts” under “Information” panel on the top. In the contact management window, choose the contacts that you want to export. Click “Export” button. When the drop-down menu pops up, you can either click “Export selected contacts to computer” or “Export all contacts to computer”. After that, click “to Outlook Express” or “to Outlook 2003/2007/2010/2013”. Then, the contract transferring begins. Be sure your Oppo A2 is connected all the time.
As you see, apart from exporting Android contacts to Outlook, you can also copy contacts from Oppo A2 to vCard, Windows Live Mail and Windows Address Book. If you have a Gmail account, you’re able to export Android contacts to your computer, and then backup these Android contacts to your Gmail account too.

Now, download Dr.Fone - Phone Manager (Android) to have a try!
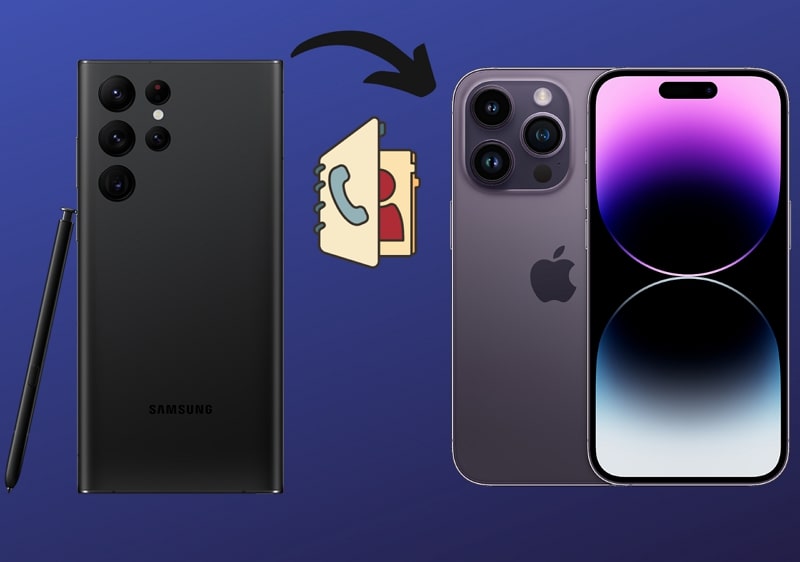
6 Ways To Transfer Contacts From Oppo A2 to iPhone
Transitioning from an Android to an iPhone can be an exciting move. However, the process to transfer contacts from Oppo A2 to iPhone might seem daunting. Thankfully, technological advancements have introduced several hassle-free methods. With these, you can smoothly transfer contacts from an Android device to an iPhone.
This article will delve into 6 effective ways to effortlessly migrate your contacts. It ensures a smooth transition without worrying about losing essential contacts. These step-by-step solutions will guide you through the process, simplifying the task.
Author Recommendation. The Best Method to Transfer Contacts from Oppo A2 to iPhone

Way 1: Wondershare Dr.Fone
Wondershare Dr.Fone is a powerful and user-friendly tool. It simplifies the process of transferring contacts from an Android device to an iPhone. Dr.Fone offers a robust phone transfer feature that can transfer your contacts and other data in minutes. With its user-friendly interface, the process involves straightforward clicks. This powerful tool efficiently moves data between devices operating on different systems, such as iOS and Android.

Key Features of Wondershare Dr.Fone
- It is compatible with Android 14 and the latest iOS 17.
- The Phone Transfer of Wondershare Dr.Fone is fully compatible with over 8000 devices from all major brands.
- Wondershare Dr.Fone enables the transfer of up to 15 different file types between phones.

Steps To Transfer Contacts From Oppo A2 to iPhone via Wondershare Dr.Fone
Follow these simplified steps for how to transfer contacts from Oppo A2 to iPhone using Wondershare Dr.Fone:
- Step 1: Choose Phone Transfer After Launching Dr.Fone
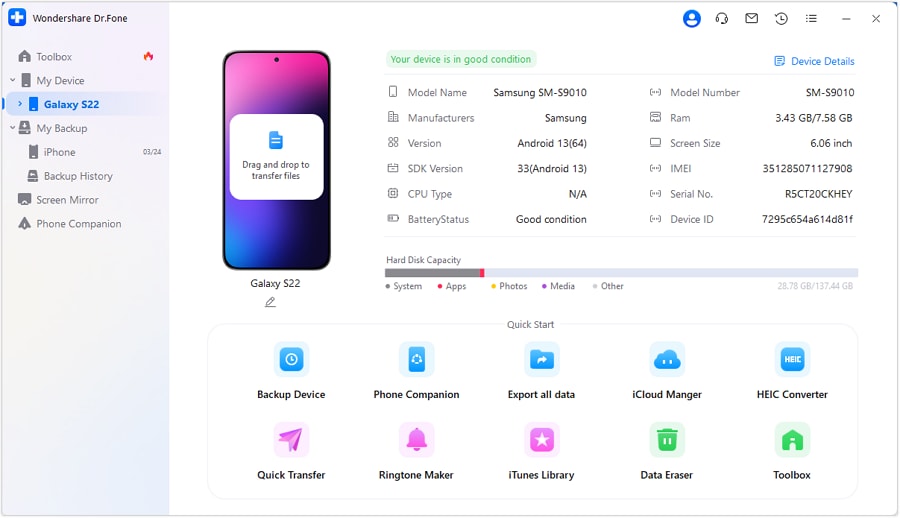
On your computer, download and install the latest version of Wondershare Dr.Fone. Then open it once it is installed and click “Toolbox” from the left sidebar. Proceed to the primary interface and select the option labeled “Phone Transfer.” Then, connect both your Android and iPhone devices to the computer.
Power Tools add-on for Google Sheets, 12-month subscription

- Step 2: Connect Devices and Complete Contacts Transfer
Once devices are detected by Wondershare Dr.Fone, ensure that they are correctly assigned. The Android device will be at the “Source” location. In the same way, assign the “Destination” position to the iPhone. Choose the “Contacts” category among the data options and click “Start Transfer.” Allow the process a few moments to complete.

Way 2: Utilize Move to iOS App
The Move to iOS app is a dedicated solution provided by Apple. It is specifically designed to help the migration of data, including contacts, from an Android device to an iPhone. This official app aims to simplify the transition process. Nevertheless, its utilization is limited to setting up an iPhone for the initial time or following a factory reset. Here is how to transfer contacts from Oppo A2 to iPhone using Move to iOS app:
- Step 1. Download and set up the Move to iOS application on your Oppo A2. Then, start setting up your iPhone until you reach the “Apps & Data” screen. Here, choose “Move Data from Android” and go on to open the Move to iOS app on the Android device.
 Easy GIF Animator is a powerful animated GIF editor and the top tool for creating animated pictures, banners, buttons and GIF videos. You get extensive animation editing features, animation effects, unmatched image quality and optimization for the web. No other GIF animation software matches our features and ease of use, that’s why Easy GIF Animator is so popular.
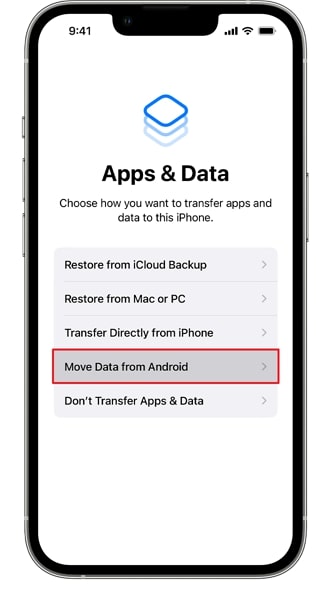
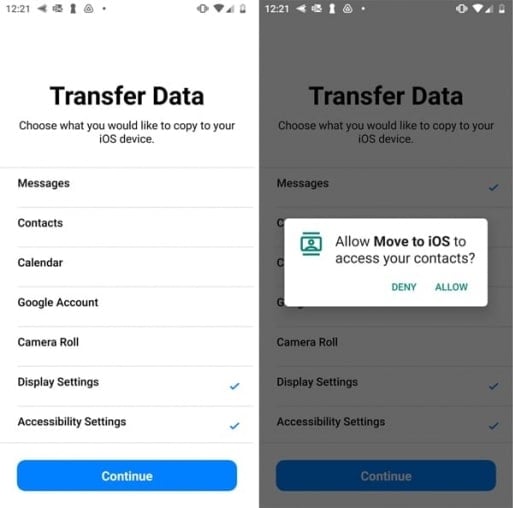
- Step 2. Proceed by tapping “Continue” on both your devices and consenting to the terms and conditions. Follow it by tapping “Next” and insert the code from the iPhone to the Move to iOS app to establish a connection. From the available data transfer options, ensure to choose “Contacts.” Now, follow the on-screen prompts to complete the transfer process.

Way 3: Sync Contacts to Google Account
Syncing contacts to a Google account serves as a convenient method. It can automatically transfer contacts from an Android device to an iPhone. Moreover, it is an excellent choice if your Android contacts are stored in a Google account. This method operates for both new and already set-up iPhones. Follow these instructions to sync your contacts to your Google account and subsequently access them on your iPhone:
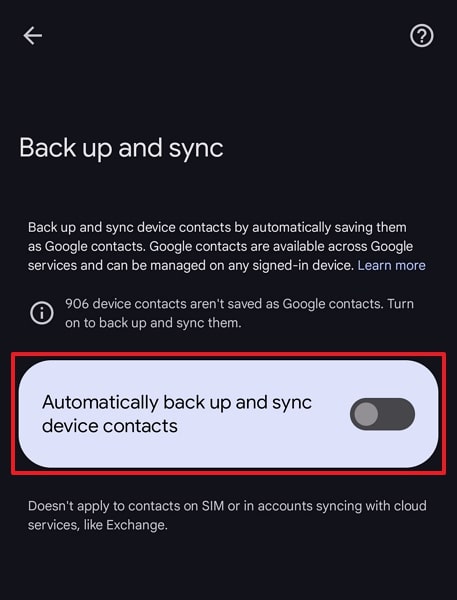
- Step 1. Access the Google Contacts app on your Oppo A2 and tap on the “Profile” icon at the top right corner. Following this, access the “Contacts Settings” option followed by “Google Contacts sync settings.”
- Step 2. Next, you need to select “Also sync device contacts.” On the following screen, ensure “Automatically back up & sync device contacts” is toggled on. Now, move to your iPhone and access the Settings app.
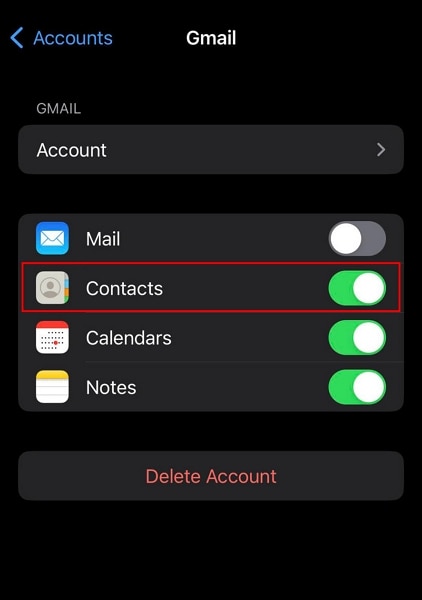
- Step 3. Go to the “Settings” app and locate the “Contacts” settings. Proceed by scrolling to locate “Accounts” and then tap on it. Afterwards, choose “Add Account” and sign in with your Google Account. Once logged in, make sure to enable the “Contacts” option.
Way 4: Using the SIM Card
Transferring contacts using a SIM card provides a basic yet effective method. This method might be the least convenient option. The reason is it involves physically exchanging SIM cards between the phones. Moreover, you can’t use this method if you use the Google Contacts app. However, some Android brands like Samsung still allow it. Follow these steps for how to move contacts from Oppo A2 to iPhone via SIM card:
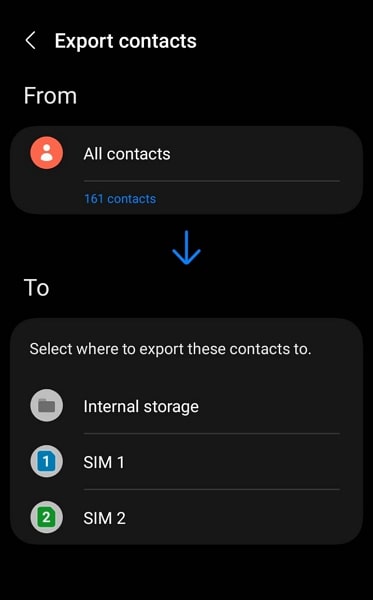
- Step 1. Open the Samsung Contacts app on your Android and tap the “Three Lines” icon to select “Manage Contacts.” Here, tap “Export Contacts,” choose the “SIM Card” as the export location, and select “All” contacts to be exported.
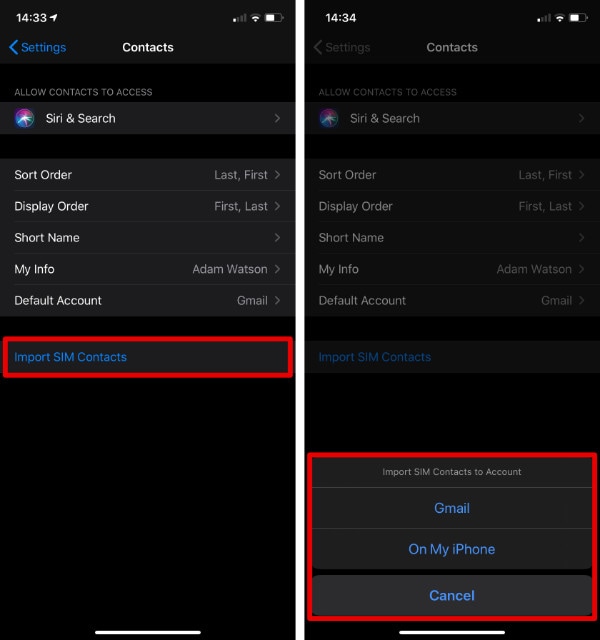
- Step 2. After it is done, insert the SIM card into the iPhone and open Settings. Move to “Contacts” and press “Import SIM Contacts” on the next screen to complete the process of moving contacts from a SIM card on an iPhone or email.
Way 5: Sync Using iTunes/Finder
Syncing contacts from an Android device to an iPhone using iTunes or Finder is another method. It is an indirect transfer by syncing Google contacts from your account to your iPhone. This method enables you to consolidate your contacts from your Google account onto your iPhone. Here is how to send contacts from Oppo A2 to iPhone via iTunes/Finder:
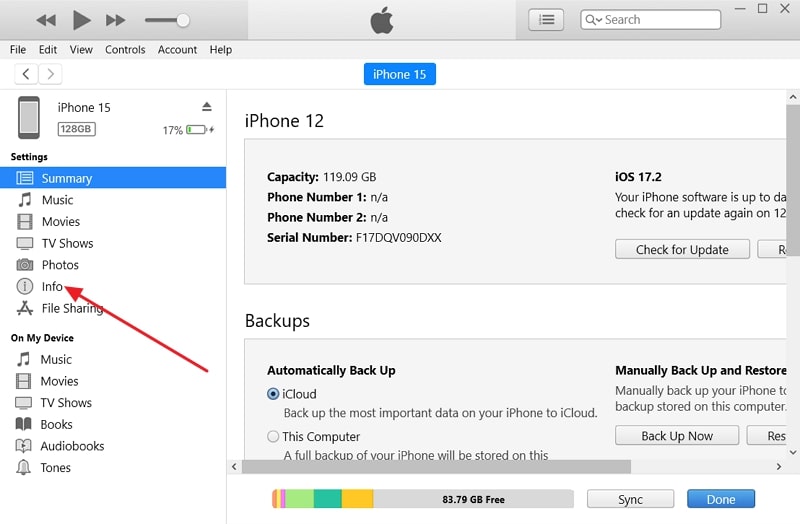
- Step 1. Make sure your Oppo A2 has its contacts synced with a Google account. Next, download and install the most recent version of iTunes on your computer. Link your iPhone to your computer using a USB cable and launch iTunes. Once your iPhone icon appears in iTunes, click on it and navigate to the “Info” tab in the left sidebar.
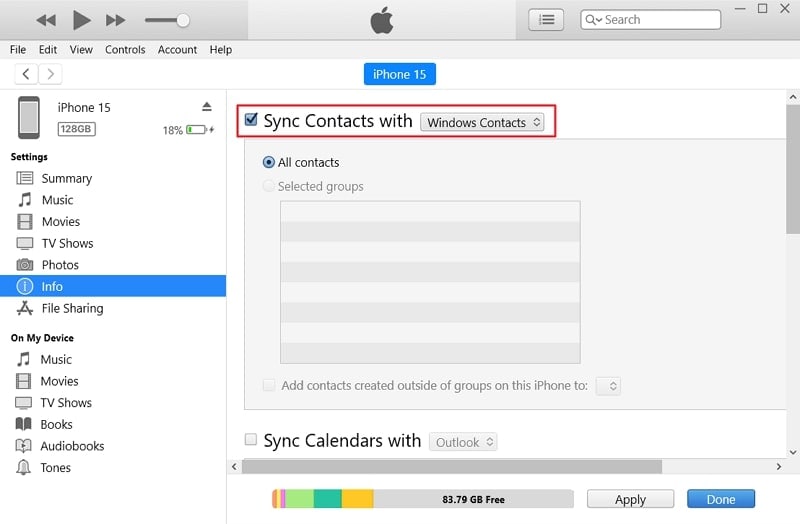
- Step 2. Ensure the box beside “Sync Contacts with” is checked, then pick “Google Contacts” from the drop-down menu. Log in to your Google account and designate the contacts for synchronization. Tap “Apply” in the bottom right to initiate syncing your iPhone with your Google contacts.
Way 6: Import the VCF File
Importing a VCF file directly to your iPhone allows for a simple and direct transfer of contacts. It happens without the need for additional software or complex procedures. This method retains contact details and ensures a smooth transition. Follow these steps to import a VCF file containing your contacts while answering how to move contacts from Oppo A2 to iPhone:
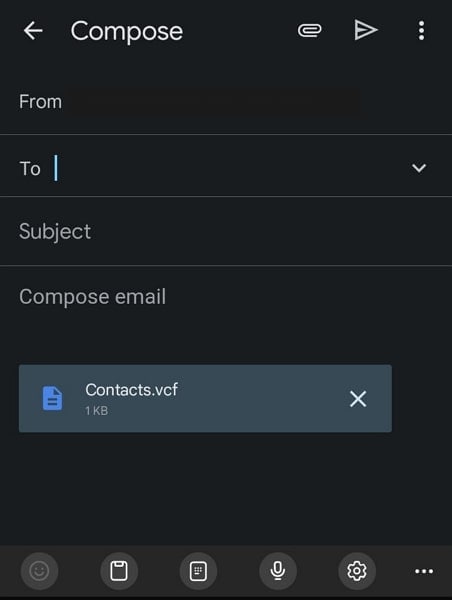
- Step 1. Access the Contacts app on your Oppo A2 and hold on to a contact to select. Among the options displayed, opt for “Select All” and proceed by tapping the “Share” option. Now, you need to select a way to share these contacts. Here, we are choosing Gmail as it is the simplest, but you can select any feasible method.
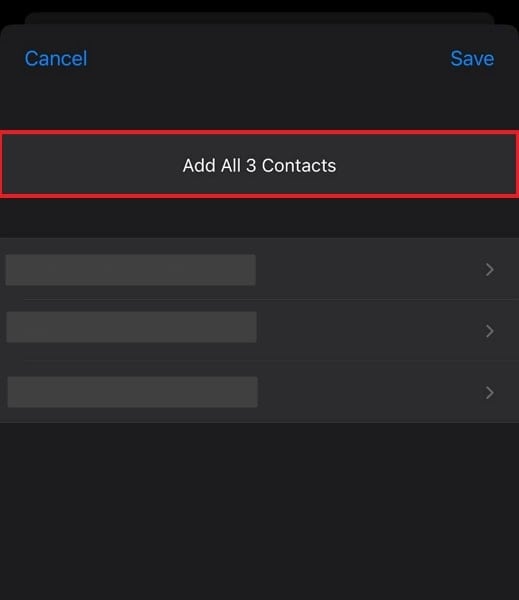
- Step 2. Now move to your iPhone and open the mail with Contacts from the Android device. Press the attached file, choose “Share,” select the “Contacts” app and tap “Add All Contacts.”
 Power Tools add-on for Google Sheets, Lifetime subscription
Author Recommendation: The Best Method To Transfer Contacts From Oppo A2 to iPhone
When considering the most efficient and reliable method to transfer contacts from Oppo A2 to iPhone, our recommendation leans toward using Wondershare Dr.Fone. Among various available methods, Wondershare Dr.Fone offers a comprehensive, user-friendly experience.
It simplifies the transfer process with its intuitive interface and dependable performance. Here’s why we recommend Wondershare Dr.Fone for transferring contacts:
- Ease of Use: Wondershare Dr.Fone’s straightforward interface makes it accessible to users with varying levels of technical expertise. The step-by-step guidance ensures a hassle-free transfer process.
- Comprehensive Transfer Options: Beyond contacts, Wondershare Dr.Fone enables the transfer of various data types. This caters to broader migration needs, including photos, messages, music, videos, etc.
- Reliability and Security: With a solid reputation in data management software, Wondershare Dr.Fone ensures the security and integrity of your data. It prioritizes privacy and reliability during the transfer process.
- Cross-Platform Compatibility: Fone supports transfers between different operating systems. That makes it an ideal choice when migrating from Oppo A2 to iOS devices like iPhones.
- Efficiency and Speed: The software streamlines the transfer process to an excellent measure. It saves valuable time by swiftly migrating contacts and other data without data loss or errors.
Conclusion
In conclusion, transitioning from an Android device to an iPhone doesn’t have to be a daunting task. It is especially not the case when it comes to how to transfer contacts from Oppo A2 to iPhone. Throughout this guide, we’ve explored various effective methods. Each one offered its unique approach to simplify the transfer process.
You can opt for the user-friendly interface of Wondershare Dr.Fone, the official Move to iOS app, or sync via Google accounts. Other options include utilizing the SIM card, syncing through iTunes/Finder, or the direct import of a VCF file. Selecting the ideal method often depends on personal preferences. Wondershare Dr.Fone emerges as a standout recommendation due to its versatility, reliability, and ease of use.
5 Ways To Teach You To Transfer Files from Oppo A2 to Other Android Devices Easily
Transferring data from one phone to another when switching devices is a complex and tough task. The data stored in their old phone is one of the major reasons why people are hesitant to switch devices. However, it is only the case when you don’t know the right method. If you plan to switch to a new Android device, this article will help you transfer files from Oppo A2 to Other Android Devices.
There are multiple ways to transfer files from one Android to another, but we have chosen the easiest 5 methods in this article. Stick with the article to find different methods for Android-to-Android file transfer, along with their pro, cons, and best-case scenarios.
 Allavsoft Batch Download Online Videos, Music Offline to MP4, MP3, MOV, etc format
Part 1: Transfer Files Between Android via Bluetooth
When trying to transfer files between Android phones, Bluetooth is available as the in-built option. It is part of all Android devices, and you don’t need any internet, computer, or cable to use it. Although newer and faster transfer methods have overshadowed Bluetooth as a data transfer option, it is still among the reliable options.
Steps To Transfer Files via Bluetooth
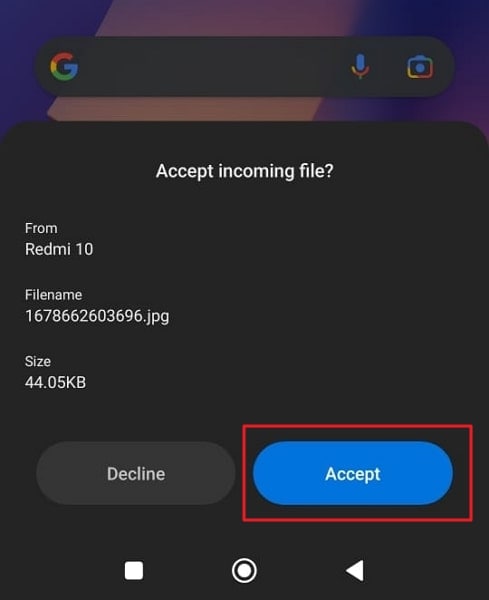
Step 1: Start by enabling Bluetooth on both Android devices and ensuring their visibility is set to all. Afterward, select the targeted files on the old Android phone.
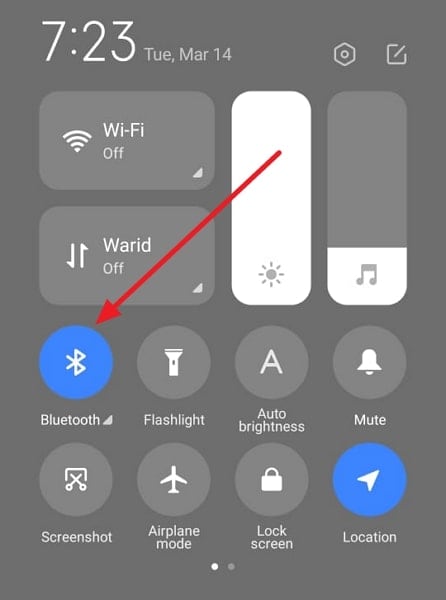
Step 2: Now, press the “Share” icon and select “Bluetooth.” Choose your new Android device from the available devices on the next screen.
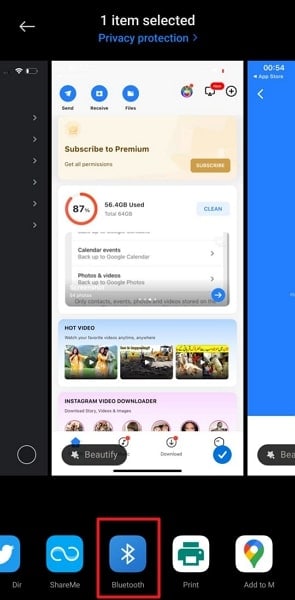
Step 3: Move to your new Android phone and hit “Accept” to start the transfer process. The transfer time will be depended on the size of the files.
Pros and Cons
| Pros | Cons |
|---|---|
| · It is an in-built option for all Android devices. | · It is an extremely slow method for transferring files |
| · You don’t need internet, cable, or Wi-Fi to send files via Bluetooth. | · If you send large files using this method, the process frequently fails, which can corrupt the files. |
| · Using Bluetooth doesn’t require any special knowledge or skills |
 OtsAV DJ Pro
Best For
Using Bluetooth is best for transferring small to medium, size files. It is also convenient when you can’t access the internet.
Part 2: Transfer Files from Oppo A2 to Other Android Devices by Nearby Share
Nearby Share is a method developed by Google to share files between Android phones. It can be considered Google’s answer to Apple’s AirDrop, though, unlike AirDrop, it doesn’t require Wi-Fi. This method is available for all Android devices though you should use the latest Android OS for smoother working. Moreover, Bluetooth needs to be enabled to use this method.
Step-by-Step Guide To Transfer Files via Nearby Share
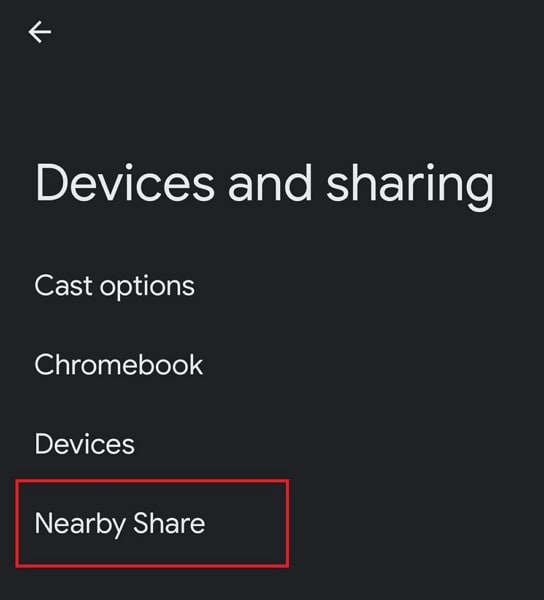
Step 1: You will need to activate “Nearby Share” on both devices first. To do that, go to the phone’s “Settings” and access the “Google” settings. Here, tap “Devices and Sharing,” and from the next appearing screen, choose “Nearby Share.”
Step 2: In the “Nearby Share” screen, toggle it on and set device visibility to “Everyone.” Once you activate it on both Android devices, find and select the files you want to transfer on the old Android phone.
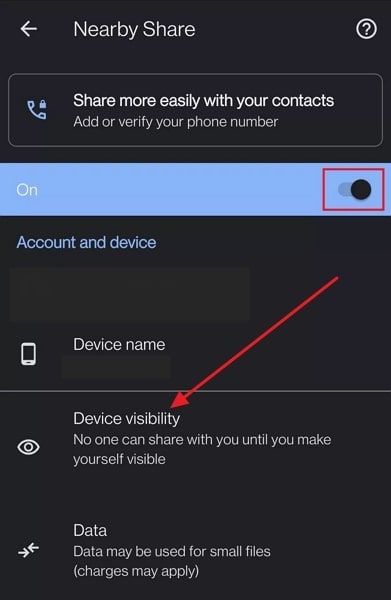
Step 3: After selecting the required files, press the “Share” button and select “Nearby Share” from the options. It will detect nearby devices and select your new Android device once it appears. A prompt will appear on both phones with a matching PIN. Accept the files on the new phone to start the transfer process.


Pros and Cons
| Pros | Cons |
|---|---|
| · It is a fast and secure way of transferring files between Android devices. | · You can only send limited types of files through this method. |
| · You do not need Wi-Fi to use this feature. | · This feature consumes a lot of battery if you use it for a long time or transfer large-size files. |
| · Nearby Share is available on a wide range of Android devices. |
Best For
Using Nearby Share is recommended when you don’t have access to a computer or the internet, and you need to share large files.
Part 3: Transfer Files Between Android by USB Cable
If you have access to a computer, you can use it to transfer files from Oppo A2 to Other Android Devices. All you need is a USB cable, and you are set. In this method, you will first copy data from the old phone to the computer and then copy it to the new phone from the computer. It works by default on Windows, but for Mac, you need Android File Transfer.
 Lyric Video Creator Professional Version
Instructions To Transfer Files by USB Cable
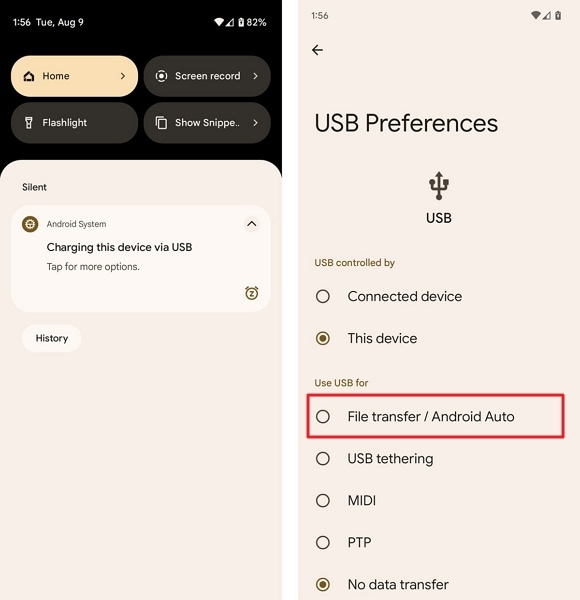
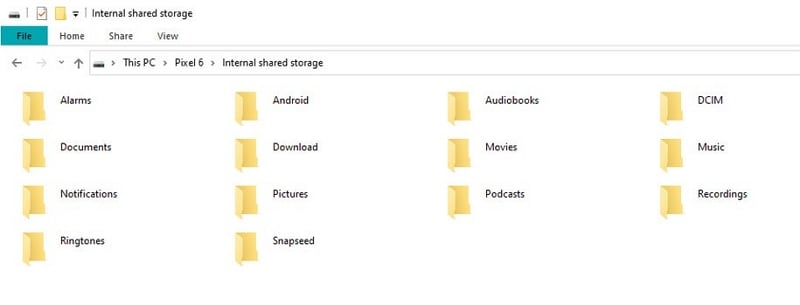
Step 1: First, connect your old Android phone to your computer using a USB cable. A prompt will appear on your asking for the USB purpose. Here, select “File Transfer/Android Auto.” It will give your computer access to the phone data.
Step 2: Now copy all the data you want to transfer to your computer and disconnect the old device. Afterward, connect the new Android device to the computer, give access permission, and copy the data you took from the old phone to the new phone.
Pros and Cons
| Pros | Cons |
|---|---|
| · You do not need to use any third-party app for this method | · This method can be time-consuming as you need to transfer the same data two times. |
| · It is a reliable and secure method. | · It only works well on Windows; on Mac, it becomes a hassle. |
| · Only a USB cable is needed to transfer the data. |
 NeoDownloader - Fast and fully automatic image/video/music downloader.
Best For
Using a USB cable is best for transferring data when you have large files and don’t have any better options.

Part 4: Sync Files from Oppo A2 to Other Android Devices With Google Account
Google Account is another great way for Android-to-Android file transfer if you haven’t set up the new phone yet. It allows you to back up all your data on the old device and restore it to the new Android device. With this method, you can transfer most of the data from the old phone, including settings, contacts, notes, etc.
Step-by-Step Guide To Transfer Files With Google Account
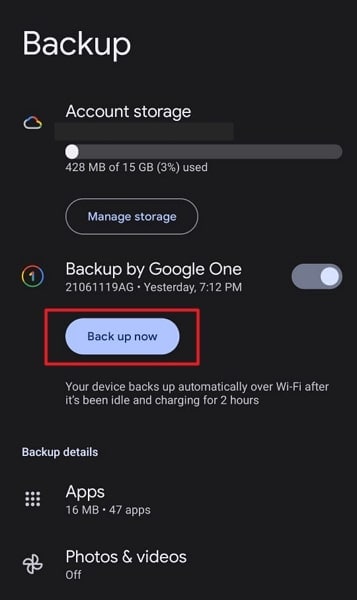
Step 1: On your old Android device, go to “Settings” and tap “Google.” In the Google settings, select “Backup” and tap “Backup Now” to back up your phone. Once the backup is complete, move to the new device.

Step 2: When setting up the new Android device, sign in using the same Google Account. Afterward, select “Restore from Google Backup” when the option appears to restore the backup from the old phone.
 KoolReport Pro is an advanced solution for creating data reports and dashboards in PHP. Equipped with all extended packages , KoolReport Pro is able to connect to various datasources, perform advanced data analysis, construct stunning charts and graphs and export your beautiful work to PDF, Excel, JPG or other formats. Plus, it includes powerful built-in reports such as pivot report and drill-down report which will save your time in building ones.
 It will help you to write dynamic data reports easily, to construct intuitive dashboards or to build a whole business intelligence cockpit.
KoolReport Pro package goes with Full Source Code, Royal Free, ONE (1) Year Priority Support, ONE (1) Year Free Upgrade and 30-Days Money Back Guarantee.
Developer License allows Single Developer to create Unlimited Reports, deploy on Unlimited Servers and able deliver the work to Unlimited Clients.
Pros and Cons
| Pros | Cons |
|---|---|
| · It can transfer most of the phone data to the new Android phone. | · If your old device data is larger than 15GB, then you have to buy the storage because Google only provides 15GB free storage. |
| · Using Google Account is also secure, as your backup is encrypted. | · It requires you to use the same Google Account on both devices. |
| · The devices don’t need to be near each other. |

Best For
Using Google Account to transfer files from Oppo A2 to Other Android Devices is best when you still haven’t set up the new Android device.
Part 5: Best choice: The Fastest Way to Transfer Files from Oppo A2 to Other Android Devices with Dr.Fone
Want to find the best and fast way to transfer files from Oppo A2 to Other Android Devices? If you don’t want to go through any time-consuming or complex transfer process, we recommend you use Wondershare Dr.Fone. It is a complete toolbox for smartphones and includes all the necessary solutions. Regarding Android data transfer, it can quickly transfer data between 8000+ Android devices, including the latest ones.
Key Features of Dr.Fone
- Using the Dr.Fone app, you can transfer data to Android devices with the latest Android 13 OS.
- This tool allows you to transfer, back up, and restore your entire WhatsApp data from chats to emojis to locations.
- If you have lost your phone data, you can recover it back using the Dr.Fone app safely and quickly.
- With this tool, you can also repair system issues in your device in a secure environment.
Steps To Transfer Files from Oppo A2 to Other Android Devices With Dr.Fone
Aside from being the fastest way to transfer files between Android phones, it also has the simplest transfer process. You only need Dr.Fone installed on your system and a couple of USB cables to use this method. Here is how you can transfer files from phone to phone via Dr.Fone:
Step 1: Establish the Connection Between Android Devices
Use USB cables to connect both Android devices to the computer and launch Dr.Fone app. From the “Home” screen, click “Phone Transfer” and wait for the program to assign devices to the correct positions.
![]() FX PRO (Gold Robot + Silver Robot(Basic Package))
FX PRO (Gold Robot + Silver Robot(Basic Package))
Step 2: Assign Android Devices to their Correct Positions
For transferring data from the old Android device to the new one, the old device should be at the “Source” position and the new device at the “Destination” position. If the positions assigned by the program are incorrect, use the “Flip” button to correct them.

Step 3: Select the Desired Data and Complete the Transfer Process
Now select the data you want to transfer and click “Start Transfer” to begin the transfer process. In case you want to delete data on the new device, select “Clear Data before Copy” before pressing “Start Transfer.”


Pros and Cons
| Pros | Cons |
|---|---|
| · It can transfer over 15 types of data from one phone to another. | · You will need a computer to transfer data through Dr.Fone |
| · The transfer process of this method is extremely fast and gets completed within minutes. | · It also needs USB cables to connect your Oppo A2s. |
| · You do not need the internet to use this method. |
Best For
It is best for all sorts of data transfer situations. Whether you are transferring a few files or moving all the data, it is a perfect tool.
Conclusion
To summarize, while it may seem troublesome to transfer files from Oppo A2 to Other Android Devices, in reality, it isn’t. This has been well demonstrated through the article using 5 of the easiest transfer methods. It includes methods suited for a few files, like Bluetooth, to the best method of using Dr.Fone. With Dr.Fone, you can transfer all types of data from Oppo A2 to Other Android Devices in the shortest time possible.
- Title: How to Transfer Contacts from Oppo A2 to Outlook | Dr.fone
- Author: Nova
- Created at : 2024-08-09 17:21:59
- Updated at : 2024-08-10 17:21:59
- Link: https://blog-min.techidaily.com/how-to-transfer-contacts-from-oppo-a2-to-outlook-drfone-by-drfone-transfer-from-android-transfer-from-android/
- License: This work is licensed under CC BY-NC-SA 4.0.